1
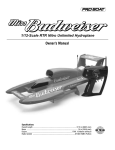
Care and Handling of fuel
• Follow all directions and warnings on the fuel bottle.
• It is very important to keep fuel containers capped
tightly at all times. Some components in the fuel can
evaporate very quickly or absorb moisture upsetting
the performance qualities of the fuel.
• Never store unused fuel in the fuel dispensing bottle.
Immediately return fresh unused fuel back into your
Performance Engines
quart or gallon fuel bottle.
• Never mix old fuel with fresh new fuel. Never mix
Owners Manual
different fuel brands together.
INTRODUCTION
• Always store the fuel in a cool dry location, off of
concrete floors and away from any source of heat,
Congratulations on your purchase of a Dynamite®
ignition, flame or combustion.
racing engine. Precisely manufactured and assembled,
your Dynamite engine will provide you with troubleWarning! Model engine fuel is poisonous
free performance if you carefully read and follow
to humans and animals.
these instructions.
Drinking model fuels can cause blindness and death.
Handle with utmost care and respect. Keep model fuels
Using the Proper Equipment
out of reach of children. Never leave your fuel where a
FUEL
child could have access to it.
Using the proper fuel is critical in order to achieve
GLOW PLUGS
maximum engine performance, reliability, and longevity.
A glow plug has been included and is ideal for breaking in
You must use fuel that is specifically designed for model
your new engine. In fact, during the break-in procedure,
car/truck/buggy applications. Never use any type of model
it is not uncommon to go through one or two glow plugs,
airplane glow fuel! Use of model airplane fuel can damage
as microscopic bits of metal (from the cylinder/piston
your engine and immediately void any warranty.
wearing in) bond themselves to the plug element causing
For general use we recommend using Dynamite Blue
glow plug failure. We recommend Dynamite glow plugs
Thunder™ Race Formula fuel with 20% nitro. This fuel
as the absolute best glow plugs for this engine. Dynamite
provides the best combination of power, fuel economy and glow plugs have been designed to deliver an ideal balance
engine life. Dynamite Blue Thunder fuels are vigorously
of performance and longevity.
tested, researched and formulated to deliver excellent
We recommend the DYN2500 glow plug for engines up
power as well as engine protection.
to .15 cu in and the DYN2495 for engines that are .20 cu
Dynamite Blue Thunder is the only fuel which is 100%
in and larger. It is a good idea to keep at least a couple of
certified for use in Dynamite engines.
extra glow plugs in your pit box at all times.
1
AIR FILTERS
All model car engines must use a properly oiled air
filter to keep dirt out of the engine. Any dirt that enters
the carburetor can immediately destroy your engine.
We recommend DYN2612 as an excellent choice for a
quality air cleaner for .12 and .15 engines and DYN2614
for .21 and larger engines. Clean and re-oil the air filter
after each hour of running to prevent sucking dirt into
the engine. If you intend to run your vehicle in extremely
dusty conditions the air filter should be serviced after
each 1/2 hour.
STARTER BOX AND GLOW IGNITER
Dynamite engines are equipped with either a pull start/
spin start system or may require the use of a starter box.
For spin start engines we recommend the DYN5645
Spin Start Hand Held Starter. While we recommend
using a spin starter or a starter box for the initial starts,
starting the pull start/spin start equipped engine can be
accomplished using the pull starter only as well.
For the starter box version, we recommend using the
DYN5610 Ready-Start Universal starter box in order to
handle the high compression of the Dynamite engine. You
will also need a glow plug igniter (glow driver) to light the
glow plug. Use a high-quality rechargeable glow igniter
such as the Dynamite metered glow driver (DYN1925).
Make sure it is fully charged per the instructions.
Engine BREAK-IN
Dynamite racing engines are manufactured to exacting
tolerances and require a special break-in procedure in
order to accomplish the final precise fitting of the internal
engine components. It is very important that you follow
the break-in procedure as closely as possible in order to
achieve the best performance and longest life from your
Dynamite engine. Engine break-in will take between one
and two hours.
Dynamite engines are manufactured with an ABC piston/
sleeve construction. ABC stands for aluminum piston, and
a brass sleeve that is chrome plated. This type of engine
design relies on a very precise running fit between the
piston and sleeve for proper cylinder sealing and is vital to
achieving reliable long lasting engine performance.
People have differing opinions on what is the proper
procedure to break in a model engine. Old style break-in
procedures, such as idling the engine at low operating
temperatures on the bench for several tanks of fuel or
simply running the engine with a very rich fuel mixture for
the first 4 tanks of fuel, will not achieve the best results.
Only use the Dynamite break-in procedure. Other break-in
procedures could result in a weak, damaged, or otherwise
poorly performing engine.
The procedure outlined here was extensively tested and
proven to yield better performing engines than other
“common” break-in methods.
Allow yourself plenty of time in order to properly breakin your engine. The engine break-in period will take a
minimum of 5 tanks of fuel. Do not use the break-in time
to impress your friends with your new engine. Patiently
wait until the engine is fully broken in before attempting
continued high-speed running.
During break-in, your engine may appear to be
malfunctioning with symptoms like stalling, unpredictable
performance, and fouled glow plugs. These are simply the
normal “break-in pains” engines sometimes go through.
They will disappear once your engine is fully broken in.
Carburetor Adjustments
Break-in Procedures AND TIPS
Break-in will be accomplished by accelerating, slowing,
and accelerating again at different rates for the first 5
tanks of fuel. Once the engine begins to break in, the
length and amount of the acceleration will progressively
increase. Continued high-speed running is not acceptable
during the first 5 tanks of fuel.
Perform the initial break-in on a large, flat, paved surface.
Smoothly apply all accelerating and decelerating action.
Avoid rapid acceleration and decelerating as this could
cause the engine to stall.
• Special break-in fuels are not recommended. Break-in
should be performed using the same fuel you plan to
use daily.
• Avoid breaking in the engine in extremely hot or cold
conditions.
• Avoid allowing the fuel tank to run completely empty.
Low fuel levels cause the mixture to run too lean
possibly resulting in a burned glow plug or higher
than recommended engine temperature.
• Do not break in the engine by simply idling it on a
stand. This will not achieve the best results.
• A glow plug has been included and is ideal for
breaking in your new engine. During the break-in
procedure it is not uncommon to go through one
or two plugs as microscopic bits of metal (from the
piston/sleeve wearing in) bond themselves to the plug
element causing glow plug failure. Keep extra glow
plugs handy.
• Change or clean your air filter after the break-in
procedure is complete.
• Follow the instructions exactly for each of the first 5
tanks of fuel.
• Never run your engine indoors. The exhaust fumes are
very harmful so always run your model outdoors, in a
well-ventilated area.
2
Your Dynamite engine comes equipped with one of a
number of available carburetors. Engines such as the .12,
.15, and .18 are equipped with either a 2-needle rotary
or 2-needle slide valve carburetor. Engines .21 and larger
are equipped with either a 2-needle or 3-needle slide
valve carburetor. Below are illustrations of each. Please
take a moment to review the pictures below in order to
familiarize yourself with the various functions that apply
to the particular carburetor that was supplied with your
engine.
Note: The carburetor’s initial startup fuel mixture
settings have been preset at the factory. Do not change
the settings.
High-Speed Needle
Idle Adjustment
Lean
Rich
Fuel Inlet
.21 and larger 2- and 3-needle slide valve carburetor
Idle Adjustment
High-Speed Needle
High-Speed Needle
Lean
Lean
Lean
Increase
Rich
Rich
Idle Adjustment
Low-Speed Needle
Fuel Inlet
Decrease
Fuel Inlet
.12, .15 and .18 2-needle slide valve carburetor
Rich
.21 and larger 2- and 3-needle slide valve carburetor
.12, .15 and .18 2-needle rotary carburetor
Low-Speed
Needle
Increase
Lean
Idle Adjustment
Lean
Lean
Idle Adjustment
Low-Speed Needle
Decrease
Mid-Range Needle
Rich
.21 and larger 3-needle slide valve carburetor
Rich
Rich
Low-Speed Needle
.12, .15 and .18 2-needle rotary carburetor
3
.12, .15 and .18 2-needle slide valve carburetor
Engines .21 or larger may also be equipped with a
slide valve carburetor that includes three inserts of
various diameters. These are sometimes referred to as
“restrictors” or “venturies”. These carburetor inserts are
used to alter the power curve of the engine along with fuel
economy. The three diameters have the following effects.
Small: Develops smooth linear power and is easier to
control than a larger insert. Best suited for medium
to low traction conditions on small to average size
tracks. Also offers the best fuel mileage.
Medium: Increased power for high traction, medium to
large size tracks with a slight decrease in fuel mileage
over the small insert.
Large: Offers the most explosive power and acceleration
with high-fuel consumption. Used for large and fast
high-traction tracks.
Starting Your Dynamite Engine for
the First Time
The first start of your engine is the most critical time of
the engine’s life, dictating how well it will perform and
maximizing its life expectancy.
Before you start your Dynamite engine for the first
time, make sure you have read all instructions and
precautions in this manual. Pay close attention to the
tank-by-tank break-in instructions in the next section,
and make sure you have read and understood them
before you run your engine.
It is recommended but not totally necessary to use a
heat gun to heat the engine to 160–180 degrees before
you start the break-in process. Your engine must be at
room temperature (70°F or 21° C) or above the first time
you start it. If it’s cooler than room temperature outside,
remove all fuel and keep your vehicle indoors until you’re
ready to start it and then take it outside. If it’s colder than
45 degrees, special considerations should be made.
We do not recommend running Dynamite engines at
temperatures below 35 degrees. See the cold weather
break-in tips section for more information.
Factory Needle Settings
If the engine is primed too long, it will flood with fuel
and stop turning.
Your carburetor is preset at the factory to give the correct
Should
the engine become difficult for your starter
air-to-fuel ratio and idle speed for break-in. Do not
box or hand held starter to turn over, the engine may
adjust the carburetor unless you observe a poor running
be flooded (hydro-locked).The presence of excess
condition that requires correction.
fuel between the cylinder head and piston will not
Non-pull start and Pull/Spin Start engines:
allow the piston to travel through its full range of
For the non-pull start version engine, we recommend
compression, effectively “hydro-locking” the engine.
using the DYN5610 Ready-Start Universal starter box in
Should this occur, remove the glow igniter from the plug.
order to handle the high compression of the Dynamite
Using a glow plug wrench (DYN2510), remove the glow
engine. For spin start engines we recommend the
plug and turn the model upside down and rotate the
DYN5645 Spin Start Hand Held Starter.
flywheel to clear out the excess fuel, reinstall the glow
You may need to “blip” the throttle on the transmitter
plug and start again.
(applying throttle on/off) while trying to start the engine,
Note: Your Dynamite engine doesn’t usually require
as new engines are more difficult to start due to the tight
priming. If you do need to prime your engine, watch
piston/cylinder fit.
the fuel line carefully to avoid flooding your engine.
1. Install the engine into your vehicle.
Another common occurrence with new engines is for
2. Turn on the radio system.
the piston to become stuck at the top of its travel in
3. Make sure the throttle trigger on the transmitter is in
the sleeve. This occurrence is completely different from
the idle (neutral) position and the carburetor is in the hydro-locking and is caused by the tight fit of the piston
idle position also.
and sleeve when the engine is new. In order to relieve
4. Connect the glow igniter to the engine.
the stuck piston use a flat blade screwdriver through the
5. A. For non-pull start version engines, place the vehicle flywheel’s access hole in the chassis in order to pry the
flywheel though its rotation.
on a starter box and engage the starter.
B. For spin start version engines, slide your hand
This sticking issue should be completely eliminated by the
under the strap of the starter so that your index finger break-in procedure.
is on the switch at the bottom. Place the machined
7. Once fuel reaches the carburetor, the engine should
end of the starter shaft into the matching hex socket
quickly start and idle.
in the backplate of the engine. Holding the starter
8. Disconnect the glow igniter from the model.
securely, press on the switch button and the engine
9. Proceed with the engine break-in.
should turn over and start up.
10.Do not rev your engine with no load (wheels off
6. Watch for fuel moving through the fuel line up to
the ground).
the carburetor. Pay close attention as the fuel moves
very fast. If the fuel doesn’t move through the line
within 5 seconds, prime the engine by briefly (one or
two seconds) covering the exhaust outlet with your
finger until the fuel is just visible moving through the
carburetor fuel line. Watch carefully!
4
Pull start engines:
1. Install the engine into your vehicle.
2. Turn on the radio system.
3. Make sure the throttle trigger on the transmitter is in
the idle (neutral) position and the carburetor is in the
idle position also.
4. Connect the glow igniter to the engine.
5. Use short quick pulls to start the engine.
When using a recoil starter, never pull the rope out its full
length. Doing so may cause damage and recoil starter
failure. Quick, short pulls of the recoil starter are the best
technique to use. Never extend the starter rope more than
12 inches. Should the pull starter be extremely difficult
to pull (will not extend out of the assembly), the engine
may be flooded (hydro-locked). Excess fuel between the
cylinder head and piston will not allow the piston to travel
through its full range of compression, effectively “locking
up” the engine. Should this occur, remove the glow igniter
from the plug. Use a glow plug wrench (DYN2510) to
remove the glow plug and turn the model upside down.
Give the recoil starter a few short pulls to clear out the
fuel, reinstall the glow plug and start again.
Another common occurrence with new engines is for
the piston to become stuck at the top of its travel in
the sleeve. This occurrence is completely different from
hydro-locking and is caused by the tight fit of the piston
and sleeve when the engine is new. In order to relieve
the stuck piston use a flat blade screwdriver through the
flywheel’s access hole in order to pry the flywheel through
its rotation.
This sticking issue should be completely eliminated by the
break-in procedure.
If available, we recommend using a spin starter or
starter box for the initial starts, even with a pull start
equipped engine.
You may need to “blip” the throttle on the transmitter
(applying throttle on/off) while trying to start the engine,
as new engines are more difficult to start due to the tight
piston/cylinder fit.
Tank-By-Tank Break-in Procedure:
Tank #1
1. Once the engine starts the exhaust should emit lots
of blue/white smoke, indicating that the engine is rich
(a good thing during break-in). During the first tank
of fuel, you may wish to set a higher than normal idle
speed and/or leave the glow igniter attached in order
to keep the engine from stalling.
2. Drive your vehicle on a large, flat, paved surface. Over
a 2-second time span, gently pull the throttle trigger
to 1/4 throttle and back again to idle. Accelerate and
decelerate as smoothly as you can.
3. While accelerating, look for thick blue/white smoke
from the exhaust. If there is no smoke, richen the
high-speed fuel mixture 2 hours by turning the needle
counterclockwise. Imagine the slot in the needle is
like the hour hand on a clock. Adjust it as though
you were moving the hour hand from one hour to the
previous one.
4. Regularly check the fuel level while running. When
the fuel tank is nearly empty, shut off the engine by
touching the flywheel with a tool handle or small
block of wood. Do this when the engine is at idle
speed only.
5. Rotate the flywheel so that the piston is at bottom
dead center (BDC). BDC can be found by rolling the
engine over by the flywheel with your finger into the
area of rotation that is “free” and without any drag.
Let the engine cool for 15 minutes.
Tank #2
1. Drive your vehicle on a large, flat, paved surface. Over
a 2-second time span gently pull the throttle trigger
to 1/2 throttle and back again to idle. Accelerate and
decelerate as smoothly as you can.
5
2. Regularly check the fuel level while running. When
the fuel tank is nearly empty, shut off the engine by
touching the flywheel with a tool handle or small block
of wood. Do this when the engine is at idle speed
only.
3. Rotate the flywheel so that the piston is at bottom dead
center (BDC). Let the engine cool for 15 minutes.
Tank #3
1. Drive your vehicle on a large, flat, paved surface. Over
a 3-second time span gently pull the throttle trigger
to 1/2 throttle and back again to idle. Accelerate and
decelerate as smoothly as you can.
2. As the engine breaks in, the idle speed may increase
and cause your vehicle to try to creep forward when
stopped. If this begins to occur, reduce the idle speed
by turning the idle adjustment on the carburetor
counterclockwise.
3. Regularly check the fuel level while running. When
the fuel tank is nearly empty, shut off the engine by
touching the flywheel with a tool handle or small block
of wood. Do this when the engine is at idle speed only.
4. Rotate the flywheel so that the piston is at bottom dead
center (BDC). Let the engine cool for 15 minutes.
Tank #4
1. Drive your vehicle on a large, flat, paved surface. Over
a 3-second time span gently pull the throttle trigger
to 3/4 throttle and back again to idle. Accelerate and
decelerate as smoothly as you can.
2. Regularly check the fuel level while running. When
the fuel tank is nearly empty, shut off the engine by
touching the flywheel with a tool handle or small block
of wood. Do this when the engine is at idle speed only.
3. Rotate the flywheel so that the piston is at bottom dead
center (BDC). Let the engine cool for 15 minutes.
Tank #5
• Once the engine is running, it is important to keep
the temperature of the engine up around 200 to
1. Drive your vehicle on a large, flat, paved surface. Over
215 degrees during break-in. In weather below 45
a 3-second time span gently pull the throttle trigger
degrees,
the engine will tend to run at lower than
to full throttle and back again to idle. Accelerate and
recommended temperatures of between 140 to 175
decelerate as smoothly as you can.
degrees (at proper break-in mixture settings). Do not
2. Regularly check the fuel level while running. When
lean the fuel mixture to increase engine temperature
the fuel tank is nearly empty, shut off the engine by
as this will decrease the available lubrication and
touching the flywheel with a tool handle or small
cause your piston/sleeve to wear prematurely.
block of wood. From the fifth tank on, you will not
• If needed wrap the cooling head with aluminum
need to let the engine cool between tanks. However
foil, paper towel, clean rag, or sock in order to
when shutting down the engine at any time, rotate
block some of the cooling airflow and help keep the
the flywheel so that the piston is at bottom dead
engine running around the recommended 200 to
center (BDC).
215 break-in temp.
Tank #6
The engine can actually run too hot if too much of
1. Clean and reoil your air filter before you proceed.
the cooling airflow is blocked. Make sure that you
During the sixth tank of fuel, you can run your vehicle
monitor the engine’s temp closely for the first couple
on smooth flat surfaces and off-road dirt as well.
of tanks until you get the correct amount of cover for
The engine can now begin to be tuned for general
the cooling head which will depend on your current
performance use.
weather conditions.
Adjust the cover up or down in order to expose more
Cold Weather Break-in Tips
or
fewer cooling fins to regulate engine operating
During the break-in process, the piston and sleeve wear
temperature.
into each other to form a precise fit. The engine needs to
heat up to a temperature of around 200 to 215 degrees to • If you do not have a temperature probe, a drop of
water on the cooling head (down around the glow
relieve most of the mechanical stresses that the piston/
plug area) should slowly sizzle for about 5 to 10
sleeve/rod must endure during initial break-in. A precise
seconds at around 200 to 210 degrees. If the water
fit between these components is critical for proper
sizzles for only a couple of seconds, the engine is
compression, and optimum performance. If the engine
likely over 220 degrees, and needs to be cooled down.
runs too cold during break-in, the piston and sleeve will
if water takes a long time or does not evaporate at all,
not expand to their appropriate sizes for break-in, and this
it means that the engine is running too cool.
can lead to premature wear of these components.
• In cold weather conditions it is recommended to use a • It is not recommended that you operate your engine
when ambient temperatures are below 35 degrees
heat gun to heat the engine to 160-180 degrees before
Fahrenheit. If you attempt to run your vehicle below
you start each tank of the break-in process.
35 degrees, your engine may become very difficult
to start and tune. At temperatures below freezing,
nitro fuel can begin to gel causing tuning and erratic
running issues along with being harmful to the engine.
6
TUNING YOUR DYNAMITE RACING ENGINE
A nitro engine’s performance depends on the fuel mixture.
Turning the mixture needles clockwise will lean the fuel
mixture and turning the mixture needles counterclockwise
will richen it. Leaning the fuel mixture will increase engine
power up to the point that the engine begins to starve for
fuel and begins to overheat. An engine should never be
run too lean; doing so severely shortens the life of the
engine. When an engine is too lean, it will run very strong
immediately after being started but will soon begin to sag
and hesitate or stall when accelerating. The best way to
tune an engine is by using an infrared temperature gauge,
but you can use water to check the head temperature also.
Tuning the High-Speed Needle
To obtain the correct high-speed needle setting, start the
engine and drive your vehicle around for a minute or two.
Make several high-speed passes at full throttle in order to
clear out the engine. Place a drop of water on the cylinder
head. If the water sizzles away (evaporates immediately),
the needle setting is too lean. A correct needle setting
will result in the water evaporating after 3-5 seconds. If
the water does not evaporate, chances are good that the
needle setting is too rich. Lean the needle 1 hour (imagine
the slot in the needle is the hour hand on a clock and
adjust it as though you were moving the hour hand from
one hour to the next or previous one) and run the engine
again, adjusting the needle setting to get the desired
evaporation time.
Check the temperature each time you change
the needle mixture. Do not let the engine
overheat, as this will damage the engine.
Tuning the Low-Speed Needle
Idle Speed Adjustment
The low-speed needle (also referred to as the idle mixture
or idle needle) should be set after you’re satisfied with
the high-speed needle setting. After achieving the proper
operating temperature, make a couple of high-speed
passes and then reduce the engine throttle to the idle
position. Pinch the fuel line with your fingers close to the
carb fuel inlet nipple. If the engine dies immediately, the
low-speed needle is set too lean. If the rpm’s increase
dramatically, the setting is too rich. The ideal setting
results in the rpm’s increasing just a slight amount after
pinching the fuel line.
The last setting to be made is the idle speed. Remember,
this adjustment should be made while the engine is
running at normal operating temperature.
1. Make sure the throttle trim is set so that the
carburetor is fully closed against the idle speed screw
when the trigger is in the neutral position. The best
way to assure that this setting is correct is by applying
the brakes after several high-speed runs. After the
vehicle has stopped, release the trigger to the neural
position, the engine should not pick up rpm’s. When
the brakes are reapplied the rpm’s should not drop.
When the throttle trim is set correctly you should have
to apply a slight amount of forward throttle before
the rpm’s begin to rise from idle. This will ensure that
the throttle slide is resting against the idle adjustment
screw.
2. Turn the idle speed screw counterclockwise to reduce
the idle speed, or clockwise to increase it. When there
is a need to increase the idle speed, slightly open the
throttle position while doing so in order to keep the
idle screw from damaging the carburetor slide. Ideally,
the engine should idle just fast enough to be reliable.
Avoid an idle that is set too high, as it will cause the
clutch mechanism to overheat and fail.
Mid-Range Needle Adjustment
The mid-range adjustment screw adjusts the air/fuel
mixture at half throttle and can dramatically affect midrange throttle response. The factory setting will provide
a slightly rich mid-range. For a crisper leaner mid-range,
desirable on high traction tracks where maximum
acceleration is needed, turn the mid-range screw out
(counterclockwise) 1 full turn. To soften the mid-range
response (richer), turn the mid-range screw clockwise 1
full turn for a softer feel during acceleration, best suited
for low traction conditions.
Note: The mid-range adjustment screw and
low-speed needle work in unison. Any time the
mid-range adjustment screw is adjusted it will
be necessary to readjust the low-speed needle.
When turning the mid-range screw in (clockwise),
the low-speed needle will need to be backed out
(counterclockwise). When the mid-range screw
is backed out (counterclockwise), the low-speed
needle will need to be adjusted inward (clockwise).
Fuel Mixture Adjustment Chart
The following chart provides general guidelines on how
weather conditions and altitude affect air density when
they move higher or lower than your baseline setting.
IFISCreates an airRequired Tuning
density that isAdjustment
Temperature Higher
Less Dense Leaner
Lower
More Dense
Richer
Humidity
Higher
Lower
Less Dense
More Dense
Leaner
Richer
Pressure
Higher
Lower
More Dense
Less Dense
Richer
Leaner
Altitude
Higher
Lower
Less Dense
More Dense
Leaner
Richer
Nitro %
Higher
Lower
N/A
N/A
Richer
Leaner
Tuning Engines by Temperature
Do not rely on a temp gauge alone to tune your engine as
there is NO optimal temperature that will deliver the best
tune on any given day. Factors such as track conditions,
Daily changes in temperature and barometric pressure
may require you to adjust your carburetors needles. Also driving style, atmospheric conditions, and gauge accuracy
will affect operating temperatures
if you run your vehicle at a new location at a different
Tune the engine by paying very close attention to how
altitude, some carburetor adjustment may be needed.
it responds to changes in fuel mixture (more smoke/
When the weather is colder and the air density is higher,
less smoke, fast/sluggish, reliable/stalling, smooth
you may need to richen the fuel mixture.
sound/ muffled sound, etc). Remember to make small
Conversely when the weather is warmer and the air
adjustments of 1 hour at a time. Imagine the slot in
density is lower, you may need to lean the fuel mixture.
Remember to make small adjustments of 1 hour at a time. the needle is like the hour hand on a clock. Adjust it as
though you were moving the hour hand from one hour
Imagine the slot in the needle is like the hour hand on a
clock. Adjust it as though you were moving the hour hand to the next or previous one. Once the engine is tuned for
acceptable performance, then observe the temperature.
from one hour to the next or previous one.
Fine-Tuning the Carburetor
7
A temperature gauge should only be used as a tuning
aid by giving you a relative indication of how your
adjustments are affecting the engine and to help prevent
you from reaching higher than recommended engine
operating temperatures. As you lean the fuel mixture,
the engine performance will increase along with the
temperature. If you continue to lean the fuel mixture and
the temperature increases but the engine performance
does not change, then you have exceeded the maximum
safe lean setting. In general, try to keep your engine from
exceeding 270°F when measured at the glow plug.
Most properly and fully broken in engines operate well
at temperatures of 200 to 265°F depending on track
conditions, driving style, atmospheric conditions, and
gauge accuracy.
FACTORY NEEDLE SETTINGS
If at any point you find yourself “lost” as far as tuning
goes, going back to the factory carburetor settings should
allow you to get right back on track.
Following is a listing of available carburetors and their
factory preset needle settings.
.12, .15, .18 2-needle slide valve
carburetor:
High-Speed Needle: 2 turns out (counterclockwise) from
closed.
Low-Speed Needle: 2 turns out (counterclockwise) from
closed.
.12, .15, .18 2-needle rotary carburetor:
High-Speed Needle: 2 turns out (counterclockwise) from
closed.
Low-Speed Needle: 2 turns out (counterclockwise) from
closed.
When checking the adjustment of the low-speed needle, it
is crucial that the throttle slide is closed completely when
turning the needle and that you do not over-tighten the
needle. Use a Dynamite 3-IN-1 engine-tuning screwdriver
(DYN3048) to make this job easier. When you feel
resistance in the needle, immediately stop turning and
begin turning the needles counterclockwise, counting the
number of turns from “closed”.
.21 and larger 2-needle slide valve
carburetor:
High-Speed Needle: 31/2 turns out (counterclockwise) from
closed.
Low-Speed Needle: 2 turns out (counterclockwise) from
closed.
.21 and larger 3-needle slide valve
carburetor:
High-Speed Needle: 31/2 turns out (counterclockwise) from
closed.
Low-Speed Needle: 2 turns out (counterclockwise) from
closed.
Mid-Range Needle: Screw should be just slightly in from
flush with the face of the carburetor.
8
Troubleshooting Guide
Problem
Engine won’t start:
Possible Cause/Solution
· Clogged fuel line
· Bad or improper glow plug
· Glow igniter not charged
Engine starts,
and then dies:
· Engine flooded
· Pressure line blocked
or disconnected
· Bad or improper glow plug
Engine starts and
runs for 1/2 tank and
then quits
· High-speed needle too lean
· Hole or tear in fuel line
· Defective fuel tank
· Bad or improper glow plug
· Idle speed set too low
· Overheated engine (too lean)
· Improper needle settings
Protecting Your Investment
Warranty Period
Exclusive Warranty- Horizon Hobby, Inc., (Horizon)
warranties that the Products purchased (the “Product”)
After-run maintenance must be performed in order to keep
will be free from defects in materials and workmanship at
your engine in proper operating condition.
the date of purchase by the Purchaser.
After each day of running, it’s critical to use a highLimited Warranty
quality after-run oil to protect the internals of the
engine and help prevent corrosion. The methanol used
(a) This warranty is limited to the original Purchaser
in the fuel attracts moisture that can cause corrosion
(“Purchaser”) and is not transferable. REPAIR OR
(particularly in the ball bearings).
REPLACEMENT AS PROVIDED UNDER THIS WARRANTY
IS THE EXCLUSIVE REMEDY OF THE PURCHASER. This
Follow these steps after running your engine:
warranty
covers only those Products purchased from an
1. Empty all fuel from the tank.
authorized
Horizon dealer. Third party transactions are not
2. Start and run the engine until completely out of fuel.
covered by this warranty. Proof of purchase is required
3. Carefully remove the air filter. Avoid allowing any
for warranty claims. Further, Horizon reserves the right
dirt or debris to enter the carburetor. Add 5 to 6
to change or modify this warranty without notice and
drops of a quality after-run oil into the carburetor.
disclaims all other warranties, express or implied.
Turn the engine over a few times to distribute the oil
(b) Limitations- HORIZON MAKES NO WARRANTY OR
throughout the engine.
REPRESENTATION, EXPRESS OR IMPLIED, ABOUT
4. Clean and inspect the engine, air cleaner and fuel system.
NON-INFRINGEMENT, MERCHANTABILITY OR FITNESS
Never run your engine without a properly cleaned and
FOR A PARTICULAR PURPOSE OF THE PRODUCT. THE
oiled air filter. If you happen to lose an air filter while
PURCHASER ACKNOWLEDGES THAT THEY ALONE HAVE
running your vehicle stop immediately! Clean, reoil and
DETERMINED THAT THE PRODUCT WILL SUITABLY
reinstall the air filter before continuing.
MEET THE REQUIREMENTS OF THE PURCHASER’S
A throttle return mechanism is recommended. This can
INTENDED USE.
be as simple as a rubber band on the throttle linkage.
(c) Purchaser Remedy- Horizon’s sole obligation
This will prevent high-rpm engine runaways in the case of hereunder shall be that Horizon will, at its option, (i)
radio or receiver pack malfunction. The Dynamite throttle repair or (ii) replace, any Product determined by Horizon
return spring kit (DYN6640) is highly recommended for
to be defective. In the event of a defect, these are the
.21 and larger engines.
Purchaser’s exclusive remedies. Horizon reserves the
A few minutes spent before and after each time you
right to inspect any and all equipment involved in a
run your model will allow you to enjoy it for a long
warranty claim. Repair or replacement decisions are
time to come.
at the sole discretion of Horizon. This warranty does
not cover cosmetic damage or damage due to acts of
God, accident, misuse, abuse, negligence, commercial
use, or modification of or to any part of the Product.
This warranty does not cover damage due to improper
installation, operation, maintenance, or attempted repair
by anyone other than Horizon.
AFTER-RUN MAINTENANCE
9
Return of any goods by Purchaser must be approved in
writing by Horizon before shipment.
Damage Limits
HORIZON SHALL NOT BE LIABLE FOR SPECIAL,
INDIRECT OR CONSEQUENTIAL DAMAGES, LOSS OF
PROFITS OR PRODUCTION OR COMMERCIAL LOSS IN
ANY WAY CONNECTED WITH THE PRODUCT, WHETHER
SUCH CLAIM IS BASED IN CONTRACT, WARRANTY,
NEGLIGENCE, OR STRICT LIABILITY. Further, in no event
shall the liability of Horizon exceed the individual price of
the Product on which liability is asserted. As Horizon has
no control over use, setup, final assembly, modification
or misuse, no liability shall be assumed nor accepted for
any resulting damage or injury. By the act of use, setup or
assembly, the user accepts all resulting liability.
If you as the Purchaser or user are not prepared to accept
the liability associated with the use of this Product, you
are advised to return this Product immediately in new and
unused condition to the place of purchase.
Law: These Terms are governed by Illinois law (without
regard to conflict of law principals).
Safety Precautions
This is a sophisticated hobby Product and not a toy. It
must be operated with caution and common sense and
requires some basic mechanical ability. Failure to operate
this Product in a safe and responsible manner could result
in injury or damage to the Product or other property.
This Product is not intended for use by children without
direct adult supervision. The Product manual contains
instructions for safety, operation and maintenance. It
is essential to read and follow all the instructions and
warnings in the manual, prior to assembly, setup or use,
in order to operate correctly and avoid damage or injury.
Questions, Assistance, and Repairs
Non-Warranty Repairs
Your local hobby store and/or place of purchase cannot
provide warranty support or repair. Once assembly, setup
or use of the Product has been started, you must contact
Horizon directly. This will enable Horizon to better answer
your questions and service you in the event that you may
need any assistance. For questions or assistance, please
direct your email to productsupport@horizonhobby.
com, or call 877.504.0233 toll free to speak to a service
technician.
Should your repair not be covered by warranty the repair
will be completed and payment will be required without
notification or estimate of the expense unless the expense
exceeds 50% of the retail purchase cost. By submitting
the item for repair you are agreeing to payment of the
repair without notification. Repair estimates are available
upon request. You must include this request with your
repair. Non-warranty repair estimates will be billed a
minimum of 1/2 hour of labor. In addition you will be
billed for return freight. Please advise us of your preferred
method of payment. Horizon accepts money orders and
cashiers checks, as well as Visa, MasterCard, American
Express, and Discover cards. If you choose to pay by
credit card, please include your credit card number and
expiration date. Any repair left unpaid or unclaimed
after 90 days will be considered abandoned and will be
disposed of accordingly. Please note: non-warranty repair
is only available on electronics and model engines.
Inspection or Repairs
If this Product needs to be inspected or repaired, please
call for a Return Merchandise Authorization (RMA). Pack
the Product securely using a shipping carton. Please note
that original boxes may be included, but are not designed
to withstand the rigors of shipping without additional
protection. Ship via a carrier that provides tracking and
insurance for lost or damaged parcels, as Horizon is
not responsible for merchandise until it arrives and is
accepted at our facility. A Service Repair Request is
available at www.horizonhobby.com on the “Support” tab.
If you do not have internet access, please include a letter
with your complete name, street address, email address
and phone number where you can be reached during
business days, your RMA number, a list of the included
items, method of payment for any non-warranty expenses
and a brief summary of the problem. Your original sales
receipt must also be included for warranty consideration.
Be sure your name, address, and RMA number are clearly
written on the outside of the shipping carton.
Warranty Inspection and Repairs
To receive warranty service, you must include your
original sales receipt verifying the proof-of-purchase
date. Provided warranty conditions have been met, your
Product will be repaired or replaced free of charge. Repair
or replacement decisions are at the sole discretion of
Horizon Hobby.
United States
Electronics and engines requiring inspection or repair
should be shipped to the following address:
Horizon Service Center
4105 Fieldstone Road
Champaign, Illinois 61822
All other Products requiring warranty inspection or repair
should be shipped to the following address:
Horizon Product Support
4105 Fieldstone Road
Champaign, Illinois 61822
Please call 877-504-0233 or e-mail us at
[email protected] with any questions or
concerns regarding this product or warranty.
United Kingdom
Electronics and engines requiring inspection or repair
should be shipped to the following address:
Horizon Hobby UK
Units 1-4 Ployters Rd
Staple Tye
Harlow, Essex
CM18 7NS
United Kingdom
Please call +44 (0) 1279 641 097 or e-mail us at sales@
horizonhobby.co.uk with any questions or concerns
regarding this product or warranty.
Germany
Electronics and engines requiring inspection or repair
should be shipped to the following address:
Horizon Technischer Service
Hamburger Strasse 10
25335 Elmshorn
Germany
Please call +49 4121 46199 66 or e-mail us at service@
horizonhobby.de with any questions or concerns
regarding this product or warranty.
© 2009 Horizon Hobby, Inc.
Dynamite engines are manufactured in Taiwan and distributed worldwide by:
Horizon Hobby, Inc.
4105 Fieldstone Rd.
Champaign, IL 61822
www.horizonhobby.com
10
Printed 05/09
15464.1