Transcript
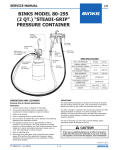
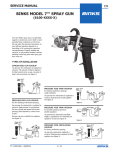
HOW DOES YOUR SPRAY GUN SHAPE UP?
No matter how experienced the sprayer, merely triggering and moving a gun in space
will not reveal any of the performance characteristics vital to a top quality finish.
A simple brief static spray pattern will immediately highlight any potential problems
before the gun is used on the painstakingly prepared workpiece or vehicle.
Follow the procedure explained below and compare the pattern to our examples.
If your result resembles examples 2-8 then look at the corrective measures before
you apply paint to the workpiece.
1. Ensure that you have the correct air cap, fluid tip and needle set-up on the gun to
match the material being applied.
2. Tape up a piece of brown paper—approx. 20" (1/2 m) square—onto the spray booth
wall at shoulder height.
3. Having set the gun at the recommended inlet or atomizing air pressure, hold it at the
correct target distance and spray at the paper WITHOUT MOVING THE GUN.
Normal Pattern – Ready to Spray
Intermittent Spray Fan or Fluttering
• Air in the fluid passageways
• Insufficient paint in cup
• Fluid tip loose
• Fluid needle packing or packing screw loose
• Cup vent hole clogged
• Good balance and uniformity
• Symmetrical pattern shape
• Good working height and width
• Uniform distribution of material
(Verify by horizontal spray out)
Banana Pattern
Heavy Top or Bottom Pattern
• Air cap horn hole dirty or damaged
• Test spray pattern, rotate 180° and test
again to isolate horn hole location
• Clean air cap thoroughly
• Replace air cap if necessary
• Fluid tip or air cap dirty or damaged
• Test spray pattern, rotate 180° and test
again to isolate cause
• Clean both items thoroughly
• Replace fluid tip or air cap if necessary
Single Split Pattern
Center Heavy Ellipse
• Bad air or paint setting
• Viscosity too high – thin with solvents
• Fluid flow too high – reduce
• Air pressure too low – increase
• Too much air for fluid quantity used
• Reduce air pressure at regulator
• Increase fluid flow by changing fluid tip
size or opening needle control knob
Double Split Pattern
Ball End Heavy Pattern
• Too much air flow
• Change fluid tip for smaller size
• Reduce flow using fluid needle control
• Reduce fan size using fan control
• Too much air for fluid quantity used
• Reduce air pressure at regulator
• Increase fluid flow by changing fluid tip
size or opening needle control knob
STATIC PATTERN TEST
Having examined the vertical spray pattern for uniformity of shape and size, now turn the air cap through 90° and static spray a horizontal pattern making sure you trigger
for long enough to load the shape with material. Then watch to see the formation of the run-outs of material across the full width of the sprayed pattern.
This will highlight how well the material is distributed throughout the spray pattern. If run-out is more obvious at the center or at the ends then this indicates a problem.
TYPICAL GOOD
PATTERN RUN-OUT
TYPICAL BAD
PATTERN RUN-OUT
THE THREE “C”s OF SPRAY GUN TROUBLESHOOTING — CONDITION, CAUSE, CORRECTION
The information below provides you with a simple and effective method of tracing problems with your gun if it proves troublesome.
Look down the left hand “CONDTITION” column until you identify the problem and you will find the possible “CAUSE” and “CORRECTION” that needs to be taken.
A
A
CONDITION
CAUSE
CORRECTION
Will not spray
No air pressure at gun
Fluid needle adjusting screw not open enough
Fluid too heavy for suction feed
Check air supply and air lines
Change to proper suction feed air cap
Increase fluid pressure at tank
Open fluid needle adjusting screw
Thin material or change to pressure feed
Gun spits paint when triggering on and off
Incorrect needle fitted to gun
Excessive needle wear
Excessive fluid tip wear
Small air leak from air cap when gun is
not triggered
Air valve contaminated and not correctly sealing
Remove valve and thoroughly clean
valves shaft and seating
A
Gun spits paint when triggering on due to
paint build-up inside air cap between
spraying operations
Fluid tip not fitted correctly in gun head
Tighten to correct torque
Fluid tip/needle leakage
Check for damage or blockage
Slow fluid leak from fluid tip and needle seat Fluid tip internal seat scored, damaged or worn
Fluid needle external profile damaged or worn
Contamination on needle or tip mating surfaces
preventing good seal
Incorrect fluid tip for fluid needle fitted to gun
Sluggish needle
Tight packing
B
Major fluid leak or fluid jetting from fluid tip Contamination on needle or tip mating
tip and needle seat
Incorrect fluid tip for fluid needle fitted to gun
Fluid needle stuck or “binding up”
B
Paint build-up on fluid tip
Fluid tip not fitted correctly in gun head
Fluid tip/needle packing worn or loose
w w w. d e v i l b i s s . c o m
K
G
E
Check tip/needle selection chart and
fit correct item
Remove needle and clean or lubricate
packing
Adjust
Remove tip and needle and thoroughly
clean surfaces preventing good seal
Check tip/needle selection chart and
fit correct item
Remove and clean fluid needle shaft
Lubricate needle packing
Loosen needle packing
F
B
Tighten to correct torque
Check for damage or blockage
J
Replace
K
Paint build-up on air cap
Damaged air cap holes
Gradual build-up of bounce-back
on gun head
Replace with new air cap
Thoroughly clean
G
Air cap retaining ring will not rotate
Contamination on retaining threads
Deformed or damaged retaining ring
Soak gun head in solvent to soften paint
Cut retaining ring off of gun (probably
replace retaining ring and baffle as well)
E
Stiff trigger action
Air valve stem bent
Contamination on air valve stem
Contamination on trigger bearing screw
Contamination on fluid needle shaft
Fluid needle packing too tight
Replace damaged component
Remove and clean
Remove and clean
Remove and clean
Loosen packing nut
H
Unable to turn fan control knob on top rear of gun Internal o-ring swollen or broken
Paint contamination on threads
Unable to get round spray
Fluid tip or air baffle incorrectly fitted
H
C
Unable to turn air control valve on handle of gun
Internal o-ring swollen or broken
Paint contamination on threads
Replace o-ring
Remove and thoroughly clean
D
Air valve sluggish or slow to turn on/off when
trigger is pulled/released
Air valve stem bent
Replace damaged component
D
D
Air leak from around air valve stem
Air valve will not operate (air valve stem will not
fully slide into valve body) when trigger is pulled
Contamination on air valve stem
Air valve seal damaged or missing
Air valve stem bent
Contamination on air valve stem
Remove and clean
Replace
Remove air valve and replace damaged
air valve stem
Remove air valve and thoroughly clean
I
Air leak from baffle seal
Baffle seal swollen or damaged
Replace
C
Slow fluid leak from needle packing
Fluid needle packing worn or loose
Tighten or replace as necessary
DeVilbiss has over 100 years of experience and innovation and offers some of the finest
HVLP and conventional spray guns, tanks, cups and accessories in the finishing industry.
Industrial Finishing | DeVilbiss
195 Internationale Blvd., Glendale Heights, IL 60139 | For Your Nearest Distributor Call: 1-888-992-4657
Air baffle chimney damaged
Replace o-rings
Remove and thoroughly clean
Remove, check components for damage
and refit correctly
Replace air baffle
J
D
I
CORRECTION
Air leak from fluid needle exit point in top of handle Seal damaged or missing
H
Replace
Replace
Thoroughly clean
CAUSE
F
A
Check tip/needle selection chart and fit
correct item
Replace with new needle
Replace with new fluid tip
A
B
CONDITION
TH1POSTER (6/07)