1
Pressing and holding down the “MAX/MIN” button for
more than 2 seconds to exit the MAX/MIN function.
7. “P2” and “P1-P2” Button
Press the “P2” or “P1-P2” button you can change the
display between P2 and P1-P2.
8. “psi”, “inWc”, “mmWc”, “mbar” Button:
Press the “psi” or “inWc” or “mmWc” or “mbar” button you can change pressure unit.
1 psi = 27.67990500784 inWc.
1 psi = 703.0698934059 mmWc.
1 psi = 68.94756718687 mbar.
MAINTENANCE
WARNING
To avoid possible electrical shock, disconnect the
thermocouple connectors from the thermometer before
removing the cover.
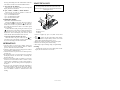
Installing and Replacing Battery
9. WIRELESS MODE:
(886W/886UW/886WE/886UWE)
Pressing the “ ” key for more than two seconds to
start wireless function. Pressing the “ ” key again for
another two seconds to stop wireless function. The wireless mode will shut down if there is no wireless signal
for two minutes.
To SET CH/ID to 00,00, pressing the “mbar” key and
“ ” power key for more than 4 seconds with the meter
powered down. The meter will set channel and ID to
00,00 status. The second display will show 00, which
means that the channel and ID has been set to 00.
To check the channel and ID of the meter:
When the meter is off, press “APO” key and “ ” for
4 seconds, LCD’s main display will show channel number, the second display will show ID number.
OPERATION
1. Zero the meter by pressing the “ZERO” button just
before taking the pressure readings, while at ambient
pressure. This will zero both P1 and P2.
2. Connect a single hose to get the gauge pressure relative
to the ambient or ZERO pressure.
3. Connect both hoses if you want to see relative pressure,
P1 minus P2.
4. By pressing the “P2” or “P1-P2” button you can change
the display between P2 and P1-P2 is constantly displayed in the LCD.
5. Press the unit button makes it possible to switch between the four measurements scales of inches of water
column (inWc), millimeters of water column (mmWc),
mbar, and psi. The scale being viewed is displayed on
the LCD.
6. If you are in an environment where the temperature is
noticeably changing while you are taking your reading,
it is advised that you disconnect the meter from the
hoses and ZERO it relative to ambient before each
reading.
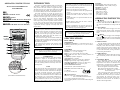
A. Screw
B. Battery Cover
C. Battery
1. Power is supplied by 4pcs 1.5V (SIZE AAA) UM-4
R03.
2. The “ ” appears on the LCD display when replacement is needed. To replace battery remove screw from
back of meter and lift off the battery cover.
3. Remove the battery from battery contacts and replace.
4. When not use for long time remove battery.
5. Don’t keep in place with high Temp, or high humidity.
Cleaning
Periodically wipe the case with a damp cloth and detergent, do not use abrasives or solvents.
Ver.1.4 02/01/10