1
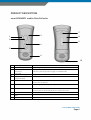
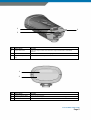
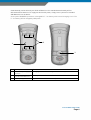
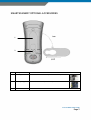
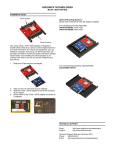
smartScanndy
USER GUIDE
COPYRIGHTS AND TRADEMARK
Advanced PANMOBIL systems GmbH & Co. KG (here after called PANMOBIL) reserves the right to
make changes in specification and other information contained in this document without prior
notice and the reader should in all cases consult PANMOBIL to determine any such changes have
been made. The information in this publication does not represent a commitment on the part of
PANMOBIL.
PANMOBIL shall not be liable for technical or editorial errors or omissions contained herein; nor
for incidental or consequential damages resulting from the furnishing, performance or use of this
material.
This document contains proprietary information which is protected by copyright.
All rights are reserved. No part of this document may be photocopied, reproduced, ore translated
into other languages without the prior written consent of PANMOBIL.
© advanced PANMOBIL Systems GmbH & Co. KG. All rights reserved.
Ethernet is a trademark of XEROX Corporation. UNIX is a registered trademark of The Open Group.
Windows 98, Windows ME, Windows NT, Windows 2000 and Windows XP are trademarks of
Microsoft Corp. Netscape is a trademark of Netscape Communications Operation.
International support contact:
advanced PANMOBIL Systems GmbH & Co. KG
Hansestr. 91
51149 Cologne
Germany
Phone:
Fax:
E-Mail:
Web Address:
+49 (0)22 03 10 334 777
+49 (0)22 03 10 334 720
[email protected]
www.PANMOBIL.com
smartSCANNDY USER GUIDE
Page 2
TABLE OF CONTENTS
COPYRIGHTS AND TRADEMARK........................................................................ 2
PRODUCT DESCRIPTION ................................................................................... 4
smartSCANNDY mobile Data Collector ............................................................ 4
SMARTSCANNDY OPTIONAL ACCESSORIES...................................................... 7
Shirt Clip .......................................................................................................... 7
Belt Clip stopple ............................................................................................... 7
INSTALLING THE USB DEVICE DRIVER.............................................................. 8
SMARTSCANNDY BLUETOOTH INTERFACE....................................................... 11
SMARTSCANNDY BARCODE OPTION SETUP...................................................... 12
Setup Procedure .............................................................................................. 12
CONFIGURATION FLOWCHART ......................................................................... 13
ENABLE / DISABLE BARCODE SYMBOLOGIES ................................................... 14
CODE 39 SETTINGS ........................................................................................... 17
CODABAR ......................................................................................................... 18
INTERLEAVED 2 OF 5 ........................................................................................ 19
EAN – 13 ........................................................................................................... 20
EAN – 8............................................................................................................. 20
UPC – A............................................................................................................. 20
UPC – E............................................................................................................. 21
STATEMENT OF AGENCY COMPLIANCE ............................................................ 22
smartSCANNDY USER GUIDE
Page 3
PRODUCT DESCRIPTION
smartSCANNDY mobile Data Collector
7
2
1
3
8
9
4
5
6
10
No. Description
Power LED (green)
1
Bluetooth connection
2
LED (blue)
Scan LED
Key 1 Laser Trigger key
3
Key 2 (free
4
programmable)
Power Key
5
Function
Indicates green light when smartScanndy is powered ON
Indicates blue light when Bluetooth connection is established
Indicates yellow light while trigger to read Barcode
Triggers the Laser Beam when pressed
Free programmable function key.
SmartScanndy Power ON / OFF (press and hold for 3 seconds to
power OFF the device)
Interface protection Cap with Stylus
6
Interface Cap
7
Battery Cover lock button Turn the slot to vertical position to lock the cover
Turn the slot to horizontal position to unlock the cover
Battery cover
Battery cover
Laser Class notification
Notifies the user to not stare into the laser beam
label
Integrated Stylus
Stylus for touch screen control
8
9
10
smartSCANNDY USER GUIDE
Page 4
1
3
2
No. Description
Stylus hide hole
1
2
3
USB Interface
Interface cap lock
clip
Function
Hides the stylus when the interface cap is attached in standard
position
USB communication and charging interface
Locks the interface cap when attached
1
2
No. Description
Serial number label
1
Scanning window
2
Function
Device serial number
Keep the scanning window clean to have best reading performance
smartSCANNDY USER GUIDE
Page 5
SmartScanndy can be driven by two kinds of Batteries. As a standard smartScanndy will be
delivered without batteries. To supply the device with power, simply insert 3 peaces of standard
AAA Batteries into the device.
As an option PANMOBIL provides a rechargeable Li – Ion battery with internal charging circuit. The
Li –Ion battery will be charged by USB power
1
2
3
No. Description
LiIon Battery charging
1
contacts
Battery contacts for
2
standard AAA Batteries
Belt Clip stoppel
3
Function
Charging contacts for rechargeable li-ion battery
Battery contacts when use with standard AAA Batteries
Stopel to fix the device on a belt clip
smartSCANNDY USER GUIDE
Page 6
SMARTSCANNDY OPTIONAL ACCESSORIES
1
2
No.
1
Description
Shirt Clip
Function
Used to fix the smartScanndy device on a shirt pocket
2
Belt Clip stopple
Used to fix the shirt clip ore belt clip
smartSCANNDY USER GUIDE
Page 7
INSTALLING THE USB DEVICE DRIVER
NOTE
The following installation description may vary on different operating systems
The necessary driver files are located on the product CD which is included in the product package.
Please brows on the CD to the directory ..\smartScanndyUSBDridver and open the directory for
the operating system of your PC. Inside that directory you can find a self extracting archive which
contains the driver software.
Please double click the archive file to execute the installation. For Windows XP operating systems
CP210x_VCP_Win2K_XP_S2K3Setup.exe
Click the button “Next” to continue the installation
smartSCANNDY USER GUIDE
Page 8
Please carefully read the terms of the license agreement. If you accept the terms, please mark the
option and click the button “Next” to continue the installation. If you do not agree, please click the
button “Cancel” to abort the installation.
If you agreed to the term of the license and clicked the button “Next” you should now see the
following window where you can specify the installation directory for the driver files.
After you have specified the installation directory click the button “Next” to continue
Click the button “Install” to continue the installation
smartSCANNDY USER GUIDE
Page 9
After the driver files have successfully been installed, please click the button “Finish” to finish the
driver files extraction.
To complete the driver installation, please connect the smartScanndy device to an USB interface on
your PC.
Depending on the Operating System and Version it may happen that the PC detects the
smartScanndy as a unknown device. Even after the driver files have been installed successfully as
described above.
In that case, please follow the driver installation instruction of the operating system specific install
wizard.
smartSCANNDY USER GUIDE
Page 10
SMARTSCANNDY BLUETOOTH INTERFACE
For online communication PANMOBIL provides an optional Bluetooth interface for smartScanndy
devices.
The Interface is of Bluetooth Class II (10 to 20 meter distance)
Device Class SPP (Serial Port Profile)
Bluetooth device name: smartScanndy + device serial number
Connection Key: 1234
After powering ON the device, the Bluetooth interface is available to accept incoming connection
requests from other Bluetooth devices like PC’s, PDA’s and Tablet PC’s
The Bluetooth specific options can be modified by using the ScanndyDownload software.
Please refer to the ScanndyDownload software user guide which is included on the product CD.
smartSCANNDY USER GUIDE
Page 11
SMARTSCANNDY BARCODE OPTION SETUP
PANMOBIL offers two tools to setup device specific options.
To setup the device you can make use of the ScanndyDownload software which is included in the
product package. Please refer to the ScanndyDownload User Guide for the setup procedure.
Setup Procedure
The smartSCANNDY unit can be configured to fit into user’s specific application.
The configuration parameters are stored in a non-volatile memory which is retained
even if power is lost.
To configure your smartSCANNDY by scanning configuration barcodes, please proceed the following
steps.
1) Locate the START CONFIGURATION barcode on page 5 to set the smartSCANNDY unit into
SETUP mode.
2) Scan the labels representing the parameter to be changed. You can setup various
parameters within one setup procedure.
3) Scan the END CONFIGURATION barcode on page 5 to save the changed parameters and exit
the setup mode.
Example: Enable reading of Code 39
1) Scan the START CONFIGURATION barcode on page 5 to enter the setup mode
2) Scan the STANDARD barcode for Code 39 type selection “ON” on page 9 to activate the Code
39 type reading.
3) Scan the END CONFIGURATION barcode on page 5 to save and exit the setup mode
NOTE
You can abort the actual configuration procedure by scanning the
ABORT CONFIGURATION barcode on page 5. All changed parameters will be set back to the values
they had before you start the configuration procedure.
smartSCANNDY USER GUIDE
Page 12
CONFIGURATION FLOWCHART
START OF CONFIGURATION
*.$/%*
SELECT INTERFACES
SELECT SYMBOLOGIES
OPERATION PARAMETERS
SET FACTORY DEFAULTS **
*SADF*
ABORT CONFIGURATION *
*ABCF*
END OF CONFIGURATION **
*EOCF*
SHOW VERSION
*SHCF*
smartSCANNDY USER GUIDE
Page 13
ENABLE / DISABLE BARCODE SYMBOLOGIES
Use this section to program the scanner for industrial and retail symbology selection.
In this programming section you can simply enable or disable barcode symbologies
by scanning the code specific barcode to either switch the symbology ON or OFF.
CODE 39
*SD1*
OFF
*SE1*
<ON>
INTERLEAVED 2OF 5
*SD2*
<OFF>
*SE2*
ON
STANDART 2 OF 5
*SD3*
<OFF>
*SE3*
ON
smartSCANNDY USER GUIDE
Page 14
MATRIX 2 OF 5
*SD4*
<OFF>
*SE4*
ON
CODABAR
*SD5*
OFF
*SE5*
<ON>
EAN - 8
*SD7*
OFF
*SE7*
<ON>
EAN – 13 / UPC-A
*SD6*
OFF
*SE6*
<ON>
UPC - E
*SD8*
OFF
*SE8*
<ON>
smartSCANNDY USER GUIDE
Page 15
ISBN / ISSN
*SDF*
<OFF>
*SEF*
ON
EAN/UPC ADDON 2/5
*SD9*
<OFF>
*SE9*
ON
CODE 128
*SDA*
OFF
*SEA*
<ON>
CODE 93
*SDB*
<OFF>
*SEB*
ON
CHINESE 2 OF 5
*SDE*
<OFF>
*SEE*
ON
smartSCANNDY USER GUIDE
Page 16
EAN 8 TO EAN 13
*AH6*
<OFF>
*AH5*
ON
CODE 39 SETTINGS
If Full ASCII Code 39 decoding is enabled, certain character pairs within the barcode
symbology will be interpreted as a single character. For example: $C will be decoded as
the ASCII character ETX.
CODE 39 TYPE
*AA1*
STANDARD
*AA2*
<FULL ASCII>
Start/stop characters identify the leading end trailing ends of the barcode. You may either transmit, or
not transmit start/stop characters.
TRANSMIT START/STOP CHAR
*AA3*
<OFF>
*AA4*
ON
When verify checksum is switched ON the unit will only read Code 39 barcodes printed with a check
character and verifies the printed check characters internally. You can also specify to transmit the
check character by switching the TRANSMIT CHECK CHAR option to ON.
smartSCANNDY USER GUIDE
Page 17
VERIFY CHECKSUM
*AA5*
<OFF>
*AA6*
ON
TRANSMIT CHECK CHAR
*AA7*
<OFF>
*AA8*
ON
CODABAR
Start/stop characters identify the leading end trailing ends of the barcode. You may either transmit, or
not transmit start/stop characters.
TRANSMIT START/STOP CHAR
*AE1*
<OFF>
*AE2*
ON
TYPE OF START/STOP
*AE3*
ABCD/ABCD
*AE4*
ABCD/TN*E
*AE5*
<abcd/abcd>
*AE6*
abcd/tn*e
smartSCANNDY USER GUIDE
Page 18
When verify checksum is switched ON the unit will only read Codabar barcodes printed with a check
character and verifies the printed check characters internally. You can also specify to transmit the
check character by switching the TRANSMIT CHECK CHAR option to ON.
VERIFY CHECKSUM
*AE9*
<OFF>
*AEA*
1.1..1.1.1.1.1.1
TRANSMIT CHECK CHAR
*AE7*
<OFF>
*AE8*
INTERLEAVED 2 OF 5
ON
When verify check digit is switched ON the unit will only read Interleaved barcodes
printed with a check digit and verifies the printed check digit internally. You can also
specify to transmit the check digit by switching the TRANSMIT CHECK DIGIT option to
ON.
VERIFY CHECK DIGIT
*AB5*
<OFF>
*AB6*
ON
TRANSMIT CHECK DIGIT
*AB3*
<OFF>
*AB4*
ON
smartSCANNDY USER GUIDE
Page 19
EAN – 13
This selection allows you to specify whether the check digit should be transmitted at the
end of the scanned data or not.
TRANSMIT CHECK DIGIT
*AF5*
OFF
*AF6*
<ON>
EAN – 8
TRANSMIT CHECK DIGIT
*AH3*
OFF
*AH4*
UPC – A
<ON>
This selection allows you to specify whether the check digit should be transmitted at the
end of the scanned data or not
TRANSMIT CHECK DIGIT
*AG5*
OFF
*AG6*
<ON>
smartSCANNDY USER GUIDE
Page 20
UPC – E
This selection allows you to specify whether the check digit should be transmitted at the
end of the scanned data or not.
TRANSMIT CHECK DIGIT
*AI3*
OFF
*AI4*
<ON>
This selection expands the UPC – E code to the 12 digit, UPC – A format if switched to
ON.
UPC-E TO UPC-A
*AI6*
<OFF>
*AI5*
ON
smartSCANNDY USER GUIDE
Page 21
STATEMENT OF AGENCY COMPLIANCE
FCC
This device complies with part 15 of the FCC rules. Operation in subject to the following two
conditions:
(1) this device may not cause harmful interference, and
(2) this device must accept any interference received, including interference that may cause
undesired operation.
CAUTION
Any changes or modifications made to this device that are not expressly approved by advanced
PANMOBIL Systems GmbH & Co. KG may void the user’s authority to operate this equipment.
NOTE
To maintain compliance with FCC rules and regulations, cables connected to this device must be
shielded cables, in which the cable shield wire(s) have been grounded to the connector shell.
CE
This product has been tested to and conforms with the provisions noted within the
CE EMC Class B Directive.
PANMOBIL shall not be liable for use of our product with equipment (i.e., power supplies, personal
computers, etc.) that is not CE marked.
smartSCANNDY USER GUIDE
Page 22