1
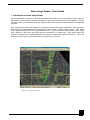
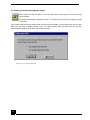
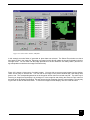
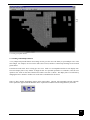
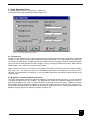
Axion Image
Viewer
Your Window To The World
User’s Guide
1
AxView
© 2000 Axion Spatial Imaging Ltd.
Suite 700, 9925—109 Street Edmonton, Alberta T5K 2J8
E-mail: [email protected]
www.axionspatial.com
All rights reserved for all countries
1. NOTICE. READ THIS AGREEMENT CAREFULLY BEFORE INSTALLING AXVIEW/AXVIEW-GPS/
AXIMAGE SOFTWARE. WE ARE WILLING TO LICENSE THE ENCLOSED SOFTWARE TO YOU
ONLY ON THE CONDITION THAT YOU ACCEPT ALL OF THE TERMS CONTAINED IN THIS ENDUSER LICENSE AGREEMENT. BY INSTALLING, COPYING, OR USING THE SOFTWARE ON THE
ENCLOSED CD-ROM, YOU ACCEPT AND AGREE TO BE BOUND BY THE TERMS OF THIS LICENSE AGREEMENT. IF YOU DO NOT AGREE TO THESE TERMS, HIT 'NO' BELOW TO EXIT
WITHOUT INSTALLING SOFTWARE..
2. OWNERSHIP AND LICENSE. This is a license agreement and NOT an
agreement for sale. We continue to own the copy of the computer programs, documentation, data, and
other content and all other copies that you are authorized by this Agreement to make (the 'Software').
Your rights to use the Software are specified in this Agreement, and we retain all rights expressly
granted to you in this Agreement.
Nothing in this Agreement constitutes a waiver of our rights under Canadian or international copyright
law or any other federal or provincial state law.
3. PERMITTED USES. You are granted the following rights to the Software:
(a) Right to Install and Use. You may install and use the Software on one single-user computer in your
possession. The Software is 'installed' on a computer when it is placed on a computer's hard disk, CDROM, or other secondary storage device. The Software is 'in use' on a computer when it is executed or
loaded into the computer's RAM or other primary memory. You may not under any circumstances have
the Software installed or in use on two or more computers at the same time.
You may not install the Software on a network server.
4. PROHIBITED USES. You may not, without written permission from us:
(a) Use, copy, modify, merge, or transfer copies of the Software except as expressly authorized in this
Agreement;
(b) Use any back-up or archival copies of the Software (or allow someone else to use such copies) for
any purpose other than to replace an original copy if it is destroyed or becomes defective;
(c) Disassemble, decompile or 'unlock', reverse engineer, or in any manner decode the Software for any
reason;
(d) Place the Software onto a server so that it is accessible via a public network such as the Internet; or
(e) Sublicense, lease, or rent the Software.
2
5. LIMITED WARRANTY.
(a) Limited Warranty. We warrant that, for sixty (60) days from the date you acquired it from us or our authorized dealers (1) the Software will perform substantially in accordance with the user documentation accompanying the Software; and (2) the media on which the Software is provided to you will be free from defects in materials and workmanship under normal use and service.
(b) Exclusive Remedies. Our entire liability and your sole and exclusive remedy for breach of the foregoing
warranty shall be, at our option, to either (1) return the price you paid, or (2) repair or replace the Software or
media that does not meet the foregoing limited warranty if a copy of the receipt is provided and the software
is removed from your computer. This limited warranty is void if failure of the Software is caused by accident, abuse, or violation of this license agreement. Any replacement Software will be warranted as above
for the remainder of the warranty period, or thirty (30) days from the date you install it, whichever is longer.
(c) WARRANTY DISCLAIMER. WE DO NOT WARRANT THAT THIS SOFTWARE WILL MEET YOUR REQUIREMENTS OR THAT ITS OPERATION WILL BE UNINTERRUPTED OR ERROR-FREE. TO THE EXTENT ALLOWED BY LAW, WE EXPRESSLY DISCLAIM ALL EXPRESS WARRANTIES NOT STATED
HERE AND ALL IMPLIED WARRANTIES, INCLUDING THE IMPLIED WARRANTIES OF MERCHANTABILITY AND FITNESS FOR A PARTICULAR PURPOSE.
This limited warranty gives you specific legal rights, and you may also have other legal rights which vary
from Province to Province.
(d) Warranty inquiries may be sent to:
Axion Spatial Imaging Ltd.
Suite 700, 9925-109 Street
Edmonton, Alberta, Canada T5K 2J8
6. LIMITATION OF LIABILITY. AXION'S LIABILITY TO YOU FOR ANY LOSSES SHALL BE LIMITED TO
DIRECT DAMAGES AND SHALL NOT EXCEED THE AMOUNT YOU ORIGINALLY PAID FOR THE
SOFTWARE. IN NO EVENT WILL AXION BE LIABLE TO YOU FOR ANY INCIDENTAL, INDIRECT, SPECIAL, OR CONSEQUENTIAL DAMAGES (INCLUDING LOSS OF PROFITS), EVEN IF AXION HAS BEEN
ADVISED OF THE POSSIBILITY OF SUCH DAMAGES. AXION MAKES EVERY EFFORT TO VERIFY
THAT FILES STORED ON OUR SERVER ARE VIRUS FREE. AXION WILL NOT BE HELD LIABLE FOR
ANY VIRUSES RESULTING FROM THE DOWNLOAD, INSTALLATION OR E-MAIL OF ANY OUR SOFTWARE.
SOME PROVINCES OR STATES DO NOT ALLOW THE EXCLUSION OR LIMITATION OF INCIDENTAL
OR CONSEQUENTIAL DAMAGES, SO THE ABOVE LIMITATION OR EXCLUSION MAY NOT APPLY TO
YOU.
7. EXPORT CONTROLS. You acknowledge that the Software is subject to the export control laws and regulations of Canada and any amendments thereof. You agree that you will not directly or indirectly transfer the
Software except in compliance with all applicable Canadian export laws and regulations.
8. TERMINATION. This Agreement is effective until terminated. You may terminate this Agreement at any
time by destroying all copies of the Software in your possession or by returning all such copies to us. This
Agreement and your right to use this Software automatically terminate if you fail to comply with any material
provision of this Agreement. Your license to use this Software also terminates if you assign this Agreement
to someone else. Upon termination, you must stop all use of the Software and must destroy any copies that
remain in your possession. Otherwise, the restrictions on your rights to use the Software will end upon expiration of the copyright to the Software.
9. MISCELLANEOUS PROVISIONS
(a) This Agreement will be governed by and construed according to the substantive laws of Alberta, Canada.
3
This is the entire agreement between us relating to the Software and supersedes any prior purchase order, communication, advertising, or representation concerning the Software. No change or modification
of this Agreement will be valid unless it is in writing and is signed by us.
(b) Canadian Transactions: If you acquired this Software in Canada, you agree to the following:
The parties hereto have expressly required that the present Agreement and its Exhibits be drawn up in
the English language./ Les parties aux presentes ont expressement exige que la presente convention et
ses Annexes soient redigees en langue anglaise.
If you have any questions about this Agreement, write to us at Axion
Spatial Imaging Ltd., Suite 700 9925-109 Street, Edmonton, Alberta,
Canada T5K 2J8 or call us at (780) 423-4413.
4
5
TABLE OF CONTENTS
1. Introduction ...................................................................... 7
2.
Installation ........................................ ..............................8
3.
Licensing .......................................... ..............................9
4. Viewing Data .................................................................10
4.1 Displaying and Manipulating a single image ................... 12
4.2 Displaying and Manipulating Multiple Images ................. 16
4.3 Working with Multiple Windows ........................................ 19
5. Image Tools ........................................................................ 20
5.1 Zoom In………………………………………………………. 20
5.2 Zoom Out .......................................................................20
5.3 Zoom ..............................................................................20
5.4 Pan View ........................................................................20
5.5 Full View......................................................................... 20
5.6 Refresh View ...................................................................20
6. Image Adjustment Tools ............................................... 21
6.1 Transparency ..................................................................21
6.2 Brightness, Contrast and Gamma Correction..................21
7. Plotting .......................................................................... 22
7.1 Plotting Geo-Referenced data .......................................23
7.2 Plotting Non-Georeferenced data ..................................25
7.3 Things to Remember .....................................................26
6
Axion Image Viewer– Users Guide
1. Introduction to Axion Image Viewer
Axion Image Viewer is a powerful map based data viewer that provides near real time display of data. Axion Image Viewer is ideally suited for extremely fast display of large CAD, GIS and remote sensing datasets. With Axion Image Viewer, most standard vector and image formats can be combined, viewed, plotted and manipulated
with ease.
Axion Image Viewer is the ideal companion to AxImage, the world’s best image compressor. AxImage creates
ACE files that provide instantaneous decompression when viewing. Nothing displays faster. Axion Image
Viewer displays georeferenced or non-georeferenced data. It also lets the user select specific tiles to display
from a dataset, as well as the order they should be displayed in the image stack. Axion Image Viewer has
options for brightness and contrast adjustment and allows for transparency between image tiles. This is the
product you need to get your expensive data to the people who need it now.
Figure 1.0. Axion Image Viewer
7
2. Installation
AxView.EXE is a self-extracting ZIP file that contains all the files necessary for installation. Explode AxView.EXE
into a temporary directory. Follow these three easy steps to install AxView and unleash your map files.
Click Start on the Windows main menu, then select run.
Figure 2.0. Windows Run command
The following dialog box will appear.
Click Browse and locate the Axion Image Viewer Setup.EXE. Click OK and follow instructions to install.
Figure 2.1. Run dialog box
8
3. Licensing
Axion Image Viewer can be used for a limited time period (30 days). After this period the software must be licensed.
From the Axion Image Viewer Help Menu, select ‘License Information’. This brings up a License Information dialog box (Figure 3.0).
Figure 3.0. License Information window
9
Select “Register” to bring up the Authorization window (Figure 3.1).
Figure 3.1. Authorization window
This window shows your Entry code and Computer ID. To fully license the software you must enter the Authorization code. This code can be obtained from Axion Spatial Imaging by email, fax, or phone. Once the
Authorization code is entered, the product is licensed.
Select ‘Help’ then ‘License Information’ to bring up the License Information window (Figure 3.1) again. You
can now type in your name and company details in the space provided. Click ‘Update Registration’ to save
this information. If you wish to transfer a license, select ‘Transfer License’ and follow the directions in the
Transfer License window.
10
4. Viewing Data
The Axion Image Viewer main window (Figure 4.0) is the starting point for image operations. From the
File menu, select ‘New’ to open a blank image window, or ‘Open’ to display existing data. Select
‘Workspace’ to create a new workspace or load an existing workspace.
Options under the window menu are grayed out until an image window is displayed.
The Options menu allows the user to save or restore a workspace, display GPS and View toolbars, and
view the message log.
The Help menu provides a link to help files as well as product information and licensing.
Figure 4.0. Axion Image Viewer main window
11
4.1 Displaying and Manipulating a Single Image
Select ‘Open’ from the File Menu or click the Open button in the top left of the Axion Image Viewer
window.
You will be presented with the Select Files window (Figure 4.1.0).
Figure 4.1.0. Select Files Window
The Select Files window allows you to add individual files or an entire folder of data to view. For individual
files click ‘Add Files’. This will bring up the standard Windows file selection dialog box (Figure 4.1.1). You can
choose a single file or select multiple files by holding down the Ctrl or Shift keys. You can select .ace, .bmp, .
tif, .shp or select ‘All files’.
12
Figure 4.1.1. Windows File Selection
13
Select ‘Open’ and your Select Files window will be updated (Figure 4.1.2). To the right is the image
preview box. To the left is the image list. Click ‘Shrink’ to restrict the window width to the Image list
only. The ‘Shrink’ button then becomes the ‘Expand’ button. Click it to return the window to its full
width.
Figure 4.1.2 Select Files window
In this example a single file is selected. It will appear outlined in green in the image preview box on
the right. The name of the file appears on the image outline and in the image list on the left. The
image list shows the image number (in this case 1), its type, whether or not it is turned on, the file
name and the path.
In the bottom right of the Select Files window is the image info box. This lists the file name as well
as geocoding, scale and format data.
In the top right of the Select Files window are six tool buttons for zooming, centering and panning
the image. These are described in detail in Section 5. These tools can be used on the preview image but unless you know the specific area of the image you wish to view, it is better to display the
image first and then zoom to an area of interest.
.
14
In the bottom left of the Select Files window are a number of other buttons. If you entered detailed image information prior to compressing your data in AxImage, the ‘More Info’ button can be used to display this in a separate window. The ‘All Off’ button will turn off all images in the preview window. The image outline will switch
from green to red. In the image list the status of the file will also change from a green ‘On’ to a red ‘Off’ indicator. The Raster and Vector check boxes are used to select and deselect each data type from the Select Files
window.
Click ‘View’ to display your data. The Select Files window will close and your image will display in the Axion Image Viewer window (Figure 4.1.3).
Notice that as you drag the cursor over the image, the corresponding geocoding information changes at the bottom of the window.
Figure 4.1.3. Axion Image Viewer single image display
15
4.2 Displaying and Manipulating Multiple Images
Select ‘Open’ from the File Menu or click the Open button in the top left of the Axion Image
Viewer window.
The Select Files window will appear as before. This time open more than one image by clicking
‘Add Folder.’
If your folder contains both geo-referenced and non-geo-referenced data, you will be given the choice to pick
which files you want to display (Figure 4.2.0). You cannot display both geo-referenced and non-georeferenced data together on the same view at the same time.
Figure 4.2.0. File Type Selection
16
Figure 4.2.1 Select Files window, add folder.
In this example an entire folder of geocoded air photo data was selected. The Select Files window now has a
large stack of files in the image list. Selecting any image from this list will update the image info display in the bottom right corner. You can zoom into the image preview box if the file names are not clearly visible. (Use the Image manipulation tools above the Image Preview window).
Figure 4.2.2 shows a closer zoom of multiple images. You may wish to remove some images from the display.
There are two ways to achieve this. You can click on an image in the preview window and it will change from
green to red. The corresponding status bar in the image list will turn also turn red and read ‘Off’. The other way of
removing an image from the display is by clicking on it in the image list and clicking the ‘Remove Files’ button on
the lower left of the Select Files window. This will remove the tile completely from the current display. The only way
to get it back is with the Add Files button. To remove all images from the display, click the ‘Clear All’ button.
17
Figure 4.2.2. Select Files window, zoomed to preview multiple images.
One of the more important functions when dealing with multiple images is the ‘Move Up’ and ‘Move Down’
buttons. In the example here, the air photos only overlap partially. If you had a stack of data over one location (e.g. image and vector data of a city neighbourhood) you would want the ability to determine the priority
of the files in the image stack. The ‘Move Up’ and ‘Move Down’ keys achieve this. Select an image in the
image list and click ‘Move Up’ or ‘Move Down’ as desired to change its display priority in the image stack.
Click ‘View’ to load your multiple images into the display window. Axion Image Viewer can display large
amounts of imagery such as air photo mosaics (Figure 4.2.3).
18
Figure
4.2.3. Large air photo mosaic
4.3 Working with Multiple Windows
A very unique and powerful feature Axion Image Viewer gives the user is the ability to open multiple views of the
same images. For example, one view can be used as the overview, another as a microscope showing an area in much
greater detail.
From the File menu click ‘New’ to bring up a new view. Each view is independent and has its own display state.
The active display state of any window is simply the last view operation performed. For instance, if the last view
operation was ‘zoom in’ this states remains active until a new state is chosen. The display state is not affected by
changing the active window to another view as the state is remembered for each view.
There are three window arrangement options on the main toolbar: Cascade, Tile horizontally and Tile vertically.
These options also appear under the Window menu. Experiment to find the best tile arrangement for your needs.
19
5. Image Tools
With single or multiple images open, take some time to explore the image tools located on the top tool bar
of Axion Image Viewer.
5.1 Zoom In
Use the zoom in tool to enlarge the map displayed on the monitor. Clicking the tool will
enlarge the image. You may need to pan the image to keep it centered in your view.
5.2 Zoom Out
Use the zoom out tool to increase the area displayed in any window. Use a mouse click in
any open view to perform the zoom-out function.
5.3 Zoom
The zoom tool lets you select a region of interest on your image and zoom into it.
5.4 Pan View
Use the Pan button to change map orientation without zooming by dragging any point on the
screen and dropping at the desired location.
5.5 Full View
Use the Full view button to zoom to display all data opened in the active Window.
5.6 Refresh View
Use the Refresh view tool to update imagery in any window.
20
6. Image Adjustment Tools
From the Image menu select ‘Adjust Image. (Figure 6.0)
This brings up the Image Adjustments window (Figure 6.0).
Figure 6.0. Image Adjustments window
6.1. Transparency
If images contain borders, such as black areas around the outside edge that would overlap other neighboring
images, you can specify how the program makes these areas transparent. The Image Adjustments window has
four options for transparency. Usually, the best option where two tiles of imagery overlap is to take the brightest
color of the two for each pixel and use that to display. This way, it always picks data from the tile, which contains
actual imagery, and not from the one with the black border.
Another option lets you pick a color value from 0 (black) to 255 (white), so the data will only be drawn if brighter
than some color. The method you choose for transparency takes effect for all datasets in all views, until it is
changed. The original data is not affected, so you can always experiment with different options without losing
any image data.
6.2. Brightness, Contrast and Gamma Correction
The Image Adjustments window has sliders for brightness, contrast and gamma correction. You can use these
to improve the appearance of your imagery. The brightness tool allows you to adjust the brightness of color images being displayed in the view. For gray-scale data, use the gamma correction option. Brightness, contrast
and gamma correction changes are applied for all views and all data, until they are turned off or changed. They
do not modify the original data, only adjust how the image is displayed on screen. Image adjustments are only
applied to imagery; they do not affect any overlying vectors or text.
21
7. Plotting
Use the ‘Axion print’ button to draw both the background raster imagery and any normal ArcView
themes or MicroStation DGN files you have displaying on top of the imagery. When you click on this
button, you first get the standard Windows dialog window for setting printer options. This is where you
can choose what printer to use, paper size, orientation, and other options.
Figure 7.0. Print Option window
22
7.1. Plotting Georeferenced Data
After you click ‘OK’, you get a second window where you can choose various options for the output data.
Figure 7.1.0. Output Data window
23
7.1.1 Customizing your Plot
•
‘Map Title’ is the title that appears on the plot.
•
The ‘title’ checkbox turns on or off the display of the map title on the plot.
•
The ‘scale bar’ checkbox turns on or off the display of the map scale bar at bottom center of the plot.
For geo-referenced data, the units are shown as kilometers.
•
The ‘map scale’ checkbox turns on or off the display of the map scale on the bottom right corner of
the plot.
•
The ‘surface area’ checkbox turns on or off the display of the surface area of the displayed data. The
units are shown as square kilometers.
•
‘Neat line’ turns on or off the neat line around the outside edge of the data.
•
‘Draw vectors’ turns on or off the plotting of any vector themes you may have turned on over top of
the raster data.
•
‘Use vector colors instead of black’ allows you to override the current theme colors and set them all
to black if using a black & white printer, or to improve contrast when displaying over grayscale raster
data.
•
‘Default line thickness’ lets you draw the vectors with a thicker line weight on paper than on the
screen. This is useful when plotting on top of raster data to make them stand out.
•
‘Draw raster background’ allows you to turn on or off the plotting of the background compressed
raster imagery. This allows you to draw the normal vector themes only, or both the imagery and the
themes.
•
‘Background grayscale color’ is the color that you want to fill the background with if you are zoomed
out past the edges of the tiled data. Black is 0 and white is 255. Using white instead of black will save
printer toner. However, if some of the tiles contain areas filled with solid black extending out to the
edge of the tile, you may want to use black to fill in around the edges of the plot so the empty area of
the tile(s) is not as noticeable. If ‘draw raster background’ is turned off, this option is ignored since
only the vector layers are drawn.
•
Under ‘Raster Display Options’:
‘Use same surface area’ causes the plot to draw the exact same extent as what is currently showing on the screen.
Or, you can use ‘Specify exact scale’ to specify an exact scale, such as 1:100,000 to plot. If you
choose this option, you can either use the current center point of what is showing on the screen
and let the program adjust the edges to get the desired scale, or you can anchor it at a particular
point by supplying the coordinates of the bottom left corner point in UTM or 3TM, depending on
the coordinate system of the data.
24
7.2. Plotting Non-Georeferenced Data
If the data being plotted is not geo-referenced, you will get the following window instead, with fewer options.
Figure 7.2.0. Non-Georeferenced Data window
25
7.3. Things to Remember
•
When printing, the program uses the same aspect ratio for the area plotted as that showing in the
window, and tries to maximize the size of the plot based on the paper size and orientation chosen.
•
If the Windows driver for the plotter gives you the option, it is usually a good idea to turn on ‘Show
preview before plotting’, in order to save ink and paper.
•
When printing very large plots, such as on HP DesignJet plotters, under the ‘properties’ window
for the Windows printer driver you may have to turn on the option to have the image spooled to the
disk before being sent to the printer. Otherwise, the data may overflow the memory capacity of the
plotter during printing.
26
27
ADMT
Advanced Digital Mapping
Technology
Making Technology Count…
Spatial Solutions that Fit
Axion Spatial Imaging Ltd
Suite 700, 9925—110 Street
Edmonton, Alberta Canada T5K 2J8
Ph: 780-423-4413 Fax: 780-423-4468
Email: [email protected]
www.axionspatial.com
28