1
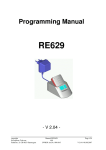
2
OPERATING INSTRUCTIONS
Digital weekly time switch
1
Explanation of display and control buttons
One-channel timer
Two-channel timer
A
B
Initial operation
2.1 Safety warning
N.B.! Electrical equipment may only be installed and fitted
by a qualified person.
The time switch may not be used for switching protective
extra-low voltages under DIN 57 100, Part 410 / VDE 0100,
Part 410, Section 4.1. Connection according to connection
diagram (observe VDE 0100).
2.2 Time switch fitted with back-up lithium battery
(special model)
In this variation of the time switch the time day and date are pre-set
to include summer time and winter time adjustment. All switching
points and program values can be entered without mains supply
voltage but are only saved once mains voltage is connected. If
button b is activated beforehand, they are lost.
i The display is activated
If no button is activated within 30 min, the display goes off.
2.3 Initial operation
Approximately 1 minute after the supply is connected to the timer
press the b button and the display appears 75 seconds later.
Do not use sharp or pointed objects as this can cause
damage to the time switch. Use a ball-point pen, for
example.
1.1 Control buttons
i
e
b
q
l
d
h
m
o
a
s
Set time and day of the week
Manual switching summer/winter time
Reset button
Programme button
a) Recall button for timer function
b) Input button for pulse switching points
Set day button
Set hour button
Set minutes button
Manual override button
Channel selection button (Two-channel timer only)
Set/Change switching level button
Pressing and holding h or m buttons will cause the
setting to be advanced rapidly.
1.2 Day identification (single day or block of days)
1 to 7 = Days of the week, 1 corresponds to Monday
1 2 3 4 5 _ _ = switching ensues Mon to Fri
_ _ _ _ _ 6 7 = switching ensues Sat and Son
1 2 3 4 _ _ _ = switching ensues Mon to Thu
1 2 3 4 5 6 _ = switching ensues Mon to Sat
1 2 3 4 5 6 7 = switching ensues every day
3
Basic functions
3.1 Setting time and day
Press i to enter the set mode. The colon stops flashing.
d Set day
h Set hours
m Set minutes
i Save settings.
3.2 Setting date and automatic summer/winter time
adjustment
The date must be entered in order to use automatic
summer/winter time adjustment and the astronomical
functions.
The time is displayed and the colon flashes:
Press e for 5 seconds: 1. 1 appears in the display.
h Enter day (default setting is 1)
m Set month (default setting is 1)
d Switch to year setting (default setting is “01”)
m Set year “01 = 2001“
d Saves the settings with automatic summer/winter time
adjustment
i Saves the settings without automatic summer/winter time
adjustment.
When the settings are saved by pressing d, f appears in the
display. Automatic summer/winter time adjustment is then activated.
3.3 Deactivating automatic summer/winter time adjustment
Press e for 5 seconds, then press i.
The symbol f appears in the display. Automatic summer/winter
time adjustment is deactivated.
3.4 Manual summer/winter time adjustment
Press the f button until the correct time is displayed.
If the symbol f appears in the display, the summer/
winter time setting cannot be changed manually.
The current time is displayed again after 60 seconds or
by pressing the i button.
3.8 Manual and permanent switching
Repeated pressing of o displays the following operating modes:
Automatic off (OFF), Automatic on (ON), Permanent off (OFF FIX),
Permanent on (ON FIX).
Two-channel timer: Press the a button to select the desired
switching channel A or B, then continue as described above.
With the settings permanently on (ON FIX) or permanently off (OFF FIX) the stored programme will be bypassed without the loss of the programme values.
3.5 Setting switching point commands
When s is pressed, the first switching point ON appears in the
display.
d Set day/day block (see 1.2)
h Set hours
m Set minutes
If s is pressed again, OFF appears in the display for the next
switching point to be entered.
d Set day/day block (see 1.2)
h Set hours
m Set minutes
The switching points are set automatically without additional
saving.
By pressing the s button again enables the next switching point
to be programmed.
The current time is displayed again after 60 seconds or
by pressing the i button.
Two-channel timer: press s, then a to select channel B, and
continue as described above.
3.6 Changing switching points commands
Press s repeatedly until the desired switching point appears in
the display.
To set the new times, proceed as described in 3.5.
The current time is displayed again after 60 seconds or
by pressing the i button.
3.7 Deleting switching points commands
Press s repeatedly until the desired switching point appears in
the display.
Press h repeatedly until −−:−− appears in the display.
s The switching point is deleted and the next switching point is
displayed.
The current time is displayed again after 60 seconds or
by pressing the i button.
Two-channel timer: press s, then a to select channel B, and
continue as described above.
The current time is displayed again after 60 seconds or
by pressing the i button.
4
Special functions
4.1 Deactivate individual switching points
Recall the switching point by pressing s and deactivate it by
pressing the o button. [ ] is displayed above the colon. This
switching point remains inactive until it is reactivated.
Activating the switching point: recall the switching point by pressing
s, then press o: [ ] appears in the display above the colon.
Two-channel timer: press s, then a to select channel B, and
continue as described above.
The current time is displayed again after 60 seconds or
by pressing the i button.
4.2 Holiday switching
This function enables the switching channels to be set permanently
On or Off for a maximum period up to 99 days without the programming of the switching points having to be changed.
Holiday switching is not possible in ON FIX or OFF FIX
(permanent switching) switching modes. This is indicated
by the symbol FIX flashing in the display.
Press the d button for 5 seconds until 0 d appears in the display.
Press d repeatedly until the desired number of days appears in
the display.
o Select the desired switching mode OFF or ON.
Do not press any other button after this, otherwise the holiday
switching mode will be deactivated again.
Two-channel timer: press the d button for 5 seconds until 0 d
appears in the display.
a Select channel B.
Then proceed as described above.
Once the set holiday period has expired, the time switch
resets automatically to the normal display. If different
holiday periods have been entered in the Two-channel
timer, switching back to the normal display occurs on
expiry of the longer period.
4.3 Random switching points
Switching points do not have to be switched at the programmed
time. They can also be switched randomly within a set time window. This timeframe can be between +/- 1 – 59 min (see
Table 1).
When q is pressed while programming a switching point (see
3.5), when the symbol w appears in the display.
4.4 Reset button
Pressing the b button deletes the time, day and date.
Pressing the s and b buttons deletes the time, day, date and
switching points, with subsequent resetting to the default settings
(see also 2.3).
4.5 Program button
Pressing q initiates the program mode.
Function
Default
setting
Pulse function
Display/
settings
P1, P2, P3
1x s
Astronomical
function
A0, A1, A2, A3,
A4, A5
A0
2x s
Latitude
S 90 to n 90
n 50
3x s
Longitude
E 180 to u 180
E10
4x s
Time zone
t -11 to t 12
+1 for CET
5x s
Sun below horizon
0° to 18°
6°
6x s
Morning time
differential
–2:59 to 2:59
0:00 h
7x s
Evening time
differential
–2:59 to 2:59
8x s
Fluctuation range of
random switching
points
1 to 59
9x s
Cycle error correction
–99 to 99
P1
1
0:00 h
2
30 min
3
differs
4
Table 1
Setting is carried out by pressing the m and h buttons.
Confirm the new set value by pressing the s button.
Leaves the program mode without saving the function just
i
displayed.
5
Pulse function
5.1 Pulse function P1
One pulse duration can be set per channel (A or B).
A pulse is executed via a pulse switching point.
A pulse can also be activated manually (timer function).
The switching point is activated with a pulse of 1 sec (default
setting). Depending on the switching mode ON or OFF, an OFF or
ON pulse switching point is executed.
To set pulse switching points
If pulse switching points are to be executed, the l button has to
be pressed additionally when entering the switching
point (see 3.5).
Two-channel timer: press s, then a to select channel B.
Then proceed as described above.
The current time is displayed again after 60 seconds or
by pressing the i button.
Setting pulse lengths
A pulse length of 00:01 min to 59:59 min duration can be entered
per channel (A or B).
Pressing i and l displays the current value.
h Enter minutes
m Enter seconds
Save by pressing i.
Two-channel timer: Press the i button, then select channel B by
pressing the l and a buttons.
Then continue as described above to enter the pulse length.
Press i to save the settings.
The pulse length set is valid for all pulse switching
points (P1).
Timer function
The timer function is used to switch from the OFF to the ON
position or vice versa.
The timer function cannot be used in the ON FIX and
OFF FIX modes (permanent switching).
The timer function is initiated by pressing the l button.
Two-channel timer:
Press a to select the channel, then press the l button.
Cancel timer function
One-channel timer: press the o button.
Two-channel timer: Press a to select the channel, then press
the o button.
If an ON pulse is cancelled, the time switch sets itself to
the OFF Automatic / position (according to the program)
or vice versa.
5.2 Pulse function P2 (description)
Using pulse function P2, each pulse switching point can be assigned its own pulse duration. On entry, a pulse switching point is
always followed by the associated pulse duration.
A pulse duration of between 00:00 min and 59:59 min can be
entered.
There is no timer function available in the P2 pulse
function mode.
Setting pulse function P2: see Table 1.
Setting pulse switching points with pulse duration
In addition to entering a switching point (see 3.5), the l button is
activated, thus marking the pulse switching point. The pulse
symbol n appears in the display. On pressing the s button
again, 00:00 appears in the display. The pulse duration is identified
by the symbol B.
h Enter minutes
m Enter seconds
Pulse switching points (with set pulse duration) and
normal switching points can be entered in any sequence.
To do this, press the s button again.
If a normal switching point already entered is subsequently identified as a pulse switching point through marking with the l button,
the following switching points then move down, and a pulse duration is inserted. This appears in the display when next pressing the
s button. If all memory locations are occupied, subsequent
conversion into a pulse switching point will be rejected.
5.3 Pulse function P3 (only on the Two-channel timer)
A pulse sequence can be programmed for channel B which can be
started or stopped manually or via channel A.
Setting pulse function P3 - see Table 1.
Setting the pulse sequence:
Only switch-on or switch-off pulses of 00:00 min to 59:59 min can
be entered for channel B. The entry of normal switching points is
restricted.
Setting a pulse sequence for channel B is initiated by pressing the
s and a buttons.
The symbol B in the display indicates that the entry of a pulse
duration is expected.
h Set minutes
m Set seconds
After entering the switch-on pulse duration, the entry of a switch-off
duration is expected after pressing the s button again. A sequence of alternating switch-on and switch-off durations forms a
pulse sequence.
Starting and stopping a pulse sequence manually
A pulse sequence entered for channel B is started by pressing the
l button.
B
ON
00:15 min
B
OFF
00:15 min
B
ON
00:01 min
B
OFF
00:04 min
B
ON
00:01 min
B
OFF
00:04 min
The entries form, for example, a
pulse sequence which, after starting,
activates channel B for 00:15 min,
deactivates it for 00:15 min, activates it for 00:01 min, deactivates it
for 00:04 min, etc.
Table 2
The pulse sequence is repeated ad infinitum until stopped by
pressing the l button again.
Channel B remains in the switching mode just adopted. On pressing the l button again, the pulse sequence recommences from
the beginning.
Starting and stopping a pulse sequence via channel A
Normal switching points and pulse switching points can be entered
for channel A.
The pulse switching points are entered in the same way as the
switching points, with additional pressing of the l button marking
the pulse switching point.
It is not possible to enter pulse durations for channel A.
A switch-on point activates channel A, while a switch-off point
deactivates channel A.
In contrast, a pulse switch-on point starts the pulse sequence on
channel B, while a pulse switch-off point stops the pulse sequence
on channel B.
An impulse sequence started via a pulse switch-on point can be
stopped by manually pressing the l button. Conversely, a pulse
sequence started manually can be stopped by a pulse switch-off
point. The pulse sequence always starts from the beginning.
Deleting switch-on and switch-off pulses
Press s, then the a button. Then press h repeatedly until
−−:−− appears in the display. Pressing s again enables the next
pulse duration to be deleted in the same way.
6
Astronomical switching functions
For the astronomical switching functions, the clock calculates the
morning and evening twilight times. The twilight times can, like the
entered switching points, be used to execute switching functions.
At dusk, for example, a light can be switched on and switched off
again at dawn. The shifting of the twilight times over the year is
taken into account in this function.
Further ways of linking the twilight times with entered switching
points can be specified by selecting the “Astronomical functions“
(A 1 to A 5).
On Two-channel timers the astronomical switching
functions can only be executed with channel A.
6.1 Selecting the astronomical function
6.3 Astronomical function A2
The time switch provides 5 astronomical functions.
For setting: see Table 1, point 4.5
Longitude and latitude: the twilight times depend on the geographical position of the place of operation. The default setting is
50° north (latitude) and 10° east (longitude), corresponding roughly
to the geographical position of Frankfurt/Main, Germany.
Clock zone: The standard clock zone is set for Central Europe.
The value must be changed corresponding to the place of operation.
Function A2 enables the switching on of a consumer item after
dusk or before dawn for a desired period of time.
The period during which the consumer item (e.g. a light) is
switched on after dusk is determined by the evening time differential. The morning time differential determines the duration of
switch-on time before dawn (see Table 1).
If one of the switching sequences is not to be executed in the
evening or morning, the corresponding time differential must be set
at 0:00.
Other cities are listed in the enclosed leaflet together with
their longitudes/latitudes and clock zones. For the setting
of other values, see Table 1.
Sun below horizon: the time switch calculates the current twilight
times based on the angles entered. The default setting is an angle
of 6°, corresponding to the “civil twilight“ (12° ≡ nautical twilight,
18° ≡ astronomical twilight).
For setting other values, see Table 1.
Morning and evening time differential: the time differentials
enable the twilight switching points to be shifted and determine the
morning and evening switch-on duration (see Table 1). The setting
0:00 makes the time differentials ineffective. Only effective for the
functions A1 and A2.
Twilight switching points: when an astronomical function has
been selected, the clock calculates the current twilight times.
These are recalculated at 0:00 h on each subsequent day.
The twilight times are stored as special switching points and can
be displayed by pressing the s button:
The time is displayed, the colon flashes.
s The dawn switching point is displayed.
Pressing s again displays the dusk switching point.
The date must be entered when using the automatic
summer/winter time switchover and astronomical functions. If the astronomical function is deactivated (= A0),
no twilight switching points are displayed.
6.2 Astronomical function A1
In astronomical function A1, the dusk switching point acts as a
switch-on point and the dawn switching point as a switch-off point.
Function A1 also provides the possibility to shift the calculated
twilight switching points. One time differential each can be set for
both the dawn and the dusk switching points, enabling execution of
the twilight switching points to be advanced or retarded. In the
case of a negative differential value, the switching point is activated correspondingly earlier, with a positive value correspondingly
later. To change the programmed default settings,
see Table 1.
Activating astronomical function A1 makes additionally
set switching points ineffective. This applies to the Onechannel timer as well as channel A of the Two-channel
timer.
Activating astronomical function A2 makes additionally
set switching points ineffective. This applies to the Onechannel timer as well as channel A of the Two-channel
timer.
6.4 Astronomical function A3 (AND-linked)
Function A3 links the switching points entered for channel A with
the twilight times. Only switching function set to operate which in
twilight time and are linked with two additional ON-OFF-switching
points.
ON-switching point switches ON
OFF-switching point switches OFF
Example 1
Switching point
Dusk/dawn
Consumer ON
15:00 ON
20:00
22:00 OFF
7:00
20:00 to 22:00
Table 3
In example 1, the time switch switches the consumer item ON at
20:00 and OFF again at 22:00. If dusk begins after 22:00, the switching point is ignored, and the consumer item is not switched on.
Example 2
Switching point
Dusk/dawn
Consumer ON
5:00 ON
20:00
22:00 OFF
7:00
20:00 to 22:00
5:00 to 7:00
Table 4
In example 2, the time switch switches the consumer item ON at
20:00 and off at 22:00 the next morning ON at 5:00 and OFF at
7:00. If dusk begins after 22:00, and dawn before 5:00, the programmed switching points are ignored.
6.5 Astronomical function A4 (OR-linked)
Function A4 facilitates another way of linking the twilight times with
the switching points entered for channel A. Switch-on phases
stipulated via switch-on and switch-off points and the switch-on
phase between dusk and dawn have equal status. The consequence of this for channel A is that the switch-on phases overlap.
Example 1
Switching points/
Programmed
Dusk/dawn/
summer
Executed
switching time
On
21.00
Off
7.00
22.00
6.00
21.00
7.00
Example 2
Switching points/
Programmed
Dusk/dawn/
winter
Executed
switching time
On
21.00
Off
7.00
18.00
8.00
18.00
8.00
Table 5
8
Technical details
8.1 Updating the switching outputs
In example 1, the time switch goes by the programmed switching
points and in Example 2, by the twilight times.
6.6 Astronomical function A5
Function A5 enables channel A to be switched on and off via two
separate paths. The channel is always switched on via the dusk
switching point and switched off with the next switching point on
the following day, not by the dawn.
Example 1
On/
Off
On/
Off
Example 2
On/
Off
On/
Off
Switching points/
Programmed
–
7.00
–
9.00
Switching points/
Programmed
–
7.00
–
9.00
Dusk/dawn/
summer
22.00
(6.00)
22.00
(6.00)
Dusk/dawn/
winter
18.00
(8.00)
18.00
(8.00)
Executed
switching time
22.00/
7.00
22.00/
9.00
Executed
switching time
18.00/
7.00
18.00/
9.00
Table 6
N.B.: Further additionally entered switching points are not
executed in channel A.
7
Example:
Default value for cycle correction: +2 sec per week
Newly ascertained cycle deviation: +3 sec per week.
3 seconds must be deducted from the default setting, i.e. –1 must
appear in the display (for setting, see Table 1).
Setting cycle error correction
Cycle error correction can only be set when mains voltage
is connected.
Cycle correction value: the cycle precision of the time switches at
room temperature (20° C) is generally better than 1 second per
day. Higher ambient temperatures, however, can cause an additional cycle error. If the ambient conditions are constant to the
greatest possible extent, the error can be minimised by resetting
the cycle correction value. To do this, the cycle error is determined
by comparing it with a time signal (e.g. radio or television) over a
period of exactly one week. The value in seconds of cycle deviation per week obtained in this manner is then taken into account
when resetting the cycle correction value.
If the time switch is fast, the cycle correction value is reduced by
the number of seconds. If the time switch is slow, the value is
increased by the number of seconds.
The factory default setting for cycle error correction is for conditions of approx. 20 °C. The newly ascertained cycle deviation must
be added to or subtracted from the default value.
If new switching points are entered or the current time is changed,
the current switching status is re-calculated in each case, and the
entered switching points are updated accordingly within 1 minute.
8.2 Behaviour in the case of electrical supply failure
In the event of loosing the supply voltage, the switching relay(s)
is/are deactivated (OFF position), and the digital display is
switched off.
Approximately 1 minute after supply voltage is restored, the relays
commence working again as programmed.
Should the cycle reserve be exhausted after a longer period of
supply failure, the switching points will be retained indefinitely. Only
the time, day and date have to be re-entered after a certain period
(see 8.3, Cycle reserve).
8.3 Technical data
Electrical connection
see rating plate
Internal power consumption
1W
Switching output
see rating plate
Switching contact
1 (2) alternator(s), floating
Number of switching points
56 (One-channel timer); arbitrary
assignment for Two-channel timer
Shortest switching interval
1 min. (for pulse programming:
1 sec)
Cycle accuracy
< + 1 sec/day; 20°C
Reserve power supply
(charging time > 1h)
> 38 hours at 20°C (Supercap)
5 years (lithium battery)
Temperature limits
–10°C to +50°C
Protection category
II acc. to EN 60335 installed
Protection type
IP 20 acc. to EN 60529 installed
9
Disposal
Depending on the model type a battery is included within the time
switch. Batteries must not be put into domestic waste. The consumer is obliged to return used batteries. To help preserve the
environment, the time switch should be disposed via an approved
recycling facility.
06/03
14-02599