1
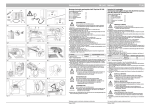
NL
P. 3
Installatiehandleiding
GB
P. 7
Installation manual
Belangrijk:
De verwarmingskabel nooit inkorten
De verwarmingskabel nooit gekruist leggen i.v.m. oververhitting
De verwarmingskabel nooit in opgerolde toestand aansluiten
Bij vragen of opmerkingen kunt u bellen met onze hotline 0416 543 301
of raadpleeg onze FAQ lijst op www.easyheat.nl
Important:
The heating cable may not be shortened
The heating cable may not be crossed over itself
The heating cable may not be connected to a power
supply when it is partially coiled.
For questions or remarks you can visit our FAQ list at www.easyheat.nl
Installatieinstructie
elektrische vloerverwarming
Inbouwdoos met
vloerverwarmingthermostaat
PVC buis voor aansluitsnoer
van de verwarmingskabel
Aansluitspanning 230 VAC
PVC buis voor
temperatuursensor
Tegellijm
Kabeleinde
Egaline of
cement gietvloer
Easy Heat
Leest u deze instructie zorgvuldig voor u met het installeren begint.
Tabel:
onderlinge afstand verwarmingskabel - te verwarmen oppervlakte
Table:
distance between heating coils - surface area to be heated
3 cm
6 cm
250 w/m2
9 cm
165 w/m2
12 cm
125 w/m2
Warm Tiles 2
1.1 m2
1.7 m2
2.2 m2
Warm Tiles 4
2.2 m2
3.3 m2
4.4 m2
Warm Tiles 7
3.7 m2
5.5 m2
7.4 m2
Warm Tiles 9
4.4 m2
6.6 m2
8.8 m2
Warm Tiles 13
6.4 m2
9.6 m2
12.8 m2
Warm Tiles 18
8.8 m2
13.2 m2
17.6 m2
Warm Tiles 28
13.8 m2
19.8 m2
26.4 m2
2
NL
Installatiehandleiding
Warm Tiles elektrische
vloerverwarming
Voor u begint met het installeren van
het Warm Tiles elektrisch vloerverwarmingssyteem dient u deze
installatiehandleiding eerst helemaal
door te lezen.
Garantieverklaring
Easy Heat Europe bv garandeert de
Easy Heat Warm Tiles verwarmingskabels voor een periode van tien jaar
op fabricage- en constructiefouten
indien deze geïnstalleerd zijn volgens
de bijgeleverde voorschriften.
De totale installatie dient altijd te
voldoen aan de lokaal geldende
installatienormen en geïnstalleerd te
worden door een bevoegde installateur.
Voor u begint met installeren dient u
te controleren of de verwarmingskabel geschikt is voor het te
verwarmen oppervlak. Eerst bepaalt
u de netto oppervlakte van uw
ruimte; dit is de oppervlakte waar u
wilt verwarmen, dus bv. niet onder
de douche, onder de keukenkastjes
enz.Vervolgens leest u op bijgaande
tabel de onderlinge afstand.
Algemene aandachtspunten
Easy Heat Warm Tiles is ontwikkeld
als een elektrisch comfort
vloerverwarmingssysteem. In veel
gevallen is het noodzakelijk dat er
nog andere verwarmingsbronnen in
de te verwarmen ruimte aanwezig
zijn. Informeer bij uw installateur.
De afstand kan variëren van 6 tot
12 centimeter. Hoe kleiner de
afstand (minimaal 6 cm) hoe sneller
uw vloer warm wordt. Een grote
onderlinge afstand tussen de
verwarmingskabels (groter dan
12 cm) in combinatie met een lage
opbouwhoogte verhoogt de kans op
koude en warme plaatsen van de
vloer.
Easy Heat adviseert het gebruik van
Master Builders-PCI (Oosterhout)
bouwstoffen voor het egaliseren van
de vloer en het lijmen van de vloertegels.
Technisch vergelijkbare materialen
(bijvoorbeeld Eurocol, Schönox)
mogen ook worden toegepast.
Informeer bij uw bouwstoffen
leverancier.
3
1): sleuf hakken in de vloer t.b.v. PVC buizen.
Om een zo laag mogelijke opbouwhoogte te
realiseren kunt u op plaatsen waar de PVC
buizen voor de vloersensor en de aansluitkabel komen te liggen een sleuf hakken van
ca. 1 cm diep.
2): gronden van de ondervloer
Om een goede hechting te krijgen tussen de
cementgebonden ondervloer en de
eventueel toe te passen egaline dient u de
ondergrond voor te behandelen met
Gisogrond. Gisogrond verhindert tevens
luchtbelvorming en te snel onttrekken van
water bij egaliseren met Periplan.Volg de
verwerkingsinstructies van de fabrikant.
3): aanbrengen montagestrip
De Easy Heat montagestrip dient in banen op
de ondervloer aangebracht te worden.
De afstand tussen de strips en de muur
bedraagt circa 20 cm, de onderlinge afstand
tussen de strips bedraagt 40 tot 50 cm.
Bevestig de strip met spijkers of schroeven.
Tevens dienen de wanden vrijgehouden te
worden m.b.v. randstrookisolatie.
Met behulp van randstrookisolatie kan de
verwarmde vloer indien nodig uitzetten.
4
4): aanbrengen verwarmingskabel
De verwarmingskabel wordt in een zig zag
patroon op de strips aangebracht.
De onderlinge afstand tussen de kabels kunt
u aflezen in de tabel op pagina 2. U begint op
de plaats waar de PVC buis van de
verwarmingskabel uit de muur komt. Aan het
einde van de kabel stopt u met leggen, u
hoeft met het einde van de verwarmingskabel niet terug naar het aansluitpunt.
De vloersensor van de thermostaat wordt
tussen de verwarmingskabels in een PVC
buis gelegd. De afstand van de muur tot de
sensor bedraagt minimaal 50 cm (zie foto).
Let op: het uiteinde van de PVC buis
afdichten m.b.v. tape zodat de voeler niet in
aanraking komt met de egaline of cement
gietvloeren.
5): controle kabel
Op plaatsen waar later in de vloer geboord
wordt (bijvoorbeeld voor de montage van
een toilet) geen verwarmingskabel leggen !
Om oververhitting te voorkomen mag de
verwarmingskabel niet gekruist of ingekort
worden, tevens mag de verwarmingskabel
zichzelf niet raken. Indien u na montage
kabel overhoudt, dient u de onderlinge
afstand tussen de verwarmingskabels te
verkleinen (minimaal 6 cm). U kunt de
werking van de kabel nu testen door deze
direct aan te sluiten op de netspanning (230
VAC). Na enige minuten voelt u de kabel
warm worden. Let op, de kabel dient
helemaal uitgerold te zijn.
6): egaline of cement gietvloer aanbrengen
De vloer wordt geëgaliseerd met een zelf
nivellerende vloeregaline of een cement
gietvloer welke geschikt is voor (elektrische)
vloerverwarming.
De laagdikte is minimaal 6 mm.Volg de
verwerkingsinstructies van de fabrikant.
5
7): betegelen
Na het uitharden van de egaline of cement
gietvloer kunt u de vloer betegelen met een
voor vloerverwarming geschikte tegellijm en
afvoegen (Tegellijm Flex / Polyflot en
voegmortel Flex van Master Builders -PCI).
Volg de verwerkingsinstructies van de
fabrikant.
8): elektra montage
De elektrische installatie dient altijd te
voldoen aan de lokaal geldende
installatienormen en geïnstalleerd te worden
door een bevoegde installateur.
Indien blijkt dat de installatie niet voldoet
aan de lokaal geldende normen vervalt de
garantie.
Easy Control F10C
Easy Control F16C
9): aansluiting thermostaat
Sluit de verwarmingskabel(s), vloersensor en
voedingsdraden aan op de thermostaat zoals
aangegeven op het aansluitschema van de
thermostaat.
Volg verder de installatiehandleiding van de
Easy Heat thermostaat.
10): thermostaat
Voor vloerverwarmingsystemen met een
vermogen groter dan 2300 watt (10A) dient u
de Easy Control F16C te gebruiken.
6
GB
Warm Tiles electric floor
heating installation manual
Before you start installing the electric
floor heating, you should first read
through this manual completely.
Guarantee declaration
Provided the cables are installed in
accordance with the supplied
instructions, Easy Heat Europe BV
guarantees the Easy Heat Warm Tiles
heating cables for a period of ten years
against manufacturing and construction
defects. The total installation must
comply with locally applicable
standards and be carried out by a
recognized installer.
Before you start installing, you
should make sure that the heating
cable is suitable for the surface to be
heated. Firstly, you have to estimate
the surface area of the room; this is
the area you want heated and does
not include, for example, the space
under the shower, under kitchen
cupboards etc. Secondly, you have to
estimate the distance between the
coils in the cable. To do this, look up
the distance in the table on page 2.
General points of attention
Easy Heat Warm Tiles is designed to
function as comfort electric floor
heating. It will usually be necessary
to have an additional heating source
in the room you want to heat. Ask
your installer for more information.
Easy Heat recommends the use of
Master Builders-PCI building
materials for levelling the floor and
laying (floor) tiles. Technically
comparable materials (for example
Eurocol, Schönex) may also be used.
Ask your building materials supplier
for more details.
The distance can vary from 6 to 12
centimetres. The smaller the
distance (minimum 6 cm) the faster
your floor will heat up. A large
distance between the coils (larger
than 12 cm) combined with a low
floor height increases the chance of
cold and warm spots in the floor.
7
1): Cutting a groove in the floor for PVC
pipes.
To keep the floor height as low as possible,
you can cut out a groove of approximately
1 cm deep in the places where the PVC pipes
for the floor sensor and the connection cable
have to be laid.
2): Priming the subfloor
The cement subfloor needs to be primed
with a suitable primer so it will bond
properly with the screed. This primer also
helps prevent the forming of air bubbles and
water being extracted too quickly when
levelling with the self-levelling floor screed.
Follow the manufacturer’s instructions.
3): Placing the mounting strip
The Easy Heat mounting strips should be laid
in grooves cut into the subfloor. The distance
between the strips and the wall should be
20 cm. The distance between the mounting
strips is 40 to 50 cm. Nail or screw the strip
into position. The sides should be kept free
with the lipping insulation.
8
4): Placing the heating cable
The heating cable should be laid on the
mounting strips in a zigzag pattern.You can
look up the correct distance between the
coils in the cable using the table on page 2.
You should start laying the cable where the
PVC pipe comes out of the wall. At the end of
the cable, you simply stop, you do not have to
return the end to the connection point (the
PVC pipe).
The floor sensor of the thermostat is placed
in a PVC tube between the heating cables.
The distance from the wall to the sensor is a
minimum of 50 cm (see photograph).
N.B. Be sure to seal off the open end of the
PVC tube with tape so that the sensor does
not come into contact with the self-levelling
floor screed.
5): Check cable
Do not lay the heating cable in places where
the floor will subsequently have to be drilled
(for example when placing a toilet)!
The heating cable may not cross over itself or
be shortened. If you have any cable over, you
should reduce the distance between the coils
(minimum 6 cm).You can test the cable to
make sure it works properly by connecting it
directly to the main electricity (230 VAC).
After a few minutes, the cable should feel
warm to touch. Take care! The cable has to be
completely laid before you do this.
6): Levelling
The cable must be covered by a cementitious
material such as a self-levelling floor screed.
The screed has to have a minimum thickness
of 6 mm. Follow the manufacturer’s
instructions for levelling the floor.
9
8): Electrical wiring
The electrical installation must always
comply with locally applicable standards and
be carried out by a recognized installer.
In case the installation is not installed
properly by local standards there is no
guarantee.
7): Tiling
After the screed has hardened, you can tile
the floor using tile adhesive and jointing
mortar suitable for floor heating. Follow the
manufacturer’s instructions.
Easy Control F10C
Easy Control F16C
9): Connecting the thermostat
Connect the cable(s), floor sensor and wiring
to the thermostat as shown in the wiring
diagram of the control. Follow instructions in
the Easy Heat thermostat installation manual.
10): Self-learning thermostat
For floor heating systems with a power over
2300 watts (10A), you need to use the Easy
Control F16C.
10
Aantekeningen / Notes:
11
U.S.A.:
Easy Heat
31977 US 20 East
NEW CARLISLE, IN 46552
Tel +1 219 654 3144
Fax +1 219 654 7739
Canada:
Easy Heat Ltd
440 Phillip St.
WATERLOO, Ont. N2L 5R9
Tel +1 519 885 2850
Fax +1 519 885 5460
The Netherlands:
Nelson Easy Heat Europe
Sluisweg 19a
5145 PE Waalwijk
The Netherlands
Tel +31 (0)416 543 301
Fax +31 (0)416 543 339
www.easyheat.nl
08.2001
http://www.easyheat.nl
12