1
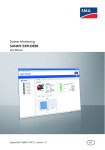
CPM User Manual (draft)
Complete Project Monitoring version 2006-09
Manual revision September 10, 2006
Written by Bas van der Doorn
Table of Contents
Introduction
2
General usage
Logging into CPM
Setting user preferences
Using the project overview
2
3
4
Project Managers and project options
Creating a new project
6
6
Teachers and assistants (important notice, please read!)
Project management page
Managing project instructors
Adding, grouping and otherwise managing students
Managing global workunits applying to all students
Grading students
8
8
9
10
13
15
Students
Signing up for a project
Handing in work, checking results
Emailing the teacher
17
18
19
Advanced functionality (coming soon)
Reporting persistent problems and bugs at the bug page
Tailoring global workunits to individual requirements
Reusing existing project structure for a new project
Introduction
CPM (Complete Project Monitoring) is a website (https://cpm.ewi.tudelft.nl/) that
supports projects and lab courses. From here on, lab course and project are used
interchangeably. It does this by allowing both the participating students and their
instructors to view the current progress of the project. This takes away misunderstandings
about whether or not something has been approved and takes away paperwork. CPM also
provides a way to keep documents created by students together with a review and
feedback of an instructor. Furthermore, the system allows for students and instructors to
email one another. Instructors will be happy to download a grade sheet that can be read
into Microsoft Excel or OpenOffice Calc at the push of a button, while having the
opportunity to insert a list of students and automatically grouping them just as easy.
CPM was created from scratch, but several great concepts were taken from older systems.
Most notably RAP (Rapid Assistance to Projects), which introduced the project overview
screen, allowing users to very quickly see the current status of their group(s) and
assignment(s). The authors of CPM, Wendy Clerx and Bas van der Doorn, would like to
thank Ruben Stranders, Edwin de Gier and Jonathan Joubert for their ideas and input
when we first started to build CPM in 2005. The manual now in front of you describes an
overhauled CPM system, much better equipped to handle lab courses, offering some
novel project features as well.
General usage
Logging into CPM
When first contacting CPM at https://cpm.ewi.tudelft.nl/, you will be shown the welcome
page. You can log in here by using your NetID account, which is the same name and
password you use to login to blackboard. The welcome screen is shown on the next page.
After you login to CPM, you will see a list of projects you have access to. Project
managers will see all projects that exist in CPM, students and instructors will see only
those projects they have access to. A typical instructor and student project description
line from the project list are shown below. As you can see, they share the overview
button, but the students only other option is emailing the teacher, while the instructors
can configure project options, manage the project or remove it. They would need to have
been granted permission to do all that, currently only few people can actually remove
projects.
instructor
student
2
welcome screen
Setting user preferences
If you click the button 'User preferences' at the top of the project list, you can choose to
enable the reception of notifications by email, whether the notifications should be
bundled in a daily summary and how many members CPM is allowed to show in an
overview screen before showing a warning. You will never receive email from CPM
unless somebody uses it to send you an email or you have both turned on notifications in
your user preferences and have set a notification on some project, member or workunit.
Daily summaries will only be sent if they are non-empty, further minimizing the email
you receive from CPM.
Note that if you set your maximum overview members to unlimited every time you view
the project overview a very large amount of time could be taken to produce this for a very
large project (at busy hours, that is), costing you more time waiting and scrolling than it
would have taken to search for a specific member and generating a small overview with
only the search results. The choice is yours, but unlimited is certainly not always
beneficial. 50 members seems a reasonable default, as there is already some scrolling
involved but it will still load in under a second even with quite a few workunits, given
that the server is not under heavy load. Suggestions concerning new or existing user
preferences are most welcome.
3
Using the project overview
The first button shown in the project list for either a student or instructor is titled
'Overview'. When clicked, it will bring up the project overview, the central screen where
instructors will probably make regular visits. The project overview is shown as a table,
with every item to be handed in as a row, and every participant as a column. Options to
switch rows and columns, as well as showing only groups instead of individual members
are coming soon, but not ready for release just yet.
In the example below one group containing 2 students is the entire project. The project
also consists of only one phase and 4 assignments that are to be handed in. This is not
very useful in practice, but corresponds to the way students view a project, as they can
only see themselves (and their own group). Instructors would normally see many more
groups, possibly even so many that the overview is hidden by default. You can always
search for students using one of the naming modes (show/search students by NetID,
student number or full name), reducing the overview size. These and other options are
accessed using the project overview control bar shown below (not for students).
4
project overview
The group name, student NetIDs and work to be handed in can be clicked on to show
further details, or allow document upload and reviewing. Note that 'Deliverable 3' is a
group assignment and thus spans the columns of all students in the group. The other
assignments are individual ones in this case. Also note that 'wclerx' has handed in
'Deliverable 1', denoted by the '?' on the blue background. As NetIDs can become very
large (over 20 characters long), only about 7 characters are shown, so more students can
fit on one page. The NetID of the second student is 'bvanderdoorn' for example, while
only 'bvander' is shown. If you keep your mouse still over the text 'bvander' a small info
box will show the full name (you need not click for it to show). When clicking on the
student name or on assignments the full NetID will be shown on the next page as well. If
you keep the mouse still over an assignment, it will show the deadline (if any) in a similar
small info box. The small info box is shown in the picture directly below.
The overview screen provides quick access to key functionality of CPM, for instructors it
might be worthwhile to take some time to click on every clickable item type so you can
save time by using these shortcuts instead of taking the long way.
You should be on your way being able to log into CPM and viewing a project by now.
Good luck and have fun using CPM. Should any problem arise, please contact the
administrator listed on the welcome page or preferably report your problem on the bug
page (which sends an email for you as well as notify other users that a problem exists,
eliminating duplicate reports).
This concludes the general section of the manual. The rest of the manual is split up in
sections so you only need to read information relevant to yourself. Skip ahead to what is
interesting, or do like most users do: learn to use CPM by trial and error.
5
Project managers and project options
When you log into CPM as a project manager, below the list of current projects is located
a form to create new ones. This form is shown below. The project options form you get
when you click 'Options' in the project list is very similar (instructors can access that).
If you are an instructor, please skip ahead beyond this paragraph. If you want to create a
project very quickly, just type in a valid course code (which will be checked against a list
of known courses) and click on the 'Create' button. This will result in the creation of a
project only Project managers and Administrators can access. It is always recommended
to fill in the second box, so a teacher or assistant can further setup the project. Also, CPM
requires uniqueness of the following combination: course code + start year + start month.
If you would enter 01 09 2010 today as start date, people would probably run into trouble
four years from now. Apart from this, the start date and end date are for administrative
purposes only, the default time span of a project is a full year.
Other options that can be set are explained in order below.
•
Grading system, if the course uses grades, either average (a 10 and 8 for two
assignments/phases in the project result in a 9 as end result) or sum (6 and 2
points for two assignments/phases in the project result in an 8). When
assignments are subdivided into phases, similar settings can be configured per
phase.
6
•
•
•
•
•
•
•
•
Number of decimals that will be shown for grades in the overview, by default
whole marks are shown rounded, set to 1 for CPM to show a decimal mark.
A student, group and assignment will always have their grades shown. If you
subdivide assignments into phases, you can activate this option to also shown
grades for each phase.
Normally students can hand in any assignment they choose. When you want to
force students to hand in their work in a strict order, activate this option. This will
only work when documents are uploaded by students, instructors can still review
assignments out of order.
User IP and time restrictions will be added to the system soon. On the project
options page each NetID can be restricted to several IP addresses and or times.
Enabling this option will result in a performance loss due to the additional checks.
If you want to know about every action taken in the project, it is possible to
activate logging of successful and/or failing actions. At the moment only the
administrator can view these logs on demand. If there is sufficient user demand, a
page will be created where the logs can be viewed by instructors. Like the IP and
time restrictions, activating logging will result in a performance loss.
The next option has been added so students can enroll themselves in a project
(just like on blackboard). CPM allows students to sign up in groups, unlike TAS
or Blackboard. Set at 1 for individual sign ups, 2 for groups of at most two and 5
for groups of at most 5. Feedback on this function would be much appreciated by
the administrator, as it is brand new.
If you have different versions of your assignments and would like students to
have the same version throughout the course, type in the number of different
versions here. These versions will then be randomly assigned over the students.
This feature is still highly experimental at the moment of writing, so it might be
best to first consult with an administrator of CPM before using it.
Finally it is possible to choose how you would like the overview to be shown by
default. For projects most users prefer to see the project members at the top and
workunits in rows. Most lab courses however favor displaying each member as a
row and the workunits at the top. The default can always be overridden by
instructors through the project overview control bar. Students always get the
project view, as they only have a limited amount of information to display
anyway.
After choosing the correct options and filling in the form, click on 'Create' to have a
project created. The page will refresh and the new project will be shown in the project
list. You can change all options selected above by clicking on 'Options' in the project list.
A last note on creating projects and setting options: the display name of a project is
automatically retrieved based on the course code you enter. If for some reason it does not
fit your needs only an administrator can manually change it. Feel free to contact an
administrator with a properly motivated request, e.g. current display name is too long, or
you want multiple projects for one course with a different name postfix.
7
Teachers and instructors
This section is written to explain common tasks to teachers or their assistants. The
creators of CPM would like to point out that in their view, all are equally important for
the safety and privacy CPM offers.
Never leave your computer unattended when logged into CPM, students might seize the
opportunity to change their grades or download work of other students who have already
completed an assignment. Also, students cannot see individual assignments of group
members; imagine an assignment created to hold 'peer reviews'. A student could then use
your unattended computer to view how others have rated him or her, violating the other
students' privacy. Students could even add themselves as instructor to do such things later
(of course this could be logged or noticed, but still).
Do not view CPM to be similar as or even less important than Blackboard. CPM allows
you to sign off and grade students, until recently such responsibility was reserved for
very few people, much less than are using CPM nowadays. With great power comes great
responsibility, please realize that.
Project management page
From the project list you can click to go to the project options, the project overview, or to
manage the project. When you click 'Manage', you will go to the page shown below.
On this page you can manage all aspects of the project, except for project options. If a
shortcut to options is desired an administrator can easily add that of course. We will start
by discussing the instructors, after that the members and finally the workunits. The other
8
buttons are assumed to be self-explanatory. Do note that downloading a zipfile with all
work of the project is not yet operational. If you have questions regarding them or would
like the manual to include an explanation, please contact an administrator.
Managing project instructors
CPM treats teachers and assistants in a very similar way. They are both added to a project
as instructors, only permissions may vary. There are several default roles to choose from,
but before we come to all that, click on 'Manage instructors and their privileges' on the
project management page. You will see a page that looks like the one below.
It is possible to add an instructor by using the form shown at the bottom. You can also
modify the permissions of existing instructors in the project who are listed at the top. To
do this simply select the permissions or new role you would like the instructor to have
and click on 'Update'. You can remove instructors from the project here as well. You can
also click on 'Members' to assign specific permissions for an instructor with respect to
project members (who are discussed next). This last button is not yet operational in the
new version of CPM, but will be soon. For now you can manage these permissions by
first navigating to a member and assigning permissions there.
All instructors must have a role in the project. At the moment these roles have no real
effect in the system, but this could change in the future. As a general guideline, the
person responsible for a course should be added as Teacher, while assistants should have
one of the other roles, possibly with full permissions however. Once again, for now a
'Limited assistant' and 'Teacher' with equal permissions can do exactly the same things.
Two permissions that deserve special mentioning here are 'view all members' and 'review
all members'. The first means an instructor will be able to view all members in the
project, download their work and view their instructor notes. The second means an
instructor has the permission to review (sign-off or grade) the work of any member in the
project. Although the 'review all' permission is worth little without the 'show all'
permission, it is important not to mix up the two.
9
Adding, grouping and otherwise managing students
The topmost button of the project management options is 'Manage project members,
grouping and their properties'. If you click on this button you will see the page shown
below in several parts. First of all the current top level members of the project.
Shown here are only two groups, a typical project would have many, or vast numbers of
individual students instead. If you click 'Details', you will switch to another view of
members with more options. These are deliberately hidden for the root members, as they
should not be accidentally modified. Removing will remove the member, any sub
members and all work performed by them. For security reasons their work is left on the
file system (and on backups, of course). It goes without saying one should be totally
aware of what he is doing when clicking this button and approving the operation.
Next are the possibilities for adding students. They are not only shown on this page, but
also on detail pages of members. If you add students or groups on this page, they will be
added to the project root. If you add them on a member details page, they will be added
as children of the member shown. Note that you cannot group students once they are in
the project currently, on request this can be added in the future.
The options for adding groups or students are quite limited; you just add them without
specifying any options. Auto numbers for groups will create group names like 'Group 1',
'Group 2', etc… If you do not intend to call your groups anything specific, it is suggested
you leave auto numbering activated for all groups you create, guaranteeing project wide
unique group names. Adding 300 students using the forms above is a real pain, therefore
CPM also features the possibility to add a list of students. You can even have groups
created automatically based on the list, using auto numbering. The input box is usually
larger than shown in the picture, but this would take up too much space in the manual.
10
A final option which can be quite useful is choosing whether to add the students in the
order listed, or randomized. The random implementation used by CPM is not superb
(comes from a standard programming library), but if more than a few students are added
it will do the job nicely. Note that randomizing the addition of non-grouped students is
also possible, although not very useful. A final note: if you set a group size of 1, each
student will be contained in his own group.
When you click on the details button for any root project member, you will go to another
page offering more options for that member. Remember you can also add sub members
on that page. You can also set an instructor note for the member, which only instructors
can read. If you want to write down something important and private concerning a
member, this is the place (e.g. 'late start due to illness' or 'completed all but the last
assignment already last year'). Finaly, you can choose to download that members' work in
a zip archive (not yet operational), send an email to that member (all students contained
therein), receive an email when the status of any workunit assigned to the member
changes (or stop these emails), or manage the workunits of that specific member (only do
that when you know what you are doing).
11
As you can see above, instructor notes can be quite long. The text counter indication of
how many characters are left is approximate, as all text you type will be converted to
HTML (e.g. & becomes &). This sometimes results in a decrease of the counter after
you click 'Change note'. As 25000 characters is about 4 full pages A4 in a 10 font type,
you should not run into this limit in practice.
A final subject to manage regarding members is the instructors that have explicit
permissions on a member, these permissions are shown at the bottom of the page. The
general project wide instructor permissions might not be specific enough for some the
needs of some courses. Also, groups you do not have access to will not appear in the
overview. This means that if you have 100 groups of 5 students and 10 assistants,
assigning each assistant 10 groups by using member permissions will reduce his
overview size from 500 students to 50. The latter is quite scrollable, while the first is not
practical at all. This also eliminates risks of assistants accidentally grading each others'
students, or possibly giving students conflicting advice in their reviews.
12
Managing global workunits applying to all students
After you have set up members (or before, the order does not matter really), you will
want to specify what work has to be handed in by students. This work specification can
be layered, just like members can be nested (into groups), workunits can be nested as
well (into phases). You could assign workunits individually to each member, possibly
tailoring the number of workunits per member. This is discussed in the advanced part of
the manual. For the moment we assume all members in a project have to do the same
assignments and we will thus assign the workunits globally to save time. You could
customize these globally assigned workunits later for specific students or groups if you
would like to do so, but for the moment don't worry about that yet.
Below the fist part of the page is shown which you will see when you click on 'Manage
global workunits (apply to all students and groups)' on the project management page.
For this project, one phase containing two other workunits and another workunit outside a
phase have been defined. As you can see you can change the display order (order in
which the workunits appear in the overview), name and deadline (only for workunits
without children) by clicking 'Update' after making changes. Even more settings can be
adjusted when clicking 'Options', which will be fully discussed a bit further down when
adding workunits is discussed. When clicking on 'Details' a similar page to the current
one will open, displaying the chosen workunit and its children, along with an instructor
note box, just like those for members. If you click on 'Remove', you will remove the
workunit and all of its children for the entire project and all its members. Any existing
reviews and documents bound to these workunits will be removed as well, leaving only
the documents behind on the filesystem for safety. Be fully aware of the consequences
this action has and always check the overview if nothing was handed in right before you
press this button and confirm the action!
Further below you find the form to add a new workunit to the project. The workunit will
be added as a child of the workunit that is currently being displayed. So if we would like
to add another workunit to 'Phase 1' in the example above, we would first need to click on
'Details' next to 'Phase 1' before filling in the form. To prevent mistakes, the text above
the form will let you know which place the new workunit will have. The form is
displayed on the next page, where all options will be discussed as well.
13
As you can see workunits have quite a few options to be set. First of all a name must be
chosen, which will be shown in the project overview. Do not use long names, as these
will not fit into the overview layout nicely and cause multiple lines to be used for one
name, reducing the useful display area. Common names like 'Analysis', 'Design',
'Implementation', 'Tests' or 'Assignment 1' will not be a problem however. Make sure
students and assistants can relate to these names, or nobody will know where to sign
something off. Although empty names are possible, these are about the worst possible
choice for almost any situation.
A grading system works just like the one you choose in project options, but applies to the
workunits contained within the workunit you set the option for. If this is set to 'Average'
for 'Phase 1' for example, the grades of 'Deliverable 1' and 'Deliverable 2' are added
together and divided by 2 giving the grade for 'Phase 1'. If you are not going to add any
workunits to the workunit you are adding now, just ignore the setting.
The display order can be chosen here, meaning that you are not forced to add a workunit
to the end of a project or phase, before moving it back up. You can only choose values
within the current workunit scope however, e.g. within 'Phase 1' you cannot add a
workunit that would have a displayOrder lower than that of 'Phase 1', or higher than that
of 'Phase 2', if any.
The grade weight determines the relative weight of a workunit compared to others within
the same scope. If you have two workunits in a project or phase, with weight 2 and 1
respectively, then CPM calculates the aggregate grade as 2*the first + 1*the second in
case of an average grading system. Does not affect childless workunits.
The group assignment level determines whether individual members, groups, or super
groups (groups of groups) hand in an assignment. Typical projects have group
assignments, with the exception of a possible peer review or personalized final report.
Typical lab courses have only assignments for individual students, or assignments for
small student groups.
The maximum grade is simply that, the maximum grade that can be awarded for a
workunit. Does not affect workunits containing other workunits.
14
Deadlines will not prevent students from handing in their work or assistants giving
reviews. A missed deadline will be marked in the overview by a special 'L'. Does not
affect workunits containing other workunits.
Version count and Version are the last properties to set. If you set one, you should not set
the other or unexpected behavior will result. If you set a version for an assignment,
everybody gets assigned the same version, making it a poor choice for a global workunit.
If you set Version count however, each student will get assigned one version out of
1…Version count by random. Changing this value will reassign the versions, so students
might have a different version than before.
Once you have chosen the options you would like, click 'Add workunit' to add the
workunit to the current scope. If you wish to add child workunits, click on the 'Details'
button next to the workunit in the list and add the children.
A final thing you can do is set notifications on workunits, meaning you will get a
notification e-mail (or daily summary) when the status of the workunit, a child workunit,
or a member instantiation of the global workunit changes. For instance, in a lab course
that is past the final deadline already you could activate this to see if any changes occur,
eliminating the need to check CPM regularly if some students have been granted extra
time. More on this is found in the user preference section.
Grading students
When you click on a workunit for a student in the project overview, you will get the
possibility to add a review for that members workunit. Students can upload documents to
CPM, for instance a text report, a zipfile with their programming code or models, any file
goes really. You will see the workunit status change in the overview (and possibly be
notified by email that it did) automatically when work is handed in. You will see a list of
uploaded documents, or a prompt that no documents have been uploaded yet.
After downloading and inspecting any documents if needed, write your feedback, set the
new status, type in the optional grade and if you are adding multiple reviews on different
aspects of an assignment, type a name as well (is anybody using this, or see a use for this
feature?). Only one review grade can be in effect at the moment though (despite possibly
different review names), this will always be the last grade entered by the user for any
review. Selecting a document to review will help you if students hand in an improved
version later, so you will know exactly which version it was you graded. Once handed in,
documents cannot be altered or removed by students or instructors. This is done so that it
will always be clear what a student has produced for a given course.
15
16
Students
As a student you will only see a very small portion of CPM, yet you are among the
largest group of its users. The creators of CPM take the student functionality very
seriously and hope you will share any good ideas about improving the system you may
have. CPM will allow you to view your current status in any project you have (been)
signed up for. You can do this from any location, just like Blackboard. You also login to
CPM with the same account as Blackboard. If a project requires you to do so, you can
hand in your work by uploading files to the system. Any file type is accepted by CPM,
but make sure that the instructor you are submitting it to can also handle it. If you are not
supposed to upload your work to CPM, instructors will probably sign-off or grade your
assignments based on real life meetings or email. In any case, you can still view your
current status. Unlike Blackboard, CPM will allow you to view your progress during a
course, not only after.
Signing up for a project
If the instructor of a project has activated the sign up system of CPM for his course, you
can choose to sign yourself up. If the course requires so, you can also sign up in groups
with your fellow students. To sign up first click the 'Sign up' button next to the course
you want to join in the project list (if the course is missing signups are disabled, if you
see other buttons you are already signed up).
If any groups to join exist at the moment, you can select one and then click on 'Join
group'. If no groups are listed or you want to start a group of your own, click 'New
group'. Whatever you choose to do, please try to fill up existing groups as much as
possible, because as an instructor you want to see 20 groups with about 5 member (if 5 is
the desired group size, might be 2 in other cases), not 100 groups of just 1 member. After
clicking either button, you will be added to the project automatically and the project list
will now show you the 'Overview' and 'Email teacher' buttons like shown in the general
section of this manual.
17
Handing in work, checking results
Viewing your results can be done in the project overview itself (discussed in the general
section). You can click on a workunit to see details like the feedback given by the
instructor, or to submit your work to CPM. When you do so, you will see the following
screen.
When reviews are added by an instructor, you will see these at the top of the screen,
along with any feedback and optional grades they have given you. If you need to submit
your work to CPM, click on the 'Browse...' button and navigate to the file you want to
submit to CPM. If you want the instructor to receive a small message along with your
submission, you can type this in the box directly above the 'Upload' button. After typing
your message, if any, click on 'Upload' to submit the file to CPM. Note that files of more
than 10 MB are not allowed (you could upload several smaller files though), if you do
need to send such a file, please contact the course instructor about this issue.
If you would like to be notified when the status of your workunit changes (e.g. an
instructor gives you feedback), click on the button at the bottom of the page to add a
notification, click it again to remove the notification again. This will only have effect
when you have notifications turned on in your user preferences (see the general part of
the manual about this).
18
Emailing the teacher
If you click on 'Email teacher' in the project list, you will see the following screen.
You can choose which instructor to email, or choose to email all instructors for a given
course. If any instructor is assigned specifically to you, these will be listed as such and
should be your first contact about the course. Project wide instructors have permissions to
see and possibly review all students, but will be less aware of your personal situation and
history.
Type the message you would like to send in the box (plain text) and possibly include an
attachment. Any emails sent through CPM will include the email address you set in your
NetID info at https://netid.tudelft.nl/, so make sure this is a valid address, or instructor
replies will not reach you. When you are done typing and attaching, click 'Send'.
The advanced section will come soon
19