1
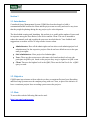
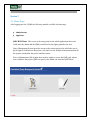
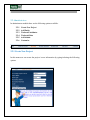
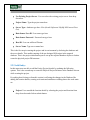
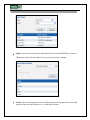
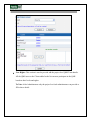
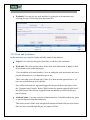
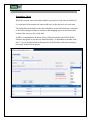
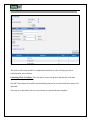
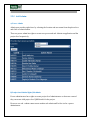
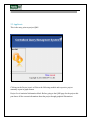
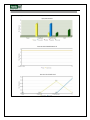
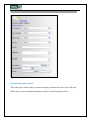
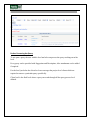
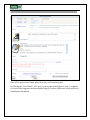
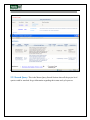
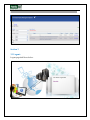
User manual of Genric CQMS Department/Group Release version Status Created By Reviewed By Approved By Work in progress Issued for review/Approved Published Chain Singh/ Sanjay Mahara Archived Sunil Malhotra Sunil Malhotra Table of Contents Section 1 ....................................................................................................................................................... 3 1.1. INTRODUCTION: ................................................................................................................................ 3 1.2. OBJECTIVE: ....................................................................................................................................... 3 1.3. HOST: ................................................................................................................................................. 3 1.4. LOGIN PAGE: ..................................................................................................................................... 4 Section 2 ....................................................................................................................................................... 5 2.1. Home Page: ............................................................................................................................................ 5 2.2 Administrator: ......................................................................................................................................... 6 2.2.1 CREATE NEW PROJECT:................................................................................................................. 6 2.2.2 ADD ENTITY: ................................................................................................................................... 7 2.2.3 WORKUNIT ATTRIBUTS:............................................................................................................... 11 2.2.4 WORKUNIT DATA: ........................................................................................................................ 14 2.2.5 ADD ADMIN: .................................................................................................................................. 17 2.2.6 CUSTOMIZE: .................................................................................................................................. 18 2.3 Applicant:.............................................................................................................................................. 19 Section 3 ..................................................................................................................................................... 21 3.1 Logout: .................................................................................................................................................. 26 Section 1 1.1. Introduction: Centralized Query Management System (CQMS) has been developed to build a communication link between the client and the project team to rectify and resolve any issue that they might be phasing during the any project cycle or development. The idea behind creating and launching this website is to enable online update of issues and its response among the Issue Raiser, Issue Solver and the Client. This site is intended to reduce the manual work and expedite the processes involved therein. Your feedback and suggestions on website will be of help to make it more robust. Administrators: Have all the admin rights and can also set sub-admins(project level administrators) for the respective projects. But do not have default access to the qms until given rights. Sub Administrators: Have project level admin rights Users: These are the various users with some roles based on their levels set who participate in QMS cycle based on the projects they are give rights to in QMS team. Client: These are the highest level in the QMS, These are the final levels for a QMS query to reach. 1.2. Objective: CQMS came into existence with an objective to have a consistent Projects Issue Recording and Resolving System across the company along with our Client, as part of the initiative to have a consistent projects Issue recording system across the projects. 1.3. Host: To access this website following link can be used: http://cms.rmsi.com/gencqms 1.4. Login page: This is the first page through which a user can login and subsequently access the other pages of CQMS website as per the assigned rights. User will use their ADS login id and password to access the site. Depending upon the authorization level, the user will be given access to CQMS website. Section 2 2.1. Home Page: After logging into the CQMS the following module available in home page: Administrator Applicant QMS HUB/Home: This serves as the entry point for the whole application where one could enter the admin and the QMS portal based on the rights granted to the user. Query Management System provides access to the various projects for which the user is given rights to feed/process the project cycle and view the statistical information about all the queries raised under the project and their status. Power Administrators/Sub-Admin does not have rights to access the QMS, only when a user is added to the project QMS user pool by the admin can enter the QMS Portal 2.2 Administrator: In administrator module there are the following options available. 2.2.1 2.2.2 2.2.3 2.2.4 2.2.5 2.2.6 Create New Project Add Entity Workunit Attributes Workunit Data Add Admin Customize 2.2.1 Create New Project: In this menu user can create the project/ server information by typing/selecting the following options. Use Existing Project Server: User can select the existing project server from drop down box. Project Name: Type the project name here. Server Type: database type here. Like (Oracle/ Sqlserver/ MySql/ MS Access/ Post Gre) Data Source User ID: User name type here Data Source Password: Password can type here Host ID: User can add host ID/name. Server Name: Type server name here This is the first step in creating the project and its environment by declaring the database and the server details. This enables running of the pre-designed SQl scripts in the targeted database. This is the project initialization part to set up the required database objects to further create the physical project DB structure. 2.2.2 Add Entity: In this menu user can able to add the Entity (Project) details by updating the following options. This is the second step to create the Physical Project Structure in the Database chosen while creating the project. Everything that is being set from this section is reflecting the changes in the Database like adding the location details, creating work units and attributes or adding data to the work units etc. Project: User can add the location details by selecting the project and location from drop down box and click on submit button. Status: User can view the project status like Raise/ Forward/ Hold/ Reject/ Answer. The project status is always same for every project it does not change. Levels: User can assign the new level of the projects and re-arrange the levels in the sequence that one wants them to be i.e. from top to bottom. User Rights: This section is used to provide add the project level QMS Team details. All the QMS users or the Clients added to the list can now participate in the QMS based on their levels and rights. To Note: After Administrators only the project level sub-administrators can provide or fill in these details Query Type: User can add the query type here by selecting the project. It should be short and duplicate not allowed. Workunit: User can give the work unit here by typing the work unit name and selecting the type of work unit from drop down box. 2.2.3 Work unit Attributes: In this menu user can create the column and table name for the database. Project: User can select the project from here to add the work unit details Work unit: This is the section where all the work units information is added i.e what all work units exists within the project. User can add the work unit from here. Now on adding the work unit details one has to provide information if it’s a dependent type or not. These work units can be deleted only if there is no data inserted against them i.e. we have not reached the next level after this. Once all the work units are registered/logged for the project then is the time to click the “Generate Auto Controls” button. Which creates the general required fields for all the QMS Projects like subjects, suggestion and attachments etc which are always a part of a query. Attribute Name: User can create the column name here. It should not have any space or special character other than underscore. This section creates all the work unit physical structure defined in the previous section. Once we have passed though this part we cannot roll back. So the creator of the work unit should have knowledge of the Project structure very clear and should know how one work unit is dependent and mapped to another and what field describes its behavior. Description Field When first work unit attribute/field is added, one unique key field is also added along with it from a combination of work unit name and “ID” string so that it could be well recognized and it’s the primary key for the work unit by default. The description field can be only one for a work unit and defines the field which is the description column/field of the work unit. If one misses out to set any of the field as description then it could be set from the “Set description If Missing “block. Once set it cannot be set again. When not set for any work unit the user cannot see the work unit data although present in the database as description field would be missing or not set. Dependency Check While the creation some work units could be at parent level and some at child level I.e. some may be the master and some could serve as the process level work units The child tables/work units are the once which have some field which are a reference to the field existing in another work unit so that mapping has to be declared in this section if the case is so for a work unit. AB for A dependent to B means A has a field referenced to one field in B(The Master at this point) so for this one should mark the “ Is dependent to another work unit ? “ box as checked which will open a list of all the other work units existing or previously defined for the project. 2.2.4 Work unit Data: In this menu user can upload and download the work unit data in cvs format by selecting the following options. Project: User can select the project from here. Work unit (Data to be added for): Work unit related data can either be added manually or by uploading the cvs file in the format suggested. To know the format for the cvs one can download the template format from the interface and then upload the data in one go by uploading it via the sheet. Notes: Before uploading the data the user need to specify whether the unique key attributes will be provided from the sheet or the application should automatically update the unique key attributes to the database as each work unit/DB Tables as one unique key which is automatically created while defining the work unit attributes. Select the work unit data which you want to add. Manual Adding: While adding manually the unique key field is also provided along with other data. The information for the work unit will be divided in the following kinds. 1. The Unique ID Field. 2. The description Field. 3. Other Fields 4. The dependent Fields: Which are reference to another work unit field and are rendered in the form of dropdowns and one need to select the item accordingly before adding the details. The total records count and the Last updated maximum key value is always present as notification for user reference. Uploading Work Unit Data : The user has to choose the project and then the work unit against which to upload the data. Provide if the unique ids would be automatically generated or provided with in the sheet to be uploaded. Next step is to upload the data in correct format as represented in the template . 2.2.5 Add Admin: a) Power Admin Admin user provides rights here by selecting the location and user name from drop down box and click on submit button. Thus one power admin has rights to create new power and sub- Admin at application and the project level respectively. b) Project Level Admin Rights/Sub-Admin Power administrators have rights to create project level administrators so that once created they can create /add project level QMS details for the project. However one sub –admin cannot create another sub-admin until he/she is also a power administrator. 2.2.6 Customize: User can customize the project by selecting the following options. This customization reflects changes at project level styling on QMS Pages for setting the project backgrounds and logo. 2.3 Applicant: This is the entry point to project QMS. Clicking on the Project icon it will show the following module and respective project summary report in graph format. Project Level statistical information block: Before going to the QMS page for the project this part shows all the current information about the project though graphical illustrations. 2.3.1 Home: 2.3.2 Query Management System: 2.3.3 Search Query: 2.3.1 Home: This is redirecting the user back to the QMS HUB. 2.3.2 Query Management System: a) Raise Query Section If given rights this block appears to fire a new Query for the project that need to be answered or provided a solution. This is the first level from where the query takes it flight and reaches the next level to be processed or answered. A query can be Raised/Forwarded/Rejected/Hold/Answered at any level except Client and Raiser. At raiser level query can be raised and at client level query can be Held, Rejected or Answered as it’s the final top most level. b) View/Process Query Section This is the part to search a query or process the query based on the access level of the user. Whole query cycle and detailed information could be viewed from this section. Further Processing the Query: To act upon a query the user with his level and role can process the query reaching out at his level. Every query can be provided with Suggestion and Description; Also attachments can be added if required. For the level just below the client level one can target the project level clients which are required to answer a particular query specifically. Client level is the final level where a query can reach through all the query process level defined. Since all the queries have unique query ids so they can be tracked easily. On clicking the “View Details” for a query a pop-up appears that shows a query’s completes cycle and all the suggestion and descriptions logged by various QMS users at their end/levels including the attachments. 2.3.3 Search Query: This is the Master Query Search Section where all the project level queries could be searched for get information regarding their status and cycle process. Section 3 3.1 Logout: Logout page shall be as below: