1
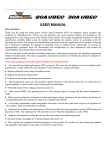
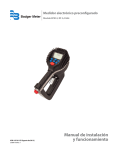
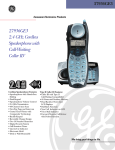
MINI46
User’s Manual
CONTENTS
MINI46
Features���������������������������������������������������������������������������������������� 01
Appearance Introduction���������������������������������������������������������� 02
Accessories Supplied with the Mini-46��������������������������������� 04
Installation of Accessories������������������������������������������������������ 05
Thank you for purchasing LP-Mini 46 ultra compact handhold FM
transceiver manufactured by Wintecronics. Based on the ever-changing
innovative technology, we have been able to develop many different
wireless products that have gained widely consumers’ attention.
Besides our appreciation for your love of our products, we even wish
you to be attentive to new product information. Your precious comment
will be appreciated by us.
Please read through the manual carefully to learn whole features of this
model.
Certificate Approval
Operation Guide�������������������������������������������������������������������������� 09
CE0681
Manu items����������������������������������������������������������������������������������� 10
Applicable model for this manual
Contents Guide��������������������������������������������������������������������������� 11
LP-MINI46
Safety warning
Consumers need to understand clearly about safety in the use of
product Turn off power before fueling or parking at the gas station.
Features
Appearance Introduction
1. Wide frequency coverage that suits application in many
countries.
32 programmable channels and 2 programming keypads
Internal TCXO resonator to enhance freq. stability
Digitally designed to ensure stable quality
Extra-small size in rugged case, compliant with US military
environment test
6. Signal light indicator ON/OFF
7. Independent CTCSS/DCS
8. Narrow band (2.5K)/ Wide band (5K) programmable options
9. 9 steps of VOX (voice-activated feature)
10.Multiple programmable functions, Programmable PRI / SOS /
SCAN channel function
2.
3.
4.
5.
2
1
3
15
10
4
11
13
14
5
12
6
7
1.
2.
3.
4.
5.
6.
7.
8.
1
16
8
9
Antenna (SMA socket)
LED Indicator
Power Switch / Volume Control
External Mic. Jack
Data socket (mini USB)
LCD display
Up button
Set button
9. Down button
10.PTT button (Push to talk)
11...Monitor button
12.Backlight button
13.Speaker
14.Mic
15.Lanyard hole
16.Belt Clip
2
Appearance Introduction
Functions
1. Antenna (SMA socket)
2. LED Indicator
3. Power Switch / Volume
Control
4. External Mic. Jack
Provide attached SMA rubber flex Antenna or other 50Ω
impedance Antenna.
Note
LED Indicator turns on red when transmitting. LED Indicator turns
on green when SQL.
Rotate the power switch / volume control knob clockwise to switch
power ON. When the click sound of switch and the melody is
heard, the transceiver is powered. Adjust volume appropriately.
Note
1. Radio Unit
1PCS
2. SMA rubber flex antenna
1PCS
3. Battery
1PCS
4. Clip
1PCS
5. Rapid Charger
1PCS
6. MINI-46 quick guide
1PCS
Avoid outburst of sound harmful to ears. Rotate the power
switch / volume control knob counterclockwise to switch
power OFF. When the click sound of switch is heard,
transceiver’s power is turned off.
Turn to lowest volume if external Mic./speaker is used, then adjust
appropriately.
Note
5. Data socket (mini USB)
It is harmful to radio if Antenna is not connecting or is
connected wrong one.
Accessories Supplied with the Mini-46
Avoid outburst of sound harmful to ears.
Data socket (mini USB): provide optional accessories and
computer interface.
6. LCD display
It appears transceiver’s situation.
7. Up button
Under menu item, it is a select button. Press temporarily up key
(▲) into scan mode.
8. Set button
Under menu item, press temporarily set key is locked.
9. Down button
Under menu item, it is a select button. Press temporarily down key
(▼) into scan mode.
10.PTT button (Push to talk)
Press PTT button of the transceiver for transmission. Release
PTT button for receiving.
11...Monitor button
Press monitor button to turn off SQL temporary and to receive
weak signal, due to distance.
12.Backlight button
Press backlight button to turn on backlight. (it will turn OFF
automatically after 8 sec. or press the button again to turn off)
13.Speaker
14.Mic
15.Lanyard hole
16.Belt Clip
3
Push up battery latch to release battery back.
4
Installation of Accessories
To Install
Place battery pack into battery compartment, when the click sound of
switch, it will lock into compartment.
To Remove
1. holding radio in one hand, push up battery latch
2. slide battery pack backwards
5
Installation of Accessories
To remove belt clip
Lift belt clip lock tab up, then gently pull the belt clip up.
To install belt clip
Slide the clip up into the slot on the back of radio until the
belt clip latch clicks.
6
Installation of Accessories
Battery charging
1.Green On: Charger is powered by the adapter.
2.Turns Red: Battery is charging.
3.Flash Green Light: Battery is fully charged.
4.Flash Red Light: Battery failed. (2W Radio / Battery)
5.Flash Red & Green Light: Battery failed. (4W Radio / Battery)
Installation of Accessories
Use of external MIC / Speaker
1. Remove accessory jack cover
2. Insert accessory jack
3. Fix accessory with the screws
Note
7
Rotate the Power Switch / Volume knob slowly to avoid
outburst of sound harmful to ears.
8
Operation Guide
The battery needs to be charged fully before using radio. The radio
has a battery voltage icon to show on LCD screen.
1. Power On/Off: Rotate the power switch / volume control knob
clockwise to switch power ON. When the click sound of switch and
the melody is heard, the transceiver is powered on. Note: avoid
outburst of sound harmful to ears. Rotate the Power switch/ volume
control knob counterclockwise to switch power OFF. When the
click sound of switch is heard, transceiver’s power is turned off.
2. Receiving / Transmitting: Rotate the Channel Control knob to the
desired channel. Before press and hold PTT button please check
LED indicator turns on green or not. The LED indicator turns on
red during transmission. Talk to the speaker microphone from
a distance of 10 cm. Release PTT button for the transceiver for
receiving. During receiving, LED indicator turns on green.
3. Adjusting Volume: For the adjustment of volume, rotate the
Power / Volume control knob in clockwise direction to increase
volume. Rotate Power / Volume knob counterclockwise to
decreases volume. Rotate the power switch/volume knob slowly
to avoid outburst of sound harmful to ears. Press monitor button
to turn off SQL temporary. Then, rotate the volume control knob in
clockwise slowly to an appropriate level.
Note
Avoid outburst of sound harmful to ears.
4. Channel Adjustment:
Momentarily press ▲▼ to select channel.
Temporarily press ▲▼ to start scanning of channel.
While receiving signal, release PTT scan mode.
Note
9
Avoid outburst of sound harmful to ears.
Manu items
No.
Items
Contents
Factory
Setting
Note
1
TSQ
Tone Squelch Type
OFF
OFF / T / CTCSS / DCS
2
CTCSS
CTCSS frequency
1(67.0Hz)
1(67.0Hz)~51(254.1Hz)
3
DCS
DCS CODE
023
023~754
TX POWER
TX power
Adjustment
Low
High / Low
5
VOX
Voice-Activate
System
OFF
OFF / Level1~ Level 9
6
Mic. Gain
Mic. Gain
Low
High / Low
7
SAVE MODE
Power Saving
mode
1:1
OFF / 1:1~1:4
8
SQL
RF Squelch
L3
L0~L9
9
SCRAMBLER
Scrambler
OFF
OFF / code1~code9
10
COMPANDOR
Compandor
OFF
ON / OFF
11
APO
Auto-power-off
OFF
OFF / 3min / 10min / 30min
/ 60min
12
TOT
Time-out-Timer
OFF
OFF / 30sec / 60sec /
120sec / 180sec
13
KEY BEEP
Key Beep
ON
ON / OFF
14
PTT BEEP
PTT Beep
OFF
ON / OFF
4
15
ROGERTONE
Roger tone
OFF
ON / OFF
16
Call Tone
Call Tone
Music 1
OFF / Music 1~Music9
17
SEND ID
PTT ID
OFF
ON / OFF
18
DEFAULT
Default
10
Contents Guide
1. TSQ: TSQ selectable, there are four items as below:
(factory setting is OFF)
OFF: Turn off TSQ and LCD screen shows as below:
DCS: Turn on DCS and LCD screen shows as below:
CTCSS: Turn on CTCSS and LCD screen shows as below:
T: Turn on Tone, during transmission. LCD screen shows “T” as below:
LCD screen doesn’t show “T” during receiving.
11
Contents Guide
2. CTCSS: There are 51 codes of CTCSS as below table
(factory setting is 1 (67.0Hz)) setting is 1 (67.0Hz))
1
67.0
11
97.4
21
136.5
31
192.8
41
159.8
2
71.9
12
100.0
22
141.3
32
203.5
42
165.5
3
74.4
13
103.5
23
146.2
33
210.7
43
171.3
4
77.0
14
107.2
24
151.4
34
218.1
44
177.3
5
79.7
15
110.9
25
156.7
35
225.7
45
183.5
6
82.5
16
114.8
26
162.2
36
233.6
46
189.9
7
85.4
17
118.8
27
167.9
37
241.8
47
196.6
8
88.5
18
123.0
28
173.8
38
250.3
48
199.5
9
91.5
19
127.3
29
179.9
39
69.3
49
206.5
10
94.8
20
131.8
30
186.2
40
62.5
50
229.1
51
254.1
12
Contents Guide
Contents Guide
3. DCS: There are 81 codes of DCS as below table.
(Factory setting is 023)
13
4. Tx Power: TX power is selectable to Low or
High (Factory setting is Low)
023
114
071
156
245
365
465
532
627
025
115
072
162
251
371
466
662
631
026
116
073
165
261
411
503
664
754
031
125
074
172
263
412
506
703
032
131
174
315
265
413
516
712
043
132
205
331
271
423
546
723
047
134
223
343
306
431
565
731
051
143
226
346
311
432
606
732
054
152
243
351
445
632
612
734
065
155
244
364
464
654
624
743
LCD Screen shows as below:
5. VOX: Volume / Sensitivity Adjustment (Factory setting is OFF)
Turn on VOX and LCD screen shows “VOX” words as below:
VOX’s sensitivity: VOX’s sensitivity can be selected from1-9
levels. VOX 4 is more sensitive than VOX9. VOX1 is least
sensitive.
14
Contents Guide
6. Mic Gain: Mic. Gain (Factory setting is Low)
Adjust Mic. Gain to transmit a clear volume.
Contents Guide
9. Scrambler: Scrambler (Factory setting is OFF)
The radio sets 9 codes of scrambler to measure a radio signal
securely. It can only be understand by someone who has special
group at the same code. It can’t transmission and receiving without
scrambler code.
7. Save Mode: Power Saving Mode (Factory setting is 1:1)
Turn on power saving mode could extend radio using time,
LCD screen shows “Save” words as below:
Power save mode can be selected 1:1 – 1:4 and off. If
power save mode is 1:4 then saving power is excellent.
8. SQL: SQL Fine ADJ (factory setting is L3)
SQL FINE adjustment, value from L0 (SQL OFF) to L9 as below:
Too low volume might miss users’ attention.
SQL factory setting is L3
SQL Min L0 & SQL Max L9
15
There are 9 codes of scrambler from code 1 to code 9, as below:
10.Compandor: Compandor (Factory setting is OFF)
The radio supports Compandor function. To turn on compandor
are used in radio communication and in some noise reduction
schemes.
Please turn off this function if a radio doesn’t support this function.
Turn on Compandor, LCD screen shows【 】as below:
11.APO: APO (factory setting is OFF)
Choose 03/10/30/60 min. depending on your need. While 03 is
selected, the radio automatically turns power off if none of the
key is operated.
LCD screen shows【APO】as bellows.
16
Contents Guide
12.TOT: Time-out timer (Factory setting is OFF)
Choose 30/60/120/180 depending on your need. Turn off “TOT”,
the radio will be continuous transmission. While turn on “TOT” and
choose 30 sec., push and hold PTT if continuous talk exceeds 20
sec. and radio will send out a beep sound.
At the same time, LCD screen shows “ ” flash, the radio will stop
transmission at time-out.
LCD screen shows【TOT】words as below:
Contents Guide
16.CALL TONE: Factory setting is Music 1
While turn on call tone, temporarily press backlight button to
transmission all member of group.
There are 9 tones are selected.
LCD screen shows as below:
Turn On and select Music 1
13.KEY BEEP: Factory setting is ON
Turn on /off key beep button, LCD screen shows as below:
14.PTT BEEP: PTT melody (Factory setting is OFF)
Turn on PTT Beep, while press PTT button a short beep will be
sent out.
17.SEND ID: PTT ID (Factory setting is OFF)
Turn on PTT ID, while release PTT, it will transmit PTT ID to all
radio automatically. It provides talker’s ID and ID settings need to
execute by software.
LCD screen shows【ID】as below:
While receiving others ID, LCD screen shows as below:
15.ROGERTONE: Roger Tone (Factory setting is OFF)
Roger Tone is selectable to ON/OFF
Beep tone will be heard at the end of the each transmission
17
18
Contents Guide
18.DEFAULT: Return to factory setting
Follow LCD screen instruction and press “YES” to return to
factory setting
19
PK MINI46-E VER.2