1
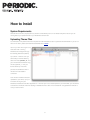
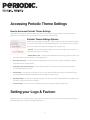
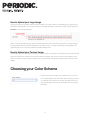
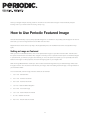
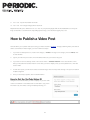
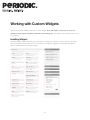
Monday, December 13, 2010
Dear ThemeForest Customer,
Thank you for purchasing our premium WordPress theme, Periodic. We hope that you enjoy using and customizing
Periodic to your needs as much as we have enjoyed designing and developing the theme.
This detailed User Guide will help you with installation, getting started and theme options set up. Please remember to
follow We Are Pixel8 on Twitter or ThemeForest to stay up to date on any and all future releases of Periodic.
Thank you again,
Erik Ford
We Are Pixel8, Inc.
1
Table of Contents
How to Install
3
Accessing Periodic Theme Settings
4
Setting your Logo & Favicon
4
Choosing your Color Scheme
5
Home Page Options 6
Sidebar Settings 8
Periodic Post Settings
8
Utility Navigation Social Settings 10
Footer Settings 10
How to Use Periodic Featured Image
11
How to Publish a Video Post
12
Customizing your Menus 13
Using Shortcodes
14
Working with Custom Widgets 15
Using Periodic Page Templates 16
Optional WordPress Plug Ins 16
jQuery Library & Plug Ins 17
Conclusion
18
2
How to Install
System Requirements
Periodic will not function properly with any versions of WordPress prior to v2.9. Please verify which version you are
running before you upload Periodic to your WordPress environment.
Uploading Theme Files
You will need an FTP (File Transfer Protocol) Client and administrative access to upload and install Periodic. If you do not
have an FTP client, please download the free Mozilla client, Filezilla.
Launch your FTP client, login to the
web server that is running
WordPress and navigate through
the following directories (folders):
wp-content > themes. Once you
are inside your themes directory,
select the folder, periodic_v1, from
your ThemeForest download. Drag
and drop periodic_v1 into your
themes directory. This entire
process should take less than 2
minutes with a broadband
connection.
Once the all of the files have been
uploaded to your server, quit your
FTP client and log into your
WordPress Dashboard and select Appearance > Themes. Upon a successful upload of your theme files, you should see
a screenshot of Periodic under the heading of Available Themes. Click on the Activate link. Congratulations! Periodic is
now your active theme.
3
Accessing Periodic Theme Settings
How to Accesses Periodic Theme Settings
Once Periodic has been successfully installed, you will see the new button, Periodic, added to your Administrative
Options in your left sidebar. Click on this button to access Periodic Theme Settings.
Periodic Theme Settings Options
Periodic Theme Settings are broken into 7 distinct sections to help you customize Periodic
to your taste. Each section has a dedicated Save Button. To access any of the 7 sections,
click on the section title to expand the settings. The 7 sections are:
1.General - You will use the General settings to set your logo image, set your favicon.ico
image and choose your color scheme.
2.Header Banner Ad - You will use the Header Banner Ad setting to paste the path of your
self hosted 468 x 60 banner image or your advertising code.
3.
Home Page Options - You will use the Home Page Options to turn off/on (a) Popular Posts slider, (b) Featured
Posts slider and six Category Blocks.
4.
Utility Navigation Social Settings - You will use this setting to turn on links to your Facebook page, Twitter
account and Feedburner account.
5.
Post Settings - You will use Post Settings to turn off/on the Author Gravatar, Author Box, Post Featured Image,
Post Sharing Module, Related Post Module and your Default Comments Avatar.
6.
Sidebar Settings - You will use the Sidebar Settings to turn off/on the custom Periodic Search Form, Sidebar Tabs
and a lists of posts from the current category.
7.
Footer Settings - You will use the Footer Settings to paste your Google Analytics Tracking code.
Setting your Logo & Favicon
Important Note: Before you upload your logo image, please take a moment to view your site. If the field for your logo image is
left blank, a plain text version will be displayed until you do so.
4
How to Upload your Logo Image
To add your logo (recommended maximum width of 250px) to your site, upload your image file (jpg, png, gif) using the
WordPress media uploader. Once your file has been successfully uploaded, you will need to select, copy and paste the
File URL to your newly uploaded file.
Return to the Periodic Settings page. Click on the General Settings option and paste the full path to your logo image in
its respective field. Click the Save Changes Button and visit your site. Your newly uploaded logo should appear in the
upper left hand corner of your site, just below the Utility Navigation Bar.
How to Upload your Favicon Image
You will follow the exact same steps to upload your favicon.ico file. It is important to remember that your file name should
be favicon,the file format should be .ico and the dimensions should be 16px by 16px. Once you have pasted your full
path to your favicon.ico file, click Save Changes, visit your site, refresh the page (if necessary) and your favicon should
appear.
Choosing your Color Scheme
Periodic comes with six built in color schemes for you to choose
from: Purple (default), Red, Green, Blue, Pink and Orange. Choose
your desired color scheme from the drop down select menu and
click Save Changes. Visit your site and reload to see the changes
take affect.
5
Home Page Options
Important Note: To be able to properly set up your home page options, you must have content published. If you do not have any
content published, please skip this section until you do.
Enabling Popular Posts Slider Module
Periodic comes with a Popular Post Slider that will display 8 of your most popular posts based on comment count. The
output will be a thumbnail image, title and comment count with icon. Your users will be able to toggle this slider off or on.
If you do not wish to use this module, simply leave this option unchecked.
Enabling Features Slider Module
The Features Slider is a great way for you to highlight key posts and articles. The section will dynamically pull your 6 most
recent posts, from the category of your choosing, and display the post’s featured image, title, published date, comment
count (with link) and excerpt. The slider will automatically fade between each of the six posts. There is also a respective
thumbnail navigation.
To have a Features Slider on your site, click on the Enable Featured Posts Slider option and select the category you
would like to display. If you have upgraded Periodic from versions 1 through 1.0.3, and would like to have the
slider continue to pull from the Features category, simply select Features from your drop down menu.
Setting up Home Page
Headline Blocks
Setting up your Home Page Headline Blocks
are self explanatory. You can have a total of 6
different blocks on your home page. Each block
will contain 2 unique columns of 5 posts from
your determined categories. (Note: Each
column is a unique category)
You can have any combination of the 3 types of
Headline Blocks (Lead, Thumbnail, Headline).
Simply enable the block and select a category.
6
7
Sidebar Settings
The Periodic Sidebar Settings allow you to add/remove additional modules to your 3 sidebars (Home, Left, Right). These
settings differ from your available widgets. To learn about the Periodic custom widgets, please skip to that section of this
guide.
Enable Custom Periodic Search Form
Periodic comes with a built in customized search form that is enhanced with a javascript. When a user clicks within the
search input field, the message “Search the <your site name> site” will disappear and the user can type in their
keywords. Upon clicking the search icon, WordPress will initiate the search. You will notice that the user’s keywords
remain in the search field after the search has been completed.
To disable this module, in all sidebars, leave this option unchecked. You are then free to use the built in WordPress
Search Widget or any other search widget of your choice.
Enable Current Category Sidebar List
Once enable, the Current Category Sidebar List will dynamically pull the most recent posts from the category (or
categories) of the post being viewed. You can select how many posts to display by choosing from the select drop down
menu.
Important Note: This module will loop through all of the categories associated with a post and return a list for each of those
categories. This means, if you have a post that resides in 3 categories, this script will return 3 different lists in your sidebar.
Enable Sidebar Tabs
Enable this option if you wish to display the Popular, Recent and Tags Tabs in your sidebars. You can enable this module
for all 3 sidebars or limit the display to any one of the 3. The module will automatically display the 5 most popular posts
(based on comment count), 5 most recent posts (based on published date) and the 20 most used tags.
If you wish to change any of these parameters, you will need to edit the following file, tabs.php, found inside your
includes directory. Some knowledge of PHP will be necessary.
Periodic Post Settings
8
Periodic gives you full control over how your posts will be displayed. Use these settings to turn off/on various post
modules.
Enable Post Featured Image
You can enable a large featured image (610 x 225) that will appear at the top of the post, below the meta information.
(Please see information regarding post featured image later in this guide). Simply leave this unchecked if you do not wish
to display the image.
Post Author Box & Author Gravatar
You can enable a 50 x 50 author Gravatar that will appear below the post title. For this function to work, you must have a
Gravatar account set up with the email address associated with the author of the post. If you do not, you can set
up a free account in seconds. Once your account is established, this module will function as intended.
You may also enable a Post Author Box that will appear at the end of the post. The author box will contain the
biographical information you have entered for the associated author. The author box will also contain a link to the
respective author’s archive page listing all posts written by this author. Simply leave this unchecked if you do not wish to
use this module.
Enable Related Posts Module
Select this option to enable a Related Post Module that will appear at the end of the post. You can manage the title of
this module as well as how many posts the module will return.
Important Note: This module is based on a tag relationship between posts. The module will query all of your posts and tags and
return random matches based on shared tags. Please make sure you have tagged your posts and be weary of tags that are
similar (WordPress and Word Press). The module will treat these as separate tags.
9
Enable Share Post Module
By enabling this option, you will be dividing your post content into two columns. The right column will contain all of your
content, as entered via the WordPress Editor. The left column will contain the list of post sharing scripts. You can
determine which scripts you would like to use by enabling them.
If you do not wish to use this module, leave it unchecked. Your post content will not be divided into two columns if you
are not using this module.
Set your Default Comment Avatar
The exact same way you set your logo and favicon, you can set your own custom 50 x 50 default gravatar. If left blank,
this will default to the avatar setting in your Discussion settings.
Utility Navigation
Social Settings
You can add additional links to your top navigation
bar for your RSS Feeds and Social Networks. Leave
your Twitter and Facebook fields blank if you do not
wish to display these links. Otherwise, type the full
URL to the respective networks.
You will notice there is a field for your Feedburner
URL. This will redirect your RSS feed links to
Feedburner. Paste your Feedburner URL into the
appropriate field. Please note this will default to the
built in RSS2 Feed link if you do nothing.
Footer Settings
10
Paste your Google Analytics Tracking Code into the text box and click Save Changes. This automatically add your
tracking code to your footer before the closing </body> tag.
How to Use Periodic Featured Image
Periodic will automatically crop any newly uploaded images into 10 variations to be possibly used throughout the site. For
best result, your source image should not be smaller than 800 x 600.
Important Note: Periodic will not crop images already uploaded prior to the installation. You will need to upload the image
again..
Setting an Image as Featured
While you are in the WordPress Editor, click on the Upload/Insert Image icon just below the Permalink. This will launch
the upload modal window. Click Select File, navigate to the file you wish to upload and click Open. As WordPress begins
to upload the file, you will see a progress bar indicating so. Once the upload is complete, you can optionally enter data
related to the image. For SEO purposes, we recommend giving each of your images a title.
While the Image Modal Window is still open, click the Use as featured image link and your selected image will be used
throughout the site. You should see a thumbnail of your image, under the heading Featured Image, in the right sidebar of
your WordPress Editor.
The 10 thumbnails, and their usage, Periodic creates are as followed:
1.
150 x 150 - Standard Size
2.
270 x 120 - Archives Thumbnail
3.
300 x 300 - Features Thumbnail
4.
130 x 60 - Features Slider Navigation
5.
610 x 225 - Post Lead Image
6.
130 x 130 - Search Results Thumbnail
7.
60 x 60 - Sidebar Thumbnail
8.
290 x 215 - Recent Video Thumbnail
11
9.
210 x 100 - Popular Post Slider Thumbnail
10. 190 x 100 - Home Page Category Block Lead Post
Important Note: All of these dimensions are set to “true” in your functions.php file. This means that WordPress will crop the
image to match these exact dimensions. Depending upon the image, some unwanted cropping may occur.
How to Publish a Video Post
Periodic allows you to publish video posts using your videos hosted on YouTube. To begin publishing video posts and be
able to use the Recent Video widget, you much follow these steps:
1.
If you have not already done so, create a new category -> Videos. The slug for this category must be videos. This
is case sensitive.
2.
Type in your title and post content, in the WordPress Editor, as you would for any post.
3.
If you have not done so already, create a new Custom Field -> YouTube Video ID. This is case sensitive. In this
field, you will paste the YouTube Video ID of the video you wish to display. Once you have pasted the ID, click Add
Custom Field.
4.
As with other posts, you will need to select a Featured Image, write an excerpt and add tags. This post can reside in
multiple categories.
5.
Once you are ready to publish, click the Publish Button.
How to Get the YouTube Video ID
Navigate to the YouTube Video you wish to display on your site. Take
notice to the full URL in the address bar. You will need to copy the ID
information only. This will be a string immediately following “v=”.
12
Paste the ID into your YouTube Video ID Custom Field.
Periodic will handle the rest by properly embedding a video player at the top of this post. You will notice that all other
aspects of this post match your none video posts.
Video Archives
Once you have published a video post, you will have access to the video specific archive template. This will allow your
users the ability to view your videos right from the archive page using jQuery and the Fancybox plug in, which are
built into the theme.
Recent Video Widget
You can also use the Recent Video Widget to display your most recent posting to this category in any of the widgetized
areas. The widget contains a play button, title, thumbnail and link to the video archives page.
For more information about Widgets, please skip to the Custom Widget Section.
Customizing your Menus
Periodic uses the WordPress 3+ Menu settings with a fallback for WordPress 2.9 users. If you are using WordPress 2.9,
your Top Menu will be a list of your pages and the Main Menu will be a list of your categories. The Periodic menus
support drop down menus, using jQuery and the Superfish plug in, which are built into the theme.
Setting Up your Menus in WordPress 3+
Your customized menus will be inactive until you follow these steps.
1.
Click on the Menus options under the Appearance heading in your Admin left sidebar. This will load Menus options
page.
2.
Periodic supports 2 menus (Utility Menu = Top Menu & Main Menu = Large Menu). Click on the Create Menu option
and name it whatever you like. You can add custom links, pages or categories to any of your menus. You can also
13
order the menu to taste by clicking and dragging. To enable sub menus, drag the menu slightly to the right of its
parent allowing it to snap into place.
3.
Once you are satisfied with your menu, click Save Menu.
4.
Under Theme Location, select which menu should appear where and click Save.
Visit your site to see your changes. You can edit your menus until you are satisfied with the outcome.
Important Note: You will be limited in the total number of top level navigation links in each menu. If your links expand beyond
the width of the associated menu, the option will wrap to the next available space thus causing a break in the layout. As you can
tell from the Periodic demo, the main navigation has 10 links with room for possibly one more.
Using Shortcodes
Periodic comes with 9 shortcodes to give you additional presentational elements within your posts and pages. Please
visit the Periodic demo to see the various shortcodes in action.
Each shortcode must wrap the content with an open and closed shortcode -> [shortcode] ... content ... [/shortcode]
Periodic Shortcode List
1.
Left Pull Quote = [pullleft float=”alignleft”] ... content ... [/pullleft]
2.
Right Pull Quote = [pullright float=”alignright”] ... content ... [/pullright]
3.
Unordered List with Check marks = [checklist] ... unordered list ... [/checklist]
4.
Unordered List with Arrows = [arrowlist] ... unordered list ... [/arrowlist]
5.
Boxed Content = [note] ... content ... [/note]
6.
Button = [button url=URL] ... content ... [/button]
Periodic supports multiple columns within your post and pages. You can divide your content into a maximum of four
columns using one of the following shortcodes: [two_column], [three_column] or [four_column] around each block of text
within the columns except for the last column. The last column should be wrapped around a corresponding shortcode
with the appendage, “_last”. Example: [three_column_last].
Important Note: We recommend only using the four column shortcode on full width pages for aesthetic purposes.
14
Working with Custom Widgets
Periodic comes with 6 widgetized areas and 7 custom widgets. All of your widgets can be used in any of the
widgetized areas with the exception of Periodic Custom Categories. This widget is only intended for use in one of
the 3 sidebars.
Installing Widgets
WordPress Widgets support drag and drop. Simply select the widget you would like to activate, drag it to the location,
enter any necessary data and click Save. You can reorder your widgets by dragging and dropping and WordPress
supports multiple instances of the same widget.
15
Using Periodic Page Templates
Periodic comes with 4 page templates you can use on your pages (with
Right Sidebar (Default), with Left Sidebar, Contributers Page* and Full Width).
To assign any page template to a given page, simply select which template
to use from the select drop down menu under the Page Attributes heading.
Note that WordPress will automatically select the Default Template whenever
you create a new page. You will have to manually change which template
your respective page is utilizing for each page and click Update to see the
changes take effect.
*Version 1.0.4 Update: As of the release of Periodic 1.0.4, you now have a
Contributors Page Template that will automatically list all of your authors on one page. The list will include the authors
Gravatar, bio and a link to their respective author archive. To use this template, create a new page and give the page a title.
From the template drop down menu, select Contributors template and publish. You can optionally include text, as you would for
any page. This text will appear before the author list.
Optional WordPress Plug Ins
Periodic has styles built in for the following free WordPress plug ins. These plug ins are optional. If you choose not to use
these plug ins, Periodic will still function properly.
Important Note: You will need to download and install these plug ins after you have installed Periodic.
1.
WP-PageNavi - Creates pagination on your archive and search results pages. Once you have installed and
activated this plug in, make sure you deactivate the plug in’s CSS file.
2.
Contact Form 7 - Create as many Contact Forms as you wish and insert them into pages and posts.
To get started using Contact Form 7, we have included a separate text file, Snippets.txt, with the code to copy and paste
for a simple contact form.
16
jQuery Library & Plug Ins
Periodic comes with the following jQuery Plug Ins built into the theme. All of the plug ins are in no conflict mode, have
been minified and tested for compatibility. As of this documentation, there are no known issues with their functionality.
The jQuery library is being properly called from the Google Apps server ensuring that it will not load multiple instances of
the library.
1.
jQuery Cycle
2.
jQuery Fancybox
3.
jQuery Superfish
4.
jQuery Easing
5.
jQuery UI
17
Conclusion
We have attempted to answer as many questions as possible with this guide. If you have any questions not covered in
this document, post them to the “Item Discussion” and we will answer them as soon as possible.
Thanks again for your purchase and enjoy Periodic! Be sure to leave a rating. We greatly appreciate it.
18