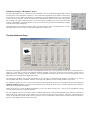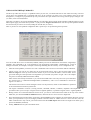
1
PFC.DLL: Precision Flight Controls interfacing module
for Microsoft Flight Simulator
Freeware by Pete Dowson, © 6th March 2007
Support Forum: http://forums.simflight.com/viewforum.php?f=54
PFC is Precision Flight Controls, Inc,
makers of quality flight simulation controls and displays.
(see http://www.flypfc.com).
Version 2.20 of PFC.dll (for FS9 and before)
and
Version 4.20, PFCFSX.DLL (for FSX and beyond)
Note: All my Windows based software is always available in the latest versions from
http://www.schiratti.com/dowson . (Selected modules are also available elsewhere). This is
not my web site (I have none) but the list is there courtesy of Enrico Schiratti
PFC.dll also needs FSUIPC Version 3.53 or later for correct operation. The current version is 3.731
PFCFSX.dll needs FSUIPC4 for FSX—any version, but latest is best. The current version is 4.081
This package contains the following parts:
PFC.dll
PFCFSX.dll
PFC.DLL User Guide.doc
PFC.DLL User Guide.pdf
PFC version 2 module, for FS9 and earlier
PFCFSX version 4 module, for FSX and hopefully succeeding versions
This document: please read it! (Word 97 format)
This document (in Adobe Acrobat format)
USERS OF PREVIOUS VERSIONS SHOULD REFER TO IMPORTANT CHANGES IN THE HISTORY SECTION!
Introduction: what is PFC.DLL?
This program is a Microsoft Flight Simulator driver for the COM-port connected equipment produced by PFC Inc. It currently
handles the following PFC products:
Any one control console out of these:
• Throttle Quadrant Console
• Cirrus II Console with built-in Jetliner, Beech or Mooney yoke
• Professional Flight Console, with or without hardware trim mechanism
• Jetliner Console with built in Avionics Stack and Jet-style “RIC” section
• Jet Cockpit, built to emulate a 737NG series aircraft
• PFC 737NG MCP with optional EFIS switch boxes and six-pack indicators
(The MCP can also be used in combination with one of the consoles provided the console is connected through the MCP
and the latter is set to run at 9600 bps).
with the following connecting options:
• Rudder pedals, with digital or analogue toe brakes
• Avionics Stack, except for Jetliner console and Jet Cockpit, where it is built in
• Remote Instrument Controller (RIC), connecting to the separate Avionics Stack
• Separate yoke connected via the controller, except for the Jet Cockpit, Cirrus II and Professional Consoles, where one is
built in
NOTE that this driver does not support Game Port connected controls, such as those also made and supplied by PFC. For
Game Port connections you will need a normal joystick driver and will follow the standard installation and calibrations for
joysticks in both Windows and Flight Simulator. The same applies to other USB connected controls.
Also please note that the Rudder Trim knob on the consoles (but not in the cockpit) is a hardware trimming device and only
applies to rudders actually connected through the console, not those connected to a Game Port or USB input.
All functions are either pre-programmed or user programmable, with some exceptions often depending upon whether you are
using standard FS panels or one of the special ones supported: Project Magenta by Enrico Schiratti (PM), or 767 Pilot in
Command by Wilco (767PIC).
For use with 767PIC you must be using Windows 98 or 2000, or later. Earlier versions of Windows do not support the facilities
used to send keystrokes, and Win NT doesn’t support FSUIPC which is needed. Without the keystroke facilities you will not be
able to successfully use the keystroke programming facilities, nor the 767 PIC option. Also, be aware that the integration for the
FS2002 version of 767PIC is much better if you upgrade to version 1.3 of the panel. The update is available from the Wilco site
and also from www.mcp747.com. [767PIC support is not extended to the Jet Cockpit or MCP implementations]
PFC.dll is a module for FS2000, FS2002 or FS2004, and it should be placed into the ‘Modules’ folder—see the Installation
section below. It also needs the FSUIPC.dll module installed, of a suitable revision level. The FSUIPC package is not included
here. Please note that updates to FSUIPC are quite frequent—please check the appropriate web sites, such as the Schiratti one
mentioned above, and certainly obtain the full package for the documentation.
This module may work with FS98, CFS1 and CFS2, but at the time of this Release it has not been tested with those Microsoft
simulators. If it does work, the functionality will not be as complete as with FS2000/2/4, for which it has been optimised. It
cannot be used with CFS3.
PFCFSX.dll is a module for FSX, but it is loaded by FSUIPC4 not directly by FSX. You must have previously installed
FSUIPC4 correctly. Then you can place PFCFSX.dll into the ‘Modules’ folder created by the FSUIPC4 installation. The
FSUIPC4 package is not included here.
With only one minor difference the action and operation of the two versions of the PFC driver is identical. The difference is
only where, in FS, you find the options menu entry.
Installation
For FS9 (FS2004) and earlier: copy the PFC.DLL file into your flight simulator Modules folder. Do the same with
FSUIPC.DLL, if you haven’t already installed this module.
For FSX, you must install FSUIPC4 first if you’ve not already done so. The FSUIPC4 installer will create a Modules folder,
and it is onto that folder you then must copy the PFCFSX.DLL.
IMPORTANT: If you cannot see the DLL, please go to the Explorer’s View menu. Select “Folder Options” and then the
“View” Tab. Then choose either the “Show all files” button or the “Do not show hidden files”—anything but the “Do not show
hidden or system files” button! (Windows 98 now seems to regard all DLLs as system files and not the “application extensions”
they usually are!).
That’s it!
WARNING (FS9 and before): Do NOT keep multiple versions of PFC (or any other module) in the Modules folder with simple
renaming. If they are in that folder and still have the file type “DLL” they will still be loaded and used by Flight Simulator. The
name is actually not relevant at all—Flight Simulator looks at all DLL files in that folder and loads all those that show the right
external links. If you want to keep older versions of any modules, make a separate folder (e.g. “OldModules”) and put them in
there, with any name you like. (This warning is not applicable to FSX).
Okay. Now make sure you know which COM port is being used for your PFC equipment. This will usually be COM1 or
COM2, but it is possible to install more than two COM ports on a PC. If possible, use a serial port adapter for USB instead of a
real COM port—these give much more reliable operation, especially on Windows XP installations. When using one of these,
you also install an appropriate driver (supplied with the adapter), and this effectively adds another COMn port, probably
COM3, or one more than the number of COM ports already installed.
If you are using a PFC 737NG MCP **(see Note below), please not that it already has a USB adapter built in, and can be
connected directly to a PC USB port. The driver should have been supplied with it. Use the USB connection in preference to
the serial connection. If you have another console, such as the Jetliner, connect that by serial cable to the MCP. At the time of
writing the MCP normally operates at 19200 bps, but will have to be slowed to 9600 (by internal jumper) to allow the
additional console to work.
Load up Flight Simulator*. When you run it the first time after installing PFC.DLL or PFCFSX.DLL it will execute some
connection checks, and will prompt you to configure the correct COM port as shown here:
** NOTE: The PFC MCP normally operates at 19200 bps, not the usual 9600 bps of other PFC devices. The PFC driver cannot detect this. If you have only
the MCP connected and are using the PFC DLL for it rather than, say, the Project Magenta MCP.EXE connection, then you will need to add/or change the
following parameter in the PFC.INI (or PFCFSX.INI file after running FS with the DLL installed for the first time. Close down FS and edit the file:
[Connection]
Speed=19200
Once you’ve done this, the connection checks will continue, but you may get the results as shown below:
The driver should normally work directly after the COM port is selected, but in some cases you will have to restart FS once the
COM port is selected. To do this simply click the “Quit FS” button and load FS again.
Hopefully you will get something more like this, depending upon what you have connected:
Here all of the main PFC connections are okay (yoke, pedals, throttle quadrant and avionics stack), but there’s no Project
Magenta CDU or RCDU, and no MCP (whether the hardware PFC MCP or the Project Magenta MCP program).
Note that the checks do not necessarily operate automatically all the time. You may have to move the yoke or pedals, and at
least ensure that some levers on the quadrant are not parked firmly at idle. By waiting or pressing “Retry” you get another few
seconds in which to operate the controls to see if the driver recognises them correctly. Or you can either Quit FS, or elect to
Abort the checks and continue with Flight Simulator.
Once in FS proper, and ready to fly, you can enter the PFC driver options via ALT P, and tell it not to run these checks next
time. If you are using the PFC 737NG cockpit this is not allowed, and, in fact, if you abort the checks then you will get a
warning.
You can also change the COM port in the main PFC options, but this is not really recommended. However, these procedures
will be made clear in the following sections.
Setting PFC options
Options in PFC are actually controlled by parameter settings in a file called PFC.INI or PFCFSX.INI, respectively. This is not
supplied with PFC, but it is generated the first time you run FS with PFC installed. It sits next to PFC in the FS Modules folder.
If at any time you run into trouble, always try deleting this INI file before running Flight Sim, so that all the options are reset to
defaults. It is actually a good idea to do this when updating to later versions of the DLL too, as some things may have been
changed rendering some of the parameters in the INI file redundant or plain incorrect.
On the other hand, if you have spent time setting up the equipment and the driver settings to your liking, and it is all working
well, please do take the precaution of making a back-up copy of the INI file, in case it ever gets corrupted or deleted. Also, if
you have a good working installation for, say, FS9, you can copy the PFC.INI file over to your new FSX installation, in with the
PFCFSX.DLL, renaming it PFCFSX.INI so that you don’t have to set things up all over again for the new Sim.
Of course, if you do lose your INI file, or have cause to delete it and start again, you will have to re-specify the COM port and
check your other settings, as now described.
All of the options of general interest are accessible whilst running FS, via a Menu entry. This is by far the best and easiest way
to access the more popular options. There are some rather obscure ones which can only be accessed by editing the INI file, but
these are not useful to most users and are only briefly described towards the end of this document, for more experienced users.
With the appropriate PFC DLL correctly installed, and Flight Simulator running and ready, look at the Menu. (Press ALT to
bring it up if it is hidden). On FS9 or earlier there should be a PFC item. On FSX you will have to first select the Add-Ons
menu entry, and then you should see the PFC entry next to the FSUIPC one. Either way, select it now. You will get the first
page of the PFC Options display, very similar to the one shown here (the version number, date will be different, and there may
be other minor differences:
Before going on to look briefly at each page of Options provided by the DLL, a quick word about how to operate the window.
The tabs at the top select between various “pages” of options. You can visit all these, make changes, as you like, but nothing is
actually changed until you press the “OK” button. If you press the ESCape key or “Cancel”, or close the window using the close
button at top right, then none of the changes you have made on any page will be effective. Pressing the “OK” button confirms
all the changes made in all pages. You can re-visit any and all before confirming them in this way.
To get started
The various Settings pages contain quite a lot of options and settings you will want to look at and maybe change later, but to get
started and try out your equipment you just initially need to pay attention to these parts:
1.
Selecting the correct COM port for the PFC connection. You should have done this already, in the Connection Checks
dialogue. If you need to change it, this is in the Main Options page as shown selected above.
2.
The driver cannot detect what PFC equipment you have, so you need to tell it where it matters. The driver defaults to
assuming you are using a Cirrus II console. If you are NOT using one of these, go to the Consoles page, select “Cirrus II
Console” in the left/right selection window at the top (if it is not already selected), and uncheck the top right option which
says you are using one. If you don’t do this, and are using a Throttle Quadrant Console, then you may get some spurious
switch settings made when you first load Flight Simulator.
3.
If you are using a Jetliner Console or Jet Cockpit, go again to the Consoles page, select “Jetliner Console” or “Jet Cockpit”
in the left/right selection window at the top, and check the top right option to say you are using one. (NOTE: if you are
using a Cirrus II or Professional Flight Console, you can select both the Cirrus and the Jetliner consoles in the driver, but it
will still act as if the Cirrus II or Pro is being used).
4.
For you lucky 737NG cockpit users there’s a separate page for you to check. If you do not say that you are using one of
these, you will find that most of the extra buttons and switches in that simulator will not function correctrly.
5.
If you are using a Cirrus II, Professional console or Cockpit, or have a yoke connected through the PFC console and so into
the same COM port, you will need to enable the aileron and elevator axis in the Flight Controls page, and perform the
calibration there too (more on calibration later). These are not enabled by default to avoid interference with Game or USB
port yokes.
6.
The same thing goes for rudder pedals and their toe brakes, if connected through the PFC system. PFC DLL handles both
digital (on/off) and analogue toe brakes. See the Flight Controls page. Currently the Trims and Steering assignments
need only to be made for the Jet Cockpit.
7.
If you will not be using Wilco’s 767 PIC (not really supported well for FS2004, and cetainly not for FSX) then it may be a
good idea to check the option on the Main options page to “suppress possible interference from Game Port throttle
assignments”. Otherwise you should make sure there are no remnant assignments to Throttle axes in the Flight Simulator
CFG file in the main FS folder). Unfortunately this option cannot be defaulted on, because the 767PIC auto-throttle uses
the same joystick controls to manage the throttle inputs. The Phoenix (PSS) series of airliners also do this, and additionally
in this case I don’t think many of the autopilot functions work anyway with the PFC provisions—the PSS aircraft seem to
use their own entirely independent autopilot.
There will certainly be other add-on packages that do something similar.
8.
Finally, for each Throttle Quadrant you own, you’ll want to fix it to the Console, and enable it and calibrate it in the
Throttle Quadrants page. For the Jet cockpit, the selection will almost certainly be the 737NG quadrant, which will be
selected automatically for you.
Main Options Page
First, after installation, you must select the correct Comm Port (also known as a serial port). This is the one to which your PFC
equipment is connected. The sockets may be marked A and B or 1 and 2, but these equate to the ports named COM1 and
COM2 respectively. You may even have extra boards installed, or USB serial adapters, giving you more serial ports. Only those
found available will be listed here.
If you did not set the COM port in the initial Connections Check, set it now. Click on the drop-down ubutton and select the
correct entry, either using the mouse or the cursor keys.
If you are a Project Magenta user and run Pmsystems, some of the switches on your console, especially in the 737NG cockpit
and on the Jetliner Console, will be routed via Pmsystems when it is running, instead of directly to FS. If you do not want this to
happen, uncheck the Work through Pmsystems if detected option. (If you do not use Pmsystems this option is not relevant in
any case).
The other options on this page, related to the Throttle Quadrant selection, are now described.
Throttle Console
The picture shown on this page shows the separate Throttle Quadrant Console, but everything specific to throttle quadrants
detailed here applies equally to the throttle quadrant portion of the Cirrus II, Professional and Jetliner consoles, and the
Cockpit.
On the Main Options page you can select the specific quadrant you wish to use, by clicking on the appropriate one in the dropdown list, or specify to the DLL that it should select the quadrant automatically depending upon the specific aircraft you have
loaded into Flight Sim.
For the automatic facility to work correctly, you must do two things:
1.
Go through all the Quadrants in the “Throttle Quadrants” Page, enabling all those quadrants which you have available to
affix to the console. Do this by checking the “Enabled” checkbox top left of each quadrant page.
2.
When you load and aircraft, be sure to change the actual Quadrant affixed to the console to the most appropriate one
corresponding to the aircraft type.
For FS2000, FS2002, FS2004 or FSX, when you go to the specific Throttle Quadrant pages, you will also see a button at the
top labelled “Assign to Aircraft”. For foolproof automatic selection of a specific quadrant to a specific aircraft, by name, click
that button. The driver will record the aircraft name and quadrant number in its INI file so that it will always use this quadrant
for this aircraft—provided you have the automatic facility checked, of course. When you have an aircraft loaded with a
specifically assigned Quadrant, the Quadrants section of the Main Options will have a button labelled “Delete current aircraft
assignment”, which simply undoes the assignment for the current aircraft. Each quadrant can be assigned to any number of
aircraft.
If you don’t explicitly assign quadrants to aircraft, the driver reverts to a simple system for determining the “best fit”. This is
not foolproof, it can only select amongst the standard configurations, and it will only be approximate when you have fewer
quadrants than the variety of aircraft you fly. If you do have any problems with automatic selection, either use the assignment
system, or turn the option off and always select manually, from the list.
As well as the ten different Quadrants currently available from PFC, facilities are provided for you to program the six levers to
do whatever you want. Up to 15 such ‘user configurations’ can be specified and saved—more details are given later, in the
appropriate section, of how to do this. User configurations can be assigned to specific aircraft in automatic mode, but will not
be selected automatically without assignment.
Before actually using any throttle quadrant in Flight Sim, you should turn to the appropriate section in the Throttle Quadrants
page and calibrate each lever correctly. Calibrations are saved for each throttle quadrant, so you should only have to do this
once for each. More details in the appropriate section, later.
The option for suppressing joystick throttle inputs is important. It is there because, if you are using any joystick (or simply have
one connected to a Game Port (or USB) but not in use with Flight Simulator), it is possible for the simulator to make
assignments for the throttles. These appear in its CFG file automatically. They can cause FS to read spurious values that
prevent proper operation of the Throttle Quadrant throttle inputs. The suppression cannot be on by default because Wilco’s
767PIC (and others) uses the same input controls to operate the auto-throttle. Either enable this option here, or make sure there
are NO throttle assignments in the FS CFG file. You may need to set LOCKED=1 for the joystick entry as well, to stop FS
adding the assignments back again.
There is an option in this section for treating throttle quadrant buttons as “AutoThrottle Disconnect”. These buttons are
available with certain Jetliner console quadrants, and by default operate the TO/GA (Take off/Go around) feature—also
operating as “N1” or “THR” modes on some implementations (such as Project Magenta). If you elect to use the A/T disconnect
feature, note that it operates by temporarily disarming the auto throttle. This is the only sure way of ensuring all possible A/T
links are severed (SPD, Mach or IAS modes, TO/GA, N1 or THR modes, and the speed component of VNAV). The A/T will
be re-armed a second or so afterwards, when the current throttle lever positions will also be re-read and sent to the simulator.
The other two options—the digital filtering and the Engine equalisation—are to help deal with those who suffer any difficulty
getting exactly symmetric thrust consistently. The filtering operates for relative fast changing jitter only (2Hz or better) and
applies to all axes except the main flight controls (aileron, elevator, rudder, etc). The equalisation makes port and starboard
values of throttle, propeller pitch or mixture equal (by averaging) when they are very close—by default, within twice the
expected resolution of the axes themselves. On 4 engined aircraft the outboard (1 and 4) and inboard (2 and 3) controls are
equalised separately. There is extra equalisation for the third (#2, centre) engine on three-engined aircraft—that engine is
brought into line with the other two if it is close, but it doesn’t influence the other two.
The limits can be changed, but only in the INI file (see section near the end of this document).
Avionics Options Page
Remote Instrument Controller
This (henceforth known as RIC) is the accessory with several knobs and a switch, which connects to the rear of the Avionics
stack and provides additional facilities. The RIC has, along with the Avionics Stack, been incorporated into the Jetliner console,
and in this case two of its knobs have different roles. Those changes can be selected for use on the external RIC if you like. The
functions of the knobs on the RIC are as follows (from Left to Right):
External
ADF/RA
Jetliner
DH
Description of actions available
Whether labelled ADF/RA or DH, this turns the ADF bearing dial if the aircraft panel you are
using has such an adjustable gauge, but if you are using Project Magenta, or Wilco’s 767PIC
(and have this option selected), it normally controls the Decision Height instead.
There’s also an option in this section (“DH is CRS2”) which when selected will make this knob
adjust the course for the second NAV radio (i.e. OBI2) instead. If this option is selected it does
not matter what software you are running with Flight Simulator.
The RIC options are shown in the right part of the Avionics Options page.
CRS/DG
CRS
For the Jetliner this always adjusts the OBI bearing dial associated with the NAV1 radio, or the
Course associated with the HSI or ND in VOR/ILS modes. It is also known as OBS1. There’s an
option (“CRS does 1+2”) for both OBS1 and OBS2 to be synchronised and controlled together.
This can be useful when the VOR1 and VOR2 displays are used for pilot and co-pilot.
For the external RIC you can select between having this do the same, or adjusting the gyro
compass to correct for drift. The latter is probably more appropriate on the light aircraft. The
RIC options are shown in the right part of the Avioincs Options page.
HDG
HDG
Adjusts the heading bug on the gyrocompass and in the autopilot or MCP.
ALT
BARO
Adjusts the pressure setting (‘Kollsman’) for the altimeter, to allow it to be correctly set for
QNH, QFE or standard (29.92” or 1013.2 mb) settings.
OBS
ND
If you are using Project Magenta, or Wilco’s 767PIC (and have this option selected), then this
adjusts either the ND mode (MAP, CTR, ROSE, PLAN) or the range (10–640 nm), according to
the position of the toggle switch next to it (see next entry).
If the external RIC is being used and either the “Jet RIC” option hasn’t been selected, or you are
currently flying a prop, then it adjusts either OBS1 or OBS2, depending upon the adjacent
switch setting.
There is also an option, primarily intended for use in the PFC Jet Cockpit, to change the “ND
range” operation to instead operate OBS2 (CRS2) even when the “Jet RIC” option is selected.
NAV
Select
Mode/
Range
This is only used in conjunction with the OBS/ND switch above. Its position is not
independently detectable by the driver.
You will see from the above table that if you are using Enrico Schiratti’s Project Magenta then the PFC DLL will detect when
the Project Magenta (PM) MCP is running. If it is, then the RIC section automatically changes to operate the DH and ND
Mode/Range settings—excepting the override to use ND range for CRS2, if selected.
Additionally, as indicated in the table above, the same actions are available for Wilco’s 767PIC, but for this to operate
automatically you need to select one of the avionics options, described below. This action is needed because of the possibility
that the driver mistakenly identifies the use of 767PIC by module naming changes.
Note: adjusting heading, and other MCP registers, in the 767PIC is not as quick nor as precise as I’d like it to be unless you
are using version 1.3 of the 767PIC panel, or later, with FS2002. It is the best I can do with the keystroke based interface the
earlier versions of this panel provides. If you are a 767PIC user in FS2002 you would do well to get the latest update.
Note 2: All functions of the R.I.C. or its Jetliner equivalent can be re-programmed in FSUIPC’s “Buttons” section when using
FSUIPC version 3.30 or later. See the section about Button and Switch Re-programming later in this document.
Avionics Options
These are an assortment of operating options for the separate Avionics stack, and the avionics sections on the Jetliner Console
and Jet Cockpit. Before going into the details for each of these in turn, here’s a summary of the way the avionics buttons and
indicators work with the PFC.DLL driver:
COM radios: The frequency required is set on the standby part then swapped into the active part for use. On the separate stack,
on FS2000 and before, if only one COM radio is in use, that’s it. On FS2002, FS2004 and FSX the standby frequency
adjustments are not relayed to FS until you swap the active and standby, but any changes made in FS (for instance, by loading a
new Flight file) will be reflected in the PFC avionics display.
Normally the On/Off buttons turn off the whole set, COM+NAV. On the Jetliner, with only COM1, the on/off button only
affects the COM radio. However, the complete action of the On/Off button depends on the option labelled “COM2 radio
selectable into FS” (with the Avionics Stack) or “COM on/off swaps COM1/2 display” (with the Jetliner on FS2002, FS2004
and FSX).
On the separate stack, if the option is selected, then the On/Off button cycles between being a COM radio selector and on/off
button. With FS2000 and before, which don’t have a COM2 radio, this is useful as it allows all 4 frequencies to be selected into
FS. These are the sequences for the two radios:
Avionics COM1: Sets FS COM1 → Off → Sets FS COM2 → Sets FS COM1
Avionics COM2: Sets FS COM2 → Sets FS COM1 → Off → Sets FS COM2
Note that in this mode only the COM receiver turns off, not the complete set. If both COMs are in use, the one currently
operating FS’s COM1 radio has a flashing decimal point in the active frequency display. In FS2002 and later, if one of the PFC
COM radios is off, the on/off button on the other does not change the assignment to COM1/COM2, it simply keeps the current
assignment and alternately switches that radio off.
On the Jetliner console, with FS2002, FS2004 or FSX, the option allows the single PFC COM radio to display and operate
either COM1 (flashing point) or COM2 (not flashing). The on/off switch cycles between these two and off.
NAV radios: When two frequencies are displayed, the knob sets the standby that you then swap into the active. Pressing the
“RAD” button toggles into Radial display mode. If you are receiving a valid VOR signal then the current radial is displayed in
the standby position. Otherwise this displays – – –. Note that ILS localisers do not provide radials.
Whilst the radio is in the Radial mode, the knobs set the active radio. This directly changes the radio values in Flight Sim, so
should be used carefully—there can be a little lag if you turn the knobs too fast. You can still swap frequencies with the one
‘hidden’ behind the radial display.
The DME is also tied to the NAV frequency, switchable on the DME between NAV1 and NAV2. There is no separately tunable
DME receiver in Flight Simulator. When the in-use NAV frequency is also displayed on the DME it can be changed by the
DME frequency knobs irrespective of the mode of the related NAV radio.
On FS2002, FS2004 and FSX standby NAV frequency adjustments are not relayed to FS until you swap the active and standby,
but any changes made in FS (for instance, by loading a new Flight file) will be reflected in the PFC avionics display.
Optionally (see below) a valid VOR or ILS signal is indicated by a flashing decimal point in the active frequency display.
The Ident button toggles the Flight Sim Morse VOR/ILS ID sounder, if a valid signal is being received.
ADF radio: This device is quire complex. As well as being a receiver for NDB radio signals it is also a flight and elapsed timer
and count down time with alert. I’ll describe the main NDB reception facilities first:
NDB frequencies range from 200.0 to 1799.9, though FS has an upper limit of 1699.9 (making quite a few South American
facilities untunable). In the USA and Canada most, if not all, current NDB frequencies have zero in the fractional part and so a
simple 4 digit display is adequate in that part of the world. This is why the PFC NDB has, unfortunately, only 4 display digits
for the active frequency. In Europe there are many NDB frequencies with .5 fractional parts and there may be areas in the world
where other fraction values are used.
With a real ADF receiver in the real world, being a fraction off the correct frequency might not matter so much. The reception
might be weaker but it may not be cut off altogether. Flight Sim is not that lenient. You have to be spot on.
So the ADF operation on the PFC Avionics stack is actually (and optionally) more complex than the ones you’ll see in real life.
I’ve used the ADF and BFO buttons to swap between display modes and selection of fractions. In the optional full 5-digit
(nnnn.n) mode, you use the ADF button to swap between displaying the top four (integer) digits (nnnn) and the lower four digits
(nnn.n). You can never see them all at once, except on FS’s panel ADF.
To make it more confusing I cannot show the decimal point as that is inaccessible with this hardware, so the only way you can
tell which part is displayed is by the ANT and ADF indicators. When the ADF indicator is lit or flashing then the integer
portion is being displayed. When the ANT indicator is lit then the lower part, including the fraction, is being displayed. The
indicator is flashing only when a valid NDB signal is being received.
When the fractional part is being displayed (i.e. the ANT indicator is lit), the BFO button is used to select the fraction for
changing with the inner knob. The BFO indicator is lit when this is the case. When the higher part is displayed the BFO button
does nothing and the indicator will not light.
Note that all of this is optional. For flying in parts of the world with no fractional NDB frequencies you can simplify it all by
switching the option off, as discussed below. In the simple mode the ADF button merely toggles the ANT/ADF indicators and
the BFO button merely toggles the BFO indicator. Neither have any function in Flight Sim itself.
As with the NAV and COM radios, the knob adjusts the standby frequency with the FRQ button swapping them over. In Timer
modes, the standby frequency is lost in favour of the timer value, so then the knob adjusts the active frequency. Unlike the NAV
radios, pressing the FRQ button when a timer is displayed does not swap frequencies, but merely brings back the standby
frequency display. Press again to swap.
Timer operations are initiated by pressing the FLT button. This is actually a FLT/ET button, and in timer mode toggles
between the Flight Timer (FLT) and the Elapsed timer (ET). As there is no FT/ET indicator, they are distinguished by having a
space preceding the flight time and a – preceding the ET. The time format is nn.nn with minutes and seconds shown unless the
value is one hour or more, in which case hours and minutes are shown.
The ET can be reset to 0 by pressing the SET button. Holding the SET button in for 2 seconds causes the ET to reset to 00.00
and flash. You can now set a time in minutes and seconds with the knob. Press SET (or pretty much any other button) and the
Timer counts down. When it reaches 00.00 again the right hand display in the ADF will flash irrespective of its current mode
indicating the preset time having elapsed. It will resume counting up at the same time. The flashing continues for a number of
seconds, or it can be cancelled by pressing one of the buttons.
The timer operations abide by the specifications of the Bendix King KR87 series ADF units, so please refer to the Bendix King
manuals for further details.
DME unit: This should emulate a separate receiver, capable of being tuned independently to the other radios in the stack.
However, Flight Sim does not provide support for a separately tuneable DME radio, so some aspects of the PFC one are
redundant.
The operation of the RMT/FREQ/GST slider switch is correct, except that the GST mode is identical to the RMT mode. In both
cases the Speed and Time are shown, if available in the right hand part of the display, but in both cases the values are related to
the VOR being received on the selected NAV radio. The FREQ mode is similar but shows a copy of the NAV radio frequency.
In this mode the tuning knobs on the DME can be used to change the related in-use NAV frequency, even if a standby
frequency is displayed on that receiver.
The operation of the NAV1/NAV2/OFF slider is correct in its default mode, selecting NAV1 or NAV2 for the DME reception,
or switching the unit off. There is an option to use the NAV1/NAV2 RMI selector instead for NAV selection, as the switch is
bigger and it is easier to see what is currently selected. (Flight Sim has no RMI with NAV1/2 selectable without mouse actions,
so if this latter option is not selected the RMI switch has no function).
The distance on left is in nautical miles, and is always the slant distance to the ground-based transmitter. The speed is in knots,
where valid, and the time is an estimate in minutes. Both assume a direction directly to the radio aid in question and are not
valid for any other direction or useful indications when close to the radio or high above it.
Transponder: The operation of this is fairly obvious. The mode selector works as shown except that the “ALT” mode is
incomplete on the PFC unit as there’s no display position provided for the encoded altitude display. Optionally (see below) the
transponder has an intermittently flashing light, showing it transmitting in response to an interrogation. When you press the
Ident button that indicator lights solidly for a few seconds whilst the complete identification encoding is transmitted. None of
this has any counterpart in Flight Sim, but Squawkbox3’s transponder control (FSUIPC offsets 7B91 and 7B93) is supported.
The selector switch settings Standby, Off and Test are signalled as Standby and the On and Alt selections are signalled as
‘normal’. The Ident key triggers but only in ‘normal’ modes.
Autopilot: Parts of the autopilot mechanisms occur in other places—on the RIC, in the Altitude Pre-selector, optionally in the
GPS section (or, on the Jetliner, the section below the Autopilot), and even on the Yoke (trim, AP disconnect, and CWS/pitch
sync operations). For a full understanding please peruse all these parts. Here I just concentrate on the buttons and indicators in
the section made to look like a Bendix King autopilot and actually labelled ‘Autopilot’.
First, with a standard Bendix King A/P as depicted in the PFC Avionics stack, none of the A/P functions can be selected until
you have successfully run the unit through its Test. To do this, simply press the ‘Test’ button. The test sequence will begin with
all the indicators lit, then just the AP Eng indicator flashing with a beeping sound. At the end of this the Autopilot is ready.
Second, also standard with this type of autopilot, you should engage the Flight Director (FD) first. AP Engage will not normally
work unless the FD is engaged. Selecting FD modes (such as ALT, HDG) instead will automatically engage the FD in any case.
Both of these restrictions can be optionally lifted, and they are both removed automatically when using Project Magenta’s
MCP, or Wilco’s 767, which also change several aspects of the A/P to make it more amenable to airliner type operations. You
will then also want to select the option to stop the A/P Engage LED flashing (and the PC beeping) whenever the A/P is
disengaged.
That said, here are the functions explained:
External
Jetliner
Description of actions available
FD
FD
On those aircraft with a Flight Director, this button switches it on and off. See above for
interactions with the other autopilot switches.
ALT
ALT hold
Sets the current altitude into the autopilot and engages altitude hold. With Project Magenta’s
MCP the altitude is rounded to the nearest 100 feet. The value used in the autopilot is the one
registered by the altimeter, so it is dependent upon the Kollsman pressure setting.
HDG
HDG sel
Engages Heading hold for the heading set by the heading bug (or, for airliners, in the Heading
register of the MCP). To hold current heading you need to set the bug first.
NAV
vor LOC
Engages a hold on the NAV1 radial specified by the OBS1 value, in either the To or From
direction, as indicated on the OBI. You should be on or close to the desired radial and in the
correct direction first. The NAV indicator in the A/P flashes until the correct course is locked.
On Project Magenta and 767PIC this engages LOC mode, which operates similarly for VOR
signals or provides Localiser only approaches with ILS signals.
APR
APP
Engages an Approach course, on both localiser and glideslope (if both are available).
When using FS’s autopilot, the APR light flashes until the localiser is acquired, and the GS light
illuminates when the glideslope is acquired. Whether this occurs with other autopilots depends
upon their implementation. Airliner MCP indications are not the same.
BC
AP/2
For FS panels, this is similar to APR but for a Back Course.
If you are using Project Magenta’s MCP or 767PIC this button instead enables the other
autopilot—when you are in the correct position to be able to use it.
On Project Magenta, you can enable either A/P, but only both on approach.
On 767PIC (with the option selected, see below) you can only operate this autopilot if the other
one (on the A/P button) is enabled first and you are on approach. This difference is simply
because of the need in 767PIC to use the main A/P disconnect bar below the A/P buttons.
There’s no separate disconnect bar on the PFC equipment.
AP eng
A/P or
AP ENG
Engages or disengages the only or main autopilot. See above regarding optional restrictions on
this. [If the Jet Cockpit is selected as the console, this is only an AP disconnect button, as is the
red button on the yokes. The AP buttons on the MCP are used to engage the A/P]
Except in the Jet Cockpit, PFC.DLL enables the Yaw Damper when the autopilot is engaged
with this button, and disables it when the autopilot is disengaged using the same facility.
Normally, in airliners, the yaw damper is kept engaged at all times, but this tends to make
ground operations tricky in FS. If you don’t want this automatic YD switching, check the box in
the avionics options.
N.B. By default FS2002/4’s autopilot always engages the wing leveller whenever the Autopilot
is switched on.. This is apparently correct for some A/Ps, but really it is not appropriate for the
Bendix King type fitted in the Cessna and replicated in the PFC Avionics Stack. To prevent the
wing leveller coming on, you need to edit each aircraft’s AIRCRAFT.CFG file, adding these to
lines to the [Autopilot] section (adding that section too if it is missing):
use_no_default_pitch=1
use_no_default_bank=1
Take care, as these may have some other side effects.
TRIM
TRIM
The trim rocker has three different functions, as in the Bendix King KFC150 and KAP150 units.
•
With no AP modes engaged it is identical to the electric pitch trim on the yoke.
•
In AP altitude hold modes it adjusts your held altitude, commanding a climb or descent of
500 fpm until released, at which time the new altitude is held.
•
In V/S mode it adjusts the set V/S by 100 fpm up or down for each second it is held.
When using Project Magenta these actions are approximated to quite well (with the 500 fpm rate
adjusted to the normal rate for the airliner). However, they are not likely to work well with
767PIC. In the latter case the trim rocker should only be used in manual flight modes.
Note that as well as Wilco’s 767PIC, there are some other excellent but complex third party FS panels which provide highly
integrated autopilot, FMC and MCP operations, but which do this by completely bypassing the FS autopilot, or using some FS
parts in other ways. Examples are PSS 747 and 777 aircraft packages. Please do not expect the PFC (or for that matter any
other) external controls to be able to work correctly with such panels. For those you will usually have to use the on-screen
facilities, probably via mouse operations. The special provisions in this driver for Wilco’s 767PIC are only possible because
they provide keyboard shortcuts for many of the needed controls—and even then, adjusting the values using anything but the
mouse can be painfully slow or imprecise at best.
Note: All of the Avionics buttons, knobs and switches can be re-programmed in FSUIPC’s “Buttons” section when using
FSUIPC version 3.30 or later. See the section about Button and Switch Re-programming later in this document.
Extended autopilot features (Jetliner Console): OR GPS and Altitude Pre-selector (Avionics stack):
On the Jetliner console the larger section below the Bendix-King style Autopilot section is totally dedicated to some more
advanced autopilot and avionics functions, applicable to modern airliners. These functions are also available on the GPS and
Altitude Pre-selector sections of the separate Avionics stack, the allocations being as illustrated here from the Jetliner:
[Note on GPS: Although FS2000 and FS2002 are supplied with a GPS unit, its functions are not accessible through controls
or keypresses, only though mouse actions on screen, so the GPS functions on the PFC Avionics stack are re-used for these
other actions.]
Except when flying with Project Magenta, the bottom row of six buttons, (NAV to APT/VOR on the external stack, or
VOR/NDB to Std Baro SET on the Jetliner), are all available for user programming. (See the section on Button programming
for more details on the user programming facilities).
When using Wilco’s 767PIC (or most other advanced panels with their own Autopilot programming), the LED indications on
the PFC autopilot are unlikely to operate correctly. The driver can read genuine FS settings and also Project Magenta settings,
but not those local to specific separately programmed systems.
These are the button allocations and actions:
External
NAV/GPS
Jetliner
N1
Description of actions available
With Project Magenta and 767PIC, this sets N1 or THR mode. For other FS panels it operates
the TO/GA facility.
This requires the Auto-Throttle to be armed, but there is no specific AT Arm switch on the
separate avionics stack. To handle this, on all standard FS panels and Project Magenta, if the
Auto-Throttle is not armed when N1 (THR) mode is engaged, the driver automatically arms it.
Similarly the A/T is disarmed when the mode is cancelled unless some other mode needs it.
(This is not done for 767PIC as there’s no way the driver can detect whether the A/T is armed or
not).
ON/OFF
IAS/
MACH
Selects IAS or MACH on the MCP’s speed dial. For most FS panels this selection only operates
when the autothrottle is armed and speed mode engaged. With Project Magenta and 767PIC the
changeover should be immediate.
Direct To
(Đ)
SPD
Sets the IAS or Mach speed hold mode, assuming the auto-throttle is armed. Whether IAS or
Mach mode is used depends on the preceding button.
Note that there is no specific AT Arm switch on the separate avionics stack. To handle this, on
all standard FS panels and Project Magenta, if the Auto-Throttle is not armed when SPD mode is
engaged, the driver automatically arms it. Similarly the A/T is disarmed when the mode is
cancelled unless some other mode needs it. (This is not done for 767PIC as there’s no way the
driver can detect whether the A/T is armed or not).
MSG
VNAV
Not used except with Project Magenta or 767PIC, where it operates the VNAV button.
This requires the Auto-Throttle to be armed, but there is no specific AT Arm switch on the
separate avionics stack. To handle this, if the Auto-Throttle is not armed when VNAV mode is
engaged, the driver automatically arms it. Similarly the A/T is disarmed when the mode is
cancelled unless some other mode needs it.
ENT
LNAV
Not used except with Project Magenta or 767PIC, where it operates the LNAV button.
GPS knob
SPD knob
Adjusts the speed setting, whether Mach or IAS. The outer adjuster changes the IAS in 10 knot
increments, the inner in 1 knot. For mach the increment is normally .01 for either. (There are
currently some problems with MACH setting in Project Magenta).
NAV
VOR/
NDB
Programmable except for Project Magenta, where it selects VOR and/or NDB locations for
display on the ND. The button can be set to switch both VOR and NDB together (the default), or
to cycle through VOR – NDB – both – neither. The option appears in the Jetliner section of the
Consoles page.
WPT
WPT
Programmable except for Project Magenta, where it selects Waypoint (fixes and intersections)
for display on the ND.
FPL
ARPT
Programmable except for Project Magenta, where it selects airports for display on the ND.
CALC
DATA
Programmable except for Project Magenta, where it operates the route waypoint data (times and
restrictions) for display on the ND.
AUX
POS
Programmable except for Project Magenta, where it selects VOR/ILS positional data (as in an
HSI) for display on the ND.
APT/VOR
Std Baro
SET
Programmable, but pre-programmed by default to toggle the altimeter between the last set QNH
value and the standard Barometric Pressure (29.92” or 1013.2 mb) for flying Flight Levels
ENG VS
V/S
This engages Vertical Speed mode. Set the vertical speed using the knob with the VS/ALT
switch set to VS.
NOTE: With 767PIC or Project Magenta, this merely passes on the V/S mode request. For FS
panels it gets a little more complicated. FS doesn’t truly simulate V/S mode as such. Setting it
doesn’t make much difference. In ALT hold mode or FLCH you can adjust both altitude and V/S
and the simulator will try to abide by both, providing the power is available. It seems to give
priority to the V/S rather than the Speed setting, but this may vary from flight model to flight
model.
So, PFC DLL provides V/S mode in FS by setting FCH (ALT) mode if it isn’t already set, and
also, if a different altitude target is not already set, setting an extremely high (or low, depending
on direction) target altitude so that the V/S requested will be obeyed.
When V/S mode is disengaged the ALT mode will be retained. If the previously set target has
been passed the current altimeter reading is set as the altitude to hold, after rounding up or down
(according to direction) to the nearest 500 feet. If, however, the previously set altitude value has
not yet been attained, it is restored. And FLCH mode ensues.
This last action was added in version 1.31 of the DLL.
ARM
ALT
FLCH
This engages ALT hold mode without changing the altitude register. Set the altitude to the target
value using the knob with the VS/ALT switch set to ‘Alt’.
If you are using Project Magenta or 767PIC, this button sets FLCH mode, not ALT hold.
VS/ALT
VS/Alt
Use this toggle switch to select which of V/S and ALT you adjust with the rotary knob.
SET
SEL
Set the V/S or Altitude with this, after selecting one with the VS/ALT switch.
On the Jetliner Console there’s also an AT ARM switch, which operates the auto-throttle arm facility in FS and on the Project
Magenta and 767PIC panels, and possibly a TO/GA button on the throttle lever for Engine #1. The latter operates TO/GA in
most FS panels and in Project Magenta, or either N1 or GA in 767PIC, depending on whether the aircraft is on the ground or
not at the time—and if so, whether the indicated airspeed is less than 50 knots or not.
Note that in all the above, the facilities for Wilco’s 767PIC panel only operate if you have not de-selected the option to detect
the 767PIC panel (see Avionics Options, below)..
Simulator buttons: Along the bottom of the Avionics stack, and on the front vertical face of the Jetliner Console, there are six
buttons which have labels relating them more to simulator actions than anything to do with real flying. These are all
programmable by you, the user, as described in later sections, but also come with some pre-defined default actions, as follows:
RESET
Free for user programming
START
Free for user programming
FREEZE
Pauses or un-pauses the simulation
MAP
Toggles the view between the normal cockpit/forward view and the top-down ‘map’ view. Same as
the keyboard Ctrl+S key.
CON
Cycles through all the views in FS – same as the keyboard ‘S’ key.
INSTR
Toggles between full-screen scenery view and normal panel+scenery view. Same as the keyboard
‘W’ key.
Note: All of the A/P and GPS buttons, knobs and switches can be re-programmed in FSUIPC’s “Buttons” section when using
FSUIPC version 3.30 or later. See the section about Button and Switch Re-programming later in this document.
THE AVIONICS OPTIONS
Marker beacon lights flash: This option makes the Marker Beacon lights, at the top of the Avionics stack, flash when
indicating a marker, rather than just hold steady. The flashing pattern is correct for the beacon type, matching the sound (dots
and dashes) which should be made by Flight Sim. The reason it is optional and defaulted off is that I found the beacon lights far
too bright, and having them flashing made this worse and very distracting! <G>
Transponder ident light flashes: If this option is set the ident light (on the left of the display) flashes intermittently to simulate
the transmitted responses to received inquiries. There’s nothing functional in this for Flight Sim; it is just an extra attempt
towards more realistic operation. It does show that FS and the PFC driver are still active, of course.
FS avionics switch acts on PFC avionics: If this option is set then the operation of the Avionics switch in most FS panels will
also toggle the PFC avionics displays on and off. This is particularly useful for the avionics stack when connected through the
Throttle Quadrant System, which has no avionics switch of its own. It may even be better using this than the hardware switch on
the Cirrus and Jetliner consoles, as the latter also removes power from the avionics controller board and when it is switched
back on this can sometimes supply odd parameters or even fail to initialise correctly.
COM2 radio selectable into FS: (Avionics stack), or
COM on/off swaps COM1/2 display: (Jetliner console on FS2002 and FS2004):
This varies according to FS version:
FS2000: this only supports only one COM radio, whilst the separate PFC Avionics stack has two COM radios. You can either
just never use the COM2 radio, or set this option and use the On/Off button to not only switch them on and off but also select
which one is connected to Flight Sim’s COM1. The one being used has a flashing decimal point. [This option is not applicable
to the Jetliner Console].
FS2002/FS2004: on the Avionics stack, COM1 corresponds to FS’s COM1 and COM2 corresponds to FS’s COM2. You do not
need anything further. However, for compatibility and convenience, this option will allow you to use the on/off button select
either of the PFC COM radios into FS’s COM1, and the other then maps to FS’s COM2. Thus you effectively have one active
and three standby frequencies for each radio. The active COM1 radio has a flashing decimal point. On the Jetliner console,
which only sports a single COM radio, the option is more important as it allows that radio to be used as COM1 or COM2. The
decimal point flashes when it is COM1.
NAV radio reception makes point flash: With this option set the decimal point in the “Use” frequency flashes when a valid
VOR or ILS station is tuned and received.
Extended ADF frequencies (nnnn.n): This allows NDB stations with fractional parts in their frequencies to be tuned on the
ADF receiver. See the lengthy description above to find out how five digits are managed with only a four-digit display.
ADF reception flashes ADF/ANT light: With this option set the ADF or ANT indicator (whichever is currently applicable,
according to the use of the ADF button) flashes when the ADF is receiving a good NDB signal.
Paused FS freezes ADF timers: If this option is not set then the timers continue counting even during pauses in FS.
Use RMI N1/2 toggle for DME select: The RMI NAV select switch just below and apparently associated with the DME
device is actually intended, instead, to select the NAV receiver to drive the NAV needle on the RMI gauge. However, those FS
aircraft panels with such gauges unfortunately have no means other than mouse clicking to make such a selection. This option
allows that switch to be used to select which NAV receiver supplies the DME signal. If selected, the little N1/N2/Off slider
merely acts as an On/Off switch for the DME instead.
Must Test and enable FD to use AP: Strict simulation of the original Bendix King autopilot should mean that you must run
the self-test before using any aspect of the autopilot, and engage the Flight Director (either directly or indirectly—by selecting a
control mode) before engaging the AP itself. Turn this option off if you want to be free of this. If you use Project Magenta’s
MCP, or the Wilco 767 PIC, these requirements don’t apply in any case.
Don’t flash/beep on A/P disconnect: The autopilot is modelled on General Aviation Bendix-King types. These flash the AP
Engaged indicator and beep repeatedly when the AP is disengaged. This is not wanted in an airliner cockpit environment, and
so an option is provided to turn it off.
Provide A/P control for Wilco 767PIC: If you own and use this aircraft and panel package, the PFC driver can be set to
automatically configure many of the avionics buttons, dials and switches to operate the 767’s autopilot. The driver detects when
the panel is loaded by looking for the B767W module running in FS (this is installed by Wilco into your Modules folder), and
the gauge B767WAFDS running at the time. It will not perform these checks if you have this option de-selected. This should be
used if you encounter any problems with similarly named modules. [The 767PIC options will not work on Windows 95 or
earlier, nor on versions of NT before SP3.]
The driver controls the 767PIC autopilot through the keyboard shortcuts provided. If you change these you will need to reload a
flight or change aircraft from and back to the 767 in order to force the PFC driver to read the revised keyboard assignments.
As well as the automatic re-assignment of actions to suit the 767PIC panel, you can assign any of the available 767PIC controls
to any of the programmable buttons. (See the section later on user programming).
Don’t set yaw damper on AP Eng: Normally PFC.DLL enables the yaw damper when the autopilot is engaged with the main
“AP ENG” button (or the yoke equivalent on PFC yokes), and disables it when the autopilot is disengaged using the same
facilities. In airliners the yaw damper is usually engaged at all times except when an engine is out, but this tends to make ground
operations tricky in FS. If you don’t want this automatic YD switching, check the box in the avionics options.
VOR/NDB button cycles (PM): This option refers to the Jetliner avionics button labelled “VOR/NDB”, but it has an equal
effect when using the separate Avionics stack and Project Magenta. It allows the Project Magenta ND display options to be
cycled between VOR, NDB, VOR+NDB and off, effectively combining two ND option buttons into one. [Note that on the
regular Avionics Stack the button is the one labelled NAV in the GPS section].
Flight Controls and Trims/Steering Pages
These pages are used to enable and calibrate the main flight controls, trims and steering tiller, if these are available and
connected through the PFC system. These controls are not all enabled by default as they can produce unwanted interference
with game port or USB connected joysticks and pedals if you are using those for any of the main flight control in Flight Sim.
Only you know which devices you have connected where. There is no automatic way the driver can configure this.
Check the little check boxes for each of these devices you are using through the PFC system. Make sure the others are not
checked. In the picture above left three of the controls are enabled, and the Rudder is shown selected, ready for calibration.
Note also the “response curve” top left. This is shown with its default setting—a linear response. You can set different curves
for each control, to get the responsiveness, the “feel” you prefer.
Note that, even if they are not enabled, the sliders shown on this page will move when you operate the controls—assuming that
you do have them connected through the PFC system. However, they will only be effective in FS if you check the appropriate
“enabling” checkboxes.
In the unlikely event that any of the sliders move in the wrong direction, check the relevant “RVS” (for reverse) checkbox. This
will make the driver interpret the incoming values in the opposite sense. Do this before attempting calibration as described
next—otherwise you will probably have to re-calibrate in any case.
The checkboxes marked “F” operate a simple digital filtering. Enable these only if you get a fluttering on the controls. The filter
operates for changes in direction faster than 2Hz.
CALIBRATION
Control axes such as those used in joysticks, rudders, yokes and throttles are almost always based on variable resistance
provided by a potentiometer and moving wiper contact. The game port, USB or other interfacing circuitry converts this into a
numerical value by electrical tricks such as timing how long it takes to charge or discharge a capacitor through the resistance.
This is simple, it works, and it is cheap. However, it does tend to give some variation in the readings obtained even for
apparently the same positions of the operating lever and hence wiper contact. These variations are due to an assortment of
physical conditions, including temperature, humidity and simple mechanical movements.
Many applications of controls such as these do not need precise values in any case, and the fact that it is going up or down is
often sufficient. However, with flight controls there are certain positions which do need to be fairly precise: for example, the
minimum or “idle” value for a throttle, and the centre values for ailerons, elevators and rudders.
Since the software drivers for your controls cannot predict with any accuracy the range of values it might see, nor certainly the
centre positions, you need to perform some ‘calibration’. This is simply the measurement of the range of values returned by
each control, and the setting of specific positions or ‘zones’ to represent important values.
To calibrate your controls in the Flight Controls page, perform the following actions on them, one at a time:
1.
Select an axis to calibrate: click on the ‘select’ button at the bottom of the column for that axis. The column will be
highlighted as shown for the Aileron axis in the picture above. The “select” button will change into a “Set automatic”
button, and other setting buttons will appear to the left. [We’ll look at the “automatic” facility after trying things manually,
as it is important you understand what is going on].
2.
Move the control to the extremes—full forward and back, or full left and right. Note that the value shown in the column in
the row labelled “input value” changes. To make full use of this entire range, when the input value reaches its highest click
the top button on the left—this may be called different things according to axis being set. For the ailerons it will be the
“right-most limit” because, to get those high numbers you will be turning the yoke to the right. In generic cases this button
will simply be labelled “Set upper limit”, but it will be reasonably descriptive in all cases. When you click it you will see
the input value recorded in the selected column, and in that row. You can do the same with the lowest value, using the leftmost limit button.
3.
This is all there is to basic range calibration. However, you should consider leaving a ‘dead zone’ at both extremes. This is
an area of control movement, very small, at either end, in which the value being used in the program doesn’t get larger or
smaller, despite the input value changes. By doing this you can guarantee full range in Flight Sim even across variations in
the values returned by your controls.
Set dead zones either end by doing the minimum and maximum calibration, as in step 2, but with the control moved away
from the extreme position, so that it returns a slightly lower or higher value.
Once you’ve done this you should find the Scaled output value, which is the one actually sent to Flight Sim, always ranges
from its minimum to its maximum, for that particular control type. The aileron, elevator and rudder controls have a full
range of –16383 to +16383. Your calibration should enable this to be achieved 100% of the time.
4.
With these particular controls (but not with them all), the centre position is also very important. Your flight controls should
self-centre themselves automatically when released. Again, because of variations the values actually returned for their
stable central “hands-off” position will not always be the same. You need to set a small range of values which the driver
will interpret as meaning “centred”, and for which it will always return to FS the same centre value (0).
5.
To do this, hold the control slightly off-centre, to the higher side (reading the input value) and press the Set centre high
button. Then do the same with the control held to the low side and pressing Set centre low. You may need to review these
settings occasionally to be sure you always get a zero Scaled output value for hands-off operation.
Repeat these steps for each active control. The “toe brake” operation may be digital or analogue. If it is digital then there’s little
calibration needed, provided the Scaled output value is 200 when the brake is operated and 0 when released. This is the
braking range implemented in the DLL for Flight Sim.
Note that there is nothing permanent about anything you may do here. The results are saved in the PFC.INI file, but you can
revisit this page and re-calibrate at any time. The fact that you do not have to exit Flight Sim or even reload it makes it much
easier and you can immediately test the results of your changes.
If you do think you’ve made a real mess and want to start again, just click the Set defaults button at top left. This will restore
the values to they way they were when you originally installed the PFC.DLL.
AUTOMATIC Calibration facilities are now also included. Once you have selected an axis for calibration you can toggle
between manual setting and automatic setting using the button at the bottom of the selected axis column. Automatic calibration
works as follows:
1.
After selecting “Set automatic” (the button changes to “Set manual” to enable you to change back) the program is
recording the maximum and minimum values, as you move the axis. So move it to both extremes several times, then leave
it in the centre.
2.
Having measured the maximum and minimum positions, the calibration is set 10 units away from those extremes—to give a
safety margin, a definite “null” zone, at either extreme. This may be too much or too little—it is not possible in automatic
calibration mode for the program to do better. You may want to go back to manual mode to adjust these extremes.
3. With axes having “centre” positions, after moving the axis to either extreme several times, leave the axis, still selected, in
its central or parked position for several seconds, and watch the two centre values. They will automatically adjust to give a
central range of about 12 units, 6 either side of your parked position. Again this may be too much, or not enough, to assure
you of a good stable centre. [For the “ARM” position of the Spoiler axis, mentioned later, you will most certainly need to
calibrate manually].
Sensitivity changes: “Response Curves”
The three main flight controls—aileron, elevator and rudder—can, if connected through the PFC console,
be subjected to some adjustment in the driver. The values fed to Flight Sim can be made to change more
slowly near the centre, whilst still reaching the extremes by faster adjustment further over. This produces
a sort of “S-curve” response, like the one shown in the illustration for Ailerons, to the right. The response
curve setting only appears when the control is selected, and is remembered for each of the three main
controls, independently. Adjust the flatness to suit your controls and your FS aircraft models by using the
scroll bar to the right of the graph.
This adjustment is most useful on rudders, which can often seem too ‘fierce’ in Flight Sim, but you may
also find it improves your control over the other flight control surfaces too.
Throttle Quadrants Page
The PFC throttle quadrant system provides interchangeable controls with varying numbers of axes up to a maximum of six.
There are, at the time of writing, ten different quadrants available (with some variations for the Jetliner console with its
additional button capability), and the PFC.DLL is pre-programmed to handle each of these correctly, assigning the correct
(labelled) lever to the appropriate Flight Sim control.
The selection of quadrant can be done specifically by you, the user, or automatically according to the name or the type of
aircraft loaded. But, always remember, the DLL cannot tell what quadrant you have actually bolted to the console.
For automatic selection to work you need to tell the driver which quadrants you have at your disposal. Do this by checking the
Quadrant enabled checkbox at top left on each quadrant entry. Change from one entry to another using the arrow buttons to
either side of the quadrant description.
There are sections for 15 user-configured quadrants as well. Leave these alone for now—first get all your quadrants working
correctly the way they were originally intended.
For each quadrant you own you need to connect it, find the right section in the Throttle Quadrants page, check the operation of
each of the levers, ensuring they match what you see on screen, and then proceed to calibrate each lever. Calibration here is
exactly as described above (for flight Controls), and this won’t be repeated here. Please follow the same directions. However,
there are a few things to note for each control type:
CarbHeat
Operates the carb heat on props, or the anti-ice on jets, but only supported on the Throttle Quadrant for the
single carburated prop. This control is digital so should need no calibration. The scaled output value is
simply 0 or 1 and will change over somewhere near the centre of the lever’s movement.
Condition
The condition controls are actually the same, to Flight Sim, as the Mixture controls, but provide a centre
setting capability so that the “Low Idle” position, on the notch, can be calibrated. This should be set to
give a scaled output value of 8191 (i.e. halfway in the full mixture range of 0–16383).
Mixture
There are up to four mixture controls, although never more than two used on the default quadrants. The
scaled output range for these is 0–16383.
PropPitch
There are up to four of these, but again only two ever used on default quadrants. The range is 0–16383
PropPitchR
The TurboProp uses reversible pitch propellers, which require these controls which have a forward and
reverse range just like the ThrottleR controls described above. You need to set the centre dead zone to
encompass the notch area, which represents zero pitch or “feathered” props.
Reverser
The jet reverser lever has a scaled output range of 0 (full forward) to –4096 (full back). This is how it
should be calibrated. [The actual maximum reverse varies from aircraft to aircraft, and for FS2002 or
later PFC.DLL detects this and re-adjusts the –4096 value accordingly. But this difference will not show
during calibration].
In operation its effect is to modify the values sent by the other (up to four) throttle levers. The reverser is
ignored if any of the throttles are not at full idle (scaled output of 0). As the reverser is pulled back, all
throttles simultaneously engage reverse and feed the range 0 to –4096 Or whatever) to Flight Sim.
Differential reverse thrust can then be established by moving any individual throttle forward. Only a
quarter of the travel is used, and pushing a throttle forward by that amount will reduce the reverse thrust
from that engine, from maximum reverse back to idle.
Once reverse is engaged, the throttles cannot be used for forward thrust again until the reverser is pushed
full forward (to the “stowed” position) and the throttles returned to idle. This latter interlock is to avoid
sudden engagement of forward thrust after using asymmetric reversal.
Note that the PFC driver automatically activates ground spoilers if Reverse is engaged using the Reverser
when on the ground with an airspeed of 60 knots or higher. The spoilers do not need arming for this to
occur.
Reverser1
Reverser2
Separate jet reversers work just like the single reverser described above, but relate just to Engine 1 or
Engine 2 specifically. This facility is only intended for use with twin jet aircraft.
Spoilers
The analogue spoiler setting (or “speed brakes”) provides a scaled output range of 0–16383 as usual, but
note that the action is reversed: full forward gives the spoilers down value of 0. The reversal is already
built into the default quadrant settings where the spoilers are used.
You will also notice that the dialogue provides for a “centre” position for this lever. This is so that you can
set an “arming” position on your lever, for auto-deployment of full spoilers by FS on touchdown. The
range of values above full down (a ‘scaled output’ of 0) and up to and including the lower value for the
‘centre’ is the ARM position. Any range set from low centre to high centre is wasted (it will give zero
spoiler). Then from the higher centre value to full up (scaled output of 16383) gives the full range of
manually set spoiler positions—i.e. 0–100% deployed.
Calibrate the spoilers so that you have a range of movement for ARMing. On the PFC quadrants featuring
spoiler levers there is a position marked ‘Arm’. Try to calibrate it so that the ARM read-out for ‘scaled
output’ on the screen coincides with that area on the lever. Make sure there’s enough dead zone at the
minimum end (full up) to guarantee a scaled output of 0 there.
Note that the PFC driver automatically activates 100% (ground) spoilers if Reverse is engaged using any
of the Reverser axes when on the ground with an airspeed of 60 knots or higher. The spoilers do not need
arming for this to occur.
SpoilersD
This is a special version of the Spoiler axis control designed for levers with two détentes—one for the
ARM position and another for the FLIGHT position. The two are calibrated as if they are either extremes
of an extended ‘centre’—follow the button labels on screen. The position from spoilers retracted (output
0) to the ARM calibrated notch, plus 6 more units (to allow for small jitter) is treated as ARM. Then the
movement from the ARM notch+6 to the FLT notch–6 is calibrated for 7% minimum up to 75% (default)
spoiler deployment, smoothly. It remains at 75% until the axis goes to or above the full spoiler deployment
(“Ground”), where, when the aircraft is on the ground, it moves immediately to 100% There is no
adjustment between Flight and Ground deployment values. When in flight the maximum deployment is the
Flight deployment, which can be adjusted. Do this in PFC.INI before loading FS via the parameter
SpoilerFlightPercent.
Note that the PFC driver automatically activates 100% (ground) spoilers if Reverse is engaged using any
of the Reverser axes when on the ground with an airspeed of 60 knots or higher. The spoilers do not need
arming for this to occur.
Throttle
There are up to four throttles, 1–4, corresponding to the maximum of four engines supported by Flight
Sim. The Scaled output values for the standard throttles operate from 0 (idle) to 16383 (max thrust). The
jets with Reversers supply the capability of a reverse thrust range of 0 to –4096 (adjusted for each aircraft),
but you won’t see this in the calibration screens as there each control is treated separately. There’s no
reverser interaction with throttles whilst calibrating.
Note that on the jet quadrants it is very important that the throttles can be reduced to complete idle (i.e. a
scaled output value of 0). If any of them do not reduce to idle when pulled right back you will not be able
to engage reverse thrust with the reverser lever.
ThrottleR
There are also up to four throttles with a reversing range. These are used on the TurboProp quadrant. With
these throttles a “centre” dead zone should be set to always encompass the ‘notch’ in the lever slot, being
the idle position. The region below this is then the reversing zone. The forward thrust zone ranges from 0
(idle) to 16383, whilst the reverse zone goes from 0 to –4096 (which, in FS2002 or later, is adjusted when
used, for each aircraft independently).
Flaps
You can calibrate an axis for flaps control. This is best done with an axis which has détentes to provide
positive positions for each setting, but it is possible without those if you have visual feedback of your
setting.
To calibrate the flaps first set the position for flaps “up” and flaps “full”. These should be calibrated when
slightly off the end stops to allow for small variations. You will see the buttons marked appropriately when
you select the flaps axis.
Then set up to 7 intermediate or interim flap settings. It is best to start from the flaps up position and work
down. The two centre display boxes show each calibrate flaps value (this will be the centre of that flap
position range) and the flap setting number (#1 to #7). You add a new position using the “Set Interim
Detent” button, and clear the one displayed with the “Clear Interim Detent” button. If you have already set
7 interim values (making 9 positions in total), further uses of the “Set” button merely alters the currently
displayed centre, unless it is “up” or “full”.
The Automatic Setting mode can be used for this too, and may be appropriate if your axis has no détentes
at all. The automatic setting sets the correct number of détente values for the currently loaded aircraft—for
example 9 including the “up” and “full” values for the 737, and 4 for the Cessna light aircraft.
Elevator Trim
Aileron Trim
Rudder Trim
Trim axes are actually provided in the Jet Cockpit, but can also be allocated on a quadrant and calibrated
there. In this case you don’t have the luxury of response curve assignments, but those shouldn’t be needed
in any case.
Steering tiller
This can be calibrated to provide a separate steering capability to the rudders, when on the ground. When
both rudders and a tiller are in use, PFC.DLL automatically gives more effect to the tiller at low speeds
and gradually transfers that effect to the rudders as the ground speed increases. By around 60 knots it will
be all rudder. The tiller has no effect in the air.
USER CONFIGURED QUADRANTS
The driver provides slots for up to 15 quadrants where you, the user, can decide which lever does what. Obviously, to do this
you’ll need a real quadrant that is equipped with levers in the positions you want to use. One example, which we’ll work
through here, is using the 4-jet quadrant to fly twin jets with the two spare throttle levers being used for proper analogue “toe”
(or rather, in this case hand) brakes.
Note that, to be able to use any user-defined quadrant, you will either need to switch off the automatic quadrant selection (in the
Main Options page), and select them yourself—or just press the Assign to aircraft button near the top of the quadrant window
for each aircraft you want to use it with (loading the aircraft first, of course!).
Here’s a picture of a user quadrant configuration that is quite easy to set up following the steps below:
You can see that all six levers are allocated, enabled, and they are also all calibrated for use with the 4-engined jet
quadrant—but configured to fly a two-engined jet with proportional ‘hand brakes’ (substituting for a lack of
analogue toe brakes, for example). The steps to achieving something like this with any “User Configuration” are:
1.
Affix the actual quadrant you wish to use. This is needed for both correct lever association and for calibration.
2.
Choose a lever you wish to use, make sure the on-screen slider moves with it, then click the button in the
Press to assign row at the top of the relevant column. If you’ve not used this before it will be blank. You’ll
get a menu listing all of the possible axis assignments you can make (see picture on right—this is an example
only, there are already additional facilities added).
Most of these will already be familiar to you, and are described earlier. The only extra ones you’ll find here
are “elevator trim”, a combined Left+Right Brake (“bothBrakes”), and a list of “combination” controls for
engines 1+2 and 3+4.
This elevator trim control is a direct analogue control over the pitch trim, which is rather different in operation
to the incremental trim used everywhere else.
The engine combination controls (covering Throttle, ThrottleR, Mixture, Condition, PropPitch and PropPitchR) are
provided to allow you to run up to 4 engines with a 2 engined quadrant, or possible 2 engines with a 1 engined quadrant.
3.
Having chosen one of the listed functions for this lever, you will see it described in the button at the top of the column.
Make sure you check the Check to enabled checkbox, otherwise the axis won’t be seen in Flight Sim.
4.
Now check the direction of movement. If necessary check the RVS (reverse) checkbox to ensure that the direction of travel
meets your expectations. If you are strangely inclined to allocate aileron or rudder control to a lever here then, since the
slider orientations are only vertical, you’ll need to know that the scaled output value needs to be negative for LEFT (port),
positive for RIGHT (starboard).
5.
Finally, calibrate the axis just as described earlier.
Repeat all these steps for each lever you want to use. You can also rename the set. Instead of “User Config n” just edit the
name, there in the display. The names are saved in the INI file (and can be edited there as well if you like, but do this when FS
isn’t running).
When you’ve done, when you press the “OK” button, everything will be saved in the PFC.INI file. You may want to make a
copy of that now to safeguard all this hard work!
Consoles Page
IMPORTANT: If you are using the Throttle Quadrant Console, not a Cirrus II, Professional, Jetliner Console, or Jet Cockpit
then you should uncheck the option saying that a Cirrus is being used (“CIRRUS II console button codes enabled”). Otherwise,
since this is defaulted, you may get spurious switch changes when starting FS.
If you are using a Jetliner Console, be sure to uncheck the top right option in the Cirrus/Pro section, and then check the option
to enable the Jetliner console button codes in its own section. If you have both console codes enabled (which is allowed for
development and testing purposes), then the Cirrus II button codes and assignments take precedence.
If you are in a Jet Cockpit, disable the Cirrus selection and enable only the Jet Cockpit one.
There are several options applicable to the Cirrus II and Professional Consoles, including three user-programmable buttons. But
… the way PFC equipment buttons are assigned is very similar throughout all parts of the driver, so this subject will be covered
together, for Avionics, Console and Yoke buttons: see Button Assignments later in this document.
The other options on this page are related to differences in the ways the other switches and buttons can be made to behave.
Before going into those, I will review the switches and buttons available on both current consoles, and what they do in Flight
Sim, by default.
Note that most switch positions are self-synchronising, in that the setting on the Console is automatically reflected in the
Simulator. However, this isn’t the case with some switches, due to the way the firmware works in the unit itself, and sometimes
you may need to toggle some switches to make the simulator match their settings.
Also, after switching on the Avionics (by the Avionics switch on the Jetliner, or this switch or the Battery switch on the Cirrus
II), wait for a few seconds for the avionics to correctly initialise before operating any other switches or buttons. The driver
automatically discards all signals for more than a second after these switches are enabled in order to try to avoid incorrect
settings.
Also, sometimes, in my experience, the avionics come up in a strange mode with some switches not working correctly (the Gear
switch seems prone to this). If this happens, switch off again, count to 5 and try again. It usually sorts itself out. This
phenomenon must be to do with hardware initialisation as it isn’t detectable or correctable in the software.
Note: All of the console buttons and switches can also be re-programmed in FSUIPC’s “Buttons” section when using FSUIPC
version 3.30 or later. See the section about Button and Switch Re-programming later in this document.
Cirrus II or Professional Flight Console
The table below is in order from top left, row by row to bottom right, facing the console.
Magneto (Left)
For props, controls Magneto setting (off/right/left/both) for the first or only
engine. See below for options with three and four engined aircraft. Note also
that the operation of Magneto switching on FS98 aircraft transposed into
FS2000 is not correct. The controls that are provided in FS98 to control these
settings are broken in FS2000 except for FS2000 native aircraft or derivatives.
For jets this switch is only used to select between ‘off’ and ‘gen’ on the starter
switches. This actually duplicated the function of the Alternator switches. Any
position other than ‘off’ on the Magneto switch selects ‘gen’.
Magneto (Right)
As for the left switch, but for the second or right engine on a twin. See below
for options with three and four engined aircraft.
Battery Master
Operates the battery master switch, of course. Note that when this is off the
optional PFC Avionics stack is also off (unpowered). When it is turned on the
driver discards further input for about one second, so that spurious signals
from the avionics do not upset things.
Alternator (Left)
Operates the left or only alternator switch, if one is provided in the current
aircraft. In jets this also switches between “off” and “gen”, actually
overlapping in this function with the Magneto switches. See below for options
with three and four engined aircraft.
Another thing to note is that, because of interlocks on some FS panels, the
alternator switches can get out of step with those on the panels.
Alternator (Right)
As for the Left one, this operates the right alternator where one is provided.
See below for options with three and four engined aircraft.
Avionics Master
Operates the avionics switch, where one is provided. Note that when this is off
the optional PFC Avionics stack is also off (unpowered). When it is turned on
the driver discards further input for about one second, so that spurious signals
from the avionics do not upset things.
Rudder Trim
This is handled completely within the Console and is not subject to any driver
programming.
Landing Gear
Operates the landing gear where applicable. Note that the driver synchronises
the state of the landing gear in FS with the position of this switch. This can
prove embarrassing if you ever reset your FS flight from one flying with gear
retracted to one on the tarmac or runway—the aircraft may immediately do a
belly flop on loading! Be sure to lower gear before selecting any new flight
that starts on the ground!
Flaps
Operates the flaps. There’s an option for making this a one-hit switch, or
repeat whilst held. See below.
Engine Start
This operates starters for props and jets, though FS98 props transposed into
FS2000 may start up on magneto switching in any case (see the comment on
the Mag switches, above). With genuine FS2000 and FS2002 models, for
props you have to ensure a rich mixture setting, then hold the starter on until
the engine starts. For FS2000/2002 jets you hold it on until N2 reaches 20% or
more, then switch on the fuel (Fuel boost switch).
The starter switch is inoperable if the corresponding magneto switch is in the
‘off’ position.
Pushing the switch left operates the left starter, or number one engine. On
twins you push the switch right for the right or number two engine. See below
for options with three and four engined aircraft.
Yoke
The yoke fitted to the Cirrus II Console may be a Jetliner, with 12 button
operations (4 rockers and 4 buttons), or a Beech or Mooney, each with 6
button operations (2 rockers and 2 buttons). Many of these are user
programmable, and they are all described in the sections on the Yokes page.
There’s an option concerning the electric trim action, described below.
Lights
The four light switches are active as applicable to the various aircraft or
panels. The four switches operate the following lights, as available:
NAV
STROBE
LDG
TAXI
Navigation, Wing, Recognition, Instruments
Strobes, Beacon
Landing
Taxi, Logo
Parking brake
Controls the parking brake. This may be a push button or a pull/push switch.
See the option below. The driver needs to know which type you have fitted.
Pitot Heat
Controls the pitot heat switch in all panels and aircraft so equipped. Always fly
with pitot heat enabled, or risk suffering AirSpeed Indicator (ASI) failures and
consequent auto-throttle errors.
Fuel Boost Left
On jet aircraft this controls the fuel switch for Engine number 1, on the left in
a twin. It needs to be on to allow the engine to start—normally you turn the
turbine with the starter till N2 reaches 20%, then switch on the fuel. To stop
the engine, turn this switch off.
On other aircraft, fitted with fuel pumps, this operates the fuel pump for the
first or left engine. Whether the aircraft needs the fuel actively pumped
depends on a variety of circumstances.
See below for options with three and four engined aircraft.
Fuel Boost Right
Same as the switch for Fuel Boost Left, except operating the fuel for the
second or right engine on twins. See below for options with three and four
engined aircraft.
Fuel Tank Selector
Selects the fuel tank to feed the engines: off, left, both or right, as marked.
This applies exactly to non-jet aircraft so equipped, or as near as possible to
others—usually with ‘both’ interpreted as ‘all’.
On jets, this is made a little more useful. The ‘off’ is still off, the ‘both’ selects
‘all’, but ‘Left’ selects Crossfeed Left-to-Right and ‘Right’ selects Crossfeed
Right-to-Left.
Note that some jet fuel switch gauges actually indicate crossfeed incorrectly,
or at least ambiguously. If you want to check the selected setting, look in the
Aircraft–Fuel menu in FS.
In FS2002 (and maybe before?), you will find some aircraft with multiple fuel
selector switches, whilst the PFC consoles only feature one. The PFC driver
now operates all engine fuel selectors together (in FS2002 and FS2004 only),
providing these settings for the Cirrus II selector switch:
Off
Left
Both
Right
Both switches ‘off’
Left to ‘on’, right to ‘crossfeed’, so both tanks feed the
left engine
Both switches ‘on’
Left to ‘crossfeed’, right to ‘on’, so both tanks feed the
right engine
Thanks are due to Frank Oberbuchner for prompting this approach.
Cowl flaps
This is a user-programmable switch, but is defaulted to operate the cowl flaps
on aircraft so equipped (not jets), and the autobrakes on jets.
Alternate Air
This is also a user-programmable switch, with default operations defined.
Whilst there appears to be some provision for “alternate air” in the inner
workings of FS2000 and FS2002, there are no controls or indicators for this in
the default aircraft. The standard equivalent on the types of non-jet aircraft
implemented in FS is “Carb Heat”, and this switch operates this function.
On jets the default action of this switch is to control the anti-icing.
Note: All of the console buttons and switches can be re-programmed in FSUIPC’s “Buttons” section when using FSUIPC
version 3.30 or later. See the section about Button and Switch Re-programming later in this document.
CIRRUS II and PROFESSIONAL CONSOLE OPTIONS
Parking brake is a switch: There are two different parking brake switches which can be fitted on the Console. One is a simple
push button. You push it to engage the parking brake, and push it again to disengage it. The other type is a push/pull switch, as
provided for the Alternate Air control. In this case you should pull the switch to engage the parking brake, and push it back in to
release it. This more accurately reflects real aircraft parking brake operation.
The driver cannot tell which sort of parking brake switch your Cirrus II console has fitted. By default it assumes it is a simple
push button, so check this option if you have the more realistic push/pull switch.
Accessing engines (4 and 3 engined aircraft): The Cirrus II Console has a number of switches that refer to twin engines: the
two Magneto switches (off-right-left-both), the Starter (a single left-right switch sprung to centre), the Alternator (Left and
Right) and the Fuel boost switches (also Left and Right). With all of these the Left switch always operates the first or left most
engine or its fuel. In a twin there’s no ambiguity: the Right switch operates the number 2 or right engine or its fuel.
In three-engined aircraft you can have Left controlling 1+2 (i.e. left AND centre) and Right still controlling right, or have left
controlling 1+2 and Right controlling the number 2 or centre engine.
In four-engined aircraft you can have Left controlling 1+2 (i.e. both left engines) and Right controlling both right engines, or
have left controlling the ‘outermost’ (1+4) engines, and Right controlling the ‘innermost’ (2+3) engines.
The option is provided because one method (the default) is more obvious and less confusing, whilst the other method is
actually, potentially, more useful. To explain: imagine you have landed your 747 and are either not confident that you have
enough fuel to get you to the gate, or you are cost conscious and want to save fuel in any case. In this circumstance you should
cut two of your four engines and continue taxiing on the other two. Now obviously you want symmetric thrust available, so you
cut engines 2+3, or possible 1+4. You wouldn’t cut both engines on the same side because this would give you some steering
difficulty and type wear, to say the least.
You stop a jet engine by cutting off its fuel. If the Fuel Boost switches are configured to operate Left=1+2 and Right=3+4 you
can only stop both engines on one wing or the other.
Anyway, it is your choice. If you don’t fly 3 or 4 engined aircraft there’s nothing to decide.
The other point to note here is the way the Starter switch operates with 3 and 4 engined aircraft. You cannot start more than
one engine at the same time, so the starter switch is designed to operate the starter of the first engine assigned to the direction
you press it (Left/Right) if that engine is not already running, and otherwise start the second such engine. This means that with
the 1+2/3+4 arrangement you cannot start Engine 2 before 1, or Engine 4 before 3. With the 1+4/2+3 arrangement the order is
1 then 4, 2 then 3.
If you have an engine failure this could prove problematic, depending which engine is failing.
Flaps switch repeats when held: This is a simple option which, if selected, allows the flaps to continue to lower or raise whilst
the switch is held in the appropriate position. It is defaulted off, which means you have to operate it repeatedly for each flap
détente you want to move to, but this is the more accurate option without a genuine flap lever with specific détentes.
Trim/shaker motors fitted: Only check this to enable the facilities in PFC.DLL which driver the stick shaker motor (on stall or
overspeed warnings) and trim motor (to turn the trim wheels), if you have these fitted. Do not enable them otherwise, as there is
a possibility that the version of firmware in your console might then cause odd things to happen, most noticeably flashing of the
gear indicator LEDs when trim is adjusted.
Electric Trim Switch (on Yoke): the options here allow you to decide what happens to the autopilot when you operate the
electric trim. The reason there are options here is that there seems to be quite a lot of variation in real life as to what happens,
and you will no doubt want to match the simulator operation to your real flying experience as closely as possible.
The options more or less speak for themselves, but a few words here may be useful:
You can have the simulator completely ignore the operation of the electric trim buttons when the autopilot is controlling vertical
mode (as in Alt, VS or APR modes). This is the documented action on the Bendix King KFC150 and KAP150 autopilots. You
can always and easily either completely disconnect the Autopilot (a pre-programmed button on all the yokes), or temporarily
override it with the CWS (Control Wheel Steering) button (programmed on one of the user-programmable buttons on the
Jetliner).
Alternatively you can have the autopilot automatically disconnect its vertical control modes, without affecting the lateral control
(Heading, NAV). This is said to be implemented in some aircraft. (This option is not usable when flying the Wilco 767 PIC,
since the driver cannot read the A/P modes in order to know what to change).
Finally, you can choose to have the electric trim totally disconnect the autopilot, with the usual warning beeps. This is also said
to be implemented on some aircraft, but it seems rather extreme to me, and even redundant with the AP disconnect button
available already, right next to the electric trim.
Trim sensitivity: The electric trim (from the yoke, or assigned buttons) operates by altering the pitch trim by a fixed small
amount, but doing this something like 18 times per second. The ‘small amount’ actually used can be adjusted to give the trim a
faster but less sensitive action, or, vice versa, a slower and more sensitive action. The value defaulted is 16. This is about half of
the trim change you get by one short tap on the Number Page 1 or 7 key when using keyboard trimming.
On the keyboard, a quick double tap on the trim keys gives a change in trim amounting to some 256 units. With the default
sensitivity setting of 16 this would take nearly a second to achieve on the electric trim buttons (256/16 = 16, at 18 repeats per
second). So, to allow fast massive trim corrections the electric trim is programmed to go much faster if the trim button is held
down for longer than a certain time. By default this is 8 times the normal trim (i.e. 128 units) and kicks in after the button is
held for 2 seconds (20 tenths of a second). You can adjust these two values if you like, but only in the PFC.INI file, which
means closing down FS, editing the file, then re-loading FS. PFC.INI file entries are described at the end of this document.
Jetliner Console
The table below is in order from top left, row by row to bottom right, looking down on the Jetliner Console. (The six buttons on
the front upright are the Simulator Buttons as described earlier, not here).
Engine Start switches (1–
4)
These operate the engine starters, with OFF, GEN and START positions. The
‘Start’ position is spring-loaded and, for genuine FS2000 aircraft models needs to
be held on till the Engine starts (unless the auto-latch option is selected).
Jet engines are started by using the starter to turn the turbine until N2 reaches about
20%, and then switching on the fuel. There are no separate fuel switches on the
console, so there is an option (defaulted on) to switch the fuel on automatically
when N2 reaches 20% or more. The same option switches the fuel off when you set
the starter switch to off. This stops the jets—normally the ‘off’ position would only
turn the generators off.
A separate option can be enabled which changes the starter switches for engines 3
and 4 into fuel switches for engines 1 and 2. This is obviously only operational for 1
and 2 engined jets.
Landing Gear
Operates the landing gear where applicable. Note that the driver synchronises the
state of the landing gear in FS with the position of this switch. This can prove
embarrassing if you ever reset your FS flight from one flying with gear retracted to
one on the tarmac or runway—the aircraft may immediately do a belly flop on
loading! Be sure to lower gear before selecting any new flight that starts on the
ground!
Autopilot
The whole of this section is described earlier, in the table for the Avionics.
Pitch Trim
This is handled within the Console and is not subject to any driver programming.
For normal trimming use the electric trim rocker on the yoke.
Parking brake
Controls the parking brake. This is a pull/push switch. It may need synchronising
when starting a flight.
Autobrake
This operates the B737 style autobrake switch included in the default FS2000 panel.
It works with standard panels and with Project Magenta, but note that the Wilco
767PIC autobrake is more complex. The driver attempts to synchronise matching
settings for the 767PIC, but it relies on keystrokes for incrementing or decrementing
the switch position, and these seem to be problematic with that panel—the same
problems, skipping some positions, occur even when using the keyboard directly.
Consequently, you may sometimes need to use the mouse for this switch in the
767PIC.
Flaps
Operates the flaps. There’s an option for making this a one-hit switch, or repeat
whilst held. See below.
Auto-Throttle
This operates the auto-throttle ‘arm’ switch. The auto-throttle needs arming for all
speed, TO/GA, N1/THR and VNAV operations.
Throttle Quadrant (with
optional attached TO/GA
or A/T disconnect buttons)
The throttle quadrants are described elsewhere.
The optional button on the levers normally operates TO/GA (“Take-Off/GoAround”) on standard FS panels, N1/THR on Project Magenta, and either N1 or
GA on Wilco’s 767PIC. The one chosen in the latter case depends on whether the
aircraft in the air or on the ground and, in the latter case, whether the IAS is below
50 knots or not.
Optionally, you can have the button operate as an Auto-Throttle Disconnect. The
choice in made in the Main Options page. When you use A/T disconnect what
actually happens is that the A/T is disarmed, which disconnects all possible autothrottle actions, and then re-armed a short time afterwards. This ensures that the
toggle switch indicating AT arming status remains consistent.
Adjusters for DH, CRS,
HDG, BARO and ND
mode/range
See the table for the ‘RIC’ earlier.
Rudder Trim
This is handled completely within the Console.
Aileron Trim
This is handled completely within the Console.
Radio navigation aids
The NAV, COM, DME, Transponder and ADF devices are all described earlier.
Avionics Master
Operates (simultaneously) the avionics, alternator and battery switches, where these
are provided. Note that when this is off the PFC avionics are also off (unpowered).
When it is turned on the driver discards further input for about one second, so that
spurious signals from the avionics do not upset things.
EICAS
This is user programmable, but by default it is used on Project Magenta to switch
EICAS displays.
Note that although it has a double action, up and down, these are indistinguishable
to the driver as they give the same code. Therefore only one action can be
programmed for it.
Fuel X-feed
This operates the fuel crossfeed switch in FS. The central position is normal,
enabling fuel feed from all tanks. ‘Left’ selects Crossfeed Left-to-Right and ‘Right’
selects Crossfeed Right-to-Left.
Note that the earlier default FS jet fuel switch gauges indicate crossfeed incorrectly,
or at least ambiguously—“Left-to-Right” is indicated as “Right”! If you want to
check the selected setting, look in the Aircraft–Fuel menu in FS.
APU Starter
This switch is intended for the APU engine, with Off, Gen and Start positions just
like the main engine Starters. However, there are no standard FS aircraft with APU
facilities that can be operated by the driver. Therefore the switch is completely user
programmable.
Pitot Heat
Controls the pitot heat switch in all panels and aircraft so equipped. Always fly with
pitot heat enabled, or risk suffering AirSpeed Indicator (ASI) failures and
consequent auto-throttle errors.
De-Ice
Operates the anti-ice facility in FS. This should always be used when flying through
clouds, and, in cold conditions, prior to take off.
Lights
The four light switches are active as applicable to the various aircraft or panels. The
four switches operate the following lights, as available:
TAXI
Taxi, Logo
LDG
Landing
STROBE Strobes, Beacon
NAV
Navigation, Wing, Recognition, Instruments
Note: All of the console buttons and switches can be re-programmed in FSUIPC’s “Buttons” section when using FSUIPC
version 3.30 or later. See the section about Button and Switch Re-programming later in this document.
JETLINER CONSOLE OPTIONS
Operate fuel switch and cut-off automatically: There are no separate fuel on/off switches on the console. Therefore, by
default, the driver automatically switches the fuel on when the starter is operated and the N2 reading is over 20% and it cuts the
fuel when the starter switch is set to Off. If you are using fuel switches elsewhere, or have programmed them on other Jetliner
switches, then disable this automatic action here.
For 1/2 engined jets use 3/4 switches for fuel: If you fly single or twin jets then the starter switches for engines 3 and 4 are
superfluous and so can be brought into use as fuel on/off switches for engines 1 and 2. That’s what this option enables. In this
mode the upward “start” position is not used. If you load a 3 or 4-engined jet the switches automatically (and temporarily)
revert to their normal operation.
Jet starters auto-latch till combustion: In a real airliner cockpit the jet start switches are normally spring-loaded, as in the
Jetliner, but they also usually latch automatically in the “start” position and are released to spring back to the central position
when the starting sequence has completed. To simulate this you can enable this latching option. The program will continue the
starting sequence even if you release the switch—to cancel it you can press the switch in the other (“off”) direction. The starter
will remain engage until the jets are running (as indicated by the “combustion” flag in Flight Sim).
Flaps switch repeats when held: Same as for the Cirrus II Console—see earlier.
Trim/shaker motors fitted: Only check this to enable the facilities in PFC.DLL which driver the stick shaker motor (on stall or
overspeed warnings) and trim motor (to turn the trim wheels), if you have these fitted. Do not enable them otherwise, as there is
a possibility that the version of firmware in your console might then cause odd things to happen, most noticeably flashing of the
gear indicator LEDs when trim is adjusted.
Electric Trim Switch (on Yoke): Same as for the Cirrus II Console—see earlier.
Trim sensitivity: Same as for the Cirrus II Console—see earlier.
There is also the option to treat the button on the throttle lever as A/T disconnect instead of TO/GA. Please see the Main
Options page for this.
Yokes Page
This page provides the programming facilities for the Jetliner, Beech/Mooney or Professional Console style of yoke. Shown
above are the Jetliner and Beech/Mooney pages. For a Professional Flight Console with the built-in hardware trim option, use
the third page which specifically shows the right-hand rocker on the left handle reserved for the hardware trim mechanism.
More on this below. For a Professional Console without the hardware trim action, refer to the most appropriate one of the
above two pages—most probably the Jetliner Yoke page (two rockers and two buttons on each handle).
The Jetliner has 12 buttons (8 paired in rocker switches) and the Mooney and Beech yokes each have 6 buttons (4 paired in
rocker switches). Of these, three are actually pre-assigned in the hardware/firmware: electric trim down and up on one rocker,
and AP Engage/Disconnect on one button. To the driver, the latter is actually indistinguishable from the AP Eng button on the
Avionics autopilot, so it cannot be user programmed. But the electric trim actually provides a different code to the driver from
the trim rocker on the autopilot, so is re-programmable.
Note that there’s an option for the A/P disconnect button to also disconnect the Auto-Throttle (A/T). If you apply this option, it
actually changes the control in the dropdown list from “A/P disconnect” to “A/P+A/T disconnect”, so it will affect anything else
you’ve programmed to operate this control. It will also affect the A/P Eng button on the Avionics, since that it indistinguishable
from the yoke button. This dual action applies to FS auto-throttle and to Project Magenta, but not to 767PIC.
Entries in the Page representing buttons that are not programmable are greyed out. So are those lines in the “Other Yokes” page
which represent buttons not provided on the Beech and Mooney yokes.
The method of programming the buttons and the choices available to you are described fully in the Button assignments
section, later in this document. Note that yoke button actions can be programmed for different actions for when the button is
pressed and released. This is mainly of use in the settings using the twin right rockers on the Jetliner yoke as a ‘view’ hat,
where pressing the button lets you look out a side window, and releasing it returns you to a forward view automatically. The
Predefined Set 2 option sets these defaults, and this set is shown in the illustrations above. The Predefined set 1 assignments
(defaulted on initial installation) give you panning controls instead.
Note that for the separate view controls to work properly in FS2002 you may need to add the line
pan_in_cockpit_mode=1
to the [CONTROLS] section of the FS2002.CFG file.
NOTE on Professional Console with hardware trim: On this yoke the right hand rocker on the left handle is not detected by
the driver and does not adjust the trim in the simulator. To adjust that trim use the ‘electric trim’ facilities, by default
programmed on the left rocker, but also available in non-autopilot control modes on the autopilot (as described elsewhere). PFC
recommend that you use both the rockers on the left handle is unison, thus adjusting both the simulator’s trim and the yoke
centering together. Practising will no doubt allow you to develop the best technique for achieving correct trim smoothly and
precisely.
Note 2: All of the programmable yoke buttons can also be re-programmed in FSUIPC’s “Buttons” section when using
FSUIPC version 3.30 or later. See the section about Button and Switch Re-programming later in this document.
Avionics Buttons Page
This page allows you to make your own button assignments for 12 different buttons on the Avionics stack (or in the avionics
sections of the Jetliner Console). These are the six buttons along the bottom of the stack (or on the front upright of the Jetliner),
concerned with simulator settings, and a row of 6 buttons in the GPS section (or, on the Jetliner, the buttons marked VOR/NDB
through to Std Baro SET).
Five of the six buttons have fixed uses with Project Magenta, and cannot be programmed when the PM MCP is running.
The method of programming the buttons and the choices available to you are described fully in the Button assignments
section, later in this document.
Note: All of the avionics buttons, knobs and switches can be re-programmed in FSUIPC’s “Buttons” section when using
FSUIPC version 3.30 or later. See the section about Button and Switch Re-programming later in this document.
Test Page
This page provides a way for you to check out your connected PFC equipment. For every button, dial, knob or switch this page
displays the actual codes returned (in hexadecimal) and the driver’s understanding of what it means. The only parts of your PFC
equipment it does not show are the returns from the analogue axes (throttle levers, rudder and toe brakes, aileron, and
elevator)—to check those refer to the Flight Controls and Throttle Quadrants pages.
If the button, knob or switch has been re-programmed in FSUIPC (version 2.93 or later), then the labelling here will show “(to
FSUIPC)” after the function is identified. This is one way to double-check whether you’ve re-programmed any of them.
The choice at top left in this page, between the Jetliner and other yokes is simply so that the decoded descriptions can match
your yoke correctly, when you use the Test page to check your yoke buttons. There’s no other significance in this choice,
although it will also decide which yoke button page is shown to you first. It is remembered (in the PFC.INI file) so you don’t
need to set it correctly each time you visit the page.
One thing this page will illustrate well: the short spate of invalid or misinterpreted codes seen from the Avionics stack when it is
first switched on (either by application of power directly, or by use of the Master Battery or Master Avionics switches). This is
because it comes on in “Elite” mode rather than using PFC’s own protocol. The driver sets it into the correct mode as soon as it
can, and discards everything received for over a second immediately after seeing the switching, but it is still sometimes possible
for some Elite codes to get through. On the whole these do no harm as subsequent interactions sort out any discrepancies. (Note
that the discard period is not operating in Test mode).
Logging
The PFC driver always creates a small text file in the Modules folder, alongside the PFC.DLL and PFC.INI files. This is
“PFC.LOG” and normally simply provides a start and end message. If there are problems that need investigation, various other
messages can be sent to this file. When displaying the Test page, any messages shown in the window are also sent to the log—
otherwise, in this page nothing else is logged. The options for logging are shown bottom left on the Test page. If any of these
are needed, to assist in determining the cause of your problem, you will be asked to enable the appropriate ones, re-create the
problem, then close down FS and ZIP up the PFC.LOG file, and the PFC.INI file, and send them to me. Don’t forget to Clear
the logging options afterwards (press the “Clear” button on the Test page), otherwise you might find some very large PFC.LOG
files being produced!
Button Assignments (in PFC options)
The PFC driver provides for user assignments to a number of buttons on the yoke, the Cirrus II console, the Jetliner Console,
and the Avionics stack. Note that since version 1.46 of the PFC.DLL and 2.93 of FSUIPC, all the PFC buttons, knobs and
switches can be re-programmed in FSUIPC’s “Buttons” section. This way of doing things can provide more opportunities, but
is really only suited to the more experienced user. For more details, see the section below (Button and Switch Reprogramming).
Back to the PFC options for programming. For the yoke these assignments can be different for the button press and button
release, but all the others are separately programmable for Jet and other aircraft.
Each button assignment section operates the same, with the button description on the left, then a column for the Press or Jet
assignment, a column to specify the repeat rate per second, if any, and a column for the release or non-jet assignment. In the
Press/Release situation the repetition rate obviously only applied to the Press action, but in the Jet/non-jet cases the repeater is
applied to both.
In case the button description is not clear, or you just want to check its operation, when the driver detects that a listed button is
pressed you will see a mark 8to its left.
To assign an action to any button, click on the drop down button in the appropriate column. If a keypress has been assigned
you’ll need to click the ‘Reset’ button instead, which will be visible against the keypress currently assigned.
The list of controls you get in the drop-down can be very long. If you have checked the ‘List All FS Controls’ checkbox in the
bottom left corner then the list will include all the controls listed in Flight Sim’s CONTROLS module. Similarly there are
options to include extras for Project Magenta (PM …) and, if you selected Wilco 767PIC support in the Main Options, all those
“B767PIC” controls too. (Many of the FS controls will be useless or meaningless in this context, which is why, by default, only
a selected list of more useful ones is provided).
For details of most of Flight Simulator’s controls, please refer to my FS2000 Controls document, available from
www.schiratti.com.
Assignment of a control to a button here is similar to assigning them to Game Port joystick buttons in the FS CFG file. The end
result, at least for all the FS controls, is the same. The extra, non-FS controls, listed are:
.0: No action assigned
.1: Use Key Press …
As it says, this means that the button will do nothing. The odd
numerical prefix here is merely to make sure this item comes at the
top of the list which is sorted alphanumerically.
Select this if you want the button to send a keypress combination to
FS. Any single combination of Shift, Control and almost any other
CWS/Pitch Sync
Pitch trim reset
PTT Roger Wilco (local)
PTT Roger Wilco (via WideFS)
Electric Trim Down
Electric Trim Up
A/P disconnect
Carb Heat/Anti-Ice
Throttle/Prop/Mix Sync
key (but not all, and certainly not Alt). After making this selection
you make the choice by actually pressing the keys. To undo this
and get back to the regular controls list, press the ‘reset’ button.
This will not work on Windows 95 or earlier, nor on versions of NT
before SP3.
This is “control wheel steering” in AP controlled modes and “Pitch
Sync” when the autopilot modes are not engaged. For a full
explanation of these actions please see the Note below.
This is a simple control which zeroes (centres) the elevator trim
value.
This is for use with a copy of the Roger Wilco program running on
the same PC as FS. The control sends the “Transmit” command to
RW when pressed and turns this off when released. You do not
(and should not) program an action for button release—the driver
does this part automatically for this control. [This is known to work
with RW Mark 1 and Mark 1c but has not been tested with any
others]
This is for use with a copy of the Roger Wilco program running on
a separate PC under WideFS. You do not have to configure the
WideClient.ini file specifically for this function. The control sends
the “Transmit” command to RW when pressed and turns this off
when released. You do not (and should not) program an action for
button release—the driver does this part automatically for this
control. [This is known to work with RW Mark 1 and Mark 1c but
has not been tested with any others]
This is a specially programmed smooth pitch trim with adjustable
sensitivity, and pre-defined autopilot interaction. This is all
described earlier in this document (see Console Options).
Unlike the normal AP Eng control, this disconnects the autopilot
only
Operates this FS control on all 4 engines at the same time.
This toggles a facility to synchronise the settings of throttle,
propeller pitch and mixture on all engines. Basically, when
enabled, it uses the Engine 1 values* for all the engines and ignores
the inputs from the other axes. When toggled off, the current
settings for the other axes are re-instated.
This is not related to the “Prop Sync” switch fitted to some aircraft.
* There is an option, in the INI file only, to have the settings based on the
Engine 2 values instead. Only change this if you think your engine 2 axes
behave better than your engine 1 axes.
PM MCP …
PM ND …
PM PFD Decision Ht Dec
PM PFD Decision Ht Inc
PM_EICAS …
B767PIC …
A complete set of push button facilities to control the Project
Magenta MCP
A complete set of selectors and buttons to control the assorted
display modes on the Project Magenta ND
Controls for adjusting the Project Magenta PFD decision height.
Controls for selecting Project Magenta EICAS pages and display
options.
A complete set of controls linked to keyboard shortcuts defined for
Wilco’s “767 Pilot in Command” panel. Use these control names
rather than define the keystrokes explicitly, so that the PFC driver
can automatically track any key re-assignments you may make in
future (provided you reload a Flight or change aircraft after making
such re-assignments).
These will not work on Windows 95 or earlier, nor on versions of
NT before SP3.
Note on CWS/pitch sync: This control is probably the most complex one provided. Its job depends on whether you are flying
with autopilot control or not.
If you are flying without A/P control, but using the Flight Director (FD), then the control is a “pitch sync”. When you press the
button the vertical speed setting is changed to match your actual vertical speed. The idea is that the FD command bars
synchronise to your current flying mode and thereafter allow you to keep doing the same by following the bars.
This works moderately well with some aircraft, but it isn’t entirely satisfactory due to the way the FS2000 flight director works.
Hopefully this may be improved in later drivers, possibly for FS2002 in due course.
Under A/P control, the CWS action allows you to fly freely with the yoke and rudders, without disconnecting the autopilot. You
have to keep the CWS button pressed for the whole time you want this control—this is why, by default, it is provided on the
Jetliner yoke.
When you finally release the CWS button, the A/P once more takes control. It will attempt to resume the lateral modes
(heading, LNAV) as if you never took over, but the vertical mode is altered to the way you left it upon releasing the CWS. In
ALT hold, or FLCH, the altitude you achieved will become the new hold and target value. In V/S climb and descent modes the
vertical speed you set will become the set target value.
This works very well for most light aircraft, but take care with the more complex airliners, and, indeed, Project Magenta. The
interaction between V/S, VNAV, FLCH and even SPEED/N1 modes are very complex and you may not get the result you
expected. It may not work at all with some aircraft, even Wilco’s 767 PIC for which other provision have been made in this
driver.
Button and switch re-programming (with FSUIPC “Buttons” page)
With effect from PFC.DLL version 1.46 and FSUIPC 2.93, all buttons, switches and digital rotary knobs on the PFC devices
(but not the potentiometer or electromechanical trim adjusters) are detected as “joystick buttons” in FSUIPC’s Button
programming page, and therefore can be re-programmed there.
The PFC joystick numbers, seen in FSUIPC, will be 16 and higher, with button numbers ranging from 0 to 31 just like any
‘real’ joystick button set. The assignments of hardware buttons or switches to these joysticks are based on programming
expediency and are not otherwise meaningful. To re-program a button or switch or rotary in FSUIPC, just go to FSUIPC’s
“Buttons” page and press, operate, or turn the PFC device to see the joystick and button number come up on the screen ready
for programming.
Please refer to the FSUIPC User Guide (available with the full FSUIPC ZIP package) for more details of how to program
buttons there.
Note that rotary switches such as those on the avionics unit emulate a digital button that is being pressed and released as you
turn the knob. Each ‘click’ is one press or one release. Therefore, to make the assigned action repeat once per click you need to
program that action both on ‘press’ and on ‘release’.
When any switch position, button, or rotary action has been successfully programmed in FSUIPC, the normal, documented
action in the PFC driver is bypassed. This is important to realise. However, all is not lost. Just delete the programming in
FSUIPC’s Buttons page, and the previous PFC action on that button or whatever will be instantly restored.
You can check whether FSUIPC has control of any particular switch by using PFC’s Test mode. Select the Test page in the PFC
options and operate the switch. In the log of its action in the right-hand part of the display the annotation “(to FSUIPC)” will be
present if the action is programmed in FSUIPC.
Note that there is no record of FSUIPC programming in anything concerned with PFC.DLL. All of the programming details are
included in FSUIPC’s INI file, so if you delete that you will find that all of the PFC actions revert to the normal ones as
documented here.
The PFC.INI file
You should not need to edit this file in any normal circumstances. Nearly all of it is created and updated solely by the PFC.DLL, from choices you make in the
Options and Settings pages. However, there are a few parameters not accessible in the on-line pages and these are shown below:
[Connection]
Debug=0
This parameter sets up debugging options, producing immense details about the interaction between the DLL and
the PFC control system. These details are sent to a debugger that has to be running also. There are some viewers
that will show the details on screen (one good one is DBGVIEW.EXE). If any debugging is needed on your
system, details of how to do all this will be provided.
Port=COM1
This records the COM port in use (COM1–COM8). It cannot be changed whilst FS is running, but you can
configure it here if you like, rather than in FS. This may be necessary if the port assigned belongs to something
else and this is preventing FS from running well enough to get into the PFC dialogue.
Speed=9600
This parameter is normally omitted. All current PFC consoles connect at the fixed speed of 9600 bps. The
exception is the PFC MCP—by default this connects at 19200, but has to be changed to operate at 9600 if you
connect a console through it When using an unaltered MCP alone with PFC.DLL you will need to edit this parater
to read 19200.
SyncInit=Yes
[Win2000/XP only]: The driver will normally ‘auto-restart’ the serial port operations soon after initialising when
FS is first started. This has the advantage of synchronising most of the switches and the FS panel settings. For the
original operation, add this parameter but set it to ‘No’. It is set to ‘No’ automatically under Windows 98 or Me.
AutoRestartTime=3000
[Win2000/XP only]: This controls the automatic restart facility. If the driver sees no data from the PFC devices
within the given number of milliseconds (amounting to 3 seconds, by default), then it will automatically restart
the serial port connection. All such restarts are logged. If you get too many, increase this value. You can stop the
automatic action by setting this parameter to 0. It is set to ‘0’ automatically under Windows 98 or Me.
ClearOnRestart=No
[Win2000/XP only]: Set this to Yes if you want the avionics displays to clear and be refreshed on all restarts.
ReadSleepTime=20
WriteSleepTime=20
These control the polling rate for serial port input, and the frequency with which the serial output is re-charged
when there’s any data to go out. The defaults of 20 (milliseconds) amount to 50 checks per second (1000/20).
Users should not really change these except under advice.
[General]
ElevatorTrimMult=8
The electric trim fast rate (in this case 8 means 8 x 16 = 128)
ElevatorTrimDelay=20
The electric trim delay till fast rate, in tenths of a second
ElevatorTrimLatency=1024
Trim motor control: this value is how close the incoming trim gets to the FS set trim when the motor
is turned off. it is the amount it is assumed the trim will still change after the off command is sent. The units are
FS units (of a complete trim range -16384 to +16384)
IgnoreTrimDifference=257
Trim motor control: the difference between the FS setting and the axis setting is monitored. If the difference is
less than this value, the motor isn't actuated.
MaxTrimMotorTime=60
Trim motor control: this value simply limits the time the motor is kept going. It is in seconds, and is a safeguard
in case the axis is reversed or not correctly connected
AxisSmoothTime=500
This controls the small jitter smoothing interval, in milliseconds. Jitters in axis readings of less than 5 PFC units
are ignored if they cause reversals (up-down or down-up) within this time. Set this to 0 to switch this smoothing
off, or increase it for more effect but possibly less responsiveness.
ThrottleSyncEngine2=No
Set this to “Yes” only if you wish to use the Throttle/Prop/Mix Sync option but have the values used based upon
the engine 2 axes rather than the axis 1 values.
Axis3Equalise=Yes
Set this to “No” only if you want the centre engine (#2) on a three-engined aircraft to be excluded from the option
to equalise nearly-equal axis settings.
BeepWave=Sound\caapdis
This provides the sound used for A/P disconnection (and the beeps heard at the end of an A/P test). The sound
should be capable of being repeated smoothly to provide the 12-13 beeps at the end of the test. The default is part
of a standard FS installation and contains 4 beeps, repeated 3 times and a bit. The path is within the FS path.
BellWave=Sound\caapdis
This provides the sound used for the FireBell in the jet cockpit. The default is the same beep as used for the
Autopilot, but should be replaced by a suitable bell wave. The path is within the main FS path.
SpoilerFlightPercent=75
Sets the percentage of spoiler (speed brake) deployment to be activated by the Flight détente on the “SpoilersD”
calibrated axis setting.
ThrEqLimit=512
PropEqLimit=512
MixEqLimit=512
These parameters relate to the scaled axis values seen for Throttle, Propeller pitch and Mixture, respectively. They
set the limit below which values for Engines 1 and 2 are equalised if the axis equalisation option is enabled.
Note that the limit operates on the scaled values, the ones related to the range expected by Flight Sim. The default
of 512 is effectively twice the expected resolution of the actual axes in the PFC quadrant.
PMsixpacks=Yes
Set this to ‘No’ only if you are running Project Magenta’s pmSystems and you do not want the PFC driver to
handle the MCP’s sixpack annunciator lights (on Boeing airliners).
Serial Port Thread Monitor
The PFC DLL updates four separate counters in FSUIPC’s address space to indicate the thread activity. The offsets
are viewable using FSUIPC’s “Monitor” facility (see its Logging page), or via something like FSInterrogate. These
are the offsets and uses:
3370
1 byte Updated whilst the serial port READ thread is alive and working
3371
1 byte This now actually indicates trim motor operation (0 off, 1 up, 2 down)
3372
1 byte Updated whilst the serial port WRITE thread is alive and working
3373
1 byte Updated whilst PFC.DLL is receiving calls from FS (unless this is happening, none of the
other three will be seen even if the threads are working).
From version 3.09, FSUIPC provides a Hot Key facility for restarting the PFC driver. If ever the read or write
threads seem inactive, or the PFC devices are unresponsive, try using the hot key. If this happens often, you should
try another COM port or check the linking cables. Better, use a USB serial port adapter instead—with Windows
XP in particular the USB operation is noticeably superior and much less likely to suffer errors.
Application program axis handling
When using FSUIPC version 3.30 or later, application programs or modules can access the raw PFC axis values at
offsets 3BA8 onwards. One 16-bit word is allowed for each (although currently all PFC axes have a maximum
range of 0 to 127, this may change in future). The axes are:
3BA8
3BAA
3BAC
3BAE
3BB0
3BB2
3BB4
3BB6
3BB8
3BBA
3BBC
3BBE
3BC0
3BC2
3BC4
3BC6
0
1
2
3
4
5
6
7
8
9
10
11
12
13
14
15
Aileron
Elevator
Rudder
Quadrant axis 5
Quadrant axis 3
Quadrant axis 1
Left toe brake
Quadrant axis 6
Quadrant axis 4
Quadrant axis 2
Right toe brake
Elevator trim
Aileron trim
Rudder trim
Steering tiller
not used yet
There are control flags (to disconnect these axes) at offset 3BC8. Each bit, 2^0 to 2^15 can be set to disconnect the
equivalent numbered axis above.
Connection check progress indication
The progress of the connection checks are flagged in a 16-bit word at offset 556E. This is primarily so that the
indications can be shown on other screens, particularly those maintained by Project Magenta. The bits are used as
follows:
2^0
2^1
2^2
2^3
2^4
2^5
2^6
2^7
2^8
2^9
2^10
2^11
2^12
2^13
2^14
2^15
FSUIPC okay
COM port okay
Aileron controls okay
Elevator controls okay
Rudder controls okay
Throttle quadrant controls okay (at least two levers not parked)
Avionics / Radio stack seen (switches may need to be manipulated)
MCP detected (either the PFC hardware MCP, or PM’s MCP program)
PM’s CDU or RCDU detected
spare (=0)
‘Quit FS’ selected
Checks were aborted
Checks were bypassed (not possible with 737NG cockpit selected)
Checks completed bar further retries
Checking finished
=0
737NG cockpit fire control system
The following FSUIPC offsets can be used to deal with the fire control subsystem in the Jet Cockpit.
Switch indicators: 16-bit word at offset 3BD0:
Bit
Meaning when set
0
1
2
3
4
5
6
7
8
9
10
11
12
13
14
15
Engine 1 Fire Handle Left
Engine 1 Fire Handle Right
Engine 2 Fire Handle Left
Engine 2 Fire Handle Right
APU Fire Handle Left
APU Fire Handle Right
Engine 1 overheat test a
Engine 1 overheat test b
Engine 2 overheat test a
Engine 2 overheat test b
Fault test inop
Fault test fire/overheat
Extinguish test left
Extinguish test right
Bell cutout*
not used
* The bell cutout indication is held on for half a second after it goes off to ensure it can be read. If any of the others
are momentary they may warrant the same treatment, but at present I'm assuming they are either latching or held by
the pilot.
Indicator controls: 32-bit dword at offset 3BCC:
(untested)
Set bit to 1 to light the indicator, 0 to extinguish it. The bit arrangements match the assignments in the PFC control
command for these indicators.
0
1
2
3
4
5
Left bottle discharge
Right bottle discharge
APU bottle discharge
Wheel well
Fault
APU DET INOP
8
9
Engine 1 overheat
Engine 2 overheat
16
17
18
19
20
21
Left green
Right green
APU green
Engine 1 fire discharge switch
Engine 2 fire discharge switch
APU fire discharge switch
If there’s also a need to control the glareshield warning lights and six-pack indications, PM’s offset 5530 should be
used, as documented for Project Magenta. If PFC.DLL has control of the MCP it will action these changes, but
otherwise it will have to be done by the PM MCP software or pmSystems.
737NG cockpit stick shaker operation
When PFC.DLL is running without Project Magenta it operates the stick shaker when FS indicates overspeed or
stall. But if the PM MCP program is running it defers the control of the stick shaker to that program.
This is done via offset 556D (1 byte). When this is non-zero, the stick shaker will be activated. The value of this
byte is decremented by 1 every timer tick (55mSecs), so that, if the MCP program suddenly stops the stick shaker
action will also stop within approximately 14 seconds at a maximum. If the program wishes the action to continue
it must keep writing a non-zero value to 556D.
History
Version 4.20 (for FSX) has been changed to work well under Windows Vista. Like FSUIPC4 on Vista, it now places its INI
and LOG files into the Flight Simulator X Files folder, in Documents (alongside saved Flights and Plans).
Version 2.20 (for FS9 and before) has an improved and more foolproof way of entering the (optional) Connection Checks
dialogue at FS start-up. Previously the “connection check” menu item was available too early and if manually selected would
give an error, such as reporting FSUIPC version 0.000.
Versions 2.10 and 4.10 are consolidations of a number of minor improvements made internally over the last few weeks.
There’s nothing particularly changed from the user perspective except, hopefully, better running.
Versions 2.03 / 4.03 provide an option for disabling PMsystems support from the PFC driver, in case you want to run
Pmsystems in parallel, with the PFC switches going direct to FS.
Version 2.02 is a fix for an error in PFC.DLL (only) which prevented the Connect Checks from being run, even if they are
selected. Oddly a section of the resources file did a walkabout but has been re-captured and tied down correctly now.
Versions 2.01 / 4.01 are released with the only change being in the way the MCP 737 type “six pack” annunciators are driven
when using pmSystems. The bit assignments now correspond to the latest SYSVAR.TXT assignments, and if the PM MCP
program is used this needs to be version 413c or later.
Version 2.00 (PFC.DLL) and Version 4.00 (PFCFSX.DLL) were released simultaneously with joint updated documentation
and some minor improvements but no new facilities. The version 4.00 release represents the first ‘oficial’ release for FSX.
Version 1.999b only contained some changes specifically for the Cirrus II Pro console.
Version 1.998 was released with an accumulation of changes over many intervening test releases. The main changes were:
•
The initial connections checks have been improved, as follows:
(a) They now work correctly first time on a new COM port connection
(b) If there are errors, the COM port used can be changed without closing FS and restarting
(c) The ‘Quit FS’ button now does what it says. Previously it tended to hang FS instead!
•
The COM port in use can now be changed in the main options page, during an FS session, without the need to reload FS as
before.
•
The spoiler/speed brake implementation is now rather different. With the “notched” spoiler control (SpoilersD):
(a) The zone from minimum to the start of the ARM notch area gives 0% spoiler, as before.
(b) The ARM zone sets the ARM flag (and the FS internal Arm value), also as before.
(c) The zone from the end of the Arm notch area to the flight detente provides spoiler extension from 7% (the minimum
supported by FS) to the value set by the ‘SpoilerFlightPercent’ parameter. This should be around 60-70% for 737's, for
example.
(d) The zone from the flight detente to the maximim, and beyond, is now set according to FS's "on ground" flag: 100% on
ground, but remaining at "SpoilerFlightPercent" in the Air.
I think this represents pretty closely what the real thing does (well, except that you can't pull it back passed flight detente in
the air).
For the non-notched axis setting, the active spoiler values, above the ARM position, are also now scaled from 7% to 100%
deployment.
•
In conjunction with the FSUIPC release 3.537 or later, PFC axes which are read by the PFC.DLL driver can now be
assigned in FSUIPC’s ‘Axis Assignment’ facility. This greatly enriches the number of things you can do.
Note that, as with FS, FSUIPC assignment does not override any use PFC.DLL makes of the axis. To avoid having
multiple actions for the same control, be sure to disable (uncheck) in PFC’s options all the axes you are assigning in
FSUIPC. For the quadrant this applies to all possible quadrant and user configuration attachments -- FSUIPC is not aware
of your choices there.
•
Connection checks added, with option to turn them off once first loaded and set with operating COM port.
•
Many changes have been made for the PFC 737NG cockpit, including major PMsystems support for the overhead panel
and the six-pack warning annunciators.
•
The 737NG cockpit configuration now cannot be enabled except with PFC installer assistance. This is to ensure correct set
up. Once installed correctly by PFC-trained technicians, the driver is then not reconfigurable on-line. The user can run tests
and view the action of the axes, but cannot reassign switches nor re-calibrate axes.
[NOTE: If you have enabled the 737NG cockpit codes and now find yourself locked out of all of the setting up facilities,
please delete your PFC.INI and start again].
•
The motorised trim is now making use of the "move trim to position x" facilities included in the very latest 737NG
firmware.
•
Squawkbox3’s transponder control via FSUIPC offsets 7B91 and 7B93 is supported on the PFC transponder switches. The
selector switch settings Standby, Off and Test are signalled as Standby and the On and Alt selections are signalled as
‘normal’. The Ident key triggers but only in ‘normal’ modes.
•
Support for SB3’s Private Voice PTT (PVT) is added. This will work as and when the matching update for SB3 is
released.
•
COM ports above COM8 are now supported.
•
Minor problems in the button displays in the axis calibration sections of the options are fixed. These did no operational
harm (as soon as an axis is selected they correct themselves), but looked odd.
•
A serious error causing corruption in the 1st slope selection for the main flight controls is corrected. This only happened
when the dual throttle mapping was in use (i.e. Throttle1 & 2 and Throttles 3 & 4 each on one lever). The result was odd
jitter in parts of the range on the main flight controls if the 1st flattened slope had been selected.
In Version 1.922 the driver does not attempt to run the elevator trim motor when the Autopilot is not in a vertical control mode
(Alt hold, GS/APP hold, V/S, FLCH or VNAV). This allows the trim motor to be exclusively controlled by the manual
switches, or turned directly via the trim wheels themselves.
Version 1.921 includes a correction to a small long-standing bug. The Carb heat/anti-ice control, accessible in the assorted
button assignment drop-downs, was wrongly classified as a “PM control” and so only appeared in the list if PM controls were
enabled.
Version 1.92 is the first user release of the driver for some time. A large number of changes have been made, the most notable
being the initial support for the developing 737NG cockpit. Many of the changes for the new hardware are still in need of
thorough testing, but at least the main supporting elements are fully in place.
Apart from 737NG cockpit support, these changes will affect most users:
•
Connection checks have been added. These operate as soon as FS is “ready to fly” and show as a new dialogue on screen.
This can be turned off once the main options screen is reached—unless you configure the driver to support a 737NG
cockpit, in which case the checks are mandatory. They will also occur if there is any problem with the version level of
FSUIPC or the COM port itself.
The same checks also provide a new way to specify the COM port connection should this not have already been
configured.
•
The digital filtering facilities are now available for all axes, but are separately selectable for the main control axes.
•
The 2 engine axis equalisation facilities are now extended to deal with 3 and 4 engined aircraft. With 4 engines the
equalisation operates with 1 + 4, and 2 + 3, separately—i.e. outboard and inboard balancing. With 3 engines the
equalisation is between engines 1 and 3, but a close value of the centre engine (2) will bring that in too. The centre engine
action can be disabled in the INI file if desired.
•
General improvements in serial port handling and minor bug fixes are also incorporated.
Version 1.90 is a fairly major update, including:
•
Full decodes of all the new protocol codes for the PFC jet cockpit are added. Where there are matching functions in default
FS and/or PM these are implemented, but the majority are simply passed on to the pmSystems module, if it is running. The
interface to pmSystems matches that defined for the 737NG in pre-release build 30.
•
The new protocol for the PFC 737NG MCP and its associated EFIS switch panels is supported.
•
Trim and steering tiller axes, as implemented in the Jet Cockpit, are supported.
•
New outputs to control stick shaker and trim wheel motors are supported.
•
Facilities are provided via new FSUIPC offsets to disconnect PFC axes and supply the raw values for application program
use.
•
A number of small improvements are made to the serial port handling, and should help prevent some problems with hangs
or crashes when restarts occur in Windows XP systems.
•
A bug in the user selection of the “PropPitch12” axis is fixed.
Version 1.844 includes just two changes:
•
The heading changes from the RIC or Jetliner Console are now made to multiples of 10 degrees when turned quickly, and 1
degree when turned slowly. Previously the fast turning was incrementing the 10's digit, but odd slow indications input at the
same time made it more difficult to set the value quickly and exactly. This applies to the FS default A/P heading and to
Project Magenta.
•
The limits for axis equalisation are now user configurable, in the INI file only. Separate limits are available for Throttle,
Prop pitch and Mixture/Conditioning.
Version 1.84 includes a number of changes:
•
A potential problem with the Auto-restart facility is fixed. If, for any reason, there were many of these occurring, the driver
could get into a state when one is instigated before the other completes. That would probably crash or hang Flight
simulator, or at least do some damage. Of course the problem would never have arisen in the first place if there were not
some serious problem elsewhere in the system, as the restarts are only instigated on the lapse of incoming data from the
PFC equipment for more than a certain time (3 seconds by default, 1 second at minimum setting).
•
A digital filter option for quadrant and toe brakes axes is now provided. This is designed to eliminate short term jitter (at
frequencies of 2 Hz or faster) more effectively than the earlier method (which is, however, still retained to deal with any
longer term drifting). The filter is switched out by default, and is enabled in the main Options page.
•
To try to eliminate small differences between engine 1 and 2 settings, causing short term asymmetric thrust, an option is
now provided to equalise the throttle, propeller pitch and mixture settings on engines 1 and 2 whenever they are relatively
close (basically, within twice the apparent axis resolution). This does not apply to three and four engined aircraft, and is
switched off by default. The option is on the main Options page.
•
An option is provided, via an INI file change only, to base the “throttle/prop/mixture sync” action on the Engine 2 values
instead of the Engine 1 values. The only valid use of this would be where one of the engine 1 axes was suffering more jitter
or drift than the equivalent engine 2 axis.
•
Many additional switches are now recognised for passing through and programming in FSUIPC. These are mostly those
related to extra PFC equipment associated with the 737NG jet cockpit, and are destined to be fully supported in due course.
This part of the development is merely the first step. [Note that these changes have not yet been tested due to lack of
access to the needed equipment].
Version 1.831 fixes an odd Altitude rounding difference which seemed to only affect the default Grand Caravan AP Altitude
Pre-Selector display: it shows values like 1999 instead of 2000. The other displays for the same value, such as in the Radio
Stack A/P and the airliner MCPs, were okay! The correction, determined by experiment, was by the addition of 0.0039 metres
(1/256th).
Version 1.83 fixes the User Configuration throttle quadrant naming facility. In versions 1.80–1.82 the new names were either
not saved correctly in the PFC.INI file, or mis-assigned on reload.
Version 1.82 includes:
•
Fixed broken multiple engine fuel selector operation;
•
Improved and corrected operation of COM radio selection sequences using the on/off buttons;
•
Option added to switch the PFC avionics according to the FS avionics switch.
Version 1.81 was released soon after 1.80 to correct an omission that results in bad quadrant assignments for those who use the
specific aircraft assignment system. This was caused by the insertion of the 737NG quadrant as #7, renumbering all those after
that up one—including the 15 User Configured quadrants.
The ‘fix’ in version 1.80 was to delete every assignment and re-assign, or alternatively just edit the PFC.INI and increment
quadrant numbers over 6 in the [AircraftQuadrants] section by 1. However, a better solution was needed which avoids this
happening again, and also to make the INI slightly less obscure. So, in this version both the QuadrantSet and all the
[AircraftQuadrants] entries are now saved with the Quadrant shorthand name (P1N ... U15) as used in the calibration lines.
However, the DLL cannot do a blanket update of all the [AircraftQuadrants] entries. This is an INI file accessed using
Windows' Profile API, and it has to know the parameter name to read/write the parameters. Since the parameter names are the
Aircraft names, the DLL doesn’t know any of them until you load the aircraft. So, the entries there will only be updated if you
delete assignments and make re-assignments.
For those upgrading from before 1.80 direct to 1.81, the DLL fixes the [AircraftQuadrants] quadrant numbers on loading—if
they are 7 or higher it adds 1. It does not re-write the parameters: that is only done when you assign. For those few who may
have already used 1.80 and ‘corrected’ the parameters already, they will be best served if they do it again for 1.81—i.e. delete
assignments and re-assign. Sorry about that—there is an alternative ‘fiddle’ explained in the IMPORTANT read me text file
included in the ZIP.
Version 1.80 represents a significant development, encompassing just about all requests for changes received to date. Here is
the list:
•
The sounds (A/P test and disconnect) now work in FS2004.
•
The throttle sync control, added in 1.72, now works well and has no relation whatsoever to the FS “prop sync” switch. This
ill-considered link in 1.72 seemed to be responsible for some odd and unwanted behaviour.
•
The PFC driver now works fine in FS2004 even if the user has added the (undocumented) “MakeItVersionFS2002” option
to the FSUIPC INI file.
•
A new calibrated axis type, “SpoilersD” is available for notched spoiler lever movements with two détentes, one for the
Armed position and the other for the maximum Flight deployment.
•
The PFC driver now automatically sets ground spoiler deployment (i.e. 100%) if reverse is engaged (with any of the
defined reverser levers only) when on the ground at an airspeed of 60 knots or more.
•
The new 737NG quadrant, with notched spoilers, notched flaps, and twin reversers, is now supported as a standard type,
though it isn’t subject to automatic selection.
•
User configured quadrant calibration pages can now be re-named by the user.
•
The COM2 radio in FS2002 and FS2004 is now fully supported, both on the separate Avionics stack with its two PFC
COM radios, and even with the Jetliner console (on which the radio use can be easily exchanged between COM1 and 2).
•
Standby frequencies in FS2002/4 COM1, COM2, NAV1 and NAV2 are now handled. When they change in FS they are
reflected correctly in the PFC avionics. However, for efficiency the FS values are not updated when the PFC ones are
adjusted except when the active/standby values are swapped over. At that time both frequencies in FS are corrected.
Version 1.73 fixed some problems with the new Throttle Sync implementation (mainly through it’s ill-fated connection to the
FS Prop Sync switch), but the release was never made public as it was soon superseded by the more significant 1.80 version.
Version 1.72 includes these important changes:
•
The ‘restart’ facilities introduced in version 1.63, and augmented since then, do not work under Windows 98 or Me, only
Windows 2000 and XP. In fact they crash FS to the desktop on Windows 98/Me. I have not been able to find a way to fix
this, so the DLL now automatically switches the facilities off under those operating systems.
•
The problems with re-programming some but not all buttons in a group present since 1.62 also applied to the Yoke
buttons—if one was re-programmed in FSUIPC, they all had to be. This is now fixed.
•
Small axis jitter (less than 5 PFC axis units) is now eliminated if it occurs within a specific timeframe. The time defaults to
500 milliseconds but is adjustable by a new parameter (AxisSmoothTime) documented above. “Jitter” is defined as a
change in direction (up then down or vice versa) with a small difference (less than 5) within the specified time. The option
can be turned off by defining a zero time.
Note that PFC DLL has performed short-term jitter smoothing for any sized spiking for some time (since version 1.27), but
to avoid responsiveness problems this was restricted to times of 150 milliseconds or less, and it is not adjustable. Setting
the AxisSmoothTime to 150 or less will therefore revert the smoothing to the previous method only.
•
A facility for throttle, propeller pitch and mixture setting synchronisation, for multi-engined aircraft, has been added. This
is assignable as a new control (see the table of additional controls earlier in the document). On aircraft equipped with an FS
“prop sync” control, this will do the same thing. The synchronisation works by applying engine 1 values to all engines, the
inputs from the other engine controls being ignored whilst the sync switch is enabled.
Version 1.71 fixes some switch reprogramming problems introduced by the changes in version 1.62. These problems had the
effect of treating two batches of switches as re-programmed in FSUIPC if any one or more in the batch was re-programmed.
The batches affected are:
AutoThrottle, Anti-Ice, EICAS and G/A on the Jetliner Console, and
Taxi, Landing, Strobe and Nav lights on the Jetliner and Cirrus consoles.
Version 1.70 incorporates these changes (most of them based on experiments in 1.64):
•
The RIC adjustments are now mostly implemented with dual speed operation—turning the knob faster accelerates the
changes, typically ten-fold. This applies to FS and Project Magenta operations only, not including the ND range/mode
setting nor any 767 PIC facilities.
•
The ‘restart’ facility is operated automatically if no data is received from the PFC device within a specific time, defaulting
to 3 seconds. The idea of this is to attempt automatic recovery from stoppages in COM port operation on some systems. So
far, it seems these may be related to the Intel ICH5/ICH5R chipset, though this is simply based on the only similarities
between the two machines on which it is known to have happened.
•
The clearing of the displays on restart is made optional and defaulted off, and the “beep” sound is removed. A log entry is
made on every restart instead, so that checking afterwards will suffice.
•
The frequency of the thread-based COM port polling is reduced from 100 times per second to 50, and is also made
adjustable by new “sleep time” parameters.
•
A facility is provided to automatically restart the COM port operations soon after first initialisation. This has the benefit of
synchronising most, if not all, of the PFC toggle and selector type switch settings in the simulation. This is enabled by
default.
•
Operation of the fuel selector is extended (on FS2002 and FS2004 only) to all aircraft engine fuel selectors.
Versions 1.64 and 1.65 were experimental test versions, never published widely.
Version 1.63 provides some serial port performance-related changes. First, there are found activity counters maintained in
FSUIPC’s offsets 3370–3373, as described in the previous section. Second, the PFC driver will respond to a “restart PFC
driver” Hot Key message by closing the serial port and both read and write threads, and restarting them. This may be useful if
there are any problems on the COM port or the PFC power supply. The hot key is supported in FSUIPC version 3.09 or later.
Version 1.62 fixes a problem which seems to apply only to the Gear switch. This can be re-assigned in FSUIPC, but then still
retains its function in PFC. This is fixed now for this switch (and any others which may truly have been affected), so that
assignment in FSUIPC's "Buttons" page really does override that in the PFC DLL.
Version 1.61 contains a minor change to eliminate any delay before it subclasses the FS2004 window. Apparently any subclassing done later increases the probability of FS2004 getting an apparent freeze with a black screen when changing between
windowed and full screen modes. This only applies to some systems, but it can be quite consistent on those.
Version 1.60 is an important release with the following fixes and additions:
•
The methods used to deal with the serial port connection to the PFC equipment efficiently turned out to be very inefficient
on the recent Pentium 4 processors with “Hyper-Threading”. The method used in the DLL caused Windows to allocate one
of the virtual processors completely to the serial port activity, thus wasting a considerably part of the power of the new
systems. This has been fixed in this version by revising the timings in the serial port routines to be more co-operative.
•
Support for quadrant axis flaps has been added. This is in anticipation of a new specialised jet quadrant with a flaps axis
featuring proper détentes, but it can be used on any spare axis. It supports up to 9 positions including the “up” and “full”
end positions.
•
An option is provided on the Yoke pages to make the A/P disconnect button also disconnect the Auto-Throttle if it is
engaged. Of course the A/T toggle switch will need re-cycling later to get it back into synchrony. Note also that, because
the A/P Eng button on the Avionics is indistinguishable from the A/P button on the yoke, the option also affects that.
•
The EICAS toggle switch on the Jetliner console is now user re-programmable even when Project Magenta is running.
Version 1.55 includes changes to deal with some unexpected inconsistencies in FS2004’s Controls table in CONTROLS.DLL.
These otherwise would make the key assignments to some of the new FS controls (including all the GPS ones) go wrong. Most
of the problems were caused by a double entry in the table for “Add Fuel Quantity”.
Version 1.54 is almost identical to 1.53, featuring only minor cosmetic changes.
Version 1.53 includes:
•
A fix to allow the special programmable control for Roger Wilco PTT (via WideFS) to work with WideFS versions 5 and
later.
•
Addition of separate assignable Reverser axes for engines 1 and 2.
•
Support for forthcoming Flight Simulator FS2004 “A Century of Flight”. (This will need the appropriate version of
FSUIPC when available).
Version 1.50 includes these changes:
•
On the avionics stack (and the front vertical of the Jetliner Console), the two time adjustment buttons (the left most two)
are now left unassigned by default. They are for user programming. This change is made because of FS2002’s habit of
reloading all the textures each time the actual time is adjusted, taking a long time for each attempt.
•
An option is added for the Jetliner “ND Range” knob to be used for OBS2 (or CRS2) adjustment instead. This is primarily
aimed at the PFC Jet Cockpit implementation.
•
An error whereby the ‘ADF’ indicator light was only half lit is corrected. There are two actual LEDs behind that indicator
and previously only one was enabled.
•
The axis calibration facilities have been changed so that in normal manual calibration mode the button descriptions on the
left are more specifically descriptive of the action they take for the particular axis. Also an “automatic” calibration facility
has been added for the simpler cases, when records maximum, minimum and central readings and makes small adjustments
on these to create the safety dead zones.
•
An option is provided to suppress the flashing and beeping when the Autopilot is disengaged. This is a Bendix-King style
action which is less applicable to jet cockpits.
•
There is now an option to simulate the latching of the jet starter switches in the ‘start’ position until combustion has
occurred and the jets are running. This latching can be cancelled prematurely by operating the starter in the opposite
direction—i.e. to the “generator off” position.
•
The Standard Baro option (programmed onto the Jetliner MCP by default) now operates as a toggle between the STD
pressure setting (1013.2 hPa or 29.92”) and the last QNH set. This is in closer accordance with the real cockpit action.
•
On FS2002, the reverse throttle range is now automatically adjusted for differing maximum reverse settings for
each aircraft model (they are not all –4096). The same applies to the Reverser lever.
•
An FS “throttle decrement” control is sent when the reverse throttle range is first entered, in case any third party panels
need this to get out of “flight idle” and into “ground idle”. [This won’t necessarily work, however—depending how the
throttle control is programmed in the cockpit software].
•
Some additional attempts are now made to try to get the COM port configuration message box brought to the front on
screen. It still certainly isn't foolproof though. With Win2k/XP and FS set to start up in full screen mode, the warning
message box can still sometimes appear behind the main FS window, so it appears FS has hung, whilst it is only PFC.DLL
waiting for the “Ok” button to be pressed.
Version 1.48, the first release of 2003, added these facilities:
•
The number of user configurable quadrant settings is increased from 3 to 15.
•
Each individually named aircraft in your FS2000 or FS2002 installation can have any one of the 24 available throttle
quadrant settings assigned, so that the correct one is selected every time you reload such aircraft.
•
The optional throttle lever button(s) available with certain Jetliner Console quadrants can be used a auto-throttle disconnect
buttons—by default these operate the TO/GA (take off/go around) or N1/THR thrust modes.
Version 1.47 includes these changes:
•
This version is not so dependent on the version of FSUIPC installed. Due to an error, version 1.46 would crash FS if
installed with a version of FSUIPC earlier than 2.93.
•
The memory of previous quadrant axis settings is now erased whenever a different quadrant is selected, whether manually
or automatically. This prevents odd things happening when quadrant axes are re-assigned without first “zeroing” them. For
instance, brakes may get stuck on, and the reverse interlock may not be released because of the memory of the non-idle
throttle axis now not configured.
•
The operation of the Decision Height or MDA value in Project magenta is made rather more responsive and predictable by
altering the value directly rather than relying on PM’s increment and decrement facilities.
•
Options are added to the Main page for different ways of controlling the OBI settings for the VOR indicators. The DH
knob can be used to control OBI2 (or CRS2) instead, or the CRS knob can be made to keep both OBI1 and OBI2 (CRS1
and CRS2) settings synchronised and change them together.
Version 1.46 includes two new facilities and one bug fix:
•
The buttons, knobs and switches can now all be re-programmed for any FS control or keyboard action through FSUIPC
(needs FSUIPC version 2.93 or later).
•
A “BothBrakes” axis control is provided, so if necessary a single throttle quadrant lever can be allocated for proportional
and symmetric braking.
•
The “prop” side of the Avionics AUX/POS button programming facility could not easily be used to assign a keyboard
action, due to a windoing problem. This is fixed.
Version 1.45 fixes some odd behaviour with the Yaw Damper when Project Magenta is being used, and offers the option to
leave the yaw damper alone when operating the AP ENG button (and the equivalent on PFC yokes). On Project Magenta it also
turns all three autopilots off if any of them are on when the AP ENG button or yoke equivalent is pressed.
Version 1.44 includes much better integration with the MCP of Wilco’s 767PIC provided you are using version 1.3 or later
with FS2002. The update can be obtained from the Wilco site and from www.mcp747.com. As well as better MCP operations,
this also gives a working autobrake switch. (However, there seems to be an elevator spiking action with the newer 767PIC
drivers, so you may want to check the spike removal facilities in the recent versions of FSUIPC).
Version 1.44 also turns off the Project Magenta PFD, ND and EICAS displays when the Avionics switch is turned off, and vice
versa. This is not synchronised initially, hoever, to avoid mistaken concerns that there is something wrong with the displays!
Version 1.43 includes a new facility and a small error correction. Version 1.42 never made it to a general release as it only had
a 24 hour life. The new facility is the addition of axis assignments for engine combinations 1+2 and 3+4, usable in the quadrant
“User configurations”. The error correction is to the flashing of the decimal point in the NAV1 and NAV2 radio “use”
frequency displays. Previously this (optional) flash did not occur if the received VOR signals did not include DME.
Version 1.41 includes only two relatively minor changes:
•
The range of output values for throttle, prop pitch and mixture controls now extends to 16384 (100%) rather than 16383,
which is just short of 100%. This apparently matters for some aircraft implementations.
•
When using FS2002, the “fuel boost” switches on the Cirrus II console operate independent fuel pump switches, where
they exist, on propeller driven aircraft. This follows discovery of how to access these switches on FS2002. Similar support
is provided for FS2000 but this is not tested as no such aircraft could be located. This enhancement needs version 2.851 of
FSUIPC, or later.
Version 1.40 included the following changes:
•
Fixed an intermittent with button programming for keystrokes. The symptom of this was occasional mis-reading of the keys
pressed when trying to assign them.
•
Added the option for the external RIC “CRS/DG” adjuster to adjust the gyro compass for drift.
•
Enabled the DME frequency adjusting knobs. These change the related NAV frequency when the DME is in the mode
displaying same.
•
Added details of the Professional Flight Console, to the options for the yoke and console programming. These don’t make
any actual change in the way the driver works, only in the way the options are presented.
•
Added support for the upcoming FS2002 version of the Wilco 767PIC package, though this is still unfortunatel only using
the keystroke interface provided.
Version 1.31 included relatively minor changes to make the operation of the V/S mode facility rather more friendly when used
with FS aircraft panels other than 767PIC and Project Magenta. A full explanation is provided in the main section on the
Extended Autopilot / Altitude Pre-selector, above.
Version 1.30 is the first official version supporting FS2002 (through FSUIPC 2.73 or later). The support for FS2000 continues
unchanged.
Version 1.271 was issued on the same day as 1.27 to fix an error in the axis smoothing which could make the response poor on
heavily loaded or slower PC systems.
Version 1.27 was preceded by a number of interim limited releases, culminating in this, which includes the following changes:
•
Automatic axis smoothing has been added, to prevent much higher frequency jitter which can (presumably?) be caused by
poorly smoothed power supplies.
•
A revised multi-threading method is used, to prevent a crash occurring on Windows 2000 (and probably XP).
•
Throttle settings are re-established after auto-throttle modes are disengaged. There is a small delay involved—half a second
for FS autopilot and 1½ seconds for Project Magenta. This is to allow time for the dis-engagements to actually operate, as
trying to restore throttle values too early doesn’t work.
Version 1.25 performs some additional checks on the facility used to send keystrokes to FS (and thereby Wilco’s 767PIC as
well). It appears the feature needed in Windows didn’t appear till Windows 98 and SP3 for Windows NT.
The Jetliner console’s fuel crossfeed switch is, in the case that the console is being used with prop planes, made to operate the
fuel selectors: Left/Both/Right (but no Off position).
The Jetliner console’s Avionics switch is now also made to operate FS’s main Battery and Alternator switches, as there are no
separate switches for these actions.
Version 1.24 fixed a problem whereby multiple “Key Up” codes could be sent when running Wilco’s 767PIC panel. The
logging entry for “writes to FS through FSUIPC” now also turns on logging for 767PIC keystrokes (both key down and key up
events), so that these can be checked in the event of any problems.
The discarding of spurious “Elite” type codes from the avionics is now improved further by ignoring all received codes until a
reasonable number of good, recognised, codes have been seen with no intervening illegal ones. This check is in addition to the
delay of a second or so after seeing “Avionics On” or “Battery On” switch operations.
Version 1.23 fixed a bug that could cause FS to crash if the “List All FS Controls” option was selected in any of the button
assignments, and the drop-down then used on any button entry.
Response curves (“S” sensitivity changes) were provided for the main three flight control inputs.
It also contained some minor changes to make the NAV/VOR, APP and GS indicators in the Autopilot behave more like they
do in a Bendix King Autopilot, even if Project Magenta’s MCP is being used.
Version 1.22 contained just one important change: the automatic suppression of Game Port (or USB) connected throttle inputs
was made optional and defaulted off. This was because it was found that some third party aircraft (Wilco’s 767PIC in
particular) use the same input controls to drive the auto-throttle. With previous versions of the PFC DLL, the auto-throttle in
767PIC was inoperative. The checkbox for the option is within the throttle quadrant section of the Main Options page.
Note that it is still just as important to avoid interference from other throttle inputs. Apart from re-enabling the PFC
suppression, the only other way is to make sure Flight Simulator isn’t trying to read any Game Port or USB throttles. This is
down to the CFG file (in the main FS folder)—e.g. FS2000.CFG. Look for entries in the [JOYSTICK …] sections with
“THROTTLE” names. The assignments have to be removed, and a LOCKED=1 parameter included to prevent Flight simulator
adding them again.
Version 1.21 added Logging facilities, operated by extra checkboxes on the Test page. This version never went on general
release.
Version 1.20 includes many changes to support the new Jetliner Console, as well as some other improvements. Users of
previous versions should particularly note the following changes:
•
The optional RIC assignment of IAS/Mach speed settings to the OBS1/2 knob and toggle switch is removed—that control
is now used for ND map mode and range settings. The speed control is moved to the previously unused GPS section.
•
All buttons and knobs in the erstwhile GPS section are now assigned autopilot related functions, or are user programmable
as before.
•
The spoiler lever facility in the throttle quadrant now includes a “centre” setting so that the spoilers can be armed for
automatic deployment simply by positioning the lever correctly.
GOOD FLYING!
Published by Peter L. Dowson, 6th March 2007