1
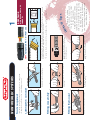
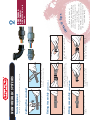
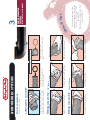
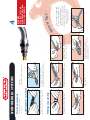
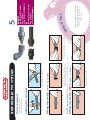
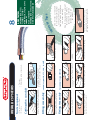
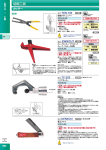
03/02
UK
Icore/Entraco
Santa Rosa, California
USA
cutting & assembly guide
Adaptaflex Ltd
Birmingham, England
Tel: (707) 535-2700
Fax: (707) 566-2064
Tel: 06172 677314
Fax: 06172 677310
Adaptaflex GmbH
Bad Homburg
GERMANY
Tel: (039) 544 4300
Fax: (039) 543 3614
Adaptaflex Pty.
Oakleigh,Victoria
AUSTRALIA
Internet: www.adaptaflex.com
Tel: 01675 468200
Fax: 01675 464930
agent details
Flexible Conduit Systems
LIT-038
Raising the Standard
TYPE SP, SN & LFH-SP
TYPE PA, PR, PI & PP
LIQUID TIGHT COVERED STEEL
FLEXIBLE SYSTEMS
TYPE PA, P1
Cut-vice. (Between
16-40mm/3/8’’-11/4’’conduit).
Adaptalok removal tool,
all sizes.
Swingcut. (Between
10 -32mm/1/4’’-1’’conduit).
Kwikcut. (Up to
32mm/1’’ conduit).
Rotocut. (20 & 25mm /
1/2’’ & 3/4’’ conduit).
(not essential, but designed to speed up installation and available from Adaptaflex)
Groove joint plier or
adjustable spanner.
TYPE SPLHCB
HIGH STRENGTH
OVERBRAIDED STEEL SYSTEM
TYPE SB, STC, SPB & SPTC
OVERBRAIDED STEEL
FLEXIBLE SYSTEMS
ADAPTASTEEL
8
Specialist Tools
Fine tooth hacksawminimum 32 TPI.
NON-METALLIC FLEXIBLE PVC
SYSTEMS TYPE XF
XF
NON-METALLIC PLIABLE PVC
SYSTEMS TYPE KF/KC
KORIFIT
5
TYPE PK, PKTC, PKSS, PRTC & PRSS
FLEXIBLE SYSTEMS
HI-SPEC NON-METALLIC
TYPE SPL, SPLHC & SPUL
ADAPTASTEEL
LARGE DIAMETER SYSTEMS
4
7
3
Tin snips.
Junior hacksaw.
Each page in this guide is
numbered and colour
coded in accordance
with this contents list.
Full technical details of
each conduit system are
given in the catalogue.
COVERED STEEL FLEXIBLE
SYSTEMS
TYPE PA, PR, PI & PP
ADAPTARING
ADAPTASTEEL
ADAPTASEAL
Utility knife.
Standard Hand Tools
TOOLS REQUIRED
The ‘Hints and Tips’ section on each page will give you a few ‘tricks of the trade’ to
help you with your installation.
How to assemble and securely fix the fitting to the
conduit.
Fitting Assembly
Illustrations show you how to cut the conduit
cleanly and accurately.
Cutting the conduit
Tools required to cut the conduit and assemble
the fitting will be illustrated.
The full range of tools is illustrated below.
N.B. not all tools are applicable to all conduit
Tools required
The various Adaptaflex
conduit system types,
either non-metallic or
metallic, are referenced
here exactly as they are
in our main product
catalogue.
TYPE S & SS
STEEL FLEXIBLE SYSTEMS
TYPE S & SS
2
ADAPTASTEEL
TYPE PA, PR, PI & PP
STEEL FLEXIBLE SYSTEMS
Contents
ADAPTALOK
ADAPTASTEEL
6
1
Select the page
Using the colour referenced index opposite choose
the Adaptaflex conduit system you are to install.
Turn to the appropriate section in this guide.
On each page in the guide you will find an
illustration of the conduit type and a typical fitting.
METALLIC
SYSTEMS
NON-METALLIC
SYSTEMS
HOW TO USE THIS GUIDE
Apply the tool over the conduit.
Fitting Removal
Offer up the fitting.
Fitting Assembly
Use the Kwikcut cutting tool, or
Cutting the conduit
Align with fitting lugs and push
tool into fitting.
Push and twist to ensure a firm fit
and seal.
Use a fine-tooth hacksaw, or utility
knife. De-burr as necessary.
• Kwikcut cutting tool, fine-tooth hacksaw, or utility knife.
• Adaptalok removal tool to assist fitting removal.
Tools required
NON-METALLIC SYSTEMS
2
3
Holding the removal tool, pull the
fitting from the conduit.
Pull back the fitting to ensure
fittings lugs have properly located
in conduit groove.
Ensure the cutting
of the conduit is square and
the cut remains in the ‘valley’
of the corrugation.
Adaptalok fittings can also be
removed by lifting the locking tabs
with a small screwdriver and easing
the fitting off the conduit.
The seal accessory is only required if
you want to upgrade performance
from IP66 to IP67/8.
nt
i
H
Tips
&
s
* IP rated to IP68 - 1.1 bar for 35 mins.Without the seal IP66 is achieved.
1) Angle seal approx. 30º and push one half to engage 2 ribs.
2) Push down on the ribs and feed the second half of the seal into the conduit.
3) Push conduit into Adaptalok as normal - see below.
1
NEW Adaptalok IP67 & IP68* Seal
WITH TYPE PA, PR PI & PP
CONDUITS
ADAPTALOK
1
Use a fine-tooth hacksaw, or utility
knife. De-burr as necessary.
Fit sealing ring over conduit,
ensuring the ribs seat in valley of
the conduit, chamfered end of ring
towards capnut.
Apply capnut over end of the
conduit.
Fit ‘C-ring’ onto the conduit,
chamfered end towards the
capnut.
Fitting Assembly ADAPTARING
Apply the capnut over the end of
the conduit.
Fitting Assembly ADAPTASEAL
Use the Kwikcut cutting tool, or
Cutting the conduit
• Kwikcut cutting tool, fine-tooth hacksaw, or utility knife.
Tools required
NON-METALLIC SYSTEMS
Apply the fitting body up to the
‘C-ring’ and fully tighten by hand.
Offer fitting body up to sealing
ring and fully tighten capnut by
hand.
Before the body of
the fitting is positioned, there
should be three rings of the
conduit visible after the seal or
‘C-ring’ is fitted.
Fitting of on anti-vibration washer
(type AWB), between capnut and
body, will ensure integrity of
assembled fitting.
nt
i
H
Tips
&
s
WITH TYPE PA, PR, PI & PP
CONDUITS
ADAPTASEAL &
ADAPTARING
2
Apply one half of clamp ring,
ensuring ribs in clamp ring align.
The straight flange fitting is
assembled in a similar manner.
Clamping ring ‘halves’ are aligned
and clipped together.
Fitting Assembly - straight flange
Offer up the conduit into the
fitting as far as the shoulder.
The clamping ring can be removed
with a screwdriver if required.
Align the second half of the clamp
ring and push click together.
Fit the ‘O’ ring into the
corresponding groove in the flange
face.
OPTIONAL SEALING KIT
Locate the flat sealing washer in the
first conduit corrugation and
proceed as below.
Fitting Assembly - 90° flange
Securely clamp the conduit and cut
using a fine tooth hacksaw or utility
knife, in the valley of the corrugation.
Cutting the conduit
• Fine-tooth hacksaw
Tools required
NON-METALLIC SYSTEMS
Ensure the cutting of the
conduit is square and the cut
remains in the ‘valley’ of the
corrugation.
Remove any excess burr from
the cut conduit.
nt
i
H
Tips
&
s
WITH TYPE PA, P1 CONDUITS
LARGE DIAMETER
SYSTEMS
3
Remove tape and pull back
braided sheath. Apply inner capnut.
Hand tighten body of fitting onto
inner locknut.
Offer up main body of fitting.
Securely clamp the conduit preferably with a Cut-vice. Cut
through the centre line of the tape.
• Tin snips.
• Adjustable grips or spanners.
Apply the outer capnut over the
braiding before removing tape.
Fitting Assembly
Apply insulating tape at the cutting
point-2 revolutions recommended.
Cutting the conduit
• Fine-tooth hacksaw.
• Cut vice.
Tools required
NON-METALLIC SYSTEMS
Position braiding over inner
locknut and secure with outer
locknut. (Ensure braid is trapped
between locknuts).
Apply sealing ring - chamfered edge
towards capnut, 3 corrugations in
from end of conduit.
Tighten components as shown.
Use tin snips as required
to trim the braiding after
cutting with hacksaw.
Other types of tape such
as parcel tape, masking tape
etc, can be used to
facilitate cutting.
nt
i
H
Tips
&
s
WITH TYPE PK, PKTC, PKSS,
PRTC & PRSS CONDUITS
HI-SPEC
FLEXIBLE SYSTEMS
4
Use a fine-tooth hacksaw, or utility
knife. De-burr as necessary.
Apply capnut over conduit.
Insert conduit into fitting between
‘barbs’ and inner shoulder.
Fitting Assembly NEW XF fittings (13-32mm)
Fully tighten the capnut by hand.
Fit ‘C-ring’ onto the conduit, chamApply the fitting body up to the
fered end towards the capnut, and
‘C-ring’ and fully tighten by hand.
in the fourth corrugation groove.
KORIFIT - push on fitting. Fitting assembly is as for Adaptalok fittings - see section 1.
Apply capnut over end of the
conduit.
Fitting Assembly KORIFIT - 3 part fitting
Use the Kwikcut cutting tool, or
Cutting the conduit
• Fine-tooth hacksaw.
• Kwikcut cutting tool.
Tools required
NON-METALLIC PVC SYSTEMS
When using push-on fittings
with Korifit, use a push and
twist action to ensure a
good seal.
nt
i
H
Tips
&
s
WITH TYPE XF CONDUIT
NON-METALLIC FLEXIBLE
PVC SYSTEMS
XF
WITH TYPE KF/KC CONDUITS
NON-METALLIC PLIABLE
PVC SYSTEMS
KORIFIT
5
Use a Rotocut.
Position and clamp conduit at
position of required cut.
• Adjustable grips or spanners.
• Utility knife.
Screw fitting through ferrule into
conduit.
Apply capnut then sealing ring chamfered end towards capnut.
Screw insert into end of
conduit.
Fitting Assembly - type M
Fit ferrule over end of conduit.
Fitting Assembly - types A & B
Securely clamp the conduit preferably with a Cut-vice - and
use a fine tooth hacksaw, or
Cutting the conduit
• Fine-tooth hacksaw and Cut-vice
• Rotocut.
Tools required
METALLIC SYSTEMS
Offer up body and tighten capnut.
Tighten with grips.
As handle is turned, gently squeeze
onto conduit to cut through spiral,
then remove and twist to separate.
Install and position fittings into
desired threaded entry, then fully
tighten the fitting.
If using Rotocut with
covered conduit, use a
utility knife to cut through
the pvc sheath.
A clean, square cut will
ease subsequent fitting
assembly.
nt
i
H
Tips
&
s
WITH TYPE SP, SN & LFH-SP
CONDUITS
COVERED STEEL FLEXIBLE
SYSTEMS
ADAPTASTEEL
WITH TYPE S & SS CONDUITS
STEEL FLEXIBLE SYSTEMS
ADAPTASTEEL
6
Use a Swingcut.
• Swingcut conduit cutter.
• Adjustable grips or spanners.
Offer up body of fitting and handtighten capnut.
Apply capnut and sealing ring over
conduit, ensuring chamfered edge
of seal is towards fitting body.
Fully screw the fitting into the
conduit.
Fitting Assembly - types A & B
Push capnut then seal over
conduit, screw in end fitting chamfered end towards capnut.
Fitting Assembly - slim M type fittings
Securely clamp the conduit preferably with a Cut-vice - and
use a fine tooth hacksaw, or
Cutting the conduit
• Fine-tooth hacksaw.
• Cut-vice conduit vice.
Tools required
METALLIC SYSTEMS
Screw the capnut onto the
fitting and tighten with grips or
spanners as above.
Install and position fittings into
desired threaded entry, then fully
tighten the fitting.
For M type fitting, ensure liquid
tight seal is applied
as shown, with tapered side
towards capnut.
For fitting types A & B, seal is
applied with chamfered side to
fitting body.
nt
i
H
Tips
&
s
WITH TYPE SPL, SPLHC & SPUL
CONDUITS
LIQUID TIGHT COVERED STEEL
FLEXIBLE SYSTEMS
ADAPTASTEEL
7
Securely clamp the conduit preferably with a Cut-vice.
Cut through centre line of tape.
• Tin snips.
• Adjustable grips or spanners.
Screw fitting body into conduit.
Remove tape and pull back braiding
to expose approx 50mm (2in) of
conduit.
Screw body of fitting into conduit.
Before removing tape, place outer
capnut onto conduit.
Apply sealing ring with chamfer
towards cut end of conduit.
Fitting Assembly - for conduit type SPLHCB
Remove tape, pinch braiding against
inner conduit and apply ferrule.
Fitting Assembly - conduit types SB, STC, SPB, & SPTC
Apply insulating tape at the cutting
point-2 revolutions recommended.
Cutting the conduit
• Fine tooth hacksaw.
• Cut-vice.
Tools required
METALLIC SYSTEMS
Screw inner nut onto fitting.
Apply inner nut to seat under
braiding.
Tighten with grips or spanners.
Screw outer nut onto inner nut
ensuring braid is trapped securely
and tighten with grips or spanners.
Use tin snips as required
to trim the braiding after
cutting with hacksaw.
Take care when pulling back
the outer braiding.
Due to the specialist nature of
this conduit we offer a
cutting and assembly
service. Please ask
for details.
nt
i
H
Tips
&
s
WITH TYPE SPLHCB CONDUIT
HIGH STRENGTH
OVERBRAIDED STEEL SYSTEM
WITH TYPE SB, STC, SPB & SPTC
CONDUITS
OVERBRAIDED STEEL
FLEXIBLE SYSTEMS
ADAPTASTEEL
8