1
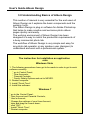
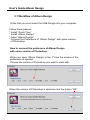
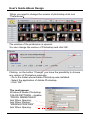
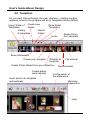
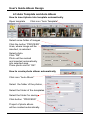
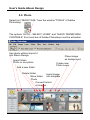
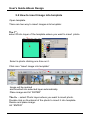
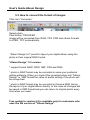
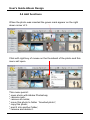
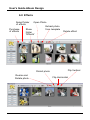
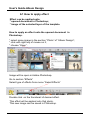
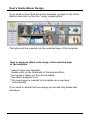
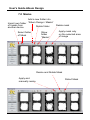
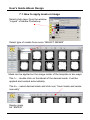
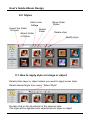
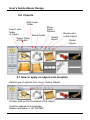
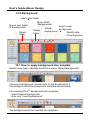
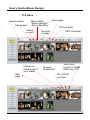
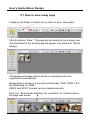
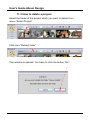
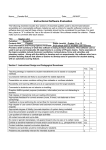
User's Guide
User's Guide
Album Design
www.SPC-international.com
Index
1.0 Introduction
2.0 Getting started and System Requirement
3.0 Understanding basics of Album Design
3.1 Workflow of Album Design
3.2 Eight Major section of Album Design
4.0
4.1
4.2
4.3
Templates
How to open and resize template
How to create own template
Auto Template and Auto Album
5.0
5.1
5.2
5.3
5.4
Photo
How to import photo into folder “Album Design / My Photo”
How to insert image into template
How to convert the format of image
Add functions
6.0 Effects
6.1 How to apply an effect
7.0 Masks
7.1 How to apply a mask on image
8.0 Styles
8.1 How to apply a style on image or object
9.0 Clipart
9.1 How to apply an object into template
10.0 Background
10.1 How to apply a background into template
11.0 Save
11.1 How to save ready page
11.2 How to modify page which was saved
11.3 How to delete a project
11.4 Publish Disk Burning / Send via FTP
User's Guide Album Design
1.0 Introduction
Album Design is a plug-in for Adobe Photoshop that helps
making exclusive and premium Photo Album. Album Design
is very simple and easy to use. Album Design helps you
increase productivity and make big profits because of its
ease of operation and the numerous albums, decorations
and tools it is bundled with.
This manual user guide will provide guidelines for using the
Album Design tools and options included in this package.
Description of the various tools and options will be divided
into categories like for example, User interface, explanation
of commonly and repetitively used options and features,
more detailed discussions about the each tools and their
specific usage.
Hints and tips will be provided along the way to present
ideas of how to get the most from the Album Design and to
provide information to use the tools more efficient and
easily.
User's Guide Album Design
2.0 Getting started and System Requirement
It is very important to set the working environment of
Album Design before we actually use it for making our Album
pages.
• After the successful installation of Album Design, insert the
USB dongle.
• Set the Resolution of Monitor to 1024 x 768 pixels or higher
• System Requirement For Album Design.
To use Album Design you must have the following:
A Personal Computer (or comparable laptop),
SVGA monitor (24-bit color at 1024x768 resolution or better)
SYSTEM REQUIREMENTS - WINDOWS PLATFORM
• Operating System Windows XP, Windows Vista or Windows 7
• QuickTime 7.5 or higher
• 2GB RAM (Recommended 3GB)
• Dual-core or higher
• HD 100 GB Free Space (Recommended SATA 7200RPM )
SYSTEM REQUIREMENTS - MACINTOSH PLATFORM
• Operating System Mac OS X 10.5 or higher
• 2GB RAM (Recommended 3GB)
• Intel Core Recommended
• HD 100 GB Free Space (Recommended SATA 7200RPM )
• Setting the Preference of Album Design with your version of
Adobe Photoshop.
User's Guide Album Design
3.0 Understanding Basics of Album Design
This section of manual is very essential for the end users of
Album Design as it explains the basic components and the
working tools.
The Album Design is plug-in software for Adobe Photoshop
that helps to make creative and exclusive photo album
pages quickly and easily.
The working environment of Album Design has been
designed in a way to match the production requirements of
a busy commercial photo lab.
The workflow of Album Design is very simple and easy for
any photo lab operator or any amateur user (designer) to
understand and work with a professional system.
The instruction for installation an application
onto
Windows Vista
1. The following procedures have got to be made in order to get to work
software correctly:
* go to Control Panel;
* User Accounts;
* Parental Controls;
* Family Safety Options and set to NEVER.
2. Restart computer.
3. Install “Quick Time”.
4. Install the software.
Windows 7
* go to the Control Panel;
* User Account and Parental Controls;
* User's Account;
* Change the settings of your User Account;
* take and drag the cursor down;
* click "OK";
* Install “Quick Time”;
* Restart computer.
User's Guide Album Design
3.1 Workflow of Album Design
At the first you must insert the USB Dongle into your computer.
Follow these passes:
* Install “Quick Time”
* Install “Album Design”
* Open “Album Design”
* Connect the Preference of “Album Design” with some version
of Photoshop.
How to connect the preference of Album Design
with some version of Photoshop.
When you open “Album Design” in the 1st time the window of the
preference is opened.
Choose the version of Photoshop you want to work with.
When the version of Photoshop is selected click the button “OK”
User's Guide Album Design
When you need to change the version of photoshop click icon
“Preferences”
The window of the preference is opened.
You can change the version of Photoshop and click OK.
Clicking on the button “Change” you have the possibility to choose
any version of Photoshop manually:
- Go to the folder where Adobe Photoshop was installed.
- Select the application of Adobe Photoshop.
- Click “OK”.
The next passes:
Window of Abobe Photoshop
COLOR SETTINGS – disable:
“PROFIL MISMATCHES”
Ask When Opening;
Ask When Pasting.
“MISSING PROFILES”
Ask When Opening.
User's Guide Album Design
3.2 Eight major sections of Album Design.
The user interface-starting window of Album Design shows 8 Major
sections.
As you start Album Design, the default user interface window will
be in Templates tab.
As shown above the user interface-starting window includes the
following components:
Templates
Photos
Effects
Masks
Styles
Cliparts
Backgrounds
Save
User's Guide Album Design
4.0 Templates
As you start Album Design, the user interface – starting window
appears, wherein the program will be in Templates tab by default.
Import folder of
Templates
Create new
Folder
Show folder
Templates
Delete
Folder
Library
of templates
Delete Photo
from template
Undo
Select dimension
Create your template
Rotation of
template
Create Photo Object from your Selection
Create album
automatically
Insert photo into template
automatically
Flip vertical
Flip horizontal
Configuration of
the preference
Minimize
Application
Help
User's Guide Album Design
4.1 How to open and to set size of template
Click on button “Dimension”
Type the size and the resolution or choose one from the “Custom”
Attention!
If you don't change the size of template it will be opened in its
original size (40x60cm).
Select type of the templates.
Click menu “Select template”.
Choose some folder with default templates.
Double click on thumbnail of a template and it will be opened in
Adobe Photoshop with the setted dimension.
Attention!
Every next template will be opened with the same dimension.
Application remembers the last setted dimension and selected
profile in its next opening.
User's Guide Album Design
4.2 How to create own template
Click icon “Create your template”
Type a name,
a size and
a resolution
of a new template.
Click “OK” Select tool “MARQUEE TOOL”
of Adobe Photoshop.
Select area where
you want to place
photo.
Click icon “Create photo layer from your selection”.
User's Guide Album Design
4.3 Auto Template and Auto Album
How to insert photo into template automatically
Open template
Click icon “Auto Template”
Select some folder of images
Click the button “PROCESS”.
Area, where image will be
inserted, is selected.
Select photo.
Click “OK”
Photo will be resized
and inserted automatically
into selected area.
Place photo and hit “OK”.
How to create photo album automatically
Click icon “Auto Album”
Select the folder of the photos
Select the folder of the templates
Select the folder for saving.
Click button “PROCESS”
Project of photo album
will be created automatically.
User's Guide Album Design
5.0 Photo
Select tool “MUVE TOOL” from the window “TOOLS” of Adobe
Photoshop.
The options “AUTO – SELECT, LAYER” and “SHOW TRANSFORM
CONTROLS” from tools bar of Adobe Photoshop must be activated.
Use photo without import it
into Album Design
Place image
as background
Import folder
Photo or one photo
Create new
Photo Layer
Add a new folder
Delete folder
Show folder
Photo
Insert image
into template
Convert format
of images
User's Guide Album Design
Resize and rotate
selected photo
Horizontal flip of photo
Distort photo
Vertical flip of photo
5.1 How to import Photo inside of the folder
“Album Design / My photo”
Create a new folder clicking the icon “Add new folder”
Import your folder of the photos or one photo using the icon:
“Import a folder of Photo” .
You may select a single photo or a group of them using the keys
Shift or Ctrl from the keybord.
User's Guide Album Design
5.2 How to insert image into template
Open template.
There are two way to insert images into template:
The 1st select Photo Layer of the template where you want to insert photo.
Select a photo clicking one time on it.
Click icon “Insert image into template”
Image will be resized
and inserted into selected layer automatically.
Place image and hit “ENTER”
The 2nd – select Photo Layer where you want to insert photo.
Double click on thumbnail of the photo to insert it into template.
Resize and place image.
Hit “ENTER”
User's Guide Album Design
5.3 How to convert the format of images
Click icon “Converter”
Select photo.
Click button “PROCESS”.
Image will be converted from RAW, TIFF, PSD and others formats
to JPEG, TIFF automatically.
"Album Design 5.2" permit to layout your digital album using the
photo in their original RAW format.
“Album Design” 5.2 version:
* support format RAW: CRW; NEF; CR2 and DNG.
* photo in RAW format may be corrected in some your preferred
editing software. When you import this corrected photo into "Album
Design" in XMP format the value of profile setting of the photo will
be recognized.
* photo in RAW format may be corrected in Camera RAW during
the layout of your digital album directly. In this case all changes will
be saved in XMP format and you can return to original photo every
time when you need.
Free update to version 5.2 is available only for customers who
uses the 5th version of "Album Design".
User's Guide Album Design
5.4 Add functions
When the photo was inserted the green mark appear on the right
down corner of it.
Click with right key of mouse on the thumbnail of the photo and this
menu will open.
This menu permit:
* open photo with Adobe Photoshop;
* remove mark;
* remove all marks;
* move this photo to folder “Inserted photo”;
* copy this photo;
* past it into another folder;
* rename and delete it.
User's Guide Album Design
6.0 Effects
Select folder
of effects
Purchase
of effects
Open Photo
Show
folder
“Effects”
Extract photo
from template
Delete effect
Flip Vertical
Distort photo
Resize and
Rotate photo
Flip Horizontal
User's Guide Album Design
6.1 How to apply effect
Effect can be applied onto:
* opened document in Photoshop;
* image of the selected layer of the template.
How to apply an effect onto the opened document in
Photoshop.
* select some image in the section “Photo” of “Album Design”;
* click with right key of mouse on it;
* choose “Open”.
Image will be open in Adobe Photoshop.
Go to section “Effects”
Select type of effects from menu “Select Effects”
Double click on the thumbnail of desired effect.
This effect will be applied onto that photo.
This new image can be saved in Photoshop.
User's Guide Album Design
If you need to insert that photo into template go back to the Photo
Section and click on the icon “Insert resized photo”
That photo will be inserted into the selected layer of the template.
How to apply an effect onto image of the selected layer
of the template.
* select a layer into template;
* double click on the thumbnail of the desired effect;
* the image is taken out from the template;
* the effect is applied on it;
* this new image is inserted into template as a new layer
automatically.
If you need to delete that new image you should only delete that
new layer.
User's Guide Album Design
7.0 Masks
Add a new folder into
Import own folder “Album Design / Masks”
of masks from
Delete folder
another device
Select folder
of Mask
Show
folder
“Masks”
Delete mask
Apply mask only
on the selected area
of image
Resize and Rotate Mask
Apply and
manually resize
Distort Mask
User's Guide Album Design
7.1 How to apply mask on image
Select photo layer from the window
“Layers” of Adobe Photoshop.
Select type of masks from menu “SELECT MASKS”
Mask can be applied on the image inside of the template in two ways:
The 1st - double click on thumbnail of the desired mask. It will be
applied and resized automatically.
The 2nd – select desired mask and click icon “Insert mask and resize
manually”
Resize mask.
Hit “ENTER”
User's Guide Album Design
8.0 Styles
Add a new
folder
Import the folder
of styles
Select folder
of Styles
Delete
folder
Show folder
Styles
Delete style
Modify style
8.1 How to apply style on image or object
Select photo layer or object where you want to apply some style.
Select desired style from menu “Select Style”
Double click on the thumbnail of the desired style.
The style will be applied onto selected photo layer or object.
User's Guide Album Design
9.0 Cliparts
Add a new
folder
Import own
folder
of clipart
Delete folder
Select folder
of Cliparts
Show
folder
Cliparts
Delete
object
Resize and
rotate object
9.1 How to apply an object onto template
Select type of objects from menu “Select Object”
Double click on the thumbnail of the object.
It will be applied onto template.
Resize and place it. Hit “ENTER”
Distort
object
User's Guide Album Design
10.0 Background
Add a new folder
Import own folder
of backgrounds
Select
folder
Show folder
Backgrounds
Delete
folder
Insert a new
Delete
background
background
Modify style
of background
10.1 How to apply background into template
Select some type of backgrounds from menu “Select Background”.
Choose a background, double click on the thumbnail of it.
The background will be placed into template automatically.
For inserting the 2nd background into template:
- select desired background;
- click icon “Insert background”.
The background will be inserted into template.
User's Guide Album Design
11.0 Save
Select project
Add project
Show folder
“Album Design /
Album Building”
Delete
project
Split
page
Create an
index page of
your album
Save page
Number
of page
Preview
Multimedia
Tiff converter
PDF converter
Send your
project or WEB
Album by FTP
CD or DVD
recorder
User's Guide Album Design
11.1 How to save ready page
Create a new folder or select one in order to save the project.
Click the button “Save”. The page will be saved by the number one.
The thumbnail of the saved page will appear into window of “Album
Design”.
All subsequent pages will be stored in ascending order the
registration automatically.
Ready page is saved in 5 formats automatically: PSD, JPEG, TIFF,
for Multimedia, for WEB.
INDEX and SPLIT formats can be created manually.
Click icon “Show folder Building” for visualized all 7 folders where
the page was saved.
User's Guide Album Design
11.2 How to modify page which was saved
If you want to modify page which was saved – double click on
thumbnail of this page in the window of “Album Design”.
The page will be opened in the window of Adobe Photoshop.
Now you can edit this page.
When modification are made you ought to select the same number
of the page from menu “Select number of Page”.
Click button “Save”
Old page will be overwritten.
Attention!
When you don't choose some number in order to save that page it
will be saved as a new page in ascending order the registration
automatically.
User's Guide Album Design
11.3 How to delete a project.
Select the folder of the project which you want to delete from
menu “Select Project”
Click icon “Delete Folder”
This window is opened. You have to click the button “Ok”.
User's Guide Album Design
11.4 Publish Disk Burning / Send via FTP
11.4.1 Disk Burning
1. Select “Disk Burning”
2. Burning on CD-DVD
your album project
11.4.2 Send via FTP
1. Select “Send via FTP”
2. Type server information and press Save
3. Drag and drop your data for sending in the FTP
Server
User's name
Password
Save Account