1
Installation
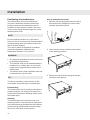
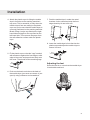
4. Attach the plastic cups for fixing the tumble
dryer’s front feet to the washing machine’s
top cover. This is essential, as only when the
tumble dryer’s feet are resting in the plastic
cups can you be sure that the tumble dryer is
correctly positioned on the washing machine.
Break off tag A on the cup fitted on the righthand side and tag B on the cup fitted on the
left-hand side. Then remove the paper from
the self-adhesive surface under the plastic
cups.
A
B
7. Push the tumble dryer in under the metal
brackets. At the same time keep the front
edge raised by 10 mm to 20 mm.
8. Lower the tumble dryer’s front feet into the
plastic cups and adjust the tumble dryer to
ensure it is level.
5. Fit the plastic cups so that the “tags” marked
with arrows are against the front edge or side
edge of the cover and press them firmly onto
the cover. Then break off the remaining tags.
Adjusting the feet
Screw the feet in or out so that the tumble dryer
is both stable and level
6. Push out the knock-out hole on the back of
the tumble dryer (you must not remove it, just
open it) using a hammer and screwdriver.
21