1
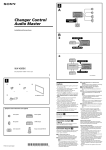
VDS2510 Installation Manual
VDS2510 Installation Manual
Video Signal Output No. 1
N.O. Alarm
N.C. Output
Ground
Audio Out
N.O. Alarm
C
N.C. Output
Ground
Audio Out
VDS2510
Installation Manual
C
Viewer
2510-L (Local Unit)
Video Signal Output No. 2
Sender
2510-R (Remote Unit)
OUTPUT Connections
There are two VIDEO OUT connectors. Please connect each connector
with a cable to a device, e.g. a monitor.
There are two Audio OUT connectors. Please connect each connector
with a cable to a device, e.g. a monitor or a speaker.
There are two ALARM OUT connectors. Please link the N.C. N.O.
connect from each of the ALARM OUT connectors to other further
application devices.
Distributor/Retailer
Copyright (c) 2006,
All Rights Reserved.
Content
Introduction .........................................................2
Features .............................................................2
Packing Checklist....................................................2
Certificate ..........................................................2
Patents ..............................................................2
Limited Warranty .....................................................2
Specification of VDS2510-R Sender ...................................3
Specification of VDS2510-L Viewer ...................................3
Functions of Remote Unit(VDS2510-R Sender) ..........................4
Functions of Local Unit(VDS2510-L Viewer) ...........................5
Installation of Remote Unit and Local Unit ..........................6
Making Connection....................................................8
Installation Notice..................................................8
Connecting Sender Unit...............................................9
Connecting Viewer Unit .............................................11
Foresight CCTV, Inc.
Email: [email protected]
Made in Taiwan
047ab, May. 2006
www.foresight-cctv.com
047ab, May. 2006
VDS2510 Installation Manual
VDS2510 Installation Manual
Introduction
The VDS2510 series is a transmission system for sending two video,
two audio, two alarm signals and DC power through one coaxial cable.
The system can transmit signals and 12VDC power up to 800 meters. If
a camera is powered at the remote end, without DC power supplying
from Viewer, the transmission distance of the VDS2510 can reach 1,000
meters.
Connecting Viewer unit
The following illustration shows the connections for the Viewer unit:
Features
Link In
DC power can be
sent to the
Remote side for
cameras power
Link Fault Indication
consumption.
System Status
LINK IN
& One cable transmits all signals and DC power.
& Universal Voltage Input (85V~265V).
& Up to 800 meters transmission range while sending DC power from the Viewer
unit; up to 1,000 meters transmission range when cameras have another power
source.
& Real time analog video signals for color and B/W (50fps/60fps), better than
480TVL resolution.
& Built-in electrical transient voltage suppressor (TVS) protection, gas
tube arrester protection and lightning protection
& Inter-carrier technology eliminates signal interference.
& Accept both N.C. or N.O. alarm connection, or mix of N.C. and N.O. In Term
mode.
DC40V
Packing Checklist
Carefully unpack the VDS2510 and check that the following items are included:
& VDS2510-R Sender (Remote Unit)
& VDS2510-L Viewer (Local Unit)
& Power supply (AC to DC power adapter) and power cord
& Four mounting brackets and four screws
& Two 1,000 ohms terminators for alarm mode use in Alarm Input side.
& Installation Manual
Contact your dealer immediately if any of the above items appears damaged or the unit
does not work.
Certificate
This equipment has been tested and found to comply with the Part 15
rules of the US FCC Regulation, and gets CE approved.
DC Power Input
LINK IN Connections
Connect the other end of the coaxial cable which is connected to
the LINK OUT side of the Sender unit to the LINK IN side of the
Viewer unit.
Connect a wire from the +12V pin and Out of the LINK FAULT PTB
connector to a buzzer or an indicator wherever you want.
Plug the power cord on and connect the AC to DC power adapter to
the DC POWER IN connector in the LINK IN side of the Viewer unit.
Patents
Patents covering the design, operation, techniques, and unique
features of the Single-cable transmission device of a surveillance
system include: U.S. Patent #US 6,369,699 B1 April 9, 2002; Taiwan
Patent #201389 September 3 2004; Europe Patent #EP 1134909 A1
September 19, 2001. Other Patents are pending.
Limited Warranty
Foresight grants a warranty for this product for 18 months.
Please offer the purchase date and the serial Number of Bar-Code
on the back of the product to your distributor or retailer as
proof for this purpose . During the warranty period, in case of
defected in material or workmanship, the defective unit will be
repaired or replaced according to the assessment of.
However, this warranty does not cover damages caused by improper
use or from unauthorized modifications by third parties.
-2-
047ab, May. 2006
- 11 -
047ab, May. 2006
VDS2510 Installation Manual
VDS2510 Installation Manual
Specification of VDS2510-R Sender
To ensure smooth operation of VDS2510, the following minimum system
and setup requirements should be met.
LINK OUT
Link Out
Power Status
Alarm
Input
Type
Selector
Coaxial cable is
used for Link Out to
send broadband
signals: 2 video, 2
Audio and 2 alarm
signals.
Coaxial Cable
1 to 800Metres
use RG-6/u
or Equivalents
Electrical:
All video, Audio and Alarm have two inputs
Video Input Signal: 1.0Vpp, 75 ohms
Bandwidth of Video Signal: 5.5MHz typ.
Audio Input Signal: 3.0Vpp, 100K ohms, max
Alarm Input type: N.C./N.O./Terminal 1,000 ohms
Power Output: DC12V, 1.0 A(2 cameras in total), max.
Connection :
(PTB= Plugable Terminal Block)
Video Input: BNC Socket X 2
Audio Input, Alarm Input and DC Out: 5 Pin PTB X 2, 3.5mm Pitch
Link Out: BNC Socket
LED here can indicate the
Alarm connecting
Specification of VDS2510-L Viewer
Electrical:
LINK OUT Connection
Connect the LINK OUT of Sender unit with one end of a coaxial cable,
and connect the other end of the coaxial cable to the LINKIN side of
All video, Audio and Alarm have two outputs
Video Output Signal: 1.0Vpp, 75 ohms
Bandwidth of Video Signal: 5.5MHz typ.
S/N ratio of Video Signal: 50dB typ.
Gain of Audio signal Output: 0dB ∮3dB, 600 ohms / internal
impedance
Bandwidth of Audio Signal: 50Hz to 10KHz ∮3dB
S/N Ratio of Audio Signal: 46dB under 1.0Vpp input at RU
Alarm Output: N.C./N.O., Contact Rating 1A, 30VDC Dry contact
DC Power Input: 40V
Max. DC power Output: 38V, 1.6A, min.
Link Fault Output : 0.15A, min.
Connection :
(PTB= Plugable Terminal Block)
Link In: BNC Socket
Link Fault: 2 Pin PTB, 3.5mm Pitch
DC Power Input: 2 Pin PTB, 5.0mm Pitch
Video Output: BNC Socket X 2
Audio Output and Alarm Output: 5 Pin PTB X 2, 3.5mm Pitch
- 10 -
047ab, May. 2006
-3-
047ab, May. 2006
VDS2510 Installation Manual
VDS2510 Installation Manual
Functions of Remote Unit
Connecting Sender unit
The following illustration shows the connections for the Sender
VDS2510-R Sender
INPUT side
VIDEO IN:
to receive a video signal from video source, eg. a camera.
AUDIO IN:
to receive an audio signal from an audio source, eg. a microphone.
ALARM IN:
to receive alarm connection from devices like sensors or infra-red
detective devices. Both N.O. and N.C. are acceptable, even at the
same time(under the TERM).
DC OUT:
to send 12VDC power to cameras.
LINK OUT Side
LINK OUT with DC IN:
to send out two video, two audio, two alarm signals to the Viewer
unit and to receive DC power from the Viewer unit.
POWER STATUS LED:
to indicate the power supplying condition. When LED is red, it
implies the power supplying to camera is stand-by or not been used.
When LED is green, it means the power is loaded well to the camera.
When LED is Yellow, it means the DC power is low. Please check if
the cable used is over length limitation or the DC consumption of
the two cameras in total is more than 1.0A (note1). When LED is
flashing, it implies the power supply might be failed due to the
power is too low to offer any function.
ALARM
Video Signal Input
No. 1
Audio Signal In
Ground
Alarm Sensor In
DC 12V Out
Audio Signal In
Ground
Alarm Sensor In
DC 12V Out
Video Signal Input
No. 2
INPUT Connection
LED:
to indicate the Alarm Input and Alarm Output are both well working.
CONNECTION INPUT TYPE:
to let users to select which alarm connection type to apply: N.C.
or N.O. or TERM (mixed with N.O. and N.C.)
Note 1. The 1.0A is based on the condition of less than 600M
distances and 5C-2V coaxial cable used.
Please refer to How to Use Alarm manual enclosed.
There are two VIDEO IN connectors. Please connect each VIDEO IN
connector with one end of a cable carrying video signal from the
video source.
There are two AUDIO IN connectors. Please connect each AUDIO IN
connector with one end of a cable carrying audio signal from the
audio source.
There are two ALARM IN connectors. Please connect each PTB connector
in ALARM IN with a wire with the N.O./N.C. connection from sensors.
Please refer to How to Use Alarm manual to improve security and
flexibility of alarm connection.
There are two DC OUT connectors. Please connect each DC OUT
connectors with the power cord (DC 12V) to the video source, e.g. a
camera.
-4-
047ab, May. 2006
-9-
047ab, May. 2006
VDS2510 Installation Manual
VDS2510 Installation Manual
Making Connection
Functions of Local Unit
The following illustration gives an overview of the Sender unit
and the Viewer unit connections.
VDS2510-L Viewer
No. 2
Video Signal Output
N.O. Alarm
N.C. Output
Ground
Audio Out
N.O. Alarm
C
N.C. Output
Ground
Audio Out
DC POWER IN:
to input the power from the power supply.
OUTPUT side
DC Power
Input
ALARM OUT:
to send the alarm connection out for a further application.
LED:
To indicate the alarm function is operating.
DC40V
System Status
AUDIO OUT:
to send out the audio signals to a device, e.g. monitor or
loudspeaker amplifier. The audio signal level output from the AUDIO
OUT is exactly the same as what the AUDIO IN received at Sender
Unit.
DC
Power
Supply
Link Fault Indication
VIDEO OUT:
to send the video signals out to a device, e.g. A monitor or DVR
Link In
Video Signal Input
Audio Signal In
Ground
Alarm Sensor In
DC 12V Out
Audio Signal In
Ground
Alarm Sensor In
DC 12V Out
C
No. 1
Video Signal Output
SYSTEM STATUS LED:
When users turn off the system, LED will be red. When users turn on
the system, LED will be yellow at the first 5 seconds for initial,
and then become green. The LED will keep green, when the system is
on.
ON/OFF:
to turn on or turn off the system
No. 2
No. 1
Video Signal Input
LINK IN with DC OUT:
to receive in two video, two audio, and two alarm signals from the
Sender unit and also to send DC power out to the Sender unit.
LINK FAULT:
to warn users if the cable between Sender unit and Viewer unit is
disconnected. To allow users to send the warning signal to an
extra warning device, e.g. buzzer, relay or light bulb and
everyplace users prefer.
DC Power to CCD Cameras
2 Video and 2 Alarm Signals
Alarm
Input
Type
Selector
Power Status
Link Out
Coaxial Cable
0 to 800Meter
use 5C-2V
or Equivalence
LINK IN side
Installation Notice
When setting up the VDS2510 Sender unit and Viewer unit, be sure to note
the following points:
Both units should be fixed securely to a permanent object such as a wall or
a pillar.
Avoid locations with extreme vibrations or dust.
Avoid locations with dampness or extreme heat.
-8-
047ab, May. 2006
-5-
047ab, May. 2006
VDS2510 Installation Manual
VDS2510 Installation Manual
I n s t a l l a t i o n o f R e m o t e a n d L o c al Units
The VD S2 51 0 u nit s ca n bo t h be fi x e d to a w a l l o r d e s k t o p w i t h
the su pp li ed mou n t i n g br a c k e t s . Th e mo u n t i n g b r a c k e t s c a n
be f ix ed on to th e re a r , to p , or bo t t o m of e i t h e r u n i t .
A tt a c h i n g t he Mounting Bracke t s
Att ac h t he mo unt i n g br a c k e t s to ei t h e r th e S e n d e r u n i t o r
the vi ew er un it as sh o w n be l o w :
1. Alig n t he mo un tin g br a c k e t wi t h th e mo u n t i n g t r a c k o n t h e
rear of th e u ni t as sh o w n he r e :
4. Fix the unit in the desired location with two screws.
Removing the Mounting Brackets
Remove the mounting as shown below:
1. Use a flat-tipped screwdriver to lift the white nub as shown below:
Mounting
Tracks
Nub
2. Slid e t he br ac ket in th e di r e c t i o n of th e a r r o w u n t i l t h e
white n ub cl ic ks int o pl a c e as sh o w n be l o w :
2 . W h i l e l i f t i ng the nub, slide the bracket out in the
d i r e c t i o n o f t he arrow as shown below:
Nub
3. Repe at th e a bo ve st e p s on an o t h e r si d e of t h e u n i t t o a t t a c h
the s ec on d b ra ck et .
3 . R e p e a t t h e a bove steps to remove the second bracket.
-6-
047ab, May. 2006
-7-
047ab, May. 2006