1
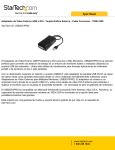
FCC GRAND HD CINEMA USB to HDMI Converter User’s Manual ISSUE: 2008/06/26 CE 1. Package Contents INDEX This package contains the following items: 1. 2. 3. 4. 5. 6. Package Contents……………..…....…………………….. Introduction………………..………..……….……………... System Requirement….…………….…..………………… Product Features…….………….…………….…………... Hardware Overview……………..…………….…………... Installation…………………………..………..……..……… 6.1 Install the HD Cinema Driver………………..……..…. 6.2 Install the USB Audio Driver……..………………..…. 6.3 Hardware Installation....…..………………………..…. 7. Using the HD Cinema.....……...…………………….….… 7.1 Using the HD Cinema DisplayLink Manager..……... 7.2 Using More HD Cinema…..………………………..…. 7.3 Firmware Update……..…..………………………..…. 8. USB PnP Sound Program………………..………….……. 8.1 Main Setting…………………….……………….……... 8.2 Mixer………………………………..………………..…. 8.3 Effect……………………………….…………….……... 8.4 Information…………………………………………..…. 9. Uninstall………………..………..…………………………. 9.1 Uninstall the HD Cinema Driver……………….……... 1 1 1 2 2 3 3 3 3 4 4 7 8 9 10 10 11 11 12 12 9.2 Uninstall the USB Audio Driver..…………………..…. 12 10. Troubleshooting…………...…..…………………………. 13 Grand HD Cinema USB Cable Driver CD (Driver & User Manual) 2. Introduction Grand is pleased to introduce the world’s first USB to HDMI converter. The Grand HD Cinema brings much convenience by allowing customers to play media files stored in PC on big screen by converting USB input into HDMI. Simply connect the USB interface of PC to the converter using the included USB cable, and connect the unit to your home theatre system with a HDMI cable, then you can enjoy the high quality pictures (resolution up to 720p) and sound on your big screen. The Grand HD Cinema is an easy way to enjoy cinema-quality movies at your home. 3. System Requirements Operating System: Microsoft Windows XP/ Vista (32bit). Processor: Pentium 4 2.4GHz or above 512MB RAM or above Available USB 2.0 port 30Mb of available disk space NOTE: When connecting more HD Cinema to a computer, a system with higher CPU performance is recommend. 1 4. Product Features 6. Installation 6.1 Install the HD Cinema Driver Plug & play. Installs in seconds. Easily connects up to 6 HDMI display devices to one PC through USB 2.0. Supports both video and audio signals (if you use multiple Grand HD Cinema, you can only select one of the display devices for sound output). Supports HDMI resolution up to 720p Compatible with Windows XP and Vista (32bit). Completely new architecture to support Vista Aero (32bit). No external power supply needed (power is supplied from the PC through USB connection). Dimensions: 100(L) x 55(W) x 33(H) mm. Bundled Software: HD Cinema Program Supports Extended and Mirror Functions Supports screen resolution and color quality adjustment in extended mode. Allows you to rotate the screen on the add-on monitor by 90, 180 or 270 degrees Supports online update automatically. The software has been awarded Microsoft Windows Certification. USB PnP Sound Program Sound Effects like 10-band Equalizer and 27 environment effects can enrich users audio experience and enjoyment. 5. Hardware Overview Step 1: Insert the provided driver CD into your CD-ROM driver. Execute the Setup.exe file from the HD Cinema Driver folder. Step 2: A dialog box should pop up to prompt you to choose desired installing language. After choosing your language, click on I Accept to start installation automatically. Step 3: After finishing the installation, a dialog box should pop up to inform you to restart your PC for the installation to completed and usable. 6.2 Install the USB Audio Driver Step 1: Insert the provided driver CD into your CD-ROM driver. Execute the Setup.exe file from the Audio Driver folder. Step 2: Follow the instructions of the wizard to complete the installation process. Step 3: After finishing the installation, a dialog box should pop up to inform you to restart your PC for the installation to completed and usable. 2 3 6.3 Hardware Installation Screen Resolution: Select the screen resolution (available only in extended mode). If you connect the HD Cinema to the display device first, and then connect to your computer, it will list only the available resolutions (640x480/ 720x480/ 1280x720) that you can select. It will list all the resolutions, if you connect the HD cinema to your computer first. Color Quality: Select the screen color quality (available only in extended mode). Screen Rotation: Rotate the screen on the additional monitor by 90, 180 or 270 degrees. After finishing the software installation, please follow the steps below to complete the hardware installation. Step 1: Use the HDMI cable to connect your display device that supports HDMI input. Step 2: Connect the HD Cinema to an USB 2.0 port of your computer by using the provided USB cable. 7. Using the HD Cinema 7.1 Using the HD Cinema DisplayLink Manager After the driver is installed, a utility (HD Cinema DisplayLink Manager) will automatically appear in the system tray. The utility allows you to quickly change the settings and resolution for HD Cinema. Right-clicking the icon will bring out the context menu. 4 5 Extend to: Reposition the extended screen to the top, bottom, left or right of the primary display. Extend: Set the HD Cinema to Extended mode. You can surf website on the VGA monitor and play videos on the HDMI display device. Off: Disable the HD Cinema on the system. Advanced: Directly access the Display Properties. You can also adjust the resolution, color quality, position and refresh rate via the Display Properties. Mirror: Set the HD Cinema to Mirror mode. You can see the same desktop image on the additional monitor. NOTE: If there is no picture on additional monitor, please adjust the other resolution of the main screen. 7.2 Using More HD Cinema It doesn’t need to install driver again as long as you has completed above process of driver installation in advance. It will automatically define the ID of new adding HD Cinema. All the HD Cinema will list in the Display Properties or the display manager menu. NOTE: When connecting more HD Cinema to a computer, a system with higher CPU performance is recommend. 6 7 7.3 Firmware Update 8. USB PnP Sound Program The USB PnP sound program is C-Media’s 3D audio control panel that you can control all Manually Update Click the Updates → Check Now…, and it will check and download the latest firmware immediately.. audio configurations. After finishing the installation of the Audio Driver and rebooting the system, you can open NOTE: Confirm that your computer is already connected to the network. “Control Panel” to find “USB PnP Sound Device” and enable it. Or you can the icon in the system tray in the right-bottom of your screen. Automatic Update Click the Updates → Configure… , the Updates Options window will appear as shown below. You can set the update method and frequency in the windows. 8 9 8.1 Main Setting 8.3 Effect Select output device (earphone or speakers). There are many environment effect presets and 10-band EQ for you to choose. Select an “Environment” button for emulation that is implemented by producing the sound reflection and reverberation. You can change the “Environment Size” to large or small, and you will hear the different felling about the environment space. You can select a pre-set mode (such as Bass, Treble, Live, etc….) for equalizer that is actually frequency response. You can also change the gain setting for each band and then give it a name in the following blank. 8.2 Mixer Adjusting the volume of each source. 8.4 Information This page will display information of audio driver and system. 10 11 9. Uninstall 10. Troubleshooting 9.1 Uninstall the HD Cinema Driver Situation Follow the steps below to uninstall the driver of the HD Cinema. Step 1: Open the Control Panel: Start → Control Panel → Add or Remove Programs. Check Point 1. Step 2: Select the HD Cinema Display Adapter and click Remove, then follow the Make sure you restart your computer after the driver installation. instructions of the uninstall wizard. The device driver has been installed, but the HD Cinema is not working 2. Check all the connectors are plugged in correctly. 3. Make sure the USB port that you are using is USB 2.0. 4. Check the additional monitor is connected correctly and the power is on. 5. Make sure the operating system, the HD Cinema is compatible with Windows XP and Vista (32bit). DVD player not working 6. Try a different USB 2.0 or computer. 1. Try to open the program in the additional display when move it over to the first before playing the DVD. extended display The mouse not move pass 1. Check the display settings and make sure that the right side of the screen your display number 2 is on the right side of 9.2 Uninstall the USB Audio Driver as it should on extended display number 1. Step 1: Open the Control Panel: Start → Control Panel → Add or Remove Programs. desktop Step 2: Select the USB PnP Sound Device and click Change/Remove, then follow the instructions of the uninstall wizard. NOTE: Please restart your PC after uninstallation. 12 13