1
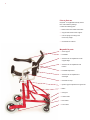
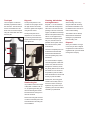
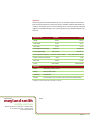
User manual
meywalk® 4
Model Medium and Large
meyland·smith
mobility and more
2
Contents
Introduction . ..................................................................................................................3
CE marking and labels ..................................................................................................3
Safety precautions . .......................................................................................................3
Prior to first use .............................................................................................................4
Meywalk® 4 parts ...........................................................................................................4
Joining the top part
and bottom frame ..........................................................................................................5
Spring loading ...............................................................................................................5
Adjustments – step by step ...........................................................................................6
Tubes . ........................................................................................................................6
Handlebar ...................................................................................................................6
Seat ............................................................................................................................7
Trunk support height . ................................................................................................7
Trunk support replacement . .......................................................................................7
Tilt function .................................................................................................................8
Getting in and out ..........................................................................................................8
Rear stop .......................................................................................................................8
Trunk support ................................................................................................................9
Brakes ...........................................................................................................................9
Drag brakes ................................................................................................................9
Non-reverse brakes ....................................................................................................9
Front wheel swivel-locks ............................................................................................9
Accessories .................................................................................................................10
Anti-tip supports . .....................................................................................................10
Leg divider ................................................................................................................10
Leg guide . ...............................................................................................................10
Trunk pad.................................................................................................................. 11
Hip pads ................................................................................................................... 11
Small swing bar......................................................................................................... 11
Cleaning, disinfection and maintenance . .................................................................... 11
Recycling ..................................................................................................................... 11
Disposal . ..................................................................................................................... 11
Warranty ......................................................................................................................12
3
Introduction
Safety precautions
Meywalk 4 Medium and Large are primar-
Never leave the user in Meywalk 4 unat-
firm flooring. Avoid loose surfaces such as
ily designed for walking-disabled children,
tended!
gravel, sand or foliage. Be aware of uneve-
®
youths and adults who have difficulty standing up without support. The user-friendly
Meywalk 4 is designed for indoor use. The
®
The walker should only be used on level and
®
Meywalk® 4 is a therapy product and should
only be used as such!
maximum body weight of the user permitted
The spring system of Meywalk® 4 may
is 130 kg.
involve a risk of the walking aid toppling over
With the Meywalk® 4 you have purchased
if used by a very restless user.
nesses and holes in the flooring as there is a
risk of toppling over or getting stuck.
Be especially careful on wet or icy surfaces
as the risk of slipping is considerably higher.
Please check that all parts are securely
fastened before using the walker. Do not
use high-pressure cleaning tools or caustic
one of the best walkers available. A higher
Meywalk® 4 rolls very easily and you should
standard is reached due to its unique design
always consider potential dangers that the
chemicals when cleaning the walker.
and high-quality materials. You will be im-
user may roll over to.
Unlike previous generations of Meywalk ®
Always hold the tilt bar securely when a
Walkers is the Meywalk® 4 now equipped
pressed by the multiple functions:
: : Meywalk® 4 follows individual body
movements and walking patterns.
: : Helps the user keep his/her torso upright and makes the user feel safe.
user is being lifted or lowered. Especially
when opening the tilt bar to lower the user,
front wheel swivel-locks as standard.
you must be prepared for the upward force
which gradually increases as the tilt bar rises.
Never let go of the tilt bar in the middle of a
: : The handlebar supports the user’s arms lifting or lowering operation, even if taken by
surprise by the heavy weight loading.
and reduces the strain on them.
: : The seat can be lowered when getting
Be aware of the higher risk of squeezing your
fingers when adjusting the walker.
in and out.
: : The rear stop helps with keeping the
If fittings are removed, open tube ends may
be revealed. These may have sharp inner
user comfortably seated.
: : The integrated springs and dynamic seat support the walking function.
edges and may be dangerous for probing
fingers. However, Meywalk® 4 and its accessories are designed to avoid open ends! If a
CE marking and labels
situation with open tube ends should never-
The type and manufacturer label is placed
theless arise, it is recommended that they be
on the bottomframe. Labels must always
closed off with plastic plugs.
be readable. Replace any unreadable or
missing labels as soon as possible. The type
and manufacturer label is important for the
Polyurethane foam and foam tubing may not
be consumed.
identification of the product and may not be
Please be aware that the upholstery heats
removed.
up if placed in direct sun light. This can cause
The Meywalk® 4 is CE marked. This guarantees that the Meywalk® 4 is in compliance with all relevant safety requirements
specified in Council Directive 93/42/EEC on
medical devices. The Meywalk® 4 was tested
by Berlin Cert, Prüf- und Zertifizierstelle für
Medizinprodukte GmbH, at the Berlin Technical University.
with drag brakes, non-reverse brakes and
skin damage if the upholstery is touched.
Therefore, cover up the upholstery parts or
protect the walker from direct sun light.
4
Prior to first use
Meywalk® 4 is supplied almost fully assembled. Check that the package
contains the following parts:
: : Bottom frame with wheels and brakes.
: : Top part with seat and trunk support.
: : A set of springs according to the
user’s body weight.
: : Accessories as ordered.
Meywalk® 4 parts
: : Trunk support
: : Handlebar
: : Thumb screw for adjustment of trunk
support height
: : Thumb screw for adjustment of tilt
function
: : Handlebar adjustment
: : Thumb screw for adjustment of
seat height
: : Seat with rear stop
: : Spanner grip for adjustment of upper tube
: : Brake
: : Swing bar
: : Fender wheel
: : Rear wheel
: : Front wheel
5
Joining the top part
and bottom frame
open the lid push up and turn clockwise
Place the top part in the tubes on the bottom
removal of the old springs the new ones can
frame. Remember to position the top part so
be inserted into the tubes. Now the lid can be
that the handlebar points in the direction of
fastened again by repeating the steps above
the swivelling front wheels.
in reverse order. Spring loading
The two springs inside the tubes can be
changed to obtain harder or softer suspension. As a guideline, the springs should be
fully compressed by the body weight of the
user. There are five different spring hardness
levels corresponding to the following body
weight:
: : White springs for 20 - 45 kg.
: : Yellow springs for 45 - 65 kg.
: : Blue springs for 65 - 80 kg.
: : Red springs for 80 - 100 kg.
: : Silver springs for 100 - 130 kg.
The springs can easily be interchanged. Grab
and open the swing bar so that the frame is
lowered. The tube ends are closed with a lid
- open the lids to remove the springs. To
before pulling the lid down and off. After
6
Adjustments – step by step
Handlebar
It is always a good idea to consult one of
The angle of the handlebar can be adjusted
our professionals before adjustment of
in three steps. Loosen the two thumb screws
Meywalk 4.
and turn the handlebar to the desired posi-
®
tion. Fasten the thumb screws lightly. If the
Stanchions
Warning! Do not carry out this adjustment
while a user is placed in Meywalk® 4.
handlebar is seated correctly it should not
be possible to turn it with the thumb screws
lightly fastened. When you have made sure
The height of Meywalk 4 is adjusted by way
that the handlebar is placed correctly you
of the black spanner grips. Loosen the span-
may tightly fasten the thumb screws.
®
ner grips on both sides and adjust the frame
to the desired height. Fasten the spanner
grips firmly. It is important that both sides are
adjusted to an equal height. You can check
this by way of the indentations on the tubes.
7
Seat
Trunk support height
Warning! Do not carry out this adjustment
Adjust the trunk support according to the in-
while a user is placed in Meywalk® 4.
dividual user’s height. Turn the upper thumb
Adjust the seat height according to the length
of the user’s legs. Turn the lower thumb
screw located at the front of Meywalk® 4. The
thumb screw features a “child lock” which
is released by simultaneously pressing and
turning. When released, the seat can be
adjusted up or down. Position the seat at the
screw located at the front of Meywalk® 4. The
thumb screw features a “child lock” which
is released by simultaneously pressing and
turning. When released, the trunk support
can be adjusted up or down until the correct
height has been found. Re-tighten the thumb
screw.
correct height. Hold your hand under the seat
bar bottom to make the seat slide easily up
and down.
Re-tighten the thumb screw when the desired
height has been found.
Trunk support replacement
Warning! Do not carry out this adjustment
while a user is placed in Meywalk® 4.
For trunk support replacement, loosen the
two Allen screws in front of the support. The
two screws fit all trunk supports.
The trunk support is available in five variants:
Circumference 70, 90, 105, 120 and 130 cm.
8
Tilt function
Getting in and out
Rear stop
Warning! Do not carry out this adjustment
Featuring a unique lifting and lowering
The rear stop should always be closed in
while a user is placed in Meywalk 4.
®
By means of the tilt function the user’s posture can be changed. Turn the middle thumb
screw to tilt the support. The thumb screw
is located at the front of Meywalk® 4. While
turning the screw, you can change the angle
of the trunk support and seat up to 15°. The
tilt function is continuously adjustable.
system Meywalk 4 has made it easier for
the upright position when there is a user in
the user to get in and out. Grab the front of
Meywalk® 4. Pull the rear stop backwards out
the swing bar with both hands and tip it up.
of the seat and turn it upwards. Now you can
This way the seat will be lowered approx. 13
push it down into the locked position. Repeat
cm for Medium and 22 cm for Large. When
the procedure in reverse order to open the
the user has been seated, close the trunk
rear stop again.
®
support and pull up the rear stop. The seat
is lifted by pushing down the swing bar until
it locks with an audible click. The integrated
gearing in the lifting and lowering system
means that the downward pressure need
only be about one third of the user’s weight.
The rear stop behind the seat can be adjusted in depth. First lift up the rear stop and
tilt it backwards. This reveals an Allen screw
inside the U-profile When the Allen screw is
loosened, the rear stop can be slid forwards
or backwards in the external tube. After adjustment, re-tighten the Allen screw.
9
Trunk support
Drag brakes
Non-reverse brakes
To open the trunk support push the two pad-
The drag brakes work by the roller at the
The non-reverse brake works by the grooved
ded tube pieces inwards and turn down. To
back pressing against the tire. First loosen
side pressing against the tire preventing the
close the trunk support push the tube pieces
the nut on the Allen screw. Then turn the Al-
wheel from going backwards. The non-
inwards and turn up to the locked position.
len screw to press the roller against the tire.
reverse brake can be engaged/disengaged
In order to open the trunk support, turn the
Tighten the nut in the opposite direction. Use
through the snap lock on the upper side of
two wings outwardly to either side. Oppo-
a method of trial and error to find the correct
the brake housing. Finally test the function of
site when the trunk support must be closed
pressure against the tire. Test the drag brake
the non-reverse brake.
again.
function.
Front wheel swivel-locks
To activate or de-activate the swivel-locks
Brakes
The brakes are parking brakes that work by
directly blocking the rear wheels with a braking pulley pressing against the tire.
To brake the walking aid, pull the brake
levers all the way backwards until they come
to a definite stop. In this position the brakes
are self-locking. The brakes are released by
pushing the brake levers forward again.
pull and turn the pin locks 90º.
10
Accessories
Anti-tip supports
Leg guides
Anti-tip supports are mounted on
The leg guides are mounted on
each side by first removing the
the inside of the wheel frame on
bolts fixing the wheels. Use a 6
either side. They are fastened
mm Allen key. Place the anti-tip
at the rear fork and at the point
support against the outside of the
where the connection tube is
rear fork of Meywalk 4 so that
connected to the wheel frame.
®
they fall into place in the two rear
fork recesses. Screw bolts on
both sides back on. Re-tighten
firmly.
Leg divider
Fasten the leg divider under the
seat bar with the two screws.
The leg divider is height-adjustable. Loosen the screw at the
front of the central tube. Adjust
the leg divider to the desired
height and re-tighten the screw
firmly.
Fasten the leg guides with the
screws, threaded rods and Allen
screw heads that came with the
leg guides.
11
Trunk pad
Hip pads
The hip-/side pads are to be
Cleaning, disinfection
and maintenance
Recycling
The trunk pad is mounted on
the black polyurethane shell of
mounted on the uprights. Fit the
Meywalk 4 can be washed in
cling the walker all necessary
the center box. First remove the
two pipe sections around the
warm water with detergent but
technical documentation must
screws and washers from the
stanchion, tighten them together
take care not to wash the foam
be delivered to the new user to
shell. Then mount the trunk pad
using the two screws.
padding on the rear of the trunk
ensure safe handling.
using the screws that came with
the trunk pad.
The hip-/side pads can be
adjusted in or out of the seat
by loosening the thumbscrew.
Tighten the thumbscrew again
after adjustment.
®
support, handlebar and rearstop.
With time the painted frame may
take on a matt appearance if
washed with detergent repeatedly. If so, the frame can be
When your walker is no longer
in use and you wish to dispose
disinfected.
It is recommended to regularly
check the tightness of all thumbscrews, nuts, bolts and screws.
Re-tighten if necessary. Check
the parking brake function. When
the brakes are on it should not
be possible to push the walker.
When the brakes are off it should
be easy to push the walker.
Furthermore, all moving parts
with a small swing bar. Please
be aware that the “swing bar” in
this case is locked.
Remove the swing bar and then
mount the small swing bar in the
same brackets as the swing bar
were installed in.
before handing over.
manufacturer.
The foam padding may not be
cm, by replacing the swing bar
damages by a professional
Disposal
alcohol-based disinfectants.
of Meywalk® 4 Medium with 12
disinfected and checked for
the instructions of the polish
be disinfected with standard,
It is possible to reduce the height
The walker must be cleaned,
polished with car polish. Follow
The frame and plastic parts can
Small swing bar
When handing over or recy-
should function easily and at a
low level of noise. Should you
experience any friction noise or
squeaking, then have the walker
checked by a professional.
of it please check the rules and
regulations with your local waste
management company.
Warranty
Warranty is granted on all defects that are proven to be caused by material or manufacturer
fault. The warranty period is 24 months from the time of dispatch readiness alternatively time
of delivery. The warranty does not cover any damage due to normal wear and tear, intentional,
negligent or inexpedient handling or use. This also applies if using unsuitable detergents and
lubricants.
Technical data:
Medium
Large
Length:
93 cm
110 cm
Outer width:
62 cm
68 cm
Inner width:
50 cm
57 cm
60-84 cm
80-104 cm
Seat height/inner leg length*:
Trunk support height*:
101-133 cm
120-152 cm
Trunk support circumference: 70, 90, 105, 120 and 130 cm 70, 90, 105, 120 and 130 cm
Weight: (without accessories):
Max. load:
Colors:
32 kg
34 kg
130 kg
130 kg
Red metallic
Black metallic
Materials:
Frame:
Steel tubing, powder-coated
Fittings:
Steel, powder-coated
Upholstery: Polyurethane
Wheels:
Soft solid rubber tyres on plastic rims with service-free ball bearings
* Heights are measured with half compression of springs.
Manufacturer:
meyland·smith
Dealer:
mobility and more
Meyland-Smith A/S · Industrivej 27 · DK-9830 Taars
Tlf.: +45 98 96 19 85 · Fax.: +45 98 96 19 86
www.meyland-smith.dk
ER/06-11-1