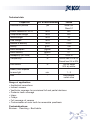
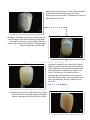
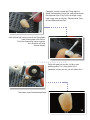
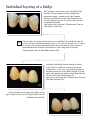
1
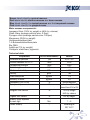
GB
0546
Light curing composite material for crowns and bridges
User
manual
Light curing composite material
for crowns and bridges
User Manual
Summary
1. Jeko® components ................................................................................................ pag. 3
»
Nobil Metal products .............................................................................................. »
Jeko Metal Primer (suitable for the metal substructure) ................................ »
Jeko Universal Link (suitable for the metal substructure) ............................ »
Jeko Paste Opaquer ............................................................................................ »
Jeko Body .................................................................................................................... »
Jeko Top........................................................................................................................ »
Jeko Stains.................................................................................................................. »
Finishing and Polishing ........................................................................................ »
General information ................................................................................................ »
Colour correlation chart ........................................................................................ »
Polimerisation times for Jeko Body and Jeko Top .................................. »
2. Jeko® accessories
3.
4.
5.
6.
7.
8.
9.
10.
11.
2
....................................................................................................
5
5
®
6
®
7
®
8
®
8
®
14
®
18
20
20
23
24
1. Jeko® components
• Metal Primer (5 ml bottle)
Primer for bonding the Paste Opaquer to the metal framework. It interacts in a stable and optimum way with resin as well as with metals
(non-precious - precious - titanium).
• Universal Link (4 g syringe)
Universal light curing paste primer for opaque to apply between Jeko
Metal Primer and any Jeko Paste Opaquer or opaques available on the
market.
• Paste Opaquer Incisal (3 g syringe)
Light curing paste opaque. It comes in only one colours for all “Vita*”
shades for characterisation of the incisal margin. Can also be used
mixed with Paste Opaquer Dentinal.
• Paste Opaquer Cervical (3 g syringe)
Light curing paste opaque. Available in 4 colours, suitable for creating
the neck effect on the cervical edge area. Can be mixed with Paste
Opaquer Dentinal to obtain different colours shades.
• Paste Opaquer Dentinal (3 g syringe)
Light curing paste opaque. Available in 10 colours, intended as a good
base for obtaining the desired colour with the Jeko Body paste composite. Thanks to its formulation, it is possible to obtain thin layers, which
mask the metal well.
• Body Dentinal (4 g syringe)
Light curing paste composite. It comes in 16 “Vita*” colours. The dentine mass Body Dentinal is applied directly on the surface concerned and
modelled to make it thinner and shaded at the incisal edge.
• Body Cervical (4 g syringe)
Light curing paste composite. Available in 14 colours to be applied onto
the cervical area concerned modelling it into a half-moon shape and
reducing the thickness towards the middle third of the crown.
• Body Incisal (4 g syringe)
Light curing paste composite. Availabe in 4 colours, it is used to complete both the shape and colour of the cosmetic coating. The Body
Incisal enamel mass is applied onto the upper part of the dentine mass.
3
• Body Transparent (4 g syringe)
Light curing paste composite, available in the following hues: Clear –
Pink – Blue. The transparent mass can be applied over the enamel mass
for better transparency or under it for greater depth.
• Body Base (4 g syringe)
Light curing paste composite. Available in only one hue, formulated to
fill the space of the intermediate bridge elements in order to adjust the
thickness of the composite cosmetic coating of the intermediate elements to that of the abutment elements.
• Body Gingival (4 g syringe)
Light curing paste composite, available in only one colour. This mass is
used to reproduce the mucosa, where required.
• Top Overlay (4 g syringe)
Light curing paste composite available in six colours: Orange – Yellow –
Light – Red – Clear – Blue. Thanks to its extraordinary physical and
mechanical properties it can be modelled as an overlay on Jeko Body
masses to increase certain characteristics such as, for example, abrasion resistance and the surface hardness value. The product is radiopaque and fluorescent.
• Stains (3 g bottle)
Light curing paste colours available in 11 shades: Clear – White – Cream
– Peach – Orange – Ochre – Brown – Light Brown – Red – Blue – Black.
This colouring system allows the characterisations of denture workpieces, also meeting individual specifications, which improve aesthetical
expectations. Some of the advantages offered: easy to use – colours
can be mixed together - thixotropicity – non-drip.
• Stain Primer (3 g bottle)
Light hardening primer for the development of a dispersion layer on
®
resin surfaces, ideal for the following application of Jeko Stains
colours. Can also be used as a thinner for the stains.
• Cleaner (50 ml bottle)
To remove the dispersion layer at the surface after final polymerisation.
* = VITA is a registered trademark of Vita Zahnfabrik.
4
2. Jeko® accessories
• Isolant Liquid (50 ml bottle)
Oil-free insulation liquid for application on the stone of the work model
to separate the composite from the stone while working, for example
inlays and onlays.
• Modelling Liquid (5 ml bottle)
Modelling liquid. Contains methylmethacrylate, read the material safety
data sheet.
• Bonding Fluid (5 ml bottle)
Light curing bonding suitable for developing anew the dispersion layer
on the surface of the light cured composite when successive layers
need to be applied to correct or repair the composite. This product contains methylmethacrylate, read the material safety data sheet.
• Brush for Paste Opaquer
Specific brush for the paste opaque.
• Top Shade Guide
A guide of the 6 colours of the Jeko Top masses.
• Mixing pad
A plexiglas pad with nonslip feet.
3. Nobil Metal products
• Pink Bond (5 g syringe)
Light curing paste opaque to mask the metal framework of skeletal
prostheses. Thanks to its special and advanced formulation featuring
integrated adherence components this opaque requires no additional
adherence system. It comes in two shades of pink, Light and Dark,
which can be mixed together to obtain different colour hues.
• Fixing Agent (2 g syringe)
This gel agent prevents the development of the dispersion layer on the
composite surface thus facilitating complete polymerisation and finishing.
• Brillance Paste (2 g syringe)
Aluminium oxide-based paste especially formulated to smooth and
polish the Jeko composite surface.
5
5. Jeko® Universal Link
Jeko® Universal Link is a universal paste primer for light curing opaque for
application between the Jeko® Metal Primer and Jeko Paste Opaquer or
the common light-hardening, powder or paste opaques available on the
market.
Jeko® Universal Link strengthens the chemical bond between primers and
opaques and, in combination with proper mechanical retentions, where
required, provides a secure adhesion in a simple way.
Preparation:
After casting, work the metal framework as usual. Sandblast the surface
(50 micron minimum aluminium oxide at a pressure between 1 and 2 bar
maximum) and clean it with dry, oil-free compressed air.
Application:
As a primer, apply Jeko® Metal Primer according to the instructions for use
already mentioned.
Allow to dry then apply Jeko® Universal Link, of thick consistency, using a
hard, shorthaired brush (no wash brand!). Make sure the layer perfectly
masks the retention areas. Thoroughly coat the mechanical retention with
Universal Link. Thanks to its transparency, the material has remarkable
curing properties, which guarantee optimum hardening.
Cure and refer to the times indicated for the opaque paste Jeko® Paste
Opaquer given in the enclosed chart “Polymerisation Times”.
Applying the opaque:
At the end of the process, apply the Jeko opaque following the instructions for use described in point 6 of this manual.
Useful recommendations:
The metal framework surfaces must be clean and free from any grease
and/or post-polishing residues.
Do not use intermediate polimerisation equipment for the polimerisation
process.
Information on polimerisation:
Light curing must be carried using equipment with an emission range
between 350-500 nm.
Mass working times:
From 1 to 3 minutes, depending on the lighting conditions.
7
6. Jeko® Paste Opaquer
Preparation:
Model bridge and crown frameworks as usual and place mechanical retentions with a diameter ranging between 200 mm and 600 mm (sphere retentions are recommended).
Make sure the closing edges between metal framework and cosmetic
coating are groove shaped or mounted (as with the glass of a watch).
Apply Jeko® Paste Opaquer on the surface already treated with Jeko®
Metal Primer and Universal Link.
Application:
Apply a thin layer of paste opaque Jeko® Paste Opaquer. Use the shorthaired brush supplied with the product.
The opaque layer must provide complete masking in order not to affect the
final colour. For an effective masking, apply at least two layers.
Opaque fluidity can be optimised mixing it on a mixing pad.
On mechanical retentions the product must be applied in a very thin layer.
Each layer must be polymerised separately (refer to the enclosed
“Polymerisation Times” chart).
Too thick opaque layers prevent optimum polymerisation reducing bonding
strength. Longer polymerisation times do not give a greater polymerisation
depth.
Useful recommendations:
The metal framework surfaces must be clean and free from any grease
and/or post-polishing residuals.
Apply the opaque in very thin layers.
Mass working times
From 1 to 3 minutes, depending on the lighting conditions.
7. Jeko® Body
Light hardening monocomponent material for crown and bridge cosmetic*
coating using a system based on two different inorganic fillers.
* According to the Vita® colour system (VITA is a registered trade mark of Vita Zahnfabrik).
The cosmetic coating material comes in screw syringes, colour coded by
field of application.
8
Brown labels identify cervical masses.
Red labels identify dentine masses and base masses.
Blue labels identify the incisal masses and the trasparent masses.
Pink labels identify the gingival mass.
Main masses components:
Inorganic fillers (74% by weight or 66% by volume)
Glass fillers (average particle size: 0.7µm)
Pyrogen silica (average particle size: 0.04µm)
Monomers (25% by weight)
Urethanedimethacrylate
1,4-Butanedioldimethacrylate
Bis GMA
Additives (1% by weight)
Catalysts, stabilizers, pigments
Technical data
Properties
Dimension of particles
Vickers Hardness HV 02/10
Compression strength
Yield strength
Modulus of elasticity
Density
Water absorption
Solubility in water
Radiopacity (ISO 4049)
Transparency
Inorganic filler content
Organic filler content
Stability when exposed
to room light
Colour stability
Unit of measurement
Values
µm
0,04 – 3,0
MPa
≥400
MPa
≥360
MPa
≥95
MPa
≥6900
g/cm3
1,80
3
µg/mm
17,4
µg/mm3
0,5
%
Not established
%
Dentine from 1% to 4%
Enamel from 5% to 9%
%
74% by weight
66% by volume
%
8% by weight
Min.
–
1–3
According to
ISO 10477
9
Range of application:
Fixed prosthesis
• Integral crowns, crowns and bridges with metal support, adhesive bridges
• Inlays, onlays, overstructures on implants, veneers, long-term temporary workpieces
Removable prosthesis
• Conical and telescopic crowns
• External parts of attachments
Contraindications:
Bruxism – Clenching – Bad habits
Preparation:
Model the bridge and crown frameworks as usual and place mechanical
retentions with a diameter ranging between 200 µm and 600 µm (sphere
retentions are recommended).
Make sure the closing edges between metal framework and cosmetic
coating are groove shaped or mounted (as with the glass of a watch).
Application:
Layering of Jeko® Body cosmetic coating:
Cervical mass Jeko® Body Cervical
Turn the syringe screw to squeeze out the cervical mass. Apply the material onto the cervical area of the surface concerned.
Work the material to make it thinner towards the crown centre.
Polymerise after each layering.
For intermediate polymerisation refer to the enclosed “Polymerisation
times” chart.
During polimerisation, a thin dispersion layer develops on the surface.
This layer is essential to the chemical bond between the layers that will be
applied afterwards.
Do not remove this layer during modelling.
If partially or totally destroyed, follow the instructions contained in the
chapter “Corrections and repairs”.
Dentine mass Jeko® Body Dentinal
Take the dentine mass from the syringe and apply it on the entire surface
concerned.
Apply the dentine so that it is thinner toward the incisal edge.
Use a spatula to model the central part making it more or less thick
10
depending on the colour you want to obtain.
For intermediate polimerisation, refer to the enclosed “Polimerisation
Times” chart.
Jeko® Body coating material is applied in thicknesses of up to 2mm and
hardened by means of an intermediate polimerisation.
Additional material layers must never be more than 2mm in thickness.
Harden them according to the intermediate polimerisation times.
To ensure good bonding between layers, keep the dispersion layer, which
develops on the composite surface undamaged between applications.
For the layering of intermediate elements use the base mass Jeko® Body
Base (thickness of each layer: 2mm).
After application, harden the Jeko® Body Base mass by a final polimerisation followed by a polimerisation to optimise the surface, and then coat it
with the opaque Jeko® Paste Opaquer.
To lightcure the mass Jeko® Body Base refer to the “Polimerisation Times”
chart and namely to the columns dedicated to Jeko® Body.
Incisal mass Jeko® Body Incisal
Take the desired quantity of enamel mass from the syringe.
Place the mass on the upper part of the coating, onto the dentine layer
on the third incisal area only.
For the purpose of obtaining certain effects it is possible to apply the
transparent mass under the enamel mass (greater depth) or over the
enamel mass (greater transparency).
When the coating has the desired shape it can be polimerised.
For intermediate polimerisation, refer to the enclosed “Polimerisation
Times” chart.
Before final polimerisation, the coating must be thoroughly covered with
Nobil Metal’s Fixing Agent.
The Fixing Agent, an oxygen-inhibiting gel for composites, prevents the
development of the dispersion layer and facilitates finishing.
For final polymerisation, refer to the enclosed “Polymerisation Times”
chart.
Surface optimisation:
If light curing is carried out as prescribed, the coating veneer shows a
higher yellow value due to the catalyst.
To obtain and fix the final colour the final surface must be obtimised by
light curing it again. Refer to the enclosed “Polimerisation Times” chart.
11
Mass working time:
From 1 to 3 minutes, depending on the lighting conditions.
Polimerisation depth:
Polimerisation depth is 2mm.
To ensure ideal physical characteristics it is recommended not to
apply layers of more than 2mm thick.
Use light curing equipment with an emission range between 350 and
500 nm.
The required physical characteristics can only be attained if lamps are in
perfect technical condition. Regularly check lighting intensity following the
manufacturer’s instructions.
Cosmetic coating finishing:
Use silicone tips (wheels, lenticular, cylindrical) and tungsten or steel burs.
To obtain a good polishing take care to avoid causing any friction (heating
up) on the material surface.
Polishing:
Polish with goat-hair brushes or felt discs and polishing paste (Nobil
Metal’s polishing pastes are recommended) and with soft cotton discs
mounted on a hand-piece.
• To obtain an ideal polishing, after finishing has been carried out place a
small quantity of Dia Past paste on the surface and polish following the
instructions supplied with the product.
• To obtain a good result and prevent the formation of deposits (nicotine,
caffeine etc.) and colour alterations the surface must be finished and
polished with the utmost care.
• Then polish the entire surface with Brillance Paste. Use goat-hair brushes. Set the micromotor to a maximum of 8,000 revs.
• For final buffing, use a cotton disc. Brilliance Paste can be used with the
cotton disc.
• After polishing, wash under room temperature running water. Use a
brush and a detergent.
• During finishing of Jeko® Body dusts are produced, as is the case with
all resins. It is recommended to carry out finishing in a well-ventilated
room.
Corrections and repairs:
Roughen the coating up to 2mm past the margin of the area to be subjected to repair and/or correction sandblasting it with aluminium oxide
12
(minimum 50 microns at max. 2 bar pressure).
Blow the surface clean with oil-free air and/or condensate, or steam clean
or wash it under runnning water.
Apply Jeko® Bonding Fluid and pre-polymerise in a lightcure unit to create
a new dispersion layer. For intermediate polymerisation, refer to the
enclosed “Polymerisation Times” chart.
A whitish appearance of the pre-polymerised Jeko® Bonding Fluid indicates an excessive polymerisation, which requires removal of the layer.
Repeat the operation previously described reducing polymerisation time.
Now lay the mass Jeko® Body and/or Jeko Top onto the area concerned
and carry out an intermediate polymerisation.
Then coat the surface with Fixing Agent and subject to final light curing
according to the enclosed “Polymerisation Times” chart.
Finish and polish the workpiece.
A note on application:
The transparency typical of light hardening materials for cosmetic coating
requires the use of coloured cervical and incisal opaques for a wholly satisfactory aesthetical result.
In this case, the recommended cervical opaques are individually mixed
with the corresponding dentine opaques to obtain the desired shade.
The masses Jeko® Body transparent pink and blue placed in the incisal
area produce natural colour effects.
The use of the masses Jeko® Body transparent allows reproducing any,
even extreme, transparency effect.
For additional characterisations of the Jeko® Body cosmetic coating the
Jeko® Stains denture colouring system can be used.
Useful recommendations:
Opaque polymerisation
• Frameworks must be degreased and free from any polishing paste residue.
• Mix the opaque homogeneously. It is recommended to apply the opaque
in two layers. Polymerise each layer separately.
Opaque removal
• Model the pontics to ensure support to the masses Jeko® Body as
required by the occlusal situation (protection against occlusal stresses).
• Avoid pre-contacts.
• Adhere to the minimum thickness of layers and to the polimerisation
times for the various components.
13
• Place suitable mechanical retention spheres.
Air inclusions
• Turn the syringe screw to squeeze out the paste and collect the mass on
a special tool taking care not to push the tool inside the tip.
• Apply enough mass to treat the whole coating and spread it.
• Do not mix Jeko® masses; use the layering technique.
Discolorations and plaque deposits
• Check the lighting power of the lightcure unit.
• Seal the surface and polish to a high gloss.
• Place the frameworks in the lightcure unit according to instructions.
• Adhere to the recommended thicknesses and polymerisation times for
Jeko® Body masses.
Recommended range of products for use with Jeko® Body:
Jeko® Stains prosthesis colouring system - Jeko® Metal Primer - Jeko®
Universal link - Jeko® Bonding Fluid - Jeko® Paste Opaquer - Jeko® Top Nobil Metal Fixing Agent - Jeko® Modelling Liquid - Jeko® Isolant Liquid Nobil Metal Brillance Paste - Nobil Metal Dia Past - Nobil Metal polishing
Kit Dia Past - Nobil Metal smoothing & polishing Kit.
8. Jeko® Top
Light hardening composite for occlusal surfaces, palatal surfaces, cusp
restorations and full coverages.
Il kit Jeko® Top contains:
6 Jeko® Top Overlay in the following colours
Orange (O); Yellow (Y); Red (R); Light (L);
Clear (C) and Blue (B)
Composition:
Monomer matrix
Diurethanedimethacrylate; Bis-GMA; 1.4- butanedioldimethacrylate
Total quantity of fillers
Inorganic filling material: 75% by weight (52% volume) glass fillers
(average particle size: 0.7 µm); pyrogen silicic acid (average particle
size: 0.04 µm)
14
Technical data
Properties
Unit of measurement
Values
µm
Silica 0,04
Glass 0,7
560
450
45
140
10000
1,93
15,2
0,7
150% Al
Dimension of particles
Vickers Hardness HV 02/10
Compression strength
Tensile strength
Yield strength
Modulus of elasticity
Density
Water absorption
Water solubility
Radiopacity (ISO 4049)
MPa
MPa
MPa
MPa
MPa
g/cm3
µg/mm3
µg/mm3
%
Transparency
%
Dentine from 2% to 4%
Enamel from 5% to 30%
Filler content
%
75% by weight
52% by volume
min.
1-3
-
Glass powder,
molten silica
Stability when exposed
to room light
Filler
Range of application:
• Aesthetical corrections
• Indirect veneers
• Vestibular coverage for provisional full and partial dentures
• Posterior teeth coverage
• Inlays
• Onlays
• Full coverage of veneers
• Customisation of resin teeth for removable prosthesis
Contraindications:
Bruxism - Clenching – Bad habits.
15
Foreword:
Occlusal materials (Jeko Top) must not be placed directly onto the metal
or the opaque.
In a first phase a layer of Jeko® Body mass is applied on the metal after it
has been treated with adhesive and opaque. Follow the relevant user
instructions. This flexible intermediate layer absorbs loads and stresses.
Preparation:
Layering of occlusal masses is carried out using an Overlay mass of the
selected colour (see Jeko Shade Guide). Layering must not exceed 2mm
in thickness.
Prior to applying Jeko® Top to Jeko® Body masses already layered, these
must be subjected to an intermediate polymerisation (refer to the
“Polymerisation Times” chart).
Inlay by the indirect technique:
Inlay build-up
Cast the model in the laboratory. Use an extra-hard plaster (Type IV).
When the plaster has hardened, lift the model from the impression.
Fill the undercuts and insulate using an oil-free insulation liquid (e.g. Jeko®
Isolant Liquid).
Build up the inlay on the model. Use Jeko Body to model deep proximal
and occlusal areas first. Each layer can be 2mm thick max.
Jeko Top masses are used for the inlay final coating. The workpiece can
also be made entirely with Jeko Top.
The intensive colours for characterisation (for ex: Jeko® Stains Kit) can be
applied between the different Overlay masses.
Each layer is subjected to an intermediate polimerisation with a suitable,
ordinary unit (refer to the “Polimerisation Times” chart).
Finish and harden the inlay by means of a final polymerisation, which optimises the surface, and take the inlay off the model (refer to the
“Polimerisation Times” chart).
Prior to final light curing apply the Fixing Agent onto the material surface.
Finish the occlusal surface with fissure burs and polish with a micromotor
using goat hair brushes or felt discs and a polishing paste (Nobil Metal’s
polishing pastes are recommended - Brillance Paste and Dia Past and Dia
Past polishing kit).
A carefully finished and polished surface is the base for an optimum result
preventing formation of deposits (nicotine, caffeine) and changes in the
restoration colour.
16
Cementation of inlays, onlays and veneers
Remove the temporary workpiece and clean the cavity. Position the dam
then clean and dry the filed surface of the teeth. Check restoration fit
exerting a light pressure. Pikle the clean tooth, apply the bonding and
polymerise with a common lightcure unit. Apply the composite cement
chosen according to the manufacturer’s instructions, place the inlay on the
cavity and press gently.
If the inlay is thicker than 2mm. a dual hardening composite should be
used. Remove excess composite and polymerise using a common
lightcure unit, following the manufacturer’s instructions.
Remove excess material with a fine diamond bur and diamond strips.
Check occlusion and correct as needed.
NOTE: cements available on the market can be used. For each phase in
the cementation process refer to the instructions supplied by the manufacturer of the products used.
Useful recommendation:
• Avoid inclusion of air bubbles.
• Thickness must not exceed 2 mm. (1-1.5mm. thickness is recommended).
• Due to the air oxygen, a thin, non-polimerised film develops on the surface - the dispersion layer. This film allows chemical bonding between
the various layers, and must not be touched or contaminated with
humidity.
• Prior to final polymerisation, apply the Fixing Agent on the material surface. The Fixing Agent prevents the material reaction with oxygen thus
allowing a thorough hardening of the surface. After polymerisation,
remove the Fixing Agent. Use a brush and running water or remove it
with fabric cloth. Product traces, if any, will be removed by the finishing
and polishing phases afterwards.
• In the case of complex modelling, work in dim lighting, or cover the
material with a sheet that does not let light through.
Polymerisation:
Exposure time for intermediate polymerisations is about 60-90 seconds
using a common lightcure unit, for all colours and for each layer.
Intermediate polymerisations can also be carried out with shorter light
exposure times if units for preliminary/pre-hardening polymerisation are
available. Hardening and final colour are obtained after final polymerisation
(refer to the “Polymerisation Times” chart) of the last layering.
17
Information on polymerisation:
To polymerise use a lightcure unit with an emission range between 350
and 500 nm.
The desired physical characteristics can only be attained if lamps are in
perfect condition. Regularly check lighting intensity following the manufacturer’s instructions.
Recommended range of products for use Jeko® Top:
Jeko® Stains prosthesis colouring system - Jeko® Bonding Fluid - Nobil
Metal Fixing Agent - Jeko® Modelling Liquid - Jeko® Isolant Liquid - Nobil
Metal Brillance Paste - Nobil Metal Dia Past - Nobil Metal Dia Past polishing
kit - Nobil Metal smoothing & polishing Kit.
9. Jeko® Stains
Lighthardening, methacrylate-based dyes for dental use.
Jeko® Stains system allows the dentist and the dental technician to meet
the increasingly high aesthetical requirements of their patients.
In a very simple way, the system makes it possible to match the existing
natural teeth in a partial denture or to make a creative, customised full
denture.
Il kit Jeko® Stains contains:
11 colours: Clear, White, Cream, Peach, Orange, Ochre, Brown, Light
Brown, Red, Blue, Black, 2 Stain Primers, 1 Cleaner.
Composition:
Organic matrix
Methylmethacrylate
Bis-GMA
Additional components
Thickening agent, Initiators, Stabilizers, Pigments
Range of application:
• Characterisation of full and partial denture base resins, with protection
by means of Clear dye
• Customisation of resin teeth available on the market
• Colour effects in the crown and bridge technique
18
Handling:
Characterisation of full and partial denture base resins
Prosthetic units are finished and smoothed with sandpaper taking into
account the musculature of each patient. After smoothing with pomice
stone, brush to a gloss the areas that are not to be coloured.
Thoroughly clean the denture using ultra-sounds or steam. Take care that
the cleaned surface to characterise is not touched afterwards.
Wet the surface to be coloured with Jeko® Stain Primer liquid; then light
cure (refer to the “Polymerisation Times” chart).
During polymerisation, a dispersion layer develops (gluey surface).
Important: if the surface results glossy and not gluey, the polymerisation
time was too long. Surfaces on which the Primer is still runny need a
slightly longer polymerisation time.
Prepare and mix the colour as needed.
After the denture has been characterised, the colours must be light cured
as shown in the “Polymerisation times” chart. No intermediate polymerisation of the individual colouring phases is required.
The superficial dispersion layer can be removed using a paper napkin
soaked in Jeko® Cleaner.
Carry out the final polishing in the usual manner.
Customisation of resin teeth available on the market
Artificial teeth are modified depending on age, sex and shape.
When the teeth have been given the desired shape, it is sandblasted with
aluminium dioxide (50 mm); clean following the instructions given at the preceding paragraph “Characterisation of full and partial denture base resins”.
Wet the surface to be coloured with Jeko® Stain Primer liquid; then light
cure (refer to the “Polymerisation Times” chart enclosed hereto).
Remove the superficial dispersion layer and carry out the final polishing in
the same way as described under “Characterisation of full and partial denture base resins”.
Effects on the crown and bridge technique
The following working instructions apply to light hardening coating materials:
• After placement of the opaque mass, characterise the neck, the dentine
and the enamel mass with Jeko® Stains colours.
• Individual correction of the coating material is obtained through mixing,
inserting and colouring.
• For polymerisation times refer to the “Polymerisation Times” chart.
19
11. GENERAL INFORMATION
Preservation and storage:
It is recommended to store the material at a temperature between 10°C
and 25°C.
Close containers immediately after use and protect against direct light.
Keep in a dry, ventilated place.
Turn the syringe screw counter-clockwise to prevent any unwanted material discharge.
Read the reference safety data sheet: dispose of the product carefully.
Expiry date:
The maximum expiry date is printed on the label of each package next to
the reference symbol. It is recommended not to use the product after its
expiry date, or if not preserved properly.
Warnings:
> Our technical instructions for use, whether oral, in writing or through
practical directions, are based on our experience and should be considered as a general guide.
> Our products are subject to continuous developments. We reserve the
right to make changes at any time and without prior notice.
> Jeko Body meets the requirements of standard EN ISO 10477. This
standard is not applicable to the use of the material in the lateral sector
in which it undergoes occlusal force.
> If used correctly this product, a Medical Device, has no side effects. In
principle, however immune reactions (e.g. allergies) or local sensitisation
cannot be totally excluded.
Please report any unwanted side effects or even only the suspicion of
such.
> In case of patient hypersensitivity to any of the components, only use
this product under strict control of a doctor or dentist.
In such cases, it is possible to request the composition of our medical
device. The dentist must take into account, when using this product,
possible cross-reactions or interactions of the product with other substances already present in the patient’s mouth.
> Should this medical device be subjected to special processes, please
forward all the above information to the dentist.
21
> During preparation, it is recommended to read the instructions for use
and observe the material safety data sheets.
> Substances containing phenol (e.g.. Eugenol) inhibit polymerisation. Do
not use materials containing such substances.
> This product was developed for its specified purposes only and must be
used in accordance with the instructions for use. The manufacturer
does not accept any liability for damages resulting from improper use or
preparation.
> When not completely hardened the material can change colour, its
mechanical properties worsen and irritation of the pulp cannot be
excluded.
> As is the case with all resins, during finishing of Jeko® composite fine
dust particles may be generated. It is recommended to work over a suction system in a well-ventilated area.
> Keep out of reach of children.
IMPORTANT NOTICE
Nobil Metal S.p.A., its Direct Agents and Licensees can in no way be held
responsible for losses or damages consequent or resulting from the use of these
products.
This/these product/s must be used exclusively for the applications specified in
these instructions for use and its/their use is restricted to dental professionals.
The Jeko Line is reserved for dental technicians for laboratory use and on prosthetic workpieces
The user of this/these product/s must, before using it/them, make sure it/they
is/are suitable for the application he wishes to use it/them for and shall assume
all risks and responsibilities.
Nobil Metal reserves the right to change these instructions at any time without
prior notice.
Jeko is a registered trademark of Nobil Metal S.p.A.
22
SHADE GUIDE
Jeko Paste Opaquer
Jeko Body
Vita
Shades
Cervical
Dentinal
Incisal
Cervical
Dentinal
Incisal
A1
JPOC 1
JPOD 1
JPOI 1
JBC A1
JBD A1
JBI 2
A2
JPOC 1
JPOD 2
JPOI 1
JBC A2/A3
JBD A2
JBI 2
A3
JPOC 2
JPOD 3
JPOI 1
JBC A2/A3
JBD A3
JBI 3
A3,5
JPOC 2
JPOD 4
JPOI 1
JBC A3,5
JBD A3,5
JBI 3
A4
JPOC 2
JPOD 4
JPOI 1
JBC A4
JBD A4
JBI 4
B1
JPOC 1
JPOD 5
JPOI 1
JBC B1
JBD B1
JBI 1
B2
JPOC 1
JPOD 6
JPOI 1
JBC B2
JBD B2
JBI 3
B3
JPOC 2
JPOD 7
JPOI 1
JBC B3
JBD B3
JBI 3
B4
JPOC 2
JPOD 7
JPOI 1
JBC B4
JBD B4
JBI 3
C1
JPOC 3
JPOD 8
JPOI 1
JBC C1
JBD C1
JBI 4
C2
JPOC 3
JPOD 9
JPOI 1
JBC C2
JBD C2
JBI 3
C3
JPOC 3
JPOD 9
JPOI 1
JBC C3
JBD C3
JBI 3
C4
JPOC 3
JPOD 8
JPOI 1
JBC C4
JBD C4
JBI 4
D2
JPOC 4
JPOD 10
JPOI 1
JBC D2/D3
JBD D2
JBI 4
D3
JPOC 4
JPOD 2
JPOI 1
JBC D2/D3
JBD D3
JBI 3
D4
JPOC 4
JPOD 4
JPOI 1
JBC D4
JBD D4
JBI 3
23
24
90 sec.
90 sec.
3 min
1 min.
9 min.
6 min.
360 sec.
180 sec.
5 min.
6 min.
9 min.
10 min.
5 min.
4 min.
9 min.
5 min.
180 sec.
180 sec.
5 min.
5 min.
9 min.
2 x HD°
5 min.
4 min.
90 sec.
90 sec.
30 sec.
90 sec.
1 min.
60 sec.
0,5 min.
90 sec.
1 min.
1 min.
9 min.
6 min.
240 sec.
180 sec.
10 min.
6 min.
9 min.
10 min.
7 min.
4 min.
7 min.
5 min.
240 sec.
180 sec.
10 min.
5 min.
9 min.
2 x HD°
7 min.
4 min.
Surface
polymerisation
9 min.
30 sec.
30 sec.
**)
5 min.
not possible
5 min.
1 x HD°
6 min.
2 min.
Jeko Stain
Primer
*) Revolving plate in its uppermost position.
**) Polymerise Jeko Stain Primer for max. 30 seconds. The minimum time the unit is set to is 90 seconds.
°) High Density (75 sec. curing, stronger halogen light).
30 sec.
90 sec.
90 sec.
90 sec.
0,5 min.
1 min.
60 sec.
1 min.
GC
Labolight LV-II
90 sec.
1 min.
1 min.
Final
polymerisation
Intermediate
polymerisation
Intermediate
Final
polymerisation polymerisation
Surface
optimisation
Jeko Top
Jeko Body
2 min.
2 min.
1 x HD°
5 min.
MPA 2000
Triad II *)
Ivoclar
Spectramat
Targis Power
Kulzer
DC-XS
Uni-XS
Schuetz-Dental
Spektra Fast
Shofu
Solidilite EX
3 min.
Paste
Opaquer
LicuLite
Dentsply
Lightcure
Unit
Polymerisation times for Jeko Body and Jeko Top
3 min.
6 min.
3 min.
180 sec.
180 sec.
5 min.
not possible
3 min.
5 min.
1 x HD°
3 min.
6 min.
2 min.
3 min.
Jeko Stains
colours
light colours
dark colours
Standard layering of a veneer crown
(Metal protection on the incisal edge)
Metal framework with mechanical ball retentions.
Sandblast the metal surface with aluminium oxide at
50 micron and clean with dry, oil-free air.
1
Application of a thin layer of the Jeko Metal Primer
bonding agent. Leave to dry for about 1 minute.
2
Application of Jeko Universal Link on the surface
treated with Jeko Metal Primer. The layer of
Universal Link must completely invest the mechanical retention and be particularly concentrated in the
undercut areas of the mechanical structure or in
those areas difficult to reach by a lamplight. (Grey =
metal – red = Metal Primer – blue = Universal Link).
Light curing: refer to the recommended times for
Jeko Paste Opaquer in the chart “Polymerisation
Times for Jeko Body and Jeko Top”.
3
Application of a first thin layer of
Jeko Opaquer Dentinal.
Light curing: refer to the chart “Polymerisation
Times for Jeko Body and Jeko Top”.
4
Application of a second layer of Jeko Opaquer Dentinal
to obtain the total masking of the metal surface.
Light curing: refer to the chart “Polymerisation Times for
Jeko Body and Jeko Top”.
5
Layering of Jeko Body Cervical mass starting from the
cervical margin of the metal framework and gradually
reducing its thickness up to the middle third of the
crown. Light curing: refer to the chart “Polymerisation
Times for Jeko Body and Jeko Top”.
6
Layering of the dentine mass Jeko Body Dentinal.
Slightly overlap the cervical mass with the dentine
in the marginal area then model the dentine to the
desired thickness according to the shape of the
crown. The thickness of the dentine mass is
gradually reduced towards the incisal margin to
create the dentine shape. Light curing: refer to the
chart “Polymerisation Times for Jeko Body and
Jeko Top”.
7
Layering of the enamel mass Jeko Body Incisal. Apply
the enamel mass on the upper part of the layered
dentine covering only the area of the incisal third.
8
Composite surface covered with Fixing Agent to
obtain the complete curing of the surface and prevent
the dispersion layer. Carry out the final light curing.
Light curing: refer to the chart “Polymerisation Times
for Jeko Body and Jeko Top”.
9
After the final light curing, wash off the Fixing Agent
under running water with a brush.
Finish the shape using steel or tungsten
burs and finish off using
silicone rubbers.
10
Polish with goat hair brushes, felt discs and
polishing paste. For a shiny polish of the
composite surface you can use soft cotton discs.
11
The veneer crown finished and polished.
12
Individual layering of a bridge
After treating the metal surface with Jeko Metal Primer
and the first layer of opaque has been applied and
polymerised, apply a second layer of Jeko Opaquer
Dentinal and characterise it with Jeko Opaquer Incisal
and Jeko Opaquer Cervical. The metal surface will thus
be completely masked.
Light curing: refer to the chart “Polymerisation Times for
Jeko Body and Jeko Top”.
13
14
The next step is the layering of the cervical mass Jeko Body Cervical directly onto the
cervical area of the characterised opaque layer. In this case, the cervical mass is used to
structure a colour harmony reproducing that of the natural tooth (the Cervical mass is
positioned based on the tooth’s characteristics). Light curing: refer to the chart
“Polymerisation Times for Jeko Body and Jeko Top”.
Layering of Jeko Body Dentinal to obtain a dentine
shape, which is suitable for enhancing the enamel
characteristics. In this case a more chromatic dentine
has been used on the canine (Body Dentinal A3,5) and
higher value dentines on both the lateral (Body Dentinal
A2) and incisor teeth (Body Dentinal A1)
Light curing: refer to the chart “Polymerisation Times for
Jeko Body and Jeko Top”.
15
Characterisation also using the Jeko Stains colours.
Light curing: refer to the chart “Polymerisation Times for
Jeko Body and Jeko Top”.
16
Layering of the enamel mass Jeko Body Incisal to
complete the morphology and colour harmony. Apply the
Fixing Agent onto the composite surface and carry out
the final light curing.
Light curing: refer to the chart “Polymerisation Times for
Jeko Body and Jeko Top”.
17
The layered bridge finished and polished.
18
Example of use of the Jeko Top (overlay)
Application of the enamel mass Jeko Body Incisal.
In this case, the enamel does not give the work piece
its final shape as this is obtained by applying a layer of
Jeko Top composite mass boosting the extraordinary
physical and mechanical properties.
Light curing: refer to the chart “Polymerisation Times
for Jeko Body and Jeko Top”.
19
Layering of the Jeko Top mass used
for shape definition.
20
Layering of the Jeko Top mass for shape definition.
After applying the Fixing Agent on the composite surface with a
brush, light curing is carried out.
Light curing: refer to the chart “Polymerisation Times for Jeko
Body and Jeko Top”.
21
The crown finished and polished
(vestibular view)
22
The crown finished and polished
(occlusal view)
23
The crown finished and polished
(distal-vestibular view)
24