1
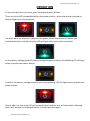
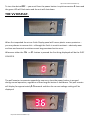
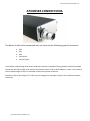
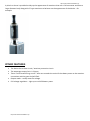
INNOKIN ITASTE MVP
http://www.sfumando.it/itaste-mvp/
USER MANUAL
•
•
•
•
•
•
Size:
Battery Capacity:
Operating Voltage:
Charing Time:
Amp limit –
Colors:
http://www.sfumando.it/itaste-mvp/
41*22*107mm
2600mAh
3.3-5.0 V
3.5H-5.5H
3.0 Amps
Silver, Titanium Blue ,Black
OPERATION
http://www.sfumando.it/itaste-mvp/
To turn the device on you must press the power button 3 times.
There are three LED’s embedded within the power switch – when the device is turned on
they will light up in this sequence:
From this point on whenever you press the power button the device will power the
attached atomiser and the following LED will light whilst the button is pressed:
As the battery voltage gradually lowers through usage eventually the following LED will light
when you press the power button:
Finally as the battery voltage is almost spent the following LED will light when you press the
power button:
Shortly after this the same LED will eventually flash and the unit will shut down indicating
that it will need to be recharged before it can be operated again
http://www.sfumando.it/itaste-mvp/
http://www.sfumando.it/itaste-mvp/
To turn the device OFF – you must Press the power button in quick succession 3 times and
the green LED will flash twice and the unit will shut down.
THE VV DISPLAY.
When first unpacked the mirror finish Display panel will have a plastic screen protector –
you may choose to remove this – although the finish is scratch resistant – obviously wear
and tear and eventual scratches cannot be guaranteed not to occur.
Whenever either the
V+
or V- button is pressed the first thing displayed will be the PUFF
COUNTER.
The puff counter increments upwards by one every time the power button is pressed
during normal operation, regardless of how long the button is held down. The puff counter
will display for approximately 1.5 seconds and then the current voltage setting will be
displayed:
http://www.sfumando.it/itaste-mvp/
http://www.sfumando.it/itaste-mvp/
Until the voltage setting is displayed pressing of either the V+ or V- will have NO effect.
Once voltage is displayed you may adjust the voltage up or down using the V+ or V- in
0.1 V steps from 3.3V up to 5V.
The voltage setting do not cycle continuously – once you have reached 5V the only way to
adjust back down is to use the V- button and vice versa.
NOTE: After the buttons are pressed or voltage has been adjusted you will not be able to
operate the power button until the display has closed down – this takes approximately 1.5
– 2.0 seconds.
CHARGING & PASS THROUGH FUNCTIONALITY.
Charging of the device can be accomplished by using the supplied charging adapter and
plugging it into a suitable powered USB port and the corresponding MICRO USB connector
on the adapter into the bottom of the device in the INPUT port.
The charge adapter consists of a standard USB connection cabled to a 3 way adapter
comprising a MINI / Micro USB connector and an IPhone connector (not suitable for iPhone 5)
The unit requires approximately 3.5 to 5.5 hours to fully charge dependant on the
discharge state of the battery – you are able to use the device whilst it is charging via its
pass-through functionality. However it is not a true direct current pass-through and still
relies upon the battery to deliver working current.
If the battery is heavily discharged the LED’s will either display red or orange for a short
time – once the Led displays steady green status there will be enough charge within the
battery to allow use of the device during its charging cycle.
Note however that continual uninterrupted use of the device will essentially negate any
charging taking place and the device will likely not charge for an extremely long duration
under this circumstance.
When the device has been fully charged the Green LED will cease to light up and the device
may now be disconnected and used as per normal.
http://www.sfumando.it/itaste-mvp/
http://www.sfumando.it/itaste-mvp/
Note a state of complete discharge need not be achieved before charging can take place –
the unit can be charged when just the orange light displays during operation and charge
time will likewise be considerably shorter as a result.
It is recommended however that even though Lithium Ion Polymer batteries do not suffer
from memory effect -- the occasional complete discharge and lengthy charge is advisable
to keep the internal battery optimised to its fullest.
Also note due to the nature of such battery cells full operating performance may not be
achieved until a few discharge and charge cycles have been accomplished.
3RD PARTY DEVICE CHARGING
Due to the high capacity of the device battery – when circumstances require - it can be
used to charge 3rd party devices such as mobile phones iPods etc… through use of the
output terminal on the base of the device.
In order to do this you must first slide the Output ON/OFF switch to the ON position and
this will activate the USB output port – connect a device to be charged into this USB port
and the MVP will commence to charge the device you have attached.
Note – naturally this will severely limit the battery capacity of the device for actual
operation of atomisers as available power is drained for the 3rd party device. Hungry
devices a such as IPADS which can pull up to 2.5 amps or more are NOT recommended for
this device – the MVP can output a maximum of 1A which will drain very quickly when
connected to power hungry devices.
Ensure that the device OUTPUT switch is in the OFF position for normal vaping operation.
Note: The device can be charged via standard USB to MICRO USB cables plugged into mains
USB chargers with an output up to 1Amps with no issues.
http://www.sfumando.it/itaste-mvp/
http://www.sfumando.it/itaste-mvp/
ATOMISER CONNECTIONS.
The device is able to be connected with no issues to the following types of atomisers:
•
•
•
•
•
CE4
CE5
eGo
VIVI NOVA
510 (all types)
It should be noted though that certain atomisers which are capable of being fitted to an EGO threaded
connection will not be able to be used on this device unless a 510 to EGO adapter is used – this is due to
the increased height of the first shoulder of the factory fitted connector.
Atomisers such as the Kanger T2 T3 fall into the category for example as they have a shallow recessed
connector.
http://www.sfumando.it/itaste-mvp/
http://www.sfumando.it/itaste-mvp/
A plinth or sleeve is provided to tidy up the appearance of atomisers that use a 510 connector and have a
large diameter body along with CE type atomisers to balance out the appearance of the device – for
example.
OTHER FEATURES
•
•
•
•
•
The device has a short circuit / atomiser protection circuit.
The amperage output limit is 3 Amps
There is a 10 second firing cut off – after ten seconds the unit will shut down power to the atomiser
connection and the green led will flash
Output mode – steady state flat voltage
Full voltage regulation – right up to red LED battery state.
http://www.sfumando.it/itaste-mvp/