1
InnoTek VirtualBox® User Manual
Version 1.3.8 Edition
InnoTek Systemberatung GmbH
Werkstrasse 24
71384 Weinstadt
Germany
+49 (0)7151 60405-0
http://www.innotek.de
InnoTek VirtualBox® User Manual
InnoTek Systemberatung GmbH
Copyright © 2004-2007 InnoTek Systemberatung GmbH
Table of Contents
1. Introduction ...................................................................................................... 1
1.1. Virtualization basics ................................................................................ 1
1.2. Features overview ................................................................................... 3
1.3. Operating system support .......................................................................... 4
1.3.1. Supported host operating systems .................................................... 4
1.3.2. Supported guest operating systems ................................................... 5
2. Installation ....................................................................................................... 6
2.1. Installing on Windows hosts ...................................................................... 6
2.1.1. Prerequisites ................................................................................ 6
2.1.2. Performing the installation .............................................................. 6
2.1.3. Uninstallation .............................................................................. 7
2.1.4. Unattended installation .................................................................. 7
2.2. Installing on Linux hosts ........................................................................... 7
2.2.1. Prerequisites ................................................................................ 7
2.2.2. Support for external kernel modules ................................................. 7
2.2.3. Performing the installation .............................................................. 8
2.2.4. Starting VirtualBox on Linux .........................................................10
3. Starting out with VirtualBox ...............................................................................12
3.1. Starting the graphical user interface ...........................................................12
3.2. Creating a virtual machine .......................................................................13
3.3. Basics of virtual machine configuration ......................................................15
3.4. Running a virtual machine .......................................................................17
3.4.1. Keyboard and mouse support in virtual machines ...............................17
3.4.2. Changing removable media ...........................................................19
3.4.3. Saving the state of the machine .......................................................19
3.4.4. Snapshots ...................................................................................20
3.5. The Virtual Disk Manager ........................................................................20
3.6. Deleting virtual machines ........................................................................22
4. The VirtualBox Guest Additions ..........................................................................23
4.1. Introduction ..........................................................................................23
4.2. Windows Guest Additions .......................................................................23
4.2.1. Installing the Windows Guest Additions ...........................................24
4.2.2. Updating the Windows Guest Additions ...........................................24
4.2.3. Unattended Installation .................................................................25
4.3. Linux Guest Additions ............................................................................25
4.3.1. Installing the Linux Guest Additions ...............................................25
4.3.2. Video acceleration and high resolution graphics modes .......................26
4.3.3. Updating the Linux Guest Additions ................................................26
5. Configuring virtual machines ..............................................................................27
5.1. Virtual machine settings ..........................................................................27
5.1.1. General settings ...........................................................................27
5.1.2. Hard disks ..................................................................................28
5.1.3. CD/DVD-ROM and floppy settings .................................................29
5.1.4. Audio settings .............................................................................30
5.1.5. Network settings ..........................................................................30
5.1.6. USB support ...............................................................................30
5.2. Storage in virtual machines ......................................................................32
5.2.1. Virtual Disk Image (VDI) files .......................................................32
5.2.2. iSCSI servers ..............................................................................33
5.3. Networking in virtual machines .................................................................33
5.3.1. Not attached ...............................................................................34
5.3.2. Network Address Translation (NAT) ...............................................34
5.3.3. Host Interface Networking .............................................................34
5.3.4. Internal Networking .....................................................................38
5.4. Folder Sharing .......................................................................................39
6. Alternative front-ends; remote virtual machines ......................................................41
6.1. Introduction ..........................................................................................41
iv
InnoTek VirtualBox® User Manual
6.2. Using VBoxManage to control virtual machines ...........................................41
6.3. VBoxSDL, the simplified VM displayer .....................................................43
6.4. Remote Desktop Support (VRDP) .............................................................43
6.4.1. VBoxVRDP, the headless VRDP server ...........................................44
6.4.2. Step by step: creating a virtual machine on a headless server ................44
6.4.3. Remote USB ...............................................................................45
6.4.4. RDP authentication ......................................................................46
6.4.5. RDP encryption ...........................................................................46
7. VBoxManage reference .....................................................................................48
7.1. VBoxManage list ...................................................................................50
7.2. VBoxManage showvminfo .......................................................................50
7.3. VBoxManage registervm / unregistervm .....................................................51
7.4. VBoxManage createvm ...........................................................................51
7.5. VBoxManage modifyvm .........................................................................52
7.6. VBoxManage startvm .............................................................................54
7.7. VBoxManage controlvm ..........................................................................54
7.8. VBoxManage discardstate ........................................................................55
7.9. VBoxManage snapshot ............................................................................55
7.10. VBoxManage registerimage / unregisterimage ...........................................55
7.11. VBoxManage showvdiinfo .....................................................................56
7.12. VBoxManage createvdi .........................................................................56
7.13. VBoxManage modifyvdi ........................................................................56
7.14. VBoxManage clonevdi ..........................................................................56
7.15. VBoxManage addiscsidisk .....................................................................56
7.16. VBoxManage createhostif/removehostif ....................................................57
7.17. VBoxManage getextradata/setextradata ....................................................57
7.18. VBoxManage setproperty .......................................................................57
7.19. VBoxManage usbfilter add/modify/remove ...............................................58
7.20. VBoxManage sharedfolder add/remove ....................................................58
7.21. VBoxManage updatesettings ...................................................................58
8. Advanced Topics ..............................................................................................59
8.1. VirtualBox configuration data ...................................................................59
8.2. Automated Windows Guest Logons (VBoxGINA) ........................................60
8.3. Custom external VRDP authentication .......................................................60
8.4. Secure Labeling with VBoxSDL ...............................................................61
8.5. Custom VESA resolutions .......................................................................62
8.6. Releasing modifiers with VBoxSDL on Linux .............................................62
9. VirtualBox Application Programming Interfaces .....................................................63
10. Troubleshooting ..............................................................................................64
10.1. General ...............................................................................................64
10.1.1. Collecting debugging information .................................................64
10.1.2. Guest shows IDE errors for VDI on slow host file system ..................64
10.1.3. Responding to guest IDE flush requests ..........................................65
10.2. Windows guests ...................................................................................65
10.2.1. Windows boot failures (bluescreens) after changing VM configuration .65
10.2.2. Windows 2000 installation failures ................................................65
10.2.3. How to record bluescreen information from Windows guests ..............66
10.2.4. No networking in Windows Vista guests .........................................66
10.3. Windows hosts .....................................................................................66
10.3.1. VBoxSVC out-of-process COM server issues ..................................66
10.3.2. CD/DVD changes not recognized ..................................................66
10.3.3. Sluggish response when using Microsoft RDP client .........................67
10.3.4. Running an iSCSI initiator and target on a single system ....................67
10.4. Linux hosts ..........................................................................................67
10.4.1. Linux kernel module refuses to load ..............................................67
10.4.2. Linux host's CD/DVD drive not found ...........................................68
10.4.3. Linux host's floppy not found .......................................................68
10.4.4. Strange guest IDE error messages when writing to CD/DVD ..............68
10.4.5. VBoxSVC IPC issues .................................................................69
10.4.6. USB not working .......................................................................69
11. ChangeLog ....................................................................................................70
11.1. Version 1.3.8 (2007-03-14) .....................................................................70
11.2. Version 1.3.6 (2007-02-20) .....................................................................70
v
InnoTek VirtualBox® User Manual
11.3. Version 1.3.4 (2007-02-12) .....................................................................71
11.4. Version 1.3.2 (2007-01-15) .....................................................................73
11.5. Version 1.2.4 (2006-11-16) .....................................................................73
11.6. Version 1.2.2 (2006-11-14) .....................................................................73
11.7. Version 1.1.12 (2006-11-14) ...................................................................74
11.8. Version 1.1.10 (2006-07-28) ...................................................................74
11.9. Version 1.1.8 (2006-07-17) .....................................................................75
11.10. Version 1.1.6 (2006-04-18) ...................................................................75
11.11. Version 1.1.4 (2006-03-09) ...................................................................76
11.12. Version 1.1.2 (2006-02-03) ...................................................................77
11.13. Version 1.0.50 (2005-12-16) .................................................................77
11.14. Version 1.0.48 (2005-11-23) .................................................................78
11.15. Version 1.0.46 (2005-11-04) .................................................................78
11.16. Version 1.0.44 (2005-10-25) .................................................................79
11.17. Version 1.0.42 (2005-08-30) .................................................................79
11.18. Version 1.0.40 (2005-06-17) .................................................................80
11.19. Version 1.0.39 (2005-05-05) .................................................................81
11.20. Version 1.0.38 (2005-04-27) .................................................................81
11.21. Version 1.0.37 (2005-04-12) .................................................................82
A. 3rd party licenses .............................................................................................83
A.1. Materials ..............................................................................................83
A.2. Licenses ..............................................................................................84
A.2.1. X Consortium License (X11) .........................................................84
A.2.2. GNU Lesser General Public License (LGPL) ....................................84
A.2.3. zlib license .................................................................................90
A.2.4. Apache License ..........................................................................90
A.2.5. OpenSSL license .........................................................................93
A.2.6. Mozilla Public License (MPL) .......................................................93
A.2.7. Slirp license ............................................................................. 100
A.2.8. liblzf license ............................................................................ 100
A.2.9. GNU General Public License (GPL) ............................................. 100
Glossary ........................................................................................................... 105
vi
Chapter 1. Introduction
InnoTek VirtualBox is a family of virtual machine products targeting desktop computers, enterprise
servers and embedded systems. Due to its modular architecture, VirtualBox can be deployed in any
environment where x86 systems are to be virtualized on x86 systems. (With "x86", we are referring
to 32-bit CPUs from AMD and Intel as well as compatible CPUs from other vendors, plus 64-bit
CPUs in 32-bit mode.)
1.1. Virtualization basics
VirtualBox allows you to run unmodified operating systems -- including all of the software that is
installed on them -- directly in a special environment on top of your existing operating system. This
environment, called a "virtual machine", is created by the virtualization software. The physical computer is then usually called the "host", while the virtual machine is often called a "guest".
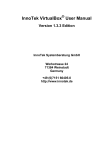
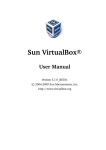
The following image shows you how VirtualBox, on a Linux host, is running Windows Vista as
guest operating system in a virtual machine (displayed in a window on the host):
VirtualBox allows most of the guest code to run unmodified, directly on the host computer, and the
guest operating system "thinks" it's running on real machine. In the background, however, VirtualBox intercepts certain operations that the guest performs to make sure that the guest can cooperate
with other programs on the host.
The techniques and features that VirtualBox provides are useful for several scenarios:
•
Operating system support. With VirtualBox, one can run software written for one operating
system on another (say, Windows software on Linux) without having to reboot. You can even
install in a virtual machine an old operating system such as DOS or OS/2 if your real computer's
hardware is no longer supported.
•
Infrastructure consolidation. The full performance provided by today's powerful hardware is
only rarely really needed, and typical servers have an average load of only a fraction of their theoretical power. So, instead of running many such physical computers that are only partially used,
one can pack many virtual machines onto a few powerful hosts and balance the loads between
them. This can save a lot of hardware expenses.
VirtualBox is unique in the virtualization market in that it can run virtual machines as mere servers for the Remote Desktop Protocol (RDP), with full client USB support. This allows for consolidating the desktop machines in an enterprise on just a few RDP servers, while the actual clients will only have to be able to display RDP data any more.
1
Introduction
•
Testing and disaster recovery. Once installed, a virtual box and its virtual hard disk can be
considered a "container" that can be arbitrarily frozen, woken up, copied, backed up, and transported between hosts. On top of that, with the use of another VirtualBox feature called "snapshots", one can save a particular state of a virtual machine and revert back to that state, if necessary. This way, one can freely experiment with a computing environment. If something goes
wrong (e.g. after installing misbehaving software or infecting the guest with a virus), one can
easily switch back to a previous snapshot and avoid the need of frequent backups and restores.
When dealing with virtualization (and also for understanding the following chapters of this documentation), it helps to acquaint oneself with a bit of crucial terminology, especially the following
terms:
Host operating system (host
OS).
The operating system of the physical computer where VirtualBox is installed. Also, the host operating system determines
which version of VirtualBox is required: VirtualBox for Windows or VirtualBox for Linux (see Section 1.3.1, “Supported
host operating systems” for further information).
Note
Even though VirtualBox for Windows and VirtualBox for Linux are usually discussed together in this document, there may be platform-specific differences which we will point out
where appropriate.
Guest operating system (guest
OS).
The operating system that is running inside the virtual machine.
Theoretically, VirtualBox can run any x86 operating system
(DOS, Windows, OS/2, FreeBSD, OpenBSD), but to achieve
near-native performance of the guest code on your machine, we
had to go through a lot of optimizations that are specific to certain operating systems. So while your favorite operating system
may run as a guest, we officially support and optimize for a select few (which, however, include the most common ones).
See Section 1.3.2, “Supported guest operating systems” for further information.
Virtual machine (VM).
When running, a VM is the special environment that VirtualBox
creates for your guest operating system. So, in other words, you
run your guest operating system "in" a VM. Normally, a VM
will be shown as a window on your computer's desktop, but depending on which of the various frontends of VirtualBox you
use, it can be displayed in full-screen mode or remotely by use
of the Remote Desktop Protocol (RDP).
With VirtualBox, we also use the term "virtual machine" in a
more abstract way. VirtualBox internally thinks of a VM as a set
of parameters that determine its operation. These settings can be
seen in the VirtualBox graphical user interface and via the
VBoxManage program; see Chapter 7, VBoxManage reference.
They include hardware settings (how much memory the VM
should have, what hard disks VirtualBox should virtualize
through which container files, what CD-ROMs are mounted
etc.) as well as state information (whether the VM is currently
running, saved, its snapshots etc.).
In other words, a VM is also what you can see in its settings dialog.
Guest Additions.
With "Guest Additions", we describe special software packages
that are shipped with VirtualBox. Even though they are part of
VirtualBox, they are designed to be installed inside a VM to im2
Introduction
prove performance of the guest OS and to add extra features.
This is described in detail in Chapter 4, The VirtualBox Guest
Additions.
1.2. Features overview
Here's a brief outline of VirtualBox's main features:
•
Clean architecture; unprecedented modularity. VirtualBox has an extremely modular design
with well-defined internal programming interfaces and a clean design that separates client and
server code. This makes it easy to control it from several interfaces at once: for example, you
can start a VM simply by clicking on a button in the VirtualBox main program and then control
that machine from the command line, or even remotely. See Chapter 6, Alternative front-ends;
remote virtual machines for details.
Due to its modular architecture, VirtualBox can also expose its full functionality and configurability through a comprehensive software development kit (SDK). Based on the standard technology COM (XPCOM on Linux), this Application Programming Interface (API) offers a comfortable way of integrating VirtualBox with other software systems. Internally, VirtualBox uses its
own public API, which guarantees that every aspect of the product is accessible to external customers as well and all interfaces are well tested.
•
Easy portability. VirtualBox already runs on Windows 2000, Windows XP and Windows Server 2003 as well as on all major Linux distributions from Red Hat, Novell and others. In addition,
a version for use on embedded µkernel systems is available. Versions for 64-bit host operating
systems and for Mac OS X will be available soon.
•
Guest Additions for Windows and Linux. The VirtualBox Guest Additions are packages
which can be installed in Windows or Linux guest systems to improve their performance and to
provide additional integration and communication with the host system.The Guest Additions are
described in detail in Chapter 4, The VirtualBox Guest Additions. In brief, among others, they
offer the following features:
•
•
Arbitrary screen resolutions (host-controlled). In guest systems that support it (currently
Windows guests), you can change the guest resolution simply by resizing the virtual machine window in the host system.
•
Arbitrary screen resolutions (guest-controlled). The VirtualBox Guest Additions can
handle arbitrary screen resolutions. Even for guest operating systems for which no Additions
have been written yet, VirtualBox will offer custom VESA resolutions.
Client/server design, XML configuration store. VirtualBox stores all its configuration in
XML files: one XML document for global settings and a XML file per virtual machine. This allows you to transport VM definitions between the different frontends and even across host computers.
For details, please refer to Section 8.1, “VirtualBox configuration data”.
•
Great hardware support. Among others, VirtualBox supports:
•
Full ACPI support. The Advanced Configuration and Power Interface (ACPI) is fully supported by VirtualBox. This eases cloning of PC images from real machines or third-party
virtual machines into VirtualBox. With its unique ACPI power status support, VirtualBox
can even report to ACPI-aware guest operating systems the power status of the host. For mobile systems running on battery, the guest can thus enable energy saving and notify the user
of the remaining power (e.g. in fullscreen modes).
•
I/O APIC support. VirtualBox virtualizes an Input/Output Advanced Programmable Interrupt Controller (I/O APIC) which is found in many modern PC systems. This eases cloning
of PC images from real machines or 3rd party virtual machines into VirtualBox.
•
USB device support. VirtualBox implements a virtual USB controller and allows you to
3
Introduction
connect arbitrary USB devices to your virtual machines without having to install devicespecific drivers on the host. USB support is not limited to certain device categories. For details, see Section 5.1.6.1, “USB settings”.
•
Multiscreen resolutions. VirtualBox virtual machines support screen resolutions many
times that of a physical screen, allowing them to be spread over a large number of screens attached to the host system.
•
Built-in iSCSI support. This unique feature allows you to connect a virtual machine directly to an iSCSI storage server without going through the host system. The VM accesses the
iSCSI target directly without the extra overhead that is required for virtualizing hard disks in
container files. For details, see Section 5.2.2, “iSCSI servers”.
•
PXE Network boot. The integrated virtual network cards of VirtualBox fully support remote booting via the Preboot Execution Environment (PXE).
•
Multigeneration snapshots. VirtualBox can save successive snapshots of the state of the virtual
machine. You can revert the virtual machine to the state of any of the snapshots. For details, see
Section 3.4.4, “Snapshots”.
•
VRDP remote access. You can run any virtual machine in a special VirtualBox program that
acts as a server for the VirtualBox Remote Desktop Protocol (VRDP). With this unique feature,
VirtualBox provides high-performance remote access to any virtual machine. A custom RDP
server has been built directly into the virtualization layer and offers unprecedented performance
and feature richness.
VRDP support is described in detail in Section 6.4, “Remote Desktop Support (VRDP)”.
On top of this special capacity, VirtualBox offers you more unique features:
•
•
Extensible RDP authentication. VirtualBox already supports Winlogon on Windows and
PAM on Linux for RDP authentication. In addition, it includes an easy-to-use SDK which
allows you to create arbitrary interfaces for other methods of authentication; see Section 8.3,
“Custom external VRDP authentication” for details.
•
USB over RDP. Via RDP virtual channel support, VirtualBox also allows you to connect arbitrary USB devices locally to a virtual machine which is running remotely on a VirtualBox
RDP server; see Section 6.4.3, “Remote USB” for details.
Folder sharing. VirtualBox folder sharing lets you access files from the host system inside
guests. Shared folders can be set up for all virtual machines, or for a single VM. Temporary
shared folders may also be set up while a VM is running. Shared folders are described in Section 5.4, “Folder Sharing”.
1.3. Operating system support
1.3.1. Supported host operating systems
Currently, VirtualBox is available for the following Windows 32-bit operating systems:
•
Windows 2000, service pack 3 and higher
•
Windows XP, all service packs
•
Windows Server 2003
and for the following Linux 32-bit systems:
•
Debian GNU/Linux 3.1 ("sarge") and "etch"
4
Introduction
•
Fedora Core 4 and 5
•
Gentoo Linux
•
Redhat Enterprise Linux 3 and 4
•
SUSE Linux 9 and 10
•
Ubuntu 5.10 ("Breezy Badger"), 6.06 ("Dapper Drake"), 6.10 ("Edgy Eft")
It should be possible to use VirtualBox on most Linux 2.4 and Linux 2.6 based systems using either
the VirtualBox installer or by doing a manual installation; see Section 2.2, “Installing on Linux
hosts”.
VirtualBox is written to be extremely modular and portable. If you are interested in using VirtualBox on a different system, please contact us to discuss adding support. Ports to 64-bit Windows and
Linux as well as Mac OS X are already underway.
1.3.2. Supported guest operating systems
While VirtualBox is designed to provide a generic virtualization environment for x86 systems, our
focus is to optimize the product's performance for a select list of guest systems. The following table
provides an overview of current support:
Operating system
Support status
Windows NT 4.0
All versions/editions and service packs are fully
supported (but see remark 1 below). Guest Additions are available with a limited feature set.
Windows 2000 / XP / Server 2003
All versions/editions and service packs are fully
supported. Guest Additions are available.
Windows Vista
Experimental support, full support expected
soon. Guest Additions are available with a limited feature set.
DOS / Windows 3.x / 95 / 98 / ME
Limited testing has been performed. Use beyond
legacy installation mechanisms not recommended. No Guest Additions available.
Linux 2.4
Limited support.
Linux 2.6
All versions/editions and service packs are fully
supported (but see remark 2 below). Guest Additions are available.
FreeBSD
Limited support. Guest Additions are not available yet.
OpenBSD
Versions 3.7 and 3.8 are supported. Guest Additions are not available yet.
Remarks:
1.
With Windows NT 4.0, there are some issues with older service packs. We recommend to install service pack 6a.
2.
For Linux 2.6, we strongly recommend using version 2.6.13 or higher for better performance.
However, version 2.6.18 (and some 2.6.17 versions) introduced a race condition that can cause
boot crashes in VirtualBox; if you must use a kernel >= 2.6.17, we advise to use 2.6.19 or later.
5
Chapter 2. Installation
As installation of VirtualBox varies depending on your host operating system, we provide installation instructions in two separate chapters for Windows and Linux, respectively.
2.1. Installing on Windows hosts
2.1.1. Prerequisites
For the various versions of Windows that we support as host operating systems, please refer to Section 1.3.1, “Supported host operating systems”.
In addition, Windows Installer 1.1 or higher must be present on your system. This should be the
case if you have all recent Windows updates installed.
Note
Presently VirtualBox can only be run from user accounts with administrator rights. This
will be fixed in a future release.
2.1.2. Performing the installation
The VirtualBox installation can be started
•
either by double-clicking on its Microsoft Installer archive (MSI file)
•
or by entering
msiexec /i VirtualBox.msi
on the command line.
In either case, this will display the installation welcome dialog and allow you to choose where to install VirtualBox to and which components to install. In addition to the VirtualBox application, the
following components are available:
USB support
This package contains special drivers for your Windows host
that VirtualBox requires to fully support USB devices inside
your virtual machines.
Networking
This package contains extra networking drivers for your Windows host that VirtualBox needs to support Host Interface Networking (to make your VM's virtual network cards accessible
from other machines on your physical network).
Depending on your Windows configuration, you may see warnings about "unsigned drivers" or similar. Please select "Continue" on these warnings as otherwise VirtualBox might not function correctly after installation.
The installer will create a "VirtualBox" group in the programs startup folder which allows you to
launch the application and access its documentation.
With standard settings, VirtualBox will be installed for all users on the local system. In case this is
not wanted, you have to invoke the installer as follows:
msiexec /i VirtualBox.msi ALLUSERS=2
This will install VirtualBox only for the current user.
6
Installation
2.1.3. Uninstallation
As we use the Microsoft Installer, VirtualBox can be safely uninstalled at any time by choosing the
program entry in the "Add/Remove Programs" applet in the Windows Control Panel.
2.1.4. Unattended installation
Unattended installations can be performed using the standard MSI support.
2.2. Installing on Linux hosts
2.2.1. Prerequisites
For the various versions of Linux that we support as host operating systems, please refer to Section 1.3.1, “Supported host operating systems”.
In any case, the following packages must be installed on your Linux system:
•
Qt 3.3.5 or higher;
•
SDL 1.2.7 or higher (this graphics library is typically called libsdl or similar).
Note
To be precise, these packages are only required if you want to run the VirtualBox graphical
user interfaces. In particular, VirtualBox, our main graphical user interface, requires both
Qt and SDL; VBoxSDL, our simplified GUI, requires only SDL. By contrast, if you only
want to run the headless VRDP server that comes with VirtualBox, neither Qt nor SDL are
required.
2.2.2. Support for external kernel modules
VirtualBox uses a special kernel module to perform physical memory allocation and to gain control
of the processor for guest system execution. Without this kernel module, you will still be able to
work with Virtual Machines in the configuration interface, but you will not be able to start any virtual machines.
To be able to install this kernel module, you will have to prepare your system for building external
kernel modules. As this process can vary from system to system, we will only describe what to do
for systems we have tested
•
Most Linux distributions can be set up simply by installing the right packages. Normally, these
will be the GNU compiler (GCC), GNU Make (make) and packages containing header files for
your kernel. The version numbers of the header file packages must be the same as that of the
kernel you are using:
•
In newer Debian and Ubuntu releases, you must install the right version of the linuxheaders and if it exists the linux-kbuild package. Current Ubuntu releases should have
the right packages installed by default.
•
In older Debian and Ubuntu releases, you must install the right version of the kernelheaders package.
•
On Fedora and Redhat systems, the package is kernel-devel.
•
On SUSE and OpenSUSE Linux, you must install the right versions of the kernel-source
and kernel-syms packages.
•
On Slackware Linux, the package is called kernel-source.
7
Installation
•
Alternatively, if you built your own kernel (on Gentoo systems, this will usually be the case), /
usr/src/linux will point to your kernel sources, and you have not removed the files created
during the build process, then your system will already be correctly set up.
In order to use VirtualBox's USB support, the user account under which you intend to run VirtualBox must have read and write access to the USB filesystem (usbfs).
In addition, access to /dev/net/tun will be required if you want to use Host Interface Networking, which is described in detail in Section 5.3.3, “Host Interface Networking”.
2.2.3. Performing the installation
VirtualBox is available as a Debian package (in fact, there are packages for Ubuntu 6.10 "Edgy",
Ubuntu 6.06 "Dapper" and Debian 4.0 "Etch") or as an alternative installer (.run) which should work
on most Linux distributions.
2.2.3.1. Installing VirtualBox from a Debian package
First, download the appropriate package for your distribution. The following examples assume that
you are installing to an Ubuntu Edgy system. Use dpkg to install the Debian package:
sudo dpkg -i VirtualBox_1.3.8_Ubuntu_edgy.deb
You will be asked to accept the VirtualBox Personal Use and Evaluation License. If you answer no
here, the installation will be aborted. Otherwise the installation will continue.
The group vboxusers will be created during installation. Note that a user who is going to run VirtualBox must be member of that group. Also note that adding an active user to that group may require a restart of the session of that user. This should be done manually after successful installation
of the package.
The installer will also search for a VirtualBox kernel module suitable for your kernel. The package
includes pre-compiled modules for the most common kernel configurations. If no suitable kernel
module is found, the installation script tries to build a module itself. If the build process is not successful you will be shown a warning and the package will be left unconfigured. Please have a look
at /var/log/vbox-install.log to find out why the compilation failed. You may have to install
the appropriate Linux kernel headers (see Section 2.2.2, “Support for external kernel modules”).
After correcting any problems, do
sudo /etc/init.d/vboxdrv setup
This will start a second attempt to build the module.
If a suitable kernel module was found in the package or the module was successfully built, the installation script tries to load the module. In some cases this can fail. If it does, you can type dmesg
to find out why the module could not be loaded. The most common reasons are:
•
The NMI watchdog is either active. Add nmi_watchdog=0 to the kernel command line and reboot. Then execute sudo dpkg-reconfigure virtualbox again.
•
The kernel disagrees about the version of the gcc used to compile the module. Make sure that
you use the same compiler as used to build the kernel.
Once VirtualBox has been successfully installed and configured, you can start it by selecting "VirtualBox" in your start menu or from the command line (see Section 2.2.4, “Starting VirtualBox on
Linux”).
2.2.3.2. Using the alternative installer
The alternative installer performs the following steps:
8
Installation
•
It unpacks the application files to a target directory of choice. By default, the following directory
will be used:
/opt/VirtualBox-1.3.8
•
It builds the VirtualBox kernel module (vboxdrv) and installs it.
•
It adds an init script to start the VirtualBox kernel module (/etc/init.d/vboxdrv).
•
It creates a new system group called vboxusers.
•
It creates symbolic links to VirtualBox, VBoxSDL and VBoxManage in /usr/bin.
•
It creates /etc/udev/60-vboxdrv.rules, a description file for udev, if that is present, which
makes the module accessible to anyone in the group vboxusers.
•
It remembers its own installation directory by writing it to /etc/vbox/vbox.cfg.
The installer must be executed as root with either install or uninstall as the first parameter. If
you do not want the installer to ask you whether you wish to accept the licence agreement (for example, for performing unattended installations), you can add the parameter license_accepted_unconditionally. Finally, if you want to use a directory other than the default installation directory, add the desired path as an extra parameter.
sudo ./VirtualBox.run install /opt/innotek/VirtualBox
Or if you do not have the "sudo" command available, run the following as root instead:
./VirtualBox.run install /opt/innotek/VirtualBox
If any users on your system should be able to access host USB devices from within VirtualBox
guests, you should add them to the appropriate user group that your distribution uses for USB access, e.g. usb or usbusers.
2.2.3.3. Performing a manual installation
If, for any reason, you cannot use the shell script installer described previously, you can also perform a manual installation. Invoke the installer like this:
./VirtualBox.run --keep --noexec
This will unpack all the files needed for installation in the directory install under the current directory. The VirtualBox application files are contained in VirtualBox.tar.bz2 which you can unpack to any directory on your system. For example:
sudo mkdir /opt/VirtualBox
sudo tar jxf ./install/VirtualBox.tar.bz2 -C /opt/VirtualBox
or as root:
mkdir /opt/VirtualBox
tar jxf ./install/VirtualBox.tar.bz2 -C /opt/VirtualBox
The sources for VirtualBox's kernel module are provided in the src directory. To build the module,
change to the directory and issue
make
If everything builds correctly, issue the following command to install the module to the appropriate
module directory:
9
Installation
sudo make install
In case you do not have sudo, switch the user account to root and perform
make install
The VirtualBox kernel module needs a device node to operate. The above make command will tell
you how to create the device node, depending on your Linux system. The procedure is slightly different for a classical Linux setup with a /dev directory, a system with the now deprecated devfs
and a modern Linux system with udev.
On certain Linux distributions, you might experience difficulties building the module. You will have
to analyze the error messages from the build system to diagnose the cause of the problems. In general, make sure that the correct Linux kernel sources are used for the build process.
Note that the user who is going to run VirtualBox needs read and write permission on the VirtualBox kernel module device node /dev/vboxdrv. You can either define a vboxusers group by entering
groupadd vboxusers
chgrp vboxusers /dev/vboxdrv
chmod 660 /dev/vboxdrv
or, alternatively, simply give all users access (insecure, not recommended!)
chmod 666 /dev/vboxdrv
You should also add any users who will be allowed to use host USB devices in VirtualBox guests to
the appropriate USB users group for your distribution. This group is often called usb or usbusers.
Next, you will have to install the system initialization script for the kernel module:
cp /opt/VirtualBox/vboxdrv.sh /etc/init.d/vboxdrv
(assuming you installed VirtualBox to the /opt/VirtualBox directory) and activate the initialization script using the right method for your distribution. You should create VirtualBox's configuration file:
mkdir /etc/vbox
echo INSTALL_DIR=/opt/VirtualBox > /etc/vbox/vbox.cfg
and, for convenience, create the following symbolic links:
ln -sf /opt/VirtualBox/VBox.sh /usr/bin/VirtualBox
ln -sf /opt/VirtualBox/VBox.sh /usr/bin/VBoxSVC
ln -sf /opt/VirtualBox/VBox.sh /usr/bin/VBoxManage
2.2.3.4. Updating and uninstalling VirtualBox
Before updating or uninstalling VirtualBox, you must terminate any virtual machines which are currently running and exit the VirtualBox or VBoxSVC applications. To update VirtualBox, simply run
the installer of the updated version. To uninstall VirtualBox, invoke the installer like this:
sudo ./VirtualBox.run uninstall
or as root
./VirtualBox.run uninstall
To manually uninstall VirtualBox, simply undo the steps in the manual installation in reverse order.
2.2.4. Starting VirtualBox on Linux
To start the VirtualBox graphical user interface, simply start the VirtualBox program. To start the
10
Installation
command line management interface for virtual machines, start VBoxManage. To start a single virtual machine from the command line, start VBoxSDL. The following chapters explain how to use
these applications.
The following detailed instructions should only be of interest if you wish to execute VirtualBox
without installing it first. You should start by compiling the vboxdrv kernel module (see above)
and inserting it into the Linux kernel. VirtualBox consists of a service daemon (VBoxSVC) and several application programs. As a result, prior to starting one of the VirtualBox application programs,
the service daemon must be started:
export LD_LIBRARY_PATH=. ./VBoxSVC
All VirtualBox applications will communicate with the daemon through Unix local domain sockets.
There can be multiple daemon instances under different user accounts and applications can only
communicate with the daemon running under the user account as the application. The local domain
socket resides in a subdirectory of your system's directory for temporary files called
.vbox-<username>-ipc. In case of communication problems or server startup problems, you may
try to remove this directory.
All VirtualBox applications (VirtualBox, VBoxSDL, VBoxManage and VBoxVRDP) require the
VirtualBox directory to be in the library path:
export LD_LIBRARY_PATH=. ./VBoxManage showvminfo "Windows XP"
11
Chapter 3. Starting out with VirtualBox
As already mentioned in Section 1.1, “Virtualization basics”, VirtualBox allows you to run each of
your guest operating systems on its own virtual computer system. The guest system will run in its
virtual machine (VM) as if it were installed on a real computer, according to the parameters of the
virtual system you have created for it. All software running on the guest system does so as it would
on a real machine.
You have considerable latitude in deciding what virtual hardware will be provided to the guest. The
virtual hardware can be used for communicating with the host system or with other guests. For instance, if you provide VirtualBox with the image of a CD-ROM in an ISO file, VirtualBox can
present this image to a guest system as if it were a physical CD-ROM. Similarly, you can give a
guest system access to the real network via its virtual network card, and, if you choose, give the host
system, other guests, or computers on the internet access to the guest system.
VirtualBox comes with many advanced interfaces, which will be described later in this manual:
•
Chapter 7, VBoxManage reference explains how to use create, configure, and control virtual machines completely from the command line.
•
Section 6.3, “VBoxSDL, the simplified VM displayer” explains how to run a single VM at a
time with a reduced graphical interface.
•
Section 6.4.1, “VBoxVRDP, the headless VRDP server” shows how to run virtual machines remotely.
The following introductory sections, however, describe VirtualBox, the graphical user interface,
which is the simplest way to unleash the power of VirtualBox.
3.1. Starting the graphical user interface
After installing VirtualBox as described in Chapter 2, Installation, on Windows, you can find the
graphical user interface in the "Programs" menu (under the "VirtualBox" group); on Linux, you can
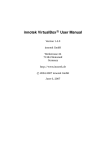
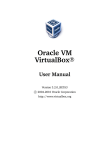
type VirtualBox on the command line. Then, a window like the following should come up:
On the left, you can see a pane that lists all the virtual machines you have created so far (three in the
12
Starting out with VirtualBox
example above). A row of buttons above it allows you to create new VMs and work on existing
VMs. The pane on the right displays the properties of the virtual machine currently selected, if any.
When you start VirtualBox for the first time, as there is no virtual machine yet, everything will be
empty.
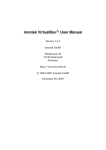
3.2. Creating a virtual machine
Clicking on the "New" button in the user interface will guide you through setting up a new virtual
machine (VM). A wizard will show up:
On the following pages, the wizard will ask you for the bare minimum of information that is needed
to create a VM, in particular:
1.
A name for your VM, and the type of operating system (OS) you want to install.
The name is what you will later see in the VirtualBox main window, and what your settings
will be stored under. It is purely informational, but once you have created a few VMs, you will
appreciate if you have given your VMs informative names. "My VM" probably is therefore not
as useful as "Windows XP SP2".
For "Operating System Type", select the operating system that you want to install later. While
this setting presently has no lasting effect, VirtualBox will use this setting to display an operating system accordingly and also make certain recommendations later based on your selection
(such as the amount of memory and hard disk space to allocate), and future VirtualBox versions may offer certain system-specific virtualization features. It is therefore recommended to
always set it to the correct value.
2.
The amount of memory (RAM) that the virtual machine should have for itself. Every time a
virtual machine is started, VirtualBox will allocate this much memory from your host machine
and present it to the guest operating system, which will report this size as the (virtual) computer's installed RAM.
Note
Choose this setting carefully! The memory you give to the VM will not be available to your
host OS while the VM is running, so do not specify more than you can spare. For example,
if your host machine has 1 GB of RAM and you enter 512 MB as the amount of RAM for a
13
Starting out with VirtualBox
particular virtual machine, while that VM is running, you will only have 512 MB left for all
the other software software on your host. If you run two VMs at the same time, even more
memory will be allocated for the second VM (which may not even be able to start if that
memory is not available). On the other hand, you should specify as much as your guest OS
(and your applications) will require to run properly.
A Windows XP guest will require at least a few hundred MB RAM to run properly, and Windows Vista will even refuse to install with less than 512 MB. Of course, if you want to run
graphics-intensive applications in your VM, you may require even more RAM.
So, as a rule of thumb, if you have 1 GB of RAM or more in your host computer, it is usually
safe to allocate 512 MB to each VM. But, in any case, make sure you always have at least
256-512 MB of RAM left on your host operating system. Otherwise you may cause your host
OS to excessively swap out memory to your hard disk, effectively bringing your host system to
a standstill.
As with the other settings, you can change this setting later, after you have created the VM.
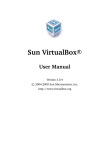
3.
Next, you must specify a virtual hard disk for your VM. There are several ways in which VirtualBox can provide hard disk space to a VM, but the most common way is to use a virtual disk
image (.VDI file) on your "real" hard disk, whose contents VirtualBox presents to your VM as
if it were a complete hard disk.
The wizard presents to you the following window:
The wizard allows you to create a new virtual hard disk file for the virtual primary hard disk or
use an existing one. Note also that the disk images can be separated from a particular VM, so
even if you delete a VM, you can keep the .VDI file, or copy it to another host and create a new
VM for it there.
In the wizard, you have the following options:
•
If you have previously created any virtual hard disks which have not been attached to other
virtual machines, you can select those from the drop-down list in the wizard window.
•
Otherwise, to create a new virtual hard disk, press the "New" button.
14
Starting out with VirtualBox
•
Finally, for more complicated operations with virtual disks, the "Manage" button will
bring up the Virtual Disk Manager, which is described in more detail in Section 3.5, “The
Virtual Disk Manager”.
Most probably, if you are using VirtualBox for the first time, you will want to create a new
disk image. Hence, press the "New" button.
This brings up another window, the "Create New Virtual Disk Wizard".
VirtualBox supports two types of VDI files:
•
A dynamically expanding file will only grow in size when the guest actually stores data
on its virtual hard disk. It will therefore initially be small on the host hard drive and only
later grow to the size specified as it is filled with data.
•
A fixed-size file will immediately occupy the file specified, even if only a fraction of the
virtual hard disk space is actually in use. While occupying much more space, a fixed-size
file incurs less overhead and is therefore slightly faster than a dynamically expanding file.
For details about the differences, please refer to Section 5.2.1, “Virtual Disk Image (VDI)
files”.
To prevent your physical hard disk from running full, VirtualBox limits the size of the image
file. Still, it needs to be large enough to hold the contents of your operating system and the applications you want to install -- for a modern Windows or Linux guest, you will probably need
several gigabytes for any serious use:
After having selected or created your VDI file, again press "Next" to go the next page.
4.
After clicking on "Finish", your new VM will be created. You will then see it in the list on the
left side of the VirtualBox main window, with the name you have entered.
3.3. Basics of virtual machine configuration
When you select a virtual machine from the list of VMs in the main VirtualBox window, you will
see a summary of that VM's settings on the right of the window, under the "Details" tab.
Clicking on the "Settings" button in the toolbar at the top of VirtualBox main window brings up a
detailed window where you can configure many of the properties of the VM that is currently selec15
Starting out with VirtualBox
ted. But be careful: even though it is possible to change all VM settings after installing a guest operating system, certain changes might prevent a guest operating system from functioning correctly if
done after installation.
Note
The "Settings" button is disabled while a VM is either in the "running" or "saved" state.
This is simply because the settings dialog allows you to change fundamental characteristics
of the virtual computer that is created for your guest operating system, and this operating
system may not take it well when, for example, half of its memory is taken away from under its feet. As a result, if the "Settings" button is disabled, shut down the current VM first.
VirtualBox provides a plethora of parameters that can be changed for a VM, and even more parameters are available through the VBoxManage program; see Chapter 7, VBoxManage reference. The
various settings that can be changed in the "Settings" window are described in detail in in Section 5.1, “Virtual machine settings”.
For now, if you have just created an empty VM, you will probably be most interested in the settings
presented by the "CD/DVD-ROM" section if want to make a CD-ROM or a DVD-ROM available
the first time you start it, in order to install your guest operating system.
For this, you have two options:
•
If you have actual CD or DVD media from which you want to install your guest operating system (e.g. in the case of a Windows installation CD or DVD), put the media into your host's CD
or DVD drive.
Then, in the settings dialog, go to the "CD/DVD-ROM" section and select "Host drive" with the
correct drive letter (or, in the case of a Linux host, device file).
This will allow your VM to access the media in your host drive, and you can proceed to install
from there.
•
If you have downloaded installation media from the Internet in the form of an ISO image file
(most probably in the case of a Linux distribution), you would normally burn this file to an
empty CD or DVD and proceed as just described. With VirtualBox however, you can skip this
step and mount the ISO file directly. VirtualBox will then present this file as a CD or DVDROM drive to the virtual machine, much like it does with virtual hard disk images.
In this case, in the settings dialog, go to the "CD/DVD-ROM" section and select "ISO image
file". This brings up the Virtual Disk Image Manager, where you perform the following steps:
16
Starting out with VirtualBox
1.
Press the "Add" button to add your ISO file to the list of registered images. This will
present an ordinary file dialog that allows you to find your ISO file on your host machine.
2.
Back to the manager window, select the ISO file that you just added and press the "Select"
button. This selects the ISO file for your VM.
The Virtual Disk Image Manager is described in detail in Section 3.5, “The Virtual Disk Manager”.
3.4. Running a virtual machine
The "Start" button in the main window starts the virtual machine that is currently selected.
This opens up a new window, and the virtual machine which you selected will boot up. Everything
which would normally be seen on the virtual system's monitor is shown in the window, as can be
seen with the image in Section 1.1, “Virtualization basics”.
In general, you can use the virtual machine much like you would use a real computer. There are
couple of points worth mentioning however.
3.4.1. Keyboard and mouse support in virtual machines
3.4.1.1. Capturing and releasing keyboard and mouse
Since the operating system in the virtual machine does not "know" that is not running on a real computer, it expects to have exclusive control over your keyboard and mouse. This is, however, not the
case since, unless you are running the VM in full-screen mode, your VM needs to share keyboard
and mouse with other applications and possibly other VMs on your host.
As a result, initially after installing a host operating system and before you install the guest additions
(we will explain this in a minute), only one of the two -- your VM or the rest of your computer -can "own" the keyboard and the mouse. You will see a second mouse pointer which will always be
confined to the limits of the VM window. Basically, you activate the VM by clicking inside it.
To return ownership of keyboard and mouse to your host operating system, VirtualBox reserves a
special key on your keyboard for itself: the "host key". By default, this is the right Control key on
your keyboard, but you can change this default in the VirtualBox Global Settings. In any case, the
current setting for the host key is always displayed at the bottom right of your VM window, should
you have forgotten about it:
In detail, all this translates into the following:
•
Your keyboard is owned by the VM if the VM window on your host desktop has the keyboard
focus (and then, if you have many windows open in your guest operating system as well, the
window that has the focus in your VM). This means that if you want to type within your VM,
17
Starting out with VirtualBox
click on the title bar of your VM window first.
To release keyboard ownership, press the Host key (as explained above, typically the right Control key).
Note that while the VM owns the keyboard, some key sequences (like Alt-Tab for example) will
no longer be seen by the host, but will go to the guest instead. After you press the host key to
reenable the host keyboard, all key presses will go through the host again, so that sequences like
Alt-Tab will no longer reach the guest.
•
Your mouse is owned by the VM only after you have clicked in the VM window. The host
mouse pointer will disappear, and your mouse will drive the guest's pointer instead of your normal mouse pointer.
Note that mouse ownership is independent of that of the keyboard: even after you have clicked
on a titlebar to be able to type into the VM window, your mouse is not necessarily owned by the
VM yet.
To release ownership of your mouse by the VM, also press the Host key.
As this behavior can be inconvenient, VirtualBox provides a set of tools and device drivers for guest
systems called the "VirtualBox Guest Additions" which make VM keyboard and mouse operation a
lot more seamless. Most importantly, the Additions will get rid of the second "guest" mouse pointer
and make your host mouse pointer work directly in the guest.
This will be described later in Chapter 4, The VirtualBox Guest Additions.
3.4.1.2. Typing special characters
Operating systems expect certain key combinations to initiate certain procedures. Some of these key
combinations may be difficult to enter into a virtual machine, as there are three candidates as to who
receives keyboard input: the host operating system, VirtualBox, or the guest operating system. Who
of these three receives keypresses depends on a number of factors, including the key itself.
•
Host operating systems reserve certain key combinations for themselves. For example, it is impossible to enter the Ctrl+Alt+Delete combination if you want to reboot the guest operating system in your virtual machine, because this key combination is usually hard-wired into the host
OS (both Windows and Linux intercept this), and pressing this key combination will therefore
reboot your host.
Also, with Linux, the key combination Ctrl+Alt+Backspace normally resets the X server (to restart the entire graphical user interface in case it got stuck). As the X server intercepts this combination, pressing it will usually restart your host graphical userface (and kill all running programs, including VirtualBox, in the process).
Third, also with Linux, the key combination Ctrl+Alt+Fx (where Fx is one of the function keys
from F1 to F12) normally allows to to switch between virtual terminals. As with
Ctrl+Alt+Delete, these combinations are intercepted by the host operating system and therefore
always switch terminals on the host.
If, instead, you want to send these key combinations to the guest operating system in the virtual
machine, you will need to use one of the following methods:
•
Use the items in the "VM" menu of the virtual machine window. There you will find "Insert
Ctrl+Alt+Delete" and "Ctrl+Alt+Backspace"; the latter will only have an effect with Linux
guests, however.
•
Press special key combinations with the Host key (normally the right Control key), which
VirtualBox will then translate for the virtual machine:
18
Starting out with VirtualBox
•
•
Host key + Del to send Ctrl+Alt+Del (to reboot the guest);
•
Host key + Backspace to send Ctrl+Alt+Backspace (to restart the graphical user interface of a Linux guest);
•
Host key + F1 (or other function keys) to simulate Ctrl+Alt+F1 (or other function keys,
i.e. to switch between virtual terminals in a Linux guest).
For some other keyboard combinations such as Alt-Tab (to switch between open windows),
VirtualBox allows you to configure whether these combinations will affect the host or the guest,
if a virtual machine currently has the focus. This is a global setting for all virtual machines and
can be found under "File" -> "Global settings" -> "Input" -> "Auto-capture keyboard".
3.4.2. Changing removable media
While a virtual machine is running, you can change removable media from the "Devices" menu of
the VM's window. Here you can select in detail what VirtualBox presents to your VM as a CD,
DVD, or floppy.
The settings are the same as would be available for the VM in the "Settings" dialog of the VirtualBox main window, but since that dialog is disabled while the VM is in "running" or "saved" state,
this extra menu saves you from having to shut down and restart the VM every time you want to
change media.
Hence, in the "Devices" menu, VirtualBox allows you to attach the host drive to the guest or select a
floppy or DVD image using the Disk Image Manager, all as described in Section 3.3, “Basics of virtual machine configuration”.
3.4.3. Saving the state of the machine
When you click on the "Close" button of your virtual machine window (at the top right of the window, just like you would close any other window on your system) (or press the Host key together
with "Q"), VirtualBox asks you whether you want to "save" or "power off" the VM.
The difference between these two options is crucial. They mean:
•
Saving the machine state: With this option, VirtualBox "freezes" the virtual machine by completely saving its state to your local disk. When you later resume the VM (by again clicking the
"Start" button in the VirtualBox main window), you will find that the VM continues exactly
where it was left off. All your programs will still be open, and your computer resumes operation.
Saving the state of a virtual machine is thus the equivalent of suspending a laptop computer (e.g.
by closing its lid).
•
Power off the machine: With this option, VirtualBox also stops running the virtual machine,
but without saving its state. This is equivalent of pulling the power plug on a real computer
without properly shutting down. If you start the machine again after powering it off, your operating system will have to reboot completely and may begin a lengthy check of its (virtual) system
19
Starting out with VirtualBox
disks.
As a result, this should only be done with care, since it can potentially cause data loss or an inconsistent state of the guest system on disk.
The "Discard" button in the main VirtualBox window discards a virtual machine's saved state. This
has the same effect as powering it off, and the same warnings apply.
3.4.4. Snapshots
With VirtualBox's snapshots, you can save a particular state of a virtual machine for later use. At
any later time, you can revert to that state, even though you may have changed the VM considerably
since then.
This is particularly useful for making sure that a guest installation is not damaged by accidental
changes, misbehaving software, or viruses.
Once you have set up the machine the way you want it, simply take a snapshot, and should anything
happen to the installation, you can simply revert to its snapshot state.
To take a snapshot of your VM, perform the following steps:
1.
You can only take a snapshot if your VM is in the "saved" or "powered off" state (as displayed
next to the VM in the VirtualBox main window). So, if your VM is not running, close it and
have its state saved to disk.
2.
In the VirtualBox main window, click on the "Snapshots" tab on the top right of the main window, and then on the small camera icon (for "Take snapshot").
3.
A window will up and ask you to name the snapshot. This name is purely for reference purposes to help you remember the state of the snapshot. For example, a useful name would be
"Fresh installation from scratch, no external drivers".
4.
Your new snapshot will then appear in the list of snapshots under the "Snapshots" tab. Underneath, you will see an item called "Current state", signifying that the current state of your VM
is a variation based on the snapshot you took earlier.
(If you later take another snapshot, you will see that they will be displayed in sequence, and
each subsequent snapshot is a derivation of the earlier one.)
To revert to an earlier snapshot, you click on the "Current state" item and select "Discard current
state". This will bring the VM back to the state of the nearest (most recent) snapshot. In the same
way, you can merge several earlier snapshots into one.
Note
The snapshot reverted to will affect the virtual hard drives that are connected to your VM,
as the entire state of the virtual hard drive will be reverted as well. This means also that all
files that have been created since the snapshot and all other file changes will be lost.
In order to prevent such data loss while still making use of the snapshot feature, it is possible to add a second hard drive in "write-through" mode using the VBoxManage interface
and use it to store your data. As write-through hard drives are not included in snapshots,
they remain unaltered when a machine is reverted. See Section 5.2, “Storage in virtual machines” for details.
3.5. The Virtual Disk Manager
20
Starting out with VirtualBox
VirtualBox keeps an internal registry of all available hard disk, CD/DVD-ROM and floppy disk images. This registry can be viewed and changed in the Virtual Disk Manager, which you can access
from the "File" menu in the VirtualBox main window:
The Disk Image Manager shows you all images that are currently registered with VirtualBox, conveniently grouped in three tabs for the three possible formats. These formats are:
•
Hard disk images in VirtualBox's own Virtual Disk Image (VDI) format. As mentioned above in
Section 3.2, “Creating a virtual machine”, VirtualBox creates a guest's virtual hard drive as a
single big VDI file on your host computer's disk. These image files can either be set to expand as
they fill up, or created to always be the size of the virtual disk;
•
CD/DVD images in standard ISO format;
•
floppy images in standard RAW format.
As you can see in the screenshot above, for each image, the Virtual Disk Manager shows you the
full path of the image file and other information, such as the virtual machine the image is currently
attached to, if any. Also, as can be seen in the screenshot, if you have created snapshots for a virtual
machine, additional "differencing" hard disk images may automatically be created; see Section 3.4.4, “Snapshots” for details.
The Virtual Disk Manager allows you to
•
create new hard disk images using the "New" button; this will bring up the "Create Disk Image"
wizard already described in Section 3.2, “Creating a virtual machine”;
•
import existing images on your hard drive into VirtualBox using the "Add" button;
•
remove an image from the registry (and optionally delete the image file when doing so);
•
"release" an image, that is, detach it from a virtual machine if it is currently attached to one as a
virtual hard disk.
21
Starting out with VirtualBox
We recommend that you maintain two special folders on your system for keeping images: one for
VDI files (which can, in the case of dynamically expanding images, grow to considerable sizes), and
one for ISO files (which were probably downloaded from the Internet).
VDI files can be copied onto other host systems and imported into virtual machines there, although
certain guest systems (notably Windows 2000 and XP) will require that the new virtual machine be
set up in a similar way to the old one.
You can also duplicate VDI files on the same host to quickly produce a second virtual machine with
the same operating system setup. However, you should only make copies of virtual disk images using the utility supplied with VirtualBox; see Section 7.14, “VBoxManage clonevdi”. This is because
VirtualBox assigns a unique identity number (UUID) to each disk image, which is also stored inside
the image, and will refuse to work with two images that use the same number. If you do accidentally
try to reimport a disk image which you copied normally, you can make a second copy using VirtualBox's utility and import that instead.
3.6. Deleting virtual machines
The "Delete" button in the main VirtualBox window lets you remove a virtual machine which you
no longer need. All settings for that machine will be lost. However, any hard disk images attached to
the machine will be kept; you can delete those separately using the Disk Image Manager (described
just above).
You cannot delete a machine which has snapshots or is in a saved state, so you must discard these
first.
22
Chapter 4. The VirtualBox Guest Additions
The previous chapter covered getting started with VirtualBox and installing operating systems. For
any serious and interactive use, the VirtualBox Guest Additions will make your life much easier by
providing closer integration between host and guest and improving the interactive performance of
guest systems.
4.1. Introduction
As said in Section 1.1, “Virtualization basics”, the Guest Additions are designed to be installed inside a virtual machine. They consist of device drivers and system applications for the guest operating system that optimize the guest for better performance and usability. To install these additions,
you simply provide a special ISO file that comes with VirtualBox as a virtual CD-ROM to your
guest operating system and install from there.
VirtualBox presently provides Guest Additions for Windows and Linux guests; if you need support
for other operating systems, please contact InnoTek.
Our Guest Additions offer the following features:
1.
Mouse pointer integration. To overcome the limitations for mouse support that were described in Section 3.4.1.1, “Capturing and releasing keyboard and mouse”, this provides you
with seamless mouse support. Essentially, a special mouse driver is installed in the Windows or
Linux guest that communicates with the "real" mouse driver on your host and moves the guest
mouse pointer accordingly. You will only have one mouse pointer any more, and pressing the
Host key is no longer required to "free" the mouse from being captured by the guest OS.
2.
Better video support. While the virtual graphics card the VirtualBox emulates for any guest
operating system provides all the basic features, the custom video drivers that are installed with
the Guest Additions provide you with extra high and non-standard video modes as well as accelerated video performance.
In addition, with Windows guests, when the Guest Additions are installed, you can resize the
virtual machine's window, and the video resolution in the Windows guest will be automatically
adjusted (as if you had manually entered an arbitrary resolution in the guest's display settings).
3.
Time synchronization. With the Guest Additions installed, VirtualBox can much better ensure
that the guest's system time is better synchronized. The problem is that an operating system expects to have 100% of a computer's time for itself without interference, which is no longer the
case when your VM runs together with your host operating system and possibly other applications on your host. As a result, your guest operating system's timing will soon be off significantly. The Guest Additions will re-syncronize the time regularly.
4.
Shared Folders. These provide an easy way to exchange files between the host and the guest.
Much similar to ordinary Windows network shares, you can tell VirtualBox to treat a certain
folder as a shared folder, and VirtualBox will make it available to the guest operating system as
a network share. For details, please refer to Section 5.4, “Folder Sharing”.
5.
Automated Windows logons (credentials passing; Windows guests only). For details, please
see Section 8.2, “Automated Windows Guest Logons (VBoxGINA)”.
4.2. Windows Guest Additions
The VirtualBox Windows Guest Additions are designed to be installed in a virtual machine running
a Windows operating system. The following versions of Windows guests are supported:
•
Microsoft Windows NT 4.0 (any service pack)
23
The VirtualBox Guest Additions
•
Microsoft Windows 2000 (any service pack)
•
Microsoft Windows XP (any service pack)
•
Microsoft Windows Server 2003 (any service pack)
Generally, it is strongly recommend to install the Windows Guest Additions.
4.2.1. Installing the Windows Guest Additions
The VirtualBox Guest Additions are provided as a CD-ROM image file which is called
VBoxGuestAdditions.iso. An easy-to-use installation program will guide you through the setup
process. As VirtualBox can provide ISO files as a virtual CD-ROM drive to the Windows guest,
Windows can automatically install these additions.
4.2.1.1. Mounting the Additions ISO file
In the "Devices" menu in the virtual machine's menu bar, VirtualBox has a handy menu item named
"Install guest additions", which will automatically bring up the Additions in your VM window.
If the menu item does not work, you can perform the following steps manually:
1.
Start the virtual machine where you have installed a Windows guest operating system.
2.
Select "Mount CD/DVD-ROM" from the "Devices" menu in the virtual machine's menu bar
and then "CD/DVD-ROM image". This brings up the Virtual Disk Manager described in Section 3.5, “The Virtual Disk Manager”.
3.
In the Virtual Disk Manager, press the "Add" button and browse your host file system for the
VBoxGuestAdditions.iso file:
4.
•
On a Windows host, you can find this file in the VirtualBox installation directory (usually
under C:\Program files\InnoTek VirtualBox).
•
On a Linux host, you can find this file in the additions folder under where you installed
VirtualBox (usually /opt/VirtualBox-xxx).
Back in the Virtual Disk Manager, select that ISO file and press the "Select" button. This will
mount the ISO file and present it to your Windows guest as a CD-ROM.
4.2.1.2. Running the installer
Unless you have the Autostart feature disabled in your Windows guest, Windows will now autostart
the VirtualBox Guest Additions installation program from the Additions ISO. If the Autostart feature has been turned off, choose setup.exe from the CD/DVD drive inside the guest to start the installer.
The installer will add several device drivers to the Windows driver database and then invoke the
hardware detection wizard.
Depending on your configuration, it might display warnings that the drivers are not digitally signed.
You must confirm these in order to continue the installation and properly install the Additions.
After installation, reboot your guest operating system to activate the Additions.
4.2.2. Updating the Windows Guest Additions
Windows Guest Additions can be updated by running the installation program again, as previously
described. This will then replace the previous Additions drivers with updated versions.
24
The VirtualBox Guest Additions
Alternatively, you may also open the Windows Device Manager and select "Update driver..." for
two devices:
1.
the VirtualBox Graphics Adapter and
2.
the VirtualBox System Device.
For each, choose to provide your own driver and use "Have Disk" to point the wizard to the CDROM drive with the Guest Additions.
4.2.3. Unattended Installation
In order to allow for completely unattended guest installations of Windows 2000 and XP, the Guest
Additions driver files have been put separately on the Additions ISO file. Just like with other thirdparty drivers, the files have to be copied to the OEM directory of Windows. Using the PCI hardware
detection, they will then be recognized and installed automatically.
4.3. Linux Guest Additions
Like the Windows Guest Additions, the VirtualBox Guest Additions for Linux take the form of a set
of device drivers and system applications which may be installed in the guest operating system.
The following Linux distributions are officially supported:
•
Fedora Core 4 and 5
•
Redhat Enterprise Linux 3 and 4
•
SUSE Linux 9 and 10
•
Ubuntu 5.10 and 6.06
Other distributions may work if they are based on comparable software releases. If you require such
support, please contact InnoTek.
As with Windows guests, we recommend installation of the VirtualBox Guest Additions for Linux.
4.3.1. Installing the Linux Guest Additions
The VirtualBox Guest Additions for Linux are provided on the same ISO CD-ROM as the Additions
for Windows described above. They also come with an installation program guiding you through the
setup process, although, due to the significant differences between Linux distributions, installation
may be slightly more complex.
Installation involves the following steps:
1.
Before installing the Guest Additions, you will have to prepare your guest system for building
external kernel modules. This is exactly the same process as described in Section 2.2.2,
“Support for external kernel modules”, except that this step must now be performed in your
Linux guest instead of on a Linux host system, as described there.
2.
Mount the VBoxGuestAdditions.iso file as your Linux guest's virtual CD-ROM drive, exactly the same way as described for a Windows guest in Section 4.2.1.1, “Mounting the Additions ISO file”.
3.
Change to the directory where your CD-ROM drive is mounted and execute as root:
sh ./VBoxLinuxAdditions.run
25
The VirtualBox Guest Additions
The VirtualBox Guest Additions contain several different drivers. If for any reason you do not wish
to install them all, you can specify the ones which you wish on the command line - for example
sh ./VBoxAdditions.run x11
to install the X Window graphic drivers. Type in the command
sh ./VBoxAdditions.run help
for more information.
4.3.2. Video acceleration and high resolution graphics modes
In Linux guests, VirtualBox video acceleration is available through the X Window System. Typically, in today's Linux distributions, this will be the X.Org server. During the installation process, X
will be set up to use the VirtualBox video driver, using whatever graphics modes were set up before
the installation. If these modes do not suit your requirements, you can change your setup by editing
the configuration file of the X server, usually found in /etc/X11/xorg.conf.
VirtualBox can use any default X graphics mode which fits into the virtual video memory allocated
to the virtual machine, as described in Section 5.1.1, “General settings”. You can also add your own
modes to the Monitor section of the X server configuration file. VirtualBox will accept any modes
acceptable to X with a vertical refresh of at least 1 Hz, a horizontal refresh of at least 1 kHz and a
horizontal resolution which is a multiple of eight.
An example of a mode line for a 5120x1024 graphics mode would be:
ModeLine "5120x1024" 25 5120 5121 5122 5123 1024 1025 1026 1027
4.3.3. Updating the Linux Guest Additions
The Guest Additions can simply be updated by going through the installation procedure again with
an updated CD-ROM image. This will replace the drivers with updated versions. You should reboot
after updating the Guest Additions.
26
Chapter 5. Configuring virtual machines
5.1. Virtual machine settings
Below we describe the various settings that are available for each VM.
Most of these settings are available in the settings window after selecting a virtual machine in the
VirtualBox main window and clicking on the "Settings" button. To keep the user interface simple,
those of the following settings which are not as commonly used are not shown in that settings window. They are, however, available through VBoxManage and will be described in Chapter 7, VBoxManage reference later.
5.1.1. General settings
In the Settings window, under "General", you can configure the most fundamental aspects of the virtual machine such as memory and essential hardware. The following settings are available:
Name
The name under which the VM is shown in the list of VMs in
the main window. Under this name, VirtualBox also saves the
VM's configuration files. By changing the name, VirtualBox renames these files as well. As a result, you can only use characters which are allowed in your host operating system's file
names.
Note that internally, VirtualBox uses unique identifiers (UUIDs)
to identify virtual machines. You can display these with VBoxManage.
OS Type
The type of the guest operating system that is (or will be) installed in the VM. This is the same setting that was specified in
the "New Virtual Machine" wizard, as described with Section 3.2, “Creating a virtual machine” above.
Memory size (RAM)
The amount of RAM that is allocated and given to the VM when
it is running. The specified amount of memory will be allocated
from the host operating system (from resident memory so it
must be available or made available as free memory on the host
when attempting to start the VM and will not be available to the
host while the VM is running). Again, this is the same setting
that was specified in the "New Virtual Machine" wizard, as described with guidelines under Section 3.2, “Creating a virtual
machine” above.
Generally, it is possible to change the memory size after installing the guest operating system (provided you do not reduce
the memory to an amount where the operating system would no
longer boot).
Note
As Microsoft Windows' activation mechanism is sensitive to some hardware changes, if
you are changing settings for a Windows guest, some of these changes may trigger a request for another activation with Microsoft.
Video memory size
Size of the memory provided by the virtual graphics card available to the guest, in MB. As with the main memory, the specified amount will be allocated from the host's resident memory.
Based on the amount of video memory, higher resolutions and
color depths may be available, but for most setups, the default
27
Configuring virtual machines
video memory size of 8MB should be sufficient.
Boot order
This setting determines the order in which the guest operating
system will attempt to boot from the various virtual boot
devices. Analogous to a real PC's BIOS setting, VirtualBox can
tell a guest OS to start from the virtual floppy, the virtual CD/
DVD drive, the virtual hard drive (each of these as defined by
the other VM settings), or none of these.
With VBoxManage modifyvm -boot<1-4>, you can also
configure a VM to boot from the network. See Section 7.5,
“VBoxManage modifyvm”.
Enable ACPI
VirtualBox can present the Advanced Configuration and Power
Interface (ACPI) to the guest operating system for configuring
the virtual hardware. In addition, via ACPI, VirtualBox can
present the host's power status information to the guest.
ACPI is the current industry standard to allow operating systems
to recognize hardware, configure motherboards and other
devices and manage power. As all modern PCs contain this feature and Windows and Linux have been supporting it for years,
it is also enabled by default in VirtualBox.
Note that all Windows operating systems starting with Windows
2000 install different kernels depending on whether ACPI is
available, so ACPI must not be turned off after installation.
Turning it on after installation will have no effect however.
Enable I/O APIC
Advanced Programmable Interrupt Controllers (APICs) are a
newer x86 hardware feature that have replaced old-style Programmable Interrupt Controllers (PICs) in recent years. With an
I/O APIC, operating systems can use more than 16 interrupt requests (IRQs) and therefore avoid IRQ sharing for improved reliability.
However, software support for I/O APICs has been unreliable
with some operating systems other than Windows. Also, the use
of an I/O APIC slightly increases the overhead of virtualization
and therefore slows down the guest OS a little.
Note that all Windows operating systems starting with Windows
2000 install different kernels depending on whether an I/O
APIC is available. As with ACPI, the I/O APIC therefore must
not be turned off after installation of a Windows guest OS.
Turning it on after installation will have no effect however.
Snapshot folder
By default, VirtualBox saves snapshot data together with your
other VirtualBox configuration data (on Linux hosts, this is
~.VirtualBox/Machines/<vmname>/Snapshots). With this setting, you can specify any other folder for each VM.
BIOS logo cutomization
By default, when the virtual machine starts up, VirtualBox displays the InnoTek company logo. With VBoxManage, you can
change this logo to one of your choosing.
5.1.2. Hard disks
In the VM Settings window, the "Hard Disks" section allows you to connect up to three virtual hard
disk images to your virtual machine.
As with a real PC, VirtualBox's IDE support offers you two IDE controllers, each with a "master"
and a "slave" connection. With one of these four connectors being reserved to the CD-ROM/DVD
28
Configuring virtual machines
drive (see below), that leaves you with three possible hard disks, each represented by one virtual
disk image (.VDI file).
The settings of the first disk ("Primary Master") are initially set by the "Create VM" wizard. Normally, you will stick with this setting for the rest of a VM's lifetime. You may, however, freely remove, add and exchange virtual hard drives after the machine has been set up. For example, if you
wish to copy some files from another virtual disk that you created, you can connect that disk as a
second hard disk.
To connect an additional disk, select the corresponding checkbox and click on the folder icon on the
right to bring up the Virtual Disk Image Manager. To remove a virtual disk, simply uncheck the appropriate checkbox. To replace a hard drive with a different one, click on the folder icon for that
drive and select or create a new one using the Virtual Disk Manager.
For more information, please see Section 3.5, “The Virtual Disk Manager” and Section 5.2.1,
“Virtual Disk Image (VDI) files”.
5.1.3. CD/DVD-ROM and floppy settings
In the VM Settings window, the settings in these two categories determine what VirtualBox
provides as a floppy disk and as a CD/DVD-ROM drive to your VM's guest operating system. For
both the floppy and and CD/DVD-ROM categories, the following options are available:
•
Not mounted: The virtual device is presented as empty, that is, no floppy (or no CD/
DVD-ROM) is present.
•
Host drive: The physical device of the host computer is connected to the VM, so that the guest
operating system can read from and write to your physical device. This is, for instance, useful if
you want to install Windows from a real installation CD. In this case, select from the drop-down
list the drive letter (or, on the Linux host, the device) of your host drive.
•
Image file: Quite similar to virtual hard disks, this presents a file on your host as a device to the
guest operating system. To use an image file, you must first import it into the Virtual Disk Manager; see Section 3.5, “The Virtual Disk Manager”. The image file format varies depending on
the type of device:
•
For floppies, the file must be in raw format.
•
For CD- and DVD-ROMs, the file must be in ISO format. Most commonly, you will select
this option when installing an operating system from an ISO file that you have obtained from
the Internet. For example, most Linux distributions are available in this way.
All these settings can be changed while the guest is running. Since the "Settings" dialog is not available at that time, you can also access these settings from the "Devices" menu of your virtual machine window.
Note
The identification string of the drive provided to the guest (which is displayed by some
configuration tools such as the Windows Device Manager) is always "VBOX CD-ROM",
irrespective of the current configuration of the virtual drive. This is to prevent hardware detection from being triggered in the guest operating system every time the configuration is
changed.
Using the host drive normally provides a read-only drive to the guest. As an experimental feature
(which currently works for data only, audio is not supported), it is possible to give the guest access
to the CD/DVD writing features of the host drive (if available):
VBoxManage modifyvm <vmname> -dvdpassthrough on
29
Configuring virtual machines
See also Section 7.5, “VBoxManage modifyvm”.
5.1.4. Audio settings
The "Audio" section in a virtual machine's Settings window determines whether the VM will see a
sound card connected, and whether the audio output should be heard on the host system.
If audio is enabled for a guest, VirtualBox simulates an Intel AC'97 controller for the virtual machine. In that case, you can select what audio driver VirtualBox will use on the host. On Linux
hosts, you can select between the OSS or the ALSA subsystem.
5.1.5. Network settings
The "Network" section in a virtual machine's Settings window allows you to configure how VirtualBox presents virtual network cards to your VM, and how they operate.
VirtualBox can simulate up to four virtual network cards for a virtual machine. These cards are
presented as AMD PCNet cards, which most current operating systems (as well as GNU GRUB)
support out of the box, without needing extra drivers.
Note
Unfortunately, Windows Vista is now an exception and requires manual driver installation;
see Section 10.2.4, “No networking in Windows Vista guests”.
When you first create a virtual machine, VirtualBox enables one of these four cards and selects "Network Address Translation (NAT)" for it. This way the the guest can connect to the outside world using the host's networking, but it does not allow the host or other physical machines to make new
connections to the guest (other than answering requests sent by the guest).
In other words, the default settings are good enough for supporting the most common Internet services (surfing, downloading and e-mail) in the guest. For details about the more advanced Networking settings, please see Section 5.3, “Networking in virtual machines”.
5.1.6. USB support
5.1.6.1. USB settings
The "USB" section in a virtual machine's Settings window allows you to configure VirtualBox's
sophisticated USB support.
VirtualBox can allow virtual machines to access the USB devices on your host directly. To achieve
this, VirtualBox presents to the guest operating system a virtual USB controller. As soon as the
guest system starts using a USB device, it will appear as unavailable on the host.
Note
Be careful with USB devices that are currently in use on the host! For example, if you allow your guest to connect to your USB hard disk that is currently mounted on the host,
when the guest is activated, it will be disconnected from the without a proper shutdown.
This may cause data loss.
In addition to allowing a guest access to your local USB devices, VirtualBox even allows your
guests to connect to remote USB devices by use of the VRDP protocol. For details about this, see
Section 6.4.3, “Remote USB”.
In the Settings dialog, you can first configure whether USB is available in the guest at all. If so, you
can determine in detail which devices are available. For this, you must create so-called "filters" by
specifying certain properties of the USB device.
Clicking on the "+" button to the right of the "USB Device Filters" window creates a new filter.
30
Configuring virtual machines
You can give the filter a name (for referencing it later) and specify the filter criteria. The more criteria you specify, the more precisely devices will be selected. For instance, if you specify only a
vendor ID of 046d, all devices produced by Logitech will be available to the guest. If you fill in all
fields, on the other hand, the filter will only apply to a particular device model from a particular
vendor, and not even to other devices of the same type with a different revision and serial number.
In detail, the following criteria are available:
1.
Vendor and product ID. With USB, each vendor of USB products carries an identification
number that is unique world-wide, the "vendor ID". Similarly, each line of products is assigned
a "product ID" number. Both numbers are commonly written in hexadecimal (that is, they are
composed of the numbers 0-9 and the letters A-F), and a colon separates the vendor from the
product ID. For example, 046d:c016 stands for Logitech as a vendor, and the "M-UV69a Optical Wheel Mouse" product.
Alternatively, you can also specify "Manufacturer" and "Product" by name.
To list all the USB devices that are connected to your host machine with their respective
vendor and product IDs, you can use the following command (see Chapter 7, VBoxManage reference):
VBoxManage list usbhost
On Windows, you can also see all USB devices that are attached to your system in the Device
Manager. On Linux, you can use the lsusb command.
2.
Serial number. While vendor and product ID are already quite specific to identify USB
devices, if you have two identical devices of the same brand and product line, you will also
need their serial numbers to filter them out correctly.
3.
Remote. This setting specifies whether the device will be local only, or remote only (over
VRDP), or either.
On a Windows host, you will need to unplug and reconnect a USB device to use it after creating a
filter for it.
As an example, you could create a new USB filter and specify a vendor ID of 046d (Logitech, Inc),
a manufacturer index of 1, and "not remote". Then any USB devices on the host system produced by
Logitech, Inc with a manufacturer index of 1 will be visible to the guest system.
Several filters can select a single device -- for example, a filter which selects all Logitech devices,
and one which selects a particular webcam.
You can deactivate filters without deleting them by clicking in the checkbox next to the filter name.
5.1.6.2. Implementation notes
On Windows hosts, two kernel mode device drivers provide USB proxy support. A USB filter driver
allows VirtualBox to capture devices when they are plugged in. Installing, uninstalling and updating
this filter requires a system restart. A second USB device driver then claims USB devices and makes
them available to a virtual machine. After defining a USB device filter for a VM, the device needs to
be replugged once for VirtualBox to claim it. Also, you might have to confirm a driver signing
warning when starting a VM with assigned USB devices.
On Linux hosts, VirtualBox accesses USB devices on Linux through the usbfs file system. Therefore, the user executing VirtualBox needs read and write permission to the USB file system. Most
distributions provide a group (e.g. usbusers) which the VirtualBox user needs to be added to.
Also, VirtualBox can only proxy to virtual machines USB devices which are not claimed by a Linux
host USB driver. Please refer to the driver= entry in /proc/bus/usb/devices to see which
devices are claimed.
31
Configuring virtual machines
5.2. Storage in virtual machines
5.2.1. Virtual Disk Image (VDI) files
VirtualBox implements a custom container format for guest hard disks -- Virtual Disk Image (VDI)
files.
The VDI files reside on the host system and are seen by the guest systems as hard disks of a certain
geometry. When creating an image, its size has to be specified which determines this fixed geometry. It is therefore not possible to change the size of the virtual hard disk later.
As briefly mentioned in Section 3.2, “Creating a virtual machine”, there are two options of how to
create the image: fixed-size or dynamically expanding.
•
If you create a fixed-size image of e.g. 10 GB, a VDI file of roughly the same size will be created immediately on your host system.
•
For more flexible storage management, use a dynamically expanding image. This will initially
be very small and not occupy any space for unused virtual disk sectors, but the image file will
grow every time a disk sector is written to for the first time. While this format takes less space
initially, the fact that VirtualBox needs to constantly expand the image file consumes additional
computing resources, so until the disk has fully expanded, write operations are slower than with
fixed size disks. However, after a dynamic disk has fully expanded, the performance penalty for
read and write operations is negligible.
For either of the above two image types (that is, irrespective of whether an image is fixed-size or dynamically expanding), you can also specify whether write operations affect the image directly.
1.
With normal images (the default setting), there are no restrictions on how guests can read from
and write to the disk. Because of this, a normal hard disk can only be attached to a single virtual machine at any given time (although you can detach them from a VM and attach them to another).
When you take a snapshot of your virtual machine as described in Section 3.4.4, “Snapshots”,
the state of such a "normal hard disk" will be recorded together with the snapshot, and when reverting to the snapshot, its state will be fully reset.
2.
By contrast, immutable images are read-only and can be used from multiple virtual machines
simultaneously. Write accesses to immutable hard disks will be directed to a special differencing disk image which VirtualBox creates automatically. However, when you shut down the
VM to which the immutable disk is attached, the changes in the differencing disk will be completely discarded.
Of course, creating a virtual disk image as immutable makes no sense, because then the hard
disk would always be reset to an empty state when the VM is shut down to which it is attached.
Hence, you will ordinarily create a "normal" virtual disk image and then, when its contents are
deemed useful, then mark it immutable.
To mark a disk image as "immutable", use the VBoxManage modifyvdi command; see Section 7.13, “VBoxManage modifyvdi”.
3.
Finally, write-through hard disks are like normal hard disks in that they fully support read
and write operations also. However, their state is not saved when a snapshot is taken, and not
restored when a VM's state is reverted.
To create a disk image as "write-through", use the VBoxManage createvdi command; see
Section 7.12, “VBoxManage createvdi”. To mark an existing image as write-through, use
VBoxManage modifyvdi; see Section 7.13, “VBoxManage modifyvdi”.
32
Configuring virtual machines
To illustrate the differences between the various types with respect to snapshots: You have installed
your guest operating system in your VM, and you have taken a snapshot. Imagine you have accidentally infected your VM with a virus and would like to go back to the snapshot. With a normal
hard disk image, you simply revert the state of the VM, and the earlier state of your hard disk image
will be restored as well (and your virus infection will be undone). With an immutable hard disk, irrespective of the snapshot, all it takes is to shut down your VM, and the virus infection will be discarded. With a write-through image however, you cannot easily undo the virus infection by means
of virtualization, but will have to disinfect your virtual machine like a real computer.
Still, you might find write-though images useful if you want to preserve critical data irrespective of
snapshots, and since you can attach more than one VDI to a VM, you may want to have one immutable for the operating system and one write-through for your data files.
5.2.2. iSCSI servers
iSCSI stands for "Internet SCSI" and is a standard that allows for using the SCSI1 protocol over Internet (TCP/IP) connections. Especially with the advent of Gigabit Ethernet, it has become affordable to attach iSCSI storage servers simply as remote hard disks to a computer network. In iSCSI
terminology, the server providing storage resources is called an "iSCSI target", while the client connecting to the server and accessing its resources is called "iSCSI initiator".
VirtualBox is unique on the virtualization market in that it can transparently present iSCSI remote
storage to a virtual machine as a virtual hard disk. The guest operating system will not see any difference between a virtual disk image (VDI file) and an iSCSI target. To achieve this, VirtualBox has
an integrated iSCSI initiator.
VirtualBox's iSCSI support has been developed according to the iSCSI standard and should work
with all standard-conforming iSCSI targets. To use an iSCSi target with VirtualBox, you must first
register it as a virtual hard disk with VBoxManage; see Section 7.15, “VBoxManage addiscsidisk”.
The target will show up in the list of disk images, as described in Section 3.5, “The Virtual Disk
Manager”, and can thus be attached to one of the VM's three hard disk slots the usual way.
Note
As opposed to the VDI files described previously, the type of iSCSI targets cannot be "normal" or "immutable", but will always be set to "write through". This means that their state
is not saved or reverted with snapshots.
5.3. Networking in virtual machines
As briefly mentioned in Section 5.1.5, “Network settings”, VirtualBox provides up to four virtual
PCI Ethernet cards for each virtual machine.
Each of these adapters can be separately configured in one of the following four modes:
•
Not attached
•
Network Address Translation
•
Host Interface Networking
•
Internal Networking
1
SCSI, in turn, is the "Small Computer System Interface" and is an established industry standard for data transfer between
devices, notably storage devices. Established as early as 1986, SCSI is still used for connecting hard disks and tape devices
even today. Especially in the PC market, however, it competed with other data transfer standards such as IDE. It is still in
common use in workstations and servers.
33
Configuring virtual machines
The following sections describe the available network modes.
5.3.1. Not attached
When a virtual network card's mode is set to "Not attached", VirtualBox reports to the guest that a
network card is present, but that there is no connection -- as if no Ethernet cable was plugged into
the card. This way it is possible to "pull" the virtual Ethernet cable and disrupt the connection,
which can be useful to inform a guest operating system that no network connection is available and
enforce a reconfiguration.
5.3.2. Network Address Translation (NAT)
Network Address Translation is the simplest way of accessing an external network from a virtual
machine. Usually, it does not require any configuration on the host network and guest system.
In NAT mode, the guest operating system receives its network configuration from an DHCP server
that is integrated into VirtualBox. The network frames from the guest operating system are analyzed
by VirtualBox's NAT engine, the TCP/IP data is extracted, and the host operating system's TCP/IP
engine is then used to send the translated data.
However, VirtualBox's NAT engine by default only permits outgoing TCP/IP connections (TCP and
UDP). It is therefore not possible to establish connections from the external network (including the
host machine) to the virtual machine.
NAT is good enough for surfing the Internet, downloading files, and receiving e-mail in the guest
operating system. As you cannot, however, establish new connections to the guest with the default
configuration, you cannot run a server inside the guest. This also means that folders declared as
"shared" with Windows Networking (SMB) will not be found from outside the virtual machine. If
you require these, you will either need to configure incoming TCP/UDP port mappings for NAT or
use one of the more advanced (but more complicated) network setups from the following sections.
Incoming NAT connections can be configured with the command line tool VBoxManage. For NAT,
the guest needs to share the port number space of the guest. Therefore you need to define on which
host port a particular guest port should be mapped. If the host doesn't itself run a server using a particular port, the port can be used by the guest. An example how to set up incoming NAT connections to a ssh server on the guest requires the following three commands:
VBoxManage setextradata "Linux Guest"
"VBoxInternal/Devices/pcnet/0/LUN#0/Config/ssh/UDP" 0
VBoxManage setextradata "Linux Guest"
"VBoxInternal/Devices/pcnet/0/LUN#0/Config/ssh/GuestPort" 22
VBoxManage setextradata "Linux Guest"
"VBoxInternal/Devices/pcnet/0/LUN#0/Config/ssh/HostPort" 2222
The ssh name is an arbitrary name for a particular mapping. With that configuration in place, all
connections to the host, port 2222 should be forwarded to the guest, port 22. To remove a mapping,
run the same commands, but without the value parameter (e.g. the 2222).
It is not possible to configure incoming NAT connections while the VM is running. However you
can change the settings for a VM which is currently saved (or powered off at a snapshot).
Note
ICMP (a protocol used e.g. by the ping utility) is supported in a very limited fashion. You
will only get a response from 10.0.2.2 (the NAT IP of the host) and 10.0.2.15 (the NAT IP
of the guest).
VirtualBox supports configuring more than one card of a VM to use NAT networking. The first card
gets the network 10.0.2.0, the second card gets the network 10.0.3.0 and so on.
5.3.3. Host Interface Networking
With Host Interface Networking, VirtualBox creates a new host networking interface for a guest's
34
Configuring virtual machines
virtual network card. In other words, the virtual network card of the guest is also represented as if
another network card was plugged into the host system.
With Host Interface Networking, your virtual machines can be accessed from other computers and
the Internet. As opposed to with NAT that we described just above, you can therefore run server
software in your VMs. Also, network protocols other than TCP/IP are supported.
The following general rules apply to host networking:
1.
A host interface must be created statically on the host before being attached to a virtual machine's virtual networking card. (Alternatively, on Linux hosts, interfaces can also be created
dynamically by VirtualBox.)
2.
A host interface can only be connected to one virtual network card at a time.
3.
Even though host interfaces are created on the host, they must be configured only from within
the guest. Do not set network parameters from the host.
Also, generally speaking, there are two ways in which your new host interface can gain access to the
network traffic for the virtual machine:
•
With TCP/IP routing, the standard mechanisms for TCP/IP routing apply. Most probably, you
give the new host interface its own IP address and then set up a route from the host interface to
your real network interface (and back) with the route command. With this method, you have to
define an identical IP configuration on both the guest and the host interface and configure the
correct routing rules on the host.
Since most host network interfaces are not normally configured to support this, however, routing
requires a thorough understanding of TCP/IP networking and will not be covered here. VirtualBox does support it though, and if you require support for it, do not hesitate to contact InnoTek.
•
With Ethernet bridging, by contrast, you can sort of split a physical network adapter into two by
switching it into the so-called "promiscuous" mode. This means that the network adapter will
also accept packages (ethernet frames) for MAC addresses other than its own, as well as send
out packets with a MAC address other than its own. By establishing a second, "virtual" MAC
address for the guest, you can make your network adapter act as if it was really two network adapters.
In some network environments, measures have been taken to prevent a client connected to an Ethernet switch from using more than one source MAC address on a single Ethernet port by temporarily
blocking communication on the switch port. These setups are not compatible with Host Interface
Networking in bridging mode.
Warning
Setting up bridging will break your current network connectivity temporarily, until the
bridge has been configured correctly. This must be taken into account especially when setting up VirtualBox on a remote system. Generally bridging (just like setting up routing) requires in-depth knowledge of networking concepts and the utilities involved to configure
the network setup. Incorrect use can lead to loss of network connectivity. Use with caution.
5.3.3.1. Bridging on Windows hosts
When you install VirtualBox on the Windows host, a special networking driver is installed together
with the rest of VirtualBox. This driver, the VirtualBox Host Interface NDIS driver, can be used to
create additional host interfaces.
Use the VBoxManage tool to create new host interfaces on your Windows system:
VBoxManage createhostif "VM1 external"
35
Configuring virtual machines
Each new host interface thus created appears as an additional network card in your standard "Network Connections" properties.
Note
If your host is running Windows XP or newer, you can also use the built-in bridging feature to connect your host interfaces to your physical network card. After creating the desired host interfaces, select your physical network adapter in the Network Connections
folder and the desired host interface adapters and select "Bridge connections" from the
popup menu. Note that you have to transfer your network configuration from your physical
network adapter to the network bridge because your physical network adapter will only
function as a transport medium in your bridge setup. When more than one connection is
active on a bridge, Windows will automatically put your physical Ethernet adapter into
promiscuous mode so that it will receive network data for all bridged connections.
After you have created your new host interface this way, you can select "Host Interface" as the networking mode in a virtual machine's Settings window and select the new interface in the "Interface
name" drop-down list. With the above example, this drop-down list would contain "VM1 external".
5.3.3.2. Bridging on Linux hosts
On Linux, we have implemented Host Interface Networking with the Linux kernel's own TAP interfaces. Therefore, make sure that your Linux kernel has support for TUN/TAP enabled. Additional
drivers are then not required.
With TAP, the Linux kernel can simulate Ethernet interfaces that, instead of being attached to networking hardware, communicate with user-space programs -- in our case, VirtualBox. The TAP interfaces therefore appear like physical network interfaces (e.g. eth0) on your system.
Note
TAP is an Ethernet methodology and therefore independent of TCP/IP networking. When
you set up TAP devices on your host, you therefore do not need to set TCP/IP configuration (such as a IP address and netmask) on it.
For information how to create TAP devices, please refer to the documentation of your distribution.
Often, this can be accomplished using the tunctl utility, which is part of the User Mode Linux
project. For example, on Gentoo Linux, this can be found in the sys-apps/usermode-utilities
package.
Bridging, then, is a feature provided by the Linux kernel and can be controlled with the brctl command from another utility package. For example, on Gentoo, this can be found in the netmisc/bridge-utils package.
Now, to make things even more complicated, there are two ways these interfaces can be created:
1.
As described for Windows hosts above, it is possible to define static, persistent TAP interfaces
on the Linux host and make them available to VirtualBox.
2.
You can also have VirtualBox create TAP interfaces dynamically each time a VM starts, and
destroyed when the VM stops.
We shall describe both methods below.
5.3.3.2.1. Static TAP interfaces
After creating a new TAP interface, you will have to create an ethernet bridge, put your Ethernet adapter into promiscous mode so that it can accept frames for other interfaces as well, add it to the
bridge and then transfer the network configuration of your Ethernet adapter to the bridge.
To create a TUN device and bridge it, perform the following steps as root:
36
Configuring virtual machines
1.
As root, run tunctl to create a new TAP interface:
tunctl -t tap1 -u <username>
where <username> is the user who wants to run VirtualBox with the new bridge.
2.
Create a new bridge, which we will call br0:
brctl addbr br0
3.
Put your network adapter in promiscuous mode so that it will accept Ethernet frames for MAC
addresses other than its own:
ifconfig eth0 0.0.0.0 promisc
You will lose network connectivity on eth0 at this point.
4.
Add your network adapter to the bridge:
brctl addif br0 eth0
5.
Transfer the network configuration of your ethernet adapter to the bridge (the following example assumes your network adapter is configured with DHCP):
dhclient br0
Your physical Ethernet adapter will now merely act as a transport medium for the bridge.
For configurations where the network adapter is configured statically, you need to setup br0 exactly as you would have set up eth0. At this point the host should have network connectivity
again.
6.
Add the new TAP device to the bridge as well:
brctl addif br0 tap1
7.
Activate the new TAP device:
ifconfig tap1 up
After this, you can now specify tap1 in the settings of your virtual machine, as if it were a real network adapter.
Note
In order to use a static TAP interface, the VirtualBox process needs to have write access to
/dev/net/tun. Either make sure the access bits allow access or add the user of the VirtualBox process to the group owning that device file.
5.3.3.2.2. Dynamically created TAP interfaces
With this method, VirtualBox will create a TAP device every time the VM is started, and destroy
the TAP device again when the VM is no longer running.
Note
In order to create a dynamic TAP interface, the VirtualBox process needs to have write access to /dev/net/tun. Either make sure the access bits allow access or add the user of the
VirtualBox process to the group owning that device file.
As with the static interfaces described previously, the dynamically created TAP interfaces require a
37
Configuring virtual machines
networking bridge and your Ethernet adapter in promiscous mode. However, as opposed to the configuration for static devices, bridging with dynamically created devices effectively consists of two
components:
1.
There is one part that sets up an Ethernet bridge and puts your Ethernet controller in promiscuous mode; this needs to be performed only once after startup. For a setup with eth0 and DHCP, the following commands (run as root) will perform these steps:
/sbin/brctl addbr br0
/sbin/ifconfig eth0 0.0.0.0 promisc
/sbin/brctl addif br0 eth0
/sbin/dhclient br0
2.
A second part must be run by VirtualBox every time the TAP interface is created and destroyed, to add the interface to the bridge or remove it from the bridge, respectively. Since the
names of the TAP interfaces (and your bridge) are not known at the time you are configuring
your VM, VirtualBox instead calls two scripts that configure the TAP interfaces:
a.
a setup script, which will be called by VirtualBox during VM startup, right after it has
created the TAP interface; this script must then bring up that TAP interface (using ifconfig up) and add it to the bridge you have set up;
b.
optionally, a termination script, which VirtualBox will call prior to destroying the TAP
interface again.
So instead of adding a static TAP interface name to the bridge (as described earlier), you must
supply one or two scripts that do this for the TAP devices created by VirtualBox. These scripts
each receive two parameters:
a.
the interface file descriptor (numeric value >= 0)
b.
the TAP interface name (typically from tap0 to tapx)
Using the following TAP setup script for the above bridge configuration, the dynamically created host interface will be added to the bridge. Note that bridge manipulation requires root permissions.
#!/bin/sh
sudo /sbin/ifconfig $2 up
sudo /sbin/brctl addif br0 $2
The corresponding termination script looks as follows:
#!/bin/sh
sudo /sbin/brctl delif br0 $2
In certain configurations, the VirtualBox VM process (e.g. VirtualBox, VBoxSDL, or VBoxVRDP)
is wrapped into a parent process which allocates the required TAP devices and lets VirtualBox inherit the file handles. For this to work, the file descriptor has to be passed to the VirtualBox VM
configuration using VBoxManage. In this case, the setup and termination scripts will not be called.
5.3.4. Internal Networking
Internal Networking is similar to Host Interface Networking in that the VM can directly communicate with the outside world without the restrictions imposed by NAT. However, the "outside world"
is limited to other VMs which connect to the same internal network.
Even though technically, everything that can be done using Internal Networking can also be done
using Host Interface Networking, there are two good reasons why this extra mode was implemented:
1.
Security. In Host Interface Networking mode, all traffic goes through an interface of the host
38
Configuring virtual machines
system. It is therefore possible to attach a packet sniffer (such as Ethereal) to the host interface
and log all traffic that goes over a given interface. If, for any reason, you prefer two or more
VMs on the same machine to communicate privately, hiding their data from both the host system and the user, Host Interface Networking therefore is not an option.
2.
Speed. Internal Networking is more efficient than Host Interface Networking, as VirtualBox
can directly transmit the data without having to send it through the host operating system's networking stack.
Internal networks are created automatically as needed, i.e. there is no central configuration. Every
internal network is identified simply by its name. In order to attach a VM's network card to an internal network, set its networking mode to "Internal Networking" using VBoxManage modifyvm
<VM name> -nic<x> intnet and specify a network name with the command VBoxManage
modifyvm <VM name> intnet<x> <network name>. If you do not specify a network name,
the network card will be attached to the network "intnet" by default. You will also have to manually
assign an IP address to the network adaptors. Guests which need to communicate with one another
should use IP addresses on the same subnet (e.g. 192.168.2.1 and 192.168.2.2). Please note that you
may have to deactivate guest firewalls in order to allow guests to communicate with each other. See
also Section 7.5, “VBoxManage modifyvm”.
Once there is more than one active virtual network card with the same internal network ID, the VirtualBox support driver will automatically "wire" the cards and act as a network switch. The VirtualBox support driver implements a complete Ethernet switch and supports both broadcast/multicast
frames and promiscuous mode.
As a security measure, the Linux implementation of Internal Networking only allows VMs running
under the same user ID to establish an internal network. For information on how to lift this restriction, contact InnoTek.
5.4. Folder Sharing
Shared Folders allow you to access files of your host system from within the guest system, much
like ordinary shares on Windows networks would -- except that shared folders do not need a networking setup. Sharing is accomplished using a special service on the host and a file system driver
for the guest, both of which are provided by VirtualBox.
In order to use this feature, the VirtualBox Guest Additions have to be installed. Currently, Shared
Folders are limited to Windows XP, Windows 2000 and Linux 2.4 and 2.6 guests.
To declare a folder as shared to VirtualBox, you specify a certain path on the host (which will become the shared folder) and give it a "share name" that only VirtualBox will use. Using this share
name, which the VirtualBox Shared Folders service will provide to the guest, a drive letter mapping
can be performed in the guest.
Shares are created using the VBoxManage command line interface; see Chapter 7, VBoxManage reference. The command is as follows:
VBoxManage sharedfolder add "VM name" -name "sharename" -hostpath "C:\test"
There are two types of shares:
1.
VM shares which are only available to the VM for which they have been defined;
2.
transient VM shares, which can be added and removed at runtime and do not persist after a VM
has stopped; for these, add the -transient option to the above command line.
Then, you can mount the shared folder from inside a VM the same way as you would mount an ordinary network share:
39
Configuring virtual machines
•
In a Windows guest, use the following command:
net use x: \\vboxsvr\sharename
Replace "x:" with the drive letter that you want to use for the share, and sharename with the
share name specified with VBoxManage.
•
In a Linux guest, use the following command:
mount -t vboxsf [-o OPTIONS] sharename mountpoint
Replace sharename with the share name specified with VBoxManage, and mountpoint with
the path where you want the share to be mounted (e.g. /mnt/share). The usual mount rules apply, that is, create this directory first if it does not exist yet.
Beyond the standard options supplied by the mount command, the following OPTIONS are available:
iocharset CHARSET
to set the character set used for I/O operations (utf8 by default) and
convertcp CHARSET
to specify the character set used for the shared folder name (utf8 by default).
40
Chapter 6. Alternative front-ends; remote
virtual machines
6.1. Introduction
As briefly mentioned in Section 1.2, “Features overview”, VirtualBox has a very flexible internal
design that allows you to use different front-ends to control the same virtual machines. To illustrate,
you can, for example, start a virtual machine with VirtualBox's easy-to-use graphical user interface
and then stop it from the command line. With VirtualBox's support for the Remote Desktop Protocol
(VRDP), you can even run virtual machines remotely on a headless server and have all the graphical
output redirected over the network.
In detail, the following front-ends are shipped in the standard VirtualBox package:
1.
VirtualBox is our graphical user interface (GUI), which most of this User Manual is dedic-
ated to describing, especially in Chapter 3, Starting out with VirtualBox. While this is the easiest-to-use of our interfaces, it does not (yet) cover all the features that VirtualBox provides.
Still, this is the best way to get to know VirtualBox initially.
2.
VBoxManage is our command-line interface and is described in the next section.
3.
VBoxSDL is an alternative, simply graphical front-end with an intentionally limited feature set,
designed to only display virtual machines that are controlled in detail with VBoxManage. This
is interesting for business environments where displaying all the bells and whistles of the full
GUI is not feasible. VBoxSDL is described in Section 6.3, “VBoxSDL, the simplified VM displayer”.
4.
Finally, VBoxVRDP is yet another front-end that produces no visible output on the host at all,
but merely acts as a VRDP server. Now, even though the other graphical front-ends
(VirtualBox and VBoxSDL) also have VRDP support built-in and can act as a VRDP server,
this particular front-end requires no graphics support. This is useful, for example, if you want
to host your virtual machines on a headless Linux server that has no X Window system installed. For details, see Section 6.4.1, “VBoxVRDP, the headless VRDP server”.
If the above front-ends still do not satisfy your particular needs, it is relatively painless to create yet
another front-end to the complex virtualization engine that is the core of VirtualBox, as the VirtualBox core neatly exposes all of its features in a clean COM/XPCOM API.
6.2. Using VBoxManage to control virtual machines
This section will give you a brief introduction to VBoxManage and how you can use it to create and
operate virtual machines.
In essence, VBoxManage supports everything that our graphical user interface allows you to do with
the click of a button. VBoxManage supports a lot more than that, however. It exposes really all the
features of the virtualization engine, even those that cannot (yet) be accessed from the GUI.
You will need to use the command line if you want to
•
use a different user interface than the main GUI (for example, VBoxSDL or the headless
VBoxVRDP server);
•
enable VRDP support for a VM;
•
control some of the more advanced and experimental configuration settings for a VM.
41
Alternative front-ends; remote virtual machines
There are two main things to keep in mind when using VBoxManage: First, VBoxManage must always be used with a specific "subcommand", such as "list vms" or "createvm" or "startvm". All the
subcommands that VBoxManage supports are described in detail in Chapter 7, VBoxManage reference.
Second, most of these subcommands require that you specify a particular virtual machine after the
subcommand. There are two ways you can do this:
•
You can specify the VM name, as it is shown in the VirtualBox GUI. Note that if that name contains spaces, then you must enclose the entire name in double quotes (as it is always required
with command line arguments that contain spaces).
For example:
VBoxManage startvm "Windows XP"
•
You can specify the UUID, which is the internal unique identifier that VirtualBox uses to refer
to the virtual machine. Assuming that the aforementioned VM called "Windows XP" has the
UUID shown below, the following command has the same effect as the previous:
VBoxManage startvm 670e746d-abea-4ba6-ad02-2a3b043810a5
You can type VBoxManage list vms to have all currently registered VMs listed with all their settings, including their respective names and UUIDs.
Some typical examples of how to control VirtualBox from the command line are listed below:
•
To create a new virtual machine from the command line and immediately register it with VirtualBox, use VBoxManage createvm with the -register option,1 like this:
$ VBoxManage createvm -name "SUSE Linux 10.2" -register
VirtualBox Command Line Management Interface Version 1.3.3
(C) 2005-2007 InnoTek Systemberatung GmbH
All rights reserved.
Virtual machine 'SUSE Linux 10.2' is created.
UUID: c89fc351-8ec6-4f02-a048-57f4d25288e5
Settings file: '/home/username/.VirtualBox/Machines/SUSE Linux 10.2/SUSE Linux 10.2.xm
As can be seen from the above output, a new virtual machine has been created with a new UUID
and a new XML settings file.
•
To show the configuration of a particular VM, use VBoxManage showvminfo; see Section 7.2,
“VBoxManage showvminfo” for details and an example.
This is the default configuration after a VM has been created, as shown above.
•
To change VM settings, use VBoxManage modifyvm, e.g. as follows:
VBoxManage modifyvm "Windows XP" -memory "512MB"
For details, see Section 7.5, “VBoxManage modifyvm”.
•
1
To control VM operation, use one of the following:
•
To start a VM that is currently powered off, use VBoxManage startvm; see Section 7.6,
“VBoxManage startvm” for details.
•
To pause or save a VM that is currently running, use VBoxManage controlvm; see Section 7.7, “VBoxManage controlvm” for details.
For details, see Section 7.4, “VBoxManage createvm”.
42
Alternative front-ends; remote virtual machines
6.3. VBoxSDL, the simplified VM displayer
VBoxSDL is a simple graphical user interface (GUI) that lacks the nice point-and-click support
which VirtualBox, our main GUI, provides. VBoxSDL is currently primarily used for internal debugging at InnoTek and therefore not officially supported. Still, you may find it useful for environments where the virtual machines are not necessarily controlled by the same person that uses the virtual machine.
As you can see in the following screenshot, VBoxSDL does indeed only provide a simple window
that contains only the "pure" virtual machine, without menus or other controls to click upon and no
additional indicators of virtual machine activity:
To start a virtual machine with VBoxSDL instead of the VirtualBox GUI, enter the following on a
command line:
VBoxSDL -vm <vm>
where <vm> is, as usual with VirtualBox command line parameters, the name or UUID of an existing virtual machine.
6.4. Remote Desktop Support (VRDP)
VirtualBox, the graphical user interface, has a built-in server for the VirtualBox Remote Desktop
Protocol (VRDP). This allows you to see the output of a virtual machine's window remotely on any
other computer and control the virtual machine from there, as if it was running on the remote machine.
VRDP is a backwards-compatible extension to Microsoft's Remote Desktop Protocol (RDP). Typically graphics updates and audio are sent from the remote machine to the client, while keyboard and
mouse events are sent back.
With VirtualBox, the graphical user interface, the VRDP server is disabled by default, but can
easily be enabled on a per-VM basis with VBoxManage:
VBoxManage modifyvm <vmname> -vrdp on
If you use VBoxVRDP (described below), VRDP support will automatically be enabled.
43
Alternative front-ends; remote virtual machines
Additional settings for modifyvm are -vrdpport and -vrdpauthtype; see Section 7.5,
“VBoxManage modifyvm” for details.
6.4.1. VBoxVRDP, the headless VRDP server
While the VRDP server that is built into the VirtualBox GUI is perfectly capable of running virtual machines remotely, it is not convenient to have to run VirtualBox if you never want to have
VMs displayed locally in the first place. In particular, if you are running servers whose only purpose
is to host VMs, and all your VMs are supposed to run remotely over VRDP, then it is pointless to
have a graphical user interface on the server at all -- especially since, on a Linux host, VirtualBox
comes with dependencies on the Qt and SDL libraries, which is inconvenient if you would rather not
have the X Window system on your server at all.
VirtualBox therefore comes with yet another front-end that produces no visible output on the host at
all, but instead only delivers VRDP data. This "headless server" is called VBoxVRDP.
To start a virtual machine with VBoxVRDP, you have two options:
•
You can use VBoxManage startvm <vmname> -type vrdp. The extra -type option causes
the VirtualBox core to use VBoxVRDP as the front-end to the internal virtualization engine.
•
The recommended way, however, is to use VBoxVRDP directly, as follows:
VBoxVRDP -startvm <uuid|name>
This is the recommended way, because when starting the headless interface through VBoxManage, you will not be able to view or log messages that VBoxVRDP may have output on the console. Especially in case of startup errors, such output might be desirable for problem diagnosis.
6.4.2. Step by step: creating a virtual machine on a headless server
The following instructions may give you an idea how to create a virtual machine on a headless server over a network connection. We will create a virtual machine, establish a VRDP connection and
install a guest operating system -- all without having to touch the headless server. All you need is
the following:
1.
VirtualBox on a server machine with a supported host operating system (Linux or Windows);
for the following example, we will assume a Linux server;
2.
an ISO file on the server, containing the installation data for the guest operating system to install (we will assume Windows XP in the following example);
3.
a terminal connection to that host over which you can access a command line (e.g. via telnet
or ssh);
4.
an RDP viewer on the remote client; on a Linux client, you could use rdesktop to connect;
from a Windows machine, you could use the RDP viewer that comes with Windows (usually
found in "Accessories" -> "Communication" -> "Remote Desktop Connection").
Note that on the server machine, since we will only use the headless server, neither Qt nor SDL nor
the X Window system will be needed.
1.
On the headless server, create a new virtual machine:
VBoxManage createvm -name "Windows XP" -register
44
Alternative front-ends; remote virtual machines
Note that if you do not specify -register, you will have to manually use the registervm command later.
2.
Make sure the settings for this VM are appropriate for the guest operating system that we will
install. For example:
VBoxManage modifyvm "Windows XP" -memory "256MB" \
-acpi on -boot1 dvd -nic1 nat
3.
Create a virtual hard disk for the VM (in this case, 10GB in size) and register it with VirtualBox:
VBoxManage createvdi -filename "WinXP.vdi" -size 10000 -register
4.
Set this newly created VDI file as the first virtual hard disk of the new VM:
VBoxManage modifyvm "Windows XP" -hda "WinXP.vdi"
5.
Register the ISO file that contains the operating system installation that you want to install
later:
VBoxManage registerimage dvd /full/path/to/iso.iso
6.
Attach this ISO to the virtual machine, so it can boot from it:
VBoxManage modifyvm "Windows XP" -dvd /full/path/to/iso.iso
(Alternatively, you can use VBoxManage controlvm dvdattach directly, without having to
register the image first; see Section 7.7, “VBoxManage controlvm” for details.)
7.
Start the virtual machine using VBoxVRDP:
VBoxVRDP -startvm "Windows XP"
If everything worked, you should see a copyright notice. If, instead, you are returned to the
command line, then something went wrong.
8.
On the client machine, fire up the RDP viewer and try to connect to the server. Assuming a
Linux client, try the following:
rdesktop -a 16 my.server.address
(With rdesktop, the -a 16 option requests a color depth of 16 bits per pixel, which we recommend. Also, after installation, you should set the color depth of your guest operating system to
the same value.)
You should now be seeing the installation routine of your guest operating system.
6.4.3. Remote USB
As a special feature on top of the VRDP support, VirtualBox supports remote USB devices over the
wire as well. That is, the VirtualBox guest that runs on one computer can access the USB devices of
the remote computer on which the RDP data is being displayed the same way as USB devices that
are connected to the actual host. This allows for running virtual machines on a VirtualBox host that
acts as a server, where a client can connect from elsewhere that needs only a network adapter and a
display capable of running an RDP viewer. When USB devices are plugged into the client, the remote VirtualBox server can access them.
45
Alternative front-ends; remote virtual machines
For these remote USB devices, the same filter rules apply as for other USB devices, as described
with Section 5.1.6.1, “USB settings”. All you have to do is specify "Remote" (or "Any") when setting up these rules.
6.4.4. RDP authentication
For each virtual machine that is remotely accessible via RDP, you can individually determine if and
how RDP connections are authenticated.
For this, use VBoxManage modifyvm command with the -vrdpauthtype option; see Section 7.5,
“VBoxManage modifyvm” for a general introduction. Three methods of authentication are available:
•
The "null" method means that there is no authentication at all; any client can connect to the
VRDP server and thus the virtual machine. This is, of course, very insecure and only to be recommended for private networks.
•
The "external" method provides external authentication through a special authentication library.
VirtualBox comes with two default libraries for external authentication:
•
On Linux hosts, VRDPAuth.so authenticates users against the host's PAM system.
•
On Windows hosts, VRDPAuth.dll authenticates users against the host's WinLogon system.
In other words, the "external" method per default performs authentication with the user accounts
that exist on the host system.
However, you can replace the default "external" authentication module with any other module.
For this, VirtualBox provides a well-defined interface that allows you to write your own authentication module; see Section 8.3, “Custom external VRDP authentication” for details.
•
Finally, the "guest" authentication method performs authentication with a special component
that comes with the Guest Additions; as a result, authentication is not performed with the host
users, but with the guest user accounts. This method is currently still in testing and not yet supported.
6.4.5. RDP encryption
RDP features data stream encryption, which is based on the RC4 symmetric cipher (with keys up to
128bit). The RC4 keys are being replaced in regular intervals (every 4096 packets).
RDP provides three different authentication methods:
1.
Historically, RDP4 authentication was used where the RDP client does not perform any checks
in order to verify the identity of the server it connects to. Using a man in the middle (MITM)
attack, the user's credentials could be obtained. Therefore RDP4 authentication is insecure and
should generally not be used.
2.
RDP5.1 authentication employs a server certificate for which the client possesses the public
key. This way, it is guaranteed that the server must possess the corresponding private key.
However, this hardcoded private key became public some years ago and therefore RDP5.1 authentication must be considered to be insecure and should generally not be used.
3.
RDP5.2 authentication is based on TLS 1.0 with customer supplied certificates. The server supplies a certificate to the client which must be signed by a certificate authority (CA) that the client trusts (for the Microsoft RDP Client 5.2, the CA has to be added to the Windows Trusted
Root Certificate Authorities database). VirtualBox allows you to supply your own CA and
server certificate and uses OpenSSL for encryption.
46
Alternative front-ends; remote virtual machines
While VirtualBox supports all of the above, only RDP5.2 authentication should be used in environments where security is a concern. As the client that connects to the server determines what type of
encryption will be used, with rdesktop, the Linux RDP viewer, use the -4 or -5 options.
47
Chapter 7. VBoxManage reference
When running VBoxManage without parameters or when supplying an invalid command line, the
syntax diagram will be shown. The Linux and Windows versions are slightly different, to reflect differences between these operating systems. When in doubt, check the output of the VBoxManage
command to for the commands available on a particular host system. The following diagram shows
a superset of all commands understood by VBoxManage:
VirtualBox Command Line Management Interface Version 1.3.8
(C) 2005-2007 InnoTek Systemberatung GmbH
All rights reserved.
Usage:
VBoxManage list
vms|ostypes|hostdvds|hostfloppies|hostifs|
hdds|dvds|floppies|usbhost|usbfilters|
systemproperties
VBoxManage showvminfo
<uuid>|<name>
VBoxManage registervm
<filename>
VBoxManage unregistervm
<uuid>|<name>
[-delete]
VBoxManage createvm
-name <name>
[-register]
[-basefolder <path> | -settingsfile <path>]
VBoxManage modifyvm
<uuid|name>
[-name <name>]
[-ostype <ostype>]
[-memory <memorysize>]
[-vram <vramsize>]
[-acpi on|off]
[-ioapic on|off]
[-hwvirtex on|off|default]
[-bioslogofadein on|off]
[-bioslogofadeout on|off]
[-bioslogodisplaytime <msec>]
[-bioslogoimagepath <imagepath>]
[-biosbootmenu <disabled|menuonly|messageandmenu>
[-boot<1-4> none|floppy|dvd|disk|net>]
[-hd<a|b|d> none|<uuid>|<filename>]
[-dvd none|<uuid>|<filename>|host:<drive>]
[-dvdpassthrough on|off]
[-floppy disabled|empty|<uuid>|
<filename>|host:<drive>]
[-nic<1-N> none|null|nat|hostif|intnet]
[-nictype<1-N> Am79C970A|Am79C973]
[-cableconnected<1-N> on|off]
[-nictrace<1-N> on|off]
[-nictracefile<1-N> <filename>]
[-hostifdev<1-N> none|<devicename>]
[-intnet<1-N> network]
[-macaddress<1-N> auto|<mac>
[-tapsetup<1-N> none|<application>]
[-tapterminate<1-N> none|<application>]
[-audio none|null|oss|alsa|winmm|dsound]
[-vrdp on|off]
[-vrdpport default|<port>]
[-vrdpauthtype null|external|guest]
[-usb on|off]
[-snapshotfolder default|<path>]
VBoxManage startvm
<uuid>|<name>
[-type gui|vrdp]
VBoxManage controlvm
<uuid>|<name>
pause|resume|reset|poweroff|savestate|
acpipowerbutton |
setlinkstate<1-4> on|off |
48
VBoxManage reference
usbattach <uuid>|<address> |
usbdetach <uuid>|<address> |
dvdattach none|<uuid>|<filename>|host:<drive> |
floppyattach none|<uuid>|<filename>|host:<drive> |
setvideomodehint <xres> <yres> <bpp> |
setcredentials <username> <password> <domain>
[-allowlocallogon <yes|no>]
VBoxManage discardstate
<uuid>|<name>
VBoxManage snapshot
<uuid>|<name>
take <name> [-desc <desc>] |
discard <uuid>|<name> |
discardcurrent -state|-all |
edit <uuid>|<name>|-current
[-newname <name>]
[-newdesc <desc>] |
showvminfo <uuid>|<name>
VBoxManage registerimage
disk|dvd|floppy <filename>
[-type normal|immutable|writethrough] (disk only)
VBoxManage unregisterimage
disk|dvd|floppy <uuid>|<filename>
VBoxManage showvdiinfo
<uuid>|<filename>
VBoxManage createvdi
-filename <filename>
-size <megabytes>
[-static]
[-comment <comment>]
[-register]
[-type normal|writethrough] (default: normal)
VBoxManage modifyvdi
<uuid>|<filename>
compact
VBoxManage clonevdi
<uuid>|<filename> <outputfile>
VBoxManage addiscsidisk
-server <name>|<ip>
-target <target>
[-port <port>]
[-lun <lun>]
[-encodedlun <lun>]
[-username <username>]
[-password <password>]
[-comment <comment>]
VBoxManage createhostif
<name>
VBoxManage removehostif
<uuid>|<name>
VBoxManage getextradata
global|<uuid>|<name>
<key>|enumerate
VBoxManage setextradata
global|<uuid>|<name>
<key>
[<value>] (no value deletes key)
VBoxManage setproperty
vdifolder default|<folder> |
machinefolder default|<folder> |
vrdpauthlibrary default|<library> |
hwvirtexenabled yes|no
VBoxManage usbfilter
add <index,0-N>
-target <uuid>|<name>|global
-name <string>
-action ignore|hold (global filters only)
[-active yes|no] (yes)
[-vendorid <XXXX>] (null)
[-productid <XXXX>] (null)
[-revision <IIFF>] (null)
[-manufacturer <string>] (null)
[-product <string>] (null)
[-remote yes|no] (null, VM filters only)
[-serialnumber <string>] (null)
VBoxManage usbfilter
modify <index,0-N>
49
VBoxManage reference
-target <uuid>|<name>|global
[-name <string>]
[-action ignore|hold] (global filters only)
[-active yes|no]
[-vendorid <XXXX>|""]
[-productid <XXXX>|""]
[-revision <IIFF>|""]
[-manufacturer <string>|""]
[-product <string>|""]
[-remote yes|no] (null, VM filters only)
[-serialnumber <string>|""]
VBoxManage usbfilter
remove <index,0-N>
-target <uuid>|<name>|global
VBoxManage sharedfolder
add <vmname>|<uuid>
-name <name> -hostpath <hostpath>
[-transient]
VBoxManage sharedfolder
remove <vmname>|<uuid>
-name <name> [-transient]
VBoxManage updatesettings
[<dir>|<file>] [-apply]
[-nobackup] [-skipinvalid]
Each time VBoxManage is invoked, only one command can be executed. However, a command
might support several subcommands which then can be invoked in one single call. The following
sections provide detailed reference information on the different commands.
7.1. VBoxManage list
The list command gives relevant information about your system and information about VirtualBox's current settings.
The following subcommands are available with VBoxManage list:
•
vms, hdds, dvds and floppies all give you information about virtual machines and virtual
disk images currently registered in VirtualBox, including all their settings, the unique identifiers
(UUIDs) associated with them by VirtualBox and all files associated with them.
•
ostypes lists all guest operating systems presently known to VirtualBox, along with the identifiers used to refer to them with the modifyvm command.
•
hostdvds, hostfloppies and hostifs, respectively, list DVD, floppy and host networking
interfaces on the host, along with the name used to access them from within VirtualBox.
•
hostusb supplies information about USB devices attached to the host, notably information use-
ful for constructing USB filters and whether they are currently in use by the host.
•
usbfilters lists all global USB filters registered with VirtualBox -- that is, filters for devices
which are accessible to all virtual machines -- and displays the filter parameters.
•
systemproperties displays some global VirtualBox settings, such as minimum and maxim-
um guest RAM and virtual hard disk size, folder settings and the current authentication library in
use.
7.2. VBoxManage showvminfo
The showvminfo command shows information about a particular virtual machine. This is the same
information as VBoxManage list vms would show for all virtual machines.
You will get information similar to the following:
50
VBoxManage reference
$ VBoxManage showvminfo "Windows XP"
VirtualBox Command Line Management Interface Version 1.3.2
(C) 2005-2007 InnoTek Systemberatung GmbH
All rights reserved.
Name:
Guest OvS:
UUID:
Config file:
Memory size:
VRAM size:
Boot menu mode:
ACPI:
IOAPIC:
Hardw. virt.ext:
State:
Floppy:
DVD:
NIC 1:
NIC 2:
NIC 3:
NIC 4:
Audio:
VRDP:
USB:
Windows XP
Other/Unknown
1bf3464d-57c6-4d49-92a9-a5cc3816b7e7
/home/username/.VirtualBox/Machines/Windows XP/Windows XP.xml
128MB
8MB
message and menu
on
off
off
powered off
empty
empty
disabled
disabled
disabled
disabled
disabled (Driver: Unknown)
disabled
disabled
USB Device Filters:
<none>
Shared folders:
<none>
7.3. VBoxManage registervm / unregistervm
The registervm command allows you to import a virtual machine definition in an XML file into
VirtualBox. There are some restrictions here: the machine must not conflict with one already registered in VirtualBox and it may not have any hard or removable disks attached. It is advisable to
place the definition file in the machines folder before registering it.
Note
When creating a new virtual machine with VBoxManage createvm (see below), you can
directly specify the -register option to avoid having to register it separately.
The unregistervm command unregisters a virtual machine. If -delete is also specified then the
XML definition file will be deleted.
7.4. VBoxManage createvm
This command creates a new XML virtual machine definition file.
The -name <name> parameter is required and must specify the name of the machine. Since this
name is used by default as the file name of the settings file (with the extension .xml) and the machine folder (a subfolder of the .VirtualBox/Machines folder), it must conform to your host operating system's requirements for file name specifications. If the VM is later renamed, the file and
folder names will change automatically.
However, if the -basefolder <path> and the -settingsfile <filename> options are used,
the XML definition file will be given the name <filename> and the machine folder will be named
<path>. In this case, the names of the file and the folder will not change if the virtual machine is renamed.
By default, this command only creates the XML file without automatically registering the VM with
your VirtualBox installation. To register the VM instantly, use the optional -register option, or
run VBoxManage registervm separately afterwards.
51
VBoxManage reference
7.5. VBoxManage modifyvm
This command changes the properties of a registered virtual machine. Most of the properties that
this command makes available correspond to the VM settings that VirtualBox graphical user interface displays in each VM's "Settings" dialog; these were described in Section 5.1, “Virtual machine
settings”.
Some of the more advanced settings, however, are only available through the VBoxManage interface.
The following settings are available through VBoxManage modifyvm:
•
-name <name>: This changes the VM's name and possibly renames the internal virtual machine
files, as described with VBoxManage createvm above.
•
-ostype <ostype>: This specifies what guest operating system is supposed to run in the VM.
As mentioned at Section 3.2, “Creating a virtual machine”, this setting is presently purely descriptive. To learn about the various identifiers that can be used here, use VBoxManage list
ostypes.
•
-memory <memorysize>: This sets the amount of RAM, in MB, that the virtual machine
should allocate for itself from the host. Again, see the remarks in Section 3.2, “Creating a virtual
machine” for more information.
•
-vram <vramsize>: This sets the amount of RAM that the virtual graphics card should have.
See Section 5.1.1, “General settings” for details.
•
-acpi on|off; -ioapic on|off: These two determine whether the VM should have ACPI
and I/O APIC support, respectively; again, see Section 5.1.1, “General settings” for details.
•
-hwvirtex on|off|default: This enables or disables the use of virtualization extensions in
the processor of your host system. This feature may still be experimental at the time you read
this, and may not be enabled in your build of VirtualBox.
•
You can influence the BIOS logo that is displayed when a virtual machine starts up with a number of settings. Per default, an InnoTek logo is displayed.
With -bioslogofadein on|off and -bioslogofadeout on|off, you can determine
whether the logo should fade in and out, respectively.
With -bioslogodisplaytime <msec> you can set how long the logo should be visible, in
milliseconds.
With -bioslogoimagepath <imagepath> you can, if you are so inclined, replace the image
that is shown, with your own logo. The image must be an uncompressed 256 color BMP file.
•
-biosbootmenu <disabled|menuonly|messageandmenu:
•
-boot<1-4> none|floppy|dvd|disk|net>: This specifies the boot order for the virtual
machine. There are four "slots", which the VM will try to access from 1 to 4, and for each of
which you can set a device that the VM should attempt to boot from.
•
-hd<a|b|d> none|<uuid>|<filename>: This specifies the settings for each of the three vir-
tual hard disks that can be attached to a VM (primary master and slave, and secondary slave; the
secondary master is always reserved for the virtual CD/DVD drive). For each of these three, specify either the UUID or a filename of a virtual disk that you have
•
either registered with VBoxManage registerimage; see Section 7.10, “VBoxManage registerimage / unregisterimage”;
•
or created using VBoxManage createvdi with the -register option; see Section 7.12,
“VBoxManage createvdi”;
52
VBoxManage reference
•
•
alternatively, specify the UUID of an iSCSI target that you have registered with VBoxManage addiscsidisk; see Section 7.15, “VBoxManage addiscsidisk”.
-dvd none|<uuid>|<filename>|host:<drive>: This specifies what VirtualBox should
provide to the VM as the virtual CD/DVD drive; specify either the UUID or the filename of an
image file that you have registered with VBoxManage registerimage (see Section 7.10,
“VBoxManage registerimage / unregisterimage”). Alternatively, specify "host:" with the drive
specification of your host's drive.
•
-dvdpassthrough on|off: With this, you can enable DVD writing support (currently experi-
mental; see Section 5.1.3, “CD/DVD-ROM and floppy settings”).
•
-floppy disabled|empty|<uuid>|<filename>|host:<drive>: This is the floppy equivalent to the -dvd option described above.
•
-nic<1-N> none|null|nat|hostif|intnet: With this, you can set, for each of the VM's
virtual network cards, what type of networking should be available. They can be not present
(none), not connected to the host (null), use network address translation (nat), a host interface
(hostif) or communicate with other virtual machines using internal networking (intnet). These
options correspond to the modes which are described in detail in Section 5.3, “Networking in
virtual machines”.
•
-nictype<1-N> Am79C970A|Am79C973: This allows you, for each of the VM's virtual net-
work cards, to specify whether the host will see the network adaptors as 10 Mbps AMD PCnet
79C970A cards or as 100Mbps 79C973 cards. This is in fact purely cosmetic, as both virtual
cards run at full speed.
•
-cableconnected<1-N> on|off: This allows you to temporarily disconnect a virtual net-
work interface, as if a network cable had been pulled from a real network card. This might be
useful for resetting certain software components in the VM.
•
With the "nictrace" options, you can optionally trace network traffic, for debugging purposes.
With -nictrace<1-N> on|off, you can enable network tracing for a particular virtual network
card.
If enabled, you must specify with -nictracefile<1-N> <filename> what file the trace
should be logged to.
•
-hostifdev<1-N> none|<devicename>: If host interface networking has been enabled for a
virtual network card (see the -nic option above; otherwise this setting has no effect), use this
option to specify which host interface the given virtual network interface will use.
For Windows hosts, this should be the name of a VirtualBox host interface which you have created using the createhostif command (see Section 5.3.3.1, “Bridging on Windows hosts”).
For Linux hosts, this should be the name of an existing static interface or none if you wish to allocate an interface dynamically. In the latter case, you should also specify the creation and termination scripts for the interface with -tapsetup<1-4> and -tapterminate<1-4> (see Section 5.3.3.2, “Bridging on Linux hosts”).
•
-intnet<1-N> network: If internal networking has been enabled for a virtual network card
(see the -nic option above; otherwise this setting has no effect), use this option to specify the
name of the internal network (see Section 5.3.4, “Internal Networking”).
•
-macaddress<1-N> auto|<mac>: With this option you can set the MAC address of the virtu-
al network card. Per default, each virtual network card is assigned a random address by VirtualBox at VM creation.
•
-audio none|null|oss: With this option, you can set whether the VM should have audio
support.
•
-vrdp on|off: With the VirtualBox graphical user interface, this enables or disables the built-
53
VBoxManage reference
in VRDP server. Note that if you are using VBoxVRDP, our headless server described in Section 6.4.1, “VBoxVRDP, the headless VRDP server”, VRDP output is always enabled.
•
-vrdpport default|<port>: This lets you specify which port should be used; "default" or
"0" means port 3389, the standard port for RDP. Only one machine can use a given port at a
time.
•
-vrdpauthtype null|external|guest: This allows you to choose whether and how au-
thorization will be performed; see Section 6.4.4, “RDP authentication” for details.
•
-usb on|off: This option enables or disables the VM's virtual USB controller; see Sec-
tion 5.1.6.1, “USB settings” for details.
•
-snapshotfolder default|<path>: This allows you to specify the folder in which snap-
shots will be kept for a virtual machine.
7.6. VBoxManage startvm
This command starts a virtual machine that is currently in the "Powered off" or "Saved" states.
The optional -type specifier determines whether the machine will be started in a window (GUI
mode, which is the default) or whether the output should go through VBoxVRDP, the headless VRDP
server; see Section 6.4.1, “VBoxVRDP, the headless VRDP server” for more information.
Note
We do not recommend to use VBoxManage startvm to start virtual machines from the command line. If you want to use a front-end other than VirtualBox, our graphical user interface, please start that front-end directly, as you might otherwise miss important error and
state information that VirtualBox may display on the console. Again, see Section 6.4.1,
“VBoxVRDP, the headless VRDP server” for more information.
7.7. VBoxManage controlvm
The controlvm subcommand allows you to change the state of a virtual machine that is currently
running. The following can be specified:
•
VBoxManage controlvm <vm> pause temporarily puts a virtual machine on hold, without
changing its state for good. The VM window will be painted in gray to indicate that the VM is
currently paused. (This is equivalent to selecting the "Pause" item in the "VM" menu of the
GUI.)
•
Use VBoxManage controlvm <vm> resume to undo a previous pause command. (This is
equivalent to selecting the "Resume" item in the "VM" menu of the GUI.)
•
VBoxManage controlvm <vm> reset has the same effect on a virtual machine as pressing
the "Reset" button on a real computer: a cold reboot of the virtual machine, which will restart
and boot the guest operating system again immediately. The state of the VM is not saved beforehand, and data may be lost. (This is equivalent to selecting the "Reset" item in the "VM" menu
of the GUI.)
•
VBoxManage controlvm <vm> poweroff has the same effect on a virtual machine as
pulling the power cable on a real computer. Again, the state of the VM is not saved beforehand,
and data may be lost. (This is equivalent to selecting the "Close" item in the "VM" menu of the
GUI or pressing the window's close button, and then selecting "Power off the VM" in the dialog.)
After this, the VM's state will be "Powered off". From there, it can be started again; see Section 7.6, “VBoxManage startvm”.
54
VBoxManage reference
•
VBoxManage controlvm <vm> savestate will save the current state of the VM to disk and
then stop the VM. (This is equivalent to selecting the "Close" item in the "VM" menu of the GUI
or pressing the window's close button, and then selecting "Power off the VM" in the dialog.)
After this, the VM's state will be "Saved". From there, it can be started again; see Section 7.6,
“VBoxManage startvm”.
A few extra options are available with controlvm that do not directly affect the VM's running
state:
•
The setlinkstate<1-4> operation connects or disconnects virtual network cables from their
network interfaces
•
usbattach and usbdettach make host USB devices visible to the virtual machine on the fly,
without the need for creating filters first. The USB devices can be specified by UUID (unique
identifier) or by address on the host system.
You can use VBoxManage list usbhost to locate this information.
•
dvdattach inserts a DVD image into the virtual machine or connects it to the host DVD drive.
With this command (as opposed to VBoxManage modifyvm), the image file does not first have
to be registered with VirtualBox.
You can use VBoxManage list hostdvds to display all the drives found on the host and the
names VirtualBox uses to access them.
•
floppyattach works in a similar way.
•
setvideomodehint requests that the guest system change to a particular video mode. This re-
quirest that the guest additions be installed, and will not work for all guest systems.
•
The setcredentials operation is used for remote logons in Windows guests. For details,
please refer to Section 8.2, “Automated Windows Guest Logons (VBoxGINA)”.
7.8. VBoxManage discardstate
This command discards the saved state of a virtual machine which is not currently running, which
will cause its operating system to restart next time you start it. This is the equivalent of pulling out
the power cable on a physical machine, and should be avoided if possible.
7.9. VBoxManage snapshot
This command is used for taking snapshots of a virtual machine and for manipulating and discarding
snapshots.
The take operation takes a snapshot of a virtual machine. You must supply a name for the snapshot
and can optionally supply a description.
The discard operation discards a snapshot specified by name or by identifier (UUID).
The discardcurrent operation will either revert the current state to the most recent snapshot (if
you specify the -state option) or discard the last snapshot and revert to the last but one (with the all option).
7.10. VBoxManage registerimage / unregisterimage
These commands register or unregister hard disk, DVD or floppy images in VirtualBox. This is the
command-line equivalent of the Virtual Disk Manager; see Section 3.5, “The Virtual Disk Manager”
55
VBoxManage reference
for more information.
Note however that when you unregister a hard disk image using VBoxManage, it will not be deleted
from the host computer's hard drive.
7.11. VBoxManage showvdiinfo
This command shows information about a virtual hard disk image, notably its size, its size on disk,
its type and the VM it is in use by.
7.12. VBoxManage createvdi
This command creates a new virtual hard disk image. You must specify the filename for the new image and the virtual size. If you give the -static option, disk space for the whole image will be allocated at once on the host. With the -comment option you can attach a comment to the image. The
-register option, if given, tells VirtualBox to register the image for use with virtual machines.
You can use the -type option to create a disk in write-through mode, which will not be affected by
snapshots; see Section 5.2.1, “Virtual Disk Image (VDI) files” for details. (As described there, you
cannot create a VDI with the "immutable" type, as it would then always remain empty.)
7.13. VBoxManage modifyvdi
The modifyvdi command can be used to change the type of a virtual disk image between normal,
write-through and immutable. Again, see Section 5.2.1, “Virtual Disk Image (VDI) files” for details.
Only images that have previously been registered with VirtualBox can be set to immutable, as the
property is set in VirtualBox's configuration and not in the disk image file itself.
7.14. VBoxManage clonevdi
This command duplicates a registered virtual hard disk image to a new image file with a new unique
identifier (UUID). The new image can be transferred to another host system or imported into VirtualBox again using the Virtual Disk Manager; see Section 3.5, “The Virtual Disk Manager”.
7.15. VBoxManage addiscsidisk
The addiscsidisk command attaches an iSCSI network storage unit to VirtualBox. The iSCSI
target can then be made available to and used by a virtual machine as though it were a standard
write-through virtual disk image.
This command has the following syntax:
VBoxManage addiscsidisk -server <name>|<ip>
-target <target>
[-port <port>]
[-lun <lun>]
[-username <username>]
[-password <password>]
[-comment <comment>]
where the parameters mean:
server
The host name or IP address of the iSCSI target.
target
Target name string. This is determined by the iSCSI target and
used to identify the storage resource.
port
TCP/IP port number of the iSCSI service on the target
(optional).
56
VBoxManage reference
lun
Logical Unit Number of the target resource (optional). Often,
this value is zero.
username, password
Username and password for target authentication, if required
(optional).
Note
Currently, username and password are stored without encryption (i.e. in cleartext) in the
machine configuration file.
comment
Any description that you want to have stored with this item
(optional; e.g. "Big storage server downstairs"). This is stored
internally only and not needed for operation.
7.16. VBoxManage createhostif/removehostif
These two commands add and remove, respectively, virtual network interfaces on Windows hosts.
See Section 5.3.3.1, “Bridging on Windows hosts” for details.
7.17. VBoxManage getextradata/setextradata
These commands let you attach and retrieve string data to a virtual machine or to a VirtualBox configuration (by specifying global instead of a virtual machine name). You must specify a key (as a
text string) to associate the data with, which you can later use to retrieve it. For example:
VBoxManage setextradata Fedora5 installdate 2006.01.01
VBoxManage setextradata SUSE10 installdate 2006.02.02
would associate the string "2006.01.01" with the key installdate for the virtual machine Fedora5,
and "2006.02.02" on the machine SUSE10. You could retrieve the information as follows:
VBoxManage getextradata Fedora5 installdate
which would return
VirtualBox Command Line Management Interface Version 1.2.1
(C) 2005-2006 InnoTek Systemberatung GmbH
All rights reserved.
Value: 2006.01.01
7.18. VBoxManage setproperty
This command is used to change global settings which affect the entire VirtualBox installation.
Some of these correspond to the settings in the "Global settings" dialog in the graphical user interface. The following properties are available:
vdifolder
This specifies the default folder that is used to keep Virtual Disk
Image (VDI) files.
machinefolder
This specifies the default folder in which virtual machine definitions are kept; see Section 8.1, “VirtualBox configuration data”
for details.
vrdpauthlibrary
This specifies which library to use when "external" VRDP authentication has been selected for a particular virtual machine;
see Section 6.4.4, “RDP authentication” for details.
57
VBoxManage reference
hwvirtexenabled
This selects whether or not hardware virtualization support is
enabled by default. Note: This feature may still be experimental
at the time you read this.
7.19. VBoxManage usbfilter add/modify/remove
The usbfilter commands are used for working with USB filters in virtual machines, or global filters which affect the whole VirtualBox setup. Global filters are applied before machine-specific filters, and may be used to prevent devices from being captured by any virtual machine. Global filters
are always applied in a particular order, and only the first filter which fits a device is applied. So for
example, if the first global filter says to hold (make available) a particular Kingston memory stick
device and the second to ignore all Kingston devices, that memory stick will be available to any machine with an appropriate filter, but no other Kingston device will.
When creating a USB filter using usbfilter add, you must supply three or four mandatory parameters. The index specifies the position in the list at which the filter should be placed. If there is
already a filter at that position, then it and the following ones will be shifted back one place. Otherwise the new filter will be added onto the end of the list. The target parameter selects the virtual
machine that the filter should be attached to or "global". name is a name for the new filter and for
global filters, action says whether to allow machines access to devices that fit the filter description
("hold") or not to give them access ("ignore"). In addition, you should specify parameters to filter
by. You can find the parameters for devices attached to your system using VBoxManage list
usbhost. Finally, you can specify whether the filter should be active, and for local filters, whether
they are for local devices, remote (over an RDP connection) or either.
When you modify a USB filter using usbfilter modify, you must specify the filter by index (see
the output of VBoxManage list usbfilters to find global filter indexes and that of VBoxManage showvminfo to find indexes for individual machines) and by target, which is either a virtual
machine or "global". The properties which can be changed are the same as for usbfilter add. To
remove a filter, use usbfilter remove and specify the index and the target.
7.20. VBoxManage sharedfolder add/remove
This command allows you to share folders on the host computer with guest operating systems. For
this, the guest systems must have a version of the VirtualBox guest additions installed which supports this functionality.
Shared folders are described in detail in Section 5.4, “Folder Sharing”.
7.21. VBoxManage updatesettings
The updatesettings command updates all VirtualBox configuration files from an earlier to the
current version. You will need this when you upgrade your version of VirtualBox, but should not
need it apart from that.
58
Chapter 8. Advanced Topics
8.1. VirtualBox configuration data
For each system user, VirtualBox stores configuration data in the user's home directory, as per the
conventions of the host operating system:
•
On Linux, this is $HOME/.VirtualBox.
•
On Windows, this is %HOMEDRIVE%%HOMEPATH%\.VirtualBox; typically something like
C:\Documents and Settings\Username.
VirtualBox creates this configuration directory automatically, if necessary. Optionally, you can supply an alternate configuration directory by setting the VBOX_USER_HOME environment variable.
VirtualBox stores all its global and machine-specific configuration data in XML documents. We intentionally do not document the specifications of these files, as we must reserve the right to modify
them in the future. We therefore request that these files not be edited manually. VirtualBox provides
complete access to its configuration data through its Application Programming Interface (API) and
the VBoxManage command line tool; see Chapter 7, VBoxManage reference.
In the configuration directory, VirtualBox.xml is the main configuration file. This includes global configuration options and the media and virtual machine registry. The media registry links to all
CD/DVD, floppy and disk images that have been added to the Virtual Disk Manager. For each registered VM, there is one entry which points to the VM configuration file, also in XML format.
You can globally change some of the locations where VirtualBox keeps extra configuration and data
by selecting "Global settings" from the "File" menu in the VirtualBox main window. Then, in the
window that pops up, click on the "General" tab.
•
Virtual machine settings and files are, by default, saved as XML files in a subdirectory of the
.VirtualBox/Machines directory. You can change the location of this main "Machines"
folder in the "Global settings" dialog.
By default, for each virtual machine, VirtualBox uses another subdirectory of the "Machines"
directory that carries the same name as the virtual machine. As a result, your virtual machine
names must conform to the conventions of your operating system for valid file names. For example, a machine called "Fedora 6" would, by default, have its settings saved in
.VirtualBox/Machines/Fedora 6/Fedora 6.xml. If you would like more control over
the file names used, you can create the machine using VBoxManage createvm with the settingsfile option; see Section 7.4, “VBoxManage createvm”.
The virtual machine directory will be renamed if you change the machine name. If you do not
wish this to happen, you can create the machine using VBoxManage createvm with the basefolder option. In this case, the folder name will never change.
•
VirtualBox keeps snapshots and saved states in another special folder for each virtual machine.
By default, this is a subfolder of the virtual machine folder called Snapshots -- in our example,
.VirtualBox/Machines/Fedora 6/Snapshots. You can change this setting for each machine using VBoxManage as well.
•
VDI container files are, by default, created in the .VirtualBox/VDI directory. In particular,
this directory is used when the "Create new virtual disk" wizard is started to create a new VDI
file. Changing this default is probably most useful if the disk containing your home directory
does not have enough room to hold your VDI files, which can grow very large.
59
Advanced Topics
8.2. Automated Windows Guest Logons (VBoxGINA)
When Windows is running in a virtual machine, it might be desirable to perform coordinated and
automated logons of guest operating systems using credentials from a master logon system. (With
"credentials", we are referring to logon information consisting of user name, password and domain
name, where each value might be empty.) Since Windows NT, Windows has provided a modular
system logon subsystem ("Winlogon") which can be customized and extended by means of socalled GINA modules (Graphical Identification and Authentication). The VirtualBox Guest Additions for Windows come with such a GINA module which and can therefore perform automated logons.
The Guest Additions installer copies VBoxGINA.dll to the target directory but doesn't activate it. In
order to install it, it has to be copied to the SYSTEM32 directory of Windows and the string registry
key
HKEY_LOCAL_MACHINE\SOFTWARE\Microsoft\Windows
NT\CurrentVersion\Winlogon\GinaDLL has to be created and set to VBoxGINA.dll. The VirtualBox GINA is implemented as a wrapper around the standard Windows GINA (MSGINA.DLL) so
it will most likely not work correctly with 3rd party GINA modules.
Credentials can be set only for running VMs and are transient information, i.e. they are not stored in
any persistent manner. Setting credentials can be achieved using the following command:
VBoxManage controlvm "Windows XP" \
setcredentials "John Doe" "secretpassword" "DOMTEST"
The above information will then be available to the guest and will be queried by the VirtualBox
GINA module using the VirtualBox Guest Additions device driver. When Windows is in logged out
mode, the GINA module will constantly poll for credentials and if they are present, a logon will be
attempted. After retrieving the credentials, the GINA module will erase them so that the above command will have to be repeated for subsequent logons.
When resetting a VM, the credentials will be erased for security reasons. Note that this is a write
only value, i.e. there is no way to retrieve the credentials from the host side. Credentials can be reset
from the host side by setting empty values.
For Windows XP guests, the logon subsystem has to be configured to use the classical logon dialog
as the VirtualBox GINA does not support the XP style welcome dialog.
8.3. Custom external VRDP authentication
As described in Section 6.4.4, “RDP authentication”, VirtualBox supports arbitrary external modules to perform authentication with its VRDP servers. When the authentication method is set to "external" for a particular VM, VirtualBox calls the library that was specified with VBoxManage setproperty vrdpauthlibrary. This library will be loaded by the VM process on demand, i.e.
when the first RDP connection is made by an external client.
External authentication is the most flexible as the external handler can both choose to grant access to
everyone (like the "null" authentication method would) and delegate the request to the guest authentication component. When delegating the request to the guest component, it will still be called afterwards with the option to override the result.
A VRDP authentication library is required to implement exactly one entry point:
#include "VRDPAuth.h"
/**
* Authentication library entry point. Decides whether to allow
* a client connection.
*
* Parameters:
*
*
pUuid
Pointer to the UUID of the virtual machine
*
which the client connected to.
*
guestJudgement
Result of the guest authentication.
*
szUser
User name passed in by the client (UTF8).
*
szPassword
Password passed in by the client (UTF8).
60
Advanced Topics
*
szDomain
Domain passed in by the client (UTF8).
*
* Return code:
*
*
VRDPAuthAccessDenied
Client access has been denied.
*
VRDPAuthAccessGranted
Client has the right to use the
*
virtual machine.
*
VRDPAuthDelegateToGuest Guest operating system must
*
authenticate the client and the
*
library must be called again with
*
the result of the guest
*
authentication.
*/
VRDPAuthResult VRDPAUTHCALL VRDPAuth(
PVRDPAUTHUUID pUuid,
VRDPAuthGuestJudgement guestJudgement,
const char *szUser,
const char *szPassword
const char *szDomain)
{
/* process request against your authentication source of choice */
return VRDPAuthAccessGranted;
}
The second arguments contains information about the guest authentication status. For the first call, it
is always set to VRDPAuthGuestNotAsked. In case the function returns VRDPAuthDelegateToGuest, a guest authentication will be attempted and another call to the method is made with its
result. This can be either granted / denied or no judgement (the guest component chose for whatever
reason to not make a decision). In case there is a problem with the guest authentication module (e.g.
the Additions are not installed or not running or the guest did not respond within a timeout), the "not
reacted" status will be returned.
8.4. Secure Labeling with VBoxSDL
When running guest operating systems in fullscreen mode, the guest operating system usually has
control over the whole screen. This could present a security risk as the guest operating system might
fool the user into thinking that it is either a different system (which might have a higher security
level) or it might present messages on the screen that appear to stem from the host operating system.
In order to protect the user against the abovementioned security risks, the secure labeling feature has
been developed. Secure labeling is currently available only for VBoxSDL. When enabled, a portion
of the display area is reserved for a label in which a user defined message is displayed. The label
height in set to 20 pixels in VBoxSDL. The label font color and background color can be optionally
set as hexadecimal RBG color values. The following syntax is used to enable secure labeling:
VBoxSDL -securelabel -seclabelfnt ~/fonts/arial.ttf \
-seclabelsiz 14 "Windows XP" \
-seclabelfbcol 00FF00 -seclabelbgcol 00FFFF
In addition to enabling secure labeling, a TrueType font has to be supplied.
Typically, full screen resolutions are limited to certain "standard" geometries such as 1024 x 768.
Adding the secure label with a height of 20 pixels would therefore require the resolution to be 1024
x 788 which is either not possible for results in suboptimal display quality. In most cases, VBoxSDL
would chose the next higher resolution, e.g. 1280 x 1024 and the guest's screen would not cover the
whole display surface. If VBoxSDL is unable to choose a higher resolution, the secure label will be
painted on top of the guest's screen surface. In order to address this problem, a feature called "Y offset" has been implemented. This takes the height of the secure label and provides custom video
modes to the guest that are reduced by the height of the label so that guest height + label height results in a valid native display resolution. For Windows guests, the VirtualBox Guest Additions automatically provide the reduced video modes. In addition to that, the VESA BIOS has been adjusted
to duplicate its standard mode table with adjusted resolutions. The adjusted mode IDs can be calculated using the following formula:
reduced_modeid = modeid + 0x30
61
Advanced Topics
For example, in order to start Linux with 1024 x 748 x 16, the standard mode 0x117 (1024 x 768 x
16) is used as a base. The Linux video mode kernel parameter can then be calculated using:
vga = 0x200 | 0x117 + 0x30
vga = 839
The reason for duplicating the standard modes instead of only supplying the adjusted modes is that
most guest operating systems require the standard VESA modes to be fixed and refuse to start with
different modes.
When using the X.org VESA driver, custom modelines have to be calculated and added to the configuration (usually in /etc/X11/xorg.conf. A handy tool to determine modeline entries can be
found at http://www.tkk.fi/Misc/Electronics/faq/vga2rgb/calc.html.
8.5. Custom VESA resolutions
Apart from the standard VESA resolutions, the VirtualBox VESA BIOS allows you to add up to 16
custom video modes which will be reported to the guest operating system. When using Windows
guests with the VirtualBox Guest Additions, a custom graphics driver will be used instead of the
fallback VESA solution so this information does not apply.
Addition video modes can be configured for each VM using the extra data facility. The extra data
key is called CustomVideoMode<x> with x being a number from 1 to 16. Please note that modes
will be read from 1 until either the following number is not defined or 16 is reached. The following
example adds a video mode that corresponds to the native display resolution of many notebook
computers:
VBoxManage setextradata "Windows XP" \
"CustomVideoMode1" "1400x1050x16"
The VESA mode IDs for custom video modes start at 0x160. In order to use the above defined custom video mode, the following command line has be supplied to Linux:
vga = 0x200 | 0x160
vga = 864
For guest operating systems with VirtualBox Guest Additions, a custom video mode can be set using the video mode hint feature.
8.6. Releasing modifiers with VBoxSDL on Linux
When switching from a X virtual terminal (VT) to another VT using Ctrl-Alt-Fx while the
VBoxSDL window has the input focus, the guest will receive Ctrl and Alt keypress events without
receiving the corresponding key release events. This is an architectural limitation of Linux. In order
to reset the modifier keys, it is possible to send SIGUSR1 to the VBoxSDL main thread (first entry
in the ps list). For example, when switching away to another VT and saving the virtual machine
from this terminal, the following sequence can be used to make sure the VM is not saved with stuck
modifiers:
kill -usr1 <pid>
./VBoxManage controlvm "Windows 2000" savestate
62
Chapter 9. VirtualBox Application
Programming Interfaces
These are not yet documented.
63
Chapter 10. Troubleshooting
This chapter provides answers to commonly asked questions. In order to improve your user experience with VirtualBox, it is recommended to read this section to learn more about common pitfalls
and get recommendations on how to use the product.
10.1. General
10.1.1. Collecting debugging information
For problem determination, it is often important to collect debugging information which can be analyzed by VirtualBox support. This section contains information about what kind of information can
be obtained.
Every time VirtualBox starts up a VM, a log file is created containing some information about the
VM configuration and runtime events. The log file is called VBox.log and resides in the VM log file
folder. Typically this will be a directory like this:
$HOME/.VirtualBox/Machines/{machinename}/Logs
When starting a VM, the configuration file of the last run will be renamed to .1, up to .3. Sometimes when there is a problem, it is useful to have a look at the configuration. Also when requesting
support for VirtualBox, supplying the corresponding log file is mandatory.
10.1.2. Guest shows IDE errors for VDI on slow host file system
Occasionally, some host file systems provide very poor writing performance and as a consequence
cause the guest to time out IDE commands. This is normal behavior and should normally cause no
real problems, as the guest should repeat commands that have timed out. However some guests (e.g.
some Linux versions) have severe problems if a write to a VDI file takes longer than about 15
seconds. Some file systems however require more than a minute to complete a single write, if the
host cache contains a large amount of data that needs to be written.
The symptom for this problem is that the guest can no longer access its files during large write or
copying operations, usually leading to an immediate hang of the guest.
In order to work around this problem (the true fix is to use a faster file system that doesn't exhibit
such unacceptable write performance), it is possible to flush the VDI after a certain amount of data
has been written. This interval is normally infinite, but can be configured individually for each disk
of a VM using the following command:
VBoxManage setextradata <vmname>
"VBoxInternal/Devices/piix3ide/0/LUN#[x]/Config/FlushInterval" [b]
The value [x] that selects the disk is 0 for the master device on the first channel, 1 for the slave
device on the first channel, 2 for the master device on the second channel or 3 for the master device
on the second channel. Only disks support this configuration option. It must not be set for CD-ROM
drives.
The unit of the interval [b] is the number of bytes written since the last flush. The value for it must
be selected so that the occasional long write delays do not occur. Since the proper flush interval depends on the performance of the host and the host filesystem, finding the optimal value that makes
the problem disappear requires some experimentation. Values between 1000000 and 10000000 (1 to
10 megabytes) are a good starting point. Decreasing the interval both decreases the probability of
the problem and the write performance of the guest. Setting the value unnecessarily low will cost
performance without providing any benefits. An interval of 1 will cause a flush for each write operation and should solve the problem in any case, but has a severe write performance penalty.
Providing a value of 0 for [b] is treated as an infinite flush interval, effectively disabling this workaround. Removing the extra data key by specifying no value for [b] has the same effect.
64
Troubleshooting
10.1.3. Responding to guest IDE flush requests
If desired, the virtual disk images (VDI) can be flushed when the guest issues the IDE FLUSH
CACHE command. Normally these requests are ignored for improved performance. To enable
flushing, issue the following command:
VBoxManage setextradata <vmname>
"VBoxInternal/Devices/piix3ide/0/LUN#[x]/Config/IgnoreFlush" 0
The value [x] that selects the disk is 0 for the master device on the first channel, 1 for the slave
device on the first channel, 2 for the master device on the second channel or 3 for the master device
on the second channel. Only disks support this configuration option. It must not be set for CD-ROM
drives.
Note that this doesn't affect the flushes performed according to the configuration described in
10.1.2. Restoring the default of ignoring flush commands is possible by setting the value to 1 or by
removing the key.
10.2. Windows guests
10.2.1. Windows boot failures (bluescreens) after changing VM
configuration
Often, customers encounter Windows startup failures (the infamous "blue screen") after performing
configuration changes to a virtual machine which are not allowed for an already installed Windows
operating system. Depending on the presence of several hardware features, the Windows installation
program chooses special kernel and device driver versions and will fail to startup should these hardware features be removed.
Most importantly, never disable ACPI and the I/O APIC if they were enabled at installation time.
Enabling them for a Windows VM which was installed without them does not cause any harm.
However, Windows will not use these features in this case.
10.2.2. Windows 2000 installation failures
When installing Windows 2000 guests, you might run into one of the following issues:
•
Installation reboots, usually during component registration.
•
Installation fills the whole hard disk with empty log files.
•
Installation complains about a failure installing msgina.dll.
These problems are all caused by a bug in the hard disk driver of Windows 2000. After issuing a
hard disk request, there is a race condition in the Windows driver code which leads to corruption if
the operation completes too fast, i.e. the hardware interrupt from the IDE controller arrives too soon.
With physical hardware, there is a guaranteed delay in most systems so the problem is usually hidden there (however it should be possible to reproduce it on physical hardware as well). In a virtual
environment, it is possible for the operation to be done immediately (especially on very fast systems
with multiple CPUs) and the interrupt is signalled sooner than on a physical system. The solution is
to introduce an artificial delay before delivering such interrupts. This delay can be configured for a
VM using the following command:
VBoxManage setextradata <vmname>
"VBoxInternal/Devices/piix3ide/0/Config/IRQDelay" 1
This sets the delay to one millisecond. In case this doesn't help, increase it to a value between 1 and
5 milliseconds. Please note that this slows down disk performance. After installation, you should be
able to remove the key (or set it to 0).
65
Troubleshooting
10.2.3. How to record bluescreen information from Windows
guests
When Windows guests run into a kernel crash, they display the infamous bluescreen. Depending on
how Windows is configured, the information will remain on the screen until the machine is restarted
or it will reboot automatically. During installation, Windows is usually configured to reboot automatically. With automatic reboots, there is no chance to record the bluescreen information which
might be important for problem determination.
VirtualBox provides a method of halting a guest when it wants to perform a reset. In order to enable
this feature, issue the following command:
VBoxManage setextradata <vmname>
"VBoxInternal/PDM/HaltOnReset" 1
10.2.4. No networking in Windows Vista guests
Unfortunately, with Vista, Microsoft dropped support for the virtual AMD PCnet card that we are
providing to virtual machines. As a result, after installation, Vista guests initially have no networking. To fix that, download the official NDIS5 AMD driver for installation in the guest from here:
http://www.amd.com/us-en/ConnectivitySolutions/ProductInformation/0,,50_2330_6629_2452%5E24
54%5E2486,00.htm
However, the next problem will be how to get your Vista to access that driver file, as the guest has
no networking. One possible solution is to create an ISO CD-ROM that contains it and then mount
that ISO in the guest. On a Linux host, this can be easily done with this command:
mkisofs -o name-of-target-iso -R -J /path/to/folder/with/amd/driver/file
Alternatively, put the driver file on a USB stick and enable a corresponding USB filter for the VM.
10.3. Windows hosts
10.3.1. VBoxSVC out-of-process COM server issues
VirtualBox makes use of the Microsoft Component Object Model (COM) for inter and intra process
communication. This allows VirtualBox to share a common configuration among different virtual
machine processes and provide several user interface options based on a common architecture. All
global status information and configuration is maintained by the process VBoxSVC.exe which is an
out-of-process COM server. Whenever a VirtualBox process is started, it requests access to the
COM server and Windows automatically starts the process. Note that it should never be started by
the end user.
When the last process disconnects from the COM server, it will terminate itself after some seconds.
The VirtualBox configuration (XML files) is maintained and owned by the COM server and the
files are locked whenever the server runs.
In some cases - such as when a virtual machine is terminated unexpectedly - the COM server might
not notice that the client is disconnected and stay active. In other rare cases the COM server might
experience an internal error and subsequently other processes fail to initialize it. In these situations,
it is recommended to use the Windows task manager to kill the process VBoxSVC.exe.
10.3.2. CD/DVD changes not recognized
In case you have assigned a phyical CD/DVD drive to a guest and the guest does not notice when
the medium changes, make sure that the Windows media change notification (MCN) feature is not
turned
off.
This
is
a
key
in
the
Windows
registry
66
Troubleshooting
HKEY_LOCAL_MACHINE\System\CurrentControlSet\Services\Cdrom\Autorun)
which
certain applications may disable against Microsoft's advice. If it is set to 0, change it to 1 and reboot
your system. VirtualBox relies on Windows notifying it of media changes.
10.3.3. Sluggish response when using Microsoft RDP client
If connecting to a Virtual Machine via the Microsoft RDP client (called Remote Desktop Connection), there can be large delays between input (moving the mouse over a menu is the most obvious
situation) and output. This is because this RDP client collects input for a certain time before sending
it to the VRDP server built into VirtualBox.
The interval can be decreased by setting a Windows registry key to smaller values than the default
of 100. The key does not exist initially and must be of type DWORD. The unit for its values is milliseconds. Values around 20 are suitable for low-bandwidth connections between the RDP client and
server. Values around 4 can be used for a gigabit Ethernet connection. Generally values below 10
achieve a performance that is very close to that of the local input devices and screen of the host on
which the Virtual Machine is running.
Depending whether the setting should be changed for an individual user or or for the system, either
HKEY_CURRENT_USER\Software\Microsoft\Terminal Server
Client\Min Send Interval
or
HKEY_LOCAL_MACHINE\Software\Microsoft\Terminal Server
Client\Min Send Interval
can be set appropriately.
10.3.4. Running an iSCSI initiator and target on a single system
If attempting to access an iSCSI target running in a guest virtual machine with an iSCSI initiator
(e.g. Microsoft iSCSI Initiator) running on the host system, a deadlock occurs in the host OS. This is
caused by a flaw in the Windows cache manager component, and causes sluggish host system response for several minutes, followed by a "Delayed Write Failed" error message in the system tray
or in a separate message window. The guest is blocked during that period and may show error messages or become unstable. VirtualBox contains a workaround for this problem until Microsoft addresses the issue.
It is activated by setting the environment variable VBOX_DISABLE_HOST_DISK_CACHE to 1. This
can be achieved e.g. by executing the follwing command in a command prompt window before
starting VirtualBox in the same command prompt window:
set VBOX_DISABLE_HOST_DISK_CACHE=1
This decreases performance of guest disk accesses (especially writes). It does not affect the performance of other applications running on the host operating system.
10.4. Linux hosts
10.4.1. Linux kernel module refuses to load
If the VirtualBox kernel module (vboxdrv) refuses to load, i.e. you get an "Error inserting vboxdrv:
Invalid argument", check (as root) the output of the dmesg command.
In 90% of all cases, this will exhibit a problem with Linux 2.6.19 and higher, and the message will
be: "NMI watchdog active -- refused to load the kernel module! Please disable the NMI watchdog
by specifying 'nmi_watchdog=0' at kernel command line."
Add this option to your grub configuration, reboot, and the module should load.
67
Troubleshooting
10.4.2. Linux host's CD/DVD drive not found
If you have configured a virtual machine to use the host's CD/DVD drive, but this does not appear to
work, make sure that the current user has permission to access the corresponding Linux device file
(usually /dev/cdrom or similar). On most distributions, the user must be added to a corresponding
group (usually called cdrom or cdrw).
Also, if your CD/DVD device has a different name, VirtualBox may be unable to find it. On Linux
hosts, VirtualBox performs the following steps to locate your CD/DVD drives:
1.
VirtualBox examines if the environment variable VBOX_CDROM is defined (see below). If so,
VirtualBox omits all the following checks.
2.
VirtualBox tests if /dev/cdrom works.
3.
In addition, VirtualBox checks if any CD/DVD drives are currently mounted by checking /
etc/mtab.
4.
In addition, VirtualBox checks if any of the entries in /etc/fstab point to CD/DVD devices.
In other words, you can try to set VBOX_CDROM to contain a list of your CD/DVD devices, separated by colons, for example as follows:
export VBOX_CDROM='/dev/cdrom0:/dev/cdrom1'
10.4.3. Linux host's floppy not found
The previous instructions (for CD/DVD drives) apply accordingly to floppy disks, except that VirtualBox tests for /dev/fd* devices by default. This can be overridden with the VBOX_FLOPPY environment variable.
10.4.4. Strange guest IDE error messages when writing to CD/
DVD
If the experimental CD/DVD writer support is enabled with an incorrect VirtualBox, host or guest
configuration, it is possible that any attempt to access the CD/DVD writer fails and simply results in
guest kernel error messages (for Linux guests) or application error messages (for Windows guests).
VirtualBox performs the usual consistency checks when a VM is powered up (in particular it aborts
with an error message if the device for the CD/DVD writer is not writable by the user starting the
VM), but it cannot detect all misconfigurations. The necessary host and guest OS configuration is
not specific for VirtualBox, but a few frequent problems are listed here which occurred in connection with VirtualBox.
Special care must be taken to use the correct device. The configured host CD/DVD device file name
(in most cases /dev/cdrom) must point to the device that allows writing to the CD/DVD unit. For
CD/DVD writer units connected to a SCSI controller or to a IDE controller that interfaces to the
Linux SCSI subsystem (common for some SATA controllers), this must refer to the SCSI device
node (e.g. /dev/scd0). Even for IDE CD/DVD writer units this must refer to the appropriate SCSI
CD-ROM device node (e.g. /dev/scd0) if the ide-scsi kernel module is loaded. This module is
required for CD/DVD writer support with all Linux 2.4 kernels and some early 2.6 kernels. Many
Linux distributions load this module whenever a CD/DVD writer is detected in the system, even if
the kernel would support CD/DVD writers without the module. VirtualBox supports the use of IDE
device files (e.g. /dev/hdc), provided the kernel supports this and the ide-scsi module is not
loaded.
Similar rules (except that within the guest the CD/DVD writer is always an IDE device) apply to the
guest configuration. Since this setup is very common, it is likely that the default configuration of the
guest works as expected.
68
Troubleshooting
10.4.5. VBoxSVC IPC issues
On Linux, VirtualBox makes use of a custom version of Mozilla XPCOM (cross platform component object model) for inter and intra process communication. The process VBoxSVC serves as a communication hub between different VirtualBox processes and maintains the global configuration, i.e.
the XML database. When starting a VirtualBox component, the processes VBoxSVC and VirtualBoxXPCOMIPCD are started automatically. They are only accessible from the user account they are
running under. VBoxSVC owns the VirtualBox configuration database which normally resides in
~/.VirtualBox and while it is running, the configuration files are locked. Communication
between the various VirtualBox components and VBoxSVC is performed through a local domain
socket residing in /tmp/.vbox-<username>-ipc. In case there are communication problems (i.e.
a VirtualBox application cannot communicate with VBoxSVC), terminate the daemons and remove
the local domain socket directory.
10.4.6. USB not working
If USB is not working on your Linux host, make sure that the current user has permission to access
the USB filesystem (usbfs), which VirtualBox relies on to retrieve valid information about your
host's USB devices.
As usbfs is a virtual filesystem, a chmod on /proc/bus/usb has no effect. The permissions for
usbfs can therefore only be changed by editing the /etc/fstab file.
For example, most Linux distributions have a user group called usb or similar, of which the current
user must be a member. To give all users of that group access to usbfs, make sure the following line
is present:
# 85 is the USB group
none
/proc/bus/usb
usbfs
devgid=85,devmode=664
0
0
Replace 85 with the group ID that matches your system (search /etc/group for "usb" or similar).
Alternatively, if you don't mind the security hole, give all users access to USB by changing "664" to
"666".
The various distributions are very creative from which script the usbfs filesystem is mounted.
Sometimes the command is hidden in unexpected places. For SuSE 10.0 the mount command is part
of the udev configuration file /etc/udev/rules.d/50-udev.rules. As this distribution has no
user group called usb, you may e.g. use the vboxusers group which was created by the VirtualBox
installer. Since group numbers are allocated dynamically, the following example uses 85 as a placeholder. Modify the line containing (a linebreak has been inserted to improve readability)
DEVPATH="/module/usbcore", ACTION=="add",
RUN+="/bin/mount -t usbfs usbfs /proc/bus/usb"
and add the necessary options (make sure that everything is in a single line):
DEVPATH="/module/usbcore", ACTION=="add",
RUN+="/bin/mount -t usbfs usbfs /proc/bus/usb -o devgid=85,devmode=664"
Debian Etch has the mount command in /etc/init.d/mountkernfs.sh. Since that distribution
has no group usb, it is also the easiest solution to allow all members of the group vboxusers.
Modify the line
domount usbfs usbdevfs /proc/bus/usb -onoexec,nosuid,nodev
so that it contains
domount usbfs usbdevfs /proc/bus/usb -onoexec,nosuid,nodev,devgid=85,devmode=664
As usual, replace the 85 with the actual group number which should get access to USB devices.
Other distributions do similar operations in scripts stored in the /etc/init.d directory.
69
Chapter 11. ChangeLog
This section summarizes the changes between VirtualBox versions. Note that this is not a detailed
changelog and not all changes are listed. VirtualBox version numbers consist of three numbers separated by dots where the first number represents the major version, the 2nd number the minor version and the 3rd one the build number. Build numbers of official releases are always even. An odd
build number represents an internal development or test build.
11.1. Version 1.3.8 (2007-03-14)
•
Windows installer: Fixed installation problem if UAC is active
•
Linux installer: added RPM for rhel4 and Mandriva 2007.1
•
Linux installer: Remove any old vboxdrv modules in /lib/modules/*/misc
•
Linux installer: Many small improvements for .deb and .rpm packages
•
Linux installer: Improved setup of kernel module
•
GUI: Host-Fn sends Ctrl-Alt-Fn to the guest (Linux guest VT switch)
•
GUI: fixed setting for Internal Networking
•
GUI: show correct audio backend on Windows (dsound)
•
GUI: improved error messages if the kernel module is not accessible
•
GUI: never fail to start the GUI if the kernel module is not accessible
•
VMM: Fixed occasional crashes when shutting down Windows TAP device
•
VMM: fixed issues with IBM's 1.4.2 JVM in Linux guests
•
RDP: fixed color encoding with 24bpp
•
BIOS: zero main memory on reboot
•
BIOS: added release logging
•
USB: fixed parsing of certain devices to prevent VBoxSVC crashes
•
USB: properly wakeup suspended ports
•
USB: fixed a problem with unplugged USB devices during suspend
•
Audio: fixed crashes on Vista hosts
•
NAT: allow configuration of incoming connections (aka port mapping)
•
Network: hard reset network device on reboot
•
iSCSI: Fixed a hang of unpaused VMs accessing unresponsible iSCSI disks
•
Linux Additions: Support Xorg 7.2.x
•
Linux Additions: Fixed default video mode if all other modes are invalid
•
Linux Additions: Set default DPI to 100,100
•
Linux Additions: fixed initialization of video driver on X server reset
70
ChangeLog
11.2. Version 1.3.6 (2007-02-20)
•
Windows installer: perform installation for all users instead of just the current user (old behavior
still available)
•
Linux installer: fixed license display to not block installation
•
Linux installer: added RPM for openSUSE 10.2
•
GUI: fixed problems with several keyboard layouts on Linux hosts
•
GUI: added online help on Linux hosts (using kchmviewer)
•
GUI: fixed handle leak on Windows hosts
•
Graphics: increased VRAM limit to 128MB
•
BIOS: fixed CD/DVD-ROM detection in Windows Vista guests
•
VMM: fixed incompatibility with OpenBSD 4.0
•
VDI: fixed issues with snapshot merging
•
Network: fixed incompatibility between Vista UAC and Host Interface Networking
•
Network: fixed issues with Windows NT 4.0 guests
•
Audio: fixed problem with ALSA on Linux before 2.6.18 causing system reboots
•
RDP: added support for MS RDP 6.0 clients
•
RDP: fixed issue with PAM authentication on certain distributions
•
RDP: fixed sporadic disconnects with MS RDP clients
•
iSCSI: improved behavior when pausing a VM with iSCSI connections
•
iSCSI: improved read timeout handling
11.3. Version 1.3.4 (2007-02-12)
•
General: fixed unresolved symbol issue on Windows 2000 hosts
•
General: added warnings at VirtualBox startup when there is no valid Linux kernel module
•
General: fixed problem with unrecognized host CDROM/DVD drives on Linux
•
General: fixed compatibility issue with SELinux
•
GUI: improved USB user interface, easier filter definitions, menu to directly attach specific
devices
•
GUI: added VM settings options for VRDP
•
GUI: fixed GDI handle leak on Windows hosts
•
GUI: worked around issue in the Metacity window manager (GNOME) leading to unmovable
VM windows
•
GUI: show an information dialog before entering fullscreen mode about how to get back
71
ChangeLog
•
GUI: several fixes and improvements
•
VMM: fixed occasional crashes when shutting down a Windows guest
•
VMM: fixed crash while loading Xorg on openSUSE 10.2
•
VMM: fixed problems with OpenBSD 3.9 and 4.0
•
VMM: fixed crash while loading XFree86 in SUSE 9.1
•
VMM: fixed Debian 3.1 (Sarge) installation problem (network failure)
•
VMM: fixed crash during SUSE 10.2 installation
•
VMM: fixed crash during Ubuntu 7.04 RC boot
•
VMM: fixed crash during ThinClientOS (Linux 2.4.33) bootup
•
ATA/IDE: pause VM when host disk is full and display message
•
ATA/IDE: fixed incompatibility with OpenSolaris 10
•
VDI containers: do not allocate blocks when guest only writes zeros to it (size optimization
when zeroing freespace prior to compacting)
•
CDROM/DVD: fixed media recognition by Linux guests
•
Network: corrected reporting of physical interfaces (fixes Linux guest warnings)
•
Network: fixed IRQ conflict causing occassional major slowdowns with XP guests
•
Network: significantly improved send performance
•
Audio: added mixer support to the AC'97 codec (master volume only)
•
Audio: added support for ALSA on Linux (native, no OSS emulation)
•
iSCSI: improved LUN handling
•
iSCSI: fixed hang due to packet overflow
•
iSCSI: pause VM on iSCSI connection loss
•
Linux module: never fail unloading the module (blocks Ubuntu/Debian uninstall)
•
Linux module: improved compatibility with NMI watchdog enabled
•
Windows Additions: fixed hardware mouse pointer with Windows 2003 Server guests
•
Linux Additions: compile everything from sources instead of using precompiled objects
•
Linux Additions: better compatibility with older glibc versions
•
Linux Additions: when uninstalling, only delete the files we put there during installation, don't
remove the directory recursively to prevent unwanted data loss
•
Linux Installer: added support for Slackware
•
Linux Additions: added support for Linux 2.4.28 to 2.4.34
•
RDP: fixed sporadic disconnects with MS RDP clients
•
RDP: fixed race condition during resolution resize leading to rare crashes
72
ChangeLog
11.4. Version 1.3.2 (2007-01-15)
•
General: Added experimental support for Windows Vista as a host
•
General: Added support for Windows Vista as a guest
•
GUI: numerous improvements including a redesigned media manager
•
BIOS: added DMI information for recent Linux kernels
•
VMM: experimental support for AMD SVM hardware virtualization extensions
•
VMM: significant performance improvements for Linux 2.6 guests
•
VMM: performance improvements for Windows guests
•
Network: fixed issues with DOS guests
•
Network: fixed creation of more than one host interface during process lifetime on Windows
•
VBoxManage: added support for compacting VDI files (requires zeroing freespace in the guest)
•
API: startup even when a VM configuration file is inaccessible or corrupted
•
API: faster startup using lazy media access checking
•
Linux Additions: fixed several installation issues and added better error checks
•
Linux Additions: added support for X.org 7.1
•
Installer: added packages for Ubuntu 6.10 (Edgy Eft), Ubuntu 6.06 LTS (Dapper Drake) and
Debian 4.0 (Etch)
11.5. Version 1.2.4 (2006-11-16)
Several bug fixes that accidentially didn't make it into 1.2.2
11.6. Version 1.2.2 (2006-11-14)
Note: Guest Additions have to be updated for the enhanced VRDP features to work.
•
Linux Additions: improved compatibility with Red Hat distributions
•
Linux Additions: enhanced display performance, solved several issues
•
Linux Additions: added color pointer support
•
Linux Additions: added support for X.org 7.x
•
VMM: fixed sporadic mouse reset problem
•
VMM: fixed several issues with Linux guests
•
VMM: significant performance improvements for Linux 2.6 guests
•
VMM: significant general performance improvements
•
VMM: fixed sporadic reboot problems (logo hang)
•
VMM: added support for Intel VT-x (aka Vanderpool)
73
ChangeLog
•
VMM: experimental support for IBM OS/2 Warp (requires VT-x to be enabled)
•
USB: added support for isochronous transfers (webcams, audio, etc.)
•
USB: fixed problem with devices not showing up after a guest reboot
•
USB: fixed several issues
•
BIOS: fixed use of fourth boot device
•
BIOS: added boot menu support
•
BIOS: added support for disks up to 2 Terabytes
•
VRDP: significantly enhanced performance and reduced bandwidth usage through new acceleration architecture
•
VBoxManage: added support for capturing network traffic
•
GUI: added fullscreen mode
•
GUI: fixed several problems
11.7. Version 1.1.12 (2006-11-14)
•
Additions: enabled more display modes for X.org 7.x
•
VMM: stability improvements
•
VMM: resolved excessive performance degradation caused by Symantec Antivirus
•
iSCSI: fixed memory corruption issue
•
VBoxSDL: made hostkey configurable
•
VRDP: report error in case binding to the port fails
•
VRDP: added mouse wheel support
•
NAT: significant performance improvements
•
Network: stability fixes
•
Network: significant performance improvements
•
ACPI: improved host power status reporting
•
PXE: added support for Microsoft RIS / ProxyDHCP
•
PXE: fixed several issues, added diagnostic messages
11.8. Version 1.1.10 (2006-07-28)
•
IDE: added workaround for Acronis TrueImage (violates IDE specification)
•
IDE: resolved issues with certain Linux guests
•
ACPI: further improved host power status reporting
74
ChangeLog
•
API: fixed several race conditions and improved reliability
•
API: increased maximum guest RAM size to 2GB (Linux host) and 1.2GB (Windows host)
•
USB: added option to set the OHCI timer rate
•
VMM: fixed several issues
•
VRDP: fixed infinite resize loop
•
GUI: changed the default host key to Right Control
11.9. Version 1.1.8 (2006-07-17)
•
IDE: new ATA implementation with improved performance, reliability and better standards
compliance
•
IDE: added experimental support for ATAPI passthrough (to use CD/DVD burners inside VMs)
•
VMM: fixed user mode IOPL handling (hwclock failure)
•
VMM: fixed crashes upon termination in Linux X servers
•
VMM: fixed problems with Knoppix 5.0 (and other Linux kernels 2.6.15+)
•
VMM: improved handling of self modifying code (aka Linux 2.6.15+ errors)
•
VMM: introduce release logging for better servicability
•
VMM: significant performance improvements, especially for Linux 2.6 guests
•
VRDP: several issues have been fixed
•
VRDP: fixed enhanced rdesktop to build correctly under Linux 2.6.15+
•
Additions: added support for SUSE 10.1 and Fedora Core 5
•
NAT: improved performance and stability
•
NAT: handle host IP configuration changes at runtime
•
VBoxManage: made VRDP authentication configurable
•
VDI: added workaround against possible Windows host deadlocks caused by a sychronisation
flaw in Windows
•
ACPI: improved host power status reporting
11.10. Version 1.1.6 (2006-04-18)
•
ACPI: added workaround for XP SP2 crash in intelppm.sys (the real problem is a bug in this
driver)
•
IDE: added support for image files of up to 8 terabytes
•
API: fixed several race conditions on SMP systems
•
Network: significant performance improvements
75
ChangeLog
•
VRDP: fixed several issues with USB redirection
•
IDE: added workaround for Windows 2000 installation problems due to a bug in the Windows
disk driver (see troubleshooting section)
•
VRDP: provide extensive connection information (also exposed through VBoxManage)
•
Linux module: added support for Linux 2.6.16
•
VBoxManage: improved support for immutable disk images
•
iSCSI: several fixes
•
USB: several fixes
•
VBoxSDL: added switch for fixed video mode and guest image centering
•
VMM: improved performance of Linux 2.6.x guests
11.11. Version 1.1.4 (2006-03-09)
Note: The configuration file format has been changed. After applying this update, execute "VBoxManage updatesettings" to convert your configuration to the new format. Note: Guest Additions
have to be updated.
•
General: added support for multi-generation snapshots
•
VMM: fixed Linux guest reboot regression
•
VRDP: added client authentication through external authentication libraries (WinLogon and
PAM interfaces are provided as sample code)
•
VRDP: close TCP connection immediately when receiving bad data from the remote side
•
VRDP: improved Microsoft RDP client support
•
XPCOM: fixed race condition on SMP systems that could lead to hung client processes (Linux
host)
•
API: fixed race condition on SMP systems
•
Network: added AMD PC-Net II 100MBit network card (Am79C973)
•
Network: added PXE boot ROM for network boot
•
Audio: fixed regression with Windows 2000 guests
•
Audio: pause playback when VM is paused
•
iSCSI: added standards compliant iSCSI initiator for transparent access of iSCSI targets
•
VBoxSDL: ship on Windows as well
•
VBoxManage: added command to clone a VDI file to another one having a different UUID
•
Additions: added Linux additions (timesync, mouse pointer integration and graphics driver)
•
Additions: added Shared Folders for Windows guests (except NT)
•
Linux module: fixed compilation problem on SUSE 10 system
•
Linux installer: added custom shell script installer
76
ChangeLog
11.12. Version 1.1.2 (2006-02-03)
Note: Guest Additions have to be updated. The installation method has changed.
•
BIOS: fixed CMOS checksum calculation (to avoid guest warnings)
•
BIOS: improved APM support (to avoid guest warnings)
•
IDE: Linux 2.6.14+ and OpenBSD now operate the controller in UDMA mode by default
•
VMM: fixed hang when rebooting Windows 2000 guests with enabled audio adapter
•
VMM: fixed random user mode crashes with OpenBSD guests
•
VMM: increased timing accuracy (PIT, RTC), reduced PIT query overhead
•
VMM: tamed execution thread to make GUI more responsive (esp. when executing real mode
guest code such as bootloaders)
•
VMM: significant performance enhancements for OpenBSD guests
•
VMM: several performance enhancements
•
VMM: improved memory layout on Windows hosts to allow for large amounts of guest RAM
•
VMM: significantly improved VM execution state saving and restoring (at the expense of state
file sizes)
•
ACPI: fixed Windows bluescreen when assigning more than 512MB RAM to a guest
•
ACPI: correctly report battery state when multiple batteries are present on the host (Linux hosts)
•
ACPI: enabled by default for newly created VMs
•
APIC: added optional I/O APIC
•
Graphics: fixed distortion when changing guest color depth without changing the resolution
•
VRDP: added support for remote USB (requires special rdesktop client)
•
VRDP: added support for the Microsoft RDP client
•
VRDP: improved audio support
•
Floppy: controller can be disabled
•
Floppy: fixed "no disk in drive" reporting
•
Floppy: fixed writing to floppy images
•
VBoxManage: restructured USB device filter syntax to make it more intuitive
•
VBoxManage: added command for setting guest logon credentials
•
Additions: added installer for Windows 2000/XP/2003 guests
•
Additions: added custom GINA module which hooks MSGINA and can perform automatic logons using credentials retrieved from the VMM
•
Documentation: added draft of VirtualBox user manual
11.13. Version 1.0.50 (2005-12-16)
77
ChangeLog
Note: Guest Additions have to be updated
•
VMM: added support for OpenBSD guests
•
VMM: fixed a memory leak
•
Network: added Internal Networking (to directly wire VMs without using host interfaces and
making the traffic visible on the host)
•
Network: fixed crash/hang at exit with TAP on Linux
•
Graphics: added support for additional custom VESA modes
•
Graphics: added support for VESA modes with y offset
•
VRDP: added support for remote audio (PCM encoding)
•
USB: fixed several potential crashes
•
USB: fixed revision filter matching
•
USB: fixed support for devices with integrated USB hubs
11.14. Version 1.0.48 (2005-11-23)
Note: The configuration has to be deleted as the format has changed. On Linux, issue rm -rf
~/.VirtualBox. On Windows, remove the directory C:\Documents
and
Settings\<username>\.VirtualBox. If you fail to do so, VirtualBox will not startup. Note: Guest
Additions have to be updated
•
VMM: fixed a Linux 2.6 guest panic on certain P4 CPUs
•
VMM: performance improvements
•
Graphics: fixed y offset handling in dynamic resolution mode (secure labeling support)
•
VDI: added support for immutable independent images (part of the upcoming snapshot feature)
•
Additions: added VBoxControl command line utility to get/set the guest video acceleration
status
•
Additions: video acceleration is turned off by default, use VBoxControl to enable it. It usually
helps for VRDP performance.
•
GUI: DirectDraw support for faster display handling on Win32.
•
GUI: allow creation and assignment of disk images in the New VM wizard.
•
USB: fixed high CPU load on certain Linux distributions
•
VBoxSDL: fixed several secure labeling issues (crash at exit, protection against guest video
modes greater than what SDL provides on the host)
•
VBoxManage: convert command line parameters from the current codepage to Unicode
11.15. Version 1.0.46 (2005-11-04)
Note: Guest Additions have to be updated
78
ChangeLog
•
Linux: VirtualBox binaries can now be started from directories other than the installation directory
•
VMM: added support for PAE guest mode
•
VMM: added support for hosts running in NX (No Execute) / DEP (Data Execution Prevention)
mode
•
Graphics: fixes for dynamic resolution handling
•
Linux module: yet another kernel panic fix due to weird patches in RedHat Enterprise Linux 4
Update 2
•
VBoxSVC: if VBOX_USER_HOME is set, look for configuration in this directory (default:
$HOME/.VirtualBox)
11.16. Version 1.0.44 (2005-10-25)
Note: Guest Additions have to be updated.
•
Installer: greatly improved Windows installer, fixed uninstall and perform driver and COM registration through MSI
•
VBoxManage: added commands to create and delete Win32 Host Interface Networking adapters
•
VDI: updated virtual disk image format (for newly created images; old images continue to work)
with enhanced write performance and support for the upcoming snapshot feature
•
Network: performance improvements
•
Graphics: added hardware acceleration to virtual graphics adapter and corresponding Guest Additions driver
•
Graphics/Additions/GUI: added dynamic resizing support
•
Graphics: added workaround for buggy VESA support in Windows Vista/Longhorn
•
VRDP: performance and stability improvements; added support for graphics acceleration architecture
•
USB: restructured USB subsystem; added support for filters to autocapture devices that meet
defined criteria
•
GUI: added mouse wheel support
•
VMM: added support for PAE host mode
11.17. Version 1.0.42 (2005-08-30)
Note: The configuration has to be deleted as the format has changed. On Linux, issue rm -rf
~/.VirtualBox. On Windows, remove the directory C:\Documents
and
Settings\<username>\.VirtualBox. If you fail to do so, VirtualBox will not startup. Note: Guest
Additions have to be updated.
•
USB: added USB support for Windows hosts
•
Network: renamed TUN to "Host Interface Networking" and TAP on Linux
•
Network: added support for Host Interface Networking on Windows hosts
79
ChangeLog
•
Network: added "cable connected" property to the virtual network cards
•
Floppy: added a virtual floppy drive to the VM and support for attaching floppy images and capturing host floppy drives
•
DVD/CD: added host CD/DVD drive support
•
BIOS: added boot order support
•
Saved states: made location configurable (default, global setting, machine specific setting, including VBoxManage command support)
•
VMM: added support for host CPUs without FXSR (e.g. Via Centaur)
•
VMM: increased performance of Linux 2.6 guests
•
VMM: improved timing
•
VMM: fixed traps in XP guests with ACPI enabled
•
VBoxManage: added remote session start function (tstHeadless has been removed from the distribution)
•
VBoxManage: restructured commands, added numerous improvements
•
GUI: propagate hostkey change to all running instances
•
GUI: perform image access tests asynchronously
•
GUI: added boot order support
•
GUI: user interface redesign
11.18. Version 1.0.40 (2005-06-17)
Note: The configuration has to be deleted as the format has changed. On Linux, issue rm -rf
~/.VirtualBox. On Windows, remove the directory C:\Documents
and
Settings\<username>\.VirtualBox. If you fail to do so, VirtualBox will not startup. Note: Guest
Additions have to be updated.
•
SDK: ship VirtualBox development tools and sample program
•
BIOS: made startup logo animation configurable for OEM customers
•
BIOS: fixed network card detection under DOS
•
Graphics: fixed VESA modes in XP and XFree86/X.org
•
Network: fixed Linux guest issues
•
Network: fixed NAT DHCP server to work with MS-DOS TCP/IP
•
Network: fixed performance issue under heavy guest CPU load
•
Network: fixed errors with more than one network card
•
USB: added experimental USB support for Linux hosts
•
VMM: fixed DOS A20 gate handling in real mode
•
VMM: fixed TSS IO bitmap handling (crash in Debian/Knoppix hardware detection routine)
80
ChangeLog
•
VMM: fixed IO issue which broke VESA in X11
•
VMM: performance improvements for Linux guests
•
VMM: added local APIC support
•
VBoxSDL: added pointer shape support and use host pointer in fullscreen mode if available
•
GUI: determine system parameters (e.g. maximum VDI size) using the API
•
GUI: added detailed error information dialogs
•
GUI: special handling of inaccessible media
•
API: better error message handling, provide system parameters, handle inaccessible media
•
Guest Additions: implemented full pointer shape support for all pointer color depths including
alpha channel
•
VBoxManage: several command extensions
11.19. Version 1.0.39 (2005-05-05)
Note: Guest Additions have to be updated.
•
Linux: converted XPCOM runtime to a single shared object
•
Linux: fixed SIGALRM process crash on certain distributions
•
VMM: fixed Linux guests with grsecurity (address space scrambling)
•
ACPI: added experimental ACPI support
•
VRDP: added shadow buffer for reduced bandwidth usage
•
VRDP: added support for pointer shapes and remote pointer cache
•
GUI: added support for pointer shapes
•
Windows Additions: added support for high resolution video modes, including multi screen
modes (2, 3 and 4 screens)
•
VBoxManage: added new command line tool to automate simple administration tasks without
having to write application code
11.20. Version 1.0.38 (2005-04-27)
•
GUI: fixed creation of disk images larger than 4GB
•
GUI: added network and audio configuration panels
•
GUI: several keyboard issues fixed
•
VBoxSDL: fixed -tunfd handling and added -tundev (Linux host)
•
IDE: significant performance improvements in DMA modes
•
Video: VRAM size is now configurable (1MB - 128MB; default 4MB)
81
ChangeLog
•
VMM: fixed several crashes and hangs while installing certain builds of Windows 2000 and XP
•
VMM: allow guests to have more than 512MB of RAM
•
VMM: resolved compatibility issues with SMP systems (Windows Host)
•
VRDP: process cleanup on Linux fixed
•
Linux module: fixed build error on Red Hat 2.4.21-15-EL
•
NT Additions: fixed installation and a trap
•
Win2k/XP Additions: fixed installation
11.21. Version 1.0.37 (2005-04-12)
Initial build with changelog.
82
Appendix A. 3rd party licenses
InnoTek VirtualBox incorporates materials from several Open Source software projects. Therefore
the use of these materials by VirtualBox is governed by different Open Source licenses. This document reproduces these licenses and provides a list of the materials used and their respective licensing conditions. Section 1 contains a list of the materials used. Section 2 reproduces the applicable
Open Source licenses. For each material, a reference to its license is provided.
A.1. Materials
•
VirtualBox contains portions of QEMU which is governed by licenses A.2.1 and A.2.2 and
(C) 2003-2005 Fabrice Bellard Copyright (c) 2004-2005 Vassili Karpov (malc) Copyright (c)
2004 Antony T Curtis Copyright (c) 2003 Jocelyn Mayer
•
VirtualBox contains code which is governed by license A.2.1 and
Copyright 2004 by the Massachusetts Institute of Technology.
•
VirtualBox contains code of the BOCHS VGA BIOS which is governed by license A.2.2 and
Copyright (C) 2001, 2002 the LGPL VGABios developers Team.
•
VirtualBox contains code of the BOCHS ROM BIOS which is governed by license A.2.2 and
Copyright (C) 2002 MandrakeSoft S.A. Copyright (C) 2004 Fabrice Bellard Copyright (C) 2005
Struan Bartlett.
•
VirtualBox contains the zlib library which is governed by license A.2.3 and
Copyright (C) 1995-2003 Jean-loup Gailly and Mark Adler.
•
VirtualBox contains Xerces which is governed by license A.2.4 and for which the following attributions apply:
"This product includes software developed by The Apache Software Foundation
(http://www.apache.org/). Portions of this software were originally based on the following: software copyright (c) 1999, IBM Corporation., http://www.ibm.com."
•
VirtualBox contains Xalan which is governed by license A.2.4 and for which the following attributions apply:
"This product includes software developed by The Apache Software Foundation
(http://www.apache.org/). Portions of this software were originally based on the following: software copyright (c) 1999, IBM Corporation., http://www.ibm.com."
•
VirtualBox may contain OpenSSL which is governed by license A.2.5 and
Copyright (C) 1995-1998 Eric Young ([email protected]). This product includes software
written by Tim Hudson ([email protected]).
•
VirtualBox may contain NSPR and XPCOM which is governed by license A.2.6 and
Copyright (C) The Authors.
•
VirtualBox contains Slirp which is governed by license A.2.7 and was written by Danny Gasparovski.
Copyright (c), 1995,1996 All Rights Reserved.
•
VirtualBox contains liblzf which is governed by license A.2.8 and
83
3rd party licenses
Copyright (c) 2000-2005 Marc Alexander Lehmann <[email protected]>
•
VirtualBox contains Etherboot which is governed by license A.2.9 with the exception that aggregating Etherboot with another work does not require the other work to be released under the
same license (see http://etherboot.sourceforge.net/clinks.html). Etherboot is
Copyright (c) Etherboot team.
A.2. Licenses
A.2.1. X Consortium License (X11)
Permission is hereby granted, free of charge, to any person obtaining a copy
of this software and associated documentation files (the "Software"), to deal
in the Software without restriction, including without limitation the rights
to use, copy, modify, merge, publish, distribute, sublicense, and/or sell
copies of the Software, and to permit persons to whom the Software is
furnished to do so, subject to the following conditions:
The above copyright notice and this permission notice shall be included in
all copies or substantial portions of the Software.
THE SOFTWARE IS PROVIDED "AS IS", WITHOUT WARRANTY OF ANY KIND, EXPRESS OR
IMPLIED, INCLUDING BUT NOT LIMITED TO THE WARRANTIES OF MERCHANTABILITY,
FITNESS FOR A PARTICULAR PURPOSE AND NONINFRINGEMENT. IN NO EVENT SHALL
THE AUTHORS OR COPYRIGHT HOLDERS BE LIABLE FOR ANY CLAIM, DAMAGES OR OTHER
LIABILITY, WHETHER IN AN ACTION OF CONTRACT, TORT OR OTHERWISE, ARISING FROM,
OUT OF OR IN CONNECTION WITH THE SOFTWARE OR THE USE OR OTHER DEALINGS IN
THE SOFTWARE.
A.2.2. GNU Lesser General Public License (LGPL)
GNU LESSER GENERAL PUBLIC LICENSE
Version 2.1, February 1999
Copyright (C) 1991, 1999 Free Software Foundation, Inc.
59 Temple Place, Suite 330, Boston, MA 02111-1307 USA
Everyone is permitted to copy and distribute verbatim copies
of this license document, but changing it is not allowed.
[This is the first released version of the Lesser GPL. It also counts
as the successor of the GNU Library Public License, version 2, hence
the version number 2.1.]
Preamble
The licenses for most software are designed to take away your
freedom to share and change it. By contrast, the GNU General Public
Licenses are intended to guarantee your freedom to share and change
free software--to make sure the software is free for all its users.
This license, the Lesser General Public License, applies to some
specially designated software packages--typically libraries--of the
Free Software Foundation and other authors who decide to use it. You
can use it too, but we suggest you first think carefully about whether
this license or the ordinary General Public License is the better
strategy to use in any particular case, based on the explanations below.
When we speak of free software, we are referring to freedom of use,
not price. Our General Public Licenses are designed to make sure that
you have the freedom to distribute copies of free software (and charge
for this service if you wish); that you receive source code or can get
it if you want it; that you can change the software and use pieces of
it in new free programs; and that you are informed that you can do
these things.
To protect your rights, we need to make restrictions that forbid
distributors to deny you these rights or to ask you to surrender these
84
3rd party licenses
rights. These restrictions translate to certain responsibilities for
you if you distribute copies of the library or if you modify it.
For example, if you distribute copies of the library, whether gratis
or for a fee, you must give the recipients all the rights that we gave
you. You must make sure that they, too, receive or can get the source
code. If you link other code with the library, you must provide
complete object files to the recipients, so that they can relink them
with the library after making changes to the library and recompiling
it. And you must show them these terms so they know their rights.
We protect your rights with a two-step method: (1) we copyright the
library, and (2) we offer you this license, which gives you legal
permission to copy, distribute and/or modify the library.
To protect each distributor, we want to make it very clear that
there is no warranty for the free library. Also, if the library is
modified by someone else and passed on, the recipients should know
that what they have is not the original version, so that the original
author's reputation will not be affected by problems that might be
introduced by others.
Finally, software patents pose a constant threat to the existence of
any free program. We wish to make sure that a company cannot
effectively restrict the users of a free program by obtaining a
restrictive license from a patent holder. Therefore, we insist that
any patent license obtained for a version of the library must be
consistent with the full freedom of use specified in this license.
Most GNU software, including some libraries, is covered by the
ordinary GNU General Public License. This license, the GNU Lesser
General Public License, applies to certain designated libraries, and
is quite different from the ordinary General Public License. We use
this license for certain libraries in order to permit linking those
libraries into non-free programs.
When a program is linked with a library, whether statically or using
a shared library, the combination of the two is legally speaking a
combined work, a derivative of the original library. The ordinary
General Public License therefore permits such linking only if the
entire combination fits its criteria of freedom. The Lesser General
Public License permits more lax criteria for linking other code with
the library.
We call this license the "Lesser" General Public License because it
does Less to protect the user's freedom than the ordinary General
Public License. It also provides other free software developers Less
of an advantage over competing non-free programs. These disadvantages
are the reason we use the ordinary General Public License for many
libraries. However, the Lesser license provides advantages in certain
special circumstances.
For example, on rare occasions, there may be a special need to
encourage the widest possible use of a certain library, so that it becomes
a de-facto standard. To achieve this, non-free programs must be
allowed to use the library. A more frequent case is that a free
library does the same job as widely used non-free libraries. In this
case, there is little to gain by limiting the free library to free
software only, so we use the Lesser General Public License.
In other cases, permission to use a particular library in non-free
programs enables a greater number of people to use a large body of
free software. For example, permission to use the GNU C Library in
non-free programs enables many more people to use the whole GNU
operating system, as well as its variant, the GNU/Linux operating
system.
Although the Lesser General Public License is Less protective of the
users' freedom, it does ensure that the user of a program that is
linked with the Library has the freedom and the wherewithal to run
that program using a modified version of the Library.
The precise terms and conditions for copying, distribution and
modification follow. Pay close attention to the difference between a
"work based on the library" and a "work that uses the library". The
former contains code derived from the library, whereas the latter must
be combined with the library in order to run.
85
3rd party licenses
GNU LESSER GENERAL PUBLIC LICENSE
TERMS AND CONDITIONS FOR COPYING, DISTRIBUTION AND MODIFICATION
0. This License Agreement applies to any software library or other
program which contains a notice placed by the copyright holder or
other authorized party saying it may be distributed under the terms of
this Lesser General Public License (also called "this License").
Each licensee is addressed as "you".
A "library" means a collection of software functions and/or data
prepared so as to be conveniently linked with application programs
(which use some of those functions and data) to form executables.
The "Library", below, refers to any such software library or work
which has been distributed under these terms. A "work based on the
Library" means either the Library or any derivative work under
copyright law: that is to say, a work containing the Library or a
portion of it, either verbatim or with modifications and/or translated
straightforwardly into another language. (Hereinafter, translation is
included without limitation in the term "modification".)
"Source code" for a work means the preferred form of the work for
making modifications to it. For a library, complete source code means
all the source code for all modules it contains, plus any associated
interface definition files, plus the scripts used to control compilation
and installation of the library.
Activities other than copying, distribution and modification are not
covered by this License; they are outside its scope. The act of
running a program using the Library is not restricted, and output from
such a program is covered only if its contents constitute a work based
on the Library (independent of the use of the Library in a tool for
writing it). Whether that is true depends on what the Library does
and what the program that uses the Library does.
1. You may copy and distribute verbatim copies of the Library's
complete source code as you receive it, in any medium, provided that
you conspicuously and appropriately publish on each copy an
appropriate copyright notice and disclaimer of warranty; keep intact
all the notices that refer to this License and to the absence of any
warranty; and distribute a copy of this License along with the
Library.
You may charge a fee for the physical act of transferring a copy,
and you may at your option offer warranty protection in exchange for a
fee.
2. You may modify your copy or copies of the Library or any portion
of it, thus forming a work based on the Library, and copy and
distribute such modifications or work under the terms of Section 1
above, provided that you also meet all of these conditions:
a) The modified work must itself be a software library.
b) You must cause the files modified to carry prominent notices
stating that you changed the files and the date of any change.
c) You must cause the whole of the work to be licensed at no
charge to all third parties under the terms of this License.
d) If a facility in the modified Library refers to a function or a
table of data to be supplied by an application program that uses
the facility, other than as an argument passed when the facility
is invoked, then you must make a good faith effort to ensure that,
in the event an application does not supply such function or
table, the facility still operates, and performs whatever part of
its purpose remains meaningful.
(For example, a function in a library to compute square roots has
a purpose that is entirely well-defined independent of the
application. Therefore, Subsection 2d requires that any
application-supplied function or table used by this function must
be optional: if the application does not supply it, the square
root function must still compute square roots.)
These requirements apply to the modified work as a whole.
86
If
3rd party licenses
identifiable sections of that work are not derived from the Library,
and can be reasonably considered independent and separate works in
themselves, then this License, and its terms, do not apply to those
sections when you distribute them as separate works. But when you
distribute the same sections as part of a whole which is a work based
on the Library, the distribution of the whole must be on the terms of
this License, whose permissions for other licensees extend to the
entire whole, and thus to each and every part regardless of who wrote
it.
Thus, it is not the intent of this section to claim rights or contest
your rights to work written entirely by you; rather, the intent is to
exercise the right to control the distribution of derivative or
collective works based on the Library.
In addition, mere aggregation of another work not based on the Library
with the Library (or with a work based on the Library) on a volume of
a storage or distribution medium does not bring the other work under
the scope of this License.
3. You may opt to apply the terms of the ordinary GNU General Public
License instead of this License to a given copy of the Library. To do
this, you must alter all the notices that refer to this License, so
that they refer to the ordinary GNU General Public License, version 2,
instead of to this License. (If a newer version than version 2 of the
ordinary GNU General Public License has appeared, then you can specify
that version instead if you wish.) Do not make any other change in
these notices.
Once this change is made in a given copy, it is irreversible for
that copy, so the ordinary GNU General Public License applies to all
subsequent copies and derivative works made from that copy.
This option is useful when you wish to copy part of the code of
the Library into a program that is not a library.
4. You may copy and distribute the Library (or a portion or
derivative of it, under Section 2) in object code or executable form
under the terms of Sections 1 and 2 above provided that you accompany
it with the complete corresponding machine-readable source code, which
must be distributed under the terms of Sections 1 and 2 above on a
medium customarily used for software interchange.
If distribution of object code is made by offering access to copy
from a designated place, then offering equivalent access to copy the
source code from the same place satisfies the requirement to
distribute the source code, even though third parties are not
compelled to copy the source along with the object code.
5. A program that contains no derivative of any portion of the
Library, but is designed to work with the Library by being compiled or
linked with it, is called a "work that uses the Library". Such a
work, in isolation, is not a derivative work of the Library, and
therefore falls outside the scope of this License.
However, linking a "work that uses the Library" with the Library
creates an executable that is a derivative of the Library (because it
contains portions of the Library), rather than a "work that uses the
library". The executable is therefore covered by this License.
Section 6 states terms for distribution of such executables.
When a "work that uses the Library" uses material from a header file
that is part of the Library, the object code for the work may be a
derivative work of the Library even though the source code is not.
Whether this is true is especially significant if the work can be
linked without the Library, or if the work is itself a library. The
threshold for this to be true is not precisely defined by law.
If such an object file uses only numerical parameters, data
structure layouts and accessors, and small macros and small inline
functions (ten lines or less in length), then the use of the object
file is unrestricted, regardless of whether it is legally a derivative
work. (Executables containing this object code plus portions of the
Library will still fall under Section 6.)
Otherwise, if the work is a derivative of the Library, you may
distribute the object code for the work under the terms of Section 6.
87
3rd party licenses
Any executables containing that work also fall under Section 6,
whether or not they are linked directly with the Library itself.
6. As an exception to the Sections above, you may also combine or
link a "work that uses the Library" with the Library to produce a
work containing portions of the Library, and distribute that work
under terms of your choice, provided that the terms permit
modification of the work for the customer's own use and reverse
engineering for debugging such modifications.
You must give prominent notice with each copy of the work that the
Library is used in it and that the Library and its use are covered by
this License. You must supply a copy of this License. If the work
during execution displays copyright notices, you must include the
copyright notice for the Library among them, as well as a reference
directing the user to the copy of this License. Also, you must do one
of these things:
a) Accompany the work with the complete corresponding
machine-readable source code for the Library including whatever
changes were used in the work (which must be distributed under
Sections 1 and 2 above); and, if the work is an executable linked
with the Library, with the complete machine-readable "work that
uses the Library", as object code and/or source code, so that the
user can modify the Library and then relink to produce a modified
executable containing the modified Library. (It is understood
that the user who changes the contents of definitions files in the
Library will not necessarily be able to recompile the application
to use the modified definitions.)
b) Use a suitable shared library mechanism for linking with the
Library. A suitable mechanism is one that (1) uses at run time a
copy of the library already present on the user's computer system,
rather than copying library functions into the executable, and (2)
will operate properly with a modified version of the library, if
the user installs one, as long as the modified version is
interface-compatible with the version that the work was made with.
c) Accompany the work with a written offer, valid for at
least three years, to give the same user the materials
specified in Subsection 6a, above, for a charge no more
than the cost of performing this distribution.
d) If distribution of the work is made by offering access to copy
from a designated place, offer equivalent access to copy the above
specified materials from the same place.
e) Verify that the user has already received a copy of these
materials or that you have already sent this user a copy.
For an executable, the required form of the "work that uses the
Library" must include any data and utility programs needed for
reproducing the executable from it. However, as a special exception,
the materials to be distributed need not include anything that is
normally distributed (in either source or binary form) with the major
components (compiler, kernel, and so on) of the operating system on
which the executable runs, unless that component itself accompanies
the executable.
It may happen that this requirement contradicts the license
restrictions of other proprietary libraries that do not normally
accompany the operating system. Such a contradiction means you cannot
use both them and the Library together in an executable that you
distribute.
7. You may place library facilities that are a work based on the
Library side-by-side in a single library together with other library
facilities not covered by this License, and distribute such a combined
library, provided that the separate distribution of the work based on
the Library and of the other library facilities is otherwise
permitted, and provided that you do these two things:
a) Accompany the combined library with a copy of the same work
based on the Library, uncombined with any other library
facilities. This must be distributed under the terms of the
Sections above.
88
3rd party licenses
b) Give prominent notice with the combined library of the fact
that part of it is a work based on the Library, and explaining
where to find the accompanying uncombined form of the same work.
8. You may not copy, modify, sublicense, link with, or distribute
the Library except as expressly provided under this License. Any
attempt otherwise to copy, modify, sublicense, link with, or
distribute the Library is void, and will automatically terminate your
rights under this License. However, parties who have received copies,
or rights, from you under this License will not have their licenses
terminated so long as such parties remain in full compliance.
9. You are not required to accept this License, since you have not
signed it. However, nothing else grants you permission to modify or
distribute the Library or its derivative works. These actions are
prohibited by law if you do not accept this License. Therefore, by
modifying or distributing the Library (or any work based on the
Library), you indicate your acceptance of this License to do so, and
all its terms and conditions for copying, distributing or modifying
the Library or works based on it.
10. Each time you redistribute the Library (or any work based on the
Library), the recipient automatically receives a license from the
original licensor to copy, distribute, link with or modify the Library
subject to these terms and conditions. You may not impose any further
restrictions on the recipients' exercise of the rights granted herein.
You are not responsible for enforcing compliance by third parties with
this License.
11. If, as a consequence of a court judgment or allegation of patent
infringement or for any other reason (not limited to patent issues),
conditions are imposed on you (whether by court order, agreement or
otherwise) that contradict the conditions of this License, they do not
excuse you from the conditions of this License. If you cannot
distribute so as to satisfy simultaneously your obligations under this
License and any other pertinent obligations, then as a consequence you
may not distribute the Library at all. For example, if a patent
license would not permit royalty-free redistribution of the Library by
all those who receive copies directly or indirectly through you, then
the only way you could satisfy both it and this License would be to
refrain entirely from distribution of the Library.
If any portion of this section is held invalid or unenforceable under any
particular circumstance, the balance of the section is intended to apply,
and the section as a whole is intended to apply in other circumstances.
It is not the purpose of this section to induce you to infringe any
patents or other property right claims or to contest validity of any
such claims; this section has the sole purpose of protecting the
integrity of the free software distribution system which is
implemented by public license practices. Many people have made
generous contributions to the wide range of software distributed
through that system in reliance on consistent application of that
system; it is up to the author/donor to decide if he or she is willing
to distribute software through any other system and a licensee cannot
impose that choice.
This section is intended to make thoroughly clear what is believed to
be a consequence of the rest of this License.
12. If the distribution and/or use of the Library is restricted in
certain countries either by patents or by copyrighted interfaces, the
original copyright holder who places the Library under this License may add
an explicit geographical distribution limitation excluding those countries,
so that distribution is permitted only in or among countries not thus
excluded. In such case, this License incorporates the limitation as if
written in the body of this License.
13. The Free Software Foundation may publish revised and/or new
versions of the Lesser General Public License from time to time.
Such new versions will be similar in spirit to the present version,
but may differ in detail to address new problems or concerns.
Each version is given a distinguishing version number. If the Library
specifies a version number of this License which applies to it and
"any later version", you have the option of following the terms and
conditions either of that version or of any later version published by
89
3rd party licenses
the Free Software Foundation. If the Library does not specify a
license version number, you may choose any version ever published by
the Free Software Foundation.
14. If you wish to incorporate parts of the Library into other free
programs whose distribution conditions are incompatible with these,
write to the author to ask for permission. For software which is
copyrighted by the Free Software Foundation, write to the Free
Software Foundation; we sometimes make exceptions for this. Our
decision will be guided by the two goals of preserving the free status
of all derivatives of our free software and of promoting the sharing
and reuse of software generally.
NO WARRANTY
15. BECAUSE THE LIBRARY IS LICENSED FREE OF CHARGE, THERE IS NO
WARRANTY FOR THE LIBRARY, TO THE EXTENT PERMITTED BY APPLICABLE LAW.
EXCEPT WHEN OTHERWISE STATED IN WRITING THE COPYRIGHT HOLDERS AND/OR
OTHER PARTIES PROVIDE THE LIBRARY "AS IS" WITHOUT WARRANTY OF ANY
KIND, EITHER EXPRESSED OR IMPLIED, INCLUDING, BUT NOT LIMITED TO, THE
IMPLIED WARRANTIES OF MERCHANTABILITY AND FITNESS FOR A PARTICULAR
PURPOSE. THE ENTIRE RISK AS TO THE QUALITY AND PERFORMANCE OF THE
LIBRARY IS WITH YOU. SHOULD THE LIBRARY PROVE DEFECTIVE, YOU ASSUME
THE COST OF ALL NECESSARY SERVICING, REPAIR OR CORRECTION.
16. IN NO EVENT UNLESS REQUIRED BY APPLICABLE LAW OR AGREED TO IN
WRITING WILL ANY COPYRIGHT HOLDER, OR ANY OTHER PARTY WHO MAY MODIFY
AND/OR REDISTRIBUTE THE LIBRARY AS PERMITTED ABOVE, BE LIABLE TO YOU
FOR DAMAGES, INCLUDING ANY GENERAL, SPECIAL, INCIDENTAL OR
CONSEQUENTIAL DAMAGES ARISING OUT OF THE USE OR INABILITY TO USE THE
LIBRARY (INCLUDING BUT NOT LIMITED TO LOSS OF DATA OR DATA BEING
RENDERED INACCURATE OR LOSSES SUSTAINED BY YOU OR THIRD PARTIES OR A
FAILURE OF THE LIBRARY TO OPERATE WITH ANY OTHER SOFTWARE), EVEN IF
SUCH HOLDER OR OTHER PARTY HAS BEEN ADVISED OF THE POSSIBILITY OF SUCH
DAMAGES.
END OF TERMS AND CONDITIONS
A.2.3. zlib license
This software is provided 'as-is', without any express or implied
warranty. In no event will the authors be held liable for any damages
arising from the use of this software.
Permission is granted to anyone to use this software for any purpose,
including commercial applications, and to alter it and redistribute it
freely, subject to the following restrictions:
1. The origin of this software must not be misrepresented; you must not
claim that you wrote the original software. If you use this software
in a product, an acknowledgment in the product documentation would be
appreciated but is not required.
2. Altered source versions must be plainly marked as such, and must not be
misrepresented as being the original software.
3. This notice may not be removed or altered from any source distribution.
Jean-loup Gailly
[email protected]
Mark Adler
[email protected]
A.2.4. Apache License
Apache License
Version 2.0, January 2004
http://www.apache.org/licenses/
TERMS AND CONDITIONS FOR USE, REPRODUCTION, AND DISTRIBUTION
1. Definitions.
"License" shall mean the terms and conditions for use, reproduction,
and distribution as defined by Sections 1 through 9 of this document.
90
3rd party licenses
"Licensor" shall mean the copyright owner or entity authorized by
the copyright owner that is granting the License.
"Legal Entity" shall mean the union of the acting entity and all
other entities that control, are controlled by, or are under common
control with that entity. For the purposes of this definition,
"control" means (i) the power, direct or indirect, to cause the
direction or management of such entity, whether by contract or
otherwise, or (ii) ownership of fifty percent (50%) or more of the
outstanding shares, or (iii) beneficial ownership of such entity.
"You" (or "Your") shall mean an individual or Legal Entity
exercising permissions granted by this License.
"Source" form shall mean the preferred form for making modifications,
including but not limited to software source code, documentation
source, and configuration files.
"Object" form shall mean any form resulting from mechanical
transformation or translation of a Source form, including but
not limited to compiled object code, generated documentation,
and conversions to other media types.
"Work" shall mean the work of authorship, whether in Source or
Object form, made available under the License, as indicated by a
copyright notice that is included in or attached to the work
(an example is provided in the Appendix below).
"Derivative Works" shall mean any work, whether in Source or Object
form, that is based on (or derived from) the Work and for which the
editorial revisions, annotations, elaborations, or other modifications
represent, as a whole, an original work of authorship. For the purposes
of this License, Derivative Works shall not include works that remain
separable from, or merely link (or bind by name) to the interfaces of,
the Work and Derivative Works thereof.
"Contribution" shall mean any work of authorship, including
the original version of the Work and any modifications or additions
to that Work or Derivative Works thereof, that is intentionally
submitted to Licensor for inclusion in the Work by the copyright owner
or by an individual or Legal Entity authorized to submit on behalf of
the copyright owner. For the purposes of this definition, "submitted"
means any form of electronic, verbal, or written communication sent
to the Licensor or its representatives, including but not limited to
communication on electronic mailing lists, source code control systems,
and issue tracking systems that are managed by, or on behalf of, the
Licensor for the purpose of discussing and improving the Work, but
excluding communication that is conspicuously marked or otherwise
designated in writing by the copyright owner as "Not a Contribution."
"Contributor" shall mean Licensor and any individual or Legal Entity
on behalf of whom a Contribution has been received by Licensor and
subsequently incorporated within the Work.
2. Grant of Copyright License. Subject to the terms and conditions of
this License, each Contributor hereby grants to You a perpetual,
worldwide, non-exclusive, no-charge, royalty-free, irrevocable
copyright license to reproduce, prepare Derivative Works of,
publicly display, publicly perform, sublicense, and distribute the
Work and such Derivative Works in Source or Object form.
3. Grant of Patent License. Subject to the terms and conditions of
this License, each Contributor hereby grants to You a perpetual,
worldwide, non-exclusive, no-charge, royalty-free, irrevocable
(except as stated in this section) patent license to make, have made,
use, offer to sell, sell, import, and otherwise transfer the Work,
where such license applies only to those patent claims licensable
by such Contributor that are necessarily infringed by their
Contribution(s) alone or by combination of their Contribution(s)
with the Work to which such Contribution(s) was submitted. If You
institute patent litigation against any entity (including a
cross-claim or counterclaim in a lawsuit) alleging that the Work
or a Contribution incorporated within the Work constitutes direct
or contributory patent infringement, then any patent licenses
granted to You under this License for that Work shall terminate
as of the date such litigation is filed.
91
3rd party licenses
4. Redistribution. You may reproduce and distribute copies of the
Work or Derivative Works thereof in any medium, with or without
modifications, and in Source or Object form, provided that You
meet the following conditions:
(a) You must give any other recipients of the Work or
Derivative Works a copy of this License; and
(b) You must cause any modified files to carry prominent notices
stating that You changed the files; and
(c) You must retain, in the Source form
that You distribute, all copyright,
attribution notices from the Source
excluding those notices that do not
the Derivative Works; and
of any Derivative Works
patent, trademark, and
form of the Work,
pertain to any part of
(d) If the Work includes a "NOTICE" text file as part of its
distribution, then any Derivative Works that You distribute must
include a readable copy of the attribution notices contained
within such NOTICE file, excluding those notices that do not
pertain to any part of the Derivative Works, in at least one
of the following places: within a NOTICE text file distributed
as part of the Derivative Works; within the Source form or
documentation, if provided along with the Derivative Works; or,
within a display generated by the Derivative Works, if and
wherever such third-party notices normally appear. The contents
of the NOTICE file are for informational purposes only and
do not modify the License. You may add Your own attribution
notices within Derivative Works that You distribute, alongside
or as an addendum to the NOTICE text from the Work, provided
that such additional attribution notices cannot be construed
as modifying the License.
You may add Your own copyright statement to Your modifications and
may provide additional or different license terms and conditions
for use, reproduction, or distribution of Your modifications, or
for any such Derivative Works as a whole, provided Your use,
reproduction, and distribution of the Work otherwise complies with
the conditions stated in this License.
5. Submission of Contributions. Unless You explicitly state otherwise,
any Contribution intentionally submitted for inclusion in the Work
by You to the Licensor shall be under the terms and conditions of
this License, without any additional terms or conditions.
Notwithstanding the above, nothing herein shall supersede or modify
the terms of any separate license agreement you may have executed
with Licensor regarding such Contributions.
6. Trademarks. This License does not grant permission to use the trade
names, trademarks, service marks, or product names of the Licensor,
except as required for reasonable and customary use in describing the
origin of the Work and reproducing the content of the NOTICE file.
7. Disclaimer of Warranty. Unless required by applicable law or
agreed to in writing, Licensor provides the Work (and each
Contributor provides its Contributions) on an "AS IS" BASIS,
WITHOUT WARRANTIES OR CONDITIONS OF ANY KIND, either express or
implied, including, without limitation, any warranties or conditions
of TITLE, NON-INFRINGEMENT, MERCHANTABILITY, or FITNESS FOR A
PARTICULAR PURPOSE. You are solely responsible for determining the
appropriateness of using or redistributing the Work and assume any
risks associated with Your exercise of permissions under this License.
8. Limitation of Liability. In no event and under no legal theory,
whether in tort (including negligence), contract, or otherwise,
unless required by applicable law (such as deliberate and grossly
negligent acts) or agreed to in writing, shall any Contributor be
liable to You for damages, including any direct, indirect, special,
incidental, or consequential damages of any character arising as a
result of this License or out of the use or inability to use the
Work (including but not limited to damages for loss of goodwill,
work stoppage, computer failure or malfunction, or any and all
other commercial damages or losses), even if such Contributor
has been advised of the possibility of such damages.
9. Accepting Warranty or Additional Liability. While redistributing
92
3rd party licenses
the Work or Derivative Works thereof, You may choose to offer,
and charge a fee for, acceptance of support, warranty, indemnity,
or other liability obligations and/or rights consistent with this
License. However, in accepting such obligations, You may act only
on Your own behalf and on Your sole responsibility, not on behalf
of any other Contributor, and only if You agree to indemnify,
defend, and hold each Contributor harmless for any liability
incurred by, or claims asserted against, such Contributor by reason
of your accepting any such warranty or additional liability.
END OF TERMS AND CONDITIONS
A.2.5. OpenSSL license
This package is an SSL implementation written
by Eric Young ([email protected]).
The implementation was written so as to conform with Netscapes SSL.
This library is free for commercial and non-commercial use as long as
the following conditions are aheared to. The following conditions
apply to all code found in this distribution, be it the RC4, RSA,
lhash, DES, etc., code; not just the SSL code. The SSL documentation
included with this distribution is covered by the same copyright terms
except that the holder is Tim Hudson ([email protected]).
Copyright remains Eric Young's, and as such any Copyright notices in
the code are not to be removed.
If this package is used in a product, Eric Young should be given attribution
as the author of the parts of the library used.
This can be in the form of a textual message at program startup or
in documentation (online or textual) provided with the package.
Redistribution and use in source and binary forms, with or without
modification, are permitted provided that the following conditions
are met:
1. Redistributions of source code must retain the copyright
notice, this list of conditions and the following disclaimer.
2. Redistributions in binary form must reproduce the above copyright
notice, this list of conditions and the following disclaimer in the
documentation and/or other materials provided with the distribution.
3. All advertising materials mentioning features or use of this software
must display the following acknowledgement:
"This product includes cryptographic software written by
Eric Young ([email protected])"
The word 'cryptographic' can be left out if the rouines from the library
being used are not cryptographic related :-).
4. If you include any Windows specific code (or a derivative thereof) from
the apps directory (application code) you must include an acknowledgement:
"This product includes software written by Tim Hudson ([email protected])"
THIS SOFTWARE IS PROVIDED BY ERIC YOUNG ``AS IS'' AND
ANY EXPRESS OR IMPLIED WARRANTIES, INCLUDING, BUT NOT LIMITED TO, THE
IMPLIED WARRANTIES OF MERCHANTABILITY AND FITNESS FOR A PARTICULAR PURPOSE
ARE DISCLAIMED. IN NO EVENT SHALL THE AUTHOR OR CONTRIBUTORS BE LIABLE
FOR ANY DIRECT, INDIRECT, INCIDENTAL, SPECIAL, EXEMPLARY, OR CONSEQUENTIAL
DAMAGES (INCLUDING, BUT NOT LIMITED TO, PROCUREMENT OF SUBSTITUTE GOODS
OR SERVICES; LOSS OF USE, DATA, OR PROFITS; OR BUSINESS INTERRUPTION)
HOWEVER CAUSED AND ON ANY THEORY OF LIABILITY, WHETHER IN CONTRACT, STRICT
LIABILITY, OR TORT (INCLUDING NEGLIGENCE OR OTHERWISE) ARISING IN ANY WAY
OUT OF THE USE OF THIS SOFTWARE, EVEN IF ADVISED OF THE POSSIBILITY OF
SUCH DAMAGE.
The licence and distribution terms for any publically available version or
derivative of this code cannot be changed. i.e. this code cannot simply be
copied and put under another distribution licence
[including the GNU Public Licence.]
A.2.6. Mozilla Public License (MPL)
MOZILLA PUBLIC LICENSE
Version 1.1
---------------
93
3rd party licenses
1. Definitions.
1.0.1. "Commercial Use" means distribution or otherwise making the
Covered Code available to a third party.
1.1. "Contributor" means each entity that creates or contributes to
the creation of Modifications.
1.2. "Contributor Version" means the combination of the Original
Code, prior Modifications used by a Contributor, and the Modifications
made by that particular Contributor.
1.3. "Covered Code" means the Original Code or Modifications or the
combination of the Original Code and Modifications, in each case
including portions thereof.
1.4. "Electronic Distribution Mechanism" means a mechanism generally
accepted in the software development community for the electronic
transfer of data.
1.5. "Executable" means Covered Code in any form other than Source
Code.
1.6. "Initial Developer" means the individual or entity identified
as the Initial Developer in the Source Code notice required by Exhibit
A.
1.7. "Larger Work" means a work which combines Covered Code or
portions thereof with code not governed by the terms of this License.
1.8. "License" means this document.
1.8.1. "Licensable" means having the right to grant, to the maximum
extent possible, whether at the time of the initial grant or
subsequently acquired, any and all of the rights conveyed herein.
1.9. "Modifications" means any addition to or deletion from the
substance or structure of either the Original Code or any previous
Modifications. When Covered Code is released as a series of files, a
Modification is:
A. Any addition to or deletion from the contents of a file
containing Original Code or previous Modifications.
B. Any new file that contains any part of the Original Code or
previous Modifications.
1.10. "Original Code" means Source Code of computer software code
which is described in the Source Code notice required by Exhibit A as
Original Code, and which, at the time of its release under this
License is not already Covered Code governed by this License.
1.10.1. "Patent Claims" means any patent claim(s), now owned or
hereafter acquired, including without limitation, method, process,
and apparatus claims, in any patent Licensable by grantor.
1.11. "Source Code" means the preferred form of the Covered Code for
making modifications to it, including all modules it contains, plus
any associated interface definition files, scripts used to control
compilation and installation of an Executable, or source code
differential comparisons against either the Original Code or another
well known, available Covered Code of the Contributor's choice. The
Source Code can be in a compressed or archival form, provided the
appropriate decompression or de-archiving software is widely available
for no charge.
1.12. "You" (or "Your") means an individual or a legal entity
exercising rights under, and complying with all of the terms of, this
License or a future version of this License issued under Section 6.1.
For legal entities, "You" includes any entity which controls, is
controlled by, or is under common control with You. For purposes of
this definition, "control" means (a) the power, direct or indirect,
to cause the direction or management of such entity, whether by
contract or otherwise, or (b) ownership of more than fifty percent
(50%) of the outstanding shares or beneficial ownership of such
entity.
94
3rd party licenses
2. Source Code License.
2.1. The Initial Developer Grant.
The Initial Developer hereby grants You a world-wide, royalty-free,
non-exclusive license, subject to third party intellectual property
claims:
(a) under intellectual property rights (other than patent or
trademark) Licensable by Initial Developer to use, reproduce,
modify, display, perform, sublicense and distribute the Original
Code (or portions thereof) with or without Modifications, and/or
as part of a Larger Work; and
(b) under Patents Claims infringed by the making, using or
selling of Original Code, to make, have made, use, practice,
sell, and offer for sale, and/or otherwise dispose of the
Original Code (or portions thereof).
(c) the licenses granted in this Section 2.1(a) and (b) are
effective on the date Initial Developer first distributes
Original Code under the terms of this License.
(d) Notwithstanding Section 2.1(b) above, no patent license is
granted: 1) for code that You delete from the Original Code; 2)
separate from the Original Code; or 3) for infringements caused
by: i) the modification of the Original Code or ii) the
combination of the Original Code with other software or devices.
2.2. Contributor Grant.
Subject to third party intellectual property claims, each Contributor
hereby grants You a world-wide, royalty-free, non-exclusive license
(a) under intellectual property rights (other than patent or
trademark) Licensable by Contributor, to use, reproduce, modify,
display, perform, sublicense and distribute the Modifications
created by such Contributor (or portions thereof) either on an
unmodified basis, with other Modifications, as Covered Code
and/or as part of a Larger Work; and
(b) under Patent Claims infringed by the making, using, or
selling of Modifications made by that Contributor either alone
and/or in combination with its Contributor Version (or portions
of such combination), to make, use, sell, offer for sale, have
made, and/or otherwise dispose of: 1) Modifications made by that
Contributor (or portions thereof); and 2) the combination of
Modifications made by that Contributor with its Contributor
Version (or portions of such combination).
(c) the licenses granted in Sections 2.2(a) and 2.2(b) are
effective on the date Contributor first makes Commercial Use of
the Covered Code.
(d)
Notwithstanding Section 2.2(b) above, no patent license is
granted: 1) for any code that Contributor has deleted from the
Contributor Version; 2) separate from the Contributor Version;
3) for infringements caused by: i) third party modifications of
Contributor Version or ii) the combination of Modifications made
by that Contributor with other software (except as part of the
Contributor Version) or other devices; or 4) under Patent Claims
infringed by Covered Code in the absence of Modifications made by
that Contributor.
3. Distribution Obligations.
3.1. Application of License.
The Modifications which You create or to which You contribute are
governed by the terms of this License, including without limitation
Section 2.2. The Source Code version of Covered Code may be
distributed only under the terms of this License or a future version
of this License released under Section 6.1, and You must include a
copy of this License with every copy of the Source Code You
distribute. You may not offer or impose any terms on any Source Code
version that alters or restricts the applicable version of this
License or the recipients' rights hereunder. However, You may include
an additional document offering the additional rights described in
Section 3.5.
3.2. Availability of Source Code.
95
3rd party licenses
Any Modification which You create or to which You contribute must be
made available in Source Code form under the terms of this License
either on the same media as an Executable version or via an accepted
Electronic Distribution Mechanism to anyone to whom you made an
Executable version available; and if made available via Electronic
Distribution Mechanism, must remain available for at least twelve (12)
months after the date it initially became available, or at least six
(6) months after a subsequent version of that particular Modification
has been made available to such recipients. You are responsible for
ensuring that the Source Code version remains available even if the
Electronic Distribution Mechanism is maintained by a third party.
3.3. Description of Modifications.
You must cause all Covered Code to which You contribute to contain a
file documenting the changes You made to create that Covered Code and
the date of any change. You must include a prominent statement that
the Modification is derived, directly or indirectly, from Original
Code provided by the Initial Developer and including the name of the
Initial Developer in (a) the Source Code, and (b) in any notice in an
Executable version or related documentation in which You describe the
origin or ownership of the Covered Code.
3.4. Intellectual Property Matters
(a) Third Party Claims.
If Contributor has knowledge that a license under a third party's
intellectual property rights is required to exercise the rights
granted by such Contributor under Sections 2.1 or 2.2,
Contributor must include a text file with the Source Code
distribution titled "LEGAL" which describes the claim and the
party making the claim in sufficient detail that a recipient will
know whom to contact. If Contributor obtains such knowledge after
the Modification is made available as described in Section 3.2,
Contributor shall promptly modify the LEGAL file in all copies
Contributor makes available thereafter and shall take other steps
(such as notifying appropriate mailing lists or newsgroups)
reasonably calculated to inform those who received the Covered
Code that new knowledge has been obtained.
(b) Contributor APIs.
If Contributor's Modifications include an application programming
interface and Contributor has knowledge of patent licenses which
are reasonably necessary to implement that API, Contributor must
also include this information in the LEGAL file.
(c)
Representations.
Contributor represents that, except as disclosed pursuant to
Section 3.4(a) above, Contributor believes that Contributor's
Modifications are Contributor's original creation(s) and/or
Contributor has sufficient rights to grant the rights conveyed by
this License.
3.5. Required Notices.
You must duplicate the notice in Exhibit A in each file of the Source
Code. If it is not possible to put such notice in a particular Source
Code file due to its structure, then You must include such notice in a
location (such as a relevant directory) where a user would be likely
to look for such a notice. If You created one or more Modification(s)
You may add your name as a Contributor to the notice described in
Exhibit A. You must also duplicate this License in any documentation
for the Source Code where You describe recipients' rights or ownership
rights relating to Covered Code. You may choose to offer, and to
charge a fee for, warranty, support, indemnity or liability
obligations to one or more recipients of Covered Code. However, You
may do so only on Your own behalf, and not on behalf of the Initial
Developer or any Contributor. You must make it absolutely clear than
any such warranty, support, indemnity or liability obligation is
offered by You alone, and You hereby agree to indemnify the Initial
Developer and every Contributor for any liability incurred by the
Initial Developer or such Contributor as a result of warranty,
support, indemnity or liability terms You offer.
3.6. Distribution of Executable Versions.
You may distribute Covered Code in Executable form only if the
requirements of Section 3.1-3.5 have been met for that Covered Code,
and if You include a notice stating that the Source Code version of
the Covered Code is available under the terms of this License,
including a description of how and where You have fulfilled the
96
3rd party licenses
obligations of Section 3.2. The notice must be conspicuously included
in any notice in an Executable version, related documentation or
collateral in which You describe recipients' rights relating to the
Covered Code. You may distribute the Executable version of Covered
Code or ownership rights under a license of Your choice, which may
contain terms different from this License, provided that You are in
compliance with the terms of this License and that the license for the
Executable version does not attempt to limit or alter the recipient's
rights in the Source Code version from the rights set forth in this
License. If You distribute the Executable version under a different
license You must make it absolutely clear that any terms which differ
from this License are offered by You alone, not by the Initial
Developer or any Contributor. You hereby agree to indemnify the
Initial Developer and every Contributor for any liability incurred by
the Initial Developer or such Contributor as a result of any such
terms You offer.
3.7. Larger Works.
You may create a Larger Work
not governed by the terms of
Work as a single product. In
requirements of this License
by combining Covered Code with other code
this License and distribute the Larger
such a case, You must make sure the
are fulfilled for the Covered Code.
4. Inability to Comply Due to Statute or Regulation.
If it is impossible for You to comply with any of the terms of this
License with respect to some or all of the Covered Code due to
statute, judicial order, or regulation then You must: (a) comply with
the terms of this License to the maximum extent possible; and (b)
describe the limitations and the code they affect. Such description
must be included in the LEGAL file described in Section 3.4 and must
be included with all distributions of the Source Code. Except to the
extent prohibited by statute or regulation, such description must be
sufficiently detailed for a recipient of ordinary skill to be able to
understand it.
5. Application of this License.
This License applies to code to which the Initial Developer has
attached the notice in Exhibit A and to related Covered Code.
6. Versions of the License.
6.1. New Versions.
Netscape Communications Corporation ("Netscape") may publish revised
and/or new versions of the License from time to time. Each version
will be given a distinguishing version number.
6.2. Effect of New Versions.
Once Covered Code has been published under a particular version of the
License, You may always continue to use it under the terms of that
version. You may also choose to use such Covered Code under the terms
of any subsequent version of the License published by Netscape. No one
other than Netscape has the right to modify the terms applicable to
Covered Code created under this License.
6.3. Derivative Works.
If You create or use a modified version of this License (which you may
only do in order to apply it to code which is not already Covered Code
governed by this License), You must (a) rename Your license so that
the phrases "Mozilla", "MOZILLAPL", "MOZPL", "Netscape",
"MPL", "NPL" or any confusingly similar phrase do not appear in your
license (except to note that your license differs from this License)
and (b) otherwise make it clear that Your version of the license
contains terms which differ from the Mozilla Public License and
Netscape Public License. (Filling in the name of the Initial
Developer, Original Code or Contributor in the notice described in
Exhibit A shall not of themselves be deemed to be modifications of
this License.)
7. DISCLAIMER OF WARRANTY.
COVERED CODE IS PROVIDED UNDER THIS LICENSE ON AN "AS IS" BASIS,
WITHOUT WARRANTY OF ANY KIND, EITHER EXPRESSED OR IMPLIED, INCLUDING,
WITHOUT LIMITATION, WARRANTIES THAT THE COVERED CODE IS FREE OF
DEFECTS, MERCHANTABLE, FIT FOR A PARTICULAR PURPOSE OR NON-INFRINGING.
THE ENTIRE RISK AS TO THE QUALITY AND PERFORMANCE OF THE COVERED CODE
97
3rd party licenses
IS WITH YOU. SHOULD ANY COVERED CODE PROVE DEFECTIVE IN ANY RESPECT,
YOU (NOT THE INITIAL DEVELOPER OR ANY OTHER CONTRIBUTOR) ASSUME THE
COST OF ANY NECESSARY SERVICING, REPAIR OR CORRECTION. THIS DISCLAIMER
OF WARRANTY CONSTITUTES AN ESSENTIAL PART OF THIS LICENSE. NO USE OF
ANY COVERED CODE IS AUTHORIZED HEREUNDER EXCEPT UNDER THIS DISCLAIMER.
8. TERMINATION.
8.1. This License and the rights granted hereunder will terminate
automatically if You fail to comply with terms herein and fail to cure
such breach within 30 days of becoming aware of the breach. All
sublicenses to the Covered Code which are properly granted shall
survive any termination of this License. Provisions which, by their
nature, must remain in effect beyond the termination of this License
shall survive.
8.2. If You initiate litigation by asserting a patent infringement
claim (excluding declatory judgment actions) against Initial Developer
or a Contributor (the Initial Developer or Contributor against whom
You file such action is referred to as "Participant") alleging that:
(a) such Participant's Contributor Version directly or indirectly
infringes any patent, then any and all rights granted by such
Participant to You under Sections 2.1 and/or 2.2 of this License
shall, upon 60 days notice from Participant terminate prospectively,
unless if within 60 days after receipt of notice You either: (i)
agree in writing to pay Participant a mutually agreeable reasonable
royalty for Your past and future use of Modifications made by such
Participant, or (ii) withdraw Your litigation claim with respect to
the Contributor Version against such Participant. If within 60 days
of notice, a reasonable royalty and payment arrangement are not
mutually agreed upon in writing by the parties or the litigation claim
is not withdrawn, the rights granted by Participant to You under
Sections 2.1 and/or 2.2 automatically terminate at the expiration of
the 60 day notice period specified above.
(b) any software, hardware, or device, other than such Participant's
Contributor Version, directly or indirectly infringes any patent, then
any rights granted to You by such Participant under Sections 2.1(b)
and 2.2(b) are revoked effective as of the date You first made, used,
sold, distributed, or had made, Modifications made by that
Participant.
8.3. If You assert a patent infringement claim against Participant
alleging that such Participant's Contributor Version directly or
indirectly infringes any patent where such claim is resolved (such as
by license or settlement) prior to the initiation of patent
infringement litigation, then the reasonable value of the licenses
granted by such Participant under Sections 2.1 or 2.2 shall be taken
into account in determining the amount or value of any payment or
license.
8.4. In the event of termination under Sections 8.1 or 8.2 above,
all end user license agreements (excluding distributors and resellers)
which have been validly granted by You or any distributor hereunder
prior to termination shall survive termination.
9. LIMITATION OF LIABILITY.
UNDER NO CIRCUMSTANCES AND UNDER NO LEGAL THEORY, WHETHER TORT
(INCLUDING NEGLIGENCE), CONTRACT, OR OTHERWISE, SHALL YOU, THE INITIAL
DEVELOPER, ANY OTHER CONTRIBUTOR, OR ANY DISTRIBUTOR OF COVERED CODE,
OR ANY SUPPLIER OF ANY OF SUCH PARTIES, BE LIABLE TO ANY PERSON FOR
ANY INDIRECT, SPECIAL, INCIDENTAL, OR CONSEQUENTIAL DAMAGES OF ANY
CHARACTER INCLUDING, WITHOUT LIMITATION, DAMAGES FOR LOSS OF GOODWILL,
WORK STOPPAGE, COMPUTER FAILURE OR MALFUNCTION, OR ANY AND ALL OTHER
COMMERCIAL DAMAGES OR LOSSES, EVEN IF SUCH PARTY SHALL HAVE BEEN
INFORMED OF THE POSSIBILITY OF SUCH DAMAGES. THIS LIMITATION OF
LIABILITY SHALL NOT APPLY TO LIABILITY FOR DEATH OR PERSONAL INJURY
RESULTING FROM SUCH PARTY'S NEGLIGENCE TO THE EXTENT APPLICABLE LAW
PROHIBITS SUCH LIMITATION. SOME JURISDICTIONS DO NOT ALLOW THE
EXCLUSION OR LIMITATION OF INCIDENTAL OR CONSEQUENTIAL DAMAGES, SO
THIS EXCLUSION AND LIMITATION MAY NOT APPLY TO YOU.
10. U.S. GOVERNMENT END USERS.
The Covered Code is a "commercial item," as that term is defined in
98
3rd party licenses
48 C.F.R. 2.101 (Oct. 1995), consisting of "commercial computer
software" and "commercial computer software documentation," as such
terms are used in 48 C.F.R. 12.212 (Sept. 1995). Consistent with 48
C.F.R. 12.212 and 48 C.F.R. 227.7202-1 through 227.7202-4 (June 1995),
all U.S. Government End Users acquire Covered Code with only those
rights set forth herein.
11. MISCELLANEOUS.
This License represents the complete agreement concerning subject
matter hereof. If any provision of this License is held to be
unenforceable, such provision shall be reformed only to the extent
necessary to make it enforceable. This License shall be governed by
California law provisions (except to the extent applicable law, if
any, provides otherwise), excluding its conflict-of-law provisions.
With respect to disputes in which at least one party is a citizen of,
or an entity chartered or registered to do business in the United
States of America, any litigation relating to this License shall be
subject to the jurisdiction of the Federal Courts of the Northern
District of California, with venue lying in Santa Clara County,
California, with the losing party responsible for costs, including
without limitation, court costs and reasonable attorneys' fees and
expenses. The application of the United Nations Convention on
Contracts for the International Sale of Goods is expressly excluded.
Any law or regulation which provides that the language of a contract
shall be construed against the drafter shall not apply to this
License.
12. RESPONSIBILITY FOR CLAIMS.
As between Initial Developer and the Contributors, each party is
responsible for claims and damages arising, directly or indirectly,
out of its utilization of rights under this License and You agree to
work with Initial Developer and Contributors to distribute such
responsibility on an equitable basis. Nothing herein is intended or
shall be deemed to constitute any admission of liability.
13. MULTIPLE-LICENSED CODE.
Initial Developer may designate portions of the Covered Code as
"Multiple-Licensed". "Multiple-Licensed" means that the Initial
Developer permits you to utilize portions of the Covered Code under
Your choice of the NPL or the alternative licenses, if any, specified
by the Initial Developer in the file described in Exhibit A.
EXHIBIT A -Mozilla Public License.
``The contents of this file are subject to the Mozilla Public License
Version 1.1 (the "License"); you may not use this file except in
compliance with the License. You may obtain a copy of the License at
http://www.mozilla.org/MPL/
Software distributed under the License is distributed on an "AS IS"
basis, WITHOUT WARRANTY OF ANY KIND, either express or implied. See the
License for the specific language governing rights and limitations
under the License.
The Original Code is ______________________________________.
The Initial Developer of the Original Code is ________________________.
Portions created by ______________________ are Copyright (C) ______
_______________________. All Rights Reserved.
Contributor(s): ______________________________________.
Alternatively, the contents of this file may be used under the terms
of the _____ license (the "[___] License"), in which case the
provisions of [______] License are applicable instead of those
above. If you wish to allow use of your version of this file only
under the terms of the [____] License and not to allow others to use
your version of this file under the MPL, indicate your decision by
deleting the provisions above and replace them with the notice and
other provisions required by the [___] License. If you do not delete
the provisions above, a recipient may use your version of this file
under either the MPL or the [___] License."
[NOTE: The text of this Exhibit A may differ slightly from the text of
99
3rd party licenses
the notices in the Source Code files of the Original Code. You should
use the text of this Exhibit A rather than the text found in the
Original Code Source Code for Your Modifications.]
A.2.7. Slirp license
Redistribution and use in source and binary forms, with or without
modification, are permitted provided that the following conditions
are met:
1. Redistributions of source code must retain the above copyright
notice, this list of conditions and the following disclaimer.
2. Redistributions in binary form must reproduce the above copyright
notice, this list of conditions and the following disclaimer in the
documentation and/or other materials provided with the distribution.
3. All advertising materials mentioning features or use of this software
must display the following acknowledgment:
This product includes software developed by Danny Gasparovski.
THIS SOFTWARE IS PROVIDED ``AS IS'' AND ANY EXPRESS OR IMPLIED WARRANTIES,
INCLUDING, BUT NOT LIMITED TO, THE IMPLIED WARRANTIES OF MERCHANTABILITY
AND FITNESS FOR A PARTICULAR PURPOSE ARE DISCLAIMED. IN NO EVENT SHALL
DANNY GASPAROVSKI OR CONTRIBUTORS BE LIABLE FOR ANY DIRECT, INDIRECT,
INCIDENTAL, SPECIAL, EXEMPLARY, OR CONSEQUENTIAL DAMAGES (INCLUDING, BUT
NOT LIMITED TO, PROCUREMENT OF SUBSTITUTE GOODS OR SERVICES; LOSS OF USE,
DATA, OR PROFITS; OR BUSINESS INTERRUPTION) HOWEVER CAUSED AND ON ANY
THEORY OF LIABILITY, WHETHER IN CONTRACT, STRICT LIABILITY, OR TORT
(INCLUDING NEGLIGENCE OR OTHERWISE) ARISING IN ANY WAY OUT OF THE USE OF
THIS SOFTWARE, EVEN IF ADVISED OF THE POSSIBILITY OF SUCH DAMAGE.
A.2.8. liblzf license
Redistribution and use in source and binary forms, with or without modification, are permitted provided that the following conditions are met:
1.
Redistributions of source code must retain the above copyright notice,
this list of conditions and the following disclaimer.
2.
Redistributions in binary form must reproduce the above copyright
notice, this list of conditions and the following disclaimer in the
documentation and/or other materials provided with the distribution.
3.
The name of the author may not be used to endorse or promote products
derived from this software without specific prior written permission.
THIS SOFTWARE IS PROVIDED BY THE AUTHOR ``AS IS'' AND ANY EXPRESS OR IMPLIED
WARRANTIES, INCLUDING, BUT NOT LIMITED TO, THE IMPLIED WARRANTIES OF MERCHANTABILITY AND FITNESS FOR A PARTICULAR PURPOSE ARE DISCLAIMED. IN NO
EVENT SHALL THE AUTHOR BE LIABLE FOR ANY DIRECT, INDIRECT, INCIDENTAL, SPECIAL, EXEMPLARY, OR CONSEQUENTIAL DAMAGES (INCLUDING, BUT NOT LIMITED TO,
PROCUREMENT OF SUBSTITUTE GOODS OR SERVICES; LOSS OF USE, DATA, OR PROFITS;
OR BUSINESS INTERRUPTION) HOWEVER CAUSED AND ON ANY THEORY OF LIABILITY,
WHETHER IN CONTRACT, STRICT LIABILITY, OR TORT (INCLUDING NEGLIGENCE OR OTHERWISE) ARISING IN ANY WAY OUT OF THE USE OF THIS SOFTWARE, EVEN IF ADVISED
OF THE POSSIBILITY OF SUCH DAMAGE.
A.2.9. GNU General Public License (GPL)
GNU GENERAL PUBLIC LICENSE
Version 2, June 1991
Copyright (C) 1989, 1991 Free Software Foundation, Inc.
51 Franklin St, Fifth Floor, Boston, MA 02110-1301 USA
Everyone is permitted to copy and distribute verbatim copies
of this license document, but changing it is not allowed.
Preamble
The licenses for most software are designed to take away your
freedom to share and change it. By contrast, the GNU General Public
License is intended to guarantee your freedom to share and change free
software--to make sure the software is free for all its users. This
100
3rd party licenses
General Public License applies to most of the Free Software
Foundation's software and to any other program whose authors commit to
using it. (Some other Free Software Foundation software is covered by
the GNU Library General Public License instead.) You can apply it to
your programs, too.
When we speak of free software, we are referring to freedom, not
price. Our General Public Licenses are designed to make sure that you
have the freedom to distribute copies of free software (and charge for
this service if you wish), that you receive source code or can get it
if you want it, that you can change the software or use pieces of it
in new free programs; and that you know you can do these things.
To protect your rights, we need to make restrictions that forbid
anyone to deny you these rights or to ask you to surrender the rights.
These restrictions translate to certain responsibilities for you if you
distribute copies of the software, or if you modify it.
For example, if you distribute copies of such a program, whether
gratis or for a fee, you must give the recipients all the rights that
you have. You must make sure that they, too, receive or can get the
source code. And you must show them these terms so they know their
rights.
We protect your rights with two steps: (1) copyright the software, and
(2) offer you this license which gives you legal permission to copy,
distribute and/or modify the software.
Also, for each author's protection and ours, we want to make certain
that everyone understands that there is no warranty for this free
software. If the software is modified by someone else and passed on, we
want its recipients to know that what they have is not the original, so
that any problems introduced by others will not reflect on the original
authors' reputations.
Finally, any free program is threatened constantly by software
patents. We wish to avoid the danger that redistributors of a free
program will individually obtain patent licenses, in effect making the
program proprietary. To prevent this, we have made it clear that any
patent must be licensed for everyone's free use or not licensed at all.
The precise terms and conditions for copying, distribution and
modification follow.
GNU GENERAL PUBLIC LICENSE
TERMS AND CONDITIONS FOR COPYING, DISTRIBUTION AND MODIFICATION
0. This License applies to any program or other work which contains
a notice placed by the copyright holder saying it may be distributed
under the terms of this General Public License. The "Program", below,
refers to any such program or work, and a "work based on the Program"
means either the Program or any derivative work under copyright law:
that is to say, a work containing the Program or a portion of it,
either verbatim or with modifications and/or translated into another
language. (Hereinafter, translation is included without limitation in
the term "modification".) Each licensee is addressed as "you".
Activities other than copying, distribution and modification are not
covered by this License; they are outside its scope. The act of
running the Program is not restricted, and the output from the Program
is covered only if its contents constitute a work based on the
Program (independent of having been made by running the Program).
Whether that is true depends on what the Program does.
1. You may copy and distribute verbatim copies of the Program's
source code as you receive it, in any medium, provided that you
conspicuously and appropriately publish on each copy an appropriate
copyright notice and disclaimer of warranty; keep intact all the
notices that refer to this License and to the absence of any warranty;
and give any other recipients of the Program a copy of this License
along with the Program.
You may charge a fee for the physical act of transferring a copy, and
you may at your option offer warranty protection in exchange for a fee.
2. You may modify your copy or copies of the Program or any portion
of it, thus forming a work based on the Program, and copy and
101
3rd party licenses
distribute such modifications or work under the terms of Section 1
above, provided that you also meet all of these conditions:
a) You must cause the modified files to carry prominent notices
stating that you changed the files and the date of any change.
b) You must cause any work that
whole or in part contains or is
part thereof, to be licensed as
parties under the terms of this
you distribute or publish, that in
derived from the Program or any
a whole at no charge to all third
License.
c) If the modified program normally reads commands interactively
when run, you must cause it, when started running for such
interactive use in the most ordinary way, to print or display an
announcement including an appropriate copyright notice and a
notice that there is no warranty (or else, saying that you provide
a warranty) and that users may redistribute the program under
these conditions, and telling the user how to view a copy of this
License. (Exception: if the Program itself is interactive but
does not normally print such an announcement, your work based on
the Program is not required to print an announcement.)
These requirements apply to the modified work as a whole. If
identifiable sections of that work are not derived from the Program,
and can be reasonably considered independent and separate works in
themselves, then this License, and its terms, do not apply to those
sections when you distribute them as separate works. But when you
distribute the same sections as part of a whole which is a work based
on the Program, the distribution of the whole must be on the terms of
this License, whose permissions for other licensees extend to the
entire whole, and thus to each and every part regardless of who wrote it.
Thus, it is not the intent of this section to claim rights or contest
your rights to work written entirely by you; rather, the intent is to
exercise the right to control the distribution of derivative or
collective works based on the Program.
In addition, mere aggregation of another work not based on the Program
with the Program (or with a work based on the Program) on a volume of
a storage or distribution medium does not bring the other work under
the scope of this License.
3. You may copy and distribute the Program (or a work based on it,
under Section 2) in object code or executable form under the terms of
Sections 1 and 2 above provided that you also do one of the following:
a) Accompany it with the complete corresponding machine-readable
source code, which must be distributed under the terms of Sections
1 and 2 above on a medium customarily used for software interchange; or,
b) Accompany it with a written offer, valid for at least three
years, to give any third party, for a charge no more than your
cost of physically performing source distribution, a complete
machine-readable copy of the corresponding source code, to be
distributed under the terms of Sections 1 and 2 above on a medium
customarily used for software interchange; or,
c) Accompany it with the information you received as to the offer
to distribute corresponding source code. (This alternative is
allowed only for noncommercial distribution and only if you
received the program in object code or executable form with such
an offer, in accord with Subsection b above.)
The source code for a work means the preferred form of the work for
making modifications to it. For an executable work, complete source
code means all the source code for all modules it contains, plus any
associated interface definition files, plus the scripts used to
control compilation and installation of the executable. However, as a
special exception, the source code distributed need not include
anything that is normally distributed (in either source or binary
form) with the major components (compiler, kernel, and so on) of the
operating system on which the executable runs, unless that component
itself accompanies the executable.
If distribution of executable or object code is made by offering
access to copy from a designated place, then offering equivalent
access to copy the source code from the same place counts as
102
3rd party licenses
distribution of the source code, even though third parties are not
compelled to copy the source along with the object code.
4. You may not copy, modify, sublicense, or distribute the Program
except as expressly provided under this License. Any attempt
otherwise to copy, modify, sublicense or distribute the Program is
void, and will automatically terminate your rights under this License.
However, parties who have received copies, or rights, from you under
this License will not have their licenses terminated so long as such
parties remain in full compliance.
5. You are not required to accept this License, since you have not
signed it. However, nothing else grants you permission to modify or
distribute the Program or its derivative works. These actions are
prohibited by law if you do not accept this License. Therefore, by
modifying or distributing the Program (or any work based on the
Program), you indicate your acceptance of this License to do so, and
all its terms and conditions for copying, distributing or modifying
the Program or works based on it.
6. Each time you redistribute the Program (or any work based on the
Program), the recipient automatically receives a license from the
original licensor to copy, distribute or modify the Program subject to
these terms and conditions. You may not impose any further
restrictions on the recipients' exercise of the rights granted herein.
You are not responsible for enforcing compliance by third parties to
this License.
7. If, as a consequence of a court judgment or allegation of patent
infringement or for any other reason (not limited to patent issues),
conditions are imposed on you (whether by court order, agreement or
otherwise) that contradict the conditions of this License, they do not
excuse you from the conditions of this License. If you cannot
distribute so as to satisfy simultaneously your obligations under this
License and any other pertinent obligations, then as a consequence you
may not distribute the Program at all. For example, if a patent
license would not permit royalty-free redistribution of the Program by
all those who receive copies directly or indirectly through you, then
the only way you could satisfy both it and this License would be to
refrain entirely from distribution of the Program.
If any portion of this section is held invalid or unenforceable under
any particular circumstance, the balance of the section is intended to
apply and the section as a whole is intended to apply in other
circumstances.
It is not the purpose of this section to induce you to infringe any
patents or other property right claims or to contest validity of any
such claims; this section has the sole purpose of protecting the
integrity of the free software distribution system, which is
implemented by public license practices. Many people have made
generous contributions to the wide range of software distributed
through that system in reliance on consistent application of that
system; it is up to the author/donor to decide if he or she is willing
to distribute software through any other system and a licensee cannot
impose that choice.
This section is intended to make thoroughly clear what is believed to
be a consequence of the rest of this License.
8. If the distribution and/or use of the Program is restricted in
certain countries either by patents or by copyrighted interfaces, the
original copyright holder who places the Program under this License
may add an explicit geographical distribution limitation excluding
those countries, so that distribution is permitted only in or among
countries not thus excluded. In such case, this License incorporates
the limitation as if written in the body of this License.
9. The Free Software Foundation may publish revised and/or new versions
of the General Public License from time to time. Such new versions will
be similar in spirit to the present version, but may differ in detail to
address new problems or concerns.
Each version is given a distinguishing version number. If the Program
specifies a version number of this License which applies to it and "any
later version", you have the option of following the terms and conditions
either of that version or of any later version published by the Free
103
3rd party licenses
Software Foundation. If the Program does not specify a version number of
this License, you may choose any version ever published by the Free Software
Foundation.
10. If you wish to incorporate parts of the Program into other free
programs whose distribution conditions are different, write to the author
to ask for permission. For software which is copyrighted by the Free
Software Foundation, write to the Free Software Foundation; we sometimes
make exceptions for this. Our decision will be guided by the two goals
of preserving the free status of all derivatives of our free software and
of promoting the sharing and reuse of software generally.
NO WARRANTY
11. BECAUSE THE PROGRAM IS LICENSED FREE OF CHARGE, THERE IS NO WARRANTY
FOR THE PROGRAM, TO THE EXTENT PERMITTED BY APPLICABLE LAW. EXCEPT WHEN
OTHERWISE STATED IN WRITING THE COPYRIGHT HOLDERS AND/OR OTHER PARTIES
PROVIDE THE PROGRAM "AS IS" WITHOUT WARRANTY OF ANY KIND, EITHER EXPRESSED
OR IMPLIED, INCLUDING, BUT NOT LIMITED TO, THE IMPLIED WARRANTIES OF
MERCHANTABILITY AND FITNESS FOR A PARTICULAR PURPOSE. THE ENTIRE RISK AS
TO THE QUALITY AND PERFORMANCE OF THE PROGRAM IS WITH YOU. SHOULD THE
PROGRAM PROVE DEFECTIVE, YOU ASSUME THE COST OF ALL NECESSARY SERVICING,
REPAIR OR CORRECTION.
12. IN NO EVENT UNLESS REQUIRED BY APPLICABLE LAW OR AGREED TO IN WRITING
WILL ANY COPYRIGHT HOLDER, OR ANY OTHER PARTY WHO MAY MODIFY AND/OR
REDISTRIBUTE THE PROGRAM AS PERMITTED ABOVE, BE LIABLE TO YOU FOR DAMAGES,
INCLUDING ANY GENERAL, SPECIAL, INCIDENTAL OR CONSEQUENTIAL DAMAGES ARISING
OUT OF THE USE OR INABILITY TO USE THE PROGRAM (INCLUDING BUT NOT LIMITED
TO LOSS OF DATA OR DATA BEING RENDERED INACCURATE OR LOSSES SUSTAINED BY
YOU OR THIRD PARTIES OR A FAILURE OF THE PROGRAM TO OPERATE WITH ANY OTHER
PROGRAMS), EVEN IF SUCH HOLDER OR OTHER PARTY HAS BEEN ADVISED OF THE
POSSIBILITY OF SUCH DAMAGES.
END OF TERMS AND CONDITIONS
104
Glossary
A
ACPI
Advanced Configuration and Power Interface, an industry specification for BIOS and hardware extensions to configure PC
hardware and perform power management. Windows 2000 and
higher as well as Linux 2.4 and higher support ACPI. Windows
can only enable or disable ACPI support at installation time.
API
Application Programming Interface.
APIC
Advanced Programmable Interrupt Controller, a newer version
of the original PC PIC (programmable interrupt controller).
Most modern CPUs contain an on-chip APIC ("local APIC").
Many systems also contain an I/O APIC (input output APIC) as
a sperate chip which provides more than 16 IRQs. Windows
2000 and higher use a different kernel if they detect an I/O
APIC during installation. Therefore an I/O APIC must not be removed after installation.
COM
Microsoft Component Object Model, a programming infrastructure for modular software. COM allows applications to provide
application programming interfaces which can be accessed from
various other programming languages and applications. VirtualBox makes use of COM both internally and externally to
provide a comprehensive API to 3rd party developers.
DHCP
Dynamic Host Configuration Protocol. This allows a networking device in a network to acquire its IP address (and other networking details) automatically, in order to avoid having to configure all devices in a network with fixed IP addresses. VirtualBox has a built-in DHCP server that delivers an IP addresses to
a virtual machine when networking is configured to NAT; see
Section 5.3, “Networking in virtual machines”.
GUI
Graphical User Interface. Commonly used as an antonym to a
"command line interface", in the context of VirtualBox, we
sometimes refer to the main graphical VirtualBox program as
the "GUI", to differentiate it from the VBoxManage interface.
GUID
See UUID.
I/O APIC
See APIC.
C
D
G
I
105
Glossary
iSCSI
Internet SCSI; see Section 5.2.2, “iSCSI servers”.
MAC
Media Access Control, a part of an Ethernet network card. A
MAC address is a 6-byte number which identifies a network
card. It is typically written in hexadecimal notation where the
bytes are separated as colons, such as 00:17:3A:5E:CB:08.
NAT
Network Address Translation. A technique to share networking
interfaces by which an interface modifies the source and/or target IP addresses of networking packages according to specific
rules. Commonly employed by routers and firewalls to shield an
internal network from the Internet, VirtualBox can use NAT to
easily share a host's physical networking hardware with its virtual machines. See Section 5.3, “Networking in virtual machines”.
PIC
See APIC.
PXE
Preboot Execution Environment, an industry standard for booting PC systems from remote network locations. It includes DHCP for IP configuraiton and TFTP for file transfer. Using UNDI,
a hardware independent driver stack for accessing the network
card from bootstrap code is available.
RDP
Remote Desktop Protocol, a protocol developed by Microsoft as
an extension to the ITU T.128 and T.124 video conferencing
protocol. With RDP, a PC system can be controlled from a remote location using a network connection over which data is
transferred in both directions. Typically graphics updates and
audio are sent from the remote machine and keyboard and
mouse input events are sent from the client. VirtualBox contains
an enhanced implementation of the relevant standards called
"VirtualBox RDP" (VRDP), which is largely compatible with
Microsoft's RDP implementation. See Section 6.4, “Remote
Desktop Support (VRDP)” for details.
SCSI
Small Computer System Interface. An industry standard for data
transfer between devices, especially for storage. See Section 5.2.2, “iSCSI servers”.
M
N
P
R
S
U
106
Glossary
UUID
A Universally Unique Identifier -- often also called GUID
(Globally Unique Identifier) -- is a string of numbers and letters
which can be computed dynamically and is guaranteed to be
unique. Generally, it used as a global handle to identify entities.
VirtualBox makes use of UUIDs to identify VMs, Virtual Disk
Images (VDI files) and other entities.
VM
Virtual Machine -- a virtual computer that VirtualBox allows
you to run on top of your actual hardware. See Section 1.1,
“Virtualization basics” for details.
VRDP
See RDP.
XPCOM
Mozilla Cross Platform Component Object Model, a programming infrastructure developed by the Mozilla browser project
which is similar to Microsoft COM and allows applications to
provide a modular programming interface. VirtualBox makes
use of XPCOM on Linux both internally and externally to
provide a comprehensive API to third-party developers.
V
X
107