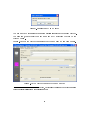
1
Chromsquare
1.5 User Manual
GCxGC/MS & LCxGC/MS version for
Shimadzu GCMSsolution and GCsolution
Chromaleont srl
September 2012
Contents
1 Foreword
14
1.1
Contact Information
. . . . . . . . . . . . . . . . . . . . . . . . . .
14
1.2
Legal Information . . . . . . . . . . . . . . . . . . . . . . . . . . . .
14
1.2.1
Copyright
. . . . . . . . . . . . . . . . . . . . . . . . . . . .
14
1.2.2
Warranty
. . . . . . . . . . . . . . . . . . . . . . . . . . . .
15
Introduction . . . . . . . . . . . . . . . . . . . . . . . . . . . . . . .
16
1.3.1
Outline of the Software . . . . . . . . . . . . . . . . . . . . .
16
1.3.2
Outline of the Manual
17
1.3
. . . . . . . . . . . . . . . . . . . . .
2 Installation and Startup
19
2.1
Installing the software
. . . . . . . . . . . . . . . . . . . . . . . . .
19
2.2
Uninstalling the software . . . . . . . . . . . . . . . . . . . . . . . .
21
2.3
Starting ChromSquare software
. . . . . . . . . . . . . . . . . . . .
22
2.4
Registering the License . . . . . . . . . . . . . . . . . . . . . . . . .
23
2.4.1
License policy . . . . . . . . . . . . . . . . . . . . . . . . . .
23
2.4.2
License management
24
. . . . . . . . . . . . . . . . . . . . . .
3 Chromsquare Overview
3.1
27
General Terminology and Concepts
. . . . . . . . . . . . . . . . . .
27
. . . . . . . . . . . . . . . . . . . . . . . . .
27
3.1.1
Chromatogram
3.1.2
Chromatographic Map
3.1.3
Integration
. . . . . . . . . . . . . . . . . . . . .
28
. . . . . . . . . . . . . . . . . . . . . . . . . . .
28
1
3.1.4
Peaks
. . . . . . . . . . . . . . . . . . . . . . . . . . . . . .
29
3.1.5
Blobs . . . . . . . . . . . . . . . . . . . . . . . . . . . . . . .
29
3.1.6
Blob IDs . . . . . . . . . . . . . . . . . . . . . . . . . . . . .
30
3.1.7
Blobs vs. Blob IDs
. . . . . . . . . . . . . . . . . . . . . . .
31
3.1.8
Methods . . . . . . . . . . . . . . . . . . . . . . . . . . . . .
31
3.1.9
Units . . . . . . . . . . . . . . . . . . . . . . . . . . . . . . .
32
3.2
Chromsquare
3.3
File Management
3.4
Graphical User Interface
. . . . . . . . . . . . . . .
32
. . . . . . . . . . . . . . . . . . . . . . . . . . . .
34
3.3.1
Raw Data Files vs. ChromSquare Files . . . . . . . . . . . .
34
3.3.2
Chromsquare
Result Files
35
3.3.3
Chromsquare
Schedule Files
3.3.4
Chromsquare
Method Files
3.3.5
. . . . . . . . . . . . . . . . . . .
. . . . . . . . . . . . . . . . .
36
. . . . . . . . . . . . . . . . . .
37
Opening Files . . . . . . . . . . . . . . . . . . . . . . . . . .
37
The Java Console . . . . . . . . . . . . . . . . . . . . . . . . . . . .
37
3.4.1
38
The Java Console buttons
. . . . . . . . . . . . . . . . . . .
4 Menu Bar
4.1
4.2
Menu
40
File
. . . . . . . . . . . . . . . . . . . . . . . . . . . . . . .
40
4.1.1
Open Datale . . . . . . . . . . . . . . . . . . . . . . . . . .
40
4.1.2
Close Datale . . . . . . . . . . . . . . . . . . . . . . . . . .
43
4.1.3
Assemble Datale . . . . . . . . . . . . . . . . . . . . . . . .
43
4.1.4
Save Datale
. . . . . . . . . . . . . . . . . . . . . . . . . .
43
4.1.5
Export as CDF le . . . . . . . . . . . . . . . . . . . . . . .
44
4.1.6
Export as XML for Excel
. . . . . . . . . . . . . . . . . . .
44
4.1.7
Save Map as Image . . . . . . . . . . . . . . . . . . . . . . .
44
4.1.8
Data info
. . . . . . . . . . . . . . . . . . . . . . . . . . . .
46
4.1.9
Exit
. . . . . . . . . . . . . . . . . . . . . . . . . . . . . . .
46
Menu
4.2.1
Method
. . . . . . . . . . . . . . . . . . . . . . . . . . . . . .
New Method
. . . . . . . . . . . . . . . . . . . . . . . . . .
2
46
47
4.3
4.4
4.5
4.6
4.2.2
Open Method . . . . . . . . . . . . . . . . . . . . . . . . . .
47
4.2.3
Save Method
47
4.2.4
Save Method As...
Menu
. . . . . . . . . . . . . . . . . . . . . . . . . .
. . . . . . . . . . . . . . . . . . . . . . .
48
. . . . . . . . . . . . . . . . . . . . . . . . . . . . .
48
. . . . . . . . . . . . . . . . . . . . . . . . . . . . . . .
48
Schedule
4.3.1
New
4.3.2
Add chromatograms
4.3.3
Open Schedule
4.3.4
Menu
. . . . . . . . . . . . . . . . . . . . . .
49
. . . . . . . . . . . . . . . . . . . . . . . . .
49
Save Schedule As... . . . . . . . . . . . . . . . . . . . . . . .
49
View
. . . . . . . . . . . . . . . . . . . . . . . . . . . . . . .
49
4.4.1
Reset Zoom . . . . . . . . . . . . . . . . . . . . . . . . . . .
50
4.4.2
Zoom In . . . . . . . . . . . . . . . . . . . . . . . . . . . . .
50
4.4.3
Zoom Out . . . . . . . . . . . . . . . . . . . . . . . . . . . .
50
4.4.4
3D View . . . . . . . . . . . . . . . . . . . . . . . . . . . . .
50
Menu
Options
. . . . . . . . . . . . . . . . . . . . . . . . . . . . .
4.5.1
Interpolation switches
4.5.2
2D Chromatogram Plot switches
. . . . . . . . . . . . . . .
52
4.5.3
Linear Chromatogram Plot switches . . . . . . . . . . . . . .
54
Menu
Action
. . . . . . . . . . . . . . . . . . . . .
51
52
. . . . . . . . . . . . . . . . . . . . . . . . . . . . . .
54
4.6.1
Integrate ROI . . . . . . . . . . . . . . . . . . . . . . . . . .
55
4.6.2
Integrate Whole Chromatogram . . . . . . . . . . . . . . . .
55
4.6.3
Quantitate . . . . . . . . . . . . . . . . . . . . . . . . . . . .
56
4.6.4
Remove Integration . . . . . . . . . . . . . . . . . . . . . . .
56
4.6.5
Integrate all chromatograms . . . . . . . . . . . . . . . . . .
56
4.6.6
Create Calibration
. . . . . . . . . . . . . . . . . . . . . . .
56
4.6.7
Show Calibration . . . . . . . . . . . . . . . . . . . . . . . .
57
4.6.8
Create Calibration Group
. . . . . . . . . . . . . . . . . . .
57
4.6.9
Show Calibration Group
. . . . . . . . . . . . . . . . . . . .
57
4.6.10 Create Chromatogram Report . . . . . . . . . . . . . . . . .
57
4.6.11 Search selected Blob
60
. . . . . . . . . . . . . . . . . . . . . .
3
4.7
4.8
4.6.12 Search all Blobs . . . . . . . . . . . . . . . . . . . . . . . . .
60
4.6.13 Correct Wrap Around
. . . . . . . . . . . . . . . . . . . . .
60
. . . . . . . . . . . . . . . . . . . . . . . . . . . . . . .
60
Menu
Tools
4.7.1
Report Template Editor
. . . . . . . . . . . . . . . . . . . .
60
4.7.2
Compare/Subtract Chromatograms . . . . . . . . . . . . . .
62
Menu
Help
. . . . . . . . . . . . . . . . . . . . . . . . . . . . . . .
62
4.8.1
Help
. . . . . . . . . . . . . . . . . . . . . . . . . . . . . . .
62
4.8.2
License . . . . . . . . . . . . . . . . . . . . . . . . . . . . . .
62
4.8.3
Java 3D Info . . . . . . . . . . . . . . . . . . . . . . . . . . .
63
4.8.4
Java Console
. . . . . . . . . . . . . . . . . . . . . . . . . .
63
4.8.5
About
. . . . . . . . . . . . . . . . . . . . . . . . . . . . . .
63
5 Schedule Panel
64
5.1
Schedule Tool Bar . . . . . . . . . . . . . . . . . . . . . . . . . . . .
64
5.2
Schedule Table
. . . . . . . . . . . . . . . . . . . . . . . . . . . . .
65
The Context Menu of the Schedule Table . . . . . . . . . . .
67
5.2.1
6 Method Panel
6.1
6.2
71
Panel contents . . . . . . . . . . . . . . . . . . . . . . . . . . . . . .
71
6.1.1
Integration page . . . . . . . . . . . . . . . . . . . . . . . . .
72
6.1.2
Method Filename . . . . . . . . . . . . . . . . . . . . . . . .
72
6.1.3
Method Parameters
72
6.1.4
Blobs ID Table (Blob Recognition)
6.1.5
Buttons for Blob ID Table management
6.1.6
Groups ID Table
6.1.7
Buttons for Group Table management
6.1.8
ROI
6.1.9
Ion Selection for Map Display
. . . . . . . . . . . . . . . . . . . . . .
. . . . . . . . . . . . . .
72
. . . . . . . . . . .
73
. . . . . . . . . . . . . . . . . . . . . . . .
74
. . . . . . . . . . . .
74
. . . . . . . . . . . . . . . . . . . . . . . . . . . . . . .
75
. . . . . . . . . . . . . . . . .
75
Shimadzu Spectra Search page . . . . . . . . . . . . . . . . . . . . .
75
6.2.1
75
Library le #n
. . . . . . . . . . . . . . . . . . . . . . . . .
4
6.2.2
Delete duplicates
. . . . . . . . . . . . . . . . . . . . . . . .
76
6.2.3
Reverse search . . . . . . . . . . . . . . . . . . . . . . . . . .
76
6.2.4
LRI upper tolerance-lower tolerance . . . . . . . . . . . . . .
76
6.2.5
LRI index in library
. . . . . . . . . . . . . . . . . . . . . .
76
6.2.6
LRI Table . . . . . . . . . . . . . . . . . . . . . . . . . . . .
77
7 Chromatogram Panel
78
7.1
Panel Contents
. . . . . . . . . . . . . . . . . . . . . . . . . . . . .
78
7.2
The Map Plot Window . . . . . . . . . . . . . . . . . . . . . . . . .
79
7.2.1
Features . . . . . . . . . . . . . . . . . . . . . . . . . . . . .
79
7.2.2
Selection . . . . . . . . . . . . . . . . . . . . . . . . . . . . .
79
7.2.3
Zoom
. . . . . . . . . . . . . . . . . . . . . . . . . . . . . .
80
7.2.4
Map Plot Context Menu . . . . . . . . . . . . . . . . . . . .
83
The Graphical Parameters Page . . . . . . . . . . . . . . . . . . . .
86
7.3.1
The Color Mapping Panel
. . . . . . . . . . . . . . . . . . .
86
7.3.2
The Navigator Panel
. . . . . . . . . . . . . . . . . . . . . .
88
The Chromatogram page . . . . . . . . . . . . . . . . . . . . . . . .
89
7.4.1
Single modulation in zoom interval
90
7.4.2
Single modulation in whole modulation interval
7.4.3
Multiple modulation in zoom interval
7.4.4
7.3
7.4
. . . . . . . . . . . . . .
. . . . . . .
90
. . . . . . . . . . . .
91
Multiple modulation in whole modulation interval . . . . . .
92
7.5
The Spectrum page . . . . . . . . . . . . . . . . . . . . . . . . . . .
93
7.6
The Data Analysis page
93
. . . . . . . . . . . . . . . . . . . . . . . .
7.6.1
The Data Analysis table
. . . . . . . . . . . . . . . . . . . .
7.6.2
The Data Analysis Toolbar
7.6.3
The Data Analysis Context Menu . . . . . . . . . . . . . . . 100
. . . . . . . . . . . . . . . . . .
94
99
7.7
The Grouping page . . . . . . . . . . . . . . . . . . . . . . . . . . . 106
7.8
The Status Bar
. . . . . . . . . . . . . . . . . . . . . . . . . . . . . 107
8 Qualitative Data Analysis
108
5
8.1
8.2
8.3
Set up the Chromatogram
. . . . . . . . . . . . . . . . . . . . . . . 108
8.1.1
Load the Chromatogram . . . . . . . . . . . . . . . . . . . . 108
8.1.2
View the Chromatogram . . . . . . . . . . . . . . . . . . . . 108
Integrate the Chromatogram . . . . . . . . . . . . . . . . . . . . . . 109
8.2.1
Set up the Method
. . . . . . . . . . . . . . . . . . . . . . . 110
8.2.2
Integrate Whole Chromatogram . . . . . . . . . . . . . . . . 111
8.2.3
Integrate ROI . . . . . . . . . . . . . . . . . . . . . . . . . . 111
8.2.4
Check the Integration Results
8.2.5
Change the Integration Parameters
8.3.1
Manual Identication of the Blobs . . . . . . . . . . . . . . . 114
8.3.2
Automatic Identication of the Blobs . . . . . . . . . . . . . 115
118
External Standard Calibration . . . . . . . . . . . . . . . . . . . . . 118
9.1.1
Set up the Schedule . . . . . . . . . . . . . . . . . . . . . . . 118
9.1.2
Set up the Method
9.1.3
Load a chromatogram
9.1.4
Integrate the chromatogram . . . . . . . . . . . . . . . . . . 127
9.1.5
Identify the Blobs . . . . . . . . . . . . . . . . . . . . . . . . 129
9.1.6
Integrate again
9.1.7
Integrate All Chromatograms
9.1.8
Assign the concentrations
9.1.9
Save the Schedule . . . . . . . . . . . . . . . . . . . . . . . . 134
. . . . . . . . . . . . . . . . . . . . . . . 123
. . . . . . . . . . . . . . . . . . . . . 126
. . . . . . . . . . . . . . . . . . . . . . . . . 130
9.1.10 Create the Calibration
9.2
. . . . . . . . . . . . . . 112
Identify the Blobs . . . . . . . . . . . . . . . . . . . . . . . . . . . . 114
9 Quantitative Data Analysis
9.1
. . . . . . . . . . . . . . . . . 112
. . . . . . . . . . . . . . . . . 131
. . . . . . . . . . . . . . . . . . . 132
. . . . . . . . . . . . . . . . . . . . . 134
9.1.11 View Calibration results
. . . . . . . . . . . . . . . . . . . . 136
9.1.12 Save the Schedule again
. . . . . . . . . . . . . . . . . . . . 136
Internal Standard Calibration
9.2.1
. . . . . . . . . . . . . . . . . . . . . 138
Set up the Schedule . . . . . . . . . . . . . . . . . . . . . . . 138
6
9.2.2
Set up the Method
. . . . . . . . . . . . . . . . . . . . . . . 138
9.2.3
Load a chromatogram
9.2.4
Integrate the chromatogram . . . . . . . . . . . . . . . . . . 138
9.2.5
Identify the Blobs . . . . . . . . . . . . . . . . . . . . . . . . 138
9.2.6
Integrate again
9.2.7
Integrate All Chromatograms
9.2.8
Assign the concentrations
9.2.9
Save the Schedule . . . . . . . . . . . . . . . . . . . . . . . . 139
. . . . . . . . . . . . . . . . . . . . . . . . . 139
9.2.10 Create the Calibration
9.3
9.4
. . . . . . . . . . . . . . . . . . . . . 138
. . . . . . . . . . . . . . . . . 139
. . . . . . . . . . . . . . . . . . . 139
. . . . . . . . . . . . . . . . . . . . . 139
9.2.11 View Calibration results
. . . . . . . . . . . . . . . . . . . . 139
9.2.12 Save the Schedule again
. . . . . . . . . . . . . . . . . . . . 140
Quantitation of an Unknown Sample Chromatogram
. . . . . . . . 140
9.3.1
Add unknown sample les to the schedule
. . . . . . . . . . 140
9.3.2
Load a chromatogram
9.3.3
Integrate the chromatogram . . . . . . . . . . . . . . . . . . 140
9.3.4
Execute the Quantitative Analysis
. . . . . . . . . . . . . . . . . . . . . 140
. . . . . . . . . . . . . . 141
Group Calibration
. . . . . . . . . . . . . . . . . . . . . . . . . . . 142
9.4.1
Description
. . . . . . . . . . . . . . . . . . . . . . . . . . . 142
9.4.2
Dene Groups in the Method Panel . . . . . . . . . . . . . . 143
9.4.3
Integrate All Chromatograms
9.4.4
Group Calibration
9.4.5
Group Quantitation . . . . . . . . . . . . . . . . . . . . . . . 154
. . . . . . . . . . . . . . . . . 147
. . . . . . . . . . . . . . . . . . . . . . . 149
10 Advanced Topics
156
10.1 3D View . . . . . . . . . . . . . . . . . . . . . . . . . . . . . . . . . 156
10.1.1 Description
. . . . . . . . . . . . . . . . . . . . . . . . . . . 156
10.1.2 Changing the scene . . . . . . . . . . . . . . . . . . . . . . . 158
10.1.3 The 3D View Tool Bar . . . . . . . . . . . . . . . . . . . . . 158
10.2 Compare/subtract tool . . . . . . . . . . . . . . . . . . . . . . . . . 161
7
10.2.1 Introduction . . . . . . . . . . . . . . . . . . . . . . . . . . . 161
10.2.2 Denitions . . . . . . . . . . . . . . . . . . . . . . . . . . . . 161
10.2.3 Description of the Compare/Subtract window
. . . . . . . . 162
10.2.4 Operations . . . . . . . . . . . . . . . . . . . . . . . . . . . . 165
10.3 Dene Polygonal Blobs . . . . . . . . . . . . . . . . . . . . . . . . . 165
10.4 Proles . . . . . . . . . . . . . . . . . . . . . . . . . . . . . . . . . . 168
10.4.1 Description
. . . . . . . . . . . . . . . . . . . . . . . . . . . 168
10.4.2 Dening a new Prole
10.5 Conguration
. . . . . . . . . . . . . . . . . . . . . . . . . . . . . . 170
10.5.1 Description
10.5.2 The le
. . . . . . . . . . . . . . . . . . . . . 168
. . . . . . . . . . . . . . . . . . . . . . . . . . . 170
Options.xml
. . . . . . . . . . . . . . . . . . . . . . 170
10.6 Ion selection . . . . . . . . . . . . . . . . . . . . . . . . . . . . . . . 171
10.6.1 Description
. . . . . . . . . . . . . . . . . . . . . . . . . . . 171
10.7 Assembling Data Files
10.7.1 Description
. . . . . . . . . . . . . . . . . . . . . . . . . 172
. . . . . . . . . . . . . . . . . . . . . . . . . . . 172
10.7.2 Procedure . . . . . . . . . . . . . . . . . . . . . . . . . . . . 173
11 Technical Notes
177
11.1 Prerequisites to install ChromSquare with GCMSsolution spectra
search
. . . . . . . . . . . . . . . . . . . . . . . . . . . . . . . . . . 177
11.1.1 Description
. . . . . . . . . . . . . . . . . . . . . . . . . . . 177
8
List of Figures
2.1
The Chromsquare desktop icon
. . . . . . . . . . . . . . . . . . . .
2.2
The Chromsquare initial splash screen
2.3
Enter License Code window for Normal License
2.4
Enter License Code window for Demo License
3.1
Chromsquare
. . . . . . . . . . . . . . . .
22
23
. . . . . . . . . . .
25
. . . . . . . . . . . .
26
Main Window . . . . . . . . . . . . . . . . . . . . . .
33
3.2
The Java Console . . . . . . . . . . . . . . . . . . . . . . . . . . . .
39
4.1
The Menu File
40
4.2
File description and features of the Data le selected
. . . . . . . .
42
4.3
The Save Map as Image Dialog Box . . . . . . . . . . . . . . . . . .
45
4.4
The Select Font Dialog Box
45
4.5
The Current Data Info Dialog Box
4.6
The Menu Method
. . . . . . . . . . . . . . . . . . . . . . . . . . . . .
. . . . . . . . . . . . . . . . . . . . . .
. . . . . . . . . . . . . . . . . .
46
. . . . . . . . . . . . . . . . . . . . . . . . . . .
47
4.7
The Menu Schedule . . . . . . . . . . . . . . . . . . . . . . . . . . .
48
4.8
The Menu View . . . . . . . . . . . . . . . . . . . . . . . . . . . . .
50
4.9
The Menu Options
. . . . . . . . . . . . . . . . . . . . . . . . . . .
51
4.10 The Menu Action . . . . . . . . . . . . . . . . . . . . . . . . . . . .
55
4.11 The Report Template Selector Dialog Box
. . . . . . . . . . . . . .
58
4.12 The Chromatogram Report Preview . . . . . . . . . . . . . . . . . .
59
4.13 The Menu Tools . . . . . . . . . . . . . . . . . . . . . . . . . . . . .
61
4.14 The Report Template Editor Window . . . . . . . . . . . . . . . . .
61
4.15 The Menu Help . . . . . . . . . . . . . . . . . . . . . . . . . . . . .
62
9
4.16 The The Java 3D information window
. . . . . . . . . . . . . . . .
63
5.1
The Tool Bar of the Schedule Panel . . . . . . . . . . . . . . . . . .
64
5.2
The Schedule Panel before loading a Method . . . . . . . . . . . . .
68
5.3
The Schedule Panel after loading a Method . . . . . . . . . . . . . .
68
5.4
The Schedule Panel after the assignment of the Concentrations . . .
69
5.5
The context menu of the Schedule Table
. . . . . . . . . . . . . . .
70
6.1
The Method Panel - Integration Page . . . . . . . . . . . . . . . . .
71
6.2
The Method Panel - Shimadzu Spectra Search Page . . . . . . . . .
76
7.1
Map Plot - Context Menu
. . . . . . . . . . . . . . . . . . . . . . .
81
7.2
Map Plot - Zoomed Region
. . . . . . . . . . . . . . . . . . . . . .
82
7.3
Insert Blob Name window
. . . . . . . . . . . . . . . . . . . . . . .
84
7.4
The Method Panel with the new Blob ID . . . . . . . . . . . . . . .
84
7.5
Graphical Parameters Page
. . . . . . . . . . . . . . . . . . . . . .
86
7.6
Navigator Panel with Zoomed Area . . . . . . . . . . . . . . . . . .
88
7.7
The Toolbar of the Chromatogram page
. . . . . . . . . . . . . . .
90
7.8
Single modulation in zoom interval
. . . . . . . . . . . . . . . . . .
91
7.9
Single modulation in whole modulation interval
. . . . . . . . . . .
91
7.10 Multiple modulation in zoom interval . . . . . . . . . . . . . . . . .
92
7.11 Multiple modulation in whole modulation interval . . . . . . . . . .
92
7.12 The Spectrum page . . . . . . . . . . . . . . . . . . . . . . . . . . .
93
7.13 Data Analysis page - Overall view . . . . . . . . . . . . . . . . . . .
94
7.14 Data Analysis page - Left view
. . . . . . . . . . . . . . . . . . . .
94
7.15 Data Analysis page - Right view . . . . . . . . . . . . . . . . . . . .
95
7.16 Data Analysis page - Example showing ID Grouping case . . . . . .
98
7.17 Data Analysis page - The Data Analysis Toolbar
99
. . . . . . . . . .
7.18 Enhanced representation of the selected Blob . . . . . . . . . . . . . 100
7.19 Data Analysis page - The Data Analysis Context Menu
10
. . . . . . 101
7.20 Show Spectrum window
. . . . . . . . . . . . . . . . . . . . . . . . 102
7.21 A full zoomed Blob . . . . . . . . . . . . . . . . . . . . . . . . . . . 103
7.22 The window displaying Blob Info
. . . . . . . . . . . . . . . . . . . 104
7.23 The Assign Compound dialog box . . . . . . . . . . . . . . . . . . . 105
7.24 Method Panel showing one Group . . . . . . . . . . . . . . . . . . . 106
7.25 Grouping page - The results . . . . . . . . . . . . . . . . . . . . . . 106
7.26 Chromatogram Panel - The Status Bar . . . . . . . . . . . . . . . . 107
8.1
The Method parameters
. . . . . . . . . . . . . . . . . . . . . . . . 110
8.2
Qualitative Analysis: Whole Chromatogram integrated
8.3
Qualitative Analysis: Dene ROI
8.4
Qualitative Analysis: ROI integrated
9.1
A list of les properly ordered for quantitative analysis
9.2
Initial Window for Quantitative Analysis . . . . . . . . . . . . . . . 121
9.3
Schedule Panel with some Chromatograms added
9.4
The Schedule Menu with Add chromatograms command selected . 122
9.5
Switch to the Method Panel
9.6
The Method Menu with Open Method command selected . . . . . 124
9.7
The Method Panel showing a new empty Method
. . . . . . . . . . 125
9.8
The Method Panel with some parameters entered
. . . . . . . . . . 125
9.9
The icon for loading the selected chromatogram
. . . . . . . 111
. . . . . . . . . . . . . . . . . . . 113
. . . . . . . . . . . . . . . . . 113
. . . . . . . 120
. . . . . . . . . . 121
. . . . . . . . . . . . . . . . . . . . . . 123
. . . . . . . . . . . 126
9.10 The Menu Action - Integrate Whole Chromatogram . . . . . . . . . 127
9.11 The window showing the calculation progress . . . . . . . . . . . . . 128
9.12 Integrated chromatogram - Zoomed view . . . . . . . . . . . . . . . 128
9.13 Manual identication of a Blob
. . . . . . . . . . . . . . . . . . . . 129
9.14 Method Panel showing Blob names and Method le name . . . . . . 130
9.15 Integrated chromatogram with names of the recognized Blobs
9.16 Schedule panel ready to insert concentration values
. . . 131
. . . . . . . . . 133
9.17 Schedule panel while inserting a concentration value . . . . . . . . . 134
11
9.18 The Calibration Results Dialog box . . . . . . . . . . . . . . . . . . 135
9.19 The Calibration Graph window
. . . . . . . . . . . . . . . . . . . . 137
9.20 The Quantitation Results reported on the Schedule Panel . . . . . . 142
9.21 Method Panel with some Blob ID dened . . . . . . . . . . . . . . . 144
9.22 List of all Blob IDs . . . . . . . . . . . . . . . . . . . . . . . . . . . 145
9.23 Selection of the Blob IDs . . . . . . . . . . . . . . . . . . . . . . . . 145
9.24 Method Panel with one Group . . . . . . . . . . . . . . . . . . . . . 146
9.25 Method Panel with more Groups
. . . . . . . . . . . . . . . . . . . 147
9.26 Integration Results with Named Groups
. . . . . . . . . . . . . . . 148
9.27 Integration Results: Grouping Results Table . . . . . . . . . . . . . 149
9.28 Group Calibration Command
. . . . . . . . . . . . . . . . . . . . . 150
9.29 Group Calibration Summary . . . . . . . . . . . . . . . . . . . . . . 151
9.30 Group Calibration Data
. . . . . . . . . . . . . . . . . . . . . . . . 152
9.31 Group Calibration Graph . . . . . . . . . . . . . . . . . . . . . . . . 153
9.32 Group Calibration - Quantitation Results - Data Analysis Page
. . 154
9.33 Group Calibration Quantitation Results Grouping Page . . . . . 155
10.1 3D View Window - Initial View
. . . . . . . . . . . . . . . . . . . . 157
10.2 3D View Window - Surface colorization . . . . . . . . . . . . . . . . 160
10.3 Compare/Subtract Tool
. . . . . . . . . . . . . . . . . . . . . . . . 162
10.4 The Compare/Subtract Window Tool Bar
. . . . . . . . . . . . . . 163
10.5 Dening a Polygonal Region . . . . . . . . . . . . . . . . . . . . . . 166
10.6 Entering the polygon region name . . . . . . . . . . . . . . . . . . . 167
10.7 The polygonal Blob after integration
. . . . . . . . . . . . . . . . . 167
10.8 Open Dialog Box with Prole Combo Box
. . . . . . . . . . . . . . 169
10.9 The New Prole window . . . . . . . . . . . . . . . . . . . . . . . . 170
10.10Method Panel with Ion Selection
. . . . . . . . . . . . . . . . . . . 172
10.11The File selection Dialog box of the Assemble case . . . . . . . . . . 173
10.12List of the les to assemble . . . . . . . . . . . . . . . . . . . . . . . 174
12
10.13Files selected for assembling
. . . . . . . . . . . . . . . . . . . . . . 174
10.14Asking for conrmation before assembling
. . . . . . . . . . . . . . 175
10.15The resulting assembled chromatogram . . . . . . . . . . . . . . . . 176
13
Chapter 1
Foreword
1.1 Contact Information
Chromaleont S.r.l.
Via Industriale 143, I-98123, Messina, Italy
Tel.: +39-3392620612; Fax: +39-090-358220
e-mail: [email protected]
Web site: www.chromaleont.it
1.2 Legal Information
1.2.1 Copyright
Copyright Chromaleont S.r.l. 2009-2010. All rights are reserved, including those
to reproduce this publication or parts thereof in any form, without the express
permission of Chromaleont S.r.l.
Information in this publication is subjected to change without notice and does not
represent a commitment on the part of the vendor.
Any error or omission which may have occurred in this publication will be corrected
as soon as possible, but not necessary immediately upon detection.
Chromaleont makes no claims or warranty concerning the inuence of the application of this publication on the operation of the machine.
Note that Chromaleont does not have any obligation concerning the eects resulting from the application of the contents of this manual.
14
1.2.2 Warranty
Chromaleont provides for this product the warranty described in the following
paragraphs.
1.2.2.1
Period
Please contact Chromaleont at [email protected] for information about
the period of this warranty.
1.2.2.2
Description
If a product/part failure occurs for reasons attributable to Chromaleont during
the warranty period, Chromaleont will repair or replace the product/part free of
charge. However, in the case of products which are usually available on the market
only for a short time, such as personal computers and their peripherals/parts,
Chromaleont may not be able to provide identical replacement products.
1.2.2.3
Exceptions
Failures caused by the following are excluded from the warranty, even if they occur
during the warranty period.
1. Improper product handling.
2. Repairs or modications performed by parties other than Chromaleont or
Chromaleont designated companies.
3. Product use in combination with hardware or software other than that designated by Chromaleont.
4. Computer viruses leading to device failures and damage to data and software,
including the product's basic software.
5. Power failures leading to device failures and damage to data and software,
including the product's basic software.
6. Turning OFF the product without following the proper shutdown procedure
leading to device failures and damage to data and software, including the
product's basic software.
15
7. Reasons unrelated to the product itself.
8. Product use in harsh environments, such as those subject to high temperatures or humidity levels, corrosive gases, or strong vibrations.
9. Fires, earthquakes, or any other act of nature, contamination by radioactive
or hazardous substances, or any other force major event, including wars,
riots, and crimes.
10. Product movement or transportation after installation.
11. Consumable items (Recording media such as oppy disks and CD-ROMs are
included).
1.3 Introduction
1.3.1 Outline of the Software
Congratulations on your purchase of the Chromaleont
Chromsquare
GCxGC/MS
& LCxGC/MS version for Shimadzu GCMSsolution and GCsolution.
Chromsquare
workstation software is designed for visualizing, processing, and re-
porting on data obtained by Two-Dimensional Chromatography.
A license and USB Bluetooth Key is required for execution. A trial version, with
60 days soft-key license, is also available at no charge.
The software and the documentation are released with dierent license types, listed
in the next Section. License types refer to the types of data les that the software
can analyze, namely:
•
data les in proprietary format, generated by various kinds of Shimadzu
instruments;
•
data les in open format (AIA/ANDI).
There is also a general purpose license type which includes all the other ones.
1.3.1.1
License types
Presently the following license types are provided:
16
1. GCxGC/MS & LCxGC/MS version for Shimadzu GCMSsolution and GCsolution
2. LCxLC version for Shimadzu LCsolution
3. LCxLC version for Shimadzu LCMSsolution and LCsolution
4. Text and NetCDF Version
5. Text and NetCDF Version with NIST Spectra Search
6. All Features Version
The present Manual is specic for GCxGC/MS & LCxGC/MS version for Shimadzu GCMSsolution and GCsolutionlicense type. Manuals
relative to other licenses may be furnished on demand.
1.3.2 Outline of the Manual
1.3.2.1
Prerequisites
Please read this Instruction Manual carefully before using the product and operate
the product in accordance with the instruction given thereby. Keep this instruction
manual for future reference.
This Instruction material was written with the assumption that the reader has
some knowledge of MS-Windows. For information on the names and terminology
associated with MS-Windows, please refer to the MS-Windows user documentation. If you are using MS-Windows for the rst time, please read the MS-Windows
user documentation prior to reading this Help material.
1.3.2.2
Structure
The Manual can be considered as consisting of four parts :
1. the rst part is a general introduction and includes the Chapters 1-3;
2. the second part is an analytical description of all parts of the Graphical User
Interface (the Menu and the three Main Panels); it includes Chapters from
4 to 7;
3. the third part is a detailed description of the main routine operations : namely,
Qualitative and Quantitative Analysis; it includes Chapters 8 and 9;
17
4. the fourth part is a description of various advanced operations ; it includes
Chapter 10.
1.3.2.3
How to use this Manual
We recommend that the user carefully read the following key chapters:
•
Chapter 3 (Overview): this gives an essential introduction to the main concepts and terminology;
•
Chapter 8 (Qualitative Analysis): this describes step by step the most common usage of the software;
•
Chapter 9 (Quantitative Analysis): the same as before, for users which will
use the software for quantitation.
All others chapters may be used as reference : that is, they do not need to be read
sequentially, but more protably consulted upon the frequent references from the
aforementioned key Chapters.
1.3.2.4
How to understand the Figures
The Figures reproduce screen shots (or parts of them) taken during software operations.
Figures have the main function of supporting the user to better interpret
the contents of the written text, and to avoid misunderstandings about
the use of the graphical objects.
They do not always represent an exact reproduction of software behaviour, since
this is aected by to many factors (like license types and choice of sample data
les). In same cases, where the type of license makes the dierence, the Figures
refers to that very license; in other cases, when the Figure is just used to explain
an operation not depending on any particular license, the Figure may contain
references to a license dierent from that to which the manual refers.
18
Chapter 2
Installation and Startup
2.1 Installing the software
The
Chromsquare
is a Java application : this means that it may run under any
operating system, provided that a suitable Java Virtual Machine is installed on
1
it .
Before installing the
Chromsquare
software verify that a recent Java Runtime
Environment (version 1.6 or later) is installed. For free download, visit the site
http://www.java.com.
The install disk is provided as a CD-ROM. To install the
Chromsquare
software,
insert the CD-ROM into the driver. The disk contains a bootstrap installation.
The installation procedure is a very straightforward, very similar to the most
common installation procedures. The user should navigate among various dialog
boxes, answering to very simple questions.
In the following steps, an outline of the installation procedure is reported. The
various windows make a sequence that may be navigated in both directions: at
any time it is possible to go back to correct some parameter, but normally the user
advances through a series of
Next
commands.
1. The rst window is a Prerequisite window: it warns the user about some
hardware requirements. If the requirements are satised, select
Yes
to con-
tinue with the installation.
1 The compatibility dopes not apply to some components which provide the interaction with
the instrumentation software, which are only compliant with Microsoft Windows systems.
19
2. The next window is a Welcome window; no answer is required; select
Next
to continue.
3. The next window informs the user about the installed Java Environment; no
answer is required; select
Next
to continue.
4. The next window informs the user about the installed Java Environment;
select
Next
to continue.
5. The next windows is Select Destination Location. The software suggests as
C: root disk. It
Next to continue.
default the folder ChromSquare in the
to change the default folder. Select
6. The next windows is Select Start Menu Folder.
is recommended not
The software suggests as
default the folder ChromSquare. It is recommended not to change the default
value. Select
Next
to continue.
7. The next windows is Select Additional Tasks. The software asks for creating
a desktop icon. It is recommended to check the box. Select
Note.
Next to continue.
The installation procedure creates a second ChromSquare icon, la-
beled Debug Mode, in the Program Group (this second icon is not displayed
on the desktop); the icon allows to run the application displaying an informative window, called Java Console (see See Section 3.4). The Java Console
may be useful to detect errors; it does not aect the software performance
(only in some cases it can run a little slowly).
Normally the user should not use this second icon, except when requested
from the Technical Assistance; anyway, running in Debug Mode does not do
any harm, and the Java Console can be closed at any moment.
8. The next windows is Ready to Install.
This is a nal review of the previ-
ous steps, before proceeding with the very installation. Select
Install
to
continue.
9. The Installing window is then displayed, showing a progress bar which lasts
for some instants; at the end the window will close automatically.
10. The installation procedure terminates asking the user for some optional installations.
•
The rst one concerns the installation of a set of sample les ; sample
les are specic for the license purchased.
Answer
Yes
if this is the
rst installation or an upgrade of a previous installation: sample les
are very useful for testing the software before real use and they do not
20
require too much disk space; answer
No
if you are just re-installing the
software starting from the same media; in case of doubt, answer
Yes.
The installation of sample les is accomplished through a Command
Prompt window, that appears and disappears in few seconds, except in
the case that other sample les are found: in this case the Command
Prompt window will ask if you want to overwrite existing sample les;
even in this case, answer
Yes.
At the end, a message will inform the user about the folder used for the
sample les installation.
•
The second optional installation concerns the manual les ; manual les
are specic for the license purchased.
Answer
installation or an upgrade of the software:
Yes
if this is the rst
manual les may change
between dierent releases of the software; answer
No
only if you are re-
installing the software starting from the same media; in case of doubt,
answer
Yes.
The installation of manual les is accomplished through a Command
Prompt window, that appears and disappears in few seconds, except in
the case that other manual les are found: in this case the Command
Prompt window will ask if you want to overwrite existing manual les;
even in this case, answer
Yes.
At the end, a message will inform the user about the folder used for the
manual les installation.
Note:
the windows about the optional installations are shown only if the
installation package contains the samples or manual les; if you are installing
an upgrade of the software, it is possible that these les are not present, and
the corresponding windows are not shown.
11. The last window (Completing the ChromSquare Setup Wizard ) terminates
the installation procedure. If you want to launch immediately the program,
tick the appropriate check box and then the
Finish
button.
2.2 Uninstalling the software
There is no specic uninstall procedure of the software:
Windows uninstall facility, as follows:
•
From the Windows
Start
menu, choose
21
Settings;
just use the standard
Control Panel;
•
then click
•
double click the
•
select
•
choose
Add/Remove Programs
icon;
ChromSquare;
Remove.
The procedure may slightly vary according to the dierent Windows versions and
languages.
2.3 Starting ChromSquare software
To execute
Chromsquare
, use the desktop icon or the corresponding item of the
Start menu (see Figure 2.1).
Figure 2.1: The Chromsquare desktop icon
A splash screen containing information about the software and its producer is
shown during the few seconds required to load the application software.
The splash screen is shown in the Figure 2.2.
22
Figure 2.2: The Chromsquare initial splash screen
2.4 Registering the License
2.4.1 License policy
Chromsquare
software always requires a license : this may be a regular license or
a demo license :
•
regular licenses are based on an hardware device (Bluetooth Adapter key, or
simply BT key );
•
demo licenses are based on an expiration date.
In both cases:
•
any license is supplied together with an activation code, that is a sequence
2
of 32 hexadecimal digits .
•
licenses (both regular and demo ones) are provided in dierent license types.
Types are relative to a particular set of instruments. See the Section 1.3.1.1
for a list of the available types.
The rst time that the software is executed, it asks the user to enter the activation
code; in the case of demo license, it also asks for the expiration date.
2 Hexadecimal digits are the 10 digits from 0 to 9 and the 6 characters from A to F.
23
If the data entered are correct, they are saved internally (so that they are non
longer required the next time the software is executed) and the software session
can start.
If they are not correct, the software will be terminated.
2.4.2 License management
When the software starts, it performs the following operations:
1. Before all, it checks if a BT key is present:
•
if it is present, the software assumes that this is a case of a regular
license;
•
if it is not present, the software assumes that this is a case of a demo
license.
2. A window is then displayed, showing the Software License Agreement and
some elds to be compiled by the user:
•
The Activation Code, that the user had received together with the software CD; it may be entered manually (beware of entering exactly 32
hexadecimal digits), or may be copied and pasted if the license had been
provided though an electronic medium.
•
The License Type, to be chosen through the Combo Box.
•
In the case of demo license, also the Expiration Date (in the format
YYYY.MM.DD)
should be entered.
Figure 2.3 shows the Software License Agreement window in the Normal License
case.
Figure 2.4 shows the Software License Agreement window in the Demo License
case.
24
Figure 2.3: Enter License Code window for Normal License
25
Figure 2.4: Enter License Code window for Demo License
26
Chapter 3
Chromsquare Overview
3.1 General Terminology and Concepts
This chapter introduces some terms thoroughly used by the software and in the
manual text. Even if these terms should be already familiar to the software users
in the eld of bi-dimensional chromatography, it is important to specify exactly
their meaning, since there are some subtle dierences that must be cleared, to
avoid misunderstanding of some descriptions.
3.1.1 Chromatogram
With this term we mean the data coming from chromatographic instrumentation;
since data are normally recorded on les, the term chromatogram is used both for
data loaded in memory and for les containing these data (more accurately, one
should speak of chromatographic data and chromatographic les : for brevity, often
we simply speak of chromatograms ).
Chromatogram is basically a sequence of data, each datum being a couple of
numeric values, corresponding to time and absorbance.
In bi-dimensional chromatography, chromatograms are acquired through a couple of instruments; the resulting data are normally recorded on a unique chromatogram. The overall chromatogram is then split into many slices, called mod-
ulations, according to a parameter called modulation period (in some case the
original chromatogram corresponds to a set of les, each le corresponding to a
single modulation: in these case, the overall chromatogram is build by the software
joining together the single modulations).
27
In bi-dimensional chromatography, chromatograms are represented as bi-dimensional
Maps.
3.1.2 Chromatographic Map
A Chromatographic Map is a bi-dimensional representation of a chromatogram,
according to the following criteria:
•
Horizontal Axis is a counter which represents the modulation number; this
is equivalent to a time axis which measures the total time;
•
Vertical Axis is a time axis which measures the modulation time, that is the
time elapsed from the beginning of each modulation;
•
Colors are used to represent the value of the absorbance at a given point;
the relation between Colors and absorbance is ruled by a Color map, that
can be congured by the user.
The Chromatographic Map is dened on a rectangular mesh of discrete points.
If the points are too much separated (this is frequent, especially in zoomed visualization) the graphic result is a set colored rectangles, resembling a pixel map too
much enlarged. For a better visualization it is possible to perform an interpolation, that calculates a color value at each pixel point of the screen (and not only
at the points of the mesh); in this way the result is a smoothed continuous map
of colors.
3.1.3 Integration
Integration is the calculation process which analyzes the Chromatogram in order
to recognize and identify Peaks (see 3.1.4) and Blobs (see 3.1.5):
•
Recognize means to nd the Blob contours on the map. Recognition is geometrical analysis of the chromatogram map, that can be tuned on the basis
of some parameters.
•
Identify means to assign an identity (that is a name ) to a recognized Blob.
Identication is a process that is generally carried on manually by the user,
which selects the Blobs with the mouse on the map and assign them a name;
GCMSSolution license allows to perform an automatic identication; automatic identication is executed through calls to GCMSSolution software.
28
3.1.4 Peaks
A
Peak
is the basic object of any kind of chromatography: peaks are a signicant
variation of the absorbance signal along modulation time; we have a Peak when it
is possible to recognize a maximum point (Peak Top), a Beginning Point, and an
End Point.
3.1.5 Blobs
A
Blob
is a close geometrical gure, obtained by joining together the beginning
and the end points of the same Peak in adjacent modulations.
Due to the discrete nature of Chromatogram data, Blobs gures are close polygons.
In
Chromsquare
Blobs are data structures which contain various information, both
geometrical and analytical.
3.1.5.1
Blobs: geometrical data
Geometrical data are dened when the Blob is recognized. They include:
•
The description of the Top of the Blob (that is the point of the Blob having
the maximum intensity ; it corresponds to maximum of all Tops of the Peaks
included in the Blob). The Top Blob is identied by:
the Top Modulation Index (that is the counter of the modulation corresponding to the Top);
the Top Time Index (that is the counter of the chromatographic point
corresponding to the Top);
the Total Retention Time (also called
TtR),
that is the retention time
of the chromatographic point corresponding to the Top;
the Second Retention Time (also Called
2tR), that is the retention time
of the chromatographic point corresponding to the Top measured along
the modulation, i.e, the second dimension ;
the Blob Index : this is an integer number which unequivocally identify
the Blob, through a special combination of the Top Modulation Index
and Top Time Index; the Index is useful in the various calculations, since
it avoids the uncertainty arising from the approximations of decimal
numbers.
29
•
The description of the limits of the Blob in the two directions:
the First Modulation and the Last Modulation : two integer numbers
which give the extent of the Blob along the First Dimension;
the Top Modulation Start and the Top Modulation End : two integer
numbers which give the extent of the Blob along the Second Dimension
(that is the rst and last chromatographic points of the Blob measured
along the modulation passing for the Top);
•
the Area of the Blob, that is the area of the corresponding polygon.
3.1.5.2
Blobs: analytical data
Analytical data are computed, and stored in the Blob data structure, as the various
calculation steps are executed.
•
After the completion of the recognition of all Blobs (Integration ), the software
can compute the Area percent of any single Blob.
•
During the identication process, a Blob ID (see next Section) may be assigned to the Blobs (some Blobs could be remain unidentied and classied
as unknown). To each identied Blobs, an ID and a Name are assigned.
•
At the end of the identication process, the Blobs Grouping becomes possible: all Blobs which share the same Blob ID can be treated as single entities,
named Groups. A series of new values (sum of the areas, other percentages
with various normalizations) can now be computed.
•
After the Quantitative Analysis, concentrations can be computed and stored
in the Blob data structure.
•
In the case of Spectral Search with LRI computation, the relative data are
stored in the Blob data structure as well.
See the section 7.6.1 for other details and samples of the Blob data structure,
3.1.6 Blob IDs
A Blob ID is the identication of a Blob or of a group of adjacent Blobs: assigning
a Blob ID means to assign a name to a region of the chromatogram map.
Blob ID is a data structure containing 3 elements:
30
•
the
Name,
that is name of the chemical compound(s) corresponding to the
region; note that names may be very long character string;
•
the
ID,
that is an integer number, a sort of abbreviation used for easier
reference when more chromatograms are compared among them (like in the
calibration process);
•
the
Region,
that is the geometrical description of the polygonal area.
The user can directly set and modify the rst two items (IDs and names) through
the Method Panel (see chapter xxx). Regions are set through a graphical procedure, described in chapter xxx.
3.1.7 Blobs vs. Blob IDs
It is important to highlight the dierence between Blob and Blob ID :
•
Blobs are single objects, belonging to a chromatogram; Blobs are stored in
the ChromSquare Result File (xxx).
•
Blob IDs are analytical information, stored in a Method.
•
In the rst instance, Integration nds all the Blobs of a chromatogram; Blob
IDs are unknown at this time.
•
In the second instance, a Method (containing Blob IDs description) can be
applied; after this step, some Blobs are identied, and a Blob ID is assigned
to them.
3.1.8 Methods
A Method is a set of information that are used by the integration process.
A Method contains three kinds of information:
•
parameters, that are used for Blobs recognition (see xxx for details);
•
a list of Blob identiers (called also Blob IDs, see 3.1.6);
•
an optional Region of Interest (also called ROI);
Methods can be saved and loaded to/from special les, called Method Files (see
xxx).
31
3.1.9 Units
Time is always represented internally in minutes; tables and graphs also show time
in minutes, except in the particular cases, where time is represented in seconds.
Absorbance is normally represented in microVolts, except in the particular cases,
where absorbance is represented in milliVolts.
Anyway please refer of the man-
ual of the software that generated the data le that has been imported, since
ChromSquare uses the same unit as it is dened in the original le.
3.2 Chromsquare Graphical User Interface
The
Chromsquare
Graphical User Interface
consists of a Main Window and many
secondary windows. It is important to know the exact names of these windows, in
order to easily understand the description reported in the manual.
In this manual, the windows names and other objects of the Graphical
User Interface (menu items, toolbar icons, etc.) are represented with
a monospaced font, that is the font used for the present paragraph.
The
Chromsquare
Main Window is represented in Fig. 3.1. It includes - together
with the usual Windows tool bars, like the Menu Bar and the upper Tool Bar an important feature, called ChromSquare Side Bar, placed in the left side of the
main window. This bar contains some large icons (presently 3, but others could
be added in future releases); each icon behaves as a button which lets the user to
switch among dierent panels: the
the
Method Panel.
Schedule Panel,
the
Chromatogram Panel,
In other words, the contents of the main window varies according to the Panel
selected:
in each moment the user can easily shift from one panel to another,
without opening and closing specic windows.
The following table summarizes the list of items reported in Fig. 3.1.
32
Figure 3.1:
Chromsquare
33
Main Window
Name
Function
Title Bar
The Title Bar displays the program name, the license
type, and the name of the chromatogram le currently
loaded.
Menu Bar
The Menu Bar represents the main access to all commands and options of the software: it contains all the
operations for loading and saving les and workspaces,
editing reports, viewing and saving images, switch on
and o various graphical features and interpolation options.
Tool Bar
Frequently used commands are assigned to the buttons
of the Tool Bar, making their use easier. For a detailed
explanation of the Tool bar, see the chapters describing
the corresponding commands.
Side Bar
Contains icons for switching among the main Panels.
Schedule Panel
This window is used to display the
Chromatogram
This
Panel
Panel, which represents the raw chromatogram as entire
Schedule Panel for
quantitative analysis.
window
is
used
to
display
the
Chromatogram
or as modulation chromatogram of a single fraction. In
this window it is also possible to display the integration
results, including retention times, compound names and
quantitative results subsequent to data analysis.
Method Panel
This window is used to display the
Method Panel, which
lets to assign the method parameters.
3.3 File Management
3.3.1 Raw Data Files vs. ChromSquare Files
Before to proceed with the description of the software operations, it is important
square
to understand the File Management engine adopted by Chrom
.
The File Management is based on the following concepts:
•
The software reads Raw Data Files, that is les that are generated by instruments; these les may have dierent extensions, according to the kind
of instruments and to the software license installed, but all have a common
peculiarity:
a Raw Data File is always treated
34
as is ;
it cannot be
changed or modied in any way.
Raw Data Files can only be read,
copied or moved to a dierent folder.
• Chromsquare
software uses for its purposes various les (schedule les, result
les, method les), which will be described later; we will call them generically
Chromsquare les. All these les have a common peculiarity: they are all
XML les, even if they do not have .xml extension, but a specic extension
for each kind of le. Normally the user does not interact directly with these
les: it is the software that manages them. However, being XML les means
that they are open text les: if necessary, the user can explore their content
using a normal browser, like Internet Explorer (or Mozilla or Safari).
A
special mechanism (based on check-sum control) prevents the user to modify
the le contents: the user may inspect the les, but only the software may
manage them.
The
Chromsquare
les are described in the following paragraphs.
3.3.2 Chromsquare Result Files
Chromsquare
Results Files are XML les which have
.xrs
extension (Xml Re-
sult Set ).
They contain all possible information about the chromatogram, except chromatographic data, that remain stored in the Raw Data File (the reason of this choice is
evident: chromatographic data can be really huge; there is no real benet in the
duplication of this amount of data for each chromatogram being analyzed; what is
actually important is to maintain in the Result File a link to the Raw Data le ).
Results File is a sort of summary of the relevant chromatographic data, useful for
qualitative and quantitative analysis. It is a small le, that can be quickly read,
avoiding the CPU overload due to reading of large raw data le when this is not
necessary.
A Result File is generated as soon as a chromatographic le has been loaded with
the Open Data File command (see xxx); initially it contains only the link to the
Raw Data File and few input information (Modulation Period, Second Eluition
Time) that have been set by the user at the opening of the le.
Subsequently, the Result File will be enriched with other information which reect
the progress of the analysis:
•
after the integration completion, the Result File will include the list of all
Blobs, with full details of each Blob;
35
•
after the integration completion, the Result File will also include the full
description of the Method used for the integration;
•
if quantitative analysis is performed, the Results File will also include all
results of the quantitation, namely the concentrations of the identied Blobs;
•
the Result File also includes visual information (like axis scales and color
scale), so that when the le will be reopened, it will reproduce the exact
state of the analysis that there was at the instant of last saving.
The le is overwritten each time a relevant operation is performed on the chromatogram; le overwriting may be also forced by the user through the
File
Save Data
command (see xxx), in order to reect minor changes.
3.3.3 Chromsquare Schedule Files
Chromsquare
Schedule Files are XML les which have
.wls extension (Worklist
Set ). A schedule (called also worklist ), is a set of one or more chromatographic
les.
The user denes a schedule by adding les to the table of the Schedule Panel (les
may be also removed or moved up and down across the table).
Adding a le to the schedule is not the same thing that opening it: opening a
le means loading into memory the full raw data, allowing the visualization of the
chromatogram; adding a le to the schedule just means to add an item to a list (a
special icon can be used to load and view each single chromatogram of the list).
Setting up a schedule give the user the possibility to plan operations to be accomplished on the whole set of chromatograms with just one command.
These
operations are:
• Integration of a group of chromatograms
using the same method ; this
operation is normally nalized to a calibration, but not necessarily; this
operation is activated by the command
Integrate All Chromatograms, see
xxx.
• Calibration.
Calibration is performed using the chromatograms of the
schedule dened as Standards.
A chromatogram is treated as a Standard
if concentrations have been assigned for all Blobs dened in the method.
36
3.3.4 Chromsquare Method Files
Chromsquare
Method Files are XML les which have
.xcm
extension (XML
ChromSquare Method ).
Method Files are used for storing Method data (see 3.1.8).
3.3.5 Opening Files
When the user executes a command for opening a le (using the menu File Open
command or the View icon of the Schedule Tool bar), the software executes some
controls before actually opening the specied les:
1. if the user selects a Raw Data le, and there is no corresponding Result
.xrs
le in the same folder, the software opens it and generates the cor-
responding Result le;
2. if the user selects a Raw Data le, and there is a corresponding Result
.xrs
le in the same folder, the software displays a Dialog Box, which informs the
user that opening the Raw Data will destroy the existing Result le;
3. if the user selects a Result
.xrs
le, the software loads from this le all
available information, then searches the Raw Data specied in the Result le
and loads it into memory;
4. the software cannot open a Raw Data le if there is in the same folder another
Raw Data le with the same le name but dierent extension; in this case a
warning message is displayed, and the user should move one of the two Raw
Data les to another folder before continuing (this happens, for example,
when an exported version - AIA/ANDI or any other version - of the same
datale had been generated using the same name).
3.4 The Java Console
This is a special window that does not belong to the main Graphical User Interface
but that is shown in a separate window on the desktop. This windows is used by
the software to record various kinds of informative messages. See Figure 3.2 for a
sample of this window.
These messages contain technical information and are not designed for normal
user, but for technical assistance.
37
The contents of the Java console greatly changes, according to the operations made
by the user. The window automatically scrolls, like in traditional Log windows,
always showing the most recent message.
It is however possible to look at the
oldest messages using the right scroll bar. It is also possible to clear the console
in the case of too many messages.
Normally the Java Console is not shown. It should be used only in cases of malfunctioning of the software. There are two ways to show the Java console:
Debug Mode
•
Starting the software using the
•
Showing the window at run-time using the proper menu item (see 4.8.4).
icon.
Note that Java Console always is not automatically displayed as a full size window,
but always starts in an iconized state. The user should explicitly maximize it to
the normal size.
3.4.1 The Java Console buttons
On the bottom of the Java Console there are three buttons:
• Copy to clipboard.
The contents of the window is copied to the clipboard
(the clipboard contents can then be pasted on some other document).
• Mail To.
The contents of the window is directly mailed to the technical
service.
• Clear.
The contents of the window is cancelled.
38
Figure 3.2: The Java Console
39
Chapter 4
Menu Bar
4.1 Menu File
The
Menu File
contains the main operations concerning chromatographic data
les (opening, closing, saving). The menu is shown in 4.1
Figure 4.1: The Menu File
4.1.1 Open Datale
This command is used for choosing a chromatogram and loading it directly into
memory. The same operation can be performed through the icons of the Schedule
40
Panel: in that case, however, the user rst choose one or more chromatograms,
and then load them into memory. The command Open Datale, on the contrary,
makes the two steps in a single operation (this command is useful when the user
wants to quickly check the contents of some chromatogram; the Schedule Panel
procedure is recommended in the routine work).
The operation includes two steps:
1.
File selection.
A special File Selection Dialog Box
is shown, to let the
user to choose the le to be loaded.
2.
File loading.
The selected le is loaded into memory and shown in the
chromatogram Panel; if everything goes well, a new row is added to the
Schedule list. Otherwise, an error message is displayed and the Schedule list
remains unchanged.
Read carefully the notes at Section 3.3.5 to fully understand the le mechanism.
4.1.1.1
File Types
The File Selection Dialog Box lters the directory contents and only
shows the les which are compatible with the purchased license type.
The present manual applies to license
GCxGC/MS & LCxGC/MS version for
Shimadzu GCMSsolution and GCsolution.
This license is compatible with the following Data les:
.gcd and .qgd; Shimadzu exported le types .aia,
.andi, .cdf, .csv, .txt
•
Shimadzu le types
•
ChromSquare Result Data Files (le type
4.1.1.2
.xrs).
The Accessory Panel
The command
Open Datafile shows an Open File dialog box, which is slightly difAccessory
ferent from the traditional ones; in fact it contains, on the right side, an
panel
(see the sample in the Figure 4.2).
This panel is made up by three parts:
41
Figure 4.2: File description and features of the Data le selected
•
the upper part is used to dene and select a prole (see Section 10.4); since
proles are dened only for some kinds of les, this part is not always displayed;
•
the central part (that becomes the upper part when proles are not used) is
reserved to the user, which can specify some additional information about
nd
st
the data le being opened (modulation time, 2
elution time, 1 modulation
time);
•
the lower part is used by the software to display information about the data
le (the software actually reads a little fragment of the le, trying to detect all
information about its structure, and reports the obtained information in this
part of the window; when this is not possible, information should be supplied
by the user through a prole; in this case, the software warns the user with
the message
4.1.1.3
further information required:
use a profile).
Setting the Modulation Time
The Modulation Time must always be dened (otherwise the software does not
know how to extract the modulations from the chromatogram).
Modulation Time can be assigned in two ways:
•
Explicitly, by directly writing the value in the text eld; note that the value
42
entered in the eld will be interpreted by the software according to the units
(minutes or seconds) shown in the combo box on the right; if the units are
changed after that the value has been entered, the value will be automatically
converted to the new units; for this reason, the user should always choose
the correct units before entering the Modulation Time value.
•
Implicitly, by assigning to the data le a lename which contains the modulation time, according to the following rules:
The last part of the lename (before the le extension) should consist
by a number followed by a unit ;
unit can be min for minutes, or sec for seconds.
For example:
2min
or
120sec.
4.1.2 Close Datale
This command closes the current data le, clearing all references to the chromatogram currently loaded.
4.1.3 Assemble Datale
This command assembles more chromatograms into a unique data le; it is used
when the modulations had been saved onto dierent les (a single le for each
modulation, with les numbered as a sequence). See Section 10.7 for details.
4.1.4 Save Datale
This command allows to save various information about the chromatogram being
square
analyzed into a special Chrom
le, called Result File (extension .xrs). See
Section 3.3.2 for details about this le.
43
4.1.5 Export as CDF le
This command allows to export the current chromatogram in NetCDF
according to the AIA-ANDI
2
standards. The exported le will have
1
format,
.cdf
ex-
tension (a sux _export is also added to the le name before the extension, in
order to avoid the presence of two les with same name and dierent extensions
in the same folder, which is not allowed by the software).
4.1.6 Export as XML for Excel
This command allows to save various information about the chromatogram being
analyzed into a special
The exported le has
.xml
le, similar to the
.xrs
le (see 3.3.2).
.xml extension; these les can be easily read and managed
by the latest versions of Microsoft Excel, which allows a deep investigation of the
le contents. XML les can also be viewed (with less functionality) by Internet
Explorer or other Internet browsers.
The software always asks for the lename of the exported le and the folder where
it should be placed (the folder path is remembered for future savings).
It is a
good practice to use lename and folders dierent from those of the original chromatogram, to avoid conicts.
4.1.7 Save Map as Image
Any image displayed by the
.png
Chromsquare
software can be saved as a graphic
le.
The command opens a File Selection Dialog Box
for the selection of the folder
and of the le name of the graphic le.
The Dialog Box (represented in Figure 4.3) also contains some customization controls:
1 NetCDF (Network Common Data Form) is a set of software libraries and self-describing,
machine-independent data formats that support the creation, access, and sharing of arrayoriented scientic data.
2 AIA-ANDI is a set of standards developed in 1990 by manufacturers of analytical instru-
mentation, through their trade organization, the Analytical Instrument Association (AIA). AIA
sponsored the development of a series of standards to interchange analytical data across vendor
platforms. These standards, known as ANalytical Data Interchange (ANDI) standards, are supported by many commercial software products. NetCDF les are
binary
les, that must read and
written by means of specic software libraries; they cannot be managed by plain text editors.
44
Figure 4.3: The Save Map as Image Dialog Box
•
The text elds Width and Height, that can be used to specify the size of the
image in dpi ;
•
the button with the three dots, which in turn opens a second dialog box for
choosing the appropriate font and size (Figure 4.4).
Figure 4.4: The Select Font Dialog Box
45
4.1.8 Data info
This command opens a Dialog Box which shows some information about the current chromatogram.
A sample of the Data Info Dialog Box is shown in Figure
4.5.
This information is useful for checking purposes, but is not generally used during
the normal routine analysis.
Figure 4.5: The Current Data Info Dialog Box
4.1.9 Exit
This command closes the current session of
Chromsquare
; a conrmation request
is displayed, in order to avoid an accidental closure.
4.2 Menu Method
Menu Method contains the commands for the management of the Method les
(.xcm, see 3.3.4).
The
The menu is shown in 4.6.
The commands
Open, Save, Save As act like all traditional le management com-
mands; the only peculiarity is that le names are ltered through the extension
.xcm,
and that the software keeps a record of the last folder used for storing
46
method les (so that it normally shows this folder when prompts the user for a
method le selection).
Figure 4.6: The Menu Method
4.2.1 New Method
The command clears the current method and switches the current visualization
(see 3.2) to the
Method Panel.
The Panel will show an empty Method (that is
a Method with only some default parameters dened) that the user could ll, as
described in Chapter 6.
4.2.2 Open Method
The command opens a File Selection Dialog Box , which prompts the user for
the selection of an existing method le (.xcm extension).
is loaded, the visualization shifts to the
Method Panel,
As soon as the le
that will show all the
parameters of the Method just loaded.
4.2.3 Save Method
The command saves the method that is being currently edited in the Method
Panel, writing it onto a Method le.
If this method had been previously loaded from a Method le through an
Method command,
Open
the current method will be saved onto the same le and folder.
47
If no method had been loaded, the software asks the user to use the command
Save Method As.
4.2.4 Save Method As...
The command saves the method that is being currently edited in the Method
Panel, writing it onto a Method le.
In this case, the software always asks the user to select the name and the folder
to be used for the Method le. The command is typically used when no Method
le had been yet dened, but it can also be used to save an existing Method le
with a dierent name.
4.3 Menu Schedule
The
Menu Schedule
contains the main operations concerning the management of
the Schedules. See Chapter Section 5 for the description of the Schedule Panel,
and Section 3.3.3 for a description of Schedule Files.
The menu is shown in 4.7
Figure 4.7: The Menu Schedule
4.3.1 New
The command will set up a new Schedule (that is an empty one, containing no
chromatograms), that will become the Current Schedule.
48
4.3.2 Add chromatograms
The command opens a File Selection Dialog Box
which allows the user to select
one or more chromatograms to be added to the current Schedule.
Pressing the
CTRL key during the selection will allow to select more than one chromatogram.
The command performs the same action of the
Plus Sign
icon of the Schedule
Toolbar (see Section 5.1). As already pointed out in that Section, the command
does not actually load the chromatogram/s, but just creates the link/s for the
subsequent analysis.
4.3.3 Open Schedule
The command opens a File Selection Dialog Box
for the selection of an existing
Schedule File (.wls, see 3.3.3), that becomes the Current Schedule.
The le contents is copied in the Schedule Table (see 5.2), that can then be edited
by the user.
The command does not automatically switch the current visualization to the
Schedule Panel.
4.3.4 Save Schedule As...
The command opens a File Selection Dialog Box
for the selection of a folder and
of a le where the Current Schedule will be saved as a Schedule File (.wls).
The command is used both for dening a new Schedule File and for overwriting
an existing one.
4.4 Menu View
The
Menu View contains some commands concerning the visualization of the chro-
matogram.
The menu is shown in 4.8
49
Figure 4.8: The Menu View
4.4.1 Reset Zoom
The command restores the initial visualization of the full chromatogram after one
or more zoom operations.
See Section 7.2.3 for a complete description of Zoom operations.
4.4.2 Zoom In
This command increases the zoom factor by a xed amount; the eect is to see a
smaller region and more details around the current position of the mouse cursor.
See Section 7.2.3 for a complete description of Zoom operations.
4.4.3 Zoom Out
This command decreases the zoom factor by a xed amount; the eect is to see a
larger region and less details around the current position of the mouse cursor.
See Section 7.2.3 for a complete description of Zoom operations.
4.4.4 3D View
The command generates a 3D View of the region currently selected in the map
plot.
See Section 10.1 for details about the 3D representation.
50
4.5 Menu Options
The
Menu Options
contains the commands which allow a ne tuning of the bi-
dimensional plot (both the plot details and the drawing of various labels).
All these commands work as switches:
each time that an item is selected, the
switch changes from ON to OFF and back; when the switch is ON, a small check
sign is shown to the left of the menu item.
The menu is shown in Figure 4.9.
Figure 4.9: The Menu Options
The menu Options is divided in three parts, separated by horizontal lines:
•
•
The rst division contains switches regarding interpolation ;
The second part contains switches which set the details of the 2D map plot
(upper frame of the chromatogram panel);
51
•
The third part contains switches which set the details of the linear map plot
(lower frame of the chromatogram panel)
4.5.1 Interpolation switches
4.5.1.1
Enhance Small Peaks
The switch enables an algorithm which enhances the visualization of the small
peaks.
4.5.1.2
Graphical Data Interpolation
The switch enables the interpolation of data on the 2D map:
if
ON,
the ab-
sorbance value at any geometrical point of the map is calculated as the result of
a linear interpolation of the values of the nearest chromatographic data points,
generating an eect of a continuous shade of colors; if
OFF,
only the values of
actual chromatographic data points are taken into account, generating an eect of
a pixelated map.
4.5.1.3
Smooth Blobs
The switch enables the smoothing of the Blob contours: if
bounded by smoothed curves, if
OFF by straight
ON
the contours are
lines.
4.5.2 2D Chromatogram Plot switches
4.5.2.1
Draw Names onto Map Plot
The switch enables the writing of the names of the Blobs in the bi-dimensional
map plot.
4.5.2.2
Draw TtR onto Map Plot
The switch enables the writing of the Total retention time (First Dimension retention time + Second Dimension retention time) of the Blobs in the bi-dimensional
map plot.
52
4.5.2.3
Draw 2tR onto Map Plot
The switch enables the writing of Second Dimension retention time of the Blobs
in the bi-dimensional map plot.
4.5.2.4
Draw Area onto Map Plot
The switch enables the writing of the Areas of the Blobs in the bi-dimensional
map plot.
4.5.2.5
Draw Area Perc onto Map Plot
The switch enables the writing of the Area Percents of the Blobs in the bidimensional map plot.
The Area Percent of a Blob is computed as the percent
ratio of the area of the Blob with respect to the sum of the areas of all Blobs (both
identied and unidentied).
4.5.2.6
Draw Normalized Area Perc onto Map Plot
The switch enables the writing of the Normalized Area Percents of the Blobs in
the bi-dimensional map plot. The Normalized Area Percent of a Blob is computed
as the percent ratio of the area of the Blob with respect to the sum of the areas
of all identied Blobs.
4.5.2.7
Draw Concentration onto Map Plot
The switch enables the writing of the Concentrations of the Blobs in the bidimensional map plot.
4.5.2.8
Tick Blob Contour IDed Blobs
The switch enables the drawing of the Blob contour of the identied Blobs in the
bi-dimensional map plot.
4.5.2.9
Tick Blob Contour Unknown
The switch enables the drawing of the Blob contour of the unidentied Blobs in
the bi-dimensional map plot.
53
4.5.2.10
Draw Only selected Ions
The switch enables the drawing of a bi-dimensional map plot based upon a selection
of ions instead of the normal map plot based on all ions. The selection of ions is
dened in the Method (see Section 6.1.9).
4.5.3 Linear Chromatogram Plot switches
4.5.3.1
Enhance Blob Line in Chromatogram
The switch enables an enhanced representation of the Blob line contour for a better
visualization in the linear chromatogram view.
4.5.3.2
Draw Names onto Chromatogram
The switch enables the writing of the name of the Blob which the peak belongs to
in the linear chromatogram view.
4.5.3.3
Draw TtR onto Chromatogram
The switch enables the writing of the total retention time of the top of the Blob
which the peak belongs to in the linear chromatogram view.
4.5.3.4
Draw 2tR onto Chromatogram
The switch enables the writing of the second dimension retention time of the top
of the Blob which the peak belongs to in the linear chromatogram view.
4.6 Menu Action
The commands of the menu Action correspond to the actions that the user can perform on the software, like various kinds of integration, Blob searching, calibration,
quantitation and so on.
The menu is shown in 4.10
Note: Figure 4.10 shows a full menu Action; some menu items are not implemented
in all software versions. The items implemented in your license version are those
54
described in the following of the current section.
Figure 4.10: The Menu Action
4.6.1 Integrate ROI
The command performs the integration on a Region of Interest (ROI), that is on
only a part of the chromatogram plot (see Section 3.1.3 for the exact meaning of
integration ). ROIs are useful to speed up the calculation, especially in the case of
large chromatograms.
The ROI is stored within the Method (see Section 6.1.8) and can be graphically
dened through the mouse and context menu command (see Section 7.2.4.3).
See the next Section (4.6.2) for details about the integration process and results.
4.6.2 Integrate Whole Chromatogram
The command performs the integration of the whole chromatogram plot (see Section 3.1.3 for the exact meaning of integration ).
The integration can take some time, during which a progress bar, showing the
advancement of the calculation, may be displayed. At the end of the integration
the following changes will appear to the user:
55
•
In the Map Plot window, all recognized Blobs are marked and tagged with
various kinds of information, according to the options set up through the
Menu Options (see 4.9).
•
The Table of the Results page (in the lower window of the Chromatogram
Panel) will be lled with the integration results.
4.6.3 Quantitate
The command starts the execution of the Quantitative Analysis (also called Quan-
titation ). See Chapter 9 for a detailed description of the procedure.
Since Quantitation requires that a Calibration has already been set and saved on
a Schedule le (see Section 3.3.3), the rst action subsequent to the Quantitate
command is a File Selection Dialog Box
that will ask for the Calibration Schedule
le.
4.6.4 Remove Integration
The commands clears the current integration.
The Map Plot will be cleared by Blob marks and labels, and the Table of the
Result page will be emptied.
This command is seldom used, since each integration (both Whole and ROI )
overwrites the former one.
4.6.5 Integrate all chromatograms
The command starts a procedure for the automatic integration all the chromatograms
in the schedule list.
The process, once initiated, cannot be stopped by the user. In the case of huge
chromatograms, the integration of all chromatograms may take a long computation
time: it is then a good practice, when dealing with a new schedule, to execute a
single integration (see 4.6.2 to get an estimate of the overall computation time.
4.6.6 Create Calibration
The command starts the procedure for the generation of a new Calibration curve,
based on the current schedule.
56
See Section 9.1.10 for a detailed description of the procedure.
4.6.7 Show Calibration
The command opens a new window where are summarized the features of the
current Calibration (if it has already been dened).
4.6.8 Create Calibration Group
The command starts the procedure for the generation of a new Group Calibration
curve based on based on the current schedule.
See Section 9.4.4 for a detailed description of the procedure.
4.6.9 Show Calibration Group
The command opens a new window where are summarized the features of the
current Group Calibration (if it has already been dened).
4.6.10 Create Chromatogram Report
The command generates a report on a PDF le.
Reports can containing both the chromatogram map and the table of results, with
3
dierent levels of details which are assigned through a Report Template .
Some standard Report Templates are supplied at installation time.
Other tem-
plates may be created by the user, using the tool Report Template Editor (see
Section 4.7.1 ).
As rst action, the Create Chromatogram Report command displays a pop up
window, showing the list of available Report Templates (see Figure 4.11).
After that the user has chosen the desired template, the relative report is generated
and displayed in a Preview window. A sample of this window is shown in Figure
4.12
3 The Report Templates are XSL les, that is XML text les which follow the XSL Transformations (XSLT) Version 2.0 rules, see
http://www.w3.org/TR/xslt20/.
57
Figure 4.11: The Report Template Selector Dialog Box
58
Figure 4.12: The Chromatogram Report Preview
59
4.6.11 Search selected Blob
The command calls the instrumentation software in order to search the selected
Blob (use the Data Analysis context menu, described at Section 7.6.3, to select
the Blob).
This command is presently implemented only for GCMSsolution, LCsolution and
LCMSsolution versions of the software.
4.6.12 Search all Blobs
The command calls the instrumentation software in order to search all Blobs.
This command is presently implemented only for GCMSsolution, LCsolution and
LCMSsolution versions of the software.
4.6.13 Correct Wrap Around
This command allows to add a time interval to the start modulation time : in this
way all modulations are shifted by the same time amount; the visual result is that
the map will appear shifted towards the top or towards the bottom, with a wrap
eect.
4.7 Menu Tools
The
Menu Tools
contains commands which calls some auxiliary modules, which
perform some independent operations (that is operations not linked to the current
loaded chromatograms).
The menu is shown in 4.13
4.7.1 Report Template Editor
This command calls a special tool, the Report Template Editor.
The Report Template Editor allows the user to prepare a custom Report Template.
This template will be automatically added to the list of Report Tem-
plates and appear in the selection panel when the command
Chromatogram Report
is executed.
60
Action | Generate
Figure 4.13: The Menu Tools
The Report Template Editor window is shown in 4.14
Figure 4.14: The Report Template Editor Window
The user can choose:
•
paper format and orientation;
•
whether the report should include the Plot Map or not;
•
whether the report should include the Result Table or not;
•
which columns of the Result Table have to be printed and, in the case of
numerical values, how many decimal digits are requested.
61
The report name must be unique: if accidentally an existing name is chosen, the
text appears in red. Once nished, pressing the Ok button, the report template
is automatically generated and saved.
4.7.2 Compare/Subtract Chromatograms
The command opens a special window designed to perform the comparison and
subtraction of chromatograms.
The tool is described in detail in Section 10.2.
4.8 Menu Help
The
Menu Help
is identied by a question mark and - as usual - is the last menu
of the Menu Bar.
The menu contains items relative to various kinds of information tobe displayed.
The menu is shown in 4.15
Figure 4.15: The Menu Help
4.8.1 Help
The command shows the ChromSquare User Manual in an Acrobat Reader window.
4.8.2 License
The command displays information about the license currently installed.
62
4.8.3 Java 3D Info
This command opens a window that displays information about the Java 3D version installed (if any). This information is useful when the 3D visualization command (see 10.1) does not generate an image or the image is not satisfactory: in
these cases, the information displayed should be sent to the Technical Support in
order to detect the origin of the problem. A sample window is shown in Figure
4.16.
Figure 4.16: The The Java 3D information window
4.8.4 Java Console
This command opens a new window, called Java Console. Java Console window
is used by the software to record various information that can be useful to the
technical assistance in the cases of malfunctioning of the software. See Section 3.4
Normally, this window is shown initially if the user choose to start ChromSquare
in Debug mode ; the command lets the user to show the window at any moment at
run time.
4.8.5 About
The command displays information about
erences about the software producer.
63
Chromsquare
current version and ref-
Chapter 5
Schedule Panel
The Schedule Panel is shown when the user clicks on the corresponding large icon
Schedule
of the Side Bar Panel (see Figure 3.1)
The Schedule Panel contains a Schedule Bar and the Schedule Table.
Figure 5.1: The Tool Bar of the Schedule Panel
5.1 Schedule Tool Bar
The Schedule Tool Bar is placed in the upper side of the
terface, immediately under the Menu Bar.
64
Chromsquare
main in-
This Tool Bar is shown only when the Schedule Panel is selected. The icons of
the Tool Bar summarize the most frequent operations; some of these operations
correspond to menu commands; other ones are exclusive of the Tool Bar.
The
meaning of each icon is also shown as a tooltip (small informative yellow window,
which is automatically displayed when the mouse passes over or near the icon).
Scanning the icons of the tool bar from the left to the right, you can nd the
following commands:
1.
Plus Sign:
Adds a Chromatogram to the current Schedule; does not open
the chromatogram; just add it to the list. A File Selection Dialog Box
ap-
pears, allowing the user to select the chromatogram.
2.
Minus Sign:
Removes a Chromatogram from the current Schedule; the com-
mand does not actually delete any le; only le reference is deleted from the
current list.
3.
Magnifying Lens:
Loads the selected chromatogram from the Raw Data
le.
4.
Arrow Up:
5.
Arrow Down:
6.
New symbol:
Moves the selected chromatogram one row up.
Moves the selected chromatogram one row down.
Creates a new empty Schedule.
Corresponds to the menu
Opens an existing Schedule.
Corresponds to the menu
command 4.3.1.
7.
Open symbol:
command 4.3.3.
8.
Floppy Disk symbol:
Saves the current Schedule. Corresponds to the menu
command 4.3.4.
The last item in the tool bar shows the name of the current Method (if a Method
has already been loaded or dened).
5.2 Schedule Table
The Schedule Table is a table which shows a row for each chromatogram loaded.
The Schedule Table is a dynamic table, that is its contents vary according to the
operations performed on the software.
The Table has at least two columns:
65
•
the rst column contains the lenames of the chromatograms;
•
the second column is used to dene the role of the chromatogram in the
calibration procedure (quantitative analysis, see 9): that is, if it is either a
standard or an unknown sample (the column header reports the abbreviation
Std./Smp.).
Subsequent columns correspond to the Blob IDs dened in the Method loaded.
5.2.0.1
Populating the Schedule Table
The population of the table evolves as follows:
1. Initially (when software starts or the command
New Schedule
is executed),
the table only contains the header of the rst two columns (Filename,
Std./Smp.)
and no rows, exactly as shown in Figure 5.1.
2. As long as chromatograms are added to the schedule list, new rows are added
to the table, reporting the chromatogram lename in the rst column of the
table, leaving for the moment empty the Standard-Sample option of the
second column; see Figure 5.2.
3. When the user denes a Method (this may be accomplished in dierent
ways, see the Method Panel chapter for details), the table is lled with new
columns, each column corresponding to a Blob ID dened in the Method.
The new columns have headers that report the names of the Blob IDs. The
columns are designed to contain the concentrations of the compounds cor-
responding to the Blob IDs : a cell placed at a given row and column will
contain the concentration of the compound corresponding to the Blob ID
specied by the column, in the chromatogram specied by the row. Initially
all concentrations are set equal to zero.
4. At this point, the user can ll in the table: this is a two-step procedure. The
rst step is the choice between Standard or Sample : this is easily done using
the combo boxes of the second column. The second step is the assignment of
the concentrations to the Blob IDs of the chromatogram that should be used
as standards for the calibration. The user should assign the concentrations,
lling the table cells, according to the following criteria:
•
Chromatograms dened as standards have all concentrations dierent
from zero ;
66
•
Chromatograms to be considered as unknown samples maintain zero
concentrations for all Blobs, with the exception of the Blobs that are
referenced as internal standards, which also have concentrations dierent from zero.
5. The process of lling in the schedule table may be a long process, especially when there are many rows and/or many Blobs: during this process the
software does not check the coherence of data entered, to avoid continuous
interruptions for the user. A global check is performed only when the user
gives a
Save
or
Calibrate
command: if some concentration is not coherent
with the preceding schema, a message error is shown, giving the user the possibility to correct the data. When everything is right, the software accepts
the schedule table, and redraws it using the following coloring model:
•
Sample Blob IDs (i.e., cells with zero concentrations), are shown with
YELLOW background;
•
Standard Blob IDs ( i.e., cells with non-zero concentrations), are shown
with GREEN background.
6. When one or more rows have been dened as standard (that is, all concentrations have been assigned) it is possible to proceed with the calibration.
If calibration succeeds, the software automatically calculates the concentrations of the Blobs of the sample chromatograms and lls the table with the
calculated concentration values.
A Schedule Table can be saved on a Schedule File (extension
.wls), using the Save
icon of the Schedule Tool Bar or the corresponding Menu command.
When a Schedule File is opened, the Schedule Table is automatically lled with
all information saved on the le.
The various steps of the process are shown in Figure 5.2, Figure 5.3, Figure 5.4.
5.2.1 The Context Menu of the Schedule Table
When the number of the cells of the Schedule Table is large, the work of manually
providing all values can be a long and tiring activity.
In order to simplify this
activity, especially when there are replications of the values, the user can use a
special context menu, which allows some copy and paste operations on cells and
rows. The context menu is activated by clicking with the right button of the mouse
on a given cell; the menu shows the following items:
67
Figure 5.2: The Schedule Panel before loading a Method
Figure 5.3: The Schedule Panel after loading a Method
68
Figure 5.4: The Schedule Panel after the assignment of the Concentrations
• Copy Cell:
the value of the currently selected cell is copied to the clipboard.
• Paste Cell:
the value stored in the clipboard is copied to the currently
selected cell.
• Fill Row (Only null values):
the value stored in the clipboard is copied
in the cells of the currently selected row which have values equals to zero.
• Fill Row (All values):
the value stored in the clipboard is copied in all
cells of the currently selected row.
The context menu is shown in Figure 5.5:
69
Figure 5.5: The context menu of the Schedule Table
70
Chapter 6
Method Panel
6.1 Panel contents
Figure 6.1: The Method Panel - Integration Page
The Method Panel is shown when the user clicks on the corresponding large icon
Method
of the Side Bar Panel (see Figure ).
The Method Panel window consists of one or more pages (tabs ): the main page
71
Integration,
which is always present, and optional pages depending on the pur-
chased license (Shimadzu Spectra Search page and NIST Spectra Search page).
6.1.1 Integration page
The Integration page is shown in Figure 6.1.
Its components are described in the following paragraphs.
6.1.2 Method Filename
This is the full path name of the le corresponding to the Method shown.
If the Method has been loaded from a le, this is the path name of the source le.
If the Method has been saved on a le, this is the path name of the destination
le. The two les normally coincide. This eld cannot be edited directly in the
table (the eld is read-only); the name of the Method le is assigned through the
File Selection Dialog Box
associated to the command
Save As.
Method Open
and
Method
6.1.3 Method Parameters
This section contains three parameters; these parameters have initially values -1.0,
meaning that the integration algorithm will assume default values. The parameters
are:
• Minimum Area:
minimum value of the area of the integrated Blobs (Blobs
with smaller area will be ignored).
• Noise:
value for ltering the noise level.
• Peak shift:
percent value per for the peak shift tolerance.
6.1.4 Blobs ID Table (Blob Recognition)
The
Blobs ID Table
contains a list of the Blobs IDs that will be used by the
software for the Blobs recognition.
The Table contains:
72
•
a row for each Blob ID;
•
the following ve columns:
Subtraction.
ID, name, Int.Std.ID, Ion Selection, Background
1. The rst column contains the ID of the Blobs; normally, the ID is
generated automatically.
2. The second column contains the names of the Blobs; the names are
normally assigned by the user in the Blob Denition procedure (see
7.2.4.2). Blob names can be automatically generated using the
Selected Blob or Search all Blobs commands.
Search
The table allows the
user to modify the Blob names after their original denition.
3. The third column is only used for Calibrations with Internal Standards.
For each row, the cell corresponding to the third column indicates another Blob ID (among those dened in the method) that will be assumed
as internal standard. In order to simplify this assignment, the cells of
the third columns are in eect combo boxes : each combo box reports a
list of all other Blob IDs; the combo box allows the user to establish
the mapping between the Blob ID and the Blob ID used as Internal
Standard. Internal Standard IDs can be dierent for each row.
4. The fourth column is used to specify Ion Selection in the case of chromatograms generated by mass spectrometers; see Chapter 10.6 for details.
5. The fth column is used to switch On/O the subtraction of the background of the Blob ID. When selected, the background is measured
before each peak start and after each peak end. The average spectrum
of the background is subtracted when the total area of the Blob is calculated.
This selection has no eect if a Ion Selection is dened for
the given Blob. When background subtraction is selected, the baseline
calculated upon the TIC is substituted by the average background total
count.
When the user denes a new method, rows are generated dynamically: as soon as
the user denes a new Blob, a corresponding new row is added to the table, using
the name assigned in the Blob Denition procedure (see 7.2.4.2).
See Sections 3.1.5, 3.1.6, 3.1.7 for more details about Blobs and Blob IDs.
6.1.5 Buttons for Blob ID Table management
Below the Blob ID Table there are 3 buttons, to be used for table editing:
73
•
Button
delete:
it is used to delete the currently selected Blob ID (row of the
table); take note there is no corresponding add button, since Blob Ids (rows)
may be added to the table only through the aforementioned procedure (see
9.2.3).
•
Button
Bg On All
(Background On All):
ground Subtraction check boxes are set to
pressing this button, all Back-
On,
that is the background sub-
traction process is scheduled for all Blob IDs.
•
Button
Bg Off All
(Background O All): pressing this button, all Back-
ground Subtraction check boxes are set to
Off,
that is no background sub-
traction process is scheduled.
6.1.6 Groups ID Table
Groups ID Table contains a set of Group IDs that will be used by the software for
the recognition of the Group IDs. The Table contains:
•
a row for each Group ID;
•
three columns: ID, name, Blob ID.
1.
2.
3.
ID: a counter of the Group ID.
name: the name assigned by the user to the Group ID.
Blobs: the list of the Blob IDs which belong to the Group
ID, comma
separated.
Note that the table is read-only, and all modications should be accomplished
through the buttons.
6.1.7 Buttons for Group Table management
Below the Group Table there are 2 buttons, to be used for table editing:
•
Button
add:
is used to add a new row (that is a new Group ID) to the table;
pressing this button will open a window containing a list of all currently
dened Blob IDs; the user can then select through the mouse one or more
Blob IDs that will become part of the Group ID. Pressing the CTRL key
during the selection will allow to select more than one Blob ID.
•
Button
delete:
it is used to delete from the table the Group ID currently
selected .
74
6.1.8 ROI
ROI means Region Of Interest ; this denes a smaller region of rectangular shape
inside the chromatogram Map.
The ROI is dened by the user through mouse commands and Context menu in
the Chromatogram Panel (see 7.2.4.3).
The ROI is unambiguously dened by the Total Retention Times of two opposite
points of the rectangle (remember that Total Retention Times actually identies
a point in the 2D Map Plot).
6.1.9 Ion Selection for Map Display
In this eld the user can specify a list of Ions which will be used for the graphical
representation on the chromatogram Map.
Ions are represented with the same
syntax used to select ions for quantitation (see Chapter 10.6).
Once this parameter has been set, it is possible to display the Chromatogram map
with a color representation given only by the selected ions.
6.2 Shimadzu Spectra Search page
The window for the
Shimadzu Spectra Search
is shown in the Figure 6.2:
In order to perform the Shimadzu spectra search, GCMSsolution, LCMSsolution
or LabSolutions must be installed. Please read the technical note (Chapter 11.1)
in order to correctly set up the Shimadzu software.
6.2.1 Library le #n
The page contains ve edit elds,where the user can specify the full paths of the
spectra libraries that the Shimadzu software will use to perform the spectra search.
The assignment of the paths is accomplished by pushing the little buttons representing a folder placed on the right of any text eld.
The buttons cause the
opening a File Selection Dialog Box , which allows the user to select the library
les (.lib) navigating across the Shimadzu software folders.
Shimadzu software allows to perform the search using up to 5 libraries. At least
one library must be dened.
75
Figure 6.2: The Method Panel - Shimadzu Spectra Search Page
6.2.2 Delete duplicates
If this box is checked, the duplicate hits found during the search are deleted and
only the one with the higher similarity index is displayed.
6.2.3 Reverse search
If this box is checked, the reverse search is performed instead of the direct one.
6.2.4 LRI upper tolerance-lower tolerance
When using Linear Retention Indexes (LRI), the result set is ltered to the only
hits that match the LRI within a range denes by these two numbers.
6.2.5 LRI index in library
Shimadzu libraries allow to store up to 5 Linear Retention Indexes for each reference compound. This parameter lets the user to choose which one has to be used
76
for the library search. If
no LRI
is selected, no ltering is performed against the
Linear Retention Index.
6.2.6 LRI Table
This table is made by three columns:
1.
Name
is the name of the Blob identifying the LRI milestone (e.g., the ap-
propriate alkane). This is only for a documentation purpose (and to remind
the user): in fact, it is equivalent to write C7, Carbon 7, Heptane etc.
2.
3.
RT is the retention time of the top of the milestone Blob.
LRI is the retention index (conventionally set to the number of carbon atoms
multiplied by 100).
The table is fully editable, so that the user can enter a new line (using the button
+ on the bottom of the table), delete a line (using button -) and ll in the
values. Once the table is lled with all values, when an integration is performed,
the retention times for the Blob identied in the chromatogram are rescaled to the
times included in the LRI table, and the LRI is computed for each Blob.
The user can also prepare a chromatogram containing the milestone Blobs (for
example, an appropriate mix of alkanes) and integrate it. Once this operation is
done, having the datale open, it is possible to import those Blobs in the table
by pressing the button Use current Chromatogram to dene LRIs. The table is
automatically lled in, and the user must only ll the LRI for each entry. At this
point the table is anyway completely editable, so it is possible to change the names
or make corrections.
Once the method is saved, all Blobs which do not have an assigned LRI are deleted
from the table, since they do not contribute to the computation. All the Blobs
that are outside the RT interval between the rst and the last entry of the table
are assigned LRI equal to 0.
77
Chapter 7
Chromatogram Panel
7.1 Panel Contents
The Chromatogram Panel is made up of two windows horizontally aligned (that
is, one above the other), and a status bar in the lower part of the panel.
•
The upper window shows the Chromatogram as a colored Map, also called
Map Plot or Contour Map ; this window corresponds to the 2D representation
of the chromatogram; it is described in Section 7.2.
•
The lower window contains various sub-windows or pages that can be selected
using the upper tabs :
Graphical Parameters page (see Section 7.3); this page contains:
∗
∗
•
the Color Map Panel ;
the Navigation Panel.
Chromatogram page (see Section 7.4).
Spectrum page (see Section 7.5).
Data Analysis page (see Section 7.6).
Grouping page (see Section 7.7).
The status bar (see Section 7.8) displays information about the current position of the mouse cursor inside the upper Map Plot.
The upper and the lower windows are separated by an horizontal oating bar, that
is a bar that can be dragged up and down with the mouse, allowing the resize of
the two windows according to current needs of the user.
78
7.2 The Map Plot Window
7.2.1 Features
The upper Map Plot window contains a Contour Map which corresponds to the
2D representation of the chromatogram, namely:
•
the abscissa axis represents the Total Retention Time ; this is always expressed in minutes ;
•
the ordinate axis represents the Modulation Time ; this is expressed in min-
utes when its value is greater then 2 minutes, otherwise it is expressed in
seconds.
Let's remember that:
•
a chromatographic point corresponds to a pair of numerical values, i.e. time
and intensity (absorbance);
•
in 2D chromatography the whole chromatogram is divided into a set of mod-
ulations, according to a modulation time ; in this representation, the time
value of the chromatographic point corresponds to two time values:
the
overall time value, represented along the x-axis, and the time value of the
single modulation, represented along the y-axis ;
•
the intensity value, or absorbance, corresponds to the third dimension; in the
3D representation (see ) this corresponds to the z-axis, whereas in the 2D
representation this corresponds to a color level ; the whole set of all points
generates a Contour Map ;
7.2.2 Selection
When a new chromatogram is loaded into memory, the corresponding Contour
Map of the full chromatogram is displayed in the Map Plot window.
The user can then select through the mouse a smaller a smaller region of the
Contour Map in a way that it well be represented in the whole Map Plot window:
this action is typically called Zoom and yields as a result an enlargement of the
selected region, allowing to see more details. Zooming can be handled in dierent
ways and is described in 7.2.3.
79
The selection af a smaller region of the chromatogram can be used not only for
zooming but also for other operations concerning regions.
The selection operations are performed according to the common rules of most
software applications:
•
Click on a point of the plot with a mouse button to start selection (that is,
the point becomes rst corner of a moving rectangle);
•
Move the mouse holding the button pressed to change the size of the rectangle; the mouse pointer identies the opposite corner of the moving rectangle;
the moving rectangle is shown in reverse colors;
•
In
Release the mouse button to close the operation.
Chromsquare
•
software the following rule will also apply:
when the selection is made by dragging the mouse with the left button
clicked, the result is directly the Zoom In of the selected region;
•
when the selection is made by dragging the mouse with the right button
clicked, the result is the displaying of a pop-up context menu, which allows
the choice among dierent operations to be made on the selected region
(Zoom In is however provided even in this case); see Section 7.2.4 for a full
description of this menu.
The Figure 7.1 shows a Map Plot selected region and the Plot Context Menu.
7.2.3 Zoom
The Zoom In operations are generally performed by selecting a region through the
mouse selection, as mentioned above. However, there are other Zoom operations
(like Zoom Out, Reset Zoom or Move Zoom) that can not be easily accomplished
in this way. For this reason, the software provides two other ways to perform Zoom
operation, which complement the mouse ones:
Menu View
•
Zoom operations through the
•
Zoom operations through the Zoom Mapping facility, which is provided in
commands;
a special window (Navigator Panel ) of the lower panel (see 7.3.2 for a full
description).
80
Figure 7.1: Map Plot - Context Menu
The Figure 7.2 shows the Map Plot after Zoom In operation, and the representation
of the zoomed region in the Zoom Mapping facility. This is the same setting of
7.1 after that the rst menu item (Zoom) has been selected.
7.2.3.1
Zoom In
The Zoom In operation may be performed in three dierent ways:
•
by selecting a region through mouse dragging with the left button : the region
will be zoomed as soon as the button is released; this is the preferred way;
•
by selecting a region through mouse dragging with the right button and then
selecting
Zoom
from the menu context that will be shown as soon as the
button is released; this way is slightly more complex, and it is provided only
to facilitate the user;
•
by using the menu command
View | Zoom In;
this is equivalent to select a
zoom region having half sizes and the same centre with respect to the current
plot.
81
Figure 7.2: Map Plot - Zoomed Region
The Zoom In operation may be performed more times, obtaining always
more deep enlargements.
7.2.3.2
Zoom Out
The Zoom Out operation can be performed in only one way:
•
by using the menu command
View | Zoom Out;
this is equivalent to select
a zoom region having double sizes and the same centre with respect to the
current plot.
7.2.3.3
Reset Zoom
The Reset Zoom operation can be performed in the following way:
•
by using the menu command
View | Reset Zoom; this causes the redrawing
of the whole chromatogram, clearing all previous zoom operations.
82
7.2.4 Map Plot Context Menu
The context menu is displayed after that a rectangular region of the Map Plot
has been selected.
This rectangular region represents the domain to which the
operation of the selected menu item will apply.
The context menu (shown in Figure 7.1) contains the menu items described in the
following Sections.
7.2.4.1
Zoom
A Zoom In operation will be performed on the selected region. See 7.2.3.1 for a
full description of Zoom In operation.
7.2.4.2
Dene Blob
The menu item command is used to manually identify one or more Blobs, that is
to assign a Blob ID to the Blob (or Blobs) contained in the selected region. If the
region contains more Blobs, the same Blob ID will be assigned to all them.
As described in 3.1.6, a Blob ID is a data structure which contains a numerical Id,
a name and a geometrical description. Whilst the Id is automatically generated by
the software, and the description is given by the selected region, the name should
be explicitly supplied by the user.
The assignment of the Blob name works as follows:
•
Select with the right mouse button a region containing one or more Blobs,
as described in 7.2.2.
•
When the context menu appears, select the second item (Dene Blob); a
small window, with title
Insert Blob Name
will be displayed. The window
contains a label which reports the initial and nal Total Retention times of
the selected region, and a text eld for entering the name.
•
Enter the desired Blob name in the text eld and give
assignment, or
Cancel
Ok
o conrm the
to delete the current assignment.
The window is shown in Figure 7.3.
It is also possible to dene a Blob ID whose region is a polygon instead of a simple
rectangle (this feature is called Polygonal Blob area ; see Section 10.3 for details).
A rectangular region becomes in this way a particular case of a polygonal one.
83
Figure 7.3: Insert Blob Name window
The new Blob Id with all its data is automatically inserted in the current Method.
The user can at once verify the Blob name and Id by switching the view to the
1
Method Panel .
Figure 7.4 shows the Method Panel after that the new Blob ID has been dened.
Figure 7.4: The Method Panel with the new Blob ID
1 The geometry is also stored in the Method, but it cannot be seen in the Method Panel due
to the complexity arising from the polygonal model
84
7.2.4.3
Dene ROI
The menu item command is used to manually dene the selected region as a
Region of Interest (ROI). The ROI description is maintained inside the Method
and is displayed in the Method Panel.
After this operation is possible to integrate only the Region of Interest (see Chapter
9) instead of the full chromatogram.
7.2.4.4
Dene noise/min. area
The menu item command is used to manually dene the selected region as a
background region for the purpose of dening the Method parameters noise and
2
minimum area (see Section 6.1.3).
These parameters are initially dened by default as -1 (meaning that the software
automatically calculates an optimal estimate over the whole chromatogram) and
may be changed by the user in order to obtain a better integration; in many cases,
however, the user does not know which values to assign.
The menu item
Define noise/min.
Area can be used for this purpose.
The user
should select a rectangular region that can be considered as background (that is a
region which does not contain signicant Blobs) and then give this command.
The software calculates an estimate of ASTM noise and minimum area throughout
the selected area, and automatically assign them to the current method. The user
can then watch the values by switching to the Method Panel, and nally perform
a new integration to apply these settings.
The operation may be obviously repeated more times on dierent regions, until a
satisfying pair of value has been obtained.
7.2.4.5
Cancel
The menu item cancel the context menu without performing any operation.
2 The minimum area parameter is very important: values too large have the eect of hiding
signicant Blobs, whereas values too small may cause the recognition of thousands of small Blobs,
which is a time-consuming activity which can last for minutes.
85
7.3 The Graphical Parameters Page
The Graphical Parameters page is divide into two panels:
•
the left panel is used for dening the Color Mapping;
•
the right panel is used for representing (and changing) the zoomed region
with respect to the overall chromatogram; it is called the Navigator Panel.
7.3.1 The Color Mapping Panel
Figure 7.5: Graphical Parameters Page
This panel contains some controls designed to dene with precision the Color
Mapping that the software uses to represent the Chromatogram Map (Contour
Plot) described in Section 7.2.
Color Mapping is the rule which transforms (maps ) an absorbance or intensity
value into a pixel color value. Color Mapping is dened by assigning:
•
the Color Map ;
•
the minimum and the maximum of the intensity scale;
•
the minimum and the maximum of the color scale.
The panel is shown in the Figure 7.5. It contains:
•
an upper pair of controls, including a slider and a text eld; these controls
are used to dene the maximum of the intensity scale, as described in 7.3.1.2;
•
an intermediate colored bar, which represents the color scale;
•
a lower pair of controls, including a slider and a text eld; these controls are
used to dene the minimum of the intensity scale, as described in 7.3.1.2;
•
a Reset button; this allow to restore the previously saved values of all scales.
86
7.3.1.1
The Color Map
The term Color Map refers to a set of instructions internally dened in the
software which implements the transformation between intensity values and color
values, that is between an intensity scale and a color scale.
Only one Color Map is presently dened in the software; this is a classical Color
Map, frequently used in this types of representations; it scans from White to Black,
passing through a series of colors (Magenta, Cyan, Blue, Green, Yellow, Orange,
Red, Brown).
7.3.1.2
The intensity scale
The minimum and the maximum values of the intensity scale are initially calculated
by the software and can then be modied by the user in order to highlight some
details instead of others.
The software calculates the initial (default) values of the intensity scale as the
mathematical minimum and the maximum of the intensity values of the whole
chromatogram.
Minimum and maximum of the intensity scale can be modied through the two
slider controls (upper and lower) of the Graphical Parameters Window. The upper
control denes the maximum, the lower control denes the minimum.
The user can manually change these values acting in two ways:
•
directly writing the numerical values in the text elds ;
•
scrolling the corresponding sliders.
7.3.1.3
The color scale
In the middle, between the two slider controls, there is an horizontal colored bar,
which represents the color scale.
The minimum and the maximum of the color scale are shown as little vertical white
lines inside the colored bar (the left line obviously representing the minimum, and
the right line the maximum ).
The user can manually change the minimum and/or the maximum values of the
color scale in two ways:
87
•
dragging with the mouse the corresponding vertical white line towards left
or towards right;
•
clicking with the mouse near one of the vertical white lines: the line will
move automatically to the current mouse position.
7.3.2 The Navigator Panel
The Navigator Panel is a window which always contains a view of the whole chro-
matogram. When the zoom is not activated, the window shows the same image of
the main Map Plot window (even if with less details and dierent size). When the
zoom is activated, the Navigator Panel window shows the chromatogram with a
rectangle inside it, representing the zoom area which is displayed enlarged in the
main Map Plot window.
A sample is shown in Figure 7.6.
Figure 7.6: Navigator Panel with Zoomed Area
The window is called Navigator since it can be used not only for viewing the
88
location of the zoom area, but also for moving or navigating it across the whole
plot. area. The navigation can be accomplished in two dierent ways:
•
Operating on the Navigator Panel;
•
Operating on the scroll bars of the main Map Plot.
7.3.2.1
Moving the zoom area with the Navigator Panel
The user can move the current zoomed area operating on its representation inside
the Navigator Panel in two ways:
•
by clicking on the center of the new position in the Navigator Panel; as soon
as the mouse button is released, the rectangle representing the zoom area
will be moved and drawn around this new position, maintaining its previous
sizes;
•
by dragging the rectangle representing the zoom area to the new desired
position.
7.3.2.2
Moving the zoom area with the Map Plot sliders
The zoomed area may also be moved using the pair of sliders placed on the upper
side and on the right side on the main Map Plot.
The sliders show the current position and sizes of the zoom area with respect to
the overall Map Plot view. The fraction of the sizes of the slider with respect to
the corresponding sizes of the Map Plot represents the fraction of the horizontal
zoom area with respect to the overall chromatogram axis.
When the user moves a slider, the rectangle on the Navigator Panel is updated as
well.
A special small button, placed in the upper right corner between the horizontal
and vertical slider, can be used as a short-cut to reset the zoom (it has the same
eect of the menu item
View | Reset Zoom).
7.4 The Chromatogram page
The chromatogram page shows the linear chromatogram, that is the plot of inten-
sity vs. modulation time, for each modulation.
89
The chromatogram displayed in the Chromatogram page represents the modulation
corresponding to the mouse pointer position in the main Map Plot.
As the user moves the mouse in the upper window, the plot quickly changes in
the lower window, following the various modulations: the plot changes so much
faster than modulation are dense in the main plot. Use the zoom for a less dense
representation of modulations, allowing a more precise identication of a single
modulation.
The linear chromatogram may be shown in 4 dierent ways, activated by corresponding buttons placed at the top of the chromatogram page (see Figure ).
Figure 7.7: The Toolbar of the Chromatogram page
7.4.1 Single modulation in zoom interval
This representation shows the plot of the chromatogram concerning the current
modulation (that is the modulation corresponding to the current mouse pointer
position in the 2D Map Plot), on a time domain that is a fraction of the modulation
time, corresponding to the vertical zoom interval in the 2D Map Plot
More precisely:
•
Abscissa axis is retention time, ranging within the limits of modulation time
set by the current zoom area (that is between the lower and upper limits of
the zoom rectangle).
•
Ordinate axis is intensity, ranging from 0 to an upper limit corresponding to
the maximum intensity. The user can change the limit through the control
Max. Int.,
either directly writing a new value in the text eld, or using the
two small arrows to quickly change it.
See Figure 7.8.
7.4.2 Single modulation in whole modulation interval
This representation shows the plot of the chromatogram concerning the current
modulation (that is the modulation corresponding to the current mouse pointer
90
Figure 7.8: Single modulation in zoom interval
position in the 2D Map Plot), on a time domain corresponding to the whole mod-
ulation time.
More precisely:
•
Abscissa axis is retention time, ranging from o to the modulation time.
•
Ordinate axis is intensity, ranging from 0 to an upper limit corresponding to
the maximum intensity. The limits can be changed as described in Section
7.4.1.
See Figure 7.9.
Figure 7.9: Single modulation in whole modulation interval
7.4.3 Multiple modulation in zoom interval
This representation shows the plot of all chromatograms concerning the modula-
tions included in the current horizontal zoom interval, on a time domain that is a
fraction of the modulation time, corresponding to the vertical zoom interval in the
2D Map Plot.
More precisely:
•
Abscissa axis is retention time, ranging within the limits of modulation time
set by the current zoom area (that is between the lower and upper limits of
the zoom rectangle).
91
•
Ordinate axis is intensity, ranging from 0 to an upper limit corresponding to
the maximum intensity. The limits can be changed as described in Section
7.4.1.
See Figure 7.10.
Figure 7.10: Multiple modulation in zoom interval
7.4.4 Multiple modulation in whole modulation interval
This representation shows the plot of all chromatograms concerning the modula-
tions included in the current horizontal zoom interval, on a time domain corresponding to the whole modulation time.
See Figure 7.11.
Figure 7.11: Multiple modulation in whole modulation interval
More precisely:
•
Abscissa axis is retention time, ranging within the limits of modulation time
set by the current zoom area (that is between the lower and upper limits of
the zoom rectangle).
•
Ordinate axis is intensity, ranging from 0 to an upper limit corresponding to
the maximum intensity. The limits can be changed as described in Section
7.4.1.
92
7.5 The Spectrum page
Chromsquare
is able to display Mass Spectra when these are included in the chro-
matographic Data File.
Mass Spectra (when available) can be viewed by selecting the page
Spectrum
in
the lower panel. As the user moves the mouse in the upper window, the spectrum
quickly changes in the lower window, following the various modulations (like in
the case of Chromatogram page, see 7.4).
A sample of Spectrum page is shown in Figure 7.12.
Figure 7.12: The Spectrum page
7.6 The Data Analysis page
The Data Analysis page shows the results of the integration and identication
activities.
The Data Analysis page is characterized by:
•
The Data Analysis Table ; table rows correspond to the Blobs, table columns
report the characteristics of each Blob.
•
The Data Analysis tool bar : it contains some buttons used to easily perform
the most common operations.
•
The Data Analysis context menu : it applies to the currently selected Blob,
and oers options for further investigation of its properties.
93
An example of the Data Analysis page is reported in Figure 7.13. Since the table
is rather large, the Figures 7.14 and 7.15 report an enlarged view for a better
readability.
Figure 7.13: Data Analysis page - Overall view
Figure 7.14: Data Analysis page - Left view
7.6.1 The Data Analysis table
The table has a vertical scrolling bar, since the number of Blobs can exceed the
available space.
94
Figure 7.15: Data Analysis page - Right view
3
The dierent columns have the following meaning :
1.
Index.
The Index is an integer number that unambiguously identify the
Blob, intended as a geometrical entity ; see Section 3.1.5 for a description of
this and other quantities.
2.
ID. The Blob ID, see 3.1.6.
3.
Name.
4.
TtR. Total retention time of the Blob.
5.
2tR. Retention time in 2nd dimension of the Blob.
6.
Area.
7.
Area ID.
Name of the Blob.
Area of the individual Blob.
Sum of the areas of all Blobs having the same ID. In the case of
Blobs Grouping, this is the overall area of the Group of Blobs: it is the same
for all the Blobs belonging to the Group.
8.
Area %.
Area percent of the individual Blob, calculated with respect to the
sum of the areas of all Blobs.
3 According to the type of analysis, some columns may be empty. For example, if Quantitative
Analysis has not yet been done, the Concentration column is void.
95
9.
Area % ID.
Sum of the areas percent of all Blobs having the same ID. In
the case of Blobs Grouping, this is the overall area percent of the Group of
Blobs.
10.
Normalized Area %.
Area percent of the individual Blob, normalized with
respect to the sum of the areas percent of all identied Blobs.
11.
Normalized Area % ID. Sum of the areas percent of all Blobs having the
same ID, normalized with the respect to the sum of the areas percent of all
identied Blobs.
12.
Concentration.
13.
LRI.
14.
LRI lib.
15.
Sim. Index.
7.6.1.1
This column will be lled after quantitation.
A Grouping sample
The Figure 7.16 shows an example af Data Analysis table for the ID Grouping
case.
In the sample shown, three Blob IDs have been manually assigned: Blob A and
Blob B are relative to individual Blobs, whereas Blob C is relative to an area which
include 3 dierent individual Blobs.
As can be seen, the rst element that catches the eye is that the Blobs which
belong to a Group are represented with a grey background.
Examining these 3 Blobs we can see that:
•
The quantity called
Area ID
is the sum of the
Area
of the 3 Blobs and is
equals for all them.
•
The quantity called
Area %
is the fraction of the Blob Area with respect to
the Area of all Blobs: the sum of all these values is then 100.
•
The quantity called
Area % ID
is the sum of the
Area%
of all Blobs having
the same ID. Whereas for Blob A and Blob B this corresponds to the
%,
equal for all them (22.55 + 8.25 + 26.80 = 57.60). The sum of all
ID
Area
in the case of Blob C this corresponds to the sum of 3 Blobs and it is
Area %
must obviously take into account just one value for each Blob ID (10.77,
6.51, 57.60); this sum is less then 100 because there are unidentied Blobs.
96
•
The quantity called
Normalized Area %
is the fraction of the
Area
of the
Blob with respect to the Area of all identied Blobs; the sum of all these
value is 100.
•
Normalized Area % ID is the fraction of the Area % ID
of the Blob with respect to the sum of the Area % ID of all identied Blobs;
the sum of all Normalized Area % ID must obviously take into account just
The quantity called
one value for each Blob ID; the sum of all these value is 100.
97
98
Figure 7.16: Data Analysis page - Example showing ID Grouping case
7.6.2 The Data Analysis Toolbar
The Toolbar is shown in Figure 7.17.
Figure 7.17: Data Analysis page - The Data Analysis Toolbar
It contains a sequence of buttons; most buttons are shortcuts for commands that
can be also executed through menu commands; the last button perform a specic
operation.
The buttons are:
1. (gear )
Integrates the whole chromatogram.
Action command
Integrate Whole Chromatogram
2. (gear with red rectangle )
est.
It corresponds to the menu
of Section 4.6.2.
Integrates only the dened Regions of Inter-
It corresponds to the menu Action command
Integrate ROI of Section
4.6.1.
3. (gear with a red delete cross )
menu Action command
Removes integration.
Remove integration
4. (wrap S red sign on a blue background )
responds to the menu Action command
It corresponds to the
of Section 4.6.4.
Correct wrap around.
Correct wrap around
It cor-
of Section
4.6.13.
5. (book )
Search selected Blob in spectra library.
Action command
6. (book collection )
Search selected Blob
of Section 4.6.11.
Search all Blobs in spectra library.
menu Action command
7. (check button )
It corresponds to the menu
Search all Blobs
Polygon mode.
It corresponds to the
of Section 4.6.12.
This is a switch which controls the mode
of dening the Blob regions on the 2D Plot: if unchecked, the normal mode
is active (rectangular selection, see Section 7.2.3 and 7.2.4.2); if checked, the
Polygon mode is active (see Section 10.3)
99
7.6.3 The Data Analysis Context Menu
To show the Data Analysis context menu the user must:
•
select a Blob, by clicking with the left mouse button on the corresponding
row: the selected row will be shown with a blue background;
•
click with the right mouse button on the selected row.
Note that the Blob corresponding to the selected row will be also shown in the 2D
Map Plot with enhanced boundaries, like in Figure 7.18.
Figure 7.18: Enhanced representation of the selected Blob
The context menu is represented in Figure 7.19. The various items are described
in the following sections.
100
Figure 7.19: Data Analysis page - The Data Analysis Context Menu
7.6.3.1
Search Blob
This menu item is implemented for the license types involving the automatic Blob
Search (see Section 8.3.2).
The command executes a search of the currently selected Blob using the external
software component.
If the search is successful, a Name and a Blob ID are assigned to the Blob, and
immediately shown both on the 2D Map Plot and in the Data Analysis table.
7.6.3.2
Delete Blob
The command deletes the currently selected Blob from the list of the integrated
Blobs.
The 2D Map Plot and the Data Analysis table are updated as well.
7.6.3.3
Show Spectrum
This menu item is implemented for the license types involving the automatic Blob
Search (see Section 8.3.2) and for chromatograms which contain Mass Spectra.
In these cases, the command shows a new window, which displays the Mass Spectrum of the currently selected Blob. A sample is given in Figure 7.20.
The window contains two Spectrum Plots:
1. The upper plot displays the mass spectrum at the top point of the Blob;
101
2. the lower plot displays the average spectrum, computed as the average of all
spectra corresponding to the chromatographic points of the Blob;
Each plot represents the spectrum according to the usual practice, that is M/Z
along the abscissa axis, and intensity percent along the ordinate axis.
Figure 7.20: Show Spectrum window
7.6.3.4
Zoom Blob
The command automatically performs a zoom of the 2D Plot Map in such a way
that the currently selected Blob is shown at the maximum enlargement, lling the
whole available space of the window. A sample can be seen in Figure 7.21.
102
Figure 7.21: A full zoomed Blob
7.6.3.5
Info Blob
The command displays a window which reports a description of the Blob, including
a list of all peaks corresponding to the various modulations, with a very detailed
description for each of them.
A sample is shown in Figure 7.22.
This window may be useful in special cases, when the user wish to investigate the
inner functioning of the software. It is not generally used in the daily practice.
103
Figure 7.22: The window displaying Blob Info
7.6.3.6
Select Compound
The command allows the user to select a dierent compound among those returned by the similarity search, performed by the external software component
(see Section 8.3.2)
The command is active only if the automatic Blob Search has already been per-
Search Blob of
Search All Blobs of Section 4.6.12).
formed on the selected Blob (through the context menu command
Section 7.6.3.1 or the main menu command
The command displays a dialog window, named
Assign compound for Blob...,
showing all compounds found by the similarity search.
The software by default identies the Blob using the compound with the highest
similarity index (the rst of the list); the user can select a dierent compound and
conrm his choice with the button
Ok.
The choice is archived, so that the assigned
compound will be shown if this window will be opened at a later time (in this case,
it will be however possible to change the former choice).
The dialog box is shown in Figure 7.23.
7.6.3.7
Add Selected to Method
Adds the currently selected and identied Blob to the Blob list used in the Method
for quantitation (The command does not work if the current Blob has been not
identied).
104
Figure 7.23: The Assign Compound dialog box
In fact, the identied Blobs are not automatically added to the Method, in order to
avoid duplications. The user should explicitly dene which Blobs are to be added
to the method, using the following procedure:
•
Once the automated search for one or more Blobs has been performed, if the
Blob is not already present in the Blob Table of the Method, the entire row
is redrawn in red in the Data Analysis table (see Section 7.6.1).
•
The user can decide to add the selected Blob to the Blob Table of the Method
or not, using this command.
•
As soon as this operation is performed, the Blob that has been included in
the Method is available for quantitation and is redrawn in black.
7.6.3.8
Add All to Method
The command automatically performs the procedure of adding a Blob to the
Method (described in the previous Section 7.6.3.7) on all the Blobs of the Blob
Table.
In other words, the procedure search for all Blobs of the Table corresponding to
rows marked in red, and add them to the Method: at the end of the procedure all
rows are redrawn in black.
105
7.7 The Grouping page
The Grouping page is the last page of the lower window of the Chromatogram
Panel. It is activated only when in the Method is dened at least one Group in
the Group table.
Figure 7.24: Method Panel showing one Group
Figure 7.25: Grouping page - The results
The page consists of a table with 6 columns and as many rows as the Groups
dened in the Method. The columns gave the following meaning:
1.
Index.
This is just a counter of the rows/groups.
2.
Name.
The name assigned to the Group in the Method.
3.
Area.
The Area of the group, corresponding to the sum of the Areas of all
Blobs which belongs to the Group.
4.
Area %.
The Area % of the group, corresponding to the sum of the Areas
% of all Blobs which belongs to the Group.
5.
Area % Group.
The percentage of the Area % of the group, with respect
to the sum of the Area % of all Groups. It obviously is 100 if only one Group
is dened.
106
6.
Conc..
The Concentration of the group, corresponding to the sum of the
Concentrations % of all Blobs which belongs to the Group.
The Figure 7.24 shows a Method Panel with the denition of a Group.
The
example shown refers the same case described in Section 7.6.1.1: a Group, named
Group AB, has been dened as the aggregation of Blob A and Blob B.
The Figure 7.25 shows the results of the integration in the Grouping page. Comparing the results with those shown in Figure 7.13, it can be seen that the Area
of the Group AB is equal to the sum of Areas of Blob A and Blob B. The same
for Area %.
7.8 The Status Bar
The Status Bar (see Figure 7.8) shows the current position of the mouse pointer
inside the Map Plot window. It includes the following information:
• Mod:
• DP:
Modulation counter (along horizontal axis)
Data Point counter (along vertical axis)
• TtR:
Total Retention Time (in minutes)
• 2tR:
Second Dimension Retention Time (in seconds)
• 1tR:
First Dimension Retention Time (in seconds)
• Int:
Intensity (or Absorbance)
Note that:
TtR = 1tR + 2tR/60
Figure 7.26: Chromatogram Panel - The Status Bar
107
Chapter 8
Qualitative Data Analysis
In this chapter it will be presented a summary of the operations of a routine
Qualitative Analysis.
In order to maintain the description uent, only the key
points will be here reported, with frequent references to specic sections of the
manuals
8.1 Set up the Chromatogram
8.1.1 Load the Chromatogram
Use the menu command
File | Open Datafile (see Section 4.1.1) to load a chro-
matogram into memory.
For large chromatograms the loading may require some time (several seconds or
even minutes); a progress bar is always displayed, giving a rough estimate of the
time required to complete the process.
When the loading operation has nished, the progress bar window closes and the
chromatogram is automatically displayed in the Chromatogram Panel.
8.1.2 View the Chromatogram
After a little expertise, the user is generally able to view at a rst sight whether
the displayed Map Plot is correct or not. Some anomalous patterns are easily
recognized and may suggest corrections to some parameters from the user.
Modulation Time and Wrap Around are the two parameters to be inuenced.
108
8.1.2.1
Correct Modulation Time
A wrong modulation time is generally the main responsible of an anomalous Map.
This is the most common case, since this information cannot be supplied automatically.
The user can easily change it and reload the chromatogram to view the changes
in the Map Plot. See Section 4.1.1.3.
Note: after the rst loading of a Data File, the software generates the corresponding Result File (see 3.3.2). If the user tries to load again the Data File using a
dierent Modulation Time, the software warns the user that the Result File is
already present and asks whether he wants to overwrite it or not. In this case the
answer should be Yes.
8.1.2.2
Correct Wrap Around
The Wrap Around correction does not change the Blob patterns, but moves the
whole Map Plot towards the top or the bottom.
See Section 4.6.13.
8.2 Integrate the Chromatogram
The integration of a new chromatogram includes various steps:
1. set up the Method;
2. integrate the whole chromatogram;
3. (optionally) dene a smaller area (Region of Interest, or ROI) and integrate
only this one;
4. check the integration results;
5. (optionally) modify some integration parameters.
For new types of chromatograms, the various steps may be repeated more times.
Once satisfactory results are obtained, the Method can be saved and used for the
integration of similar chromatograms (this is normally the case in Quantitative
Analysis). The integration with an established Method is a straightforward activity
which involves just one click.
109
8.2.1 Set up the Method
Setting up the Method includes the following actions:
1. Switch the main view to the Method Panel, using the
Method
command in
the Side Tool Bar. Method Panel is thoroughly described in Chapter 6.
2. Use an existing method, loading it by a Method File, either create a new
Method from scratch:
•
To open an existing Method, use the menu command
tion 4.2.2) and select a
.xcm
Method|Open (Sec-
Method le through the File Selection
Dialog Box .
•
To create a new Method, use the menu command
Method|New (Section
4.2.1).
3. Dene the three Method parameters (shown in the Figure 8.1):
• Minimum Area:
the minimum value of the area of the Blobs that will
be integrated (Blobs with smaller values will be discarded).
• Noise:
value of the noise level for Blobs ltering.
• Peak shift:
value per cent for the peak shift tolerance.
In the case of a new Method, the three elds are initially lled with the value
-1.0, which means that a default value is assumed for each parameter.
In the case of an existing Method, the values assigned in a previous work
session are taken.
Figure 8.1: The Method parameters
110
8.2.2 Integrate Whole Chromatogram
To integrate the whole chromatogram:
•
either use the menu command
Action | Integrate Whole Chromatogram
(Section 4.6.2);
•
either use the rst icon of the Data Analysis Tool Bar (Section 7.6.2)
Figure 8.2 shows a samples of whole chromatogram integration.
Figure 8.2: Qualitative Analysis: Whole Chromatogram integrated
8.2.3 Integrate ROI
To integrate a ROI:
•
Dene the ROI, if this has not already been dened (the ROI is stored in
the Method, and its denition can be viewed in the Method Panel, as the
Total Retention Time values of two opposite points; see 6.1.8). To dene a
ROI, use the Map Plot Context Menu (see Section 7.2.4).
•
Perform the ROI integration:
111
either use the menu command
Action | Integrate ROI (Section 4.6.1);
either use the second icon of the Data Analysis Tool Bar (Section 7.6.2)
Figures 8.3 and 8.4 shows samples of a ROI denition and its corresponding integration.
8.2.4 Check the Integration Results
After the integration (both in the whole or the ROI cases) the user may check
whether the results are correct (in the routine analysis this step is not necessary,
but in a new analysis it may be important).
To check the analysis result the user may:
•
View the integration results - that is the representation of the integrated
Blobs - on the 2D Map Plot; in order to improve this visualization, it is then
possible:
to zoom on particular zones of the plot (see Section 7.2.3);
to change the details of the Blob representation, through the various
items of the
Menu Options
(see Section 4.5);
to change the Color Map, as described in the Section 7.3.1.
All operations described above are managed in real time (that is the map
is automatically updated and re-drawn without performing any additional
operation: no further integration is required).
•
View the integration results as numerical values in the Data Analysis window, which is fully described in Section 7.6.
•
View the linear chromatogram prole in correspondence of the single Blobs,
as described in Section 7.4.
8.2.5 Change the Integration Parameters
If the results checking described above is not satisfactory, the user can change
some integration parameter and repeat the steps described in Sections 8.2.1, 8.2.2,
8.2.3, 8.2.4.
The integration parameters that can be changed are the Method parameters, described at 8.2.1.
112
Figure 8.3: Qualitative Analysis: Dene ROI
Figure 8.4: Qualitative Analysis: ROI integrated
113
8.3 Identify the Blobs
The identication of the Blobs (that is, the operation of assigning a Blob Id to the
Blobs) can be performed in two ways:
•
Manual identication.
•
Automatic identication.
8.3.1 Manual Identication of the Blobs
Manual identication is obviously the only identication possible when the current
software license does not provide the link with the software which performs the
identication (see next section for details about this).
Manual identication may be also recommended when the user is interested to few
well known and dened Blobs, which are recognized at a rst sight, and prefers to
avoid the automatic process, that in some case may be time-consuming.
Manual identication must be made separately for each Blob to be identied.
The Manual identication is made up by two steps:
•
In the rst step, the user denes the region which includes the Blob; this
may be a rectangular region or an arbitrary polygonal region.
•
In the second step, a dialog box allows the user to write the name to be
assigned to the Blob.
The procedure will be reported in details for the two cases.
8.3.1.1
Rectangular Regions
To perform the Manual identication of Blobs included in a rectangular region,
follow these steps:
•
Dene the Blob region, according to the instructions reported in Section
7.2.2 and 7.2.4.
•
Enter the Blob name in the dialog box that will be displayed soon after, as
described in Section 7.2.4.2.
If the selected region contains more than one Blob, the same name will be assigned
to all them.
114
8.3.1.2
Polygonal Regions
To perform the Manual identication of Blobs included in a polygonal region, follow
the procedure described in Section 10.3.
If the selected region contains more than one Blob, the same name will be assigned
to all them.
8.3.2 Automatic Identication of the Blobs
The automatic identication of the Blobs can be performed in the cases in which
the current license provides a link with an external software which can execute the
task.
Presently the following licenses provide this feature:
•
GCxGC/MS & LCxGC/MS version for Shimadzu GCMSsolution and GCsolution(using Shimadzu Search engine).
•
LCxLC version for Shimadzu LCMSsolution and LCsolution(using Shimadzu
Search engine).
•
LCxLC version for Shimadzu LCsolution(using Shimadzu Search engine).
•
Text and NetCDF Version with NIST Spectra Search(using NIST Spectra
Search engine).
•
All Features Version(using Shimadzu Search engine or NIST Spectra Search
engine).
The present license provides the Automatic Identication of the Blobs.
The automatic search includes from one to three steps:
1. the rst step consists of the command which starts the search;
2. the second step is optional and allows the user to modify the identied Blob;
3. the third step is also optional, and allow the user to add one or more identied
Blobs to the Method.
115
8.3.2.1
Search the Blobs
The automatic Blobs search can be performed in two modes:
•
searching a single Blob at a time ;
•
searching all Blobs with one command.
The rst one is preferred in new cases, when the user wants to check libraries,
computing times and so on.
The second one is the preferred one in the daily
analysis routine.
To search one Blob:
•
Select the row corresponding to the Blob in the Data Analysis table;
•
either give the command
Search Blob
of the Data Analysis Context Menu
(see Section 7.6.3.1);
•
or the command
Search Selected Blob (Section 4.6.11) of the Action main
menu.
To search all Blobs:
•
give the command
Search All Blobs
(Section 4.6.12) of the
Action
main
menu.
8.3.2.2
Select the Compound
This step may be executed when the user wants to modify one or more automatic
Blob assignments, selecting a dierent compound from the list generated by the
automatic search procedure.
The step is optional (in many case, the suggested compound is a good choice).
See Section 7.6.3.6.
8.3.2.3
Add Blob/s to Method
This step may be executed when the user wants to insert one or more Blob identications in the Method.
116
The step is mandatory only if the current analysis will be followed by Quantitative
Analysis.
See Section 7.6.3.8.
117
Chapter 9
Quantitative Data Analysis
In this chapter it will be presented a summary of the operations of a routine
Quantitative Analysis.
The summary will be illustrated with frequent screen
shots, which drive the user along the various steps of the procedure.
The Chapter contains four Sections:
1. External Standard Calibration.
2. Internal Standard Calibration.
3. Quantitation of an Unknown Sample Chromatogram.
4. Group Calibration.
9.1 External Standard Calibration
9.1.1 Set up the Schedule
Chromsquare
software can be used to build Calibration Plots by processing data
analyses performed at dierent concentration levels, using pre-measured GCsolution or GCMSsolution les acquired in
.gcd
or
.qgd
data formats.
All les that enter in a Quantitative Analysis must belong to the same
folder.
118
9.1.1.1
Rename the les
This Section reports some hints about the le names of the chromatograms, in
1
order to simplify the operations and avoid errors .
Some le renaming could be then necessary, according to the following rules:
•
The software orders the les alphabetically according to their names. The
names should therefore reect the logical order of the standards (concentrations and replication numbers).
•
Avoid spaces in lenames; use underscore signs (_) or minus signs (-) instead.
It is dicult to distinguish one space from more spaces if the characters are
small; besides, spaces alter the alphabetic order.
•
When using numbers to identify concentrations, try to always maintain the
same number of digits. As an example, if you use 025, 050, 100, the standards
will be always ordered correctly; if you omit the leading zeroes, the order
may be wrong.
In the directory shown in Figure 9.1 the les have been renamed according to the
aforementioned rules.
9.1.1.2
Dene a New Schedule
Once your le list has been created, open
Chromsquare
software using the appro-
priate license and switch to the Schedule Panel using the schedule icon
Schedule
at the top of the left sidebar.
See Figure 9.2.
9.1.1.3
Use the
Add les to the Schedule
Plus Button
(that is is the icon with the plus sign at the left side of the
Schedule Panel Tool bar) to add chromatograms to the current Schedule.
You must insert in the Schedule all chromatograms that should enter in the Calibration as Standards. You can also add one or more chromatograms that should be
treated as Unknown Samples ; the latter ones, however, may be added in a second
time.
1 The software actually accepts any kind of name for the les; anyway, if names are scrambled,
it will be more dicult to place them in the right order.
119
Figure 9.1: A list of les properly ordered for quantitative analysis
The operation is shown in Figure 9.3.
You must add one Standard chromatogram at a time, using an increasing order
of concentrations.
This is not mandatory, but it will help to write down the
corresponding concentrations.
Alternatively, you can add chromatograms to the Schedule by selecting the
Chromatograms
Schedule|Add
command from the Menu Bar.
Files can be removed from the current Schedule using the Minus Button (this is
the icon with the minus sign at the left side of the Schedule Panel Tool bar).
Note that adding a chromatogram to the Schedule does not mean loading it:
adding just creates a reference to the le; the very loading will be accomplished
later (see Section 9.1.3). Like removing a chromatogram from the Schedule does
not mean to delete it, but just the link.
Use the Arrows to change the order of les in the current Schedule, i.e. to move
upward or downward.
Other commands are available in the Schedule Menu, to create a new Schedule,
save the current Schedule, or open an existing one (see Section 5 for a detailed
description of the Schedule management).
The Schedule Menu is shown in Figure 9.4.
120
Figure 9.2: Initial Window for Quantitative Analysis
Figure 9.3: Schedule Panel with some Chromatograms added
121
Figure 9.4: The Schedule Menu with Add chromatograms command selected
122
9.1.2 Set up the Method
Once the Schedule has been completed, switch to the Method Panel, using the
Method icon (at the bottom of the left sidebar).
If you already have a suitable Method for this calibration, load it through the
menu item
Method|Open Method
(see Section 4.2.2). Continue to Section 9.1.2.2
if you want to modify some parameter; otherwise skip directly to Section 9.1.3.
If you do not have a Method, dene it now though the menu command
Method
Method|New
(see Section 4.2.1).
Figure 9.5 shows the switch to Method Panel icon; Figure 9.6 shows the Open
Method menu command.
Figure 9.5: Switch to the Method Panel
123
Figure 9.6: The Method Menu with Open Method command selected
9.1.2.1
Dene a New Method
After giving the menu command
Method|New Method,
the Method Panel should
show an empty method, that is most elds should be void (some elds will contain
the value -1.0, which means a default value). If you see other numbers or words
somewhere, a method is already loaded; better to close all and start again.
The Method Panel with an empty Method is shown in Figure 9.7.
9.1.2.2
Dene Method Parameters
In the Method Panel, enter Minimum Area, Noise and Peak Shift.
The Method Panel with these elds lled is shown in Figure 9.8. In this case, the
numbers 100000, 10000, 6 have been used for the three parameters.
124
Figure 9.7: The Method Panel showing a new empty Method
Figure 9.8: The Method Panel with some parameters entered
125
9.1.3 Load a chromatogram
Once the Method has been set up, switch back to the Schedule Panel, select the
rst chromatogram and load it using the icon with the Magnifying Lens (third icon
of the top tool bar). See Section 5.1.
The icon is pointed out in Figure 9.9.
Figure 9.9: The icon for loading the selected chromatogram
Alternatively, you can load the chromatogram by double clicking on the selected
row.
Loading chromatogram may require some time, during which a small window showing the progress of the operation is displayed.
At the end of the loading process the software will automatically switch to the
Chromatogram Panel, where the loaded chromatogram will be shown.
See Chapter 7 for a full description of the Chromatogram Panel.
See also the various Sections of Chapter 8.1.2 for details about the operations that
can be made to better view the displayed chromatogram.
126
9.1.4 Integrate the chromatogram
To integrate the chromatogram:
Action|Integrate whole chromatogram;
•
either use the main menu command
•
or, in the lower window of the Chromatogram Panel, switch to the Data
Analysis window and click on the rst icon (the one with the gear symbol)
of the Data Analysis Tool Bar (7.6.2).
The Menu Action command is shown in Figure 9.10.
Figure 9.10: The Menu Action - Integrate Whole Chromatogram
Integration may require some time, especially in large chromatograms: a Calculation Progress window allows the user to monitor the status of the integration.
The Calculation progress window is shown in Figure 9.11.
When the integration terminates, the Map Plot is redrawn, showing the boundaries
of the Blobs and other information, which are displayed directly on the Map Plot
at each Blob position.
At this point, before proceeding with the other steps, the user may use the various
zoom functions to get a more detailed representation of some regions of the Plot,
127
Figure 9.11: The window showing the calculation progress
and also use the various items of the Menu Options (see Section 4.5) to change the
details of the displayed information. Zooming also improves the readability of the
information displayed on the Map (when too many Blobs have been recognized,
the various info texts overlap; zooming has also the eect of spreading the Blobs,
allowing to distinguish the single texts).
See also the Section 8.2.4 for various hints about the visualization.
The Figure 9.12 shows a zoomed region of the chromatogram after the completion
of the integration.
Figure 9.12: Integrated chromatogram - Zoomed view
128
9.1.5 Identify the Blobs
The identication of the integrated Blobs has been already described in details for
Qualitative Analysis.
Two kinds of identication are provided: manual and automatic :
•
Manual identication is always possible; it must be done separately for each
Blob that should be included in the Calibration.
•
Automatic identication is provided for some types of license, and it is performed on all integrated Blobs; in this case it is possible to use ROI (see
8.2.3) to limit the number of Blobs.
Skip to Section 8.3 for a full description of both procedures.
The Figure 9.13 shows a the context menu and the dialog box for the manual
identication of a Blob.
Figure 9.13: Manual identication of a Blob
At the end of the identication, switch again to the Method Panel : you will nd
that the software has automatically lled the Blob Table in the Method, adding
the names and the IDs of each identied Blob.
129
Once the identication has been completed, save the Method with the main menu
Method|Save As, choosing a le name and a folder for the Method. File
should have the extension .xcm (the software assigns it automatically at
command
name
any case); folder may be any, but it is recommended to use the same folder which
contains the calibration data les.
After the saving operation, the full path of the Method le will be shown in the
Method Panel.
The Figure 9.14 shows the Method Panel with the Blob names and IDs; it also
shows the Method path name.
Figure 9.14: Method Panel showing Blob names and Method le name
9.1.6 Integrate again
From the main menu, select the command
Action|Integrate Whole Chromatogram
again; at the end, the software switches to the Chromatogram Panel.
Now, since the Method contains a full denition of Blobs, the software can recognize all the Blobs of the chromatogram and show their names in the Map Plot.
Select the Data Analysis tag in the lower window to see the Data Analysis Table,
which now contains also the names and the IDs of the Blobs which have been
130
identied.
The Figure 9.15 shows the Chromatogram Panel with the Blob names (both in
the Map Plot and in the Data Analysis window).
Figure 9.15: Integrated chromatogram with names of the recognized Blobs
9.1.7 Integrate All Chromatograms
Analyzing the results of the second integration described in the previous Section,
you had been able to verify whether the Method which has been previously set up
and saved entirely fulls the needs of the current calibration (in other words, if all
Blobs necessary to the calibration have been correctly integrated and identied).
If this is the case, it is possible to proceed with the integration of all remaining
chromatograms of the current Schedule, using the current Method. On the contrary, you should modify the Method, coming back to Section Set Up the Method
(9.1.2) and repeat the various steps.
The integration of the remaining chromatograms may be done in two ways:
131
•
manually, one chromatogram at a time,
•
or automatically through the main menu command
Chromatograms
Action|Integrate All
(see 4.6.5).
The rst one may be preferred in tricky cases, where may be useful to investigate
every single chromatogram for possible anomalies. This way lets the user to check
the results of every single chromatogram before continuing with the next one.
The second one is that preferred in the daily routine work.
This is a powerful
command that, for each chromatogram of the Schedule, performs the following
operations:
•
loads the chromatogram;
•
integrates it;
•
saves the results in the
.xrs
le.
All operation are carried on without further intervention of the user.
The inte-
gration of many chromatograms can take a lot of time (obviously depending on
number and complexity of the chromatograms), during which various images will
ash in the graphical interface.
Also various monitor windows will appear and
disappear during the process.
The process cannot be interrupted by the user: at any case, once started, it should
be left working and terminated by itself.
Trying to close the monitor window
has no eect on the whole process (this only closes the monitor window for that
integration; a new window will be generated at the next integration step).
9.1.8 Assign the concentrations
Now you can return to the Schedule Panel. Nothing seems to have happened; this
because when you added the chromatograms the Method was still undened. In
order to let the Schedule know that the Method has changed, it is necessary to
give the menu command
Method|Open Method,
and reload the the Method that
have been just saved.
You will see that new columns (one for each Blob) will be automatically placed in
the table and temporarily lled with zero values of concentration.
The Figure 9.16 shows the Schedule Panel with the new columns corresponding to
the Blobs.
132
Figure 9.16: Schedule panel ready to insert concentration values
Now you can write the concentrations in the cells of the Schedule table.
are the Standards, columns are the Blobs.
Rows
To facilitate the input, select a cell and give a double click: the cell will be shown
in reverse and you can directly write on it. You can also navigate through the cells
using the Tab key.
The Figure 9.17 shows the Schedule Panel while a concentration value is being
inserted.
For each row of the Table, you must also specify whether it corresponds
to a Standard or an Unknown Sample . Use the combo-box in the second
columns to make this choice.
Note that rows corresponding to the Standards will be coloured in green ; rows
corresponding to the Unknowns will be coloured in yellow.
133
Figure 9.17: Schedule panel while inserting a concentration value
9.1.9 Save the Schedule
At this point you can save the Schedule through the menu command
schedule as.
Schedule|Save
Choose the same directory of the other les and a proper name for the Schedule.
Schedule les have a
.wls
extension.
9.1.10 Create the Calibration
Now you have all the elements for making the Calibration:
•
the concentration values of all Blobs of all Standards (assigned by the user
at 9.1.8) are stored in the current Schedule;
•
the area values of all Blobs have been saved in the
.xrs les corresponding
to each Standard (generated at 9.1.7).
Just select the menu item
Action|Create Calibration.
134
The command performs the following operations:
•
.xrs les and loads into memory the area data;
this is a fast operation, since the .xrs les are relatively small les already
opens sequentially all the
containing all essential data;
•
make the calculation of the Regression lines for each Blob, correlating the
areas as linear functions of concentrations;
•
shows a nal summary of the calculation in a Dialog Box.
This summary is only a warning that the Calculation has been completed correctly
(a diagnostic Dialog Box, showing the anomalies, will be generated otherwise). The
full reporting of the results will be discussed in the next Section.
The Figure 9.18 is an example of the Dialog Box which shows the calculation
Results.
Figure 9.18: The Calibration Results Dialog box
Press the Ok button to close the Dialog Box. If the Calibration terminated without
errors, the window Calibration Data will open soon after.
135
9.1.11 View Calibration results
The Calibration Data window is made up by two pages (or tabs): Calculation and
Graphs.
•
The Graph page (a sample is shown in Figure 9.19) includes four panels :
The upper-left panel is a List of all Blobs included in the Calibration;
the List is used to select a Blob at a time, whose characteristics will be
shown in the other panels.
The upper-right panel is a Plot of the regression line corresponding to
the currently selected Blob of the List.
The central panel is a Table which describes the characteristics of the
input data used to build the regression of the currently selected Blob
of the list; the Table contains a row for each Standard chromatogram;
columns represent:
1. The Blob name (this is equal for all Standards);
2. the Id of the Standard (that is a counter);
3. the Area of the Standard (this is the result of the Integration);
4. the Concentration of the Standard (this is the value assigned by
the user in the Schedule Table; see the Section 9.1.8).
The lower panel shows a Report of the calculations regarding the currently selected Blob of the List; the Report includes:
∗
∗
∗
•
The coecients of the regression line;
the Response Factor;
the Linear Correlation Coecient (R ) and R squared.
The Calculation page contains a detailed report of the various calculations
and results of the calibration in numerical form.
In the Graph Page, select the Blobs one at a time in the upper-left list, and check
the Regression Line and the numerical coecients in the Report Panel.
9.1.12 Save the Schedule again
Finally, save again the current Schedule through the menu command
schedule as,
Schedule|Save
choosing the same le name used before (see Section 9.1.9).
136
Figure 9.19: The Calibration Graph window
This time, in the Schedule le will be also stored the coecients of all the Re-
gression lines. The Schedule le is now a Calibration le, that may be used for a
Quantitative Analysis of an unknown sample.
137
9.2 Internal Standard Calibration
Calibration with Internal Standards is very similar to the one described for the
External Standard in the Section 9.1.
In this Section, only the steps that dier from the External Standard will be discussed; for all other steps, it will only be reported a reference to the corresponding
Section.
9.2.1 Set up the Schedule
See Section 9.1.1.
9.2.2 Set up the Method
See Section 9.1.1.
9.2.3 Load a chromatogram
See Section 9.1.3.
9.2.4 Integrate the chromatogram
See Section 9.1.4
9.2.5 Identify the Blobs
See also Section 9.1.5.
Once the Blobs have been recognized, they are enumerated in the Blob table of
the Method Panel.
If a Blob has to be calculated using an Internal Standard, the cell corresponding
to the
Int.Std.ID
column (the third of the table) must contain the Blob ID of
the other Blob that should be used as Internal Standard. If the cells contains 0 or
-1, this means that the Blob does not use the Internal Standard.
Clicking an any cell of the third column, a small Combo Box will be displayed,
enumerating all available IDs. Select one of them (dierent from 0) to assign the
138
Internal Standard. Select 0 to delete the Internal Standard assignment.
9.2.6 Integrate again
See Section 9.1.6
9.2.7 Integrate All Chromatograms
See Section 9.1.7.
9.2.8 Assign the concentrations
See also Section 9.1.8.
You will see that in the Schedule Table the columns relative to the Blob dened
as Internal Standards are coloured in green, like the rows corresponding to the
Standards.
You must ll in the concentration of the Internal Standard in the sample chro-
matogram.
Remember that green cells are those where the user can write the concentrations,
whereas yellow cells are those where concentrations will be calculated.
9.2.9 Save the Schedule
See Section 9.1.9.
9.2.10 Create the Calibration
See also Section 9.1.10.
Note:
in the regression line plot, the concentrations and the areas are divided by
the concentration and the area of the internal standard, so they assume very low
values (indicatively the magnitude of the unity).
9.2.11 View Calibration results
See Section 9.1.11.
139
9.2.12 Save the Schedule again
See Section 9.1.12.
9.3 Quantitation of an Unknown Sample Chromatogram
The Quantitative Analysis of an unknown sample (also called Quantitation) is a
very simple operation once that a Schedule le containing a Calibration has been
set up.
9.3.1 Add unknown sample les to the schedule
Execute the following steps:
•
Switch to the Schedule Panel.
•
Add one or more sample chromatograms to the current Schedule, using the
commands described at Section 9.1.1.3. If the sample chromatograms have
already been added to the Schedule when dening the Standards, skip to the
next Section.
•
Dene the chromatograms just added as Samples, using the
Std.Smp.
combo box.
In the Schedule Table, rows corresponding to Samples have a yellow background
(whereas Standards have a green background).
9.3.2 Load a chromatogram
The operation is the same described for Standards. See Section 9.1.3.
9.3.3 Integrate the chromatogram
The operation is the same described for Standards. See Section 9.1.4.
Since the current Method already contains the identication of the Blobs, the
integration command should also recognize the Blobs.
140
This operations may be skipped if all unknown samples have been added to the
Schedule together with the Standards: in this case, the command Integrate All
Chromatograms (described at 9.1.7) will also integrate the unknown samples and
save the corresponding
.xrs
les with the area data.
9.3.4 Execute the Quantitative Analysis
To execute the Quantitative Analysis of all Unknown Samples included in the
Schedule give the main menu command
Action|Quantitate.
The command will use the Calibration dened within the current Schedule. Error
messages will appear if the Schedule does not contain a correct Calibration.
The Quantitation results will be shown in various places. Perform the following
actions to see all results:
1. Switch to the Schedule Panel ; the concentration results are shown, for each
column corresponding to a Blob, on the yellow lines corresponding to the
unknown Samples (these concentration were all zero before executing the
Quantitation command).
2. From the Schedule Panel, load a Chromatogram corresponding to an unknown Sample (double click on the row or use the Magnifying Lens icon).
The current panel automatically switches to the Chromatogram Panel.
3. Look at the Map Plot: the concentrations will be shown near to each Blob;
4. Look at the Data Analysis Table (7.6.1) in the Data Analysis window of the
lower panel: the Concentration column will now be lled with the calculated
concentration values.
The Figure 9.20 is an example of the Schedule Panel which shows the Quantitation
Results in the yellow row corresponding to the sample.
141
Figure 9.20: The Quantitation Results reported on the Schedule Panel
9.4 Group Calibration
9.4.1 Description
The Group Calibration is a type of calibration based on groups of Blob IDs (a
Blob ID, in its turn, is a group of adjacent Blobs, as described in Section 3.1.6);
in order to distinguish the two kinds of groups, we will call the groups of Blob IDs
as Named Groups or simply Groups.
Whereas a Blob ID is a set of one or more Blobs belonging to a given Region
(rectangular or polygonal), a Named Group is a set of more Blob IDs, assembled
by the user according to dierent criteria.
Both Blob IDs and Named Groups are dened inside the Method: whereas Blob
IDs are dened by the user through a graphical procedure, Named Groups are
dened at a second step, by manually assembling the Blob IDs dened in the
former step.
The Group Calibration is similar to the normal Calibration (also called Blob Cal-
142
ibration), with the dierence that it handles Groups of Blob IDs instead of single
Blob IDs. This means that in the Calibration algorithm the area of a Blob ID is
replaced by the sum of the areas of all Blob IDs included in the Group, and the
concentration of a Blob ID is replaced by the sum of the concentrations of all Blob
IDs included in the Group.
From the analytical point of view, the Named Groups are useful to treat more
similar compounds as a single entity, even if they are placed in dierent regions of
the graph.
In the following paragraphs are summarized the various steps of a Group Calibration.
9.4.2 Dene Groups in the Method Panel
To set up a Group Calibration, you should have already set up a normal Calibration, that is you should have already dened a Schedule (a set of Standard and
Sample Chromatograms) and a Method. See Sections 9.1.1 and 9.1.2.
To dene the Named Groups, execute the following steps:
1. Switch to the Method Panel in the main window; the upper table (labeled
Blob recognition) shows the already recognized Blob IDs; the lower table,
labeled Groups, is initially empty.
A sample of Method Panel with Blob IDs and no Group is shown in Figure
9.21.
143
Figure 9.21: Method Panel with some Blob ID dened
2. Click on the button
add,
immediately below the Groups table: a window
showing a list of all Blob IDs will be displayed; the window assigns a temporary name to the Group being dened, that is
Group followed by an increasing
number (the name could be later changed by the user).
A sample of the list is shown in Figure 9.22.
3. Select two or more Blob IDs, holding the CTRL key; the selection should
be done according to analytical criteria; in the example, we just selected
compounds having similar names.
A sample of the list with selection is shown in Figure 9.23.
144
Figure 9.22: List of all Blob IDs
Figure 9.23: Selection of the Blob IDs
Press
Ok;
a new row is inserted in the Group table, showing the new Group;
the row displays the following information:
•
a Group ID (that is a sequential identier, assigned by the system);
•
the Group Name (which is initially assigned by default as the word
Group
•
followed by the ID number);
the list of the Blob IDs belonging to the Group.
See Figure 9.24 for a sample of the Method Panel with just one Group added.
4. When one or more groups have been dened, it is possible to verify whether
a given Blob ID is included in one or more Groups, by simply moving the
mouse on the upper table; when the mouse passes over a Blob ID belonging
to some Group, the list of the Groups is shown as a tooltip.
145
Figure 9.24: Method Panel with one Group
5. It is possible to change the name of the Group (assigning a more signicant
term) by directly writing inside the cell table.
6. The operation can be repeated for more Groups.
A more complete example is shown in Figure 9.25, where 3 groups have been
dened and renamed.
7. At any time, the user can delete one or more groups through the button
delete;
subsequent operations of adding and deleting groups will destroy
the regular sequence of ID numbers: this however is not a problem, since
IDs are just identiers, and not counters.
8. At the end, the user must save the Method before continuing with the calibration and other operations.
Important Note:
the denition of Named Groups is an activity that must be
performed after the Blob recognition; the two activities cannot be mixed, in order
to avoid complicated side eects. For this reason, the Blob ID structure should
not be changed once one or more Groups have been dened. If the user tries to
delete a Blob ID when Groups are present, a message will be displayed, warning
the user that the action will reset the Group structure.
146
Figure 9.25: Method Panel with more Groups
9.4.3 Integrate All Chromatograms
After that the Method has been saved, it is possible to integrate the whole set of
chromatograms included in the schedule through the menu command
All Chromatograms
2
Action|Integrate
.
Once the integration has been completed, you can view the traditional Results
Table, clicking on the tab
Data Analysis
of the lower pane:
A sample of the Data Analysis table is shown in Figure 9.26.
If the current Method denes Named Groups, a new tab (page), named
Grouping
will appear in the lower pane, at the right of Data Analysis. By clicking on it, a
new table, with the results of the integration of Groups, will be shown.
A sample of the Grouping Results table is shown in Figure 9.27.
This table reports a row for each Group dened in the Method, and 5 columns:
2 Note that if the schedule had been previously integrated with a dierent method for
example, with a similar method not having Named Groups the software will warn that the
current Method is dierent from the Method stored in the Results les, and will ask if you which
Method should be used for the integration; the correct answer in this case is to preserve the
Method le, since we are applying a new Method.
147
Figure 9.26: Integration Results with Named Groups
1. in the rst column, the ID of the Group, as dened in the Method;
2. in the second column, the Name of the Group, as dened in the Method;
3. in the third column, the Area of the Group, calculated as the sum of the
areas of the Blob IDs which constitute the Group;
4. in the fourth column, the Area Percent of the Group, calculated as the sum
of the areas percent of the Blob IDs which constitute the Group;
5. in the fth column, the Concentration of the Group (empty at the moment;
will be calculated after that Group Calibration will be done).
By comparing the former two gures, it is easy to verify, for example, that the area
of the Group Tyr-Cat (5672969.2) is the sum of the areas of the three Blob Ids
which constitute the Group (3592113.7, 592520.2, 136974.5, 461300.2, 890060.6).
148
Figure 9.27: Integration Results: Grouping Results Table
9.4.4 Group Calibration
If the current Method denes Named Groups, two new menu items appear in the
Action|Create Calibration Group and Action|Show Calibration
Group. These commands perform actions similar to Action|Create Calibration
and Action|Show Calibration commands, with reference to Groups rather than
Action Menu:
to Blobs.
To perform a Calibration of the schedule using Groups rather than Blobs, execute
the following steps.
1. Execute the menu command
Action|Create Calibration Group.
A sample is shown in Figure 9.28.
149
Figure 9.28: Group Calibration Command
2. An informative window with a summary of the calculations will be shown;
give
Ok
to close the window.
A sample of the informative window is shown in Figure 9.29.
3. The software will display the calibration results, opening a new window,
Calibration Group Data, with two pages, respectively named Calculation
Graphs.
named
and
The Calculation page reports the calculation details of the Calibration.
A sample of the Calculation page is shown in Figure 9.30.
The Graphs page lets the user to view the calibration curve for each Group.
The list in the upper-left corner of the windows reports all the Groups of the
150
Figure 9.29: Group Calibration Summary
Method: by double-clicking on one of the groups of the list, the corresponding
graph is shown in the right side, whereas the details of the calibration line
and other statistical parameters are shown in the lower table.
A sample of the Graphs page is shown in Figure 9.31.
4. The command
Action|Show Calibration Group
allows the user to view
the former windows without perform again all calculations.
151
Figure 9.30: Group Calibration Data
152
Figure 9.31: Group Calibration Graph
153
9.4.5 Group Quantitation
The last step of Group Calibration is the Group Quantitation of the unknown
samples.
There is no specic command to achieve Group Quantitation for a given sample:
this is automatically performed together with normal Quantitation if a Group
Calibration has been previously executed on the current schedule.
The results of Group Quantitation are shown in the last column of Grouping panel.
The next two gures show the
Data Analysis
page and the
Grouping
page with
the Quantitation results of a given sample.
Figure 9.32: Group Calibration - Quantitation Results - Data Analysis Page
154
Figure 9.33: Group Calibration Quantitation Results Grouping Page
155
Chapter 10
Advanced Topics
10.1 3D View
10.1.1 Description
Chromsquare
includes a 3D facility which allows a full 3D representation of the
chromatograms, which is displayed in a separate pop up window.
To generate this representation the user must:
•
select a rectangular area on the 2D Map Plot (see Section 7.2.2 for how to
select an area);
View | 3D View.
•
give the menu command
•
(optionally) use the buttons of the 3D tool bar to modify the representation
and save it as an image.
The process to create the 3D scene can take several seconds according to the
performance of the computer. On a last generation PC it should take a few seconds.
The initial view is seen from the top and the orientation is the same as the view
selected in the map plot of chromatogram view, as shown in 10.1.
156
Figure 10.1: 3D View Window - Initial View
157
10.1.2 Changing the scene
The possible behaviours of the scene are obtained clicking and dragging the mouse
in the scene.
• Orbit
(rotates the plot according to mouse movement) is obtained by left
clicking the mouse button and moving it.
• Move
(pans the plot) is obtained by right clicking the mouse and moving
it.
• Zoom
(increases or decreases the observer's distance) is made by clicking
the central mouse button and moving it; for two button mouses, the central
button is generally simulated by clicking simultaneously the left and the
right ones; in wheel mouses third button event is generated clicking the
wheel. For most of the wheel mouses, zoom can also be obtained rotating
1
the mouse wheel .
The Status Bar at the bottom of the window reports some short hints about how
to change the scene with the mouse.
10.1.3 The 3D View Tool Bar
The 3D View window is equipped with a Tool Bar which allows to reset the scene
to the initial position and to take a snapshot of the current view.
The Tool Bar contains the following controls:
•
Icon
•
Icon
immediately restores the initial position for the surface.
takes a snapshot of the current view.
The rst time that it is
pressed, a File Selection Dialog Box is shown, allowing the user to choose
path and le name where to save the image. Once selected, the path and the
rst part of the le name will be the same for the whole session (until the
3D View window is closed), and every time the camera button is pressed a
new picture will be automatically taken and saved on a le having the same
prex le name, followed by a progressive number.
1 For additional information please refer to the specic documentation provided together with
the mouse.
158
•
Icon
takes a movie of the scene capturing one frame every half second.
Once the user has started the recording session, the icon changes into
; the
same button allows the user to stop the recording session (the icon changes
to the original one).
•
Icons
(actually three icons, numbered 1, 2, 3) switch On and O a
corresponding directional light that enlighten the scene.
•
Icon
displays a Color Selection Dialog Box which allows to select the
color for the background.
•
Icon
switches On or O the colorization of the surface depending on
the elevation, that is the intensity. See Figure 10.2.
• Combo Box Shininess
allows to change the shininess, i.e. the intensity of
the shining of the image, selecting among a series of values (low, medium,
high and default).
159
Figure 10.2: 3D View Window - Surface colorization
160
10.2 Compare/subtract tool
10.2.1 Introduction
Compare/Subtract tool is available through the menu item Tools | Compare
Subtract Chromatograms; it can be used even if no data is currently loaded.
The
This tool allows the user to load two dierent chromatograms, to superimpose
them and to subtract them.
Note that the tools handles the chromatograms as whole linear chromatograms, i.e.
without taking into account the modulations. The chromatogram Plots, therefore,
represent Total Retention Time along the horizontal axis, and Intensity along the
vertical axis.
10.2.2 Denitions
• Base Chromatogram
is the rst chromatogram: it determines the time and
modulation boundaries and the allowed sampling rate.
• Reference Chromatogram
is the second one. The only restraint is that the
sampling rate must be the same of the rst chromatogram : if it is not the
case, no operation is obviously possible.
161
Figure 10.3: Compare/Subtract Tool
10.2.3 Description of the Compare/Subtract window
The
Compare/Subtract
•
a
File
•
a
Tool Bar
•
an
window (shown in Figure 10.3) contains:
menu;
with various icons and controls, shown in Figure 10.4;
Upper Panel,
where will be plotted the Base Chromatogram (in red
color), and the Reference chromatogram (in green color);
•
a
Lower Panel,
where will be plotted the Result Chromatogram (in red
color);
•
a
Status Bar,
which reports continuously the coordinates of the mouse
pointer in the Upper Panel.
162
10.2.3.1
Zoom
Both upper and lower Plot Panels initially show chromatograms at the maximum
extent: the user may however perform zoom operations on the panels, in order to
view more details.
Zoom operations are managed in the traditional way, dragging the mouse with the
left button pressed, and releasing it when the desired region has been selected. See
7.2.3 for a general description of the zoom operations.
Zoom may be applied repeatedly, so that any desired enlargement may be achieved
on both Panels.
Use the rst icon of the Tool Bar (10.2.3.3) to reset the Zoom in both Panels and
go back to the original representation of the chromatograms.
Zoom is managed separately for each panel; the reset command however applies
to both panel at the same time.
Figure 10.4: The Compare/Subtract Window Tool Bar
10.2.3.2
The Menu File of the Compare/Subtract window
The menu File contains the following items:
• Open Base Chromatogram.
The command opens a File Selection Dialog
Box for the choice of an existing chromatogram, which will become the Base
Chromatogram.
• Open Reference Chromatogram.
The command opens a File Selection Di-
alog Box for the choice of an existing chromatogram, which will become the
Reference Chromatogram.
• Save Result Chromatogram As.
The command opens a File Selection Di-
alog Box for the denition of a new le name, where will be possibly saved
the Chromatogram arising from the subtraction operation in progress.
• Exit.
The command closes the tool window.
163
10.2.3.3
The Tool Bar of the Compare/Subtract window
The Tool Bar is made up of 4 parts (divided by a thin vertical lines).
•
The rst part contains just one item:
The command resets the Zoom on both panels, restoring the original
chromatogram view at the maximum extent.
•
The second part regards the Time Shift, that is the shifting of one chromatogram with respect to the other one along the horizontal axis; it includes
two horizontal arrows, a text eld and a mouse icon :
The command shifts the reference chromatogram left along the time
axis by a number of data points indicated in the text eld.
The command shifts the reference chromatogram right along the time
axis by a number of data points indicated in the text els.
The command allows the user to shift the reference chromatogram
along the t ime axis by selecting the start and the end positions, by clicking
with the mouse onto them.
•
The third part regards the Intensity Shift, that is the shifting of one chromatogram with respect to the other one along the vertical axis; it includes
two vertical arrows, a text eld and a mouse icon :
The command shifts the reference chromatogram down along the
intensity axis by an amount indicated in the text editor.
The command shifts the reference chromatogram up along the intensity axis by an amount indicated in the text editor.
The command allows the user to shift the reference chromatogram
along the intensity axis by selecting the start and the end positions, by click-
ing with the mouse onto them.
•
The fourth part just contains a button:
The command executes the subtraction of the
two chromatograms previously loaded, according to the shifts set through
the Tool Bar, and displays the resulting chromatogram in the lower panel.
164
10.2.3.4
Shifting the reference chromatogram using the mouse
Once the user selects the button in order to shift the chromatogram upon the time
or intensity axis, a prompt to select the rst point is displayed in the status bar.
After the start point is selected, a prompt to select the second point is displayed
in the status bar. After the second click, the shift is performed.
10.2.4 Operations
A typical set of operation
1. Open the base chromatogram using menu
File | Open Base Chromatogram.
2. Open the reference chromatogram using menu
File | Open Reference Chromatogram.
3. Adjust the horizontal and/or vertical shifting using the Tool Bar commands
(10.2.3.3) or mouse commands (10.2.3.4).
4. Press button
Execute Subtractions.
5. Where necessary, perform some zoom operations to emphasize the details.
6. Finally save the result chromatogram using the menu
chromatogram as.
File | Save result
10.3 Dene Polygonal Blobs
It is possible to identify one or more Blobs creating a polygonal region. Every Blob
whose top is included in that region gets the name and the ID dened together
with the region itself.
The region is saved into the method so that every chromatogram processed with
that method inherits the region settings.
To dene such region:
Data Analysis in the lower
check box Polygon mode.
1. Select the page
then check the
panel of Chromatogram view,
2. Left click repeatedly the mouse onto the Map Plot to select the vertices of
the polygon. The area is automatically closed, so there is no need to re-select
the rst point. Right click of the mouse deletes the last point inserted, so
undo is possible.
165
3. When nished, uncheck the check box
Polygon mode:
a prompt for the name
of the Blob is displayed.
Figure 10.5 shows a sample of a polygonal region being dened.
Figure 10.5: Dening a Polygonal Region
Figure 10.6 shows the assignment of the name to the dened region.
Figure 10.7 shows the integration results with the identication of the previously
assigned polygonal Blob ID.
166
Figure 10.6: Entering the polygon region name
Figure 10.7: The polygonal Blob after integration
167
10.4 Proles
10.4.1 Description
Proles are sets of information concerning the data les; proles have been introsquare
duced in
•
Chrom
software to simplify user input; in fact:
data les are not always self-explaining, and in many cases further information must be supplied by the user;
•
in many cases, in laboratory routine, the characteristics of data les being
analyzed do not change very often; in these cases, information specic to
the type of data le could be fully specied only the rst time that this
le is used; for all other instances, information could be given as a link to
some sort of already dened set of information. We call proles these set of
information.
Proles are dened and maintained by the user; all proles are stored in a specic
ChromaConfig.xml, which is resident in the installation folder.
ChromaConfig.xml is automatically generated during installation.
XML le,
of
Important note:
users must not directly modify the
A sample
ChromaConfig.xml
le;
only the software should do this; in the case of improper modications, the entire
prole engine could not work properly any more. If this happens, the best thing
to do is to reinstall the software from scratch (it is also possible to manually delete
the le, and manually generate all user-dened proles).
Proles change with the kind of data les being used. Not all data les are presently
linked to a prole. The working scheme is however equal for all kind of proles.
10.4.2 Dening a new Prole
This Section reports the various steps that the user must execute to dene a New
Prole.
1. Give the
File Open
command; a File Selection Dialog Box will be opened.
2. Browse to the desired folder and Select a data le; the present example
points out the case of GCsolution or GCMSsolution les acquired in
or
.qgd
data formats.
168
.gcd
3. In the the upper-right side of the Dialog Box a combo box named
will be shown, together with the two buttons
New
and
Remove
Profile
(see Figure
10.8).
Figure 10.8: Open Dialog Box with Prole Combo Box
4. Press the
New
button; a new Dialog Box, named
New Profile,
will open.
See Figure
5. Assign a name for the new prole; ll all other information requests displayed
on the
6. Press
New Profile
Save;
Window.
this will close the window, returning to File Open Dialog Box.
7. 5. In the Prole section of the File Open Dialog Box, use the combo box
to select the prole just generated.
Note that the combo box only shows
the prole types that are compatible with the selected data le and software
license.
The new prole is permanently stored in the
ChromaConfig.xml
le and can be
used when a similar data le should be analyzed.
The button
Remove of the prole section allows the user to delete from ChromaConfig.xml
le the proles that are no longer used.
169
Figure 10.9: The New Prole window
10.5 Conguration
10.5.1 Description
This section describes some technical features of
Chromsquare
software. Its con-
tent is oriented to software specialists (System Administrators, IT people). However, some information can be useful also for common users.
10.5.2 The le Options.xml
This le maintains some software options between dierent executions; for example, when the user changes one or more visualization options (see 4.5), the
information is stored in this le.
The le is a text le, coded according to the rules of the XML language.
170
A prototype of the options.xml is generated in the installation folder by the installation procedure. At rst execution, the software creates a copy of the le in the
Windows temporary folder
2
; all modications of the original options are stored
on the copy of the temporary folder.
Most options are managed directly by the software, so that the user does not
normally modify the le (wrong changes could make the le unreadable). Manual
modications are required for less common options.
10.6 Ion selection
10.6.1 Description
If the chromatogram under analysis is generated by a mass spectrometer, a selection of fragments can be used for quantitation instead of the whole intensity. This
procedure is called Ion Selection.
Note: When data le is generated using GCMSsolution, prole SPC
has to be used during loading procedure.
The operator can choose what are the ion(s) that have to be summed to calculate
the Blob area using Ion Selection information stored in the Method.
Ion Selection information is specied through the last column (the 4th column) of
the Blob recognition table of the Method Panel.
Once a Blob has been dened in the Method Panel, in the same row of name
and topology denition, a text describing Ion Selection can be entered in the last
column, as shown in Figure 10.10:
Moving the mouse around the Ion Selection column, a small yellow window (a
tooltip ) is shown, which species the syntax to be used to describe Ion Selection
information.
There are 3 possibilities:
1. If the cell is left blank, the whole intensity is taken, and all components are
summed.
2 This folder varies according to the MS Windows version:
C:\Documents and Settings\user \Local\Temp\.
C:\Users\user \Local\Temp\.
In Windows XP this is
In Windows 7 it is
Where
user
stands for the current user login
171
Figure 10.10: Method Panel with Ion Selection
2. The text MAX means that the system should take into account the most
abundant fragment.
3. The user can also provide a list of ions, by means of a set of items separated
by commas; each item can represent a single ion number (M/Z) or a range of
ion numbers; the range is described by the starting and ending M/Z numbers
separated by dashes. All numbers should be in ascending order.
For example, the following text:
60-80,96,99,105-107
means that all ions between 60 and 80, those between 105-107, plus ion 96
and 99 concur in determining the Blob area.
The results are computed upon those values.
10.7 Assembling Data Files
10.7.1 Description
This feature applies mainly to LCxGC(MS).
The feature becomes necessary when the chromatographic instruments that operate the rst and second eluition are managed separately, and a new injection
172
is performed for each modulation.
It is then possible to assemble more chro-
matograms into a unique data le; this feature is used when the modulations had
been saved onto dierent les (a single le for each modulation, with les numbered
as a sequence).
10.7.2 Procedure
To assemble more chromatograms, please use the following procedure:
File | Assemble Datafile; a File Selection Dialog
Select one of the files to assemble, will appear.
1. Select the menu item
Box , with the title
See Figure 10.11.
Figure 10.11: The File selection Dialog box of the Assemble case
2. Select one of the les shown in the window, and press
3. A new window (Select
Open.
files to assemble) with two panes will be shown.
The left pane will contain the list of all the les having similar names and
ending with dierent sequence numbers; the right pane will contain the les
that the user wants to assemble. See Figure 10.12.
4. Use the two central buttons marked with
and to transfer all les between
the panes, or double-click on a le name in order to transfer just one le.
See 10.13.
173
Figure 10.12: List of the les to assemble
Figure 10.13: Files selected for assembling
174
5. Press
Ok
when the desired conguration is achieved.
A new dialog box is
nally shown, asking for conrmation (see Figure 10.14).
Figure 10.14: Asking for conrmation before assembling
6. The software will load all single datales, assembling them into an unique
Chromsquare datale .xrs, that will be saved in the same directory. In
the assembly case, the modulation time is given by the nal retention time
of the single datales (that should be the same for all les).
7. At the end of the procedure, the resulting assembled chromatogram is displayed (see Figure 10.15)
The software will treat this chromatogram like any other chromatogram, obtained
in the traditional way. The user should only consider that in this case the number
of modulations is generally much lower that in the other cases: this could cause
some limitations at zoom level.
175
Figure 10.15: The resulting assembled chromatogram
176
Chapter 11
Technical Notes
11.1 Prerequisites to install ChromSquare with
GCMSsolution spectra search
11.1.1 Description
Since version 1.5 the spectra search function is deeply integrated with GCMSsolution.
An agreement with Shimadzu Co.
allowed to perform a seamless search, but a
version of GCMSsolution higher than 2.71 is required.
The steps to upgrade are:
•
Install GCMSsolution 2.71 according to the instructions provided by Shimadzu.
•
Run ShimadzuDllSetup.exe to enable the communication API.
•
Install ChromSquare
The spectra search function will not work with previous versions of GCMSsolution.
177