Transcript
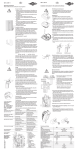
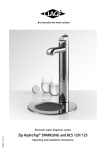
CRH 6..9
GB
CRH 6..9
Operating Instructions
GB
Installation instructions for the authorized technician
Please read these instructions carefully before using the appliance!
For your own safety
The following must be observed:
• Installation, commissioning and maintenance of this appliance
may only be undertaken by an authorized professional who will
then be responsible for adherence to the applicable standards and
installation regulations.
• The appliance may only be used when correctly installed and in
perfect working order!
• The appliance must be installed in a frost-free room!
• The appliance must be completely filled with water before being
switched on!
• The appliance and its wiring and piping must not be modified in
any way!
• The front cover of the appliance must never be opened before
disconnecting the appliance from the mains power supply!
• Be careful! When the appliance has been in use for some time, the
fittings may be very hot!
• The appliance must be earthed!
• The statutory regulations of the respective country, as well as
those of the local electricity and water supply companies.
• The specifications on the rating plate and the technical
specifications.
Installation site
• The installation site must be free from frost at all times.
• The appliance complies with protection type IP25 and may be
installed in zone 1 acc. IEC.
• In order to avoid thermal losses, the distance between the heater
and the tapping point should be as small as possible (< 2 m).
• Best performance is guaranteed at a flow pressure of ≥ 3 bar,
avoiding pressures exceeding 6 bar.
• Waterinstallation material:
Cold water pipe: Steel or copper, Hot water pipe: Copper.
Description of appliance
Installing the appliance:
This appliance is a pressure-type, hydraulically controlled instantaneous water heater for decentral water heating at one or two taps
situated in close proximity to one another.
Technical specifications: © overleaf!
1 Rinse water supply pipes thoroughly and turn off for installation.
2 Remove the front cover by unscrewing the locking screw behind
the small lid.
3 Locate and break out the required holes and cable inlets. Mark
the drilling holes with the appliance and drill them with a 6 mm
drill bit.
Use
The instantaneous water heater heats the water as it flows through
the appliance. The appliance only consumes power during this period. The heating power is switched on automatically in the event of
the minimum flow rate being exceeded. The „Power“ light indicates
that the heating system is switched on.
–
+
4 Fit the rubber grommet supplied and insert the connecting lead.
The lead must be secured with the cable clamp when using a
flexible power cord.
The temperature of the hot water depends on the rate of flow and
the temperature of the main water supply. By opening the tap more
or less you can adjust the desired water temperature between
approx. 40 °C and 60 °C:
less flow = more hot
•
Closed
flush-mounted
installation
more flow = less hot
If the heater supplies two outlets the water from the unit will be
shared between the outlets. Therefore you should use only one outlet at the time to have a sufficient flow and to avoid variation in
temperature.
with optional
piping kit UCX
Temperature monitor
If the temperature rises too high, the temperature monitor will
reduce the power supply until the water has cooled back to the permissible level. This is indicated by the "Overheat" light. If the water
overheats frequently, the cause of the fault must be remedied and
may be due, for example, to dirt in the filter, an excessive reduction
in the rate of flow or an impermissibly high inflow temperature.
5 Screw the appliance into position using the enclosed
dowels and screws.
6 Install the appliance vertically as shown in the principal
examples above. The inlet and outlet are marked with arrows.
7 The water connections are designed for surface-mounted or
flush-mounted installation. They must be carefully sealed with
a little P.T.F.E. Tape when screwed into the wall connections.
Venting
To prevent damage to the appliance, the instantaneous water heater
must be vented before using it for the first time. Each time it is emptied (e.g. after work on the plumbing system, if there is a risk of
frost or following repair work), the appliance must be re-vented
before it is used again.
8 The front cover must be cleanly broken at the specified points
for surface-mounted installation or for direct connection to the
pipes of the sanitary fitting using the optional piping kit UCX.
1 Disconnect appliance from the mains by removing the fuses.
2 Next, open and close the hot water tap valve several times until
no more air emerges from the pipe and all air has been eliminated
from the water heater (approx. 1 minute).
9 Open the water supply to the appliance and the tap to check
all connections for leaks.
3 Only then should you re-connect the power supply to the unit.
10 Next, open and close the hot water tap several times until no
more air emerges from the line and all air has been eliminated
from the heater.
How to save energy to protect the environment
The heat lost via the water pipes is very low when installed directly
alongside the pipes leading to the taps (open-outlet taps are recommended) and the hot water is rapidly supplied without drawing a
great deal of cold water first.
Electrical connection:
The instantaneous water heater is an appliance of
protection class I and must be connected to the protective
earth conductor!
Care
1 Check that the power supply is switched off prior to the electrical
connection!
• Plastic surfaces and fittings may only be wiped with a damp cloth.
Never use abrasive cleaning agents or solvents.
• For a good water supply, the perlators and shower heads should
be unscrewed and cleaned or renewed at regular intervals.
• The appliance must be connected to the supply by means of
permanent wiring throught suitable circuit breaker having a
contact separation of at least 3 mm in all poles.
• The electrical and plumbing components should be inspected by
an authorized professional at least every three years to ensure
proper functioning and operational safety at all times.
• The cross sectional area of the connection cable must be in
accordance to the power rating.
• To protect the appliance, a fuse element must be fitted with a
tripping current commensurate with the nominal current of the
appliance.
Cleaning the filter
In case of malfunctions, the filter in the cold water connecting piece
should be inspected and cleaned or replaced if necessary.
2 The connection cable should be sealed with the cable seal and
carefully connected to the terminal block using leads L, N as well
as the earth conductor.
Troubleshooting
CLAGE GmbH
customer service
Pirolweg 1 – 5
D -21337 Lüneburg
Tel:
+49 4131 8901- 40
Fax:
+49 4131 8901- 41
E-Mail service @ clage.de
Internet http://www.clage.de
If you experience a malfunction, please try to rectify the fault yourself first with the help of this table. If a fault in your appliance cannot
be rectified with the aid of this table, please contact CLAGE who will
either assist you directly or put you in touch with a customer service
contract partner in your area. Always specify the appliance model
and serial number, please!
Problem
possible cause
Solution
The pilot lamp „Power“ does not
light and the water is cold
Circuit breaker tripped
Have the fault rectified and reset
Increase flow pressure
Safety thermal cut-out tripped
Contact customer service
The pilot lamp „Power“ lights,
but the water is cold
Heating element is faulty
Replace the element
by customer service
The pilot lamp „Overheat“ lights
Overtemperature
Increase flow, check cold water temp.
Dirt in tap or filter
Cleaning, Customer service
The hot water is not hot enough
Flow and temperature of
the hot water varies
Layout of appliance
and spareparts
Depends on the heater
Check technical specifications
Outlet fitting dirty or calcified
Clean tap fitting or shower head
Filter dirty or calcified
Clean or renew the filter
3 Mount the front cover and secure with the fixing screw.
4 Fill the appliance with water completely, switch on the
power supply to the appliance.
5 Explain to the user how the instantaneous water heater works
and fold these instructions so that they fit behind the front panel.
No suitable tap
Use CLAGE shower head or tap
Replacing the flow regulator
Flow rate is too high (winter?)
Reduce the water flow slightly
Heating element defect
Contact customer service
The water pressure or the
voltage is varying
Stabilize flow pressure,
check supply voltage
In case you notice that the hot water flow rate is too low resp. the
water heater does not switch on due to the low pressure of the
incoming water at place please remove the flow regulator.
Pos.Designation
5
4
6
When ordering, please
always specify the
appliance model
and serial number!
8
7
9
3
2
10
Subject to alteration notice.
9120 2410 GP-BA 04.05
• The connecting cable must not be subjected to tensile stress
when fitted without cable clamp. The cable clamp can only be
used with CRH6 and CRH6 / 30.
Repairs may only be carried out by authorized professionals.
Flow pressure switch is not working
Water flows lower as expected
• If necessary, the connecting terminal can be moved to the lower
part of the appliance.
11
1
12
1
2
3
4
5
6
7
8
9
10
Hot water connecting piece
Temperature monitor
Heating element
Safety thermal cut-out (STB)
Appliance hood
Connection terminal
Differential pressure switch
Cable seal
Pilot lamps
Set of small spare parts with seals,
filter, screws and microswitch
(not included in delivery, only on
demand)
11 Cold water inlet
12 Cold water connecting piece
with flow regulator, return flow
inhibitor and filter
Technical specifications
Type:
Capacity:
Type of system (nominal pressure):
Heating system:
Nominal rating / -loading at 1/N/PE ~ 220 V:
Nom. rating /-loading at 1/N/PE ~ 230 V:
Nominal rating / -loading at 1/N/PE ~ 240 V:
Required cable minimum:
Switch-on flow
Switch-off flow
Hot water output at ∆t=25 K 1
Factory preset flow reducer
Increase of temperature ∆t
Hot water temperature at 15°C inlet temp.
Suitable for cold water up to appr.:
Water connection:
Weight:
Dimensions (H x W x D):
Class / Degree of protection (IEC 529):
Approvals:
1
CRH 6
CRH 6 / 30
CRH 9
0.2 liter
pressure-type, 6 bar
tubular heating element
6.0 kW / 27.3 A
6.0 kW / 27.3 A
8.0 kW / 36.4 A
6.6 kW / 28.7 A
6.6 kW / 28.7 A
8.8 kW / 38.3 A
7.2 kW / 30 A
7.2 kW / 30 A
9.6 kW / 40 A
3 x 4.0 mm2
3 x 4.0 mm2
3 x 6.0 mm2
2.9 l/min
3.6 l/min
3.5 l/min
1.9 l/min
2.7 l/min
2.5 l/min
3.8 l/min
3.8 l/min
5.0 l/min
3.5 l/min
5.0 l/min
5.0 l/min
27 K
19 K
25 K
42 °C
34 °C
40 °C
15 °C
30 °C
15 °C
G 1/2’’ for concealed or above work surface
2.1 kg
33 x 21 x 9 cm
1 / IP25
see typeplate
Temperature increase of e.g. 20 °C inlet temperature to 45 °C outlet temperature at 230 V