1
Operating Instructions
Weigh Modules
WMC
Table of contents
1
Introduction
5
1.1
1.2
2
Introduction to the WMC Weigh Module
Conventions and Symbols Used in these Operating Instructions
5
5
Safety Information
2.1
2.2
6
Definition of Signal Warnings and Symbols
Product Specific Safety Notes
6
6
3
Overview
7
4
Initial Startup of the Weigh Modules
9
4.1
4.2
4.3
4.4
4.4.1
4.4.2
4.4.3
4.5
4.6
4.7
4.8
5
6
15
5.1
5.2
5.2.1
5.2.2
5.2.3
5.2.4
5.2.5
5.2.6
5.2.7
5.2.8
16
17
17
17
18
18
18
19
19
20
Preparatory Steps for Configuration
Configuring the Weigh Module
Adjusting the weigh module
Set readability
Set stability criteria
Activating and defining the fixed filter
Adjustments to ambient conditions (filter damping)
Setting the update rate for continuous weight transmission
Recording user settings
Resetting user-specific settings to factory default
Weighing Operation
22
Transmission of Weight Values
Taring Function
Zeroing Functions
Troubleshooting Weigh Module Errors and Malfunctions
Maintenance and Service
7.1
7.2
8
9
9
10
10
10
11
11
11
13
13
14
Configuring the Weigh Module
6.1
6.2
6.3
6.4
7
Unpacking the Weigh Module
Scope of Delivery
Available Documentation
Assembling the WMC Weigh Modules
Weigh unit installation
Levelling the weigh unit
Electronic unit assembly and mounting
Install the Weighing Pan and the Draft Shield
Connect Weigh Unit and Electronic Unit
Connect Terminal and Adjust Settings
Connect the Unit to the Power Supply
Cleaning the Weigh Module
Maintenance
Technical Data
8.1
8.2
8.3
22
23
23
24
26
26
26
27
General Data
Model-Specific Data
Key to Types and List of Available Models
27
29
30
Table of contents
3
8.4
8.4.1
8.4.2
8.4.3
8.4.4
8.4.5
8.4.6
8.4.7
8.5
8.6
9
10
31
31
31
32
32
32
33
33
34
34
Accessories and Spare Parts
35
9.1
9.2
35
35
Accessories
Spare Parts
Appendix
36
10.1
10.2
4
Dimensions
WMC weigh unit dimensional drawing (with draft shield)
Standard weighing pan dimensional drawing
Weighing pan adapter dimensional drawing
Weighing pan support dimensional drawing
Custom weighing pan drawing (limitations)
Electronic unit dimensional drawing (including mounting bracket)
SWT terminal dimensional drawing
RS232C Interface (Standard Interface) Specifications
Specification for Aux Connections
Conversion Table for Weight Units
Volume/Mass Conversion Table
36
36
11
Glossary
37
12
Index
40
Table of contents
1 Introduction
Thank you for choosing a METTLER TOLEDO weigh module.
1.1 Introduction to the WMC Weigh Module
These instructions apply to all WMC weigh modules. Each weigh module consists of a weigh unit and an elec
tronic unit. A terminal may be connected, if required. The optional SWT terminal has a monochrome display
and built-in applications.
All WMC models have the following features:
● Integrated RS232C interface
● Optional interface plug-in
● Standard weighing pan and weighing pan adapter for weighing pan support or customized setups.
● Draft shield provided
● Mounting bracket and mounting accessories provided
● A CD-ROM with additional instructions and a PC program for setup and operation of the weigh module are
also included
A brief word regarding standards, directives and procedures for quality assurance: The Weigh Modules comply
with all commonly accepted standards and guidelines. They support standard processes, requirements and
work methodologies in accordance with GLP (Good Laboratory Practice) and GMP (Good Manufacturing Prac
tice). The Weigh Modules have been issued a CE-Declaration of Conformity. METTLER TOLEDO, the manufac
turer, is both ISO 9001 and ISO 14001certified.
1.2 Conventions and Symbols Used in these Operating Instructions
These symbols mark specific information on setting up, configuring, or operating weigh modules:
without a terminal ("–T").
with a terminal ("+T").
Introduction
5
2 Safety Information
2.1 Definition of Signal Warnings and Symbols
Safety notes are marked with signal words and warning symbols. These show safety issues and warnings.
Ignoring the safety notes may lead to personal injury, damage to the weigh module, malfunctions and false
results.
Signal Words
CAUTION
for a hazardous situation with low risk, resulting in damaged to the device
or the property or in losing of data or minor or medium injuries if not avoid
ed.
Attention
(no symbol)
for important information about the product.
Note
(no symbol)
for useful information about the product.
Warning Symbols
General hazard
Electrical shock
2.2 Product Specific Safety Notes
Your weigh module meets the state of the art technology and complies with all recognized safety rules, howev
er, certain hazards could arise. Do not open the weigh module: It does not contain any parts which can be
maintaines, repaired or replaced by the user. If you ever have problems with your weigh module, contact your
authorized METTLER TOLEDO dealer or service representative.
Always operate and use your weigh module only in accordance with the instructions contained in this manual.
The instructions for setting up your weigh module must be strictly observed.
If the weigh module is not used according to these Operating Instructions, protection of the weigh module
may be impaired and METTLER TOLEDO assumes no liability.
Staff Safety
In order to use the weigh module, you must have read and understood the operating instructions. Keep the
operating instructions for further reference.
Use only METTLER TOLEDO accessories and peripheral devices, these items are designed to work optimally
with your weigh module.
Safety Notes
It is not permitted to use the weigh module in explosive atmosphere of gases, steam, fog,
dust and flammable dust (hazardous environments).
CAUTION
METTLER TOLEDO recommends that you use the AC adapter provided with your unit to oper
ate it. Make sure that the voltage printed on the adapter matches your local power supply.
Plug the adapter into a grounded outlet only.
6
Safety Information
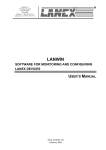
3 Overview
Weigh unit
2
6
1
4
7
3
3
5
1 Housing
2 Plastic cover
3 Connector for electronic
unit (direct cable exit and
plug)
4 Level bubble (leveling
aid)
5 Base (mounting flange)
6 Weighing pan support
with standard weighing
pan
7 Draft shield
Electronic unit
8
9
10
11
12
Housing
Weigh unit connector
Terminal connector
Optional interface plug-in
"Aux" connectors (for
"ErgoSens", hand or footoperated buttons)
13 RS232-C standard inter
face
14 Connector for AC adapter
8
10
9
11
13
12
14
Terminal SWT (accessory)
15 Display (monochrome)
16 Keyboard
15
16
Weighing pans
17 Standard weighing pan
18 Weighing pan adapter
18
17
Overview
7
Mounting accessories
20
19
19 Mounting bracket for elec
tronic unit, including DIN
clip and screws
20 Terminal holder for SWT
terminal, including screws
(accessory)
Connecting cable (accessory)
21 Terminal – electronic unit
connector cable
(0.575m/1.9ft or
2m/6.5ft long) Note: The
maximum allowable
cable length is 5m/16.4ft.
21
Power supply
22 AC adapter
23 Power cable (countryspecific)
22
8
Overview
23
4 Initial Startup of the Weigh Modules
This section tells you how to unpack your new weigh module, set it up, and prepare it for operation.
4.1 Unpacking the Weigh Module
The weigh unit and the electronic unit are each packed in separate cardboard boxes along with the associated
hardware and appropriate mounting materials. The boxes are labeled with their contents as follows: “Weighing
module,” and “Electronic Unit”. Both cardboard boxes are placed inside a large transport box. The terminal
must be ordered separately, and consequently it is supplied separately.
Unpacking the electronic unit and terminal:
Remove the top foam cushion, then remove the unit and the hardware.
Unpacking the weigh unit:
Remove the grey foam cushion. Carefully remove the weigh unit from
the cushion and place it smoothly on a level surface.
Note
Keep all packaging in case you need to transport the module in the future; the weigh module should only be
transported in its original packaging.
4.2 Scope of Delivery
Please check the scope of delivery using the following table. If any parts are missing or defective, please report
this to your METTLER TOLEDO representative or the shipper immediately.
“Weighing Module” Box
Parts
WMC weigh unit
WMC24-SH
WMC15-SH
WMC25-SH
WMC24-SH
WMC15-SH
WMC25-SH
Standard weighing pan
Weighing pan adapter
Draft shield
WMC operating instructions (this document)
Production certificate and CE Declaration of Conformity
CD-ROM with instructions and PC software
“Electronic Unit” Box
Parts
Electronic unit
Mounting bracket for electronic unit, including clip and
screws for attaching to DIN standardized rail
AC adapter
Power cable (country-specific)
Terminal option: “Terminal” Box
SWT terminal (monochrome display), including protective cover
2 terminal-electronic unit connector cables (0.575m/1.9ft and 2m/6.5ft long)
Terminal instruction manual (XS instructions, part 2 and part 3)
Initial Startup of the Weigh Modules
9
4.3 Available Documentation
The table below lists all documentation available for the WMC weigh modules, along with the document num
bers for each document.
German
English
French
Spanish
Italian
Operating Instructions for WMC
11781253 11781254 11781255
––
––
weigh modules (this document)
MT-SICS reference manual
––
11781363
––
––
––
Instructions for SWT terminal
Operating Instructions XS Balances, 11781117 11781118 11781119 11781120 11781121
Part 2
Operating Instructions XS Balances, 30003897 30003899 30003910 30003911 30003912
Part 3
The CD-ROM (11781257) provided with your unit includes all of the documents listed above.
4.4 Assembling the WMC Weigh Modules
The WMC weigh modules can be integrated into higher-level systems (machines, systems, etc.). Be sure to fol
low the tips in the following sections to select the optimal installation method.
4.4.1 Weigh unit installation
The weigh modules were designed to record weights very quickly and accurately under normal conditions and
communicate the result using the integrated interface and/or display the result on a terminal. In practice, ambi
ent conditions (vibration, oscillations, shocks, air movements and temperature changes) affect weighing time
and achievable accuracy as well as the repeatability.
You can adjust various parameters on your weigh module, see Configuring the Weigh Module (page 15). We
recommend that you adjust the settings to the levels needed for your application; higher accuracy requirements
increase the weighing time (period between the placement of the weight and the availability of a stable result).
Filter settings must be stricter to compensate for unfavorable ambient conditions, see Configuring the Weigh
Module (page 15); this also has a negative impact on weighing time. Therefore, be sure to note the following:
● Mount the weigh unit on a base that is mechanically decoupled from
●
●
●
●
●
●
●
10
Initial Startup of the Weigh Modules
the system and therefore free of shocks and vibration.
The location of the weigh unit should not be in areas that are
exposed to drafts, direct sunlight, or severe temperature fluctuations.
Make sure that any vibrations in the building are not transferred
through the floor and to the weigh unit.
Make sure that the weigh unit is as perfectly horizontal as possible.
Use the built-in precision level to achieve exact leveling. It is accept
able to have a unit that is not perfectly horizontal if its position is not
altered after it has been adjusted, see Adjusting the weigh module
(page 17) (e.g., if it is mounted in a fixed position in the system).
Attach the weigh unit to the base across as wide an area as possi
ble. Use the appropriate holes in the base plate of the cell (4x M3
screws, tightening torque 1.3 – 2 Nm).
The base must be perfectly flat to avoid putting tension on the weigh
unit base plate.
Make sure that vibrations cannot be transferred across the connector
cable between the weigh unit and the electronic unit.
Make sure that the weigh unit housing is connected in an electrically
conductive manner with the system.
If your requirements are extremely demanding (short weighing time, high accuracy), we recommend that you
try a test setup first and test the entire system under real-world conditions using various settings see Configur
ing the Weigh Module (page 15). This will allow you to tweak the system and optimize it bit by bit.
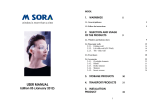
4.4.2 Levelling the weigh unit
The weigh unit must be horizontally aligned (leveled) at the desired location.
The weigh unit is equipped with a level control (level bubble). The
weigh unit is completely horizontal when the bubble is precisely in the
middle of the level window (left image = properly level, right image =
not properly level).
Note
You must always level and adjust the weigh unit after moving it to a
new location.
4.4.3 Electronic unit assembly and mounting
The electronic unit can be mounted in any position you wish. A mounting bracket and clip for attaching the unit
to a DIN standardized rail are provided. Proceed as follows for mounting:
Remove the two existing screws from the bottom side of the electronic
unit (Torx T-20) and use the provided Torx T-20 countersunk head
screws (A) to secure the mounting bracket.
B
A
Secure the clip (B) to the front face or underside of the mounting brack
et. Use the two provided M4 pan head screws (Torx T-20) to do so.
A
Note
The electronic unit can also be attached directly to a support (without
the clip) via the M4 threads of the mounting bracket.
Important:
The electronic unit meets the requirements for protection class IP40. If
required, appropriate protective measures must be taken to protect the
unit from dirt.
4.5 Install the Weighing Pan and the Draft Shield
The WMC weigh modules come with a weighing pan adapter and a standard weighing pan. The weighing pan
adapter can either be fitted with the standard weighing pan or a customized setup.
B
A
C
Remove the white plastic cover (B) from the weighing cell. This cover
protects the weighing pan support (A) from damage during transport
and keeps liquid from penetrating into the weighing cell during clean
ing. Therefore keep the cover in a safe place!
Locate the bushing of the Weighing pan adapter (C) on the pin of the
weighing pan support (A).
Initial Startup of the Weigh Modules
11
Put the standard weighing pan (D) onto the weighing pan adapter.
D
If you wish to use your own setup, place it directly on the weighing pan
adapter; the standard weighing pan is not needed in this case.
Dimensional drawings of both weighing pans are found in Section
Dimensions (page 31).
To ensure proper startup of the weigh module, the preload must not
exceed 80 % of the weighing range. The weighing range will hence be
reduced by the amount of the preload weight. If the entire weighing
range is required, the preload may not exceed 4 g (starting from stan
dard weighing pan).
● Weight of weighing pan adapter: approx. 0.2 g
● Weight of standard weighing pan: approx. 1.1 g
Note
With high preload, the adjusting weight must be chosen accordingly.
For adjusting purposes, it is preferable to convert the weighing cell back
to its original state.
Note on overload protection
The weigh units of the WMC weigh modules have overload protection.
The following limit values must not be exceeded:
● Vertical load: 1kg (static load)
● Lateral load: 200g (static load)
● Torsion: 0.3 Nm
Slide the draft shield (E) onto the weigh unit by evenly pressing down
on two opposite corners until it engages with an audible ’click’.
Attention
E
Instructions and precautions for custom weighing pan:
The weighing pan support (A) comes with a concentric M2 thread to
attach a custom weighing pan. Note the following conditions so as to
not damage the weigh unit:
● The tightening torque of the screw must not exceed 30 Ncm / 2.65
in lbs. Use Indicating Type Torque Screwdriver. (do NOT use click
type). Observe also the tensile strength of the screw used. This is
valid only for metallic counterparts.
● The screw must penetrate approx. 3 mm.
● Use only non-magnetic material for your weighing pan (eg nickelchromium steel, titanium, brass, aliminum etc.).
● Switch off the weigh module before installing the weighing pan.
See section Dimensions (page 31) for dimensions of your weighing
pan.
12
Initial Startup of the Weigh Modules
4.6 Connect Weigh Unit and Electronic Unit
The weigh unit housing has no plug or socket but a direct cable exit.
Typically, the cable length is 3 m.
A
Connect the plug to the appropriate socket of the electronic unit:
Align the red dot of the plug with the red dot on the socket (A), then
push the plug into the socket. A clicking sound confirms that the plug is
locked in place.
B
To unlock the plug, pull the sleeve (B) back, then pull the plug out of
the socket.
Attention
Lay the cable so that no one will trip over it and so that no vibrations
can travel up the cable and be transferred to the weigh unit.
4.7 Connect Terminal and Adjust Settings
You’ll need this section only if your weigh module was delivered with the optional terminal.
Place the terminal on a flat surface with the display face down. Press
the two tabs (A) on the back of the terminal to open it, and open the
bottom of the terminal (B).
B
A
A
Feed the terminal cable through the cutout in the back of the terminal
and plug in the jack (C). Make sure that the strain relief (D) is inside
the terminal.
C
D
E
F
If you want to permanently affix the terminal to the electronic unit, you
can also attach the terminal holder now (accessory, item no.
11121255):
Place the terminal holder (E) into the corresponding cutout on the bot
tom of the terminal and use the knurled screw (F) provided to secure it
from the inside of the terminal.
Initial Startup of the Weigh Modules
13
Close the bottom of the terminal. Then push in the two side tabs to
completely close the terminal.
Note:
You can also use the two tabs on the back side to adjust the viewing
angle of the terminal while it is in operation: Press both buttons simul
taneously and pull the top of the terminal gently upwards, or press it
down until it clicks into the desired position. You can choose from three
different positions.
Remove the two screws (Torx T-20) in the bottom of the electronic unit
and store them in a safe place. Align the terminal holder exactly with the
two holes and secure it with the Torx T-20 countersunk head screws
(G).
G
Plug the terminal cable plug (H) into the appropriate jack on the back of
the electronic unit and screw in to tighten. Try to run the terminal cable
as close as parallel as possible to the terminal holder.
G
H
4.8 Connect the Unit to the Power Supply
The electronic unit for your weigh module is delivered with an AC adapter and a power cord for your country.
The AC adapter is suitable for use with the following voltage range:
100 – 240 VAC, 50/60 Hz, see General Data (page 27).
Check whether your local power supply falls within this range. If it does not, DO NOT connect the electronic
unit or the AC adapter to your power supply and contact your local METTLER TOLEDO office.
Connect the AC adapter (A) to the connector (B) on the back of the elec
tronic unit and to your power supply. Tighten the connector to ensure a
good connection to the electronic unit.
A
B
Attention
Be sure to lay the cables so that they cannot be damaged or get in your
way while you’re working! Remember that the AC adapter may NOT
come into contact with any liquids!
Once the weigh module has been connected to the power supply, the
weigh module will perform a self-test, and then it will be ready to oper
ate.
14
Initial Startup of the Weigh Modules
5 Configuring the Weigh Module
Once the weigh modules have been installed, they must be configured, i.e., prepared for operation. For weigh
modules with a terminal connected, nearly all configuration work can be performed via the terminal; weigh
modules without a terminal are configured using MT-SICS commands issued from a host computer. An expan
sion of the MT-SICS command set is available for product-specific configuration work.
All weigh modules come from the factory with a built-in RS232C interface. In addition, the modules can be
equipped with a second optional interface that is inserted into the electronic unit, see Technical Data
(page 27). The optional interfaces are delivered with their own instructions describing installation and all con
figuration work needed.
The procedure for configuring the weigh modules and interface functionality depends on how the individual
weigh module is equipped. There are four possible configurations:
1.
2.
3.
4.
Weigh module without terminal, with built-in RS232C standard interface
Weigh module without terminal, with built-in RS232C standard interface and additional optional interface
Weigh module with terminal and built-in RS232C standard interface
Weigh module with terminal, built-in RS232C standard interface, and additional optional interface.
Configurations
Interface/ com
mands
1
2
3
4
Electronic unit
Weigh unit
Electronic unit
Weigh unit Optional
interface
Electronic unit
Weigh unit Termi
nal
Electronic unit
Weigh unit Optional
interface Terminal
HOST interface
Built-in RS232C
Optional interface
Built-in RS232C
(can be configured
via the terminal for
“host”, see Terminal
instructions)
Setting interface
parameters
via MT-SICS “COM”
command
interface: Configured
using SICS com
mand “COPT” via
the built-in RS232C.
Built-in RS232C:
via MT-SICS "COM"
command.
Available on host
interface
Via terminal (as per
terminal instruc
tions)
Choice of built-in
RS232C or optional
interface (the termi
nal can be used to
configure one of the
interfaces for the
“host,” see terminal
instructions).
Via terminal (as per
terminal instruc
tions)
Available on built-in
RS232C, assuming
it is configured as
host interface
Available on built-in
RS232C, assuming
it is configured as
host interface
“FastHost” com
Available on host
mands (as per MT- interface
SICS reference man
ual)
Configuring the Weigh Module
15
Interface/ com
mands
1
2
3
4
Electronic unit
Weigh unit
Electronic unit
Weigh unit Optional
interface
Electronic unit
Weigh unit Termi
nal
Electronic unit
Weigh unit Optional
interface Terminal
When the terminal is
removed, the system
behaves like a
weigh module with
out a terminal, with
a RS232C standard
interface (Configura
tion 1)
When the terminal is
removed, the system
behaves like a
weigh module with
out a terminal, with
a RS232C standard
interface and addi
tional optional inter
face (Configuration
2)
Notes
5.1 Preparatory Steps for Configuration
For weigh modules with a terminal connected, the configuration tasks
described in the following sections are performed using the terminal.
Therefore, no preparatory work is required; however, it is assumed that
you have the terminal instructions handy and are already familiar with
how to operate the terminal and use the menu structure.
The menu options for configuring the weigh module are found in the
system settings of the terminal.
The configuration tasks described in the following section are for weigh
modules without a terminal. At the end of each section, you will see a
note for users of weigh modules with terminals telling you where the
equivalent settings can be found on the terminal.
Weigh modules without a terminal are confugred via the interface with
MT-SICS commands. You’ll need a host computer (PC) and a terminal
program to do this. ” Connect the host computer with the built-in
RS232C standard interface to the weigh module. Set the communica
tions parameters of the terminal program as follows:
Baud rate:
9600
Data bits:
8
Stop bits:
1
Parity:
None
End of line:
<CR><LF>
Handshake:
None
These are the factory settings for the built-in RS232C standard interface on the weigh module.
You can change the RS232C standard interface communications parameters using the “COM” command
(SICS level 2). Once you have made your changes, you must adjust the terminal program’s communications
parameters accordingly so that you can continue to communicate with the weigh module.
For weigh modules that have an additional optional interface, you can configure them using the “COPT”
command (SICS level 2). Only the RS232C standard interface supports the “COPT” command; therefore, for
this configuration, the weigh module must first be connected with the host computer via the standard interface.
16
Configuring the Weigh Module
Once you have configured your system, you can connect the host computer with the optional interface. The
RS232C standard interface itself cannot be configured; it always uses the factory settings (see above). If an
optional interface is available, the RS232C standard interface is used as a service interface.
Note
If you have a terminal, you can connect it temporarily and configure the optional interface using the terminal.
This is easier and faster than configuring it with the “COPT” command. Once you’ve configured the optional
interface, you can disconnect and remove the terminal.
The next section describes the most important configuration task (user settings) with special consideration giv
en to the expanded MT-SICS command set for WMC weigh modules without a terminal.
5.2 Configuring the Weigh Module
It is recommended that the weigh modules are configured before they are used in order to achieve best weigh
ing performance. The following sections provide information on the most important configuration tasks.
5.2.1 Adjusting the weigh module
Following initial startup, the weigh module must be adjusted using an external weight. Various parameters can
be set for the adjustment.
For weigh modules without a terminal, the command “C2,” (SICS level
2) is used for the adjustment and the corresponding settings. Use the
“M19” command to set up the weight of the external adjustment weight
you intend to use.
Weigh module with a terminal connected: The settings for adjustment
using an external weight are part of the system settings. See the
description of the “Weighing” application for how to perform the adjust
ment. You can find more information in the terminal instructions.
Note
The adjustment of the weigh module should be carried out if the system
has not been used for a longer period. Allow time for the weigh module
to warm-up, see General Data (page 27). We recommend adjustment
at intervals of max. 24 hours.
5.2.2 Set readability
Readability refers to the smallest difference in weight that the weigh module can still measure and transmit via
the interface and/or show on the display, see Technical Data (page 27). The factory-set readability (= maxi
mum possible number of places after the decimal point) can be reduced if necessary to shorten weighing time.
For weighing modules without a terminal , use the “RDB” command to
set readability. Alternatively the “M23” command can be used to set
how many digits of the weighing result should be displayed.
For weigh modules with a terminal connected, use the “1/10d” func
tion key to set readability.
Note:
Depending on your particular weigh module, you may have several of
these function keys available, such as “1/100d” and “1/1000d”. For
more information on these function keys, see the description for the
“Weighing” application (terminal instructions).
Configuring the Weigh Module
17
5.2.3 Set stability criteria
The stability criterion specifies when a weighing result is considered stable. A stability criterion must also be ful
filled to perform the zeroing and taring functions. A separate stability criterion can be defined for every mode
(weighing, zeroing, and taring). A value is considered to be stable when it moves within a defined bandwidth
during a specified observation period. These two parameters (length of observation and bandwidth) define the
stability criterion.
For weigh modules without a terminal, use the “USTB” command to
set stability criteria.
For weigh modules with a terminal, stability criteria settings (reading
release) are part of the weighing parameters. On the SWT terminal,
you’ll find these settings in the system settings.
5.2.4 Activating and defining the fixed filter
Use the “M01” command to set the weighing type and the “M02” command to set the ambient conditions, see
Adjustments to ambient conditions (filter damping) (page 18). These two settings determine the type and
strength of signal filtering that will occur. With the “M01” command you can choose between two weighing
types, “Sensor Mode” (command “M01 2”) or “Universal” (command “M01 0”).
For the “Sensor mode” weighing type (command “M01 2”), the “FCUT”
command offers an additional option for defining filter behavior. Filtering
in “Sensor mode” is chronologically linear (fixed, non-adaptive filter)
and is appropriate if the weight readings need to be further processed.
For weigh modules with a terminal connected, selecting the weighing
type is part of the weighing parameters. On the SWT terminal, you’ll find
these settings in the system settings. The ambient conditions see
Adjustments to ambient conditions (filter damping) (page 18). deter
mine filter damping of the weighing signal. These two settings deter
mine the filtering of the weighing signal.
5.2.5 Adjustments to ambient conditions (filter damping)
Adjusting filter damping allows for the weigh module to be optimally adapted to ambient conditions. This set
ting determines how quickly the weigh module will react to a change in weight, but also how sensitive the
module will be to outside disturbances. Strong filter damping will cause the module to react more slowly to
small changes in weight, but it will also make it less sensitive to ambient conditions such as air movements
and vibrations. In general, this also increases the measurement accuracy (repeatability). You can also control
the measurement accuracy and the weighing time by changing the settings for stability criteria, see Set stability
criteria (page 18).
For weigh modules with no terminal connected, use the “M02” com
mand to adjust your system to ambient conditions (filter damping). This
command from the standard SICS command set (level 2) is described
in the MT-SICS reference manual.
Note
If the “sensor mode” weighing type is active, and the “FCUT” command
has been used to define a frequency limit, see Activating and defining
the fixed filter (page 18), the ambient condition settings for the “sensor
mode” will not take effect. In this case, the weigh signal is processed by
the fixed filter.
18
Configuring the Weigh Module
For weigh modules with a terminal connected, adjusting the system to
ambient conditions is part of the weighing parameters. On the SWT ter
minal, you’ll find these settings in the system settings.
Note
The following cut-off frequencies are associated with the “M02” command parameters
(at "M01 2" and "FCUT" < 0.001 Hz):
M02 0
M02 1
M02 2
M02 3
M02 4
5 Hz
0.65 Hz
0.28 Hz
0.15 Hz
0.056 Hz
5.2.6 Setting the update rate for continuous weight transmission
For weighing applications such as dosing to a specified target weight, the weigh module must constantly
record weight changes and forward the readings regardless of their stability to the dosing system so that it can
control the dosing process. In such cases, you should activate the “send continuous” mode to ensure a contin
uous flow of weight readings and set the number of weight readings to be transmitted each second via the
interface (update rate).
For weigh modules with no terminal connected, use the “SIR” com
mand (standard SICS level 0) to activate the “send continuous mode”
mode. Use the “UPD” command (standard SICS level 2) to set the num
ber of weight readings to be transmitted per second.
Update rates of up to 92 readings per second are possible.
For weigh modules with a terminal connected, you can activate the
“send continuous” mode and set the update rate as part of the interface
definition in the system settings.
Update rates of up to 23 readings per second are possible if a terminal
is connected.
5.2.7 Recording user settings
The current user settings can be sent to the interface using the “LST” command.
Configuring the Weigh Module
19
For weigh modules with no terminal connected, use the “LST” com
mand (expanded SICS command set for WMC weigh modules) to out
put a list of all user-specific settings. The following example shows part
of such a list:
LST B I2 "WMC25-SH WMC-Bridge 21.00900 g"
LST B I3 "1.00 25.69.4.2148.1055"
LST B I4 "BU0123456789"
LST B C0 0 0 ""
LST B C4 "0"
LST B Cx "1"
LST B COM 0 6 3 0
LST B FCUT 0.000
LST B I10 ""
LST B M01 0
LST B M02 2
LST B M03 0
LST B M17 00 00 00 0
LST B M18 1
LST B M19 200.00000 g
LST B M20 200.00000 g
LST B M21 0 0
LST B M22 1 0 1.00000000E+00 "cu1" 1.00000001E-01
LST B M22 2 0 1.00000000E+00 "cu2" 1.00000001E-01
LST B M23 0
LST B M31 0
LST B M32 1 00 00 0
LST B M32 2 00 00 0
LST B M32 3 00 00 0
LST B M33 0
LST B M35 0
LST B M67 50
LST B RDB 5
LST B TST0 0 ""
LST B UPD 10.173
LST B USTB 0 2.000 3.000
LST B USTB 1 2.000 5.000
LST A USTB 2 2.000 5.000
Note
For reading and restoring the settings, use the "e-Loader" from METTLER
TOLEDO.
For weigh modules with a terminal connected, both the system set
tings and the user-specific settings can be recorded. While viewing the
system settings or user-specific settings, simply press the Print key on
the terminal (key with the printer symbol). The current settings will be
output via the interface.
5.2.8 Resetting user-specific settings to factory default
The current user-specific settings can be reset to the factory default using the “FSET” command.
For weigh modules with no terminal connected, use the “FSET” com
mand to reset.
20
Configuring the Weigh Module
Weigh modules with a terminal connected:
On the SWT terminal, all settings can be reset in the system settings.
Please read the notes and warnings on this subject in the terminal
instructions.
Configuring the Weigh Module
21
6 Weighing Operation
This section contains helpful tips for weighing operation and information
on possible error messages. Weigh modules with a terminal connected
are operated using the terminal, and all error messages are displayed in
plain English on the terminal; consult the terminal instructions for more
information.
Information in this section applies to users with weigh modules without
a terminal. The MT-SICS commands listed here are only some of the
available commands you can use in weighing operations. See the MTSICS reference manual for more information and detailed command
descriptions.
6.1 Transmission of Weight Values
The readings transmitted via the interface refer either to zero or to the reading created as a result of the tare
command, depending on whether zeroing or taring was the last function performed. Note that the system
zeroes automatically each time it is powered up (zeroing upon startup). Commands that cannot be executed
successfully until a stability criterion is met will cancel if stability is not attained within 40 seconds (timeout).
Weight query and transmission of a single stable weight reading
Command:
S
Transmits the current stable weight reading. If
the weigh module is in the stabilization phase,
the weight reading will not be sent until the sta
bility criterion for weighing has been met.
Response:
S S [current weight reading] g
Stable weight value (the second “S” stands for
“stable”)
Response (errors): S I
Command cannot be executed, e.g., because
the stability criterion for weighing was not met
(timeout).
Weight query and immediate transmission of a single weight reading
Command:
SI
Immediate transmission of the current weight
reading, regardless of its stability.
Responses:
S S [current weight reading] g
Stable weight value
S D [current weight reading] g
Non-stable weight reading (the “D” stands for
“dynamic = not stable”)
Automatic transmission of each stable weight reading after a change in weight
Command:
SNR
Transmits the current stable weight reading, and
automatically sends all subsequent weight read
ings that fulfill the stability criterion after any
change in weight. You can input the weight
change that is necessary to trigger transmission
as needed.
If you do not want any more readings, cancel
automatic transmission with commands such
as “S,” SI,” or “@” (reset).
Response:
S S [current weight reading] g
Stable weight value. After a change in weight
and subsequent stabilization, the module will
automatically transmit the next stable weight
reading.
22
Weighing Operation
Continuous transmission of all weight readings (“continuous mode”)
Command:
SIR
Continuously transmits all weight readings,
regardless of stability. This continuous transmis
sion mode is particularly helpful for dosing to a
specified target weight because it allows moni
toring of the continuous changes in weight. The
effective number of transmitted readings per sec
ond may not deviate more than 1 reading per
second from the set transmission rate.
Responses:
S S [current weight reading] g
Stable weight value
S D [current weight reading] g
Dynamic, non-stable weight reading
6.2 Taring Function
Taring after fulfillment of the stability criterion
Command:
T
Response:
T S [current weight reading] g
Response (error):
TI
Immediate taring regardless of the stability criterion
Command:
TI
Responses:
TI S [current weight reading] g
TI D [current weight reading] g
Response (error):
TI I
This command sets the current stable weight
reading (that references the current zero) as tare
weight, transfers it to the tare memory, and
transmits it across the interface. The current
weight reading will then be set to zero. If the
weigh module is in the stabilization phase, the
command will not be executed until the stability
criterion for taring has been met, or it will cancel
in the event of a timeout.
The current stable weight reading (net weight)
has now been set to zero.
Tare function cannot be carried out. This could
occur if the current weight reading (referencing
the current zero) is negative, or if the stability
criterion for taring has not been met (timeout).
The current weight reading referencing the cur
rent zero is immediately considered to be the
tare weight. It is transferred to the tare memory
and transmitted across the interface, regardless
of the stability criterion for the taring function
being met. The current weight reading (net
weight) will then be set to zero.
The current stable weight reading (net weight)
has now been set to zero.
The current dynamic weight reading (net weight)
is set to zero (the “D” stands for “dynamic” =
not stable). In this case, the zero is also consid
ered unstable.
Command cannot be executed – this may hap
pen if the current weight reading referencing the
current zero is negative.
6.3 Zeroing Functions
Zeroing creates a new zero (reference point), sets the current weight reading to zero, and clears the tare memo
ry.The weigh module automatically zeroes itself each time it is powered up.
Weighing Operation
23
If the weigh module cannot zero upon power-up due to filter settings and prevailing ambient conditions, it will
time out, and the system zero will be used. This means that all weight values will reference this zero. You will
not be able to perform a test or an adjustment until a zero command is successfully executed.
Zeroing with fulfillment of the stability criterion
Command:
Z
Response:
ZA
Response (errors):
ZI
Immediate zeroing regardless of the stability citerion
Command:
ZI
Response:
ZI S
ZI D
Creates a new zero. If the weigh module is in the
stabilization phase, the command will not be
executed until the stability criterion for zeroing
has been met.
The current stable weight reading is set to zero
and the tare memory is cleared.
Command cannot be executed, e.g., because
the stability criterion for zeroing was not met
(timeout).
A new zero is immediately set, regardless of the
stability criterion for zeroing being met. The tare
memory is then cleared.
Zeroed on the basis of a stable weight reading.
Zeroed on the basis of a dynamic weight read
ing (the “D” stands for “dynamic” = not stable).
6.4 Troubleshooting Weigh Module Errors and Malfunctions
Go through each of the steps offered here and try to remedy the problem yourself – it may be due to system set
tings. Never open the weigh module housing.
If your weigh module doesn’t perform correctly until it has been powered up for quite a
while
If the weigh module responds to transmission, taring, or zeroing commands with “S I”, “T I” or “Z I” for a long
time after being powered up:
● Check ambient conditions.
● Check your zero after power-up by executing an “SI” command. If the weight reading deviates more than a
few increments from zero, the unit was unable to get a stable reading upon being powered up, and was
then unable to zero.
● Temporarily change your filter settings and/or your stability criterion for zeroing so that you can successfully
zero the system with a “Z” command (response: “Z A”).
● If necessary, restore the filter settings, see Recording user settings (page 19).
24
Weighing Operation
If the weigh module does not transmit the expected weight readings
● Check the weigh module settings by using the “LST” command (inquire user settings).
● Run the test function with the “TST2” command (see the MT-SICS reference manual). The difference sent is
the adjustment error, also called sensitivity deviation, that has developed as a result of drift since the last
adjustment. The result should give you an idea of whether adjustment is needed.
Note
If the difference is in the hundreds of increments (digits), you should assume that the weigh module was
never adjusted before, handled improperly, dropped, or suffered some other shock or blow. You should
have a technician check the unit before you use it again.
● Switch the power off and back on and check the message that the interface sends after the weigh module’s
startup phase. If you see an error message instead of the serial number, contact your METTLER TOLEDO
office.
If there is one of the following error on weight response perform the descript action:
● Error 10b – Check cable
● Error 14b – Check electronic box (wrong electronic box)
● Error 15b – Perform external adjustment
If the weigh module doesn’t react to your commands at all
● Check to see that power is being supplied to your unit.
● Check your interfaces and interface parameter settings.
If you, or the person at your company responsible for maintaining the weigh module, cannot remedy the prob
lem, please contact your supplier or your METTLER TOLEDO contact. Be sure to have the following information
ready when contacting us:
● Your weigh module’s current settings (“LST” command).
● Size of preload, if you’re working with the weighing pan adapter and a custom setup for accepting objects
to be weighed.
● Brief description of weighing application and the error or malfunction you are experiencing.
Weighing Operation
25
7 Maintenance and Service
To ensure that your weigh module remains reliable, accurate, and functional for many years to come, the indi
vidual components must be cleaned and maintained periodically as appropriate for the intensity of use and the
risk of contamination with debris.
7.1 Cleaning the Weigh Module
Clean the weighing pan and the weigh unit housing regularly with a damp cloth. The electronic unit and termi
nal can also be cleaned in this fashion as needed. For tougher dirt, a mild household cleaner may be used.
Make sure that no liquid penetrates inside the components (protect with plastic cover)!
CAUTION
Never use cleansers containing solvents or gritty scrubbing particles.
They could damage or scratch certain surfaces (particularly the terminal screen).
7.2 Maintenance
Your weigh module is a precision instrument, and periodic maintenance is one of the basic requirements to
ensure it will perform well for you for many years to come.
Maintenance intervals will depend on the duration of use and the application and ambient conditions. Mainte
nance must be performed by a technician trained by METTLER TOLEDO.
Ask your METTLER TOLEDO office about service packages – regular maintenance by an authorized service tech
nician will ensure your weigh module remains accurate and lengthen its service life.
26
Maintenance and Service
8 Technical Data
This section includes the most important technical data for your weigh module.
8.1 General Data
Power supply
● External power supply:
● Cable for power supply:
● Power feed-in at electronic unit:
Protection and standards
● Overvoltage category:
● Pollution level:
● Protection:
● Safety and EMV standards:
● Application range:
Primary: 100-240VAC, -15%/+10%, 50/60Hz, 0.5A
Secondary: 12VDC +/-3%, 2A (provides electronic over
voltage protection)
Please note: Detailed information on your METTLER
TOLEDO power supply unit (page 28)
Use only with a tested AC Adapter with SELV output
current.
Ensure correct polarity
Class II
2
(non-conductive soiling only; every once in a while tempo
rary conductivity may occur due to condensation)
In operation, the weigh unit is rated IP30.
The electronic unit meets IP40.
The SWT terminal is rated IP54.
See Declaration of Conformity (provided separately)
Use only in closed indoor spaces; DO NOT OPERATE in
hazardous areas
Ambient conditions
● Height above sea level:
to 4000 m
● Ambient temperature:
5-40 °C
● Relative humidity:
Max. 80% at 31°C, decreasing lineraly to 50% at 40 °C,
non-condensing
At least 60 minutes after the weigh module has been con
nected to the power supply; the weigh module can be used
immediately if it is turned on from standby mode (when
operated with a terminal connected).
● Warm-up time:
Materials
● Weigh unit housing:
● Electronic unit housing
● Terminal housing:
● Weighing pans:
Standard Equipment
Polished chromium steel,
X2CrNiMo17-12 (1.4404 resp. 316L)
Polished chromium steel,
X2CrNiMo17-12 (1.4404 resp. 316L)
Painted die-cast zinc and plastic
Standard weighing pan: chromium steel, X2CrNiMo17-12
(1.4404 resp. 316L)
Weighing pan adapter: plastic (PEEK CF30)
See Scope of Delivery (page 9)
Technical Data
27
Detailed information on your METTLER TOLEDO power supply unit
METTLER TOLEDO weigh modules are shipped with an external power supply. In accordance with Class II pro
tection, it is double-insulated and certified. It is equipped with functional grounding to ensure electromagnetic
compatibility (EMC). The ground connection has NO safety-related function. For more information on our
products’ conformity, refer to the Declaration of Conformity shipped with each product or download details from
www.mt.com.
For testing in accordance with Directive 2001/95/EC, the power supply and weigh module should be treated as
double-insulated Class II devices.
Therefore, grounding tests are not required. It is also unnecessary to conduct a grounding test between the pro
tective ground of the power supply and a metallic surface on the weigh module housing.
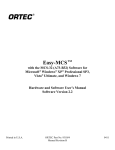
Because precision weigh modules are sensitive to electrostatic discharge, a coupling resistor (typically 10kΩ is
installed between the grounding conductor (at the power supply input) and the power supply output. See the
equivalent circuit diagram for placement. This resistor is not part of the electrical safety plan; therefore, it does
not need to be tested at regular intervals.
Equivalent circuit diagram
Plastic Housing
Double Insulation
P
AC
Input 100…240 VAC
N
Output 12 VDC
DC
10 kΩ coupling resistor for
electrostatic discharge
E
28
Technical Data
8.2 Model-Specific Data
Parameter
WMC25-SH
Limit values
Maximum load
21 g
Readability
0.01mg
Repeatability (sd) (at
0.02 mg (20 g)
nominal load)
Repeatability (sd) (at low
0.2 mg (100 g)
load)
Linearity deviation
0.05 mg
Eccentric load deviation
0.12 mg (10 g)
(test load)
Sensitivity offset1)
4x10⁻⁶ · Rnt
Sensitivity temperature
0.0002 %/°C
drift 2)
Sensitivity stability
0.0001 %/a
Typical values
Repeatability (sd)
0.01 mg
Linearity deviation
0.03 mg
Eccentric load deviation
0.08 mg (10 g)
(test load)
Minimum weight (acc. to
30 mg
USP)
Minimum weight (U=1%,
2 mg
k=2)
Settling time, typ.3)
3s
Typical uncertainties & more
Repeatability (sd)
0.01mg+0.000025%·Rgr
Differential linearity devia
√(1.2x10⁻⁸mg·Rnt)
tion (sd)
Differential eccentric load
0.0004%·Rnt
deviation (sd) (measured
at)
Minimum weight (acc. to
30mg+0.075%·Rgr
USP)
Minimum weight (U=1%,
2mg+0.005%·Rgr
k=2)
Interface update rate
92 /s
Weight of balance
0.415 kg
Dimensions of weigh unit
Height (with standard
weighing pan)
Width
Depth
Diameter of standard
weighing pan
Diameter of weighing pan
adapter
WMC24-SH
WMC15-SH
21 g
0.1mg
0.1 mg (20 g)
11 g
0.01mg
0.02 mg (10 g)
0.08 mg (5 g)
0.012 mg (5 g)
0.2 mg
0.4 mg (10 g)
0.05 mg
0.12 mg (5 g)
1x10⁻⁵ · Rnt
0.0002 %/°C
4x10⁻⁶ · Rnt
0.0002 %/°C
0.0001 %/a
0.0001 %/a
0.06 mg
0.13 mg
0.24 mg (10 g)
0.01 mg
0.032 mg
0.08 mg (5 g)
180 mg
30 mg
2 mg
2 mg
2.5 s
2.5 s
0.06mg+0.0001%·Rgr
√(2x10⁻⁷mg·Rnt)
0.01mg+0.00005%·Rgr
√(2.5x10⁻⁸mg·Rnt)
0.0012%·Rnt
0.0008%·Rnt
80mg+0.3%·Rgr
30mg+0.15%·Rgr
2mg+0.005%·Rgr
2mg+0.01%·Rgr
92 /s
0.415 kg
92 /s
0.415 kg
73.35 mm
25 mm
65 mm
15 mm
14 mm
Legend
Rgr = gross weight
Rnt = net weight (weighing)
sd = standard deviation
a = year (annum)
Technical Data
29
1)
Applies only after adjustment at nominal capacity with an OIML E2 weight (see accessories).
Temperature range 10 - 30 °C.
3) The settling time is the time between when the object to be weighed is placed on the scale and a stable sig
nal is transmitted – this assumes optimal ambient conditions and optimal parameter settings.
2)
8.3 Key to Types and List of Available Models
The type designation allows you to clearly identify your weigh module. The type designation can be found on
the name plate for the weigh unit and the electronic unit.
WMC
–
/
1
2
3
4
Maximum load/readability
For example:
25: 20g / 10 μg
15: 10g / 10 μg
24: 20g / 0.1 mg
Version
S: Single channel version
O: Weigh unit only E: Electronic unit only
Connection
H: Horizontal cable exit
Customer-specific version
For example:
01: Customer A
02: Customer B
Note:
The type designation always refers to the configuration as originally shipped. For example, if a weigh module
has a terminal added to it later, the type designation printed on the name plate will no longer be correct. In this
case, the terminal will check all weigh module components and use this information to generate a new type
designation. This designation can be queried directly at the terminal or by using a software command.
List of available models
Model
Part #
WMC25-SH
11149000
WMC15-SH
11149009
WMC24-SH
11149002
30
Technical Data
8.4 Dimensions
8.4.1 WMC weigh unit dimensional drawing (with draft shield)
±
8.4.2 Standard weighing pan dimensional drawing
Technical Data
31
8.4.3 Weighing pan adapter dimensional drawing
8.4.4 Weighing pan support dimensional drawing
8.4.5 Custom weighing pan drawing (limitations)
Ø 2.2
min. 1.0
max. 4.75
+0.02
Ø 3 +0.01
max. Ø 5.5
32
Technical Data
8.4.6 Electronic unit dimensional drawing (including mounting bracket)
8.4.7 SWT terminal dimensional drawing
Technical Data
33
8.5 RS232C Interface (Standard Interface) Specifications
Interface type:
Max. cable length:
Signal level:
Connection:
Operating mode:
Transmission mode:
Transmission code:
Baud rates:
Bits/parity:
Stop bits:
Handshake:
End of line:
Data
GND
5
1
9
Voltage interface as per EIA RS-232C/DIN 66020 (CCITT V.24/V.28)
15m
Outputs:
Inputs:
+5V ... +15V (RL = 3 – 7kΩ)
+3V ... 25V
–5V ... –15V (RL = 3 – 7kΩ)
–3V ... 25V
D-Sub 9-pin female
Full-duplex
asynchronous serial bit
ASCII
600, 1200, 2400, 4800, 9600, 19200, 384001) (can be selected using
interface commands)
7 Bit/Even, 7 Bit/Odd, 7 Bit/None, 8 Bit/None (can be selected using interface
commands)
1 stop bit
None, XON/XOFF, RTS/CTS (can be selected using interface commands)
<CR><LF>, <CR>, <LF> (can be selected using interface commands)
Pin 2: Transmission line for scale (TxD)
Pin 3: Receiving line for scale (RxD)
Pin 5: Signal ground (GND)
Pin 7: Ready to send (hardware handshake) (RTS)
Pin 8: Ready to receive (hardware handshake) (RTS)
6
Handshake
1)
38400 baud only possible with:
● Weigh module without terminal, or
● Weigh module with terminal, only via the optional RS232C interface.
8.6 Specification for Aux Connections
You can plug the “ErgoSens” from METTLER TOLEDO or an external optical sensing device into the Aux 1 and
Aux 2 jacks. This allows you to perform functions such as taring, zeroing, printing, etc (only together with ter
minal).
3.5 mm
Do not connect!
GND
Switching contact
34
Technical Data
External wiring:
Connection
Electrical data
3.5 mm stereo jack
Max. voltage: 12 V
Max. power: 150 mA
9 Accessories and Spare Parts
Accessories from METTLER TOLEDO will expand the functionality of your weigh module and open up additional
applications. This section lists the currently available options and replacement parts.
9.1 Accessories
Order number
Terminals
SWT Terminal (touchscreen, monochrome display), including 2 terminal cables (0.575 m
and 2m long), including protective covering and documentation
Interface options (plug-in module) and accessories
RS232C (second RS232C-interface)
LocalCAN: Connect up to 5 devices with LocalCAN connection
MiniMettler (backwards compatible with older METTLER TOLEDO devices) 1)
PS/2: Connect commercial keyboards and barcode readers 1)
BT (Bluetooth): For wireless control of up to 7 peripheral devices 1)
BT (Bluetooth): Wireless connection to a BT-P42 printer, a second BT-BLD display or PC 1)
Ethernet: For connecting to an Ethernet network
USB RS232C converter
Connecting cables
Terminal-electronic unit connector cable, 6-pin
0.575m/1.9ft
0.945m/3.1ft
2m/6.5ft
Miscellaneous
Terminal holder for SWT terminal, including mounting screws.
Mounting bracket for electronic unit, including DIN clip and mounting screws
CarePac® 20g F1 / 1g E2
OIML weight 20g E2, plastic box, incl. certificate
OIML weight 10g E2, plastic box, incl. certificate
Tweezers, bent tips, length 130 mm
Tweezers, straight tips, length 220 mm
1)
11121057
11132500
11132505
11132510
11132520
11132530
11132535
11132515
11103691
11132124
11132129
11132133
11121255
11121254
11123006
00158437
00158427
11116540
11116544
Only with terminal
9.2 Spare Parts
Order number
Weigh units
Weigh unit with mounted plastic cover (incll. 3 m cable with connec
tor)
Electronic units
Electronic unit (without power supply, power cord and mounting
bracket)
Weighing pans
Standard weighing pan ø 15mm (requires weighing pan adapter)
Weighing pan adapter ø 14mm (plastic)
Miscellaneous
12V Power supply (without country-specific power cable)
Protective covering for the SWT terminal
Plastic cover (cover for weighing pan support)
Standard draft shield
WMC25-OH
WMC15-OH
WMC24-OH
11149001
11149011
11149003
WMC25-E
WMC15-E
WMC15-E
11149027
11149026
11149028
30005370
30005372
11107909
11106870
30005374
30005371
Accessories and Spare Parts
35
10 Appendix
10.1 Conversion Table for Weight Units
Kilogram
Milligram
Microgram
Carat
Pound
Ounce (avdp)
Ounce (troy)
Grain
Pennyweight
Momme
Mesghal
Tael Hong Kong
Tael Singapore
(Malaysia)
Tael Taiwan
Tola
Baht
1 kg
1 mg
1 µg
1 ct
1 lb
1 oz
1 ozt
1 GN
1 dwt
1 mom
1 msg
1 tlh
1 tls
=
=
=
=
=
=
=
=
=
=
1 tlt
1 tola
1 baht
=
=
=
=
1000.0
0.001
0.000001
0.2
453.59237
28.349523125
31.1034768
0.06479891
1.55517384
3.75
4.6083
37.429
37.7993641666667
g
g
g
g
g
g
g
g
g
g
g
g
g
1g
1g
1g
1g
1g
1g
1g
1g
1g
1g
1g
1g
1g
37.5
11.6638038
15.16
g
g
g
1g
1g
1g
10.2 Volume/Mass Conversion Table
Density: 1000 g/l (= water)
Volume
Mass
1l
1000 g
1 ml
1g
1 μl
1 mg
1 nanoliter
1 μg
36
Appendix
=
=
=
=
0.001
1000.0
1000000.0
5.0
0.00220462262184878
0.0352739619495804
0.0321507465686280
15.4323583529414
0.643014931372560
0.266666666666667
0.217
0.0267172513291833
0.0264554714621853
kg
mg
µg
ct
lb
oz
ozt
GN
dwt
mom
msg
tlh
tls
0.0266666666666667
0.0857353241830079
0.0659630606860158
tlt
tola
baht
11 Glossary
Adaptive filter
A filter where damping depends on the development of the weight signal over time (cf. linear filter).
Adjustment
Sensitivity adjustment with the goal of getting as close to the ideal value as possible. On weighi modules, the
correction is made at two weight points – at the current zero and the value of the adjustment weight.
Available maximum capacity
Maximum load that the weigh module can manage to measure when the preload is included. Available maxi
mum load = nominal maximum load minus preload.
Base load
The load that is necessary to use the full weighing range of the weigh module once it is switched on. Another
name for dead load.
Calibration
An old term (no longer considered correct) for adjustment.The technically correct term for the determination of
the deviation between the actual and measured value.
Calibration factor
A term frequently used for the adjustment factor (initial adjustment). The technically correct term for the factor by
which a measured value must be multiplied to obtain the correct (actual) value.
Dead load
At METTLER TOLEDO, this term is usually used to denote the base load. In general usage, dead load may also
be used to mean “preload” (including base load).
Display accuracy
Another term for resolution or readability.
Dynamic weight
A weight reading that has not met the stability criterion. A value like this is transmitted with a status of "D"
(dynamic), as in "S D 101.01234 g" (cf. stable weight value).
Gross weight
Weight of an object including its tank, container or packaging.
Handshake
Denotes the manner in which the recipient directs data transmission via an RS232 interface to avoid data over
runs.
Hardware handshake
Data flow control with the aid of separate control lines whose status is controlled by the recipient. On weigh
modules, these are the "CTS" (clear to send) and "RTS" (request to send) lines.
Increment
Another name for readability.
Initial adjustment
During production of the weigh module, the built-in weight is compared to a traceable adjustment weight
whose weight is known exactly using a software routine. The resulting adjustment factor is stored in the
system’s permanent memory. The adjustment factor is responsible for the accuracy of the adjustment using the
built-in weight.Following an adjustment by the user, this new factor replaces the factory-defined adjsutment fac
tor and will remain in use unless the weigh module settings are reset.
Glossary
37
Initial calibration
The term used at METTLER TOLEDO for initial adjustment.
Linear filter
A filter with a fixed, defined damping independent of how the weight is measured over time.
Linearity
Deviation of a given measured value (weight value) from the ideal straight-line function between zero load and
maximum load.
Long-term stability
Specifies sensitivity deviation after a defined period of time, such as after one year.
Maximum load
Maximum weight that the weigh module can still barely measure (cf. overload).
Net weight
Weight of an object excluding its tank, container, or packaging.Net weight = gross weight minus tare weight
(see gross weight, tare weight).
Overload
Load that exceeds the available maximum load for the corresponding weigh module.In the event of overload,
the weigh module responds with a status of "+", as in "S +".
Preload
Load above and beyond the base load that is on the scale when the weigh module is switched on or zeroed
(see also available maximum load).
Readability
Another term for resolution or display accuracy.
Repeatability (sd)
A critical factor for the accuracy of weight measurement.The repeatability value corresponds to the statistical
standard deviation "sd". At METTLER TOLEDO, the standard deviation is calculated from ten consecutive mea
surements of the same weight under the same ambient conditions..
Reproducibility
Old term for repeatability.Technically correct term for the “accuracy” with which a measurement can be repeated
after time has passed under similar ambient conditions.
Resolution
Another term for readability or display accuracy. At METTLER TOLEDO, resolution denotes the number of weight
increments (points) that a weighing sensor can differentiate. This figure is calculated by taking the maximum
load and dividing it by readability. For example: A maximum load of 20g and readability of 0.00001g yield
2’000’000 points of resolution.
Sensitivity
At METTLER TOLEDO, this denotes the relationship between the actual and measured (transmitted) weight val
ue. Ideally, the sensitivity of a weighing sensor is equal to one.
Sensitivity deviation
Deviation of sensitivity from the ideal value (=1) (see adjustment).
Sensitivity drift
Deviation of sensitivity due to changes in temperature and/or the passage of time (see long-term stability).
38
Glossary
Software handshake
Data flow control achieved by transmitting a "stop" or "start" control signal from the recipient to the sender. As a
rule, the signals are "Xoff" and "Xon".
Stabilization phase
Phase after placement or removal of a load during which the weight reading has not yet achieved stability.
Stabilization time
Time from the placement or removal of a load until the first stable weight value is reached.
Stable weight
A weight reading that has met the corresponding stability criterion. Such a value is transmitted with a status "S"
(stable) (cf. dynamic weight value).
Startup zero
The zero point set when the weigh module is turned on; weighing values will reference this value until the "Zero"
function is used to set a new zero point, or until the scale is tared.
System zero point
Zero point set during production at the factory for the weigh module.If the unit settings and current ambient con
ditions prevent the weigh module from meeting the stability criterion for zeroing when it is turned on, the system
zero will become the current zero once a stability time-out has occurred. Because the system zero is usually
somewhat higher than the base load, the current weight value in this case will actually be a negative number
rather than zero.You must zero with stability before you can get correct weighing results or use the adjustment
and test functions.
Tare memory
Weight value memory that is overwritten each time the tare function is activated and cleared at each zeroing.
Tare weight
Weight of the tank, container, or packaging.The weight on the weigh module relative to the current zero will be
considered the tare weight and stored in the tare memory.
Timeout
The period of time during which the weighing value must meet the corresponding stability criterion. If current
settings and ambient conditions make this impossible, the command is cancelled and the weigh module
responds with the status "I" (Impossible = the command cannot be executed right now), e.g., "S I".
Underload
Load the is less than the base load.If the load falls below this limit, such as when the weighing platter is miss
ing, the weigh module will respond with a status of "–", as in "Z –".
Weighing period, weighing time
The time that elapses between the placement or removal of a weight (weight change) until a result is recorded,
usually a stable weight value.
Weighing range
Range where the weight to be measured must fall so that the weigh module can record it. Range between zero
and maximum load.
Glossary
39
O
12 Index
Overload protection
A
AC adapter
Accessories
Adjusting
Ambient conditions
Aux Connections
9, 14
35
17, 18
10, 18, 27
34
P
C
CarePac
CD-ROM
Cleaning
Clip
Configuration
Connector cable
Conversion table for weight units
35
9, 10
26
9, 11
15
35
36
Declaration of Conformity
Dimensions
Documentation
Draft shield
9
11, 35
9
27, 28
16
Readability
Relative humidity
RS232C
17
27
15, 34
27
35
R
9
31
10
9, 12, 35
Safety information
Scope of delivery
Spare parts
Stability
6
9
35
18
Taring Function
Technical data
General
Modules with internal
adjustment
Type designation code
Terminal
Terminal holder
Transmission of Weight Values
Troubleshooting
Type designation code
23
27
27
29
Unpacking
Update rate
User settings
9
19
19
Viewing angle
14
Warm-up time
Weighing operation
Weighing pan
Adapter
Custom
Standard
Support
Weight unit
27
22
T
E
Errors
24
Filter damping
18
F
G
GLP
GMP
5
5
H
Host computer
15, 16
I
30
13
13
22
24
30
U
Interface
optional
RS232C
standard
Introduction
ISO
14001
9001
15
15, 34
15
5
5
5
V
W
L
Level
11
M
Maintenance
Malfunctions
Materials
Mounting bracket
MT-SICS
MT-SICS reference manual
Index
Packaging
Plastic cover
Power cable
Power supply
Preparatory steps for configura
tion
Protection
Protective cover
S
D
40
12
26
24
27
9, 11
15
10
9, 11, 35
12
9, 12, 35
11
36
Z
Zeroing
23
www.mt.com/wmc
For more information
Mettler-Toledo AG, Laboratory & Weighing Technologies
CH-8606 Greifensee, Switzerland
Tel. +41 (0)44 944 22 11
Fax +41 (0)44 944 30 60
www.mt.com
Subject to technical changes.
© Mettler-Toledo AG 09/2011
11781254B en
*11781254*