1
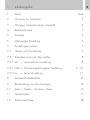
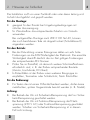
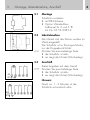
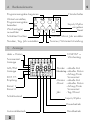
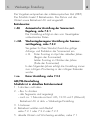
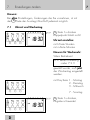
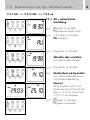
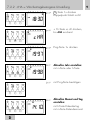
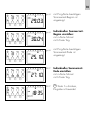
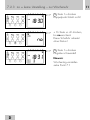
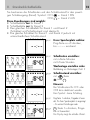
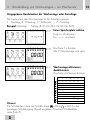
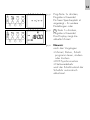
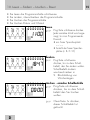
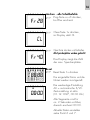
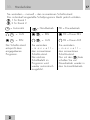
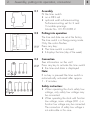
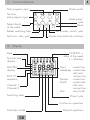
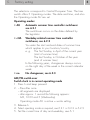
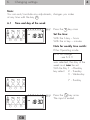
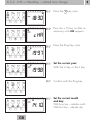
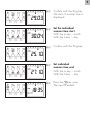
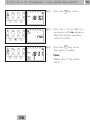
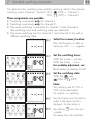
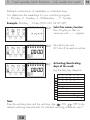
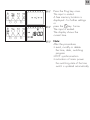
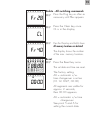
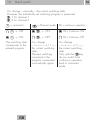
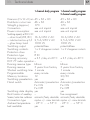
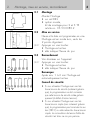
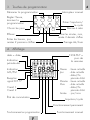
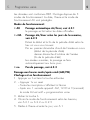
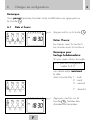
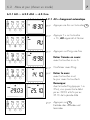
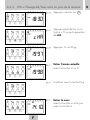
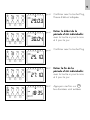
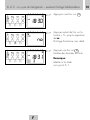
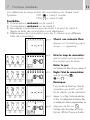
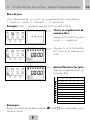
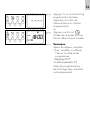
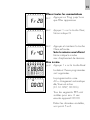
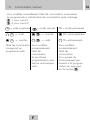
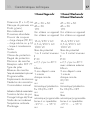
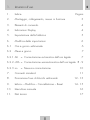
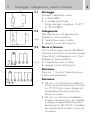
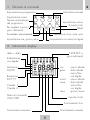
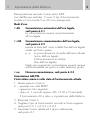
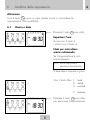
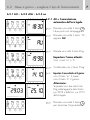
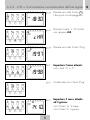
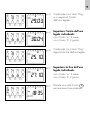
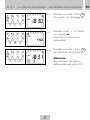
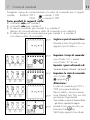
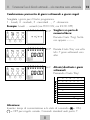
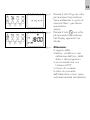
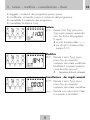
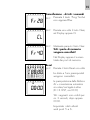
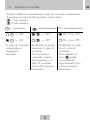
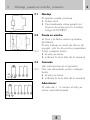
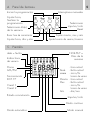
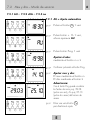
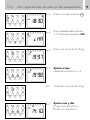
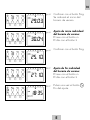
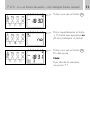
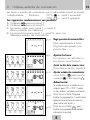
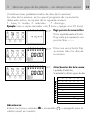
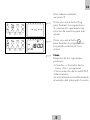
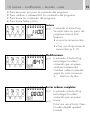
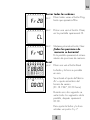
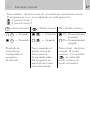
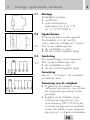
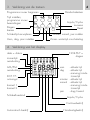
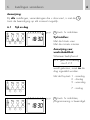
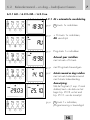
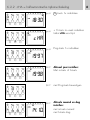
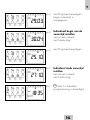
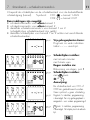
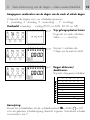
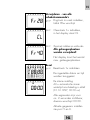
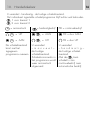
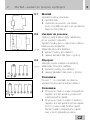
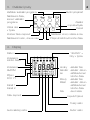
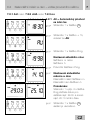
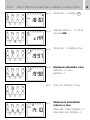
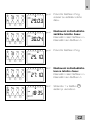
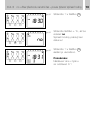
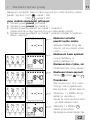
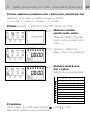
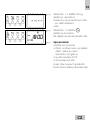
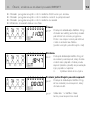
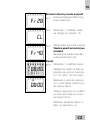
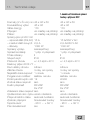
D
Bedienungsanleitung
GB
Operating Instructions
F
Mode d’emploi
I
Instruzioni d’uso
E
Instrucciones de empleo
NL
Gebruiksaanwijzing
CZ
Návod k obsluze
D
GB
F
I
E
NL
CZ
2
1.
Inhaltsangabe
1.
Inhalt
2.
Hinweise zur Sicherheit
3
3.
Montage, Inbetriebnahme, Anschluß
4
4.
Bedienelemente
5
5.
Anzeige
5
6.
Werkseitige Einstellung
6
7.
Einstellungen ändern
7
7.1
Uhrzeit und Wochentag
7
7.2
Kalendermonat und -Tag wählen
8
7.2.1 AU
Seite
= automatische Umstellung
7.2.2 cHA = Wochentagsbezogene Umstellung
7.2.3 no
= keine Umstellung
8
9 - 10
11
8.
Standard-Schaltbefehle
12
9.
Blockbildung von Wochentagen
13
10.
Lesen – Ändern – Löschen – Reset
15
11.
Handschalter
17
12.
Technische Daten
18
2. Hinweise zur Sicherheit
Die Installation muß von einer Fachkraft oder unter deren Leitung und
Aufsicht durchgeführt und geprüft werden.
Für die Montage:
• geeignet für den Einsatz bei Umgebungsbedingungen mit
üblicher Verunreinigung
• für Wandaufbau das entsprechende Zubehör von Grässlin
verwenden
Bei sachgemäßer Montage nach VDE 0100 Teil 40, können
die noch berührbaren Teile als doppelt isoliert (Schutzklasse II)
angesehen werden.
Für den Betrieb:
• Bei der Entwicklung unserer Erzeugnisse stellen wir sehr hohe
Forderungen an die EMV-Störfestigkeit der Elektronik. Die erreichte
Störfestigkeit übertrifft deutlich die zur Zeit gültigen Forderungen
der entsprechenden EN Normen
• Prüfen Sie im Einzelfall, ob dennoch weitere Schutzmaßnahmen
erforderlich sind, z. B. der Einbau entsprechender Bauteile
(Varistor, Löschdiode, RC-Glied)
• In Extremfällen ist der Einbau einer weiteren Baugruppe zu
empfehlen, Trennrelais oder Schaltschütz, Netz- Entstörfilter
Für die Bedienung:
• Für Tasten die mit einem Hilfsmittel bedient werden, dürfen keine
metallischen, spitzen Gegenstände benutzt werden (z. B. Nadel).
Achtung:
• Bei Betrieb der Uhr mit Sicherheits-Kleinspannung darf nur Sicherheits-Kleinspannung geschaltet werden.
• Bei Betrieb der Uhr mit Funktions-Kleinspannung darf Netzspannung (230 V AC) oder Funktions-Kleinspannung geschaltet
werden. Schalten von Sicherheits-Kleinspannung ist in diesem
Fall nicht zulässig.
D
3
3.
Montage, Inbetriebnahme, Anschluß
AC
DC + –
3.1
Montage
Schaltuhr montieren
• auf DIN-Schiene
• Option Wandaufbau
Aufbauset für 2 und 3 TE
Art.-Nr. 03.53.0083.2
3.2
Inbetriebnahme
Die Uhrzeit und das Datum wurden im
Werk eingestellt.
Die Schaltuhr ist im Stromspar-Modus,
nur der Doppelpunkt blinkt.
Drücken Sie eine beliebige Taste:
• die Schaltuhr ist aktiv
• sie zeigt die Uhrzeit (Wochentag)
3.3
Anschluß
Siehe Angaben auf dem Gerät!
Drücken Sie eine beliebige Taste:
• die Schaltuhr ist aktiv
• sie zeigt die Uhrzeit (Wochentag)
Hinweis:
Nach ca. 1 - 2 Minuten ist die
Schaltuhr automatisch aktiv.
AC
DC + –
4
5
4. Bedienelemente
Programmeingabe beginnen
Uhrzeit einstellen,
Programmeingabe
beenden
Wochentag(e)
auswählen
Schaltzeit löschen
Stunden, Tag, Jahr einstellen
Handschalter
Impuls/Zyklus
eingeben
Reset
Minuten, Monat, Jahr einstellen
Sommer-/Winterzeit-Umstellung
5. Anzeige
date = Datum
SommerzeitAnzeige
AM/PMAnzeige
DCF 77Empfang
Kanal 1
Kanal 2
Schaltzustand
1234567 =
Wochentag
Stunden - aktuelle Zeit
Kalendertag - aktuelles Datum
- Anfang/Ende
Sommerzeit
Minuten - aktuelle Zeit
Monat - aktuelles Datum
- Anfang/Ende
Sommerzeit
Jahr
- Tag/Monat
Impuls/Zyklus
Dauerbetrieb
Automatikbetrieb
D
Handbetrieb
6.
Werkseitige Einstellung
Die Vorgaben entsprechen der mitteleuropäischen Zeit (MEZ).
Die Schaltuhr bietet 3 Betriebsarten. Das Datum und die
Uhrzeit sowie Betriebsart AU sind eingestellt.
Betriebsarten:
• AU
Automatische Umstellung der SommerzeitRegelung, siehe 7.2.1
Die Umstellung erfolgt an den vom Gesetzgeber
vorbestimmten Daten.
• cHA
Wochentagsbezogene Umstellung der Sommerzeit-Regelung, siehe 7.2.2
Sie geben für Ihren Standort/Land das gültige
Anfangs- und Enddatum der Sommerzeit ein.
z. B. Erster Sonntag im April des aktuellen Jahres
(Beginn der Sommerzeit)
Letzter Sonntag im Oktober des Jahres
(Ende der Sommerzeit)
In den folgenden Jahren erfolgt die Umstellung immer
zum richtigen Wochentag in der richtigen Kalenderwoche.
• no
Keine Umstellung, siehe 7.2.3
AM/PM-Umschaltung
Schaltuhr ist in aktuellem Betriebszustand
1. h drücken und halten
2. – Res 1x drücken
– alle Segmente sind angezeigt
– nach ca. 1 Sekunde erscheint: AM, 12.00 und 3 (Mittwoch)
Betriebsart AU ist aktiv = Werkseitige Einstellung
3. h loslassen
4. Betriebsart wählen nach Bedarf
siehe 7.2.1 oder 7.2.2 oder 7.2.3
5. aktuelle Uhrzeit und Wochentag einstellen, siehe 7.1
6
7.
7
Einstellungen ändern
Hinweis:
Bei allen Einstellungen, Änderungen die Sie vornehmen, ist mit
der
-Taste der Ausstieg/Abschluß jederzeit möglich.
7.1
Uhrzeit und Wochentag
-Taste 1x drücken
Doppelpunkt blinkt nicht!
Uhrzeit einstellen:
mit h-Taste Stunden
mit m-Taste Minuten
Hinweis für Wochenuhr:
Wenn Betriebsart
no = keine Umstellung
- siehe 7.2.3
gewählt wurde, muß jetzt
der Wochentag eingestellt
werden.
mit Day-Taste 1
2
3
:
7
- Montag
- Dienstag
- Mittwoch
- Sonntag
-Taste 1x drücken,
Eingabe ist beendet.
D
7.2 Kalendermonat- und Tag – Betriebsart wählen
7.2.1 AU oder 7.2.2 cHA oder 7.2.3 no
7.2.1 AU = automatische
Umstellung
-Taste 1x drücken
Doppelpunkt blinkt nicht!
+ 1h-Taste 1x drücken,
AU erscheint
Prog-Taste 1x drücken
Aktuelles Jahr einstellen:
mit m-Taste oder h-Taste
Prog-Taste 1x drücken
Aktuellen Monat und Tag einstellen:
mit m-Taste Kalendermonat
mit h-Taste Kalendertag
Hinweis:
Mit der Prog-Taste (1 bzw. 2 mal
drücken) lesen Sie das Datum für den
Beginn, z. B. 29.03. und das Ende,
z. B. 25.10. der Sommerzeit.
-Taste 1x drücken,
Eingabe ist beendet.
8
7.2.2 cHA = Wochentagsbezogene Umstellung
-Taste 1x drücken
Doppelpunkt blinkt nicht!
+ 1h-Taste so oft drücken,
bis cHA erscheint
Prog-Taste 1x drücken
Aktuelles Jahr einstellen:
mit m-Taste oder h-Taste
mit Prog-Taste bestätigen
Aktuellen Monat und Tag
einstellen:
mit h-Taste Kalendertag
mit m-Taste Kalendermonat
D
9
10
mit Prog-Taste bestätigen
Sommerzeit-Beginn ist
angezeigt.
Individuellen SommerzeitBeginn einstellen:
mit m-Taste Monat
mit h-Taste Tag
mit Prog-Taste bestätigen
Sommerzeit-Ende ist
angezeigt
Individuelles SommerzeitEnde einstellen:
mit m-Taste Monat
mit h-Taste Tag
-Taste 1x drücken,
Eingabe ist beendet.
7.2.3 no = keine Umstellung – nur Wochenuhr
-Taste 1x drücken
Doppelpunkt blinkt nicht!
+ 1h-Taste so oft drücken,
bis no erscheint
Diese Schaltuhr arbeitet
ohne Datum!
-Taste 1x drücken
Eingabe ist beendet!
Hinweis:
Wochentag einstellen
siehe Punkt 7.1
D
11
12
8. Standard-Schaltbefehle
Sie bestimmen die Schaltzeiten und den Schaltzustand für den jeweiligen Schaltausgang (Kanal). Symbol: CH1:
= Kanal 1 EIN
CH2:
= Kanal 2 AUS
Diese Zuordnungen sind möglich:
• Schaltbefehle nur für Kanal 1
• Schaltbefehle nur für Kanal 2
• Den gleichen Schaltbefehl für Kanal 1 und Kanal 2
(Schaltzeit und Schaltzustand sind identisch)
• Die gleiche Schaltzeit für Kanal 1 und Kanal 2 jedoch mit
unterschiedlichem Schaltzustand
Freier Speicherplatz wählen:
Prog-Taste so oft drücken,
bis – –:-– – erscheint.
Schaltzeiten einstellen:
mit m-Taste Minuten
mit h-Taste Stunden
Wochentage einstellen siehe:
Blockbildung von Wochentagen, Punkt 9
Schaltzustand einstellen:
mit
-Taste
oder
Hinweis:
Der Schaltzustand für CH1 oder
CH2 kann deaktiviert werden.
Kein Symbol - keine Schaltung.
Prog-Taste 1x drücken, Eingabe ist beendet. Ein freier Speicherplatz ist angezeigt
– für weitere Einstellungen oder
-Taste 1x drücken, Eingabe ist beendet.
Das Display zeigt die aktuelle Uhrzeit.
9. Blockbildung von Wochentagen – nur Wochenuhr
Vorgegebene Kombination der Wochentage oder Einzeltage
Sie bestimmen die Wochentage für Ihr Schaltprogramm.
1 - Montag, 2 - Dienstag, 3 - Mittwoch ..., 7 - Sonntag
Beispiel: Montag … Freitag (8.00 Uhr EIN; 22.00 Uhr AUS)
freien Speicherplatz wählen:
Prog so oft drücken,
bis – –:– – erscheint
Day-Taste 1x drücken
alle 7 Wochentage sind aktiv
Wochentage aktivieren/
deaktivierien:
Day-Taste schrittweise drücken
1 2 3 4 5 6 7
– – – – – –
– – – – –
– –
–
–
–
–
–
–
–
Hinweis:
Die Schaltzeiten sowie der Schaltzustand
= EIN;
= AUS für den
jeweiligen Schaltausgang (Kanal) eingeben, Standard Schaltbefehle
siehe Punkt 8
D
13
14
Prog-Taste 1x drücken,
Eingabe ist beendet.
Ein freier Speicherplatz ist
angezeigt – für weitere
Einstellungen oder
-Taste 1x drücken,
Eingabe ist beendet.
Das Display zeigt die
aktuelle Uhrzeit.
Hinweis:
nach den Vorgängen
• Uhrzeit, Datum, Schaltprogramm lesen, ändern
oder löschen
• DCF-Synchronisation
• Netzwiederkehr
wird der Schaltzustand der
Schaltuhr automatisch
aktualisiert.
10. Lesen – Ändern – Löschen – Reset
•
•
•
•
Sie
Sie
Sie
Sie
lesen die Programminhalte schrittweise
ändern, überschreiben die Programminhalte
löschen die Programminhalte
löschen Datum und Uhrzeit
Lesen
Prog-Taste schrittweise drücken.
Jeder einzelne Inhalt wird angezeigt, bis zum Programmende.
Danach:
• ein freier Speicherplatz
– –:– –
• Anzahl der freien Speicherplätze (z. B. Fr 10)
Ändern
Prog-Taste schrittweise
drücken, bis zu dem Schaltbefehl, den Sie ändern wollen.
Schaltbefehl ändern:
wie beschrieben in
9. Blockbildung von
Wochentagen
Löschen - einzelne Schaltbefehle
Prog-Taste schrittweise
drücken, bis zu dem Schaltbefehl den Sie löschen
wollen.
Clear-Taste 1x drücken,
dieser Schaltbefehl ist
gelöscht.
D
15
16
Löschen - alle Schaltbefehle
Prog-Taste so oft drücken,
bis FRxx erscheint
Clear-Taste 1x drücken,
im Display steht CL
Clear-Taste drücken und festhalten.
Alle Speicherplätze werden gelöscht!
Das Display zeigt die Zahl
der max. Speicherplätze.
Reset
Reset-Taste 1x drücken
Das eingestellte Datum und die
Uhrzeit werden zurückgestellt.
Die werkseitige Einstellung
AU = automatische S/WZeitumstellung ist aktiv
(31.12.1997, 00:00 Uhr)
Alle Segmente sind für
ca. 2 Sekunden sichtbar,
danach erscheint 00:00.
Aktuelle Daten einstellen
siehe Punkt 6 und 7.
17
11. Handschalter
Sie verändern – manuell – den momentanen Schaltzustand.
Das individuell eingestellte Schaltprogramm bleibt jedoch erhalten.
1 für Kanal 1
2 für Kanal 2
= Automatik
= AUS
= EIN
Der Schaltzustand
entspricht dem
eingegebenen
Programm.
D
= Handbetrieb
= EIN
= AUS
Sie verändern
– m a n u e l l –
den momentanen
Schaltzustand.
Der nächste
Schaltbefehl im
Programm wird
wieder automatisch
ausgeführt.
FIX = Dauerbetrieb
FIX = Dauer EIN
FIX = Dauer AUS
Sie verändern
– m a n u e l l –
den momentanen
Schaltzustand.
Nur mit der
-Taste
schalten Sie von
Dauerbetrieb wieder in
den Automatikbetrieb.
18
12. Technische Daten
Maße (H x B x T) mm
Verteilerausschnitt mm
Gewicht g (ca.)
Anschluß
Leistungsaufnahme:
Schaltleistung
– ohmsche Last (VDE, IEC)
– induktive Last cos phi 0,6
– Glühlampen Last
Schaltausgang
Schaltkontakte
Ganggenauigkeit
DCF 77/Funkbetrieb
Gangreservetyp
Gangreserve
kürzeste Schaltzeit
Programmierbar
Speicherplätze
Schaltungsvorwahl
Handschalter
1-Kanal Tagesuhr
1-Kanal Wochenuhr
2-Kanal Wochenuhr
45 x 36 x 60
46 x 36
170
siehe Geräteaufdruck
siehe Geräteaufdruck
45 x 36 x 60
46 x 36
170
siehe Geräteaufdruck
siehe Geräteaufdruck
16 A/250 V AC
2,5 A/250 V AC
1000 W
potentialfrei
1 bzw. 2 Wechsler
± 2,5 s/Tag bei +20° C
–
Lithium
3 Jahre ab Werk
1 Minute
jede Minute
12
ja
Automatik/Vorwahl
Fix EIN
Fix AUS
Schaltzustands-Anzeige ja
Blockbildung von Wochentagen –.
Sommer-/Winterzeit-Umstellung automatisch/frei wählbar
Umgebungstemperatur - 25° C … + 55° C
Schutzklasse/Schutzart II/IP 20
Anschlußart
unverl. ± Schraubklemmen
Plombierbar
ja
16 A/250 V AC
2,5 A/250 V AC
1000 W
potentialfrei
1 bzw. 2 Wechsler
± 2,5 s/Tag bei +20° C
–
Lithium
3 Jahre ab Werk
1 Minute
jede Minute
20/30
ja
Automatik/Vorwahl
Fix EIN
Fix AUS
ja
feste Vorgabe
automatisch/frei wählbar
- 25° C … + 55° C
II/IP 20
unverl. ± Schraubklemmen
ja
2
1.
Contents
1.
Contents
2.
Assembly, putting into operation, connection
3
3.
Control elements
4
4.
Display
4
5.
Factory setting
5
6.
Changing settings
6
6.1
Time and day of the week
6
6.2
Calendar month and day
7
6.2.1 AU
= Automatic changeover
6.2.2 cHA = Weekday-related time change
6.2.3 no
= no changeover
Page
7
8-9
10
7.
Standard switching commands
8.
Weekday block formation
12 - 13
9.
Read – change – delete – reset
14 - 15
10.
Hand switch
16
11.
Technical data
17
GB
11
2.
Assembly, putting into operation, connection
AC
DC + –
AC
DC + –
2.1
Assembly
Fit the time switch
• on a DIN rail
• optional wall surface-mounting
Surface-mounting set for 2 and
3 module spacings
Article No. 03.53.0083.2
2.2
Putting into operation
The time and date are set at the factory.
The time switch is in Energy-saving mode.
Only the colon flashes.
Press any key:
• The time switch is actived
• It displays the time (day of the week)
2.3
Connection
See information on the unit!
Press any key to activate the time switch
• the time and date is displayed
Note:
If no key is pressed the time switch is
automatically activated after approx
1 - 2 minutes.
Safety instruction:
• When operating the clock safety low
voltage, only safety low voltage may
be connected.
• When operating the clock with function
low voltage, mains voltage (230 ~) or
function low voltage may be connected.
The connection of safety low voltage is
not admissible in this case.
3
4
3. Control elements
Start program input
Set time,
end program input
Select day(s)
of the week
Delete switching time
Set hours, day, year
Hand switch
Enter pulse/
cycle
Reset
Set minutes, month, year
Summer time/winter time switchover
4. Display
Date
Summer time
display
AM/PM
display
1234567 =
days of the week
1 = Monday
Hours
- current time
Calendar day - current date
- start/end
summer time
Minutes - current time
Month
- current date
- start/end
summer time
Year
- day/month
DCF 77
reception
Channel 1
Channel 2
Switching state
Pulse/cycle
Continuous operation
Automatic mode
GB
Manual operation
5.
Factory setting
The selections correspond to Central European Time. The time
switch offers 3 Operating modes. The date and time, and also
the Operating mode AU are set.
Operating modes:
• AU
Automatic summer time controller switchover
see 6.2.1
The switchover occurs on the dates defined by
the legislator.
• cHA
Weekday-related summer time controller
switchover, see 6.2.2
You enter the start and end dates of summer time
which applies to your location/country.
e. g. The first Sunday in April of the current year
(start of summer time)
The last Sunday in October of the year
(end of summer time)
In the following years, changeover always occurs
on the right day of the week in the correct calendar
week.
• no
No changeover, see 6.2.3
AM/PM switch-over
Switch clock is in current operating mode
1. Press h and keep pressed
2. – Press Res once
– all segments are displayed
– after approx. 1 second the following appears:
AM, 12.00 and 3 (Wednesday)
Operating mode AU is active = works setting
3. Release h
4. Select operating mode as required, see 6.2.1 or 6.2.2 or 6.2.3
5. Set the current time of day and weekday, see 6.1
5
6.
6
Changing settings
Note:
You can exit/conclude any adjustments, changes you make
at any time with the key
.
6.1
Time and day of the week
Press the
key once
Set the time:
With the h key – hours
With the m key – minutes
Note for weekly time switch:
If the Operating mode
no = no change
- see 6.2.3
was selected, the day of the
week must now be set.
With the Day 1 - Monday
key select: 2 - Tuesday
3 - Wednesday
:
7 - Sunday
Press the
key once.
The input is ended.
GB
6.2 Calendar month and day – Select the Operating mode
6.2.1 AU or 6.2.2 cHA or 6.2.3 no
6.2.1 AU = Automatic changeover
Press the key
once
Press the + 1h key 1 once,
AU appears
Press the Prog key once
Set the current year:
With the m key or the h key
Confirm with the Prog key
Set the current month and day:
With the m key – calendar month
With the h key – calendar day
Note:
With the Prog key (press once or
twice), read the date for the start
e.g. 29.03. and end e.g. 25.10.
of summer time.
Press the
key once.
The input is ended.
7
6.2.2 cHA = Weekday – related time change
Press the
key once
Press the + 1h key as often as
necessary until cHA appears
Press the Prog key once
Set the current year:
With the m key or the h key
Confirm with the Prog key
Set the current month
and day:
With the m key – calendar month
With the h key – calendar day
GB
8
9
Confirm with the Prog key
The start of summer time is
displayed.
Set the individual
summer time start:
With the m key – month
With the h key – day
Confirm with the Prog key
Set individual
summer time end:
With the m key – month
With the h key – day
Press the
key once.
The input is ended.
6.2.3 no = no changeover – only weekly time switch
Press the
key once
Press the + 1h as often as
necessary until no appears.
The time switch operators
without a date!
Press the
key once.
The input is ended.
Note:
Select day of the week
see 6.1
GB
10
11
7. Standard switching commands
You determine the switching times and the switching state for the relevant
(ON) = Channel 1
switching output (channel.) Symbol: CH1:
CH2:
(OFF) = Channel 2
These assignments are possible:
• Switching commands only for channel 1
• Switching commands only for channel 2
• The same switching commands for channel 1 and channel 2
(the switching time and switching state are identical)
• The same switching time for channel 1 and channel 2 but with a
different switching state.
Select free memory location:
Press the Prog key as often as
necessary until – –:-– – appears.
Set the switching times:
With the m key – minutes
With the h key – hours
For weekday adjustment, see:
Block formation of weekdays, Point 8
Set the switching state:
With the
key
(ON) or
(OFF)
Note:
The switching state for CH1 or
CH2 can be deactivated.
No symbol – no switching.
Press the Prog key once. The input has
ended. A free memory location is
displayed – for other settings or
Press the key
once. The input
is ended.
The display shows the current time.
8. Fixed weekday block formation – only weekly time switch
Defined combinations of weekdays or individual days
You determine the weekdays for your switching program.
1 - Monday, 2 - Tuesday, 3 - Wednesday ..., 7 - Sunday
Example: Monday … Friday (8:00 ON; 22:00 OFF)
Select free memory location:
Press Prog key as often as
necessary until – –:– – appears
Press the Day key once
All 7 days of the week are activate
Activating/deactivating
days of the week:
Jog the Day key stepwise
1 2 3 4 5 6 7
– – – – – –
– – – – –
– –
–
–
–
–
–
–
–
Note:
Enter the switching times and the switching state
= ON;
= OFF for the
relevant switching state (channel). For standard switching commands, see 7.
GB
12
13
Press the Prog key once.
The input is ended.
A free memory location is
displayed - for further settings
or
press the
key 1once.
The input is ended.
The display shows the
current time.
Note:
After the procedures
• read, modify or delete
the time, date, switching
program
• DCF synchronisation
• restoration of mains power
the switching state of the time
switch is updated automatically.
14
9. Read – change – delete – reset
•
•
•
•
You
You
You
You
can
can
can
can
read the program contents stepwise
change or overtype the program contents
delete the program contents
delete the date and time
Read
Press the Prog key step by step
Each individual content is displayed until the end of the program.
Then:
• One free memory location
– –:– –
• One digit (free memory locations)
(ex. Fr 10)
Change
Press the Prog key step by step
as far as the switching
command/contents which you
want to change/overtype.
Change the switching command/
contents:
As described in
8. Weekday block formation
Delete - individual switching commands
Press the Prog key step by
step as far as the switching
command/contents which you
want to delete.
Press the Clear key once.
This switching command
is deleted.
GB
15
Delete - All switching commands
Press the Prog key as often as
necessary until FRxx appears
Press the Clear key once.
CL is in the display
Press the Clear key and hold it down.
All memory locations are deleted!
The display shows the number
of the max. memory locations.
Reset
Press the Reset key once
The set date and time are reset.
The factory setting
AU = automatic s/wtime changeover is active
(31.12.1997, 00:00)
All segments are visible for
approx. 2 seconds,
then 00:00 appears.
AU = automatic s/w time
changeover
See point 5 and 6 for
setting the current date.
16
10. Hand switch
You change – manually – the current switching state.
However, the individually set switching program is preserved.
1 for channel 1
2 for channel 2
= automatic
= OFF
= ON
The switching state
corresponds to the
entered program.
GB
= Manual mode
= ON
= OFF
You change
– m a n u a l l y –
the current switching
state.
The next switching
command in the
program is executed
automatically again.
FIX = continuous operation
FIX = Continuous ON
FIX = Continuous OFF
You change
– m a n u a l l y –
the current switching
state.
Only with the
key
do you switch from
continuous operation
back to Automatic
mode.
17
11. Technical data
1 channel daily program 1 channel weekly program
2 channel weekly program
Dimensions (H x W x D) mm 45 x 36 x 60
Distributor cut-out mm 46 x 36
Weight g (approx.)
170
Connection
see unit imprint
Power consumption:
see unit imprint
Switching capacity at 230 V AC
– ohmic load (VDE, IEC) 16 A/250 V AC
– inductive load cos ϕ 0,6 2,5 A/250 V AC
– glow lamp load
1000 W
Switching output
potential-free
Switching contacts
1 or 2 changeover contacts
Protection class
II
Protection type
IP 20
Running accuracy
± 2.5 s/day at +20° C
DCF 77 radio operation –
Running reserve type Lithium
Running reserve
3 years from factory
Shortest switching time 1 minute
Programmable
every minute
Memory locations
12
Switching preselection yes
Hand switch
Automatic/preselection
Fix ON
Fix OFF
Switching state display yes
Block formation of weekdays –
Summer/winter time switchover automatic/freely selectable
Connection type
captive +/– screw terminals
Ambient temperature - 25° C … + 55° C
Led sealable
yes
45 x 36 x 60
46 x 36
170
see unit imprint
see unit imprint
16 A/250 V AC
2,5 A/250 V AC
1000 W
potential-free
1 or 2 changeover contacts
± 2.5 s/day at +20° C
–
Lithium
3 years from factory
1 minute
every minute
20/30
yes
Automatic/preselection
Fix ON
Fix OFF
yes
fixe assignment
automatic/freely selectable
captive +/– screw terminals
- 25° C … + 55° C
yes
2
1.
Sommaire
1.
Sommaire
2.
Montage, mise en service, raccordement
3
3.
Touches de programmation
4
4.
Affichage
4
Page
5.
Programme usine
5
6.
Modifier le programme
6
6.1
Date et heure
6
6.2
Mois et jour
7
6.2.1 AU
= changement automatique
6.2.2 cHA = Passage été/hiver selon les jours de la semaine
6.2.3 no
= pas de changement
7
8-9
10
7.
Fonctions standard
8.
Formation de blocs de jours
12 - 13
9.
Lire - Modifier - Effacer - Remise à zéro
14 - 15
10.
Commutateur manuel
16
11.
Caractéristiques techniques
17
F
11
2.
Montage, mise en service, raccordement
AC
DC + –
AC
DC + –
2.1
Montage
Monter l’horloge
• sur rail DIN
• option murale,
kit de montage pour 2 et 3 TE
article no. 03.53.0083.2
2.2
Mise en service
L’heure et la date sont programmées en usine.
L’horloge est en mode éco, seuls les
2 points clignotent.
Appuyer sur une touche:
• l’horloge est active
• elle indique l’heure du jour
2.3
Raccordement
Voir données sur l’appareil
Appuyer sur une touche:
• l’horloge est active
• elle indique l’heure du jour
Remarque:
Après env. 1 à 2 min l’horloge est
automatiquement active
Conseil de sécurité:
• Si vous alimentez l’horloge avec une très
basse tension de sécurité (isolement galvanique), le programmateur ne doit commuter
que cette tension de sécurité isolée galvaniquement (à défaut d’autres tensions).
• Si vous alimentez l’horloge avec une très
basse tension simple (sans isolement galvanique), le programmateur peut commuter le secteur (230 V) ou cette même très basse tension
simple. La commutation de tension faible de
sécurité n’est dans ce cas pas permise.
3
4
3. Touches de programmation
Démarrer la programmation
Régler l’heure,
terminer la
programmation
Choisir les jours
Effacer
Entrer les heures, jour,
année 2 premiers chiffres
Interrupteur manuel
Entrer l’impulsion/
le cycle
Remise à zéro
Entrer les minutes, mois,
année 2 dernièrs chiffres
Passage été/hiver
4. Affichage
date = date
Indication
période été
Indication
AM/PM
Réception
signal DCF 77
Canal 1
Canal 2
État de commutation
1234567 =
jours de
la semaine
Heures - heure actuelle
Jour
- date actuelle
- début/fin
période d’été
Minutes - heure actuelle
Mois
- date actuelle
- début/fin
période d’été
Année - jour/mois
Impulsion/cycle
Fonctionnement permanent
Fonctionnement en programmation
Fonctionnement manuel
5.
Programme usine
Les données sont conformes MEZ. L’horloge dispose de 3
modes de fonctionnement. La date, l’heure et le mode de
fonctionnement AU sont pré-réglés.
Modes de fonctionnement:
• AU
Passage automatique été/hiver, voir 6.2.1
le passage se fait selon les dates officielles.
• cHA
Passage été/hiver selon les jours de la semaine,
voir 6.2.2
Entrez le début et la fin de la période d’été selon le
lieu où vous vous trouvez.
Par ex. premier dimanche d’avril de l’année en cours
(début de la période d’été)
dernier dimanche d’octobre de l’année
(fin de la période d’été)
Les années suivantes, le passage se fera
automatiquement aux bons jours.
• no
Pas de passage, voir 6.2.3
Passage aux heures matin/après-midi (AM/PM)
L’horloge est en fonctionnement
1. Appuyer sur h et tenir la touche enfoncée
2. – Appuyer 1x sur reset
– Toutes les inscriptions s’affichent à l’écran
– Après env. 1 seconde apparaît: AM, 12.00 et 3 (mercredi)
le mode AU est actif = programmation usine
3. Lâcher la touche h
4. Choisir le mode de fonctionnement selon les besoins,
voir 6.2.1 ou 6.2.2 ou 6.2.3
5. Mettre à l’heure et enter le jour, voir 6.1
5
6.
6
Changer les configurations
Remarque:
Vous pouvez terminer/annuler toute modification en appuyant sur
la touche
.
6.1
Date et heure
Appuyer une fois sur la touche
Entrer l’heure:
Les heures avec la touche h
Les minutes avec la touche m
Remarque pour
horloge hebdomadaire:
Si vous avez choisi le mode
no = pas de changement
- siehe 6.2.3
vous devez entrez maintenant
la date.
Avec la touche Day 1 - lundi
2 - mardi
3 - mercredi
:
7 - dimanche
Appuyer une fois sur la
touche
, l’entrée des
données est terminée.
F
7
6.2 Mois et jour (choisir un mode)
6.2.1 AU ou 6.2.2 cHA ou 6.2.3 no
6.2.1 AU = changement automatique
Appuyer une fois sur la touche
Appuyer 1x sur la touche
+ 1h, AU apparaît à l’écran
Appuyer sur Prog une fois
Entrer l’année en cours:
avec la touche m ou h
Confirmer avec Prog
Entrer le mois:
avec la touche m et
le jour avec la touche h
Remarque:
Avec la touche Prog (appuyer 1 ou
2 fois), vous pouvez lire le début
par ex. 29.03. et la fin par ex.
25.10. de la période d’été
Appuyer sur
L’entrée des données est
terminée
6.2.2 cHA = Passage été/hiver selon les jours de la semaine
Appuyer une fois sur
Appuyer autant de fois sur la
touche + 1h jusqu’à apparition
de cHA
Appuyer 1x sur Prog
Entrer l’année actuelle:
avec la touche m ou h
Confirmer avec la touche Prog
Entrer le mois:
avec la touche m et le jour
avec la touche h
F
8
9
Confirmer avec la touche Prog,
l’heure d’été est indiquée.
Entrer le début de la
période d’été individuelle:
avec la touche m pour le mois
et h pour le jour
Confirmer avec la touche Prog
Entrer la fin de la
période d’été individuelle:
avec la touche m pour le mois
et h pour le jour
Appuyer une fois sur
Les données sont entrées
6.2.3 no = pas de changement – seulement horloge hebdomadaire
Appuyer une fois sur
Appuyer autant de fois sur la
touche + 1h jusqu’à apparition
de no.
L’horloge fonctionne sans date!
Appuyer une fois sur
L’entrée des données est finie
Remarque:
Mettre à la daté
voir point 6.1
F
10
11
7. Fonctions standards
Vous déterminez les temps et états de commutations pour chaque canal.
CH1:
= canal 1 marche
Symboles:
CH2:
= canal 2 arrêt
Possibilités:
• Commutations seulement sur le canal 1
• Commutations seulement sur le canal 2
• Les mêmes commutations pour le canal 1 et pour le canal 2
(temps et états de commutations sont identiques)
• Même temps de commutation pour les 2 canaux mais différents
états de commutation
Choisir une mémoire libre:
Appuyer sur la touche Prog jusqu’à
ce que ––:-–– apparaisse
Entrer les temps de commutation:
avec la touche m pour les minutes
et la touche h pour les heures
Entrer le jour:
voir formation de blocs de jours, parag. 8
Régler l’état de commutation:
ave la touche
ou
Remarque:
Il est possible de désactiver l’état de
commutation pour le CH1 ou CH2.
Pas de symbole - pas de commutation.
Appuyer 1x sur Prog, l’entrée des données
est finie. Un emplacement de mémoire libre
est indiqué pour d’autres programmations ou
Appuyer une fois sur
,
l’entrée des données est finie.
L’écran affiche l’heure actuelle.
8. Formation de blocs de jours fixes – seulement horloge hebdomadaire
Blocs de jour
Vous déterminez les jours pour vos programmes de commutations.
1 - lundi, 2 - mardi, 3 - mercredi ..., 7 - dimanche
Exemple: lundi … vendredi (marche à 8 h et arrêt a 22 h)
Choisir un emplacement de
mémoire libre:
Appuyer sur la touche Prog jusqu’à
ce que – –:– – apparaisse
Appuyer 1x sur la touche Day
Les 7 jours de la semaine sont
actifs
Activer/Désactiver les jours:
Appuyer progressivement sur
la touche Day
1 2 3 4 5 6 7
– – – – – –
– – – – –
– –
–
–
–
–
–
–
–
Remarque:
Entrer les temps et les états marche
chaque canal.
F
/arrêt
de commutation pour
12
13
Appuyer 1x sur la touche Prog
programmation terminée
Apparition d’un bloc de
mémoire libre pour d’autres
programmation
ou
Appuyer une fois sur
,
l’entrée des données est finie.
L’écran affiche l’heure actuelle.
Remarque:
Après les étapes suivantes:
• Lire, modifier ou effacer
l’heure, la date et les
programmes
• Réglage DCF
• Netzwiederkehr ??
l’état de programmation
de l’horloge sera actualisé
automatiquement.
9. Lire - Modifier - Effacer - Remise à zéro
•
•
•
•
Vous
Vous
Vous
Vous
lisez le contenu des programmes pas à pas
modifiez le contenu des programmes
effacez le contenu des programmes
effacez la date et l’heure
Lire
Appuyez progressivement sur Prog
Chaque contenu sera indiqué
jusqu’à la fin du programme.
Ensuite:
• une mémoire libre – –:– –
• Un chiffre (nb mémoires libres)
(ex. Fr 10)
Modifier
Appuyer progressivement sur Prog
jusqu’à ce que le contenu que vous
voulez modifier apparaisse
Modifier le contenu comme
décris dans le point 7
Effacer des commutations
séparément
Appuyer progressivement sur
Prog jusqu’à ce que le contenu
que vous voulez modifier
apparaisse.
Appuyer 1 x sur la touche
Clear, le contenu est effacé
F
14
15
Effacer toutes les commutations
Appuyer sur Prog jusqu’à ce
que FRxx apparaisse
Appuyer 1 x sur la touche Clear,
l’écran indique CL
Appuyer et maintenir la touche
Clear enfoncée.
Toutes les mémoires seront effacées!
L’écran indique le nombre
max. d’enplacement de mémoires.
Mise à zéro
Appuyer 1 x sur la touche Reset
La date et l’heure programmées
sont supprimées.
La programmation usine
AU = changement automatique
été/hiver est active
(31.12.1997, 00:00 h)
Tous les segments ??? sont
visibles pour env. 2 sec.
ensuite apparaît 00:00.
Entrer les données acutelles,
voir point 5 e 6.
16
10. Commutateur manuel
Vous modifiez manuellement l’état de commutation momentané.
Le programmation individualisé de commutation reste inchangé.
1 pour canal 1
2 pour canal 2
= mode programme
= mode manuel
= arrêt
= marche
= marche
= arrêt
L’état de commutation Vous modifiez
correspond au
momentanément
programme entré.
l’état de
commutation.
La prochaine
programmation sera
reprise automatiquement.
F
FIX = mode permanent
FIX = marche permanente
FIX = arrêt permanente
Vous modifiez
momentanément
l’état de
commutation.
Vous passez du
fonctionnement permanent à la programmation en appuyant
sur la touche
17
11. Caractéristiques techniques
1 Kanal Tagesuhr
Dimensions (H x L x P) mm 45 x 36 x 60
Découpe du panneau mm 46 x 36
Poids g (env.)
170
Raccordement
Voir schéma sur appareil
Puissance absorbée:
Voir schéma sur appareil
Pouvoir de coupure
– charge ohmique (VDE, IEC) 16 A/250 V AC
– charge inductive cos. ϕ 0,6 2,5 A/250 V AC
– lampe à incandescence 1000 W
Sortie
libre de potentiel
Contacts
1 ou 2 contact inverseur
Classe de protection II
Degré de protection
IP 20
Précision de marche
± 2,5 s/jour à +20° C
Réception radio DCF 77 –
Type de piles
Lithium
Réserve de marche
3 ans départ usine
Temps de commutation le plus court 1 minute
Programmable
chaque minute
Emplacements de mémoires 12
Présélection de commutation oui
Commutateur manuel Automatique/présélection
Fix ON/Fix OFF
Indicateur d’état de commutation oui
Formation de blocs de jours libre
Passage horloge été/hiver automatique/programmable
Mode de raccordement bornes à vis imperdables
Température ambiante
- 25° C … + 55° C
Plombage
oui
1 Kanal Wochenuhr
2 Kanal Wochenuhr
45 x 36 x 60
46 x 36
170
Voir schéma sur appareil
Voir schéma sur appareil
16 A/250 V AC
2,5 A/250 V AC
1000 W
libre de potentiel
1 ou 2 contact inverseur
II
IP 20
± 2,5 s/jour à +20° C
avec antenne externe
Lithium
3 ans départ usine
1 minute
chaque minute
20/30
oui
Automatique/présélection
Fix ON/Fix OFF
oui
libre
automatique/programmable
bornes à vis imperdables
- 25° C … + 55° C
oui
2
1.
Istruzioni d’uso
1.
Indice
2.
Montaggio, collegamento, messa in funzione
3
3.
Elementi di comando
4
4.
Indicazioni Display
4
5.
Impostazione dalla fabbrica
5
6.
Modifica delle impostazioni
6
6.1
Ora e giorno settimanale
6
6.2
Mese e giorno
7
6.2.1 AU
= Commutazione automatica dell’ora legale
Pagina
7
6.2.2 cHA = Commutazione semiautomatica dell’ora legale 8 - 9
6.2.3 no
= Nessuna commutazione
10
7.
Comandi standard
11
8.
Formazione fissa di blocchi settimanali
12 - 13
9.
Lettura – Modifica – Cancellazione – Reset
14 - 15
10.
Interruttore manuale
16
11.
Dati tecnici
17
2.
Montaggio, collegamento, messa in funzione
AC
DC + –
2.1
Montaggio
Montate l’interruttore orario:
• su barra DIN
• su parete (opzionale)
Set per montaggio a parete per 2 e 3 TE
art. 03.53.0083.2
2.2
Collegamento
Vedi dati tecnici sull’apparecchio
Premete un tasto qualsiasi:
• l’interruttore orario è attivo
• appare l’orario ed il giorno
2.3
Messa in funzione
L’orario e la data vengono impostati dalla fabbrica.
L’interruttore orario funziona con risparmio di energia
”Energy Saving“, cioè lampeggiano solo i 2 punti
Premete un tasto qualsiasi:
• l’interruttore orario è attivo
• appare l’orario ed il giorno
Attenzione:
Dopo ca. 1 - 2 minuti l’interruttore orario
è attivo automaticamente.
AC
DC + –
Attenzione:
• Nel caso in cui l’interruttore orario debba funzionare con la bassissima tensione di sicurezza
(es. 12 V-50 Hz) gli si devono collegare solo
apparecchiature funzionanti a bassissima
tensione di sicurezza.
• Nel caso in cui l’interruttore orario debba funzionare con la bassa tensione si può comandare
e collegare solo apparecchiature funzionanti a
bassa tensione (es. 230 V-50 Hz). Comandare a
bassissima tensione di sicurezza è in questo caso
non ammesso.
3
4
3. Elementi di comando
Interruttore manuale
Impostazione programma
Impostazione orario.
Termine impostazione
del programma
Impostazione comandi impulsi/ciclo
Reset
Per scegliere il giorno/
giorni settimanali
Per cancellare i tempi di comando
Impostazione minuti, mese, anno
Impostazione ore, giorno, anno
Commutazione ora solare/ora legale
4. Indicazioni display
date = data
1234567 =
giorni settimanali
Indicazione
ora legale
Indicazione
AM/PM
ore
giorno
Ricezione
DCF 77
minuti
mese
Canale 1
Canale 2
anno
Stato di comando
(ON/OFF)
- orario attuale
- data attuale
- inizio/fine
ora legale
- orario attuale
- data attuale
- inizio/fine
ora legale
- giorno/mese
impulsi/ciclo
Funzionamento fisso
Funzionamento automatico
Funzionamento manuale
I
5.
Impostazione dalla fabbrica
Preimpostazione secondo l’orario estivo MEZ
(ora dell’Europa centrale). Ci sono 3 tipi di funzionamento.
La data e l’ora nonchè l’uso AU sono preimpostati.
Modi d’uso:
• AU
Commutazione automatica dell’ora legale,
vedi punto 6.2.1
La commutazione avviene automaticamente
all’ora legale.
• cHA
Commutazione semiautomatico dell’ora legale,
vedi punto 6.2.2
Inserite la data dell’ inizio e della fine dell’ora legale
valida nel Vostro paese
p. e. la prima domenica di aprile dell’anno attuale
(inizio dell’ora legale)
L’ultima domenica di ottobre
(fine dell’ora legale)
Negli anni seguenti la commutazione avverrà sempre
automaticamente nel giorno e nella settimana giusta.
• no
Nessuna commutazione, vedi punto 6.2.3
Comutazione AM/PM
L’interruttore orario è nello stato di funzionamento attuale
1. Tenete premuto il tasto h
2. – premete una volta RESET
– appaiono tutti i segmenti
– dopo ca. 1 secondo appare: AM, 12.00 e 3 (mercoledi)
Il funzionamento AU è attivo = impostazione dalla fabbrica
3. Rilasciate il tasto h
4. Scegliete il tipo di funzionamento secondo le Vostre esigenze
vedi punti 6.2.1 o 6.2.2 o 6.2.3
5. Impostate l’orario attuale ed il giorno settimanale,
vedi punto 6.1
5
6.
6
Modifica delle impostazioni
Attenzione:
Con il tasto
si può in ogni istante uscire o concludere le
impostazioni o le modifiche.
6.1
Orario e data
Premete il tasto
una volta
Impostare l’ora:
le ore con il tasto h
i minuti con il tasto m
Nota per interruttore
orario settimanale:
Se l’impostazione è con
funzionamento
no = non è stata scelta
nessuna commutazione
Si deve adesso impostare il giorno.
Con il tasto Day 1
2
3
:
7
- lunedi
- martedi
- mercoledi
- domenica
Premete il tasto
una volta,
per terminare l’impostazione.
I
6.2 Mese e giorno – scegliere il tipo di funzionamento
6.2.1 AU o 6.2.2 cHA o 6.2.3 no
6.2.1 AU = Commutazione
automatica dell’ora legale
Premete una volta il tasto
I due punti non lampeggiano
Premete una volta il tasto ‘1h‘,
appare AU
Premete una volta il tasto Prog
Impostare l’anno attuale:
Con i tasti ‘m‘ o ‘h‘
Confermate con il tasto ‘Prog‘
Impostare il mese attuale ed il giorno:
con il tasto ‘m‘ il mese
con il tasto ‘h‘ il giorno
Attenzione:
Se premete una o due volte il tasto
Prog potete leggere la data d’inizio
p.e. 29.03. e della fine p.e. 25.10.
dell’ora legale.
Premete una volta il tasto
per terminare l’impostazione
7
6.2.2 cHA = Commutazione semiautomatica dell’ora legale
Premete una volta il tasto
I due punti non lampeggiano
Premete il tasto ‘+ 1h‘ finchè
non appare cHA
Premete una volta il tasto ‘Prog‘
Impostare l’anno attuale:
con i tasti ‘m‘ o ‘h‘
Confermate con il tasto ‘Prog‘
Impostare il mese attuale
ed il giorno:
con il tasto ‘m‘ il mese
con il tasto ‘h‘ il giorno
I
8
9
Confermate con il tasto ‘Prog‘,
e vi apparirà l’inizio
dell’ora legale
Impostare l’inizio dell’ora
legale individuale:
con il tasto ‘m‘ il mese
con il tasto ‘h‘ il giorno
Confermate con il tasto ‘Prog‘
Apparirà la fine dell’ora legale
Impostare la fine dell’ora
legale individuale:
con il tasto ‘m‘ il mese
con il tasto ‘h‘ il giorno
Premete una volta il tasto
per terminare l’impostazione
6.2.3 no = Nessuna commutazione – solo interruttore orario settimanale
Premete una volta il tasto
I due punti non lampeggiano
Premete il tasto ‘+ 1h‘ finchè
non appare no
L’interruttore orario lavora
senza data!
Premete una volta il tasto
per terminare l’impostazione
Attenzione:
Impostazione del giorno
settimanale vedi punto 6.1
I
10
11
7. Comandi standard
Scegliete i tempi di commutazione e lo stato di comando per il singolo
Simboli: CH1:
= canale 1 ON
canale.
CH2:
= canale 2 OFF
Sono possibili le seguenti scelte:
• comandi solo per canale1
• comandi solo per canale 2
• lo stesso comando per canale 1 e canale 2
(tempo di commutazione e stato di comando sono identici)
• lo stesso tempo di commutazione per canale 1 e canale 2
con diversi stato di comando
Scegliere un posto di memoria libero:
Premete il tasto Prog finchè non
appare il posto libero – –:-– –.
Impostare i tempi di comando:
con il tasto “m“ i minuti
con il tasto “h“ le ore
Impostare i giorni settimanali vedi:
“formazione di blocchi settimanali“, vedi punto 8
Impostare lo stato di comando:
con il tasto
oppure
Attenzione:
Lo stato di comando per CH1 o
CH2 può essere disattivato.
Nessun simbolo – nessuna commutazione. Premete il tasto ’Prog’ una volta,
per terminare l’impostazione.
Viene indicato un posto di memoria libero
– per ulteriori impostazioni oppure.
premete il tasto
una volta, per
terminare l’impostaziono.
Nel Display apparirà l’ora attuale.
8. Formazione fissa di blocchi settimanali – solo interruttore orario settimanale
Combinazione preinserita di giorni settimanali o giorni singoli
Scegliete i giorni per il Vostro programma.
1 - lunedi, 2 - martedi, 3 - mercoledi ..., 7 - domenica
Esempio: lunedi … venerdi (ore 8:00 ON; ore 22:00 OFF)
Scegliere un posto di
memoria libero:
Premete il tasto ’Prog’ finchè
non appare – –:– –.
Premete il tasto ’Day’ una volta
tutti i 7 giorni settimanali sono
attivi
Attivate/disattivate i giorni
settimanali:
Premendo il tasto ’Day’
1 2 3 4 5 6 7
– – – – – –
– – – – –
– –
–
–
–
–
–
–
–
Attenzione:
Inserite i tempi di commutazione e lo stato di comando
= ON,
= OFF per singolo canale. Comandi standard vedi punto 7.
I
12
13
Premete il tasto Prog una volta,
per terminare l’impostazione.
Viene evidenziato un posto di
memoria libero - per ulteriori
impostazioni.
oppure
Premete il tasto
una volta,
per terminare l’impostazione.
Nel Display apparirà l’ora
attuale.
Attenzione:
A seguito della
• lettura, modifica o cancellazione dell’ora, della
data o dei programmi
• sincronizzazione con
l’antenna DCF
• ritorno di corrente
lo stato di comando
dell’interruttore orario viene
automaticamente attualizzato.
9. Lettura – modifica – cancellarzione – Reset
•
•
•
•
14
leggete i contenuti dei programmi passo passo
modificate, scrivendo sopra il contenuto del programma
cancellate il contenuto dei programmi
cancellate la data e l’ora
Lettura
Premete il tasto ’Prog’ passo passo
Ogni singolo contenuto viene evidenziato, fino alla fine del programma.
Di seguito:
• un posto di memoria libero – –:– –
• una cifra (posti di memoria liberi)
(esempio Fr 10)
Modifica
Premete il tasto ’Prog’ passo
passo fino al comando/
contenuto che volete modificare.
Modificate il comando/contenuto:
come descritto nei punti:
8. formazione di blocchi settimanali
Cancellazione - dei singoli comandi
Premete il tasto ’Prog’ passo
passo fino al comando/
contenuto che volete cancellare.
Premete una volta il tasto Clear,
il comando è cancellato
I
15
Cancellazione - di tutti i comandi
Premete il tasto ’Prog’ finchè
non appare FRxx
Premete una volta il tasto Clear,
nel Display appare CL
Mantenete premuto il tasto Clear
Tutti i posto di memoria
vengono cancellati!
Nel Display appare il numero
totale dei posti di memoria.
Reset
Premete il tasto Reset una volta
La data e l’ora preimpostati
vengono cancellati.
La preimpostazione della fabbrica
AU = commutazione automatica
ora solare/ora legale è attiva
(31.12.1997, ore 00:00)
Tutti i segmenti sono visibili per
ca. 2 secondi, dopo appare
00:00.
Impostate i dati attuali
vedi punti 5 e 6.
16
10. Interruttore manuale
Potete modificare manualmente lo stato di comando momentaneo.
Il programma individuale impostato rimane attivo.
1 per canale 1
2 per canale 2
= automatico
= OFF
= ON
Lo stato di comando
corrisponde al
programma
impostato.
= funzionamento manuale
FIX = funzionamento fisso
= ON
FIX = fisso ON
= OFF
Modificate momentaneamente lo stato di
comando.
Con il prossimo
comando, inserito
nel programma, lo
stato di comando
ritorna alla versione
automatica.
I
FIX = fisso OFF
Modificate in modo
fisso lo stato di
comando.
Solo agendo sul
tasto
potete
commutare da
funzionamento fisso
a funzionamento
automatico.
17
11. Dati tecnici
Interruttore orario giornaliero Interruttore orario settimanale
1 canale
1 canale
2 canali
Dimensioni (A x L x P) mm 45 x 36 x 60
Dima di foratura mm 46 x 36
Peso g (circa)
170
Collegamento
vedi schema sull’apparecchio
Assorbimento:
vedi schema sull’apparecchio
Portata contatti AC a 230 V AC
– carico ohmico (VDE, IEC) 16 A/250 V AC
– carico induttivo cos ϕ 0,6 2,5 A/250 V AC
– carico lampada incandescente 1000 W
Uscita
a potenziale libero
Tipo contatti
1 /2 contatti in commutazione
Classe di protezione II
Tipo di protezione
IP 20
Precisione
± 2,5 sec./giorno a +20° C
Funzionamento Radio DCF 77 –
Tipo di riserva di carica Litio
Riserva di carica
3 anni da fabbrica
Intervento minimo
1 minuto
Programmable ogni
minuto
Memorie
12
Preselezione
si
Interruttore manuale
automatico/preselezione
fisso ON/fisso OFF
Formazione d’blocchi settimana –
Commutazione ora
automatica/scelta libera
legale/solare
Tipo collegamente
morsetti a vite imperdibile
Temperatura ambiente da - 25° C a + 55° C
Piombabile
si
45 x 36 x 60
46 x 36
170
vedi schema sull’apparecchio
vedi schema sull’apparecchio
16 A/250 V AC
2,5 A/250 V AC
1000 W
a potenziale libero
1 /2 contatti in commutazione
II
IP 20
± 2,5 sec./giorno a +20° C
con antenna esterna
Litio
3 anni da fabbrica
1 minuto
minuto
20/30
si
automatico/preselezione
fisso ON/fisso OFF
assegnazione fissa
automatica /scelta libera
morsetti a vite imperdibile
da - 25° C a + 55° C
si
2
1.
Contenido
1.
Contenido
2.
Advertencias de seguridad
3
3.
Montaje, puesta en marcha, conexión
4
4.
Panel de botones
5
Pagina
5.
Pantalla
5
6.
Ajuste de fábrica
6
7.
Cambiar los ajustes
7
7.1
Hora y día de la semana
7
7.2
Mes y día
8
7.2.1 AU
= Ajuste automático
8
7.2.2 cHA = Ajuste delhorario de verano por días
7.2.3 no
= sin horario de verano
9 - 10
11
8.
Ordenes estándar
12
9.
Selección de días
13 - 14
10.
Lectura – modificaciones – borrado – reset
15 - 16
11.
Interruptor manual
17
12.
Datos técnicos
18
E
2. Advertencias de seguridad
La instalación de la unidad ha de ser llevada a cabo por un técnico
cualificado o bajo su dirección y supervisión.
Advertencias acerca del montaje:
• Utilizar exclusivamente cables con aislamiento
• Montar solo en lugar adecuado y protegido
• Sólo apto para el uso en condiciones ambientales normales
Si se cumplen estas exigencias y la instalación se lleva a cabo
correctamente según VDE 0100, parte 40, los elementos que
quedan al contacto pueden considerarse de doble aislamiento
(clase de protección II).
Advertencias para el uso:
Los componentes electrónicos de esta unidad están protegidos
ampliamente contra interferencias del exterior. Según el tipo de
instalación hay que tener en cuenta que la tensión de suministro
puede tener picos elevados.
También la conmutación de bobinas, por ejemplo en válvulas
magnéticas y contactores, causa perturbaciones que a pesar de
todas las medidas de protección interna pueden interferir en un
aparato electrónico.
3
3.
Montaje, puesta en marcha, conexión
AC
DC + –
4
3.1
Montaje
El aparato puede montarse
• Sobre carril
• Opcionalmente sobre pared con:
Accesorio de montaje para 2 x 3 módulos
Código 03.53.0083.2
3.2
Puesta en marcha
La hora y la fecha vienen ajustadas
de fábrica.
El reloj trabaja en modo de ahorro de
energía, sólo los dos puntos parpadean.
Pulsar cualquier botón:
• el reloj se activa
• indicará la hora (día de la semana)
3.3
Conexión
¡Ver indicaciones en el aparato!
Una vez alimentado pulsar cualquier
botón:
• el reloj se activa
• indicará la hora (día de la semana)
Advertencia:
Al cabo de 1 - 2 minutos el reloj se
activa automáticamente.
AC
DC + –
E
5
4. Panel de botones
Iniciar la programación
Interruptores manuales
Ajustar hora,
finalizar la
programación
Seleccionar
impulso/ciclo
Reset
Seleccionar día(s)
de la semana
Borrar hora de conmutación
Ajustar hora, día y año
Ajustar minutos, mes y año
Ajuste horario de verano/invierno
5. Pantalla
1234567 =
Días de la
semana
date = fecha
Indica hora
de verano
Horas
AM/PM
Sincronización
DCF 77
Canal 1
Canal 2
Estado conmutación
- hora actual
- fecha actual
- inicio/fin
horario de verano
Minutos - hora actual
Mes
- fecha actual
- inicio/fin
horario de verano
Año
- día/mes
Día de
semana
Impulso/ciclo
Modo continuo
Modo automático
Modo manual
6.
6
Ajuste de fábrica
La hora ajustada corresponde a la zona horaria de Europa
Central. El reloj ofrece 3 modos de funcionamiento.
Viene preajustado con la fecha y la hora así como el modo
de servicio AU (cambio automático de horario de verano).
Modos de servicio:
• AU
Ajuste automático del horario de verano, ver 7.2.1
El ajuste se lleva a cabo de forma automática en las
fechas establecidas po la autoridad competente.
• cHA
Ajuste del horario de verano en los días
predeterminados, ver 7.2.2
Se introduce la fecha de inicio y de fin del horario
de verano válido en su paìs.
p. ej.: primer domingo de abril del año en curso
(inicio del horario de verano)
último domingo de octubre del año en curso
(fin del horario de verano)
En los años siguientes el cambio se realizará
siempre el mismo día de la semana indicada.
• no
No realizar el cambio del horario de verano, ver 7.2.3
Cambio AM/PM
Partiendo del funcionamiento normal
1. Pulsar y mantener el botón h
2. – Presionar una vez el botón RES
– Todos los segmentos de la pantalla se activan
– Tras unos segundos aproximadamente aparece:
AM, 12.00 y 3 (miércoles)
Se activa el modo de funcionamiento AU = ajuste de fábrica
3. Soltar el botón h
4. Elegir el modo de funcionamiento según necesidad,
ver 7.2.1, ó 7.2.2 ó 7.2.3
5. Ajustar el día de la semana y la hora actual, ver 7.1
E
7.
7
Cambiar ajustes
Advertencia:
Todos los ajustes o cambios que se realizan se pueden finalizar
o interrumpir en cualquier momento con el botón
.
7.1
Hora y día de la semana
Pulsar una vez el botón
Fijar hora:
con el botón h se ajusta la hora
con el botón m se ajustan
los minutos
Advertencia solamente para
interruptor horario semanal:
Si se trabaja en modo
no =
sin ajuste del horario de verano
- ver 7.2.3
hay que fijar a continuación el
día de la semana.
con el botón Day 1
2
3
:
7
- lunes
- martes
- miércoles
- domingo
Pulsar el botón
1 vez
para terminar el ajuste.
8
7.2 Mes y día – Modo de servicio
7.2.1 AU o 7.2.2 cHA o 7.2.3 no
7.2.1 AU = Ajuste automático
Pulsar el botón
1 vez
Pulsar botón + 1h 1 vez,
ahora aparece AU
Pulsar botón Prog 1 vez
Ajustar el año:
mediante el botón m o h
Confirmar pulsando el botón Prog
Ajustar mes y día:
El mes mediante el botón m
El día mediante el botón h
Advertencia:
Con el botón Prog puede visualizar
las fechas de inicio p.ej. 29.03.
(pulsar una vez) y fin p.ej. 25.10.
(pulsar dos veces) del horario de
verano
Pulsar una vez el botón
para finalizar el ajuste.
E
7.2.2
cHA = Ajuste del horario de verano por días predeterminados
Pulsar una vez el botón
Pulsar repetidamente el botón
+ 1h hasta que aparezca cHA
Pulsar una vez el botón Prog
Ajustar el año:
mediante el botón m o h
Confirmar con el botón Prog
Ajustar mes y día:
El mes con el botón m
El día con el botón h
9
10
Confirmar con el botón Prog
Se indicará el inicio del
horario de verano.
Ajuste de inicio individual
del horario de verano:
El mes con el botón m
El día con el botón h
Confirmar con el botón Prog
Ajuste de fin individual
del horario de verano:
El mes con el botón m
El día con el botón h
Pulsar una vez el botón
Fin del ajuste.
E
7.2.3 no = sin horario de verano – solo interruptor horario semanal
Pulsar una vez el botón
Pulsar repetidamente el botón
+ 1h hasta que aparezca no
¡El reloj trabajará sin fecha!
Pulsar una vez el botón
Fin del ajuste.
Nota:
Fijar día de la semana,
ver punto 7.1
11
8. Ordenes estándar de conmutación
12
Las horas y estados de conmutación para cada salida (canal) se ajustan
individualmente.
Símbolos:
CH1:
= canal 1 encendido
CH2:
= canal 2 apagado
Las siguientes combinaciones son posibles:
• Ordenes soló para el canal 1
• Ordenes soló para el canal 2
• La misma orden para canal 1 y canal 2
(Hora y estado son idénticos)
• La misma hora para canal 1 y canal 2, pero con
diferentes estados de conmutación
Elegir posición de memoria libre:
Pulsar repetidamente el botón
Prog hasta que aparezca una
posición libre – –:-– –.
Ajustar la hora:
Los minutos con el botón m
Las horas con el botón h
Ajustar los días de la semana, véase:
Formar bloques de días, capítulo 9
Ajustar estado de conmutación:
con el botón
, seleccionar la
conexión
ó desconexión
Advertencia:
Se puede desactivar el estado de conmutación para CH1 o CH2. Cuando
no hay símbolo - no habrá conmutación.
Pulsar una vez el botón Prog para
finalizar la programación. A continuación
aparecerá otra posición de memoria
para realizar más ajustes o
Pulsar una vez el botón
, para
finalizar la programación. La pantalla
indicará la hora actual.
E
9. Seleccionar grupos de días prefijados – solo interruptor horario semanal
(Combinaciones predeterminadas de días de la semana)
Los días de la semana, en los que el programa de conmutación
debe estar activo, se ajustan de la siguiente manera:
1 - lunes, 2 - martes, 3 - miércoles ..., 7 - domingo
Ejemplo: lunes a viernes (encender a las 8 horas y apagar a las 22 horas)
Elegir posición de memoria libre:
Pulsar repetidamente el botón
Prog hasta que aparezca una
posición libre – –:– –
Pulsar una vez el botón Day
se activan todos los días de
la semana
Activar/desactivar días de la semana:
Ir pulsando el botón Day.
Se activarán los distintos grupos de días
1 2 3 4 5 6 7
– – – – – –
– – – – –
– –
–
–
–
–
–
–
–
Advertencia:
Indicar las horas y estados
salida (canal) en cuestión,
= encendido;
= apagado para la
13
14
Para ordenes estándar
ver punto 8
Pulsar una vez el botón Prog
para finalizar la programación.
A continuación aparecerá otra
posición de memoria para más
ajustes
o
Pulsar una vez el botón
,
para finalizar la programación.
La pantalla indicará la hora
actual.
Nota:
Después de los siguientes
procesos:
• Cambio o borrado de la
hora, día o programas
• Sincronización de la señal DCF
• Reconexión
se actualizará automáticamente
el estado del interruptor horario.
E
10. Lectura – modificación – borrado – reset
•
•
•
•
Para
Para
Para
Para
15
leer paso por paso el contenido del programa
cambiar o sobreescribir los contenidos del programa
borrar los contenidos del programa
borrar fecha y hora
Lectura
Ir pulsando el botón Prog
Se verán todos los pasos del
programa hasta el final.
Después:
• una posición de memoria libre
– –:– –
• al final, una cifra (posiciones de
memoria libres (ej. Fr 10)
Modificaciones
Ir pulsando el botón Prog
hasta llegar la orden/
contenido que se quiere
cambiar/sobreescribir
Cambiar orden/contenido:
según las instrucciones en
9. selección de días
Borrar ordenes completas
Ir pulsando el botón Prog
hasta llegar la orden/
contenido que se quiere
borrar.
Pulsar una vez el botón Clear,
la orden elegida quedará
borrada.
16
Borrar todas las ordenes
Pulsar tantas veces el botón Prog
hasta que aparezca FRxx
Pulsar una vez el botón Clear,
en la pantalla aparecerá CL
Mantener pulsando el botón Clear
¡Todas las posiciones de
memoria se borrarán!
En la pantalla aparecerá el número
máximo de posiciones de memoria.
Reset
Pulsar una vez el botón Reset
La fecha y la hora se pondrán
en cero.
Se activará el ajuste de fábrica
AU = ajuste automático del
horario de verano
(31.12.1997, 00:00 horas)
Durante unos dos segundos se
verán todos los segmentos de la
pantalla, después aparecerá
00:00.
Para ajustar la fecha y la hora
actuales ver puntos 6 y 7.
E
17
11. Interruptor manual
Para cambiar - de forma manual - el estado de conmutación actual.
El programa en sí no se ve afectado por esta operación.
1 para el canal 1
2 para el canal 2
= Modo automático
= Modo manual
= Apagado
= Encendido
= Encendido
= Apagado
El estado de
conmutación
corresponde al
programa
introducido
Para suspender el
estado actual de
forma manual.
La siguiente orden
del programa se
ejecutará de nuevo
automáticamente.
FIX = Modo continuo
FIX = Permanentemente
encendido
FIX = Permanentemente
apagado
Para activar - de forma
manual - el modo
continuo. Con el botón
se vuelve del
modo continuo al
modo automático.
18
12. Datos técnicos
Programador día de 1 circuito
Dimensiones (A x A x P) mm 45 x 36 x 60
Recorte en el cuadro de distribución 46 x 36
Peso en g (aprox.)
170
Conexión
según esquema en aparato
Consumo
según esquema en aparato
Potencia de conmutación a 230 V AC
– carga óhmica (VDE, IEC) 16 A/250 V AC
– carga inductiva cos ϕ 0,6 2,5 A/250 V AC
– carga incandescente 1000 W
Salida
libre de potencial
Contactos de conmutación 1 ó 2 circuitos
Clase de protección
II
Indice de protección IP 20
Exactitud del reloj
± 2,5 s/día a +20° C
Sincronización DCF 77 –
Pila de reserva
Litio
Reserva de funcionamiento 3 años a partir de fábrica
Intervalo de conmutación más corto 1 minuto
Programable
cada minuto
Posiciones de memoria 12
Preselección conmutación sí
Interruptor manual
Automático/preselección
Fix activado
Fix desactivado
Indicador de estado de conmutación sí
Selección de días de semana de libre selección
Cambio de horario verano/invierno automático y de libre selección
Tipo de conexión
bornes con tornillo imperdible
Temperatura ambiente - 25° C … + 55° C
Precintable
sí
E
Programador semanal de 1 circuito
Programador semanal de 2 circuitos
45 x 36 x 60
46 x 36
170
según esquema en aparato
según esquema en aparato
16 A/250 V AC
2,5 A/250 V AC
1000 W
libre de potencial
1 ó 2 circuitos
II
IP 20
± 2,5 s/día a +20° C
con antenna extenior
Litio
3 años a partir de fábrica
1 minuto
cada minuto
20/30
sí
Automático/preselección
Fix activado
Fix desactivado
sí
de libre selección
automático y de libre selección
bornes con tornillo imperdible
- 25° C … + 55° C
sí
2
1.
Inhoud
1.
Inhoud
2.
Montage, ingebruikname, aansluiting
3
3.
Verklaring van de toetsen
4
4.
Verklaring van Display
4
5.
Fabrieksmatige instelling
5
6.
Instellingen veranderen
6
6.1
Tijd en dag
6
6.2
Maand en dag
7
6.2.1 AU
= automatische omschakeling
6.2.2 cHA = halfautomatische tijdomschakeling
6.2.3 no
Blz.
7
8-9
= geen omschakeling
10
7.
Standaard – schakelcommando’s
11
8.
Blokvorming van de dagen
12 - 13
9.
Lezen – veranderen – verwijderen – Reset
14 - 15
10.
Handschakelaar
16
11.
Technische gegevens
17
2.
AC
DC + –
AC
DC + –
3
Montage, ingebruikname, aansluiting
2.1
Montage
Schakelklok monteren
• op DIN-rail
• optie wandopbouw
opbouwset voor 2 en 3 TE
Art. nr. 03.53.0083.2
2.2
Ingebruikname
De tijd en de datum worden ingesteld.
De schakelklok zit in de “stand-by“
modus, alleen de “dubbele punt“ knippert.
Druk op een willekeurige toets:
• de schakelklok is actief
• de tijd wordt aangeduid (dag)
2.3
Aansluiting
Zie aanduidingen op het apparaat.
Druk op een willekeurige toets:
• de schakelklok is actief
• de tijd wordt aangeduid (dag)
Aanwijzing:
Na ca. 1 - 2 minuten is de schakelklok
automatisch actief.
Aanwijzing voor de veiligheid:
• Bij gebruik van de schakelklok, met een
„veilige zeer lage spanning“, mag uitsluitend
een „veilige zeer lage spanning“ worden
geschakeld.
• Bij gebruik van de schakelklok, met een
„functionele zeer lage spanning“, mag
zowel netspanning (230 V/50 Hz) als een
„functionele zeer lage spanning“ geschakeld
worden. Het schakelen van een „veilige zeer
lage spanning“ is in dit geval niet toelaatbaar.
NL
4
3. Verklaring van de toetsen
Handschakelaar
Programma invoer beginnen
Tijd instellen,
programma invoer
beeindingen
Impuls/Cyclus
invoeren
Reset
Dagen
kiezen
Schakeltijd verwijderen
Uren, dag, jaar instellen
minuten, maand, jaar instellen
Zomer- wintertijd omschakeling
4. Verklaring van het display
1234567 =
dagen
date = datum
zomertijdaanduiding
AM/PMaanduiding
DCF 77ontvangst
kanaal 1
kanaal 2
Schakeltoestand
uren
dag
- aktuele tijd
- aktuele tijd
- aanvang/einde
zomertijd
minuten - aktuele tijd
maand - aktuele tijd
- aanvang/einde
zomertijd
jaar
- dag/maand
Impuls/Cyclus
Continuebedrijf
Automatisch bedrijf
Handmatigbedrijf
5.
5
Fabrieksmatige instelling
De ingestelde gegevens voldoen aan MEZ.
De schakelklok biedt 3 bedrijfssoorten.
De datum en de tijd evenals bedrijfssoort AU zijn ingesteld.
Bedrijfssoorten:
automatische omschakeling van de zomertijdregeling,
• AU
zie 6.2.1
De omschakeling gebeurt volgens de wettelijk
aangegeven data.
• cHA
halfautomatische omschakeling van de
zomertijdregeling, zie 6.2.2
u geeft voor uw land de geldige aanvangs en
eindatum in van de zomertijd.
Bijv.
de eerste zondag van april van het aktuele
jaar (begin van de zomertijd)
De laatste zondag in oktober van het jaar
(eind van de zomertijd)
In de daarop volgende jaren geschiedt de omschakeling altijd op de juiste dag in het juiste
kalenderjaar.
• no
geen omschakeling, zie 6.2.3
AM/PM-omschakeling
Schakelklok is in de aktuele bedrijfstoestand
1. h indrukken en vasthouden
2. – Res 1x indrukken
– Alle segmenten zijn aangeduid
– Na ca. 1 seconde verschijnt: AM, 12.00 en 3 (woensdag)
Bedrijfstoestand AU is aktief = fabrieksmatige instelling
3. h loslaten
4. Bedrijfstoestand kiezen naar behoefte
zie 6.2.1 of 6.2.2 of 6.2.3
5. Aktuele tijd en dag instellen, zie 6.1
NL
6.
6
Instellingen veranderen
Aanwijzing:
Bij alle instellingen, veranderingen die u doorvoert, is met de
toets de beeindiging op elk moment mogelijk.
6.1
Tijd en dag
-toets 1x indrukken
Tijd instellen:
Met de h-toets uren
Met de m-toets minuten
Aanwijzing voor
weekschakelklok:
Wanneer bedrijfssoort
no = geen omschakeling
- zie 6.2.3
wordt gekozen, moet nu de
dag ingesteld worden.
Met de Day-toets 1
2
3
:
7
- maandag
- dinsdag
- woensdag
- zondag
-toets 1x indrukken,
programmering is beeindigd.
6.2 Kalendermaand – en dag – bedrijfssoort kiezen
6.2.1 AU of 6.2.2 cHA of 6.2.3 no
6.2.1 AU = automatische omschakeling
-toets 1x indrukken
+ 1h-toets 1x indrukken,
AU verschijnt
Prog-toets 1x indrukken
Actueel jaar instellen:
met m-toets of h-toets
met Prog-toets bevestigen
Actuele maand en dag instellen:
met m-toets kalendermaand
met h-toets kalenderdag
Aanwijzing:
Met de Prog-toets (1 resp. 2 maal
drukken) leest u de data van het
begin bijv. 29.03. en het eind
bijv. 25.10. van de zomertijd.
-toets 1x indrukken,
programmering is beeindigd.
NL
7
6.2.2 cHA = halfautomatische tijdomschakeling
-toets 1x indrukken
+ 1h-toets zo vaak indrukken
totdat cHA verschijnt
Prog-toets 1x indrukken
Aktueel jaar instellen:
Met m-toets of h-toets
met Prog-toets bevestigen
Aktuele maand en dag
instellen:
met m-toets maand
met h-toets dag
8
9
met Prog-toets bevestigen
begin zomertijd is
aangegeven.
Individueel begin van de
zomertijd instellen:
met m-toets maand
met h-toets dag
met Prog-toets bevestigen
Individueel einde zomertijd
instellen:
met m-toets maand
met h-toets dag
-toets 1x indrukken,
programmering is beeindigd.
NL
6.2.3 no = geen omschakeling – alleen weekschakelklok
10
-toets 1x indrukken
+ 1h toets zo vaak indrukken,
totdat no verschijnt.
De schakelklok werkt zonder
datum!
-toets 1x indrukken
programmering is beeindigd.
Aanwijzing:
Dag instellen zie 6.1
11
7. Standaard – schakelcommando’s
U bepaalt de schakeltijden en de schakeltoestand voor de desbetreffende
Symbool: CH1:
= kanaal 1 AAN
schakeluitgang (kanaal).
CH2:
= kanaal 2 UIT
Deze indelingen zijn mogelijk:
• schakelcommando voor alleen kanaal 1
• schakelcommando voor alleen kanaal 2
• dezelfde schakelcommando’s voor kanaal 1 en 2
(schakeltijd en schakeltoestand zijn gelijk)
• dezelfde schakeltijden voor kanaal 1 en 2 echter met verschillende
schakeltoestanden.
Vrije geheugenplaatsen kiezen:
Prog-toets zo vaak indrukken
totdat – –:-– – verschijnt.
Schakeltijden instellen:
met m-toets minuten
met h-toets uren
Dagen instellen zie:
Blokvorming van dagen, punt 8
Schakeltijden instellen:
met
-toets
of
Aanwijzing:
De schakeltoestand voor CH1 of
CH2 kan gedeaktiveerd worden.
Geen symbool = geen schakeling.
Prog-toets 1x indrukken, programmering
is beeindigd. Een vrije geheugenplaats is
aangeduid – voor verdere programming of
-toets 1x indrukken, programmering
is beeindigd. Het display toont de aktuele
tijd.
NL
8. Vaste blokvorming van de dagen – alleen weekschakelklok
Aangegeven combinaties van de dagen van de week of enkele dagen
U bepaalt de dagen voor uw schakelprogramma.
1 - maandag, 2 - dinsdag, 3 - woensdag ..., 7 - zondagg
Voorbeeld: maandag … vrijdag (8.00 uur AAN; 22.00 uur UIT)
Vrije geheugenplaatsen kiezen:
Prog-toets zo vaak indrukken,
totdat – –:– – verschijnt.
Day-toets 1x indrukken alle
7 dagen van de week zijn aktief.
Dagen aktiveren/
deaktiveren:
Day-toets stapsgewijs indrukken
1 2 3 4 5 6 7
– – – – – –
– – – – –
– –
–
–
–
–
–
–
–
Aanwijzing:
Zowel de schakeltijden als de schakeltoestand
= AAN;
= UIT
voor de gekozen schakeluitgang (kanaal) ingeven. Standaard schakel
commando’s zie 7.
12
13
Prog-toets 1x indrukken,
programmering is beeindigd.
Een vrije geheugenplaats is
aangeduid - voor verdere
programmering
of
-toets 1x indrukken,
programmering is beeindigd.
Het display toont de aktuele tijd.
Aanwijzing:
Volgens de voorgangers
• tijd, datum schakelprogramma
lezen, veranderen of
verwijderen
• DCF-synchronisatie
• Terugkeer van de netspanning
Wordt de schakeltoestand
van de schakelklok automatisch
geactualiseerd.
NL
9. Lezen – veranderen – verwijderen – Reset
•
•
•
•
U
U
U
U
14
leest de programmainhoud stapsgewijs
veranderd, overschrijft de programma inhoud
verwijderd de programma inhoud
verwijderd datum en tijd
Lezen
Prog-toets stapsgewijs indrukken
Elk deel van de inhoud wordt getoont,
tot aan het programma einde.
Vervolgens:
• een vrije geheugenplaats – –:– –
• een cijfer (vrije geheugenplaats)
(bijv. Fr 10)
Veranderen
Prog-toets stapsgewijs indrukken,
tot aan het schakelcommando/
inhoud die u veranderen of
overschrijven wilt schakelcommando/
inhoud veranderen:
zoals beschreven in:
8.
blokvorming van dagen
Verwijderen - enkele
schakelcommando’s
Prog-toets stapsgewijs
indrukken, tot aan het
schakelcommando/inhoud
die u verwijderen wilt.
Clear-toets 1x indrukken,
het schakelcommando is
verwijderd.
15
Verwijderen - van alle
schakelcommando’s
Prog-toets zo vaak indrukken,
totdat FRxx verschijnt
Clear-toets 1x indrukken,
in het display staat CL
Clear-toets indrukken en vasthouden.
Alle geheugenplaatsen
worden verwijderd!
Het display toont het aantal
max. geheugenplaatsen.
Reset
Reset-toets 1x indrukken
De ingestelde datum en tijd
worden teruggezet.
De interne instelling
AU = automatische zomerwintertijd omschakeling is aktief
(31.12.1997, 00:00 uur)
Alle segmenten zijn voor
ca. 2 seconden zichtbaar,
daarna verschijnt 00:00.
Aktuele gegevens instellen
zie punt 5 en 6.
NL
16
10. Handschakelaar
U verandert - handmatig - de huidige schakeltoestand.
Het individueel ingestelde schakelprogramma blijft echter wel behouden.
1 voor kanaal 1
2 voor kanaal 2
= automatisch
= handmatigbedrijf
= UIT
= AAN
= AAN
De schakeltoestand
komt met het
ingegeven
programma overeen.
= UIT
U verandert
– m a n u e e l –
de huidige
schakeltoestand.
Schakelcommando in
het programma wordt
weer automatisch
uitgevoerd.
FIX = continuebedrijf
FIX = duur AAN
FIX = duur UIT
U verandert
– h a n d m a t i g –
de huidige schakeltoestand.
Met de
toets
schakelt u van
continuebedrijf naar
automatische bedrijf.
17
11. Technische gegevens
1 kanaals dagklok
Maten (H x B x D) mm 45 x 36 x 60
Verdeeluitsparing mm 46 x 36
Gewicht gr. (ca.)
170
Aansluiting
zie apparaat
Vermogensopname
zie apparaat
Schakelvermogen bij 230 V AC
– ohmse belasting (VDE, IEC) 16 A/250 V AC
– inductieve belasting cos ϕ 0,6 2,5 A/250 V AC
– gloeilampbelasting 1000 W
Schakeluitgang
potentiaalvrij
Schakelcontacten
1 resp. 2 wisselcontacten
Beschermingsklasse
II
Bescherming
IP 20
Loopnauwkeurigheid ± 2.5 s/dag bij +20° C
DCF 77 antenneontvangst –
Gangreserve type
Lithium
Gangreserve
3 jaar vanaf produktiedatum
Korste schakeltijd
1 minuut
Programmeerbaar
elke minuut
Geheugenplaatsen
12
Schakelvoorkeuze
ja
Handschakelaar
Automatisch/voorkeuze
Fix AAN
Fix UIT
Aanduiding schakeltoestand ja
Blokvorming van dagen –
Zomer- wintertijd omschakeling automatisch/vrij kiesbaar
Aansluiting
vaste ± schroefklemmen
Omgevingstemperatuur - 25° C … + 55° C
Afsluitbaar
ja
1 kanaals weekklok
2 kanaals weekklok
45 x 36 x 60
46 x 36
170
zie apparaat
zie apparaat
16 A/250 V AC
2,5 A/250 V AC
1000 W
potentiaalvrij
1 resp. 2 wisselcontacten
II
IP 20
± 2.5 s/dag bij +20° C
met externe antenne
Lithium
3 jaar vanaf produktiedatum
1 minuut
elke minuut
20/30
ja
Automatisch/voorkeuze
Fix AAN
Fix UIT
ja
vast aangegeven
automatisch/vrij kiesbaar
vaste ± schroefklemmen
- 25° C … + 55° C
ja
NL
2
1.
Obsah
1.
Obsah
2.
Montáž, uvedení do provozu a připojení
3
3.
Ovládací prvky
4
4.
Displej
4
5.
Výchozí nastavení
5
6.
Změna nastavení
6
6.1
Ćasový údaj a den v týdnu
6
6.2
Kalendářní měsíc a den
7
6.2.1 AU
Strana
= Automatický přechod na letni čas
7
6.2.2 cHA = Přechod na letní čas s ohledem na den v týdnu
6.2.3 no
= Bez přechodu na letní čas
8-9
10
7.
Standardní spínací povely
11
8.
Vytváření bloků dnů v týdnu
12 - 13
9.
Čtení změna a zrušení povelů/Reset
14 - 15
10.
Ruční přepínač
16
11.
Technické údaje
17
2.
AC
DC + –
AC
DC + –
3
Montáž, uvedení do provozu a připojení
2.1
Montáž
Spínací hodiny montujte
• na DIN-lištu
• volitelně na povrch, na stěnu
tento montážní soubor má výrobkové
číslo 03.53.0083.2
2.2
Uvedení do provozu
Časový údaj a datum byly nastaveny
již ve výrobním závodě.
Spínací hodiny jsou v úsporném režimu,
bliká pouze dvojtečka
Stiskněte libovolné tlačítko:
• spínací hodiny jsou aktivní
• ukazují aktuální čas (den v týdnu)
2.3
Připojení
Zapojte podle značek na přístroji
Stiskněte libovolné tlačítko:
• spínací hodiny jsou aktivní
• ukazují aktuální čas (den v týdnu)
Poznámka:
Po asi 1 - 2 minutách se stanou
spínací hodiny automaticky aktivní.
Poznámka:
• Při provozu hodin s malým bezpečným
napětím smí být spínáno pouze toto
malé bezpečné napětí.
• Při provozu hodin s malým funkčním
napětím smí být spínáno sít´ové napětí
(230 V~) nebo malé funkční napětí.
Spínání malého bezpečného napětí
není v tomto případě povoleno.
CZ
4
3. Ovládací prvky
Začátek vkládání programu
Nastavení času,
konec vkládání
programu
Volba dne
v týdnu
Zrušení času sepnutí
Nastavení hodin, dne a roku
Ruční přepínač
Zadání
impulsu/cyklu
Reset
Nastavení minut, měsíce a roku
Přepnutí letního/zimního času
4. Displej
Datum
1234567 =
Dny v týdnu
Zobrazení
letního času
Zobrazení
AM/PM
Příjem
DCF 77
Kanál 1
Kanál 2
Stav sepnutí
Hodiny -aktuální čas
Kalendářní -aktuální datum
den
-začátek/konec
letního času
Minuty -aktuální čas
Měsíc -aktuální datum
-začátek/konec
letního času
Rok
-den/měsíe
Impuls/Cyklus
Trvalý režim
Automatický režim
Ruční režim
5.
5
Výchozí nastavení
Vložené časové údaje odpovídají SEČ (středoevropský čas).
Spínací hodiny nabízí 3 provozní režimy. Přednastaveny jsou
datum a čas a rovněž provozní režim AU.
Provoznĺ režimy:
• AU
Automatický přechod na letní čas,
viz 6.2.1
Přestavení času se provede ve dnech stanovených
zákonem.
• cHA
Přechod na letní čas s ohledem na den v
týdnu, viz 6.2.2
Vložíte datum pro začátek a konec letního času
platné pro vaše stanoviště nebo zemi
Např. První neděle v dubnu tohoto roku
(začátek letního času)
Poslední neděle v říjnu tohoto roku
(konec letního času)
V následujících letech se provede přestavení
času vždy ve správný den (např. neděle) v daném
kalendářním týdnu.
• no
Bez přechodu na letní čas, viz 6.2.3
Přepnutí AM/PM
Spínací hodiny jsou v aktuálním provozním stavu
1. Stisknout a držet tlačítko h
2. – 1x stisknout tlačítko Res
– všechny segmenty se zviditelní
– po asi 1 sekundě se zobrazí: AM, 12.00 a 3 (středa)
Provozní režim AU je aktivní = nastavení z výrobního závodu
3. Uvolnit tlačítko h
4. Podle potřeby zvolit provozní režim
viz 6.2.1 nebo 6.2.2 nebo 6.2.3
5. Nastavit aktuální čas a den v týdnu viz 6.1
CZ
6.
6
Změna nastavení
Poznámka:
Všechna nastavení, změny které provedete je možno vždy ukončit
tlačítkem
.
6.1
Časový údaj a den v týdnu
Stiskněte 1 x tlačítko
Nastavení časového údaje:
hodiny tlačítkem h
minuty tlačítkem m
Poznámka k týdenním
spínacím hodinám:
Jestliže byl zvolen provozní režim
no = bez přechodu na letní čas
- viz 6.2.3
je třeba nyní nastavit den týdnu.
Tlačítkem Day 1
2
3
:
7
- pondělí
- úterý
- středa
- neděle
Stiskněte 1 x tlačítko
zadání je ikončeno.
,
6.2
7
Kalendářní měsíc a den – volba provozního režimu
7.2.1 AU nebo 7.2.2 cHA nebo 7.2.3 no
6.2.1 AU = Automatický přechod
na letni čas
Stiskněte 1 x tlačítko
Stiskněte 1 x tlačítko + 1h,
zobrazí se AU
Stiskněte 1 x tlačítko Prog
Nastavení aktuálního roku:
tlačítkem m nebo
tlačítkem h
Potvrd´te tlačítkem Prog
Nastavení aktuálního
měsíce a dne:
Kalendářní měsíc tlačítkem m
Kalendářní den tlačítkem h
Poznámka:
Stisknutím 1 x příp. 2 x tlačítka
Prog přečtete datum pro
začátek např. 29.03. a konec
např. 25.10. letního času
Stiskněte 1 x tlačítko
zadání je ukončeno
,
CZ
6.2.2
cHA = Přechod na letní čas s ohledem na den v týdnu
Stiskněte 1 x tlačítko
Stiskejte tlačítko + 1h, až se
zobrazí cHA
Stiskněte 1 x tlačítko Prog
Nastavení aktuálního roku:
tlačítkem m nebo
tlačítkem h
Potvrd´te tlačítkem Prog
Nastavení aktuálního
měsíce a dne:
Kalendářní měsíc tlačítkem m
Kalendářní den tlačítkem h
8
9
Potvrd´te tlačítkem Prog
zobrazí se začátek letního
času.
Nastavení individuálního
začátku letního času:
Kalendářní měsíc tlačítkem m
Kalendářní den tlačítkem h
Potvrd´te tlačítkem Prog
Nastavení individuálního
konce letního času:
Kalendářní měsíc tlačítkem m
Kalendářní den tlačítkem h
Stiskněte 1 x tlačítko
zadání je ukončeno
,
CZ
6.2.3 no = Bez přechodu na letní čas – pouze týdenní spínací hodiny
10
Stiskněte 1 x tlačítko
Stiskněte tlačítko + 1h, až se
zobrazí no
Spínací hodiny pracují bez
datumu!
Stiskněte 1 x tlačítko
zadání je ukončeno
Poznámka:
Nastavení dne v týdnu
viz odstavec 6.1
,
11
7. Standardní spínací povely
Nastavení spínacích časů a stavů sepnutí pro určitý spínaný výstup
(kanál). Symbol: CH1:
= kanál 1 ZAP
CH2:
= kanál 2 VYP
Jsou možná následujĺcĺ přiřazení:
• Spínací povel pouze pro kanál 1
• Spínací povel pouze pro kanál 2
• Spínací povel současně pro kanál 1 a kanál 2
(doba sepnutí a stav sepnutí jsou pro oba kanály stejné)
• Spínací povel současně pro kanál 1 a kanál 2 avšak s rozdílným
stavem sepnutí
Nalezení volného
pamět´ového místa:
Stiskejte tlačítko Prog tak
dlouho, až se zobrazí volné
místo – –:-– –.
Nastavení časů spínání:
minuty tlačítkem m
hodiny tlačítkem h
Nastavení dnů v týdnu, viz:
Vytváření bloků dnů v týdnu, kapitola 8
Nastavení stavů sepnutí:
Tlačítkem
nastavit
nebo .
Poznámka:
Stav sepnutí pro CH1 nebo
CH2 je možno deaktivovat.
Bez symbolu - žádné sepnutí
Stiskněte 1 x tlačítko Prog,
zadání je ukončeno
Zobrazí se volné pamět´ové místo
- pro další nastavení nebo
Stiskněte 1 x tlačítko
,
zadání je ukončeno.
Na displeji se zobrazí aktuální čas.
CZ
8. Vytváření pevných bloků dnů v týdnu – pouze týdenní spínací hodiny
Předem nastavené kombinace dnů v týdnu nebo jednotlivých dnů
Nastavení dnů v týdnu ve Vašem programu spínání.
1 - pondělí, 2 - úterý, 3 - středa ..., 7 - neděle
Příklad: pondělí ... pátek (8:00 hod. ZAP; 22:00 hod. VYP)
Nalezení volného
pamět´ového místa:
Stiskněte tlačítko Prog tak
dlouho, až se zobrazí volné
místo --:-Stisknout 1 x tlačítko Day
Všech 7 dnů v týdnu je aktivních
Aktivace/deaktivace
dnů v týdnu:
Tlačítko Day postupně stiskávat.
1 2 3 4 5 6 7
– – – – – –
– – – – –
– –
–
–
–
–
–
–
–
Poznámka:
Vložení časů a rovněž stavů sepnutí
= ZAP
Standardní spínací povely, viz kapitola 7
= VYP
12
13
Stiskněte 1 x tlačítko Prog,
zadání je ukončeno
Zobrazí se volné pamět´ové místo
- pro další nastavení
nebo
Stiskněte 1 x tlačítko
,
zadání je ukončeno.
Na displeji se zobrazí aktuální čas.
Upozornění:
Jestliže se provede
• čtení, změna nebo vymazání
času, datumu nebo
spínacího programu
• synchronizace DCF
• znovuzapnutí sítě
bude stav sepnutí spínacích
hodin automaticky aktualizován.
CZ
9. Čtení, změna a zrušení povelů/RESET
•
•
•
•
14
Obsah programových míst můžete číst krok po kroku
Obsah programových míst můžete měnit a přepisovat
Obsah programových míst můžete smazat
Můžete smazat datum a čas
Čtení
Postupně stiskávejte tlačítko Prog
Zobrazí se každý jednotlivý obsah
paměti až do konce programu.
Potom se objeví volné pamět´ové
místo a zobrazí se číslice
(počet volných pamět´ových míst)
Změna
Postupně stiskávejte tlačítko Prog až
se zobrazí povel sepnutí, který chcete
změnit nebo přepsat. Změna povelu
sepnutí (obsahu paměti) se provede jak
bylo popsáno v kapitole:
8.
Vytváření bloků dnů v týdnu
Zrušení jednotlivých povelů sepnutí
Postupně stiskávejte tlačítko Prog
až se zobrazí povel sepnutí, který
chcete zrušit.
Stiskněte 1 x tlačítko Clear,
tento povel sepnutí se zruši
15
Zrušení všech povelů sepnutí
Postupně stiskávejte tlačítko Prog
až se zobrazí FRxx
Stiskněte 1 x tlačítko Clear,
na displeji se zobrazí CL
Stiskněte tlačítko Clear a držte ho sepnuté
Všechna pamět´ová místa jsou
smazána!
Na displeji se zobrazí maximální
počet pamět´ových míst
Reset
Stiskněte 1 x tlačítko Reset
Nastavený datum a čas se
přepíše na výchozí hodnoty
(31.12.1997, 00:00 hodin)
Nastavení z výrobního závodu:
AU = Automatický přechod na
letní čas je aktivní.
Všechny segmenty se zviditelní
po dobu asi 2 sekund, potom
se zobrazí 00:00.
Nastavení aktuálního datum a
času, viz kapitola 5 + 6.
CZ
10.
16
Ruční přepínač
Můžete ručně změnit aktuální stav sepnutí.
Individuální nastavení programu spínání zůstane však nezměněno.
1 platí pro kanál 1
2 platí pro kanál 2
= automatika
= ruční režim
FIX = Dauerbetrieb
= VYP
= ZAP
FIX = trvale ZAP
= ZAP
= VYP
FIX = trvale VYP
Stav sepnutí
odpovídá
zapsanému
programu.
Ručně změnite
okamžitý stav
sepnutí.
Následujíci povel
sepnutí v programu
se provede znovu
automaticky.
Ručně změnite
okamžitý stav
sepnutí.
Pouze tlačítkem
z trvalého režimu zpět
do automatického
režimu.
11.
17
Technické údaje
1-kanálové/2-kanálové spínací
hodiny s příjmem DCF
Rozměry (V x Š x H) mm 45 x 36 x 60
Rozvaděčový výřez
46 x 36
Váha cca (g)
170
Připojení
viz značky na přístroji
Příkon:
viz značky na přístroji
Spínaný výkon při 230 V AC
– odporová zátěž (VDE, IEC) 16 A
– induktivní zátěž cos ϕ 0,6 2,5 A
– žárovky
1000 W
Spínaný výstup
beznapět´ový
Spínací kontakty
1 příp. 2 přepínací
Třída ochrany
II
Stupeň krytí
IP 20
Přesnost chodu
+/– 2,5 s/při +20 ˚C
Radiový příjem DCF-77 –
Druh zálohy chodu
Lithium
Záloha chodu
3 roky od výroby
Nejkratší doba sepnutí 1 minutu
Programové rozlišení každou minutu
Počet pamět´ových míst 12
Změna stavu sepnutí ano
Ruční přepínač
FIX ZAP
Fix VYP
Zobrazení stavu sepnutí ano
Vytváření bloků dnů v týdnu volně měnitelné
Přepnutí letního času automat./volitelné
Způsob připojení
šroubovací svorky
Teplota okolí
- 25˚C ... + 55 ˚C
Plombovatelnost
ano
45 x 36 x 60
46 x 36
170
viz značky na přístroji
viz značky na přístroji
16 A/250 V AC
2,5 A/250 V AC
1000 W
beznapět´ový
1 příp. 2 přepínací
II
IP 20
+/– 2,5 s/při +20 ˚C
–
Lithium
3 roky od výroby
1 minutu
každou minutu
20/30
ano
FIX ZAP
Fix VYP
ano
volně měnitelné
automat./volitelné
šroubovací svorky
- 25˚C ... + 55 ˚C
ano
CZ
WA-EKF 3674/12.99/S:MMS/D:Bau/99/00721/80.10.0806.7