Transcript
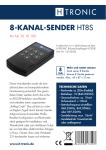
OPERATING INSTRUCTIONS
SOLAR BATTERY CHARGER UNIT 12V 4A
CE
Dear Customer,
Thanks you for buying our product. You have bought one of the most powerful, compact and
reliable units of its class.
Please read the operating instructions carefully before use.
WARNING!!! Safety Instructions!!!
Do not use the unit:
In places which are dusty, damp. In a high humidity area (over 80% rel. humidity),
Temperatures above 50°C. In areas containing inflammable materials (liquids/solvents,
gas). Do not immerse in water.
Use only in closed and dry areas.
Should the unit fail to operate, or show signs of not operating properly unplug immediately
and make sure that the unit is not put into further operation. Do not use the unit when
visible signs of damage - due to transport or inadequate storage are noticeable.
To prevent the risk of explosion by overcharging, install the battery in a well ventilated
place.
Use only solar panels as power source.
To prevent a short-circuit between Solar charger unit and battery, install a fuse on the
positive terminal/pole.
FUNCTION / DESCRIPTION OF OPERATION
The use of lead-batteries is common for the storage of solar energy (photovoltaik solar
systems). Lead-batteries require protection against overcharging. The solar charging regulator
fulfils this function.
Protection against overcharge
The battery is not fully charged when the final charging voltage is reached. The charging
current should not be completely switched off, instead reduced, so that the final charging
voltage is not exceeded. This is accomplished by the solar charger unit.
Installation - Warning: Take care that the Terminals/Pols correspond!!!
The solar charger unit should be placed proximity to the battery and be sufficiently protected
against the weather. Take care to place the battery in a well ventilated place. To guarantee
that the unit functions properly it must be connected to the solar generator, the lead-battery
and the load.
Each part of the system -solar generator, lead battery, load and solar charger unit should have
the corresponding power supply. Please check each component before installation, when in
doubt contact a Specialist!
Take careful attention of the following installation instructions:
1. Connect the battery to the corresponding terminals on the solar charger unit. To prevent
the wiring from overheating and power supply reduction the use of cable/wire 2,5 mm²
flexible is recommended. Only when a "short-circuit-protection" connection is installed, can
the battery be operated without a fuse. Otherwise must a fuse be connected to the battery
+terminal/pole in order to prevent the connection to the solar charger unit from "shortcircuiting". Both components must be installed close together in the same room.
2. Connect the solar panel to the corresponding terminals on the solar charger.
Two LED’s display the operating status:
LED red: Sufficient charging voltage from the generator, charger is charging
LED green: charger is full, final charging voltage reached, sufficient charging voltage
If no LED lights up, generator is not supplying sufficient charging voltage or charging voltage is
less than charger voltage (charger is full).
Specifications
Nominal voltage:
Charging current (solar cells):
max. Load:
max. Power use:
Final charging voltage:
Temperature range:
Measurements:
Weight:
Delivered:
12/24V
4A
4A
1,5 mA
13,8 V
-10°C up to +50°C
68 x 57 x 28 mm
150 g
Solar Battery Charger Unit with operating instructions
Connection and Operating-elements
SOLAR Laderegler 4A
3
Laden
4
Akku voll
Batterie
+ -
Modul
+ -
1.
2.
3.
4.
+/- Terminal/Pole lead-battery
+/- Terminal/Pole solar panel
LED red: lead-battery is charged
LED green: lead-battery fully
charged
Subject to technical alternation. No responsibility will be taken for printing mistakes. 08/2002
IVT Innovative Versorgungs-Technik GmbH, Dienhof 14, D-92242 Hirschau
Phone: (49) 9622-71221, Fax: (49) 9622-71220 www.IVT-Hirschau.de [email protected]
1
2