1
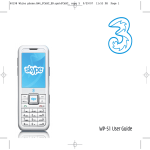
Classic Media User Manual
Portable Steam Sterilizer
211846B
2
Instructions for use
Please read these instructions before using the
autoclave.
Keep these “Instructions for use” in a safe place
close by the unit for future reference.
Service Helpline: Telephone: 01254 844 116
Contents.
Section
Page
1Introduction
3
2
3
Operating symbols, displays
and controls
3Operation
4
e.mail: [email protected]
4
Do’s and Dont’s
5
The Prestige Medical Customer Service Team is available
to provide advice and assistance during normal office
hours. To avoid delays when making contact, please have
the unit’s Model and Serial Numbers at hand.
5
Trouble shooting
6
6
Technical specification
7
7
Additional information
8
For additional information visit
IMPORTANT OPERATING INFORMATION
CAUTION!
www.prestigemedical.co.uk
Before using or maintaining the Prestige Medical Classic
Media autoclave ensure that you read and fully understand
the operating instructions paying particular attention to
information held within this page.
UK Customers
Prestige Medical Limited
East House, Duttons Way,
Shadsworth Business Park,
Blackburn BB1 2QR
Tel : +44 (0) 1254 682 622
Fax : +44 (0) 1254 682 606
Overseas
Customers
Contact your local
distributor. In case of
doubt contact Prestige
Medical.
www.prestigemedical.co.uk
[email protected]
This model is designed to operate at 121 +2ºC
for 22 minutes, for the sterilization of culture
media. MAXIMUM LOAD 500ml. Please note
that the Classic Media should not be used to
sterilize wrapped instruments or porous loads. This cycle is
not recommended for the sterilization of medical or dental
instruments. TST Strips are not supplied with this model.
When sterilizing media, to ensure the safe operation of the
autoclave and to avoid damage to the media, DO NOT
manually vent the pressure by operating the pressure
release valve at the end of the cycle. As an added safety
feature , the lid interlock has been set to release only when
the temperature of the chamber contents has dropped to
80ºC or below.
Model no.
Date of purchase
Serial no.
0086
Prestige Medical Limited
East House, Duttons Way,
Shadsworth Business Park,
Blackburn BB1 2QR
Tel : +44 (0) 1254 682 622
Fax : +44 (0) 1254 682 606
www.prestigemedical.co.uk
[email protected]
211846B
Registered in England
Reg No. 2826793
3
Section 1: Introduction
Thank you for choosing the Prestige Medical
210047/210048 Classic Media Autoclave, designed to
sterilize culture media. After removing from the box, please
check for any transit damage. If any damage to the unit is
found, please contact your supplier immediately.
Together with this unit and operating manual,
you will find the following:
• Electrical mains cord
• Instrument furniture
• Spare fuses x2 (when fitted)
• Performance test certificate
• Certificate of Compliance (230v models only)
• Warranty registration card
Section 2: Operating symbols, displays and controls
The following descriptions refer to the pictures of the
controls, display lights and operating symbols opposite.
A
D
Controls:
A Depressurization Valve
B Start Cycle Button
C Pressure Rise Indicator
D Interlock Mechanism
Display lights:
L1Power “On” light
illuminates GREEN
L2Heating light
illuminates ORANGE
L3Sterilizing light
illuminates YELLOW
L4Sterilizing complete light
illuminates GREEN
L5Fault light
illuminates RED
C
Figures:
F1Lid aligned with body, turn clockwise to close
F2Lid in closed position
Warning symbols:
W1 Caution, electric shock hazard
W2 Warning, read manual before using the autoclave
W3 Warning, unit must be earthed/grounded
W4 Warning, heat hazard
L2
L3
WARNING!
Do not touch the body or lid as these parts become
hot when the autoclave is in operation.
B
L4
L5
W1
W2
W3
W4
L1
F1
F2
211846B
4
Section 3: Operation
Before using the autoclave for the first time please take
time to read the following pages to familiarise yourself with
the operation of the unit.
We strongly recommend that all users of the autoclave are
trained in its operation.
The autoclave is very easy to use. By following this simple
operating sequence in conjunction with the pictures of
the autoclave, its controls, display panel and operating
symbols (page 3), you will be able to ensure your
autoclave functions correctly every time.
WARNING!
The mains outlet MUST BE EARTHED (GROUNDED).
The mains plug should always be easily accessible as it is to be
relied upon as “the means of disconnection”.
3.7 Starting
Press the cycle start button (B) to start the sterilizing cycle.
Light: L2 illuminates ORANGE and may flash.
As the temperature rises, air will be displaced by steam
through the Air Bleed Device located in the lid, until it
closes with an audible “click”, sealing the unit.
Sterilizing temperature is reached when:
Light: L3 illuminates ORANGE
L2 flashes ORANGE
The sterilizing cycle is completed when:
The internal buzzer sounds and
Light: L4 is illuminated GREEN.
3.8 Depressurizing
3.1 Connection
Attach the cable supplied to the rear of the unit and
plug into an EARTHED mains electrical socket of the
CORRECT voltage.
3.2 Water
Fill the unit to the water level line on the inside of the
chamber with 0.75 litres of distilled or de-ionised water.
DO NOT USE TAP WATER OR OVERFILL.
3.3 Loading (Media)
Place media containers into the instrument basket, and
place in the unit.
3.4 Closing
Always place the lid on the autoclave with the
Depressurization Valve (A) in the open position. Align
the black arrows on the lid and body (F1) and with the
interlock button (D) pressed down turn in a clockwise
direction ensuring it is completely closed (F2). Release the
interlock button.
Close the Depressurization Valve (A).
3.5 Power on
Switch the unit on at the mains.
Light: L1 illuminates GREEN
3.6 Temperature
The 121ºC temperature is automatically selected when the
power is turned on.
211846B
Once sterilizing has finished the unit should be left to
automatically cool down without opening the pressure
release valve.
3.9 Unlocking
Once the temperature has reached a safe level and is below
80ºC the interlock will release and the lid can be unlocked.
Remove the lid by pressing down on the interlock button
(D) and turning the lid in an anti-clockwise direction,
aligning the handles (F1 & F2).
3.10 Unloading
Lift off the lid, gently place upside down on a solid work
surface and leave to cool. Ensure the Depressurization Valve
(A) is in the closed position to avoid damaging it.
The basket containing the sterilized media can now be
lifted out of the unit with care.
Allow 5 minutes for the lid to cool down before
replacing as per Step “3.4”.
DO NOT USE THE MEDIA IF A COMPLETE STERILIZATION
CYCLE HAS NOT BEEN ACHIEVED.
5
Section 4: Do’s and Dont’s
To ensure your autoclave gives you the years of service
for which it was designed, it is important to remember a
few “do’s” and “don’t’s” with regards to the operation of
the unit and to carry out simple care and maintenance
procedures on a weekly basis.
12...reach over the unit when removing cover, to do so
may cause burns from rising heat and steam.
13...cover lid or obstruct steam venting area when
manually depressurizing.
Do ensure that....
* These operations should only be undertaken by a
qualified person.
1…you read these instructions and always follow the
operating sequence.
Care and maintenance
2…the media will withstand the sterilizing temperature
selected, bottles are not sealed and screw tops are
loose - do not overload the autoclave.
1. Remove from inside the lid and clean with warm,
soapy water.
3…the water level is maintained regularly with clean
distilled or de-ionised water only.
4…the unit is in a “draft free” environment and is
positioned not less than 250mm from adjacent walls.
5…you only use green sealing gasket (219500) and that it
is changed at the end of its life, if visibly damaged, or
when shrinkage has occurred.
6…the lid is securely closed when the unit is not in use,
to avoid the risk of accidental damage. Never leave in
position (F1).
7…you quote your model details, serial number and date
of purchase when contacting Prestige Medical or your
supplier.
Do not....
1…lose this operating instruction manual.
2…add any chemicals whatsoever to the water.
3…attempt to sterilize volatile substances, toxic materials
or inappropriate loads.
4…place the unit on heat sensitive surfaces ie polished
wood or glass.
Green sealing gasket
2. Rinse thoroughly, shake dry, do not wipe.
3. Replace in the lid by tucking evenly under all lugs.
It may appear slightly wrinkled until used.
4. Replace when it begins to show signs of leakage.
Autoclave
1. If a new gasket leaks, or a persistent leak develops,
gently clean the sealing surface of both the lid and
body of the unit with a “Scotchbrite” scrubbing pad
making sure you do not remove any metal. Rinse both
surfaces but do not dry.
2. Clean both interior and exterior with warm, soapy water
ensuring the electrical parts are kept dry.
3. Monitor the first cycle of the day to check the Air Bleed
Device, which is located inside the lid, audibly “clicks”
shut.
4. Prestige Medical recommends that your unit is
calibrated at six monthly intervals.
5. Lubricate underside of body lugs with “vaseline” if the
lid becomes stiff.
DO NOT LUBRICATE GASKET
5…open the Depressurization Valve (A) during the
sterilization cycle.
6…leave the Depressurization Valve (A) in the “open”
position when placing the lid upside down on a work
surface.
7…immerse the unit or electrical cord in water when
cleaning.
8…use abrasive materials or lubricants when cleaning.
9…drop or abuse the unit.
10...use in areas of risk associated with flammable
materials or gases.
11...attempt to change any fuses until the unit has been
unplugged from the mains*.
211846B
6
Section 5: Trouble shooting
In the event of a fault occurring during any stage of the
unit’s operation, identify the fault by referring to their
descriptions below. The fault can be corrected by following
a few easy steps.
(Note: light L1 will be constantly illuminated GREEN whilst
the unit is powered up).
Fault indication/Description/Remedy
Fault 1: No Power to unit
Light: L1 fails to illuminate.
Check for defective socket.
Check for power to socket.
Ensure lead is connected to electrical socket
Fault 2: Low water or boil dry.
Light: L5 flashes RED
Allow unit to cool before refilling to the correct level.
Disconnect from mains then reconnect and
repeat cycle.
If the fault repeats with sufficient water, arrange for
a service engineer to visit.
Fault 3: Sterilization failed to be achieved.
Light: L4 fails to illuminate GREEN and there is no
audible buzzer.
Disconnect from mains then reconnect and
repeat cycle.
If the fault repeats arrange for a service engineer
to visit.
Fault 4: Steam or water leaks from under the lid.
i) Worn or dirty gasket.
Wash gasket and sealing surfaces on the body and
lid as described under “Care and Maintenance”. If
the fault persists, replace with a new gasket.
ii) Incorrectly closed lid.
Ensure the unit is fully depressurized by opening Depressurization Valve (A). Remove lid and re-fit
carefully.
Disconnect from mains, reconnect and repeat cycle.
Fault 6: Excessive steam or water leaking from
Depressurization Valve (A).
Depressurization Valve (A) in “OPEN” position
Close Depressurization Valve (A).
DURING THE COURSE OF OPERATION THE WATER
LEVEL MUST BE MAINTAINED UP TO THE WATER
LEVEL LINE.
211846B
7
Section 6: Technical specification
In the unlikely event that something should go wrong, we
have incorporated a number of safety features to ensure
that your autoclave remains safe at all times.
Safety features
1. Located to the rear of the lid, beneath the cover, is a
spring called the Gasket Offset Device (GOD Spring),
designed to prevent pressure building up if the lid has
been incorrectly fitted.
DO NOT TAMPER WITH THIS SAFETY DEVICE
2. If for any reason, the temperature falls below the
minimum required sterilizing temperature, resulting
in the Sterilizing Temperature Light (L3) switching off,
the cycle timer will re-start from zero once the correct
temperature has been restored.
3. If there is an electrical or electronic failure resulting in
a build up of pressure - in excess of normal operating
pressure - one or all of the following safety features will
be activated.
i) Depressurization Valve (A) will loudly and rapidly
“vent” steam.
ii) The gasket will “extrude” through the slot in the rear of
the lid rapidly.
iii) A non - resettable thermal fuse located in the
base of the unit will “melt’ at a pre-determined
temperature, disconnecting the power.
Should any of the devices listed activate,
please observe the following steps:
a) Do not touch the unit.
b) Switch off at the wall socket and un-plug
c) Allow temperature and pressure to drop before
i) touching the unit
ii) removing your instruments
d) Do not attempt to re-start the unit
e) Arrange for an immediate service.
Fuses - Located under the control module, fuses F10A,
32 x 6.3mm, ceramic sand filled.
Mains plug top fuse (User replaceable), F13A to BS1362.
Rating - Models are rated continuously for intermittent use.
Body - Deep drawn aluminium.
Lid – Aluminium
Heater - Externally surface mounted mechanically fixed
electric element.
Temperature cut out - Thermal fuse.
Pressure - Calibrated pressure release valve.
Max. Single Fault Temperature - 133.3°C
Over voltage category - Group ll
Pollution degree - Group 2
Technical specifications - Standard Body Autoclaves 210047
Height
335 mm
Width
340 mm
Net Weight
4.0 kilos
Capacity
9 litres
Internal Dimensions (d/h)
210/236 mm
Max’ Load Weight.
3.0 kilos
Technical specifications - Extended Body Autoclaves 210048
Height
420 mm
Width
340 mm
Net Weight
4.8 kilos
Capacity
12 litres
Internal Dimensions (d/h)
210/328 mm
Max’ Load Weight.
3.0 kilos
Environment Conditions - indoor use - temperature 5°C to
40°C - altitude up to 2000m - maximum relative humidity
80% for temperatures up to 31°C decreasing linearly to
50% relative humidity at 40°C. - mains supply voltage
fluctuations not to exceed +10% of the nominal voltage
Input Connections - Mains inlet socket ‘hot’ format
conforming to IEC 302.
Safety shut down - See ‘Temperature Cut Out’.
Packaging - All packaging materials are recyclable
211846B
8
Section 7: Additional information
Spares
Approvals
Only those spare parts supplied or specified by Prestige
Medical should be used in the maintenance of the
autoclave. Use of unauthorised parts will invalidate any
warranty given and may adversely affect the performance
and safety of the unit.
Note: please ask for details of approvals specific to your
model.
Accessories
A range of accessories are available for your autoclave as
described below.
DIN 58946 Part 8 - Type testing for microbiological
performance
Contact your supplier for full details.
EMC EN50081-1, EN 50082-1, EN 50082-2
1 219720 - Extended basket (210048 Only)
ESCHLE BS 3970 Part 4 - Pressure vessel only.
CE mark - Medical device derivative.
EN 61010 - Product safety.
PD 5500
- Pressure vessel
2 219708 - Standard basket
3 219500 - Green silicone sealing gasket
4 219258 - Cord set UK
Warranty
Prestige Medical shall, in the first 12 months from the date
of purchase, repair or replace free of charge any parts which
prove to be defective in workmanship and/or materials.
Prestige Medical shall not be so liable in the event
that the purchaser has failed to adhere to the
instructions contained herein or if the autoclave has
been abused, interfered with, altered, repaired or
serviced by any unauthorised party this may also
result in the protection provided by the equipment
being impaired.
This warranty excludes the gasket, all internal furniture
and consumables. Consumer’s statutory rights are not
affected.
Product decontamination
Should the unit require repair, it must be decontaminated
in accordance with a recognised procedure prior to return
or on-site repair. A statement of equipment contamination
status must be available with the product. (Details of a
suitable procedure are available on request).
Cleaning materials
• Mild washing up liquid
• Non-abrasive cream cleaner
• Warm water
211846B
- Electrical safety code for hospital
laboratory equipment
Packaging
All Prestige Medical packaging materials used are
recyclable - please dispose of accordingly.
WEEE Statement
(Waste Electrical and Electronic Equipmentrial)
The weee directive places an obligation on all EU-based
manufacturers and importers to take back electronic
products at the end of their useful life.
Prestige Medical Limited accepts its responsibility to
finance the cost of treatment of redundant WEEE in
accordance with the specific recycling requirements.
Disposal
The symbol (shown below) is present on all Prestige
Medical Products, which indicates that the product must
NOT be disposed of with other waste. Instead it is the
user’s responsibility to dispose of their waste electrical and
electronic equipment by handing it overto an approved
reprocessor, or by returning it to Prestige Medical for
reprocessing. For more information about where you can
send your waster equipment for recycling, please contact
your local city office or Prestige Medical.