1
System Monitoring
SUNNY WEBBOX with Bluetooth® Wireless Technology
User Manual
SWebbox20-BEN104011 | Version 1.1
EN
SMA Solar Technology AG
Table of Contents
Table of Contents
1
1.1
1.2
1.3
1.4
Notes on this Manual. . . . . . . . . . . . . . . . . . . . . . . . . . . . . .
Validity . . . . . . . . . . . . . . . . . . . . . . . . . . . . . . . . . . . . . . . . . . . .
Additional Information . . . . . . . . . . . . . . . . . . . . . . . . . . . . . . . .
Symbols Used . . . . . . . . . . . . . . . . . . . . . . . . . . . . . . . . . . . . . . .
Terminology . . . . . . . . . . . . . . . . . . . . . . . . . . . . . . . . . . . . . . . .
7
7
7
7
8
2
2.1
2.2
The Sunny WebBox with Bluetooth . . . . . . . . . . . . . . . . . . 9
Function Overview . . . . . . . . . . . . . . . . . . . . . . . . . . . . . . . . . . 10
Information on the operation of the Sunny WebBox . . . . . . . . 10
3
3.1
Sunny WebBox with Bluetooth Basics . . . . . . . . . . . . . . . 11
User interface . . . . . . . . . . . . . . . . . . . . . . . . . . . . . . . . . . . . . . 11
3.1.1
Icon Bar. . . . . . . . . . . . . . . . . . . . . . . . . . . . . . . . . . . . . . . . . . . . . . . . . . . . . 12
3.1.2
Plant tree . . . . . . . . . . . . . . . . . . . . . . . . . . . . . . . . . . . . . . . . . . . . . . . . . . . . 13
3.1.3
Device menu . . . . . . . . . . . . . . . . . . . . . . . . . . . . . . . . . . . . . . . . . . . . . . . . . 14
3.1.4
Overview. . . . . . . . . . . . . . . . . . . . . . . . . . . . . . . . . . . . . . . . . . . . . . . . . . . . 14
3.1.5
Spot Values . . . . . . . . . . . . . . . . . . . . . . . . . . . . . . . . . . . . . . . . . . . . . . . . . . 15
3.1.6
Settings . . . . . . . . . . . . . . . . . . . . . . . . . . . . . . . . . . . . . . . . . . . . . . . . . . . . . 17
3.1.7
Events . . . . . . . . . . . . . . . . . . . . . . . . . . . . . . . . . . . . . . . . . . . . . . . . . . . . . . 18
3.2
Security- and password concept. . . . . . . . . . . . . . . . . . . . . . . . 20
3.2.1
User groups. . . . . . . . . . . . . . . . . . . . . . . . . . . . . . . . . . . . . . . . . . . . . . . . . . 20
3.2.2
Plant password . . . . . . . . . . . . . . . . . . . . . . . . . . . . . . . . . . . . . . . . . . . . . . . 20
3.2.3
Access security of the Sunny WebBox with Bluetooth . . . . . . . . . . . . . . . . . 21
3.2.4
Password Quality . . . . . . . . . . . . . . . . . . . . . . . . . . . . . . . . . . . . . . . . . . . . . 21
3.2.5
SMA Grid Guard . . . . . . . . . . . . . . . . . . . . . . . . . . . . . . . . . . . . . . . . . . . . . 21
3.2.6
Forgotten Password. . . . . . . . . . . . . . . . . . . . . . . . . . . . . . . . . . . . . . . . . . . . 22
3.3
Symbols . . . . . . . . . . . . . . . . . . . . . . . . . . . . . . . . . . . . . . . . . . 23
4
4.1
4.2
Logging into and out of the Sunny WebBox . . . . . . . . . . 26
Logging into the Sunny WebBox . . . . . . . . . . . . . . . . . . . . . . . 26
Logging out of the Sunny WebBox. . . . . . . . . . . . . . . . . . . . . . 26
User Manual
SWebbox20-BEN104011
3
Table of Contents
SMA Solar Technology AG
5
5.1
Operation . . . . . . . . . . . . . . . . . . . . . . . . . . . . . . . . . . . . . . 27
Plant View . . . . . . . . . . . . . . . . . . . . . . . . . . . . . . . . . . . . . . . . . 27
5.1.1
Plant Status . . . . . . . . . . . . . . . . . . . . . . . . . . . . . . . . . . . . . . . . . . . . . . . . . . 27
5.1.2
Setting Parameters for a Device Class . . . . . . . . . . . . . . . . . . . . . . . . . . . . . 28
5.1.3
Change Plant Name . . . . . . . . . . . . . . . . . . . . . . . . . . . . . . . . . . . . . . . . . . . 28
5.2
Device View . . . . . . . . . . . . . . . . . . . . . . . . . . . . . . . . . . . . . . . 29
5.2.1
Device Status. . . . . . . . . . . . . . . . . . . . . . . . . . . . . . . . . . . . . . . . . . . . . . . . . 29
5.2.2
Set Device Parameters . . . . . . . . . . . . . . . . . . . . . . . . . . . . . . . . . . . . . . . . . 29
5.3
5.4
5.5
5.6
Setting the Device Password to the Plant Password . . . . . . . . . 30
Determining the Sunny WebBox serial number . . . . . . . . . . . . 30
Determining the WAN IP address. . . . . . . . . . . . . . . . . . . . . . . 31
Activating / Deactivating SMA Grid Guard mode. . . . . . . . . . 31
6
6.1
6.2
Configuring the Sunny WebBox . . . . . . . . . . . . . . . . . . . . 33
Changing the Sunny WebBox password . . . . . . . . . . . . . . . . . 33
Plant time . . . . . . . . . . . . . . . . . . . . . . . . . . . . . . . . . . . . . . . . . 34
6.2.1
Information on the Plant time. . . . . . . . . . . . . . . . . . . . . . . . . . . . . . . . . . . . . 34
6.2.2
Setting Date and Time. . . . . . . . . . . . . . . . . . . . . . . . . . . . . . . . . . . . . . . . . . 34
6.2.3
Manually synchronizing the date and time with Sunny Portal . . . . . . . . . . . 35
6.2.4
Activating / Deactivating automatic time synchronization . . . . . . . . . . . . . . 35
6.3
Country configuration . . . . . . . . . . . . . . . . . . . . . . . . . . . . . . . . 36
6.3.1
Setting the date format . . . . . . . . . . . . . . . . . . . . . . . . . . . . . . . . . . . . . . . . . 36
6.3.2
Setting the Language . . . . . . . . . . . . . . . . . . . . . . . . . . . . . . . . . . . . . . . . . . 36
6.3.3
Setting the number format . . . . . . . . . . . . . . . . . . . . . . . . . . . . . . . . . . . . . . . 36
6.3.4
Setting the Time format . . . . . . . . . . . . . . . . . . . . . . . . . . . . . . . . . . . . . . . . . 37
6.3.5
Setting the Unit of temperature . . . . . . . . . . . . . . . . . . . . . . . . . . . . . . . . . . . 37
6.4
6.5
Changing the Sunny WebBox device name. . . . . . . . . . . . . . . 37
Ethernet network . . . . . . . . . . . . . . . . . . . . . . . . . . . . . . . . . . . . 38
6.5.1
Information on network settings . . . . . . . . . . . . . . . . . . . . . . . . . . . . . . . . . . 38
6.5.2
Applying static network settings to the Sunny WebBox . . . . . . . . . . . . . . . . 38
6.5.3
Activating / Deactivating DHCP . . . . . . . . . . . . . . . . . . . . . . . . . . . . . . . . . . 39
4
SWebbox20-BEN104011
User Manual
SMA Solar Technology AG
6.5.4
Proxy Server . . . . . . . . . . . . . . . . . . . . . . . . . . . . . . . . . . . . . . . . . . . . . . . . . 40
6.5.5
Setting the HTTP Port . . . . . . . . . . . . . . . . . . . . . . . . . . . . . . . . . . . . . . . . . . . 41
6.5.6
Setting the NAT Port . . . . . . . . . . . . . . . . . . . . . . . . . . . . . . . . . . . . . . . . . . . 41
6.6
Data Recording. . . . . . . . . . . . . . . . . . . . . . . . . . . . . . . . . . . . . 42
6.6.1
6.6.2
Information on Data Recording. . . . . . . . . . . . . . . . . . . . . . . . . . . . . . . . . . . 42
CSV Files . . . . . . . . . . . . . . . . . . . . . . . . . . . . . . . . . . . . . . . . . . . . . . . . . . . . 43
6.6.3
XML files . . . . . . . . . . . . . . . . . . . . . . . . . . . . . . . . . . . . . . . . . . . . . . . . . . . . 44
6.6.4
Setting measured value descriptions in local language . . . . . . . . . . . . . . . . 45
7
7.1
7.2
Managing Plant Data . . . . . . . . . . . . . . . . . . . . . . . . . . . . 46
Information on the plant data . . . . . . . . . . . . . . . . . . . . . . . . . . 46
Sunny Portal . . . . . . . . . . . . . . . . . . . . . . . . . . . . . . . . . . . . . . . 46
7.2.1
7.2.2
Information on the Sunny Portal . . . . . . . . . . . . . . . . . . . . . . . . . . . . . . . . . . 46
Registering Sunny WebBox in the Sunny Portal . . . . . . . . . . . . . . . . . . . . . . 47
7.2.3
Activating / Deactivating Sunny Portal . . . . . . . . . . . . . . . . . . . . . . . . . . . . . 48
7.2.4
Testing the connection to Sunny Portal . . . . . . . . . . . . . . . . . . . . . . . . . . . . . 49
7.2.5
Setting the Upload frequency . . . . . . . . . . . . . . . . . . . . . . . . . . . . . . . . . . . . 49
7.2.6
Accessing the Sunny WebBox via Sunny Portal . . . . . . . . . . . . . . . . . . . . . . 50
7.2.7
Adjusting the Plant ID for Sunny Portal . . . . . . . . . . . . . . . . . . . . . . . . . . . . . 50
7.3
SD Card . . . . . . . . . . . . . . . . . . . . . . . . . . . . . . . . . . . . . . . . . . 50
7.3.1
Information on saving plant data on an SD card . . . . . . . . . . . . . . . . . . . . . 50
7.3.2
Saving plant data on an SD card . . . . . . . . . . . . . . . . . . . . . . . . . . . . . . . . . 51
7.4
Integrated FTP server . . . . . . . . . . . . . . . . . . . . . . . . . . . . . . . . 51
7.4.1
Information on the integrated FTP server. . . . . . . . . . . . . . . . . . . . . . . . . . . . 51
7.4.2
7.4.3
Activating / Deactivating the integrated FTP server . . . . . . . . . . . . . . . . . . . 52
Accessing the FTP server via Internet Explorer . . . . . . . . . . . . . . . . . . . . . . . 53
7.5
FTP Push . . . . . . . . . . . . . . . . . . . . . . . . . . . . . . . . . . . . . . . . . . 54
7.5.1
Information on FTP Push . . . . . . . . . . . . . . . . . . . . . . . . . . . . . . . . . . . . . . . . 54
7.5.2
Activating / Deactivating FTP Push . . . . . . . . . . . . . . . . . . . . . . . . . . . . . . . . 54
7.5.3
Testing FTP Push . . . . . . . . . . . . . . . . . . . . . . . . . . . . . . . . . . . . . . . . . . . . . . 55
User Manual
SWebbox20-BEN104011
5
SMA Solar Technology AG
8
8.1
Service Functions . . . . . . . . . . . . . . . . . . . . . . . . . . . . . . . . 56
Updating the Firmware . . . . . . . . . . . . . . . . . . . . . . . . . . . . . . . 56
8.1.1
Information on Firmware Update . . . . . . . . . . . . . . . . . . . . . . . . . . . . . . . . . 56
8.1.2
Firmware update via the internet. . . . . . . . . . . . . . . . . . . . . . . . . . . . . . . . . . 57
8.1.3
Firmware Update via the SD Card . . . . . . . . . . . . . . . . . . . . . . . . . . . . . . . . 59
8.2
8.3
8.4
8.5
Stopping the Sunny WebBox . . . . . . . . . . . . . . . . . . . . . . . . . . 60
Restarting the Sunny WebBox via the user interface . . . . . . . . 60
Resetting the Sunny WebBox Using the Reset Button . . . . . . . . 61
Determining current settings of the Sunny WebBox via SD card. . 62
9
9.1
9.2
Troubleshooting . . . . . . . . . . . . . . . . . . . . . . . . . . . . . . . . . 63
General troubleshooting for the Sunny WebBox . . . . . . . . . . . 63
Bluetooth Connection . . . . . . . . . . . . . . . . . . . . . . . . . . . . . . . . 66
10
10.1
10.2
10.3
10.4
10.5
10.6
10.7
Appendix . . . . . . . . . . . . . . . . . . . . . . . . . . . . . . . . . . . . . . 68
Information on the SD card. . . . . . . . . . . . . . . . . . . . . . . . . . . . 68
Structure of the Config.xml File . . . . . . . . . . . . . . . . . . . . . . . . . 68
Structure of an XML data file . . . . . . . . . . . . . . . . . . . . . . . . . . 69
Information on your web browser. . . . . . . . . . . . . . . . . . . . . . . 70
Setting up a Proxy exception rule in Internet Explorer . . . . . . . 70
Activating IPv6 in Windows XP SP2 . . . . . . . . . . . . . . . . . . . . . 70
Allocating IP addresses in a local network . . . . . . . . . . . . . . . . 71
11
Contact . . . . . . . . . . . . . . . . . . . . . . . . . . . . . . . . . . . . . . . . 72
6
SWebbox20-BEN104011
User Manual
SMA Solar Technology AG
Notes on this Manual
1 Notes on this Manual
This manual contains instructions for operating the Sunny WebBox. Store this manual where it will be
accessible at all times. This manual does not contain any detailed information about the connected
devices. Detailed information about the devices connected is provided in the manuals for the devices.
1.1 Validity
This user manual is valid for Sunny WebBox with Bluetooth from hardware version A1 and from
firmware version 1.1.
1.2 Additional Information
Further information about SMA Bluetooth Wireless technology can be found in the download section
at www.SMA.de/en.
1.3 Symbols Used
The following types of safety instructions and general information appear in this document as
described below:
DANGER
"DANGER" indicates a hazardous situation which, if not avoided, will result in death or
serious injury.
WARNING
"WARNING" indicates a hazardous situation which, if not avoided, could result in death
or serious injury.
CAUTION
"CAUTION" indicates a hazardous situation which, if not avoided, could result in minor or
moderate injury.
NOTICE
"NOTICE" indicates a situation that can result in property damage if not avoided.
Information
Information provides tips that are valuable for the optimum operation of the product.
User Manual
SWebbox20-BEN104011
7
Notes on this Manual
SMA Solar Technology AG
1.4 Terminology
In this manual the term photovoltaic plant is shortened to PV plant. Additionally the product name
"Sunny WebBox with Bluetooth" is shortened to "Sunny WebBox" in the running text.
Formatting
[Save]
"Menu1"
"Menu1 > Menu2"
Example:
8
Meaning
Buttons are displayed in square brackets [ ].
Menu items are displayed in quotation marks.
Menu paths are given in quotation marks. The angle bracket > separates
individual menus.
Examples are represented in italics.
SWebbox20-BEN104011
User Manual
SMA Solar Technology AG
The Sunny WebBox with Bluetooth 2 The Sunny WebBox with Bluetooth As the central communication interface, the Sunny WebBox with Bluetooth creates the connection
between the devices of the the PV plant and its operator. Additionally The Sunny WebBox with
Bluetooth collects and documents all data from the connected SMA Bluetooth devices, thus permitting
interruption-free monitoring.
Via the comprehensive functions of the Sunny WebBox with Bluetooth you can amongst other things
automatically send the collected data of the PV plant to the Sunny Portal internet portal for example
or to a freely selectable FTP server for subsequent processing or present your data via the Sunny
Matrix large-format display or the Flashview computer software.
For installers the Sunny WebBox with Bluetooth is a powerful tool for configuring individual devices
or entire device classes of the PV plant and carrying out remote diagnostics. The Sunny WebBox with
Bluetooth enables early recognition of operational faults and thus helps to optimize the yield of the
PV plant.
User Manual
SWebbox20-BEN104011
9
The Sunny WebBox with Bluetooth SMA Solar Technology AG
2.1 Function Overview
The most important functions of the Sunny WebBox with Bluetooth Wireless Technology at a glance:
Plant communication
• Wireless control of the PV plant with Bluetooth Wireless Technology
External system communication
• Ethernet-Network 10/100 MBit
Integrated web server
• Quick overview of the current status of the PV plant.
• Graphic display of the most important plant data.
• Setting of individual devices or an entire device class
• Setting of SMA Grid Guard parameters
• Simple diagnostics thanks to the display of device events
• Secure data transfer thanks to a new password concept
PV plant data management
• Display plant data from the PV plant via the user interface
• Save plant data from the PV plant on an internal memory
• Save plant data from the PV plant to an optional SD card
• Automatically send system plant from the PV plant to the Sunny Portal
• Call up plant data via the internal FTP server
• Load plant data from the PV plant to an external FTP server via the FTP Push function
• Plant data in CSV or XML format
Service Functions
• Firmware update via the internet
• Time synchronization via the internet
• Restoration of the factory settings
2.2 Information on the operation of the Sunny WebBox
• The Sunny WebBox user interface needs JavaScript in order to be able to correctly perform and
display the functions and content of the Sunny WebBox. Activate JavaScript in the Web browser
If necessary, read the help section in your web browser.
• The save procedure for parameters can take up to 30 seconds. Do not separate the Sunny
WebBox with Bluetooth from the electricity supply during the save procedure. Otherwise data
can be lost.
10
SWebbox20-BEN104011
User Manual
SMA Solar Technology AG
Sunny WebBox with Bluetooth Basics
3 Sunny WebBox with Bluetooth Basics
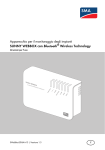
3.1 User interface
The user interface permits quick access to all important information about the PV plant and its devices.
Position
A
Description
Icon Bar
B
Plant tree
C
Device menu
D
Contents section
User Manual
Meaning
The icon bar gives you quick access to the main functions of the
Sunny WebBox.
In the plant tree, all devices in a PV system are represented in a
tree structure.
The device menu enables you to retrieve information and
undertake the configuration of devices selected in the plant tree.
The contents section shows the actual contents. The contents are
determined by the device menu.
SWebbox20-BEN104011
11
Sunny WebBox with Bluetooth Basics
Position
E
Description
Status bar
SMA Solar Technology AG
Meaning
The status bar displays the current status of the Sunny WebBox
and includes the following contents:
• serial number
• software version
upon logging on to the Sunny WebBox additionally:
• information on the password status
• SMA Grid Guard (only installers)
• current user group
• connection status to the PV plant
• current date and time
3.1.1 Icon Bar
The icon bar gives you quick access to the main functions of the Sunny WebBox.
Symbol
Meaning
The "Settings" button opens the Sunny WebBox settings. The Sunny WebBox
settings can also be adjusted via the plant tree "Sunny WebBox" / "Settings".
The "Help" button opens the Sunny WebBox help section.
The user can log out of the Sunny WebBox user interface via the "Logout" button.
12
SWebbox20-BEN104011
User Manual
SMA Solar Technology AG
Sunny WebBox with Bluetooth Basics
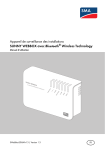
3.1.2 Plant tree
From the plant communication perspective, a PV plant is made up of several devices which are
connected to each other via the same communication type (e.g. SMA Bluetooth).
View of a Bluetooth system
The physical structure of the plant (A) is represented by means of the plant tree in the Sunny WebBox.
In addition, all devices in a plant (including the Sunny WebBox) are displayed underneath the plant
(B). From the plant communication perspective, the plant is generated by the Sunny WebBox.
The plant tree in the Sunny WebBox
In general, a distinction is made between the Plant View
(B) and the Device View (C).
• See Section .5.1 ”Plant View” (page 27)
• See Section .5.2 ”Device View” (page 29)
User Manual
SWebbox20-BEN104011
13
Sunny WebBox with Bluetooth Basics
SMA Solar Technology AG
3.1.3 Device menu
The device menu shows the settings options and spot values of a given device. The device must first
be selected in the plant tree. The menu items change according to the device selected.
Tabs
Overview
Spot Values
Settings
Events
Meaning
The overview page provides information about the devices or systems
selected in the plant tree. Here you will find a short overview of the most
important device data as well as the actual status display.
The spot values provide current data on the selected device depending on
the particular user group.
Depending on your user group, you can use the settings option to look at
and adjust various parameters.
The "Events" page displays the events that have occurred in a device. The
events displayed depend on your user group.
3.1.4 Overview
The "Overview" page displays the key data of the entire PV plant or of a particular device.
Device View
When a device is selected in the plant tree, the yield and output values of that device are also
displayed in diagrams on the overview page. There are 4 diagrams that can be accessed via the
following tabs:
Tabs
Day
Month
Year
Total
Meaning
Displays the device output during the course of a day.
Displays the daily yield of the device over one month.
Displays the monthly yield of the device over one year.
Displays the annual yield of the device over the last 10 years.
Click the mouse on a point of the graph to call up a display. The display shows the precise value at
that particular point as well as the time and date.
Scroll down to the next time period using the arrows. Use the calendar symbol to directly select a time
period.
14
SWebbox20-BEN104011
User Manual
SMA Solar Technology AG
Sunny WebBox with Bluetooth Basics
Plant View
If a plant is selected in the plant tree, the overview page displays the following data for the entire PV
plant:
• Data of all inverters in the PV plant:
– Day yield: yield achieved so far that day
– Condition: current operative condition of the plant (OK, fault, warning)
– Power: output achieved so far that day
– Total yield: total yield achieved so far
• Data on the communication products in the PV plant:
– Condition: current operative condition of the communication products (OK, fault, warning)
• Available nominal power of the inverters
3.1.5 Spot Values
The "Spot Values" page displays all values of the device or plant selected in the plant tree. The specific
user group determines which values are displayed. All values are collected into groups (parameter
groups) and subgroups.
Device View
If you have selected a device in the plant tree, the "Spot Values" page displays the values for that
particular device.
Plant View
If you have selected the plant in the plant tree, the "Spot Values" page displays the values for complete
device classes. When you click on the parameter group, the device classes are displayed separately
(e.g., solar inverters and communication products).
User Manual
SWebbox20-BEN104011
15
Sunny WebBox with Bluetooth Basics
SMA Solar Technology AG
Certain values from the individual devices in a device class are combined (e.g., total power (A)).
Depending on the type of value, a meaningful aggregate for the device class is displayed:
Symbol
Meaning
Total
Average value
e.g., 20 … 50°C
Smallest and greatest value
The aggregate value can be opened to reveal additional information.
Position
B
C
D
E
F
Meaning
Lowest power value of the 10 devices
Greatest power value of the 10 devices
Sum of power values of the 10 devices
Mean power for the 10 devices.
Number of devices in the device class.
16
SWebbox20-BEN104011
User Manual
SMA Solar Technology AG
Sunny WebBox with Bluetooth Basics
3.1.6 Settings
All parameters of the device or plant selected in the plant tree are displayed in the device menu
"Settings". For numerical values the permissible parameter limits are displayed in brackets after the
value. The display of specific parameters depends on the particular user group. All parameters are
summarized in groups (parameter groups) and subgroups.
Device View
When a device is selected in the plant tree, you can modify the parameters of that device on the
"Settings" page.
Plant View
If you have selected the plant in the plant tree, you can modify the parameters for the entire device
class on the "Settings" page. All devices in the device class are then set to the new parameter value.
When you click on the parameter group, the device classes are displayed separately (e.g., solar
inverters and communication products).
User Manual
SWebbox20-BEN104011
17
Sunny WebBox with Bluetooth Basics
SMA Solar Technology AG
If different values are set for devices in the same device class, this is indicated in editing mode by an
empty field (A).
The different options are shown in selection menus. The number of devices set to each option is shown
in brackets. See (B) and (C). By choosing an option and then saving, all devices in this device class
are set to this value. If a "*" is displayed, this parameter is not available for all devices.
In text fields the mutual leading characters are displayed. Different characters are supplemented with
"…".
3.1.7 Events
The Sunny WebBox can display its own events and the events of individual devices. The Sunny
WebBox retrieves the event list directly from the devices.
Position
A
B
C
D
E
F
G
H
Meaning
Filter for event categories
Filter for the time period of the events displayed
Priority of event
Type of event
Event in clear text and event number in brackets
Group of parameters involved (parameter group)
Date on which the event occurred
Time at which the event occurred
18
SWebbox20-BEN104011
User Manual
SMA Solar Technology AG
Sunny WebBox with Bluetooth Basics
Priority of events
The event priorities are as follows:
Symbol
Meaning
This type of event can only be remedied through intervention by the installer at the
device.
Please contact your installer with the device serial number and the event number.
Please contact your installer with the device serial number and the event number.
Types of event
There are 3 different types of event which the Sunny WebBox displays by symbols:
• Information
• Warning
• Failure
Symbols and meaning of event types
Events can have 3 different statuses:
• Incoming: the event is occurring
• In progress: the event has existed for some time and could not yet be automatically remedied.
• Outgoing: the event has come to an end.
Symbol
Meaning
Failure
Error incoming
Error outgoing
Warning
Warning in progress
Warning outgoing
Information
Information incoming
Information outgoing
User Manual
SWebbox20-BEN104011
19
Sunny WebBox with Bluetooth Basics
SMA Solar Technology AG
3.2 Security- and password concept
3.2.1 User groups
As a rule, SMA Solar Technology AG distinguishes between two user groups: users and installers.
Installers can also undertake additional settings on devices after entering the SMA Grid Guard code.
The user groups have the following rights:
User group
User
Right
This user group allows the user to read all display-relevant
information, such as spot values and parameter settings. Functionsensitive settings can not be modified.
The user can freely select the plant password for the "User" user
group.
In addition to the rights available to users, this user group may also
set or change plant parameters that affect functionality.
Installer
In addition, this user group may reset the user's plant password,
and may undertake additional settings to devices after entering the
SMA Grid Guard code.
Installer with SMA Grid Guard The installer can change SMA Grid Guard parameters for devices.
rights
3.2.2 Plant password
The plant password for the respective user group is the same for all devices in a plant. After logging
in with the plant password (user/installer), you can simultaneously configure more than one device
in your plant. If the device password is not the same as the plant password, for example in the case
of a new device in an existing plant, the device is depicted with a lock (
) in the plant tree.
Unauthorized access to your PV plant
The plant password protects your plant from unauthorized access to the plant devices.
• After initial login to a new plant, the standard password for both user groups (User/
Installer) should be changed. After changing the password a restart of the Sunny
WebBox is necessary.
Plant password at delivery
All devices are delivered with the user password: 0000 and the installer password: 1111.
20
SWebbox20-BEN104011
User Manual
SMA Solar Technology AG
Sunny WebBox with Bluetooth Basics
3.2.3 Access security of the Sunny WebBox with Bluetooth Each user group is protected by a freely selectable password. Passwords are transmitted in encrypted
form. After 4 incorrect password entries access to the Sunny WebBox is blocked for 15 minutes. After
this time you can log in again.
Protect your PV plant from unauthorized access. Take suitable protective measures - amongst others:
• Set up safe passwords (see section 3.2.4 ”Password Quality” (page 21)).
• Change your passwords at regular intervals.
• Use different passwords for different user groups.
• Never leave slips of paper with passwords lying around.
• Install a firewall in Ethernet networks.
• Close unnecessary ports in Ethernet networks.
3.2.4 Password Quality
In order to increase the security of your password, please note the following properties when selecting
a password:
• Use passwords with a minimum length of 8 characters. The longer the password, the more
secure it is.
• Do not use names or terms from dictionaries (for example: "Dog", "Cat", "Mouse", …).
• Do not use data related to your person as passwords (for example names of persons or pets,
personal- or identification numbers, car license plates, …).
• Do not repeat names or terms (for example "househouse", "carcar", …)
• Use a combination of upper and lower case letters, special characters and numbers.
• Do not use number and letter combinations which are consecutive on a keyboard (for example
"12345", "qwerty", …).
3.2.5 SMA Grid Guard
SMA Grid Guard is a security concept for country-specific settings in the inverter, which determine the
network behavior within a grid system. These settings (Grid Guard parameters) are pre-installed in the
devices and can only be changed with the SMA Grid Guard password. In order to change SMA Grid
Guard parameters, you will need to be logged in as an installer and you will need your personal SMA
Grid Guard password, which you can obtain from SMA Solar Technology. The application form for
the personal access code is located in the download area at www.SMA.de/en, in the "Data sheet"
category for each inverter.
User Manual
SWebbox20-BEN104011
21
Sunny WebBox with Bluetooth Basics
SMA Solar Technology AG
3.2.6 Forgotten Password
If you have forgotten your plant password, you can unlock the devices of your PV plant with a
Personal Unlocking Key (PUK). For every inverter and every Sunny WebBox there is one PUK for each
of the two user groups ("user" and "installer").
Procedure:
1. Request PUKs for inverters and Sunny WebBox.
2. Unlock the inverters with the PUKs via the Sunny Explorer.
3. Unlock the Sunny WebBox with the PUK.
Requesting PUKs for inverters and Sunny WebBox
1. Download the PUK application form from the download area at www.SMA.de/en.
2. Complete the application form and sign it.
3. Send the application form to the SMA Service Line:
– Send the application form by e-mail (see section 11 ”Contact” (page 72)).
or
– Send the application form by fax (see section11 ”Contact” (page 72)).
or
– Send the application form by mail (see section 11 ”Contact” (page 72)).
☑ The SMA Service Line will confirm your application and then send you the requested PUKs.
Unlocking an inverter with a PUK
Unlocking multiple inverters with PUKs
Each PUK can only be used for one inverter and one user group.
• If you requested PUKs for multiple inverters, then you have to unlock each inverter
using its individually assigned PUK.
1. Log onto the inverter with the PUK using Sunny Explorer (see Sunny Explorer user manual).
1. Choose a new plant password (see Sunny Explorer user manual).
Unlocking a Sunny WebBox with a PUK
1. Start your web browser (e.g., Internet Explorer).
2. Enter the IP address of the Sunny WebBox into the address bar and press Enter.
3. In the "User" field, select the user group that the PUK was assigned to by the SMA Service Line.
4. Enter the PUK in the "Password" field.
5. Change the password of the Sunny WebBox (see section 6.1 ”Changing the Sunny WebBox
password” (page 33)). Enter the plant password that you chose via the Sunny Explorer.
☑ The Sunny WebBox will now display the inverters in the plant tree without the padlock icon. You
have access rights for all the inverters in the corresponding user group.
22
SWebbox20-BEN104011
User Manual
SMA Solar Technology AG
Sunny WebBox with Bluetooth Basics
3.3 Symbols
Symbols for access rights
The individual devices are depicted with a symbol for the access right in the plant tree. If no symbol
is displayed after a device, you have access rights to the device that correspond to the user group
which is logged in.
Updating time in the plant tree
In the plant tree, updating the symbol for access rights (SMA Grid Guard symbol and lock
symbol) can take up to 2 minutes.
Symbol
Meaning
You do not have access to the device. The device password differs from the current plant
password.
You have access to parameters which are protected by the SMA Grid Guard password.
Parameters which are protected by SMA Grid Guard are also indicated by this symbol.
Device symbols
Device symbols are displayed in the plant tree and on the device's overview page. Devices will have
a specific status, which is displayed by a symbol.
Symbol
Meaning
Plant
Sunny WebBox
Inverter
Unknown inverter
Unknown device
Sunny SensorBox with SMA Power Injector with Bluetooth
SMA Bluetooth Repeater
User Manual
SWebbox20-BEN104011
23
Sunny WebBox with Bluetooth Basics
SMA Solar Technology AG
Group symbols for spot values and settings
Group symbols are used for specific parameter groups.
Symbol
Meaning
Status
General values that describe the status of the device. The status of other components in
the device (e.g., modems) are not listed here.
Type Plate
All values that describe the device / the plant.
Device
Values which apply to the device directly and which do not fall into any of the special
categories (e.g., DC side, AC side, plant communication, etc.).
User Rights
All values that affect the access protection for the device.
DC Side
Values affecting the DC side of the device (e.g. PV modules).
AC Side
Values affecting the grid side of the device.
Grid Monitoring
Includes parameters that affect the grid and which in part are protected by the personal
SMA Grid Guard password.
Plant and Device Control
Includes parameters for devices that must fulfill special requirements for feeding into the
medium voltage level. The parameters are protected by the personal SMA Grid Guard
password.
Plant communication
All values which define communication between communication devices and the plant.
Data Recording
All values that affect data recording for the device (storage location, storage intervals,
storage format).
Device Components
Includes parameters and measured values relating to the components of a device. This
group is a kind of "expanded type label". For example, it files the version numbers of
the system components.
Meteorology
Includes all measured values of the connected sensors e.g. temperature, irradiation and
wind speed.
24
SWebbox20-BEN104011
User Manual
SMA Solar Technology AG
Sunny WebBox with Bluetooth Basics
Other symbols
Symbol
Meaning
Hour glass
The hour glass is displayed when values are being saved in a device.
Average value
The average number refers to an average value.
Total
The total number displays the summed values.
Maximum
Displays the maximum of a value.
Minimum
Displays the minimum of a value.
Updating
This symbol indicates that data is being uploaded from the device.
Alarm
The alarm symbol indicates that values are more than 10 minutes old.
Calendar function
Opens a calendar for selecting a date, a start date, or an end date.
User Manual
SWebbox20-BEN104011
25
Logging into and out of the Sunny WebBox
SMA Solar Technology AG
4 Logging into and out of the Sunny WebBox
4.1 Logging into the Sunny WebBox
Unauthorized access to your PV plant
The plant password protects your plant from unauthorized access to the plant devices.
• After initial login to a new plant, the standard password for both user groups (User/
Installer) should be changed.
Plant password at delivery
All devices are delivered with the user password: 0000 and the installer password: 1111.
1. Start web browser (e.g. Internet Explorer).
2. Enter the IP address of the Sunny WebBox into the address bar and press enter.
☑ The Sunny WebBox login page opens.
– If the page does not open, please read section 9.1 ”General troubleshooting for the
Sunny WebBox” (page 63).
3. Select a language.
4. In the "User" field select the user group under which you wish to log in.
5. In the "Password" field enter the password belonging to the selected user group.
6. Select [Login].
☑ The Sunny WebBox start page appears.
4.2 Logging out of the Sunny WebBox
1. Select "Logout" in the icon bar.
☑ The Sunny WebBox login page opens. You have successfully logged out.
26
SWebbox20-BEN104011
User Manual
SMA Solar Technology AG
Operation
5 Operation
5.1 Plant View
5.1.1 Plant Status
Symbol
User Manual
Status
Neutral
Meaning
The status of the plant is unknown and is currently being updated.
OK
All plant devices are working as prescribed.
Warning
At least one device in the plant is displaying the "Warning" status. No
device is displaying the "Error" status.
Failure
At least one device in the plant is displaying the "Error" status.
SWebbox20-BEN104011
27
Operation
SMA Solar Technology AG
5.1.2 Setting Parameters for a Device Class
A device class refers to devices of the same type. You can configure all the devices in a device class
simultaneously. It is not possible to configure different device classes at the same time. Save the
changes made to one device class before processing another device class.
To configure all the devices in a device class, proceed as follows:
1. Select the plant in the plant tree.
2. Select "Settings" in the device menu.
☑ The parameter groups for the entire plant are displayed.
3. Select the parameter group that contains the parameter which is to be configured.
☑ The individual device classes are listed. It may take a moment for all the data to be read from
the devices.
4. Select [Edit] below the relevant device class.
5. Change the desired parameter for the entire device class.
6. Select [Save].
☑ The settings will be applied to all devices in the device class.
Saving of data when parameters are adjusted
An hour glass displays the saving process. After the changes have been saved in the Sunny
WebBox, the data is transmitted to the device. The setting process can sometimes take
several hours if the device (e.g. an inverter) is in night mode. When the device is started,
the data is transmitted to the main memory, and the hour glass is no longer displayed.
☑ The parameters for a device class have been set.
5.1.3 Change Plant Name
1. Select the Sunny WebBox in the plant tree and select "Settings" in the device menu.
or
Click on the "Settings" button in the icon bar.
2. Select the "Type label > Type label" parameter group.
3. Select [Edit].
4. Enter the desired plant name in the "Plant name" field.
5. Select [Save].
☑ The plant name has been set.
28
SWebbox20-BEN104011
User Manual
SMA Solar Technology AG
Operation
5.2 Device View
5.2.1 Device Status
The device is in a specific status. The status is displayed via the symbols in the plant tree and on the
overview page of the device.
Symbol
Status
Neutral
Meaning
The status of the device is currently being updated.
OK
The device is operational and is working as prescribed.
Warning
The device is not operating properly. It may be possible to
automatically remedy the error.
The device is in error condition. There is a problem with the
device. Check the device.
The device can not communicate at present. This may happen
at night, for example, when the inverter is not operating.
Failure
Communication error
5.2.2 Set Device Parameters
You can configure a device via its parameters. Setting parameters for a device is dependent on the
user group.
To change device parameters, proceed as follows:
1. Select the corresponding device in the plant tree.
2. Select "Settings" in the device menu.
☑ The available parameter groups for the device are displayed.
3. Select the parameter group that contains the desired parameter.
☑ Reading the values may take a moment because the values are queried directly from the
device.
4. Select [Edit].
5. Change desired parameter.
6. Select [Save].
Saving of data when parameters are adjusted
An hour glass displays the saving process. After the changes have been saved in the Sunny
WebBox, the data is transmitted to the device. The setting process can sometimes take
several hours if the device, e.g. an inverter, happens to be in night mode. When the device
is started, the data is transmitted to the main memory, and the hour glass disappears.
☑ The device parameter is set.
User Manual
SWebbox20-BEN104011
29
Operation
SMA Solar Technology AG
5.3 Setting the Device Password to the Plant Password
If the password of a device is different from the plant password, the device will be displayed with a
lock in the plant tree. This may occur, for example, when a new device is added to an existing plant.
To set the new device to the plant password, proceed as follows:
1. Log into the Sunny WebBox as "Installer".
☑ The new device is displayed with a lock in the plant tree.
2. Select the Sunny WebBox in the plant tree and select "Settings" in the device menu.
or
Click on the "Settings" button in the icon bar.
3. Select the "User Rights > Access Control" parameter group.
4. Select [Edit].
5. Enter the password of the new device in the "Set installer password" field.
6. Confirm the password in the "Confirm the password" field.
7. Enter the password of the new device in the appropriate user group field .
8. Confirm the password in the "Confirm the password" field.
9. Select [Save].
☑ The Sunny WebBox saves the password of the new device into all approved devices. All
devices now have the same plant password.
10. Restart the Sunny WebBox via the user interface (see page 60).
11. Repeat the password setting process in order to transfer your previous plant password to all
devices.
12. Select [Save].
13. Restart the Sunny WebBox via the user interface (see page 60).
☑ The device is displayed without a lock in the plant tree. The password of the new device is
matched to the plant password.
5.4 Determining the Sunny WebBox serial number
You can read off the serial number from the status bar of the user interface or alternatively via the
parameter groups or the SD Card (see section 8.5 ”Determining current settings of the Sunny
WebBox via SD card” (page 62)).
Determining the Sunny WebBox serial number via the parameter group
1. Select the Sunny WebBox in the plant tree and select "Settings" in the device menu.
or
Click on the "Settings" button in the icon bar.
2. Select the "Type label > Type label" parameter group.
☑ Read off the Sunny WebBox serial number from the "Serial Number" field.
30
SWebbox20-BEN104011
User Manual
SMA Solar Technology AG
Operation
5.5 Determining the WAN IP address
You can determine the WAN (wide area network) IP address via the parameter group or the SD card
(see section 8.5 ”Determining current settings of the Sunny WebBox via SD card” (page 62)). The
WAN IP address is the IP address via which the Sunny WebBox is to be reached via the internet.
1. Select the Sunny WebBox in the plant tree and select "Settings" in the device menu.
or
Click on the "Settings" button in the icon bar.
2. Select the "External Communication > Nat" parameter group.
☑ In the "WAN IP" field read off the WAN IP address.
5.6 Activating / Deactivating SMA Grid Guard mode
Country-specific Settings in the inverter
SMA Grid Guard parameters may only be changed with the express authorization of the
grid operator. Unauthorized changes to the SMA Grid Guard parameters void operating
license of the respective device.
Updating time in the plant tree
In the plant tree, updating the symbol for access rights (SMA Grid Guard symbol and lock
symbol) can take up to 2 minutes.
Activating SMA Grid Guard mode
In order to change SMA Grid Guard parameters in devices you must enter your SMA Grid Guard
password.
1. Log in as "Installer".
2. Select the SMA Grid Guard symbol
in the status bar of the Sunny WebBox user interface.
☑ This opens the SMA Grid Guard dialog.
3. Enter your password in the "Individual access code" field. You can obtain the password from
SMA Solar Technology AG (see page 21).
4. Select [OK].
☑ The SMA Grid Guard code is set. You can now process all devices which are indicated with
the SMA Grid Guard symbol.
User Manual
SWebbox20-BEN104011
31
Operation
SMA Solar Technology AG
Deactivating SMA Grid Guard mode
To end the SMA Grid Guard mode proceed as follows:
1. Select the SMA Grid Guard symbol
in the status bar of the Sunny WebBox user interface.
☑ This opens the SMA Grid Guard dialog.
2. Enter the blocking code "54321" in the "Individual access code" field.
3. Select [OK].
☑ The SMA Grid Guard code is deactivated. Check whether the SMA Grid Guard mode has
been deactivated for all inverters. The blocking code is not supported by inverters with SMA
Bluetooth Piggy-Back.
– If the SMA Grid Guard mode remains active, log out of the Sunny WebBox user interface
and log back in again after 2 minutes (see section 4 ”Logging into and out of the Sunny
WebBox” (page 26)). The SMA Grid Guard code is then deactivated.
32
SWebbox20-BEN104011
User Manual
SMA Solar Technology AG
Configuring the Sunny WebBox
6 Configuring the Sunny WebBox
6.1 Changing the Sunny WebBox password
Additional rights for the installer
If you are logged in as installer, you can set or change function-sensitive plant parameters
in addition to the rights of the user. In addition, the "Installer" user group has the option of
resetting the user's plant password and can change SMA Grid Guard parameters.
Password for the internal FTP server
The password set here is also valid for access to the internal FTP server.
By setting the Sunny WebBox password, all devices which are displayed without a lock in the plant
tree will be set with the Sunny WebBox password. In order to successfully transfer the password a
restart of the Sunny WebBox is necessary (see page 60).
1. Select the Sunny WebBox in the plant tree and select "Settings" in the device menu.
or
Click on the "Settings" button in the icon bar.
2. Select the "User Rights > Access Control" parameter group.
3. Select [Edit].
4. Enter a secure password in the appropriate user group field. The password can be a maximum
of 12 characters. The following special characters are permitted: ?_!-. Take note of the quality
of your password (see section 3.2.4 ”Password Quality” (page 21)).
5. Confirm the password in each case in the "Confirm Password" field.
6. Select [Save].
☑ All devices will be set with the Sunny WebBox password.
User Manual
SWebbox20-BEN104011
33
Configuring the Sunny WebBox
SMA Solar Technology AG
6.2 Plant time
6.2.1 Information on the Plant time
The date and time of a PV plant is indicated as plant time.
During operation of your Bluetooth PV plant with the Sunny WebBox all connected Bluetooth devices
assume the plant time of the Sunny WebBox.
If further communications products (e.g. Sunny Beam with Bluetooth or Sunny Explorer) are added to
the PV plant, the communications products added automatically assume the current plant time of the
PV plant.
If you change the plant time, all inverters immediately assume the new plant time. Additional
communication products in the plant apply the plant time only after some time (7 hours max. later).
The plant time can be adjusted manually in the Sunny WebBox or synchronized via the internet. With
"Automatic Time Synchronization" the Sunny WebBox aligns the date and time with Sunny Portal 1x
per day. Registration in Sunny Portal is not necessary.
NOTICE
Possible loss of data through changing the plant time.
Take note that a time adjustment can have possible effects on the data already recorded.
If for example the time or the date is put back, the recorded data could be overwritten.
Only change the plant time when it is necessary.
6.2.2 Setting Date and Time
Automatic time synchronization
You can also synchronize the plant time automatically via the internet (see section
6.2.4 ”Activating / Deactivating automatic time synchronization” (page 35)).
1. Select the Sunny WebBox in the plant tree and select "Settings" in the device menu.
or
Click on the "Settings" button in the icon bar.
2. Select the "Device > Time settings" parameter group.
3. Select [Edit].
4. In the "Summer / Winter Time Adjustment" field select "Yes" in order to activate the automatic
adjustment between Summer and Winter Time. (Status upon delivery)
or
In the "Standard/Daylight Saving Time conversion on" field select "No" in order to deactivate
the automatic adjustment between Summer and Winter Time. The date and time are to be set
manually in the event of a change.
5. In the "Set plant time" field, set the current date and time of the PV plant.
34
SWebbox20-BEN104011
User Manual
SMA Solar Technology AG
Configuring the Sunny WebBox
6. Select the time zone in which the system is located in the "Time zone" field. (Delivery status:
"(UTC+01:00) Amsterdam, Berlin, Bern, Rome, Stockholm, Vienna"
7. Select [Save].
☑ Data and time are set.
6.2.3 Manually synchronizing the date and time with Sunny Portal
1. Select the Sunny WebBox in the plant tree and select "Settings" in the device menu.
or
Click on the "Settings" button in the icon bar.
2. Select the "Device > Time settings" parameter group.
3. Select [Edit].
4. In the "Synchronize time with portal" field select "Execute" in order to synchronize the date and
time with Sunny Portal.
☑ The date time will be synchronized with Sunny Portal. The synchronization was successful if the
time is displayed in the "Plant Time" field and "--------" is again displayed in the "Synchronize Time
with Portal" field.
6.2.4 Activating / Deactivating automatic time synchronization
Activating automatic time synchronization
1. Select the Sunny WebBox in the plant tree and select "Settings" in the device menu.
or
Click on the "Settings" button in the icon bar.
2. Select the "Device > Time settings" parameter group.
3. Select [Edit].
4. In the "Automatic Time Synchronization" field select "Yes" in order to synchronize the date and
time with Sunny Portal.
☑ The automatic time synchronization is activated.
Deactivating automatic time synchronization
1. Select the Sunny WebBox in the plant tree and select "Settings" in the device menu.
or
Click on the "Settings" button in the icon bar.
2. Select the "Device > Time settings" parameter group.
3. Select [Edit].
4. In the "Time Synchronization Active" field select "No" in order to manually set the date and time
(see section 6.2.2 ”Setting Date and Time” (page 34)) (status on delivery).
☑ The automatic time synchronization is deactivated.
User Manual
SWebbox20-BEN104011
35
Configuring the Sunny WebBox
SMA Solar Technology AG
6.3 Country configuration
6.3.1 Setting the date format
Effect on existing data from the PV plant.
Changes to the format have an effect on all future data exports, e.g. data on the SD card
or data on the internal FTP server.
1. Select the Sunny WebBox in the plant tree and select "Settings" in the device menu.
or
Click on the "Settings" button in the icon bar.
2. Select the "Device > Country settings" parameter group.
3. Select [Edit].
4. In the "Date format" field select the desired data format ("DD" = day, "MM" = month, "YYYY" =
year) (Status on delivery "DD.MM.YYYY").
5. Select [Save].
☑ The date format is set.
6.3.2 Setting the Language
1. Select the Sunny WebBox in the plant tree and select "Settings" in the device menu.
or
Click on the "Settings" button in the icon bar.
2. Select the "Device > Country settings" parameter group.
3. Select [Edit].
4. Select the desired language in the "Language" field.
5. Select [Save].
☑ The language is set.
6.3.3 Setting the number format
1. Select the Sunny WebBox in the plant tree and select "Settings" in the device menu.
or
Click on the "Settings" button in the icon bar.
2. Select the "Device > Country settings" parameter group.
3. Select [Edit].
4. In the "Number format" field, select the desired number format. (Status upon delivery:
"123.456,0")
5. Select [Save].
☑ The number format is set.
36
SWebbox20-BEN104011
User Manual
SMA Solar Technology AG
Configuring the Sunny WebBox
6.3.4 Setting the Time format
Effect on existing data from the PV plant.
Changes to the format have an effect on all future data exports, e.g. data on the SD card
or data on the internal FTP server.
1. Select the Sunny WebBox in the plant tree and select "Settings" in the device menu.
or
Click on the "Settings" button in the icon bar.
2. Select the "Device > Country settings" parameter group.
3. Select [Edit].
4. In the "Time format" field select the desired time format ("hh" = 12 hour format, "HH" = 24 hour
format, "mm" = minutes, "ss" = seconds) (Status on delivery: "HH:mm").
5. Select [Save].
☑ The time format is set.
6.3.5 Setting the Unit of temperature
1. Select the Sunny WebBox in the plant tree and select "Settings" in the device menu.
or
Click on the "Settings" button in the icon bar.
2. Select the "Device > Country settings" parameter group.
3. Select [Edit].
4. Select the desired unit of temperature in the "Unit of temperature" field. (Status upon delivery:
"Celsius")
5. Select [Save].
☑ The unit of temperature has been set.
6.4 Changing the Sunny WebBox device name
1. Select the Sunny WebBox in the plant tree and select "Settings" in the device menu.
or
Click on the "Settings" button in the icon bar.
2. Select the "Type Label > Type Label" parameter group.
3. Select [Edit].
4. Enter the desired device name in the "Device name" field.
5. Select [Save].
☑ The Sunny WebBox device name is changed.
User Manual
SWebbox20-BEN104011
37
Configuring the Sunny WebBox
SMA Solar Technology AG
6.5 Ethernet network
6.5.1 Information on network settings
Changing extended network settings
Do not change any device network settings if you are not clear on the effects of the change.
Changes to values could lead to the existing network not functioning or only partially
functioning. If you have any questions please contact your network administrator.
Sunny WebBox Assistant
It is recommended to use the Sunny WebBox Assistant for the commissioning of the Sunny
WebBox and for the integration into a network. You can download the Sunny WebBox
Assistant on the internet from www.SMA.de/en.
You can assign static network settings to the Sunny WebBox or obtain these dynamically via a DHCP
server. Additionally it is possible to use a Proxy server for the internet connection.
If you would like to make the Sunny WebBox available in the internet, in order that you can for
example have direct access to the Sunny WebBox via the Sunny Portal, you must perform a Port
rerouting in your router. Here it may be necessary to align the HTTP port and the NAT port.
6.5.2 Applying static network settings to the Sunny WebBox
1. Select the Sunny WebBox in the plant tree and select "Settings" in the device menu.
or
Click on the "Settings" button in the icon bar.
2. Select the "External Communication > Ethernet" parameter group.
3. Select [Edit].
4. In the "DNS server IP" field enter the IP address of the DNS server (Domain Name System
Server). Usually, this is the IP address of the router.
5. Enter the Gateway IP address into the "Gateway IP" field. Usually, this is the IP address of the
router.
6. In the "IP Address" field enter the static IP address, under which the Sunny WebBox is to be
reachable in the local network (see section 10.7 ”Allocating IP addresses in a local network”
(page 71)).
7. In the "Subnet mask" field, enter the subnet mask of your network. Normally you can find this
information in the router manual.
8. Select [Save].
☑ The local network settings are applied to the Sunny WebBox.
38
SWebbox20-BEN104011
User Manual
SMA Solar Technology AG
Configuring the Sunny WebBox
6.5.3 Activating / Deactivating DHCP
The Sunny WebBox can obtain its network settings via a DHCP server (Dynamic Host Configuration
Protocol server). With this during the start of the Sunny WebBox the IP address, subnet mask, gateway
and DNS server are automatically obtained from the DHCP server. In order to establish the Sunny
WebBox in your network, use the Sunny WebBox Assistant.
Activating DHCP
1. Select the Sunny WebBox in the plant tree and select "Settings" in the device menu.
or
Click on the "Settings" button in the icon bar.
2. Select the "External Communication > Ethernet" parameter group.
3. Select [Edit].
4. Under "DHCP" select "Yes" in the "Activated" field in order to receive the network settings
dynamically assigned.
5. Select [Save].
☑ The Sunny WebBox obtains the network settings automatically via the DHCP server.
Deactivating DHCP
1. Select the Sunny WebBox in the plant tree and select "Settings" in the device menu.
or
Click on the "Settings" button in the icon bar.
2. Select the "External Communication > Ethernet" parameter group.
3. Select [Edit].
4. Under "DHCP" select "No" in the "Activated" field in order to assign the network settings
statically (see section 6.5.2 ”Applying static network settings to the Sunny WebBox”
(page 38)) (Status on delivery).
5. Select [Save].
6. Assigning the network settings takes place manually.
User Manual
SWebbox20-BEN104011
39
Configuring the Sunny WebBox
SMA Solar Technology AG
6.5.4 Proxy Server
If there is a Proxy server in your network, enter the Proxy settings here. The Proxy settings of the Sunny
WebBox are used for connection to the Sunny Portal and for firmware updates.
Using the Proxy server
1. Select the Sunny WebBox in the plant tree and select "Settings" in the device menu.
or
Click on the "Settings" button in the icon bar.
2. In the "Activated" field select "Yes" in order to use the Proxy server.
3. In the "Login" field enter the login name for the Proxy Server.
4. In the "Port" field enter the network port under which the Proxy server is available.
5. In the "Password" field enter the password for the Proxy Server.
6. Confirm the password entered in the "Confirm the password" field.
7. In the "Server" field enter the Proxy Server IP address.
8. Select [Save].
☑ The Proxy server will be used.
Not using the Proxy server
1. Select the Sunny WebBox in the plant tree and select "Settings" in the device menu.
or
Click on the "Settings" button in the icon bar.
2. In the "Activated" field select "No" in order not to use the Proxy server.
3. Select [Save].
☑ The Proxy server will not be used.
40
SWebbox20-BEN104011
User Manual
SMA Solar Technology AG
Configuring the Sunny WebBox
6.5.5 Setting the HTTP Port
Adjusting of the network ports
Changing the ports is only necessary in rare cases. Before adjusting the ports, contact your
network administrator.
The HTTP port is the network port under which the Sunny WebBox user interface is available. Port 80
is set by default here. Should another port be entered, this is to be explicitly specified during call up
of the user interface.
Example: The Sunny WebBox IP address is 192.168.0.168 and the HTTP port was changed to
8080; thus "http://192.168.0.168:8080" must then be entered in the address bar of the web
browser.
1. Select the Sunny WebBox in the plant tree and select "Settings" in the device menu.
or
Click on the "Settings" button in the icon bar.
2. Select the "External Communication > HTTP" parameter group.
3. Select [Edit].
4. In the "Port" field enter the desired Port. (Status upon delivery: Port 80)
5. Select [Save].
☑ The HTTP port is saved.
6.5.6 Setting the NAT Port
Adjusting of the network ports
Changing the ports is only necessary in rare cases. Before adjusting the ports, contact your
network administrator.
During a data transfer the Sunny WebBox communicates to the Sunny Portal under which IP address
and which port the Sunny WebBox is available on the internet. For this the respective port must be
freed by the router. If the NAT (Network Address Translation) in the router is changed, you must
specify the network port that has been set in the router. NAT Port is set to 80 is set by default.
1. Select the Sunny WebBox in the plant tree and select "Settings" in the device menu.
or
Click on the "Settings" button in the icon bar.
2. Select the "External Communication > Ethernet > NAT" parameter group.
3. Select [Edit].
4. In the "Port" field enter the desired Port.
5. Select [Save].
☑ The NAT port is saved.
User Manual
SWebbox20-BEN104011
41
Configuring the Sunny WebBox
SMA Solar Technology AG
6.6 Data Recording
6.6.1 Information on Data Recording
The Sunny WebBox can export the collected data from the PV plant in various data formats and make
these available via the integrated FTP server or SD card.
The following data formats are possible:
• Comma Separated Value (CSV) (see section 6.6.2 ”CSV Files” (page 43))
• Extensible Markup Language (XML) (see section 6.6.3 ”XML files” (page 44))
All data is exported at selected recording intervals in the respective directory of the data format.
Additionally you can set the description of the measured values (see section 6.6.4 ”Setting measured
value descriptions in local language” (page 45)).
Effect on existing data from the PV plant.
Changes to the format have an effect on all future data exports, e.g. data on the SD card
or data on the internal FTP server.
42
SWebbox20-BEN104011
User Manual
SMA Solar Technology AG
Configuring the Sunny WebBox
6.6.2 CSV Files
Information on CSV Files
The Sunny WebBox saves the collected data of the PV plant into the relevant Day-CSV-file every 5
minutes. The content of the existing data is added to this. Individual data is always separated by a
semicolon in the file. The decimal separator and the timestamp format in the files are determined by
the country settings.of the Sunny WebBox (see section 6.3 ”Country configuration” (page 36)).
Directory path and structure of the filename
Directory Path
…/CSV/[YYYY]/[MM]/
Structure of the filename
[YYYY]-[MM]-[DD].csv
CSV File
Example: Daily report file from 1.3.2010: …/CSV/2010/03/2010-03-01.csv
Activating export of the data in CSV format
1. Select the Sunny WebBox in the plant tree and select "Settings" in the device menu.
or
Click on the "Settings" button in the icon bar.
2. Select the "Data Recording > Export" parameter group.
3. Select [Edit].
4. In the "Data export in CSV format" field select "Yes".
5. Select [Save].
☑ Data will be exported in CSV format.
Deactivating export of the data in CSV format
1. Select the Sunny WebBox in the plant tree and select "Settings" in the device menu.
or
Click on the "Settings" button in the icon bar.
2. Select the "Data Recording > Export" parameter group.
3. Select [Edit].
4. In the "Data export in CSV format" field select "No".
5. Select [Save].
☑ Data will not be exported in CSV format.
User Manual
SWebbox20-BEN104011
43
Configuring the Sunny WebBox
SMA Solar Technology AG
6.6.3 XML files
Information on XML Files
The Sunny WebBox saves the collected data of the PV plant into a XML file every 5 minutes. In order
to reduce the quantity and amount of data, every 15 minutes the XML files to be added are
automatically packed in a ZIP file and saved onto the integrated FTP server or the SD card. As a rule
there are 3 XML files in a zip file. The decimal separator and the timestamp format in the files are
determined by the country settings.of the Sunny WebBox (see section 6.3 ”Country configuration”
(page 36)). You will find how an XML file is structured in section 10.3 ”Structure of an XML data file”
(page 69).
Directory path and structure of the filename
Directory Path
…/XML/[YYYY]/[MM]/[YYYY]-[MM]-[DD]/
Structure of the filename
[YYYY]-[MM]-[DD]_[HHMMSS].zip
[YYYY]-[MM]-[DD]_[HHMMSS].xml
Packed file in ZIP format
XML file
Example: daily report file from 1.3.2010, 12:42:08 Hrs: …/XML/2010/03/2010-03-01/201003-01_124503.zip
The ZIP file contains the following 3 XML files: 2010-03-01_123159.xml, 2010-0301_123703.xml, 2010-03-01_124208.xml.
Activating export of the data in XML format
1. Select the Sunny WebBox in the plant tree and select "Settings" in the device menu.
or
Click on the "Settings" button in the icon bar.
2. Select the "Data Recording > Export" parameter group.
3. Select [Edit].
4. In the "Data export in XML format" field select "Yes".
5. Select [Save].
☑ Data will be exported in XML format.
44
SWebbox20-BEN104011
User Manual
SMA Solar Technology AG
Configuring the Sunny WebBox
Deactivating export of the data in XML format
1. Select the Sunny WebBox in the plant tree and select "Settings" in the device menu.
or
Click on the "Settings" button in the icon bar.
2. Select the "Data Recording > Export" parameter group.
3. Select [Edit].
4. In the "Data export in XML format" field select "No".
5. Select [Save].
☑ Data will not be exported in XML format.
6.6.4 Setting measured value descriptions in local language
You can set the description of the measured values as follows:
• Technical description of the measured value Example: Metering.TotWhOut
• Description of the measured value as a term. Example: Total yield
1. Select the Sunny WebBox in the plant tree and select "Settings" in the device menu.
or
Click on the "Settings" button in the icon bar.
2. Select the "Data Recording > Export" parameter group.
3. Select [Edit].
4. In the "Measurement name in local language" field select "Yes" in order to display the
descriptions as terms.
or
In the "Measurement name in local language" field select "No" in order to display the technical
descriptions.
5. Select [Save].
☑ The measured value description is set.
User Manual
SWebbox20-BEN104011
45
Managing Plant Data
SMA Solar Technology AG
7 Managing Plant Data
7.1 Information on the plant data
The Sunny WebBox can display spot values and parameters of the registered devices and can relay
this for subsequent processing (e.g. via Sunny Portal, FTP Push, internal FTP server, SD card).
SMA devices provide various spot values and parameters depending on the device type, which can
be displayed and processed via the Sunny WebBox depending on user group. Spot values and
measured values or calculated values of the device such as for example: temperature or output.
Parameters are used in the configuration of the device and can, depending on access rights, be
edited.
You will find which spot values and parameters are available in a device in the manual of the
respective device.
The Sunny WebBox saves all continually recorded values of the connected devices on the 1 GB
internal hard drive. If the capacity of the internal drive is reached, then all values older than 12 months
will be overwritten. Save the plant data at regular intervals using the functions provided in the Sunny
WebBox to an external hard drive.
7.2 Sunny Portal
7.2.1 Information on the Sunny Portal
The Sunny WebBox offers you the possibility of sending all of your PV plant's relevant plant data
automatically to the Sunny Portal internet portal. Sunny Portal is suitable for the individual presentation
of plant data of every power class and offers comprehensive evaluation and notification functions.
You will find further information on the Sunny Portal a www.SunnyPortal.com.
Before you can use Sunny Portal, you must register via the Sunny WebBox (see page 47).
If you are already registered in Sunny Portal with the PV plant, you must align the plant identifier (see
page 50). This can be the case for example during a replacement of the Sunny WebBox.
Possible Delays in Visualization and Notifications
Please note that there can be delays before the Sunny Portal displays the transmitted data
of your PV plant and wen requested also to notifications to be sent to you.
SMS notification to a mobile telephone
Via Sunny Portal you can generate Report E-Mails, which can be sent automatically to your
mobile telephone via a third party.
46
SWebbox20-BEN104011
User Manual
SMA Solar Technology AG
Managing Plant Data
7.2.2 Registering Sunny WebBox in the Sunny Portal
1. Select the Sunny WebBox in the plant tree and select "Settings" in the device menu.
or
Click on the "Settings" button in the icon bar.
2. Select "Sunny Portal > User settings" parameter group.
3. Select [Edit].
4. In the "E-Mail" field enter the E-Mail address to which Sunny Portal should send the access data.
5. The plant identifier is automatically entered in the "Plant ID" field. The number is, with the E-Mail
address and the plant name, a clear identifier of the PV plant.
6. In the "Plant name" field enter the name of your PV plant. The plant will be displayed under this
name is Sunny Portal.
7. In the "Status and Actions" subgroup enter "Execute" in the "Register" field.
8. Select [Save].
☑ The Sunny WebBox performs the registration onto Sunny Portal. The registration was successful,
when "OK" is displayed in the "Result of the last registration" field. Sunny Portal then sends your
access data to the E-Mail address entered.
– If the registration is unsuccessful, refer to section 9.1 ”General troubleshooting for the Sunny
WebBox” (page 63).
User Manual
SWebbox20-BEN104011
47
Managing Plant Data
SMA Solar Technology AG
7.2.3 Activating / Deactivating Sunny Portal
Activating data transmission to the Sunny Portal
The transmission of data only takes place if you are logged out of the Sunny WebBox user interface.
Logging in to the user interface of the Sunny WebBox is possible at all times.
Requirement:
You must be registered in Sunny Portal (see section 7.2.2 ”Registering Sunny WebBox in the Sunny
Portal” (page 47)):
1. Select the Sunny WebBox in the plant tree and select "Settings" in the device menu.
or
Click on the "Settings" button in the icon bar.
2. Select "Sunny Portal > Basic settings" parameter group.
3. Select [Edit].
4. In the "Use Sunny Portal" field select "Yes" in order to use Sunny Portal. The Sunny WebBox
sends the PV plant data automatically to the Sunny Portal depending on the defined upload
frequency.
5. Select [Save].
☑ The Sunny WebBox will send data to the Sunny Portal.
Deactivating data transmission to the Sunny Portal
1. Select the Sunny WebBox in the plant tree and select "Settings" in the device menu.
or
Click on the "Settings" button in the icon bar.
2. Select "Sunny Portal > Basic settings" parameter group.
3. Select [Edit].
4. In the "Use Sunny Portal" field select "No" in order not to use Sunny Portal. (Status upon delivery)
5. Select [Save].
☑ The Sunny WebBox will not send data to the Sunny Portal.
48
SWebbox20-BEN104011
User Manual
SMA Solar Technology AG
Managing Plant Data
7.2.4 Testing the connection to Sunny Portal
You can test the connection to Sunny Portal. Registration in Sunny Portal is not necessary.
1. Select the Sunny WebBox in the plant tree and select "Settings" in the device menu.
or
Click on the "Settings" button in the icon bar.
2. Select the "Sunny Portal > Status and Actions" parameter group.
3. Select [Edit].
4. In the "Portal connection test" field select "Execute".
5. Select [Save].
☑ The Sunny WebBox performs a connection test. The connection test was successful, if "Ok" is
displayed in the "Result of the last portal connection test" field, and "--------" is again displayed in
the "Portal connection test" field.
– If the connection test is unsuccessful, refer to section 9.1 ”General troubleshooting for the
Sunny WebBox” (page 63).
7.2.5 Setting the Upload frequency
1. Select the Sunny WebBox in the plant tree and select "Settings" in the device menu.
or
Click on the "Settings" button in the icon bar.
2. Select the "Sunny Portal > Basic settings" parameter group.
3. Select [Edit].
4. In the "Upload frequency" field select the desired value. See Table:
Selection
"Every 15 minutes"
"Daily"
"Hourly"
Meaning
Data transmission within the next full 15 minutes.
Data transmission within the next full 24 hours.
Data transmission within the next full hour.
Possible delays of the data uploads
The uploading of data can be delayed by up to 2.5 minutes, in order to avoid too great a
data transmission load for the Sunny Portal at certain times.
If an upload is still being performed and a new upload should be started (possibly at 15
minute intervals), then the new upload is not performed. The data will be transmitted at the
next upload.
5. Select [Save].
☑ The Sunny WebBox will send the data to the Sunny Portal in the prescribed intervals.
User Manual
SWebbox20-BEN104011
49
Managing Plant Data
SMA Solar Technology AG
7.2.6 Accessing the Sunny WebBox via Sunny Portal
During every data transmission of the Sunny WebBox to the Sunny Portal, Sunny Portal saves the
current IP address of the Sunny WebBox or the current IP address of your router, with which the
internet connection is established.
Using Sunny Portal, you can directly access your Sunny WebBox via the Internet. Please note that you
must set up a port rerouting in your router. Here it may be necessary to align the HTTP port and the
NAT port of the Sunny WebBox (see section 6.5 ”Ethernet network” (page 38)).
7.2.7 Adjusting the Plant ID for Sunny Portal
In the following cases, you must adjust the plant ID in the Sunny WebBox:
• Plant data of the PV plant concerned has already been sent to Sunny Portal via another
communication device.
• The plant ID set for the Sunny WebBox was reset using the Reset button.
• The Sunny WebBox was replaced with another Sunny WebBox.
Perform the following steps to adjust the plant ID of the Sunny WebBox for Sunny Portal:
1. Register in Sunny Portal (www.SunnyPortal.com) with the access data available.
2. Go to "Configuration > Plant properties" on the Sunny Portal page.
3. Copy the plant ID to the clipboard.
4. Log into the Sunny WebBox as user or installer.
5. In the Sunny WebBox user interface select the Sunny WebBox in the plant tree.
6. Select "Settings" in the device menu.
7. Select the "Sunny Portal > User settings" parameter group.
8. Select [Edit].
9. In the "Plant ID" field delete the current content and paste in the content of the clipboard.
10. Select [Save].
☑ The plant ID for Sunny Portal is adjusted.
7.3 SD Card
7.3.1 Information on saving plant data on an SD card
You can save plant data onto an SD card. Once the SD card has been inserted into the SD card slot
the Sunny WebBox copies all plant data which is on the internal drive of the Sunny WebBox onto the
SD card. The Sunny WebBox saves new plant data to the SD card as long as the SD card remains
inserted and enough memory is available. In order to select a data format in which the data should
be made available please refer to section 6.6 ”Data Recording” (page 42):
50
SWebbox20-BEN104011
User Manual
SMA Solar Technology AG
Managing Plant Data
7.3.2 Saving plant data on an SD card
NOTICE
Loss of data on the SD card
Do not remove the SD card whilst the "SD CARD" LED is flashing green or orange. This can
damage the file system of the SD card and lead to data loss. Depending on the amount of
data, the saving process can take some time.
Please take note of information on the SD card (see section 10.1 ”Information on the SD card”
(page 68)).
1. Insert the SD card into the Sunny WebBox SD card
slot.
☑ The Sunny WebBox saves the plant data onto the SD
card.
7.4 Integrated FTP server
7.4.1 Information on the integrated FTP server
The Sunny WebBox is equipped with an integrated FTP server. You can directly access the saved
plant data via the FTP server. The FTP server is activated as standard. You can call up the data with
any FTP program or with Internet Explorer. The FTP server is protected via the passwords of the
respective user group.
Please note that for logging into the integrated FTP server, the English description (User ID) for the
respective user group and the related password must be entered:
User ID
"Installer"
"User"
User group
For the "Installer" user group
For the "User" user group
In order to select a data format in which the data should be made available please refer to section
6.6 ”Data Recording” (page 42):
User Manual
SWebbox20-BEN104011
51
Managing Plant Data
SMA Solar Technology AG
7.4.2 Activating / Deactivating the integrated FTP server
Activating the integrated FTP server
1. Select the Sunny WebBox in the plant tree and select "Settings" in the device menu.
or
Click on the "Settings" button in the icon bar.
2. Select the "Device > FTP server" parameter group.
3. Select [Edit].
4. In the "Activated" field select "Yes" in order to activate the integrated FTP server.
5. Select [Save].
☑ The integrated FTP server is activated.
Deactivating the integrated FTP server
1. Select the Sunny WebBox in the plant tree and select "Settings" in the device menu.
or
Click on the "Settings" button in the icon bar.
2. Select the "Device > FTP server" parameter group.
3. Select [Edit].
4. In the "Activated" field select "No" in order to deactivate the integrated FTP server.
5. Select [Save].
☑ The integrated FTP server is deactivated.
52
SWebbox20-BEN104011
User Manual
SMA Solar Technology AG
Managing Plant Data
7.4.3 Accessing the FTP server via Internet Explorer
1. Start Internet Explorer.
2. Enter the IP address of the Sunny WebBox with details of the User ID and the password in the
address bar of the web browser in accordance with the following template:
ftp://[UserID]:[Password]@[IP-address]
Use the following User ID:
User ID
"Installer"
"User"
User group
For the "Installer" user group
For the "User" user group
Example: if you want to log onto the Sunny WebBox having the IP address 192.168.0.168
as installer with the password "1111" then enter: ftp://Installer:[email protected]
3. Press enter on the keyboard.
☑ The browser displays the directory structure of the integrated FTP server. You can now
download and display the data.
User name and password remain saved in the web browser cache
Once you have accessed the integrated FTP server via a web browser, the user name and
password remain saved in the web browser cache. Delete the web browser cache in order
to avoid unauthorized access to the integrated FTP server.
User Manual
SWebbox20-BEN104011
53
Managing Plant Data
SMA Solar Technology AG
7.5 FTP Push
7.5.1 Information on FTP Push
The Sunny WebBox is equipped with an FTP Push function. With this function the Sunny WebBox can
load the collected data of your PV plant to a freely selectable FTP server. FTP Push always transmits
via the network port 21. The FTP Push function is deactivated as standard. The collected data is
uploaded to the directory given and in the desired data format every 15 minutes.
7.5.2 Activating / Deactivating FTP Push
Activating FTP Push
1. Select the Sunny WebBox in the plant tree and select "Settings" in the device menu.
or
Click on the "Settings" button in the icon bar.
2. Select the "Further Applications > FTP Push" parameter group.
3. Select [Edit].
4. In the "Activated" field select "Yes" in order to activate the FTP Push function.
5. In the "Login" field enter the login name of the external FTP server.
6. In the "Port" field enter the network port under which the FTP server is available.
7. In the "Password" field enter the password of the FTP server.
8. In the "Server path" field enter the sub directory into which the data should be saved on the FTP
server.
9. In the "Server" field enter the address of the server.
10. In the "Data export in CSV format" field select "Yes" in order to receive the data in CSV format.
or
In the "Data export in CSV format" field select "No" in order not to receive the data in CSV
format.
11. In the "Data export in XML format" field select "Yes" in order to receive the data in XML format.
or
In the "Data export in XML format" field select "No" in order not to receive the data in XML
format.
12. Select [Save].
☑ The FTP push function is activated.
54
SWebbox20-BEN104011
User Manual
SMA Solar Technology AG
Managing Plant Data
Deactivating FTP Push
1. Select the Sunny WebBox in the plant tree and select "Settings" in the device menu.
or
Click on the "Settings" button in the icon bar.
2. Select the "Further Applications > FTP Push" parameter group.
3. Select [Edit].
4. In the "Activated" field select "No" in order to deactivate the FTP Push function.
5. Select [Save].
☑ The FTP Push function is deactivated.
7.5.3 Testing FTP Push
1. Select the Sunny WebBox in the plant tree and select "Settings" in the device menu.
or
Click on the "Settings" button in the icon bar.
2. Select the "Further Applications > FTP Push" parameter group.
3. Select [Edit].
4. In the "Connection test" field select "Execute".
5. Select [Save].
☑ The Sunny WebBox performs a connection test. The connection test was successful, if "Ok" is
displayed in the "Result of the last connection test" field, and "--------" is again displayed in the
"Connection test" field.
– If the connection test is unsuccessful, refer to section 9.1 ”General troubleshooting for the
Sunny WebBox” (page 63).
User Manual
SWebbox20-BEN104011
55
Service Functions
SMA Solar Technology AG
8 Service Functions
8.1 Updating the Firmware
8.1.1 Information on Firmware Update
You have the option of updating the Sunny WebBox firmware. The firmware update can be
performed online via the internet or locally via the SD card. Existing settings of the Sunny WebBox
and data from the PV plant remain available after the update procedure. In order to always keep the
Sunny WebBox at the latest level, automatic firmware updates via the internet is recommended.
The update procedure is displayed via the flashing orange "SYSTEM" LED and occasionally via a red
running light across all LEDs. The firmware update is complete when the "SYSTEM" LED is green. The
Sunny WebBox is again available via the user interface after the update procedure. An update
procedure can take up to a maximum of 20 minutes.
Effect on the function during the update procedure
The Sunny WebBox restarts during the update process. Restarting affects the function of
the Sunny WebBox. For a short time you can not access the user interface.
Never remove the power supply plug during the update procedure.
56
SWebbox20-BEN104011
User Manual
SMA Solar Technology AG
Service Functions
8.1.2 Firmware update via the internet
If the Sunny WebBox has internet access, you can update the Sunny WebBox via the internet
automatically or manually.
Activating / Deactivating automatic firmware update
When the automatic firmware update is activated, the Sunny WebBox check 1x daily whether a new
firmware update is available. If a new firmware update is available, the Sunny WebBox downloads
this from the internet and starts the update procedure. The update procedure starts automatically the
following night (23:00 Hrs) when the PV plant is not in operation.
Unexpected interruption of an automatically started update procedure
If an automatically started update procedure of the Sunny WebBox is interrupted e.g. as
a result of a power failure, the Sunny WebBox restarts the update procedure in the next
defined time period.
1. Select the Sunny WebBox in the plant tree and select "Settings" in the device menu.
or
Click on the "Settings" button in the icon bar.
2. Select the "Device > Update" parameter group.
3. Select [Edit].
4. In the "Automatic update" field select "Yes" in order to activate the automatic firmware update.
(Status upon delivery)
or
In the "Automatic update" field select "No" in order to deactivate the automatic firmware update.
5. Select [Save].
☑ The automatic firmware update is set.
User Manual
SWebbox20-BEN104011
57
Service Functions
SMA Solar Technology AG
Updating the Firmware Manually
NOTICE
Loss of plant data
Only perform a manual firmware update when the PV plant is not in operation (e.g. during
the night). Otherwise losses during the recording of the plant data may occur.
You can also carry our manual updates when the automatic firmware update is activated.
1. Select the Sunny WebBox in the plant tree and select "Settings" in the device menu.
or
Click on the "Settings" button in the icon bar.
2. Select the "Device > Update" parameter group.
3. Select [Edit].
4. In the "Check for update and install it" field select "Execute".
5. Select [Save].
☑ The Sunny WebBox checks whether a new firmware update is available. If a new firmware
update is available, the Sunny WebBox downloads this from the internet and starts the update
procedure.
58
SWebbox20-BEN104011
User Manual
SMA Solar Technology AG
Service Functions
8.1.3 Firmware Update via the SD Card
NOTICE
Loss of plant data
Only perform a manual firmware update when the PV plant is not in operation (e.g. during
the night). Otherwise losses during the recording of the plant data may occur.
NOTICE
Loss of data on the SD card
Do not remove the SD card whilst the "SD CARD" LED is flashing green or orange. This can
damage the file system of the SD card and lead to data loss. Depending on the amount of
data, the saving process can take some time.
Please take note of information on the SD card (see section 10.1 ”Information on the SD card”
(page 68)).
1. With the help of the computer create a folder on the SD card with the name "UPDATE".
2. Copy the update file (*.up2) in the folder created on the SD card.
3. Remove the plug-in power supply unit from the plug
socket.
4. Insert the prepared SD card into the Sunny
WebBox SD card slot.
5. Insert the plug-in power supply unit of the Sunny
WebBox into the socket.
☑ The update procedure starts.
User Manual
SWebbox20-BEN104011
59
Service Functions
SMA Solar Technology AG
8.2 Stopping the Sunny WebBox
NOTICE
Loss of plant data
Only remove the power supply unit when the PV plant is not in operation (e.g. during the
night). Otherwise losses during the recording of the plant data may occur.
NOTICE
Loss of data on the SD card
Do not remove the Sunny WebBox from the electricity grid whilst the „SD CARD“ LED is
flashing green or orange. This can damage the file system of the SD card and lead to data
loss. Depending on the amount of data, the saving process can take some time.
1. Remove the power supply unit of the Sunny
WebBox from the plug socket.
☑ The Sunny WebBox has been stopped
8.3 Restarting the Sunny WebBox via the user interface
1. Select the Sunny WebBox in the plant tree and select "Settings" in the device menu.
or
Click on the "Settings" button in the icon bar.
2. Select the "Device > Update" parameter group.
3. Select [Edit].
4. In the "Initiate device restart" field select "Execute".
5. Select [Save].
☑ The Sunny WebBox is restarted. The restart was successful of the "SYSTEM" and "POWER" LEDs
light up again. The start-up procedure can take up to 90 seconds
– If the "SYSTEM" or "POWER" LEDs are not green, please refer to section 9.1 ”General
troubleshooting for the Sunny WebBox” (page 63).
60
SWebbox20-BEN104011
User Manual
SMA Solar Technology AG
Service Functions
8.4 Resetting the Sunny WebBox Using the Reset Button
You can reset the Sunny WebBox via a small hole in the rear side of the Sunny WebBox with the reset
button hidden behind this. For this the Sunny WebBox must be supplied with electricity.
Data back-up
Before you reset the Sunny WebBox, take note when necessary of all settings such as
network or portal settings. In addition secure the PV plant data in order to avoid data
losses.
Depending on how long you press the Reset button, the Sunny WebBox performs the actions listed in
the following table.
Duration
1 - 5 seconds
5 - 15 seconds
15 - 30 seconds
Action
Reset the passwords to the factory setting. All other settings and PV
plant data remains.
Reset the network settings to the factory setting. All other settings
and PV plant data remains.
Resets all settings (event memory, network settings, modem
settings, portal settings and passwords) of the Sunny WebBox
back to the default values. PV plant data will be fully deleted.
1. Use a sharp object to activate the hidden reset button
through the hole.
☑ The Sunny WebBox is reset.
User Manual
SWebbox20-BEN104011
61
Service Functions
SMA Solar Technology AG
8.5 Determining current settings of the Sunny WebBox via SD card
With the following steps you can determine the current settings and the current firmware of the Sunny
WebBox when you do not have access to the user interface.
Please take note of information on the SD card (see section 10.1 ”Information on the SD card”
(page 68)).
1. Insert the SD card into the Sunny WebBox SD card
slot.
☑ The Sunny WebBox creates a folder with the
name "WEBBOX_[Serial number] on the SD card
and saves the "config.xml" file there. The writing
process is complete when the "SD CARD" LED is
permanently lit. Example WEBBOX_0155000123\config.xml
2. When the "SD CARD" LED is permanently lit, remove the SD card from the Sunny WebBox SD
card slot.
3. Read off the SD card using a computer with an SD card reader.
4. Open the "config.xml" file in the WebBox_[Serial number] folder with a text editor or a web
browser.
☑ Extract the network settings of the Sunny WebBox (see section 10.2 ”Structure of the Config.xml
File” (page 68)).
62
SWebbox20-BEN104011
User Manual
SMA Solar Technology AG
Troubleshooting
9 Troubleshooting
9.1 General troubleshooting for the Sunny WebBox
No. Problem
1
The Sunny WebBox
is not available via
the user interface.
Cause
Rectification
The Sunny WebBox is not
• Connect the Sunny WebBox with
connected to the network or
the network cable directly to the
to the power supply.
computer or the local network and
supply the Sunny WebBox with
or
power (see installation manual of
The Sunny WebBox
the Sunny WebBox with Bluetooth).
can not be found
Incorrect
network
settings
of
•
Use the Sunny WebBox Assistant for
via the Sunny
the
network
components.
commissioning.
WebBox Assistant.
• Check the network settings of the
computer with which you wish to
access the Sunny WebBox. Align
the network settings when
necessary.
• Carry out a reset of the Sunny
WebBox (see page 61) and repeat
the commissioning.
• Check the network settings for the
individual network components
(e.g., router, Proxy server, etc.).
Align the network settings when
necessary.
A Firewall is blocking the
connection.
Defective or damaged
network components,
network cable or plug
connections.
User Manual
• Please contact your network
administrator.
• Deactivate the computer firewall or
enable the necessary connection.
• Replace the defective or damaged
parts in the network.
• Please contact your network
administrator.
SWebbox20-BEN104011
63
Troubleshooting
SMA Solar Technology AG
No. Problem
Cause
1
The Sunny WebBox The web browser is
is not available via incorrectly configured.
the user interface.
2
3
4
Rectification
• If there is a Proxy server in your
network, you must enter an
exception for the Proxy server in
your web browser (see section
or
10.4 ”Information on your web
The Sunny WebBox
browser” (page 70)).
can not be found
There
is
no
internet
•
Reinstall the internet access. If
via the Sunny
connection.
necessary,
please contact your
WebBox Assistant.
internet service provider.
The Sunny WebBox has not • Remove the Sunny WebBox power
correctly started.
supply unit from the plug socket and
plug it back in after a short time in
order to restart the Sunny WebBox.
Note that this can lead to loss of
collected plant data.
IPv6 is not supported by the • Use a Proxy server that supports
Proxy server.
IPv6.
The "SYSTEM" LED A system error has occurred. • Remove the Sunny WebBox power
is flashing red
supply unit from the plug socket and
plug it back in after a short time in
order to restart the Sunny WebBox.
The "POWER" LED
is off.
Sunny WebBox
does not send any
data to the Sunny
Portal or the
external FTP server
(the "DATA
UPLOAD" LED is
red)
or
The connection test
to Sunny Portal or to
the external FTP
server was not
successful.
The Sunny WebBox is not
supplied with electricity.
The data transfer is
incorrectly configured.
• Contact the SMA Serviceline.
• Check the power supply of the plug
socket and rectify any faults.
• Check the settings of Sunny Portal or
FTP Push (see page 46).
• Perform a connection test.
There is a fault in the
network.
• You must be registered for data
transfer to Sunny Portal Register
your Sunny WebBox in the Sunny
Portal(see page 47).
• Check the network settings of the
individual network components
(e.g., router, Sunny WebBox,
Computer) and adjust if necessary.
• Check the network components for
defects or damage. Replace
defective or damaged parts in the
network.
• Perform a connection test.
64
SWebbox20-BEN104011
User Manual
SMA Solar Technology AG
No. Problem
5
Sunny Portal
registration was not
successful.
6
After an FTP
download, the
Internet Explorer
shows old Sunny
WebBox data.
7
The "SD CARD" LED
glows red.
8
After a Sunny
WebBox is
replaced, two
plants appear in the
Sunny Portal with
the same name.
Troubleshooting
Cause
Invalid data
The cache properties of
Internet Explorer shows old
data.
The SD card is full.
The SD card is writeprotected.
Double Sunny Portal
registration
Rectification
• Perform a connection test (see page
49).
• Use an FTP client in order to load the
plant data from the internal FTP
server of the Sunny WebBox.
• Replace the SD card or format the
SD card in FAT 32 format.
• remove the write protection of the
SD card.
The Sunny WebBox supplied as a
replacement device logs into the Sunny
Portal with a new plant ID. Sunny Portal
creates a new plant for this plant ID, even
if you gave the plant the same name.
• Assign the plant ID of the old plant
to the replacement device (see page
50).
• In the replacement device enter the
e-mail address of a user who has
administrator rights in Sunny Portal
for the plant.
9
10
Parameters can not You do not possess the
be processed
necessary rights for the
parameters.
You have an inverter with
upgraded SMA Bluetooth
Piggy-Back with a software
version lower than
02.00.00.R.
LAN connection
can not be
displayed in
Windows.
User Manual
The network card driver
(Ethernet card) is not
installed or the network card
is defective.
• In Sunny Portal, delete the new plant
the replacement device created.
• Change the user group.
The configuration of parameters and the
graphical presentation of monthly and
annual energy values are not supported.
• Perform an update of the Bluetooth
Piggy-Back with the help of Sunny
Explorer.
• Check the installation of the network
adaptor in the device manager and
re-install the driver when necessary
or replace the faulty network card
with a new one.
SWebbox20-BEN104011
65
Troubleshooting
SMA Solar Technology AG
No. Problem
11 Fault in the user
interface display
Cause
JavaScript is not activated.
Rectification
• Activate JavaScript in the Web
browser
9.2 Bluetooth Connection
No. Problem
1
No Bluetooth
devices are
displayed in the
Sunny WebBox.
Cause
An incorrect NetID is set.
The connection quality to the
Bluetooth plant is too weak.
There are already 4 masters
connected to the Bluetooth
plant.
There are already 2
participators connected to
the device through which you
want to connect to the
Bluetooth plant.
2
66
Inverter is not
accessible.
The Bluetooth connection
was interrupted.
SWebbox20-BEN104011
Rectification
• Set the NetID of the PV plant (see
installation manual of the Sunny
WebBox with Bluetooth) and repeat
the commissioning.
• Consult your installer.
• Shorten the distance to the devices
or use and SMA Bluetooth Repeater
in order to extend the radio range.
Repeat the commissioning (see
installation manual of the Sunny
WebBox with Bluetooth).
• Remove a Master and repeat the
commissioning (see installation
manual of the Sunny WebBox with
Bluetooth).
• Change the position of the Sunny
WebBox in order to create a
connection via another device in the
plant or remove a Master from the
plant. Further information on SMA
Bluetooth can be found in the
download section at
www.SMA.de/en.
• Wait until the Sunny WebBox has
automatically recreated the
connection.
User Manual
SMA Solar Technology AG
No. Problem
2
Inverter is not
accessible.
3
4
Troubleshooting
Cause
Parameters for the Bluetooth
communication were
changed.
Inverter with upgraded SMA
Bluetooth Piggy-Back is in
night mode.
The inverter has not been set
to the same NetID and
commissioned.
An unknown
The set NetID is already
inverter is
assigned via an unknown
displayed.
Bluetooth PV plant.
An inverter is
The inverter with integrated
displayed as
Bluetooth has an old
unknown device in software packet (only for
the plant tree.
inverters SB 3000TL-20, SB
4000TL-20, SB 5000TL-20).
User Manual
Rectification
When setting parameters that regulate the
Bluetooth connection (e.g. parameters for
the transmitting power and country
parameters), the communication via
Bluetooth is interrupted for some time
because the inverters are carrying out a
reboot of the communication interface.
This does not affect inverters with
upgraded SMA Bluetooth Piggy-Back.
• Wait until the inverter has completed
a restart. The inverter is then
accessible again.
• Wait until the inverter is again
working in normal operation. The
inverter is then accessible again.
• The inverter must be set to the NetID
of your PV plant and commissioned.
Consult your installer.
• You must assign the PV plant with a
free NetID. Consult your installer.
• Update the software packet version
of your inverter to a version higher
than 2.0.
• Consult your installer.
SWebbox20-BEN104011
67
Appendix
SMA Solar Technology AG
10 Appendix
10.1 Information on the SD card
To ensure that the SD card is functioning properly, use SD cards available from SMA. Compatibility
with all SD cards available on the market cannot be guaranteed. The Sunny WebBox does not
support SD cards with storage capacities of over 2 GB or SDHC cards.
Only use SD cards which have been formatted with the FAT32 file system. If necessary reformat the
SD card using the computer.
The Sunny WebBox converts the SD card's file system to TFAT in order to increase data security. If
you wish to delete the SD card, you must format the SD card on the computer with the FAT32 file
system.
10.2 Structure of the Config.xml File
The "config.xml" configuration file contains information on the Sunny WebBox network settings, the
firmware version and further settings.
Example:
<?xml version="1.0" encoding="utf-8"?>
<WebBox>
<Settings>
<add key="Version" value="1.5" />
<add key="Plant-ID" value=" " />
<add key="User-ID" value="[email protected]" />
<add key="DHCP" value="false" />
<add key="IP-Address" value="192.168.0.168" />
<add key="SubNetMask" value="255.255.255.0" />
<add key="Gateway" value="192.168.0.100" />
<add key="DNS-Server" value="192.168.0.100" />
<add key="NAT-Port" value="80" />
<add key="Webserver-Port" value="80" />
<add key="Webservice-Port" value="80" />
</Settings>
<Export>
(…)
</Export>
</WebBox>
68
SWebbox20-BEN104011
User Manual
SMA Solar Technology AG
Setting
Version
Plant ID
User ID
DHCP
IP address
SubNetMask
Gateway
DNS Server
NAT Port
Web server port
Webservice port
Appendix
Meaning
The current firmware version of the Sunny WebBox
Plant ID for Sunny Portal
User ID for Sunny Portal
Displays whether the network settings are acquired via DHCP.
The current IP address of the Sunny WebBox
The current Subnet mask of the Sunny WebBox
The currently set Gateway IP address
The currently set DNS server IP address
The currently set NAT port
The currently set port of the web server
The set port of the web service
10.3 Structure of an XML data file
Example:
<?xml version="1.0" encoding="utf-8"?>
<WebBox>
<Info>
<Created>2010-02-10T01:37:04</Created>
<Culture>de</Culture>
</Info>
<MeanPublic>
<Key>Meine Sunny WebBox:155000234:Metering.TotWhOut</Key>
<Mean>761.858</Mean>
<Base>1</Base>
<Period>300</Period>
<Timestamp>2010-02-09T10:55:52</Timestamp>
</MeanPublic>
<MeanPublic>
(…)
</MeanPublic>
<WebBox>
Setting
Info
Create
User Manual
Meaning
Information
Date of generation
SWebbox20-BEN104011
69
Appendix
SMA Solar Technology AG
Setting
Culture
UtcOffset
MeanPublic
CurrentPublic
Key
Min
Max
Mean
Base
Period
TimeStamp
Meaning
Language
Offset in minutes to UTC
Data of the mean values
Data of the spot values
Name of the element made up of device name, serial number of the device and
the parameter name Individual values are separated by a colon.
Example: D <Key>SENS0700:5141:TmpMdul C</Key>
Smallest value in measurement interval / merging
Largest value in measurement interval / merging
Average value in measurement interval / merging
Quantity of the spot values in interval / quantity of the merged values
Length of the measurement interval in seconds
Time stamp, at which the average was calculated
10.4 Information on your web browser
In order to be able to call up the Sunny WebBox user interface, you need a current web browser.
You can user the standard settings of your web browsers.
Ensure that
• JavaScript is activated.
• If a Proxy server is active in your network, you must set up a Proxy exception rule in your browser
(see page 10.5 ”Setting up a Proxy exception rule in Internet Explorer” (page 70)).
10.5 Setting up a Proxy exception rule in Internet Explorer
1. Start Internet Explorer.
2. In Internet Explorer, select "Tools > Internet Options".
3. The "Internet Options" window opens.
4. Select the "Connections" tab, then click [Settings].
5. Select "Advanced".
6. In the "For addresses that start as follows, do not use a Proxy server:" field, enter the address
192.168.*.
7. Confirm entry with [OK] and close all further windows by selecting [OK] in each.
☑ The Proxy exception rule is set up.
10.6 Activating IPv6 in Windows XP SP2
In order to be able to locate the Sunny WebBox with the Sunny WebBox Assistant IPv6 is required.
70
SWebbox20-BEN104011
User Manual
SMA Solar Technology AG
Appendix
IPv6 stands for Internet Protocol Version 6 and specifies the procedures that are necessary for data
transfer via a packet-switching data network.
IPv6 is the successor to IPv4, which is still predominantly found in use in the internet. IPv6 is already
activated in Windows Vista, Windows 7, MacOS and Linux. IPv6 has to be activated in Windows XP
SP2.
In order to activate IPv6 manually, proceed as follows:
8. In Windows select "Start > Run"
9. In the "Open" field enter "ncpa.cpl" and select [OK]
☑ The "Network connections" window opens.
10. Double click on the LAN connection via which the Sunny WebBox is connected.
– If Windows displays several LAN connections, there are probably several network
connections installed in the computer. Ensure that you select the correct network connection,
with which the computer is connected to the Sunny WebBox. If necessary, read the manual
for your computer.
– In the event that no LAN connection is displayed, please refer to section 9.1 ”General
troubleshooting for the Sunny WebBox” (page 63).
11. Select [Properties].
☑ The "LAN connection properties" window opens.
1. Activate "Microsoft TCP/IP Version 6"
2. Select [OK].
☑ IPv6 is activated.
10.7 Allocating IP addresses in a local network
You select a static IP address (Internet Protocol). Use the address range which is available to your
router. In most cases the address range of the router lies between 192.168.0.1. and
192.168.255.254. If necessary refer to the manual of your router.
Please note during the allocation of the IP address that the first three address parts of the IP address
must be identical for all participants of the same network. Additionally you may not allocate the same
IP address twice.
Example:
Router:
Computer 1
Computer 2
Sunny WebBox
User Manual
192.168.0.1
192.168.0.2
192.168.0.3
192.168.0.168
SWebbox20-BEN104011
71
Contact
SMA Solar Technology AG
11 Contact
If you have technical problems concerning our products, contact the SMA Serviceline. We require the
following information in order to provide you with the necessary assistance:
• The current firmware version of the Sunny WebBox
• Serial number and hardware version of the Sunny WebBox.
• Type of communication interface between Sunny WebBox and the inverters.
• Type and serial numbers of the inverters connected to the plant.
SMA Solar Technology AG
Sonnenallee 1
34266 Niestetal, Germany
www.SMA.de
SMA Serviceline
Inverters:
+49 561 9522 1499
Communication:
+49 561 9522 2499
Fax:
+49 561 9522 4699
E-Mail:
[email protected]
72
SWebbox20-BEN104011
User Manual
SMA Solar Technology AG
Legal Restrictions
The information contained in this document is the property of SMA Solar Technology AG. Publishing its content, either partially or
in full, requires the written permission of SMA Solar Technology AG. Any internal company copying of the document for the
purposes of evaluating the product or its correct implementation is allowed and does not require permission.
Exclusion of liability
The general terms and conditions of delivery of SMA Solar Technology AG shall apply.
The content of these documents is continually checked and amended, where necessary. However, discrepancies cannot be
excluded. No guarantee is made for the completeness of these documents. The latest version is available online at www.SMA.de
or from the usual sales channels.
Guarantee or liability claims for damages of any kind are excluded if they are caused by one or more of the following:
• Damages during transportation
• Improper or inappropriate use of the product
• Operating the product in an unintended environment
• Operating the product whilst ignoring relevant, statutory safety regulations in the deployment location
• Ignoring safety warnings and instructions contained in all documents relevant to the product
• Operating the product under incorrect safety or protection conditions
• Altering the product or supplied software without authority
• The product malfunctions due to operating attached or neighboring devices beyond statutory limit values
• In case of unforeseen calamity or force majeure
The use of supplied software produced by SMA Solar Technology AG is subject to the following conditions:
• SMA Solar Technology AG rejects any liability for direct or indirect damages arising from the use of software developed by
SMA Solar Technology AG. This also applies to the provision or non-provision of support activities.
• Supplied software not developed by SMA Solar Technology AG is subject to the respective licensing and liability agreements
of the manufacturer.
SMA Factory Warranty
The current guarantee conditions come enclosed with your device. These are also available online at www.SMA.de and can be
downloaded or are available on paper from the usual sales channels if required.
Trademarks
All trademarks are recognized even if these are not marked separately. Missing designations do not mean that a product or brand
is not a registered trademark.
The Bluetooth® word mark and logos are registered trademarks owned by Bluetooth SIG, Inc. and any use of such marks by SMA
Solar Technology AG is under license.
SMA Solar Technology AG
Sonnenallee 1
34266 Niestetal
Germany
Tel. +49 561 9522-0
Fax +49 561 9522-100
www.SMA.de
E-Mail: [email protected]
© 2004 to 2010 SMA Solar Technology AG. All rights reserved
User Manual
SWebbox20-BEN104011
73
4."4PMBS5FDIOPMPHZ
XXX4."4PMBSDPN
4."4PMBS5FDIOPMPHZ"(
XXX4."EF
4.""NFSJDB--$
XXX4.""NFSJDBDPN
4."5FDIOPMPHZ"VTUSBMJB1UZ-UE
XXX4.""VTUSBMJBDPNBV
4."#FOFMVY413XXX4."#FOFMVYDPN
4."#FJKJOH$PNNFSDJBM$P-UE
XXX4."$IJOBDPN
4."$[FDI3FQVCMJDTSP
XXX4."$[FDIDPN
4."'SBODF4"4
XXX4."'SBODFDPN
4.")FMMBT"&
XXX4.")FMMBTDPN
4."*C©SJDB5FDOPMPHB4PMBS4-
XXX4."*CFSJDBDPN
4."*UBMJB4SM
XXX4."*UBMJBDPN
4."5FDIOPMPHZ,PSFB$P-UE
XXX4.",PSFBDPN