1
CS236I-BP12FU(L) 20131022
1
INSTALLATION MANUAL FOR
INSTALLATION PLATE MOUNTING
NOTE:
INSTALLATION PRECAUTIONS
Please read this installation manual carefully before operating the unit to ensure correct installation.
If the power cord is damaged, replacement work shall be performed by authorised personnel only.
Installation work must be performed in accordance with the national wiring standards by authorised
personnel only.
Contact an authorized service technician for repair, maintenance and installation of this unit.
This appliance is not intended for use by persons(including children) with reduced physical, sensory
or mental capabilities, or lack of experience and knowledge, unless they have been given supervision
or instruction concerning use of the appliance by persons responsible for their safety.
Children should be supervised to ensure that they do not play with the appliance.
All the pictures in the instructions are for explanation purposes only. The actual shape should prevail.
The design and specifications are subject to change without prior notice for product improvement.
Consult with the sales agency or manufacturer for details.
NOTE:
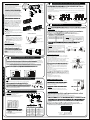
Mount the Installation Plate and drill
holes in the wall according to the
wall structure and corresponding
mounting points on the installation
plate. The installation plate provided
with the machine differ from appliance
to appliance.
(Dimensions are in " mm " unless
otherwise stated)
SAFETY PRECAUTIONS
Please read these safety precautions carefully before installation
Be sure to follow all the precautions below, they are all important for ensuring safety.
This symbol indicates the possibility of death or serious injury.
CAUTION
This symbol indicates the possibility of injury or damage to property.
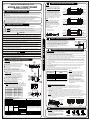
Correct orientation
of Installation Plate
120mm or
more to wall
120mm or
more to wall
Left rear side
refrigerant
pipe hole 65
A
Right rear side
refrigerant pipe
hole 65
9000Btu/h models(A:715, B:250, C:85, D:88)
150mm or more to ceiling
C
D
Indoor unit outline
120mm or
more to wall
120mm or
more to wall
Left rear side
refrigerant
pipe hole 65
A
Right rear side
refrigerant pipe
hole 65
12000Btu/h models(A:800, B:275, C:100, D:95)
150mm or more to ceiling
C
D
Indoor unit outline
120mm or
more to wall
120mm or
more to wall
B
WARNING
Indoor unit outline
B
Installation Plate Mounting
1. Fit the installation plate horizontally
on structural parts of the wall with
spaces around the installation plate.
2. If the wall is made of brick, concrete
or the like, drill five or eight 5mm
diameter holes in the wall.Insert Clip
anchor for appropriate mounting screws.
3. Fit the installation plate on the wall
with five or eight type " A " screws.
D
B
(Split Wall-Mounted Type)
150mm or more to ceiling
C
45
ROOM AIR CONDITIONER
The mounting wall is strong and solid
enough to prevent it from the vibration.
45
202000192582
CAUTION
1) This equipment must be grounded and installed with ground leakage current breaker. It may cause
electrical shock if grounding is not perfect.
2) Do not install the unit at place where leakage of flammable gas may occur. In case gas leaks and
accumulates at surrounding of the unit, it may cause fire.
3) Carry out drainage piping as mentioned in installation instructions. If drainage is not perfect, water
may enter the room and damage the furniture.
Indoor unit
15cm or more
ore
12cm or m
2.3m or more
mo
200c
60cm or more
30c
30cm
rm
ore
m or
or m
ore
more
60c
Settlement of outdoor unit
mo
276
276
780x540x250
549
760x590x285
530
290
845x700x320
560
335
810x558x310
549
325
670x540x265
481
276
ACCESSORIES
Number Name of Accessories
3
4
5
6
Gas side
7
8
9
10
3
12.7
16
Remote controller
optional
Self-tapping Screw B ST2.9x10
parts
Remote controller holder
Air freshening filter(used to install on Air filter)
Outdoor
5-7mm
Indoor
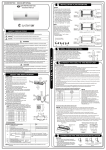
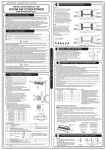
CONNECT THE CABLE TO THE INDOOR UNIT
Electrical work
Electric safety regulations for the initial Installation
1. If there is serious safety problem about the power supply, the technicians should refuse to install
the air conditioner and explain to the client until the problem is solved.
2. Power voltage should be in the range of 90%~110%of rated voltage.
3. The surge protector and main power switch with a 1.5 times capacity of Max. Current of the unit should
be installed in power circuit. Ensure the air conditioner is grounded well.
4. The appliance shall be installed in accordance with national wiring regulations. Do not operate your air
conditioner in a wet room such as a bathroom or laundry room.
5. An all-pole disconnection device which has at least 3mm clearances in all poles, and have a leakage
current that may exceed 10mA, the residual current device(RCD) having a rated residual operating
current not exceeding 30mA, and disconnection must be incorporated in the fixed wiring in accordance
with the wiring rules.
6. For the unit adopts auxiliary electric heater, keep at least 1 meter away from the nearest combustible
materials.
7. According to the attached Electrical Connection Diagram located on the panel of the indoor & outdoor
unit to connect the wire.
8. All wiring must comply with local and national electrical codes and be installed by qualified and
skilled electricians.
9. An individual branch circuit and single receptacle used only for this air conditioner must be
available. See the following table for suggested wire sizes and fuse specifications:
Rated curr ent Nominal cross-sectional
of appliance
area
(A)
(mm2)
>3 and 6
0.75
>6 and 10
1
>10 and 16
1.5
2.5
>16 and 25
4
>25 and 32
6
>32 and 40
NOTE:
The wire size of power supply cord and
interconnected wire and the current of
the fuse or switch are determined by the
maximum current indicated on the
nameplate which located on the side
panel of the unit. Please refer to the
nameplate before selecting the wire size,
fuse or switch.
The controller of the air conditioner
designed with a fuse protection function
under abnormal conditions, the
specifications of the fuse have printed on
the circuit board, such as: T3.15A/250VAC,
T5A/250VAC, etc.
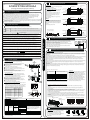
NOTE: Before performing any electrical work, turn off the main power to the system.
1. The inside and outside connecting cable can be connected without removing the front grille.
2. The indoor power cord type is H05VV-F or H05V2V2-F, the outdoor power cord and
interconnected cord type is H07RN-F.
3. Lift the indoor unit panel up, remove the electrical box cover by loosening the screw.
4. Ensure the colour of wires of outdoor unit and the terminal Nos. are the same to the indoor s
respectively.
5. Wrap those cables not connected with terminals with insulation tapes, so that they will not touch
any electrical components. Secure the cable onto the control board with the cord clamp.
NOTE: If used as MONO unit, for the standby control needs, the cross section area of cable connected
to L(1)/W, 1/1(L), 2(N) must be sufficient for the maximum system current. The maximum system current is
equal to the sum of indoor unit and outdoor unit rated current. If used as MULTI unit, L(1)/W on the
terminal block does not need to be connected.
Air inlet
Air outlet
Electronic box
cover
1
5-8(depending on models)
5-8(depending on models)
1
1
Parts you must purchase. The pipe
size differ from appliance to appliance.
Consult the technician for the proper
size.
1
2
1
1
NOTE: Except the above parts provided,the other parts needed during installation you must
purchase.
Terminal block of indoor unit
Front Panel
Qty
Installation Plate
Clip Anchor
Self-tapping Screw A ST3.9x25
Seal(For cooling & heating models only)
Drain Joint(For cooling & heating models only
6.35
Connecting Liquid side
9.52
pipe
9.52
Assembly
Wall
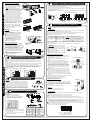
1. Determine hole positions according to left and right
side of the installation plate. The hole center is obtained
by measuring the distance as shown in the diagram above.
2. Dirll the piping plate hole with 65mm hole-core drill.
3. Drill the piping hole at either the right or the left and the
hole should be slightly slanted to the outdoor side.
4. Always take steps to protect the pipe when drilling metal
grid,metal plate or the like.
,
A
Air inlet
B
250
460
D
458
685x430x260
1
2
W
B(mm)
700x540x240
I
N
D
O
O
R
DRILL A HOLE IN THE WALL
Connect the cable to the indoor unit
Mounting dimensions
A(mm)
2
rm
ore
Anchor the outdoor unit with a bolt and nut 10 or
8 tightly and horizontally on a concrete or rigid mount.
NOTE: The outdoor unit you purchase may be like one
of the following. Install the outdoor unit according to the
dimension as indicated in the table below:
Outdoor unit dimension
mm(WxHxD)
Right rear side
refrigerant pipe
hole 65
Minimum cross-sectional area of conductors:
Outdoor unit
If an awning is built over the unit to prevent
direct sunsight or rain,be careful that heat
radiation from the condenser is not obstructed.
There should not be any animal or plant which
could be affected by hot air discharged.
Keep the spaces indicated by arrow from wall
ceiling, fence or other obstacles.
Do not place any obstacles which may cause
a short circuit of the discharged air.
A
18000Btu/h models(A:940, B:275, C:110, D:100)
U
N
I
T
SELECT THE BEST LOCATION
There should not be any heat source or stream
near the unit.
There should not be any obstacles blocking the
air circulation.
12cm
or mo
A place where air circulation in the room is good.
re
A place where drainage can be easily done.
A place where noise prevention is taken into
consideration.
Do not install the unit near the door way.
Ensure the spaces indicated by arrows from the
wall,ceiling,fence or other obstacles.
There should not be any direct sunlight. If unavoidable,
sunlight prevention should be taken into consideration.
Left rear side
refrigerant
pipe hole 65
45
WARNING
1) Install according to this installation instructions strictly. If installation is defective, it will cause water
leakage, electrical shock,or fire.
2) Use the included accessories parts and specified parts for installation. otherwise, it will cause the set
to fall, water leakage, electrical shock,or fire.
3) Install at a strong and firm location which is able to withstand the set s weight. If the strength is not
enough or installation is not properly done, the set will drop and cause injury.
4) For electrical work, follow the local national wiring standard, regulation and this installation instructions.
An independent circuit and single outlet must be used. If electrical circuit capacity is not enough or
defect found in electrical work, it will cause electrical shock,or fire.
5) Use the specified cable and connect tightly and clamp the cable so that no external force will be acted
on the terminal. If connection or fixing is not perfect, it will cause heat-up or fire at the connection.
6) Wiring routing must be properly arranged so that control board cover is fixed properly. If control board
cover is not fixed perfectly, it will overheat at connection point of terminal, fire or electrical shock.
7) When carrying out piping connection, take care not to let air substances other than the specified
refrigerant go into refrigeration cycle. Otherwise, it will cause lower capacity,abnormal high pressure
in the refrigeration cycle, explosion and injury.
8) Do not modify the length of the power supply cord or use of extension cord, and do not share the
single outlet with other electrical appliances. Otherwise, it will cause fire or electrical shock.
L(1) 1 2(N)
S
To outdoor unit
Model A
4
W 1(L) 2(N)
S
To outdoor unit
Model B
CONNECTIVE PIPE AND DRAINAGE INSTALLATION
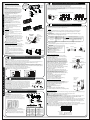
Drainage
1. Run the drain hose sloping downward.
Do not install the drain hose as illustrated
in wrong figures.
2. When connecting extension drain hose,
insulate the connecting part of extension
drain hose with a shield pipe, do not let
the drain hose slack.
Right
Wrong