1
INDOOR UNIT
●
●
CUTTING THE HOLE IN THE WALL FOR THE CONNECTING PIPING
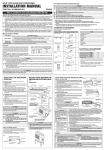
(1) Cut a 65 mm diameter hole in the wall at the position shown in (Fig.
5).
(2) When cutting the wall hole at the inside of the installation frame, cut
the hole within the range of the left and right center marks 40 mm
below the installation frame.
When cutting the wall hole at the outside of the installation frame,
cut the hole at least 10 mm below over.
(3) Cut the hole so that the outside end is lower (5 to 10 mm) than the
inside end.
(4) Always align the center of the wall hole. If misaligned, water leakage
will occur.
(5) Cut the wall pipe to match the wall thickness, stick it into the wall cap,
fasten the cap with vinyl tape, and stick the pipe through the hole.
(The connection pipe is supplied in the installation set.) (Fig. 5)
(6) For left piping and right piping, cut the hole a little lower so that drain
water will flow freely. (Fig. 5)
Fig. 5
●
Center mark
Lower
Lower
5 to 10
mm low
65 mm dia. hole
For left piping and left rear piping, align the marks on the wall hook
bracket and shape the connection pipe.
Bend the connection piping at the bend radius of 70 mm or more and
install no more than 35 mm from the wall.
After passing the indoor piping and drain hose through the wall hole,
hang the indoor unit on the hooks at the top and bottom of the wall
hook bracket.
Fasten with
vinyl tape
Fig. 8
Connection pipe
(6.35 mm dia.)
Connection pipe
(12.7 mm dia.)
[Installing the indoor unit]
●
●
10 mm
or over
Indoor unit
Indoor unit
(Fitting)
(Spacer)
(Wall pipe)
Wall
CONNECTING THE PIPING
(Outside)
Bottom hooks
Wall hook
bracket
After hooking the indoor unit to the top hook, hook the fittings of the
indoor unit to the two bottom hooks while lowering the unit and
pushing it against the wall.
Wall hook bracket
(Inside)
Top hooks
Hang the indoor unit from the hooks at the top of the wall hook bracket.
Insert the spacer, etc. between the indoor unit and the wall hook
bracket and separate the bottom of the indoor unit from the wall.
65 mm dia. hole
(Wall cap)
Align the marks.
Bend (R70) with
a pipe bender
Fig. 9
Tighten with two wrenches.
CONNECTION
INSTALLING THE WALL HOOK BRACKET
(1) Install the wall hook bracket so that it is correctly positioned horizontally and vertically. If the wall hook bracket is tiled, water will drip to
the floor.
(2) Install the wall hook bracket so that it is strong enough to withstand
the weight of an adult.
● Fasten the wall hook bracket to the wall with 6 or more screws through
the holes near the outer edge of the bracket.
● Check that there is no rattle at the wall hook bracket.
Center notch
Wall hook bracket
Fig. 6
Hook
(1) Install the outdoor unit wall cap (supplied with the optional installation set
or procured at the site) to the wall pipe.
(2) Connect the outdoor unit and indoor unit piping.
(3) After matching the center of the flare surface and tightening the nut hand
tight, tighten the nut to the specified tightening torque with a torque wrench.
(Table 2)
(1) Cut the connection pipe to the necessary
String
WARNING
If the wall pipe is not used, the cord interconnecting
the indoor and outdoor units may touch metal and
cause electric leakage.
burrs.
Install the wall hook bracket horizontally and
perpendicularly.
Table 3
Die
respectively) onto the pipe and perform the
Interchange the drain cap and the drain hose.
INDOOR UNIT WIRING
●
(3) Connect the end of the connection cord fully into the terminal block.
(4) Fasten the connection cord with a cord clamp.
(1) Remove the cord clamp.
(2) Bend the end of the connection cord as shown in the figure.
Fig. 10
Drain cap
Cord clamp
(There is a
terminal block
inside.)
Removal method of drain Installation method of
hose
drain hose
●
Remove the screw at the left of
drain hose and pull out drain
hose.
Screw
●
Vertically insert the drain hose
toward the inside, so that the
drain fixture (blue) can
accurately align with the screw
hole around the drain cock.
After inserting and before
replacing, please reinstall and
fix the removed screws.
Drain hose
Drain fixture (blue)
Screw
Screw hole
Drain fixture
(blue)
Drain hose
Drain cock
● Be sure to install around the drain hose connector.
● As the screw is inside, be sure to use screwdriver treated with
5 mm
12 mm
Indoor unit
drain hose
Cord clamp
Right bottom of
indoor unit
Tab
40 mm
In order to align the drain hose and drain cap, be
sure to insert securely and vertically. ncline insertion
will cause water leakage.
When inserting, be sure not to attach any material
besides water. If any other material is attached, it
will cause deterioration and water leakage.
After removing drain hose, be sure not to forget
mounting drain cap.
Be sure to fix the drain hose with tape to the bottom
of piping.
Remove the drain cap by pulling
at the projection at the end of
the cap with pliers, etc.
5 mm
CAUTION
●
1.5 to 2.0
1.5 to 2.0
(2) During installation, make sure that the refrigerant pipe is attached firmly
before you run the compressor. Do not operate the compressor under the
condition of refrigerant piping not attached properly with 2-way or 3-way
valve open. This may cause abnormal pressure in the refrigeration cycle
that leads to breakage and even injury.
the A dimension shown in table 3 .
For left outlet piping, cut off the
piping outlet cutting groove
with a hacksaw.
●
Wing nut type
1.0 to 1.5
1.0 to 1.5
CAUTION
use an allowance adjustment gauge and secure
Pipe (top)
Rear piping
Bottom Indoor unit drain hose
piping (bottom)
Clutch type
(1) Fasten a flare nut with a torque wrench as instructed in this manual. If
fastened too tight, the flare nut may be broken after a long period of time
and cause a leakage of refrigerant.
When using the conventional flare tool, always
Bind with vinyl tape
A (mm)
Conventional (R22) flare tool
0 to 0.5
0 to 0.5
Pipe
entional (for R22) flare tool.
[For Left rear piping, Left piping]
●
A
Use the special R410A flare tool, or the conv-
Right piping
Arm strength
Flash tool for
R410A, clutch type
ø 6.35 mm (1/4”)
ø 12.7 mm (1/2”)
12 mm
●
●
flare processing with a flare tool.
Install the indoor unit piping in the direction of the wall hole and bind
the drain hose and pipe together with vinyl tape. (Fig. 7)
Install the piping so that the drain hose is at the bottom.
Wrap the pipes of the indoor unit that are visible from the outside
with decorative tape.
Wrist strength
Pipe outside diameter
50 mm
●
15.7 to 17.6 N•m
(160 to 180 kgf•cm)
49.0 to 53.9 N•m
(500 to 550 kgf•cm)
Pipe outside
diameter
the pipe with a flaring tool.
attached to the indoor and outdoor units
Fig. 7
Tightening torque standard
(using a 20 cm wrench)
Tightening torque
(3) Insert the flare nut onto the pipe and flare
Insert the flare nut (always use the flare nut
FORMING THE DRAIN HOSE AND PIPE
Flare nut
12.7 mm dia.
will not enter the pipe and remove the
CAUTION
Flare nut tightening torque
6.35 mm dia.
(2) Hold the pipe downward so that cuttings
To prevent gas leakage, coat the flare
surface with refrigerator oil.
Connection pipe
Indoor unit pipe
Check if [L] is flared uniformly
and is not cracked or scratched.
length with a pipe cutter.
Tapping screw
Flare nut
Torque
wrench
Table 2
FLARING
Wall hook bracket
[Rear piping, Right piping, Bottom piping]
Wrench (fixed)
Connection cord
Square hole
Screw
Screw
Insert the tab into the square hole of the
indoor unit and fasten with a screw.
Connection cord
CAUTION
(1) Match the terminal block numbers and connection
cord colors with those of the outdoor unit.
Erroneous wiring may cause burning of the electric parts.
(2) Connect the connection cords firmly to the terminal
block. Imperfect installation may cause a fire.
(3) Always fasten the outside covering of the connection cord with the cord clamp. (If the insulator is
chafed, electric leakage may occur.)
(4) Securely earth the power cord plug.
(5) Do not use the earth screw for an external connector.
Only use for interconnection between two units.
magnet.
OUTDOOR UNIT
●
Set the unit on a strong stand, such as one made of concrete blocks
to minimize shock and vibration.
Do not set the unit directly on the ground because it will cause trouble.
Fig. 11
Earth screw
Control box
Fig. 13
5mm
12mm
5mm
30mm
●
Remove the outdoor unit connector cover.
Bend the end of the cord as shown in the figure.
Connect the end of the connection cord fully into the terminal block.
Fasten the sheath with a cord clamp.
Install the connector cover.
25mm
(1)
(2)
(3)
(4)
(5)
OUTDOOR UNIT INSTALLATION
12mm
OUTDOOR UNIT WIRING
Connector cover removal
●
Remove the tapping screws.
Installing the connector cover
Cord clamp
(1) After inserting the two front hooks, then insert the rear hook.
(2) Tighten the tapping screws.
Connector cord
Tapping screw
Front hooks
WARNING
Rear hooks
(1) Install the unit where it will not be tilted by more
than 5°.
Connector cover
Connection cord wiring
Run the connection cord to the rear of the outdoor unit within the A
range of the arrows shown in the figure.
(The connector cover becomes difficult to install.)
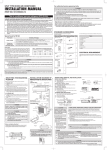
AIR PURGE
(1) Refrigerant must not be discharged into
atmosphere.
Close the high pressure side valve of the gauge manifold fully and do
not operate it during the following work.
(2) After connecting the piping , check the joints for
gas leakage with gas leak detector.
1. Check if the piping connections are secure.
10. Fully open the valve stems of the 2-way valve and 3-way valve
using a hexagon wrench. (After the valve stem begins to turn,
turn it with a torque of less than 2.9 N•m (30 kgf•cm) until it
stops turning.)
11. Firmly tighten the 2-way valve and 3-way valve blank cap and
the charging port cap.
4. Open the low pressure side valve of the gauge manifold fully.
Fig. 12
5. Operate the vacuum pump and start pump down.
3-way valve
Gauge manifold
Compound pressure gauge
Pressure gauge
-0.1 MPa
2-way valve
(-76 cmHg
Flare nut
-1 bar)
High
pressure
Low pressure
side valve
side valve
(closed)
LO
HI
6. Slowly loosen the flare nut of the 3-way valve and check if air
enters, then retighten the flare nut.
(When the flare nut is loosened the operating sound of the
vacuum pump changes and the reading of the compound
pressure gauge goes from minus to zero.)
Valve stem
7. Pump down the system for at least 15 minutes, then check if the
compound pressure gauge reads -0.1 MPa (-76 cmHg, -1 bar).
Earth screw
Outdoor unit terminal block
Connection cord
Blank cap
Charge hose
Charge
hose
CAUTION
(1) Match the terminal block numbers and connection (3) Always fasten the outside covering of the connection cord with the cord clamp. (If the insulator is
cord colors with those of the indoor unit.
chafed, electric leakage may occur.)
Erroneous wiring may cause burning of the electric
parts.
(4) Securely earth the power cord plug.
(2) Connect the connection cords firmly to the terminal (5) Do not use the earth screw for an external connector.
block. Imperfect installation may cause a fire.
Only use for interconnection between two units.
FINISHING
(1) Insulate between pipes.
● For rear, right, and bottom piping, overlap the connection pipe heat insulation and
indoor unit pipe heat insulation and bind them with vinyl tape so that there is no gap.
● For left and left rear piping, butt the connection pipe heat insulation and indoor unit
pipe heat insulation together and bind them with and vinyl tape so that there is no gap.
● For left and left rear piping, wrap the area which accommodates the rear piping housing
section with cloth tape.
● For left and left rear piping, bind the connection cord to the top of the pipe with vinyl
tape.
● For left and left rear piping, bundle the piping and drain hose together by wrapping
them with cloth tape over the range within which they fit into the rear piping housing
section.
(2) Temporarily fasten the connection cord along the connection pipe with vinyl tape. (Wrap
to about 1/3 the width of the tape from the bottom of the pipe so that water does not
enter.)
(3) Fasten the connection pipe to the outside wall with saddles, etc.
(4) Fill the gap between the outside wall pipe hole and the pipe with sealer so that rain
water and wind cannot blow in.
(5) Fasten the drain hose to the outside wall, etc.
Fig. 15
Charging port cap
Fig. 16
Indoor unit pipe (heat insulation)
Seal A
Vinyl tape
Connection pipe
(heat insulation)
Butt connection pipe (heat
insulation) against the indoor
unit pipe (heat insulation)
and wrap with seal A so that
there is no gap.
Pipe
Wrap with
cloth tape
Drain hose Cloth tape
Left piping
For connection from the left rear
Connection cord
Connection cord
Wall pipe
Connection
pipe
Drain hose
Pipe
Drain hose
Check the following:
(Outside wall cap)
(Saddle)
GOOD
(Sealer putty)
BAD
BAD
Lifted up
Wave
BAD
Drain hose
Saddle
Charging port
8. At the end of pump down, close the low pressure side gauge of
the gauge manifold fully and stop the vacuum pump.
Earth screw
Indoor unit terminal block
Connector cord
CAUTION
Always use a vacuum pump to purge the air.
Refrigerant for purging the air is not charged in the
outdoor unit at the factory.
3. Connect the gauge manifold charge hose to the charging port
of the 3-way valve (side with the projection for pushing in the
valve core).
Sheath
Fig. 14
(2) When installing the outdoor unit where it may exposed to strong wind, fasten it securely.
2. Check that the stems of 2-way valve and 3-way valve are closed
fully.
Cord clamp
Wall
Pipe
Vacuum pump
(Outdoors)
End in water
TEST RUNNING
9. Slowly loosen the valve stem of the 3-way valve. When the
compound pressure gauge reading reaches 0.1-0.2 MPa,
retighten the valve stem and disconnect the charge hose
from the 3-way valve charging port.
(If the stem of the 3-way valve is opened fully before the
charge hose is disconnected, it may be difficult to disconnect
the charge hose.)
Additional charge
Refrigerant suitable for a piping length of 15 m is charged in the outdoor
unit at the factory.
When the piping is longer than 15 m, additional charging is necessary.
For the additional amount, see the table below.
Table 5
Pipe length
Additional refrigerant
15 m
20 m
None
100 g
Table 4
Tightening torque
Blank cap (2-way valve)
19.6 to 24.5 N•m (200 to 250 kgf•cm)
Blank cap (3-way valve)
27.4 to 31.4 N•m (280 to 320 kgf•cm)
Charging port cap
12.3 to 15.7 N•m (125 to 160 kgf•cm)
CAUTION
(1) When adding refrigerant, add the refrigerant from
the charging port at the completion of work.
(2) The maximum length of the piping is 20 m. If
the units are further apart than this, correct
operation can not be guaranteed.
Between 15 m and 20 m, when using a connection pipe other than
that in the table, charge additional refrigerant with 20g/1 m as the
criteria.
● Perform test operation and check items 1 and 2 below.
● For the test operation method, refer to the operating manual.
● The outdoor unit, may not operate, depending on the room temperature. In this case, press the test run button on the remote control unit while
the air conditioner is running, (Point the transmitter section of the remote control unit toward the air conditioner and press the test run button
with the tip of a ball-point pen, etc.)
● To end test operation, press the remote control unit START/STOP button.
(When the air conditioner is run by pressing the test run button, the OPERATION indicator lamp and TIMER indicator lamp will simultaneously
flash slowly.)
1. INDOOR UNIT
(1)
(2)
(3)
(4)
Is operation of each button on the remote control unit normal?
Does each lamp light normally?
Do the air flow-direction louver operate normally?
Is the drain normal?
Fig. 17
Transmitter section
2. OUTDOOR UNIT
(1) Is there any abnormal noise and vibration during operation?
(2) Will noise, wind, or drain water from the unit disturb the neighbors?
(3) Is there any gas leakage?
Test run button
P/N 9315140029-01