1
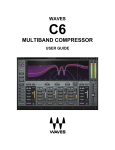
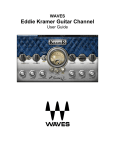
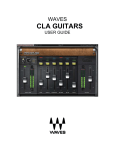
WNS Waves Noise Suppressor Table of Contents Chapter 1 – Introduction ............................................ 3 1.1 Welcome ............................................................................................................... 3 1.2 Product Overview................................................................................................ 3 1.3 Concepts and Terminology ............................................................................... 4 1.4 Components......................................................................................................... 5 Chapter 2 – Quick Start Guide .................................... 6 Chapter 3 – Interface and Controls ............................ 7 3.1 Interface ............................................................................................................... 7 3.2 Controls ................................................................................................................ 8 Chapter 4 – The WaveSystem................................... 11 4.1 The WaveSystem Toolbar ............................................................................... 11 4.2 Preset Handling ................................................................................................. 11 4.3 Interface Controls............................................................................................. 14 WNS Waves Noise Suppressor User Guide 2 Chapter 1 – Introduction 1.1 Welcome Thank you for choosing Waves! In order to get the most out of your Waves processor, please take the time to read through this manual. In conjunction, we also suggest that you become familiar with www.wavesupport.net. There you will find an extensive Answer Base, the latest Tech Specs, detailed Installation guides, new Software Updates, and current information on Authorization and Registration. By signing up at www.wavesupport.net, you will receive personalized information on your registered products, reminders when updates are available, and information on your authorization status. 1.2 Product Overview The WNS Waves Noise Suppressor was designed and engineered for Post Production professionals who require fast and effective broadband noise suppression for the cleaning of dialog tracks. It is suitable for both indoor and location recordings of dialog polluted by stationary and/or modulating environment noise. WNS is not intended for surgical removal of specific short term interferences. It is, rather, a general noise suppressor that will preserve the dialog and suppress unwanted signal simply and smoothly, with natural sound and minimal artifacts. About Waves Post Production Tools When Waves decided to develop a line of dedicated audio processors especially for Post Production, we conferred with the people who truly understand the field better than anyone: The Post professionals who design, edit, and mix sound for motion pictures, television, multimedia, and video games. Waves knows that Post Production work presents audio engineers with specialized challenges. Once we had identified and analyzed these issues and concerns, we set out to create the most advanced, most innovative Post Production sound solutions available. Waves is proud to bring more than two decades of audio processing expertise to the world of Post Production. WNS Waves Noise Suppressor User Guide 3 1.3 Concepts and Terminology The Waves WNS Noise Suppressor is a high resolution broadband noise suppressor for dialog tracks, engineered especially for post production professionals. The WNS is based on an exclusive 6-band dynamic EQ engine, with 3 standard EQ filters per band. Using 2 basic controls, Threshold and Gain reduction, WNS defines and then suppresses all signal it perceives as nondialog. It does not introduce any latency, nor does it require noise print learning. Simply set the global Threshold to just below the dialog level, and then use the Frequency range faders to shape the desired reduction intensity. Two additional controls, Low Frequency and High Frequency, set the noise suppression frequency range, leaving the areas below and above that range, respectively unprocessed. If the Low Frequency is set to 80 Hz, and the High Frequency is set to 8000 Hz, the graph will reflect these borders, and not display any signal beyond the specified range (The minimum adjustable frequency range is two octaves). In addition; High Pass and Low Pass filters can be engaged to cut frequencies below or above the “border values”. Default frequency area for each gain fader: Fader 1 2 3 4 5 6 30 99 330 1094 3627 12027 (Left to right) Frequency (Hz) WNS Waves Noise Suppressor User Guide 4 1.4 Components WaveShell technology enables us to split Waves processors into smaller plugins, which we call components. Having a choice of components for a particular processor gives you the flexibility to choose the configuration best suited to your material. The Waves Noise Suppressor consists of two components: WNS Mono WNS Stereo WNS Waves Noise Suppressor User Guide 5 Chapter 2 – Quick Start Guide Insert the WNS on a dialog track. Typically, it should be placed before other dynamic processors which may increase noise. Using your ears as well as the WNS noise profile curve, locate the frequency range(s) that requires noise suppression. Lower the Gain for the frequency range(s) that you want to suppress. If needed, change the value of the Global Threshold to ensure the right amount of suppression is taking place. If desired, limit the frequency range to which suppression is applied using the High and Low frequency range selectors. Please note: The gain faders are always aligned to the frequency range defined by the frequency selectors. For example, if you limit the range to between 50Hz and 800Hz, then the faders will be distributed across the range between these values. Frequencies outside of the specified range are not affected by the gain faders, but can be filtered out using the low pass and high pass filters. Use the content-dependent Smoothing fader to control the release behavior of the suppressor. The four center Gain Fader values are set according to the High and Low frequency borders. If you know the frequency that you want to suppress, use the High and Low frequency range selectors to set one of the gain faders to the exact value; all fader values update in real-time. If, for example, the frequency you need is 555Hz, set the Low frequency range selector to 70Hz and the High frequency range selector to 12410hz; the third fader from the left will then be set to 555Hz. The Suggest feature is based on the real-time noise profile that the WNS extracts from the audio file. Use Suggest as a starting point, then adjust the Threshold and/or Gain Faders to suit your specific needs. WNS Waves Noise Suppressor User Guide 6 Chapter 3 – Interface and Controls 3.1 Interface WNS Waves Noise Suppressor User Guide 7 3.2 Controls Display Bold White line represents the Noise Suppression. Thin Orange line represents the detected Noise Profile. Light Blue line represents the gain fader’s current location. Threshold controls the level at which noise suppression is activated. Range: -80 to 0dB Default: -20dB WNS Waves Noise Suppressor User Guide 8 Gain Faders control the amount of noise suppression. Range: -32 to +6 dB Default: 0dB Smoothing controls the release behavior of the noise suppression. Range: 1 – 100 Default: 50 Suggest takes all gain faders to the suggested suppression noise curve according to the WNS noise profile detector. Link moves all gain faders together simultaneously. WNS Waves Noise Suppressor User Guide 9 Frequency Area The minimum interval between the high and low borders is two octaves. Low Frequency determines the lowest range of the noise suppression. Range: 20 Hz to 4000 Hz Default: 30 Hz High Frequency determines the highest range of the noise suppression. Range: 400 Hz to 20000 Hz Default: 12027 Hz HP is a high pass filter which filters out the signal below the selected frequency. Range: On, Off Default: Off LP is a low pass filter which filters out the signal above the selected frequency. Range: On, Off Default: Off WNS Waves Noise Suppressor User Guide 10 Chapter 4 – The WaveSystem 4.1 The WaveSystem Toolbar All Waves processors feature the Wave System toolbar which takes care of most administrative functions you will encounter while working with your Waves software. The features of the Wave System toolbar are the same on practically all Waves processors, so familiarity with its features will be helpful whichever processor you are using. Toolbar Functions Undo Undoes the last 32 actions. Redo Redoes the last 32 undone actions. Setup A/B Toggles between two presets. This is useful for close comparison of different parameter settings Copy A->B Copies the current settings to the second preset register Load Recalls presets from file Save Saves presets in the Waves file formats ? Opens the manual for the processor you are using 4.2 Preset Handling Preset Types Factory Presets are permanent presets in the Load menu. Factory presets cannot be over-written or deleted. When applicable, different component plug-ins may have different factory presets. User Presets are your favorite settings of the plug-in saved as a preset in the Load menu, under ‘User Presets’. User Presets can be over-written and deleted. Setup Files may contain more than one preset. For example, a single file can contain all the presets for a session. When you open a Setup File, all its setups become part of your Load pop-up menu for fast access. This can be particularly useful with multiple instances of a plug-in in a single session. By saving all the settings you create into a single Setup File, they can all be quickly available for every instance of that plug-in. WNS Waves Noise Suppressor User Guide 11 Loading Presets and Setups Click-and-hold on the Load button to see the Load pop-up menu. The menu is divided into four sections. If a section is not currently available it will not appear in the Load pop-up menu. Open Preset File… Select to open any setup or preset file, whether from the Library or your own creations. ‘Filename.xps’: Displays any currently loaded Setup File and its presets. Factory Presets: Displays the default Factory Presets. User Presets: Displays any loaded User Presets. Saving Presets and Setups Click-and-hold on the Save button to see the Save pop-up menu. Four options are available. If an option is not currently available it will be grayed out and inaccessible. Select this to start a new Setup file. There are two prompts - first for the setup filename, then for the preset name. You must provide a name for both the setup file and the preset. Click OK (ENTER) to complete the save. It is a good idea to create a folder in which to save several setup files for a project. Save ‘File Name’ – “Preset Name” Overwrites the settings of the loaded preset (whether a User Preset or a preset from a Setup File) with the current settings. If a Setup File is currently loaded, the name of the Setup File is displayed followed by the name of the preset itself. If a User Preset is loaded, its name is displayed. Save to ‘File Name’ As… Saves the current settings as a new preset into the Setup file that is open (if one is not open, the option is grayed out). You will be prompted to give the preset a name. Put into Preset Menu As… Save the current settings into a User Preset that will always be in your Load menu (until Save to New File… WNS Waves Noise Suppressor User Guide 12 deleted). You will be prompted to give this preset a name. User Presets are stored in the plug-in’s preference file. Deleting Presets You may delete User Presets and presets within a Setup File. Factory Presets and Setup Library files cannot be deleted or overwritten. 1. Hold the Command (Mac)/Control (PC) key down. 2. Click-and-hold the Load button to see the pop-up menu. 3. While still holding the Command/Control key, select the preset or setup to delete. 4. A confirmation box will appear, allowing you to cancel or ‘OK’ the deletion. A/B Comparison and Copying The Setup A/Setup B button may be clicked to compare two settings. If you load a preset in the Setup B position, this will not affect the preset loaded into the Setup A position, and vice-versa. If you want to slightly modify the settings in Setup A, you can copy them to Setup B by clicking on the Copy to B button, then alter Setup A and compare with the original Setup B. The name of the current setup will be shown in the title bar (on platforms which support it), and will switch as you change from Setup A to Setup B. Note: an asterisk will be added to the preset name when a change is made to the preset. WNS Waves Noise Suppressor User Guide 13 4.3 Interface Controls Controls can be in one of three states: • • • Not Selected where the control is not the target of any user entry Selected where the control is the target of mouse control entry only Selected and Active where the control is the target for both mouse and keyboard entry Toggle Buttons Toggle buttons display the state of a control, and allow switching between two or more states. Single-click to change the control’s state. Some toggle buttons have a text display which updates with the current setting, and others (bypass, solo, or monitoring toggles) illuminate when the control is active. Some processors have link buttons between a pair of toggle buttons, allowing click-and-drag adjustment while retaining the offset between the controls. Value Window Buttons Value windows display the value of a control and allow click-and-drag adjustment, or direct control via the keyboard. • • • Using the mouse, click-and-drag on the value window to adjust. Some value windows support left/right, some up/down (as you hover over a button, arrows will appear to let you know which direction of movement that button supports). Using the arrow keys, click once with mouse to select the button, and then use up/down – left/right (depending on the direction supported by that button) to move in the smallest incremental steps across the button’s range (holding down the arrow keys will move faster through the range). Using key entry, double click on the button to open the value window, and directly enter the value from your keyboard. If you enter an out of range number, the button stays selected but remains at the current setting (system beeps? If system sounds are on?) Some processors have link buttons between a pair of value windows, allowing click-and-drag adjustment while retaining the offset between the controls. WNS Waves Noise Suppressor User Guide 14 Sliders Click on the slider itself or anywhere within the sliders track. The numerical value of the slider settings is displayed in a hover window above the slider path. Hover Box Hovering boxes will appear and display the control value when hovering with the mouse over the control. TAB Functions TAB moves the ‘selected’ status to the next control, with shift-TAB moving in the reverse direction. Additionally, the Mac has an option-TAB function for ‘down’ movement and shift-option-TAB for ‘up’ movement where applicable. If you have several Value Window Buttons selected, TAB functions will take you through the selected controls only. WNS Waves Noise Suppressor User Guide 15