1
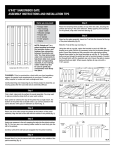
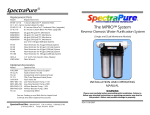
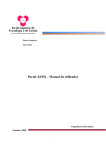
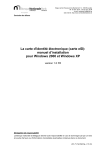
Transfer of Innovation
"MYCOTICON" (MYCOTa Intereuropean
COoperation Network)
“Identification and sustainable exploitation of wild edible
mushrooms in rural areas”
Grant Agreement no: 2011-1-GR1-LEO05-06802
MYCTICON Web site User Guide
Document title: MYCTICON Web site User Guide
Relevant Work WP4: The development of the Multi-Media Training
package : Package and MYCOTICON project web-portal
Date: 02/12
Author(s): L. Anthopoulos, V. Gerogiannis, P. Fitsilis
Document description: MYCTICON Web site User Guide
List of Contents
1.
Introduction ....................................................................................................................... 3
2.
MYCOTICON public website (Front Office)........................................................................ 4
3.
MYCOTICON Content Management System (Back Office) ................................................ 7
3.1.
Public Content (Sitemap)........................................................................................... 9
3.2.
Announcements (Current Affairs) ........................................................................... 12
3.3.
Photo gallery............................................................................................................ 14
3.4.
Video gallery ............................................................................................................ 15
3.5.
Tag Cloud ................................................................................................................. 16
3.6.
Mushrooms Catalogue ............................................................................................ 17
3.7.
Project Repository ................................................................................................... 20
3.8.
User management ................................................................................................... 20
3.9.
Change personal profile information ...................................................................... 22
3.10.
Submitting newsletter to registered users .......................................................... 22
3.11.
Submitting e-mail to website administrators ..................................................... 27
MYCOTICON Web Site, User’s Manual
Page 2
1. Introduction
This document presents and explains the options and use of the MYCOTa InterEuropean
Cooperation Network (MYCOTICON) website and of its custom-made content management
system. This website is crucial to the MYCOTICON project, it is the Deliverable No 10
(activity P0) and it is part of the WP4 “The development of the Multi-Media Training
Package in "Identification and sustainable exploitation of wild edible mushrooms in rural
areas" and MYCOTICON project web-portal”. The MYCOTICON website concerns an
information system, which follows the multitier (n-tier) architecture (Fig. 1). This
architecture is widely accepted, it follows project’s requirements, it is open for
interconnection with other information systems (i.e. with the Moodle eLearning system) and
extensible (i.e. to develop various mobile apps, relative with its data and processes).
Fig.-1: MYCOTICON website architecture
The entire information system is built with the ASP.net 2.0 platform and its data is stored in
an SQL Server 2005 database; its resources are located in a virtual Windows 2008 server that
is part of the TEIL server farm cloud; it is accessible via the web and via alternative channels
(the Internet and the 3G/4G mobile networks).
As (Fig.-1) illustrates, MYCOTICON users are distinguished in two separate groups:
MYCOTICON Web Site, User’s Manual
Page 3
a) Front-office users who have access to the public information of this website (i.e., project
analysis, scope and documents) and in some cases to authorized information (i.e.,
mushrooms’ information, photos and documents).
b) Project team members who have access to the previously described public information
and to the entire private information that this project develops.
This User’s Manual focuses mainly on the second user group, since the front-office is a
common website and its features are trivial. The remaining of this document is analyzed in
the following sections. In the following section 2, the front-office is outlined in order for its
options to be illustrated. Section 3 analyzes the back-office content management system
and explains all its components and features. Finally, section 4 summarizes this document’s
outcomes.
2. MYCOTICON public website (Front Office)
Public (web) users can access the MYCOTICON website via the web and its official Uniform
Resource Locator (URL)1. Its homepage (Fig.-2) is analyzed in three (3) different areas:
a) Logo and usability options (scroll down menu, custom search engine2, both photo and
video galleries, language change and social media).
b) Latest news (latest news scroller, press releases, documents and favorite news)
c) Activities presented on a custom calendar3.
All public content is offered in two different languages: in English which is the project’s
official language and in Greek, which is spoken by four (out of 6) project’s partners.
However, MYCOTICON website can support Multilanguage content management and
deployment, with the use of UTF-8 encoding. An indicative content page is described on
(Fig.-3). Moreover, MYCOTICON website is built according to latest website development
standards:
-
It includes some HTML 5.0 features (i.e. jquery news rotator, shadowbox image
magnifier, news infinite down scroller)
-
It is interoperable with social media. MYCOTICON project has its YouTube©, Facebook©
and Twitter© profiles, with which it exchanges data via its content management system.
Moreover, users can comment on the articles via their Facebook© profiles.
-
It offers RSS data. More specifically, RSS casts MYCOTION news, grouped in its particular
news categories.
-
It associates its content with tags and a tag cloud has already been developed and
grows.
1
http://mycoticon.teilar.gr
© Google Custom Search Engine
3
© Google Custom Calendar
2
MYCOTICON Web Site, User’s Manual
Page 4
Logo and
usability
options area
Latest news
scroller
area, RSS
and Project
members
Activities
area and tag
cloud
Fig.-2: MYCOTICON public website’s homepage
Logo and
usability
options area
Story content
shadowbox
preview, tags
area, number of
visits
Story
commenting
via
Facebook©
profiles
Fig.-3: MYCOTICON public website’s content page
MYCOTICON Web Site, User’s Manual
Page 6
3. MYCOTICON Content Management System (Back Office)
The back-office system refers to the Information management, Content Management
System (CMS) options, which have to interoperable with the Learning Management System
(LMS) of the MYCOTICON project.
There are several content (information) items that are managed by MYCOTICON CMS:
1. Website public content (sitemap, menu structure and relative content) [public]
2. Website public announcements (Current Affairs) [public]
3. Website photo gallery [public]
4. Website video gallery (via Youtube project channel) [public]
5. Tag cloud management and content tagging [public]
6. Mushroom catalogue [private, only project members]
7. Document Repository [private, only project members]
8. User management [private, only website administrators]
9. Newsletter management [private, only website administrators]
10. Personal profile management [private, only project members]
The content management system is accessible via its private URL4, which has been
disseminated to the project members. A personal password has been transmitted to each
partner, with which the content management system is accessible (Fig. -4). After successful
authorization, users can access Content Management System via its user interface (UI) of
(Fig.-5). It’s user interface offers also multilingual options with UTF-8 encoding.
Fig.-4: CMS authentication page
4
http://mycoticon.teilar.gr/admin
MYCOTICON Web Site, User’s Manual
Page 7
- Personal data
management
- Contact site
administrator
-Create
newsletters
(administrators
only)
Content
management
options
-user
management
(administrators
only)
Fig.-5: CMS Main page
MYCOTICON Web Site, User’s Manual
Page 8
3.1. Public Content (Sitemap)
MYCOTICON website content structure is hierarchical and its sitemap is organized in infinitedepth node-tree. The root of this tree is the MYCOTICON website, while the second-layer
nodes concern the localization –the languages- that are supported (Fig.-6).
Localization:
English version
Tools for each node
- sort up/down
- edit title
-delete
- create sub-node
Click on each
node to access
its content
Fig.-6: Sitemap management
MYCOTICON Web Site, User’s Manual
Page 9
A user can add a new content-node beneath or below an existing node; delete an existing
node; change a node title; alter the sorting (position) of these nodes. In order to access the
content of a node, users must click on the tile of a node (Fig.-7).
Section title
Attach binary documents
and photos to this section
Edit content with this embedded
WYSIWYG editor
Save changes or cancel
Fig.-7: section content management
By selecting a section, user navigates to a screen like the one presented on (Fig.-7) and
manage section content via a WYSIWYG editor. The user must save his changes before
leaving each section page, while he can attach a binary document (doc, pdf, xls, zip, ppt etc.)
(Fig.-8) file or a photograph (gif, jpg, png, bmp etc.) file to each content (Fig.-9). The
selection of a file is a simple, usual process, which requests from the user to locate the
selected file on his media and upload to the website. The image upload process allows a user
to upload multiple files simultaneously to the website.
MYCOTICON Web Site, User’s Manual
Page 10
Fig.-8: attaching binary documents to a section
Fig.-9: attaching images to a section
MYCOTICON Web Site, User’s Manual
Page 11
3.2. Announcements (Current Affairs)
Users can manage various announcements of the website. Announcements are separate
content records, which are assigned to the categories created beneath the “Current Affairs”
sitemap node. For MYCOTICON website, announcements concern Press Releases, Events,
Presentations, Activities, Publications and Deliverables. When a user selects
“Announcements” from (Fig.-5) he is navigated to the screen of (Fig.-10) where he can
create a new announcement or edit an existing one.
Choose the language and the
category of the new announcement
Give a title (obligatory) and a
prologue (compulsory) to a new
announcement
Create announcement content with
this embedded WYSIWYG editor
Existing articles list
Press Read More
to edit an existing
announcement
Fig.-10: announcements management
MYCOTICON Web Site, User’s Manual
Page 12
User must feel in the blank fields of (Fig.-10) in order to add/create a new announcement
and then he has to press Save on the left and below the form. By creating (pressing Save) a
new announcement, no attachments (i.e. photos) have been associated to it. Users must
find the new announcement on the list of (Fig.-10), press “Read More” link and navigate to
the screen of (Fig.-11).
Attach files to the announcement
Press Select to edit
announcement’s
content
Tags assigned to
this announcement
Attachments’ list
(binary files and
photos)
Fig.-11: announcement content management
The UI of (Fig.-11) is identical to the Section Content Management (Fig.-7). Users have to
click on the “Select” link on the upper left corner of this screen in order to access the editor
of this content, while he can attach binary files and photos with the same means as with
section content management area (Fig.-8; Fig.-9). In addition to the already presented
features, Tags can be associated to an announcement (Fig.-11). A user can select the tags
with the scroll-down menu and by pressing the “Save” button on the right of each selection.
Moreover, a user can delete an assigned tag, via clicking “Delete” on the right of a tag.
MYCOTICON Web Site, User’s Manual
Page 13
3.3. Photo gallery
Sitemap contains a photo gallery section in each language (Fig.-12), which can be organized
according to the particular requirements of the Project. For instance, by the development of
this manual, two categories have been created to describe Photo Gallery: a) partners and b)
Events.
Fig.-12: announcement content management
The management of the Photo Gallery is similar with the assignment of photos a section. For
instance, (Fig.-13) illustrates images regarding project partners. The existing images have
been inserted with the “Attach Photos” feature of this content.
Fig.-13: Partners photo gallery
By creating section (catalogues) under the photo gallery section and by attaching images to
them, they are displaying with an image rotator (Fig.-14) on the public content.
MYCOTICON Web Site, User’s Manual
Page 14
Fig.-14: photo gallery image rotator (Home Page > Media Center > Photo Gallery > Partners)
3.4. Video gallery
A Video Gallery is available for the MYCOTICON project, where partners can upload their
videos regarding meeting moments, mushrooms etc. Users must upload their videos to the
MYCOTICON Youtube© channel, which is accessible via the public homepage at its address5
and its appropriate credentials (username: [email protected], password: myc0tic0n). By
uploading a video to this channel, a Youtube© URL is assigned to this video. This URL
appears on browser’s address bar when a video plays. Users must keep the URL of a video
they upload (Copy to the windows clipboard) and then they follow the link “Videos” from
CMS main page (Fig.-5). Then, they navigate to the screen of (Fig.-15), where they select the
language of the video, they add a title to their video and they Paste the URL from Youtube©.
After saving their video information, a video gallery is created on the public content which is
available via the scroll-down navigation menu or by Home Page > Media Center > Video
Gallery path.
5
http://www.youtube.com/mycoticon
MYCOTICON Web Site, User’s Manual
Page 15
Fig.-15: managing video gallery
3.5. Tag Cloud
Tags are favor to modern websites and tag clouds are used in almost all modern CMS.
MYCOTICON CMS offers Tag management with the selection of the respective feature at
CMS Main page (Fig.-5). Then, a screen appears to the user, where tags (top) (Fig.-16a) are
organized in categories (bottom) (Fig.-16b). Users can use existing categories and assign a
tag to a category or they can create their own categories and assign their new tags to them.
Fig.-16a: managing tag cloud
MYCOTICON Web Site, User’s Manual
Page 16
Fig.-16b: managing tag categories
3.6. Mushrooms Catalogue
MYCOTICON concerns –among others- the development of a mushrooms catalogue, where a
mushroom is described with various features and four (4) images. The initial features
selected by the project team have already been incorporated and users can insert
mushrooms in a catalogue, via selecting the icon “Mushrooms Catalogue” of the CMS main
page (Fig.-5). Then, the screen of (Fig.-17) appears to the user, where at the bottom of the
list, a blank footer row allows him to insert a new mushroom, via describing its primary
features.
After inserting a new mushroom, a user can modify its features by pressing “Select” link on
the right, delete a mushroom by pressing “Delete” link on the right, or upload images and
assign them to the mushroom via double-clicking the directory buttons that appear on the
four image columns (Fig.-18). Each mushroom is assigned to a category and for this reason,
categories are managed via the “Mushroom Categories” button (Fig.-19).
Mushrooms catalogue is a private area accessible only by the authenticated project team
members, while its data is easy to be configured and to become public according to project’s
requirements.
MYCOTICON Web Site, User’s Manual
Page 17
- Main page
- Manage
Mushroom
categories
Edit an existing
mushroom or
upload images
for it
Add a new
mushroom to
the catalogue
Fig.-17: mushroom catalogue
MYCOTICON Web Site, User’s Manual
Page 18
Fig.-18: upload image and assign it to a mushroom
Fig.-19: manage mushroom categories
MYCOTICON Web Site, User’s Manual
Page 19
3.7. Project Repository
This content category concerns a private document space, where project members can
upload and share their documents. By selecting icon “Project Repository” from the CMS
main page (Fig.-5) a new screen opens (Fig.-20) where the existing documents appear in a
table. The last row of the table allows user to incorporate a new document, by giving a
description about its title, authors, publication year and category and clicking the button
with Save label. After saving the document information, users can upload the document to
the repository by clicking the upload icon on the right column. Users can alter the
description or delete the document, via clicking the “Select” or “Delete” links on the right
cell.
Upload
document
Link to the
uploaded
document
Remove
uploaded
document
Insert new
document
Fig.-20: manage document repository
Document repository is a private area accessible only by the authenticated project team
members, while its data is easy to be configured and to become public according to project’s
requirements.
3.8. User management
This section is accessible only by the website administrator. It is an area where the
administrator defines the users who can access the website CMS and its features (Fig.-21).
There are three (3) alternative or combinational roles on the CMS:
a) data access only: authenticated users can access only the mushrooms and the
document repository but they cannot alter their information.
b) Data entry: project team members have access to all CMS features, insert and
update information and documents, but they cannot access users’ management and
newsletter administration area.
c) Administrators:
they
MYCOTICON Web Site, User’s Manual
have
access
to
all
CMS
features.
Page 20
Manage an
existing user
and his
credentials
Adding new
user area
Fig.-21: user management area
MYCOTICON Web Site, User’s Manual
Page 21
3.9. Change personal profile information
Each authenticated user can alter his information, which was given during user creation
(personal data and password), via the “Personal Data” icon on the CMS main page (Fig.-5).
The screen on (Fig.-22) has the “Edit” link on the top-left, which changes the personal
information table to an editable space. After changing his information, user has to click on
the “Save” link on the up-left corner of the table.
Fig.-22: personal data management area
3.10. Submitting newsletter to registered users
This option is available only to the website administrators and offers a newsletter creation
and submission feature. It is accessible from the CMS main page on the “Newsletters” link,
which passes the user to the screens of (Fig-23) and (Fig.-24). The administrator creates a
record for the newsletter on (Fig.-23) by the same means as a new announcement and then
clicks on it on the newsletter list in order to access its content. Then (Fig-24) appears where
the user can perform the following actions:
MYCOTICON Web Site, User’s Manual
Page 22
Choose the language of the new
newsletter
Give a title (obligatory) to a new
newsletter
Create newsletter initial content
with this embedded WYSIWYG
editor
Existing newsletter list
Fig.-23: newsletter management
MYCOTICON Web Site, User’s Manual
Press Read More
to edit an existing
newsletter
Page 23
Newsletter toolbar
Title
Create newsletter content with this
embedded WYSIWYG editor and
attach existing articles with
predefined content
List of attached
articles and videos
Fig.-24: newsletter content management
i.
Preview this newsletter (Fig.-25)
ii. Attach existing articles from the announcements (Fig.-26)
iii. Attach existing videos (Fig.-28)
iv. Submit a trial version to the administrators
MYCOTICON Web Site, User’s Manual
Page 24
v. Submit to the registered users
vi. Export this newsletter to a pdf file
vii. Export this newsletter to a word document file
Fig.-25: newsletter preview
Fig.-26: attach articles to the newsletter
MYCOTICON Web Site, User’s Manual
Page 25
Fig.-27: attach videos to the newsletter
MYCOTICON Web Site, User’s Manual
Page 26
3.11. Submitting e-mail to website administrators
MYCOTICON CMS allows authenticated users to contact directly website administrators via a
web form simply by clicking the icon “Contact” from the CMS main page (Fig.-5). The web
form retrieves user data and requires only the mail subject and content (Fig. 28).
Fig.-28: web form for contacting administrator
MYCOTICON Web Site, User’s Manual
Page 27