1
USER
MANUAL
FOR MODEL RP208CN
15.11.07
This page is intentionally blank.
INDEX
CHAPTER 1
SUMMARY OF USER’S COMMANDS………………………………………….…...3
CHAPTER 2
ABOUT THE KEYPAD……………………..…………………..….…………………4
RP208KCL (LCD KEYPAD) ……………………..……………...…………………. 4
LED INDICATION AND KEYS…………………………..……….……………………5
FUNCTION AND OPERATION…………………………………...……………….7
1.
SETTING/CHANGING AND DELETING USER’S CODE……………………7
2.
SETTING DATE AND TIME……………………………...………….……….9
3.
DISPLAYING SYSTEM DATE AND TIME…………………………..……….9
4.
SETTING FOLLOW-ME PERSONAL DIALING NUMBERS………………..9
5.
QUICK ARMING…………………………...…………………………….……10
6.
CODE ARMING……..………………………...……………………………..….10
7.
BELL SQUAWK ON ARMING………………………...…………………….11
8.
DISARMING………..…………………….………..………………………..…...11
9.
ON/OFF AUDIBLE KISS-OFF……………………...………………………….11
10. DURESS DISARMING…………………...……………………..…………...…11
11. CUTTING OFF SOUNDER AND STOP AUTO-DIALING……..……………12
12. BYPASSING/ UN-BYPASSING A ZONE……………………….….………..12
13. ESCAPE KEY [ESC] ……………………...……………………….…………..12
14. EMERGENCY KEYS……………………...……………………….…………...13
15. ENTRY AND EXIT DELAYS……………………...…………………………..13
16. 24-HOUR ZONE……………………………...…………………….…….……..13
17. TROUBLE DISPLAY…………………………...……………………….…….13
18. ZONE FEATURES…………………………...………………………….……..14
19. EVENT HISTORY/MEMORY LOGGER………………………………………15
20. ON/OFF DOOR CHIME…………………………...………………….……….15
21. REMOTE CONTROL (OPTIONAL)……………...………………….……….16
WARRANTY INFORMATION
20. GUARD8 WARRANTY…...………………………...………………….……….17
CHAPTER 1- SUMMARY of USER’S COMMANDS
The Summary of User’s Commands offers installers and users a
quick and convenient way to operate the control panel. All can be
done in the disarmed state, and you do not need to enter
programming state. For detailed information, please go chapter 2.
Function
Procedure
Quick arm
Arm by code
Arm within zones
Arm within zones by code
System disarm
Bypass disarm
Free from siren
Bypass/un-bypass zone
Quick bypass/un-bypass
zone
Display trouble
Display time
Set/change main code
Set/change a user code
[ARM]
[ARM]+[master code]
[STAY]
[STAY]+[master code]
[user code]
[duress code]
[user code]
[*]+[1]+[user code]+[zone number]
[zone ]at least 2 seconds
Set date
Set time
Auto arm time
Set follow-me phone no. 1
Set follow-me phone no. 2
Set follow-me phone no. 3
Set follow-me phone no. 4
On/off buzzer
On/off door chime
Audible kiss-off
Display memory
Test system
keypad panic alarm
keypad fire alarm
keypad special emergency
Escape
[*]+[3]
[*]+[4]
[*]+[5]+[master code]+[0]+[new code]
[*]+[5]+master code]+[1-9]+[new code]
[*]+[6]+[1]+[master
code]+[MM][DD][YY]
[*]+[6]+[2]+[master code]+[H][H][M][M]
[*]+[6]+[3]+[master code]+[H][H][M][M]
[*]+[7]+[1]+[master code]+[phone No.
1]+[#]
[*]+[7]+[2]+[master code]+[phone No.
2]+[#]
[*]+[7]+[3]+[master code]+[phone No.
3]+[#]
[*]+[7]+[4]+[master code]+[phone No.
4]+[#]
[*]+[8]+[master code]+[1]
[*]+[8]+[master code]+[2]
[*]+[8]+[master code]+[3]
[*]+[9]+[master code]+[enevt number]
[*]+[0]+[master code]
[1]+[2] at leadt 2 seconds
[4]+[5] at least 2 seconds
[7]+[8] at least 2 seconds
[ESC]
LCD
Battery Low
Trouble Table
AC Power
No Clock
No
Communication
No Siren
Trouble
The Backup Battery Power is
low.
AC Power is lost.
Clock have not been set
The Communication is in
trouble.
The Siren connection is in
trouble.
CHAPTER 2 – ABOUT THE KEYPAD
RP208KCL (LCD Keypad)
The GUARD8 supports the LCD Keypad. Each control panel can
work with four LCD Keypads.
Each keypad in your system reports its status by its LED (lighted)
indicators and its LCD display. Through its keys, you can enter
commands to Arm and Disarm the system, bypass intrusion zones,
report emergencies, stop the siren, checking the trouble display,
programming the system and other functions.
(Key on next page)
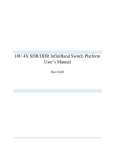
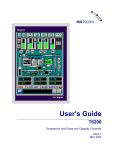
Fig.1 Layout of the RP208KCL
Keypad Instruction
1
2
3
4
5
6
Power
LCD Display
Arm
Disarm
Bypass
Fire
7 Tamper
8 Arm key-press
9 Stay key-press
10 Buzzer
11 Exit/Delete key-press
12 Digit and Function
press
key-
LED Indication and Keys
1. Power LED
On--The system is operating correctly from commercial (AC)
power; and its backup battery is in good condition.
Off--The system is inoperative due to the lack of power (from both
commercial AC and backup battery).
Flash-- Indicates a trouble condition.
2. LCD Display
The LCD Display on RP208KCL indicates the status of the system,
including each of the zones Triggered, Armed/Disarmed system,
Trouble, Time and other programming information. If there is only
“Guard8” on the display, this means that all the zones are closed,
or are not triggered. When Z1, Z2, Z3, Z4, Z5, Z6, Z7 or Z8 is/are
displayed on the display, which means the zone is open or
triggered:
Statue
Explanation
System Disarmed
System Armed
GUARD8
All the zones are secured and working normally
Zone
1
was An alarm has occurred on
Z1
triggered
Zone1
Zone
2
was An alarm has occurred on
Z2
triggered
Zone2
…
…
…
Zone
8
was An alarm has occurred on
Z8
triggered
Zone8
3. ARM LED
The ARM LED indicates whether or not the system is armed. In
armed condition, the ARM LED is on, in case of any violations,
there will be an alarm. The ARM LED is flashing, which means
burglary, fire or emergency alarm once has or have occurred in the
corresponding zone(s). The ARM LED is off when the system is
disarmed.
Statue
On
Off
Flashing
EXPLANATION
When the system is armed, in case of any
emergency, an alarm will occur. The Siren will
sound, and system will also dial the follow-me
numbers and send alarm report to alarm center.
The system is disarmed.
Burglar, fire and/or has/have once occurred.
4. READY LED
The Ready LED indicates whether the system is working normally
or not, and also indicates whether system can be armed or not.
When disarmed, the LED will be on; when armed, the LED will be
off.
STATUS
EXPLANATION
All the zones are working normally, so the system
On
can be armed now.
1. Someone is moving in the zone.
Off
2. The system is armed.
The system is under the programming status
Flashing
5. BYPASS LED
The BYPASS LED Indicate that one or more of the system’s
intrusion zones have been bypassed; See later in this manual for
more information.
6. FIRE LED
When in Fire Alarm, the Fire LED will flash.
7. TAMPER LED
When the detector(s) or the keypad is /are tampered or destroyed,
a Tamper Code report will be sent and the LED will flash.
8. SYSTEM ARMING [ARM]
When you press the [ARM] key, all the zones will be armed.
9. STAY HOME ARMING [STAY]
Home Arming (or Stay Arming) allows individuals to remain inside
and move about the premises even after the system is armed. Stay
Arming arms the perimeter detectors (eg. door and windows,
lounge), while leaving interior detectors (eg. bedroom motion
detectors) disarmed (bypassed). When you press the [STAY] key,
the interior or occupied zones will not be armed.
10. EXIT/DELETE [ESC]
Key [ESC] is used for correction in the system operation
11. DIGIT KEYS
When programming, key in 0-9 digits.
12. FUNCTION KEY [*] [#]
When programming, key [*] [#] is for entering function mode and
confirmation.
Function and Operation
KEYS AND FUNCTIONS
The Keys can support the following functions:
Enter digit(s) for Arming, Disarming, Panic Alarm, Programming
etc.
Enter user’s function mode.
Key [ARM] is for Quick Arming and Code Arming. By pressing it,
the system will be fully armed.
Key [STAY] is for Quick Stay Arming and Code Stay Arming. By
pressing it to arm, only some of the zone will be armed. Each zone
can be set as interior zone or external zone. When you use [STAY]
for arming, the external zone will be armed and the interior zones
will be disarmed.
Under the disarmed status, press [*] to enter user’s function mode.
Reference to CHAPTER 1- SUMMARY of USER’S COMMANDS
1. Setting/Changing and Deleting User’s Code
The default Master Code of the GUARD8 is 1-2-3-4. Unless your
alarm installation company has already changed it, to suit your
preference. It’s best to modify this code to one which is unique and
personalised. GUARD8 can have up to 10 Codes, one is Master
Code and the other 9 are User’s Codes. To change the Master
Code, and /or to set up User Codes, follow the steps. Make sure
the system is disarmed when setting the code. The User’s Codes
are only for Arming and Disarming the system
Functions of the Master Code:
Adding, changing and deleting User’s Code
Setting Time Clock
Operating and testing
Setting the follow-me numbers
Setting / Changing the master Codes
Step
1
2
3
4
5
Operation
The system must be disarmed (the ARMED LED will
be OFF). Enter the User Functions Mode [*][5]
Enter the current 4-digit Master Code:
For example, Press [ 1][2 ][3 ][4 ]
Press [0]
Enter the new 4-digit code selected will emit a onesecond confirming tone. The selected User Code is
now in effect.
For example, press[5 ][6][7 ][ 8]
If successful, the keypad will emit a confirming tone
“Beep ”. The selected User Code is now in effect.
SETTING/CHANGING 1-9 USER CODES
At times, it may be desirable to completely delete a User Code.
Note that it is impossible to delete the Master Code (although it can
be changed).
Step
Operation
The system must be disarmed. Enter the User
1
Functions Mode [*] and choose Codes [5]
Press [*][5]
Enter the current 4-digit Master Code:
2
For example, [5 ][6 ][7 ][8 ]
To set/delete the User Code 1, press [1]
To set/delete the User Code 2, press [2]
3
To set/delete the User Code 3, press [3]
…
The other Codes can be set/deleted in the same way.
4
Enter the new User Code:
For example, [3][3][5][5]
5
If successful, the keypad will emit a confirming tone
“Beep ”. The selected User Code is now in effect.
DELETING USER’S CODES
At times, it may be desirable to completely delete a User Code.
Note that it is impossible to delete the Master Code (although it can
be changed).
Step
Operation
1
The system must be disarmed. Enter the User
Functions Mode [*] and choose Codes [5], Press [*][5]
2
3
Enter the current 4-digit Master Code: [5 ][ 6][7 ][8 ]
To delete the User Code1, press [1]
To delete the User Code1, press [2]
To delete the User Code1, press [3]
…
The other Codes can be deleted in the same way.
4
Enter the [#]
5
If successful, the keypad will emit a one-second
confirming tone. The selected User Code is now
deleted.
2. Setting Date and Time
Set date: [*]+[6]+[1]+[MASTER CODE]+[MM][DD][YY]
Month, Date and Year should all be two digits.
Set time: [*]+[6]+[2]+[MASTER CODE]+[HH][MM]
Use a 24-Hour format. Hour and Minute should be two digits.
For example, if you want to enter 16:28, August 18, 2006, operate
as :
[*]+[6]+[1]+[MASTER CODE]+[08][18][06]
[*]+[6]+[2]+[MASTER CODE]+[16] [28]
3. Displaying System Date and Time
Press [*]+[4] to check the system time on LCD keypad. And the
format should be:
MM/DD/YY Hour :Minute
4. Setting Follow-me Number
In case of an alarm event, a phone call can be made to one or
more predefined phone numbers. There are three different tone
types that represent burglary, fire and special emergency alarms.
The Follow-Me function can support four phone numbers for each
system. Make sure the numbers are all-correct; then enter [#].
Operate as:
Set Follow-Me
NO.1+[#]
Set Follow-Me
NO.2+[#]
Set Follow-Me
NO.3+[#]
Set Follow-Me
NO.4+[#]
Phone NO.1: [*]+[7]+[1]+[MASTER CODE]+Phone
Phone NO.2: [*]+[7]+[2]+[MASTER CODE]+Phone
Phone NO.3: [*]+[7]+[2]+[MASTER CODE]+Phone
Phone NO.4: [*]+[7]+[2]+[MASTER CODE]+Phone
5. Quick Arming
GUARD8, can be divided as interior zones and external zones by
programming. Zone 7 and Zone 8 are defaulted as interior zone.
Press [ARM], and all the zones will be armed.
Press [STAY], then only the external zones or unoccupied zones
will all be armed and the interior zones will be disarmed.
Step
Operation
Before you arm your system, all of its zones must
either be secured or bypassed .The keypad’s READY
1
LED, if lit, indicates that all zones are secured. If the
READY LED is not lit, one or more unsecured zone(s)
will be display on the LCD.
Quick Arming and Code Arming:
Quick Armed Armed the system just by pressing
2
[ARM].
Quick Stay Armed Stay Arm just by pressing [STAY].
Three short Beep from the keypad when there are
3
some errors in entering. Then re-operate it.
When arming the system, there will be one
confirmation sound, which means the exit delay
4
begins now. You now leave the premises before the
exit delay time is over to avoid false alarm. The exit
delay time is defaulted as 30 seconds.
6. Code Arming
Your GUARD8 offers two methods of arming, Quick Arming and
Code Arming. It’s defaulted as quick arm. If the user requires code
arm, it should be set when programming in advance.
When GUARD8 is set as code arm, it can not support [ARM] and
[STAY] for quick arming. And it should be operated as: [ARM] +
[Master Code], or [STAY] + [Master Code] to arm or stay arm.
7. Bell Squawk on Arming
If selected, Bell Squawk on Arming will produce a brief confirmation
"chirp" from the system's external sounder(s) once the system is
armed and the Exit Delay expires. If you have a remote control
system a confirmation chirp will confirm alarm state.
8. Disarming
GUARD8 can set 10 Codes (4 digits), one Master Code and 9 User
Codes. In arming status, simply enter any code of the 10 codes to
disarm.
Step
Operation
When entering the arming zone, the keypad will
“beep” , which means the system is in entry delay
1
status. The entry delay time is defaulted as 30
seconds.
Disarming an armed system
Before the Entry Delay expires, enter the four digits of
your User Code. Or it will alarm.
2
NOTE: If you make a mistake when entering your
User Code, the keypad will produce three short beeps
and the LCD keypad will display error. If so, press
ECS and re-enter the above sequence correctly.
9. On/Off Audible kiss-off
When the system is disarmed.
Press [*]+[8]+[User’s Code]+[3] to on/off the buzzer.
10. Duress Disarming
If you are ever coerced to disarm your system, you can comply with
the intruder’s wishes while sending a silent, duress alarm, to the
Central Station. To do so, you must use a special Duress Code.
Which when used, will disarm the system in the regular manner,
while simultaneously transmitting a silent alarm to the central
station. All 10 codes (including one Master Code and 9 User
Codes) can activate the Duress disarming by adding 1 to The last
digit of your user codes. Example:
If your code is 1-2-3-4 your duress code is 1-2-3-5
If your user code is 7-8-9-0 your duress code is 7-8-9-1
Note: Under no circumstances must the Duress Code be used
haphazardly or without reason. Central Stations, along with Police
Departments, treat Duress Codes very seriously and take
immediate action.
11. Cutting off Sounder and Stop Auto-dialling
If outside the premises, open an entry door; the keypad(s) will beep
indicating that the Entry Delay period has begun. The entry delay is
defaulted as 30 seconds.
SILENCING AN ALARM IN PROGRESS
Observe the keypad. If any of the following conditions is evident, an
alarm has occurred:
The ARM LED is flashing
Z1,Z2,Z3… are displayed on the LCD
It's best to enter the premises only after police or a security
company has investigated and you feel confident that the burglar is
no longer on your premises.
Disarming an armed system
Before the Entry expires, enter the four digits of your User Code.
NOTE: If you make a mistake when entering your User Code, the
keypad will produce three short beeps and the LCD keypad will
display error. If so, press ECS and re-enter the Code.
12. Bypassing/ Un-bypassing a Zone
When an intrusion zone is bypassed, the zone will not be armed
when arming. When disarming, all the bypassed zones will be
automatically un-bypassed. There are two methods of Bypassing:
Quick Bypassing: It’s defaulted that all the zones of GUARD8 can
be set as Quick Bypass. Bypass a zone, simply press the
corresponding key for or above 2 seconds. For example, to bypass
Zone 3, press digit 3 for 2 seconds, then By Pass Z3 will be
displayed on the LCD, which means Zone 3 has been bypassed
successfully. Use the same way to un-bypass the bypassed zone.
When Zone 3 is un-bypassed, Cancel BP Z3 will be displayed on
the LCD.
Code Bypassing: If GUARD8 was programmed as code bypassing,
then press: [*]+[1]+[Disarming Code]+[Zone No] to bypass the
zone. Use the same way to un-bypass the zone.
13. Escape Key [ESC]
Keypad [ESC] is used for correction.
14. Emergency Keys
GUARD8 Keypad (RP208KCL) provides three emergency keys,
which can be pushed at anytime, and the police, fire department, or
medical emergency assistance is required. Emergency Alarm is
defaulted as silence alarm.
Press 1 and 2 simultaneously, and for at least two seconds, will
activate a Panic Alarm.(note this is silent and cannot be audible)
Press 4 and 5 simultaneously, and for at least two seconds, will
activate a Fire Alarm – This is an audible alarm.
Press 7 and 8 simultaneously, and for at least two seconds, will
activate a Medical Emergency if system is monitored.
15. Entry and Exit Delays
Your security system must allow you to enter and leave the
premises to give time to arm or disarm the system. A delay period
was chosen during your system’s installation to provide suitable
time to allow for your entry and exit. Entry/Exit Delays can be set by
programming, and it’s defaulted as 30 seconds.
16. 24-Hour Zone
GUARD8 can support several kinds of zones. All other forms of
protection, including fire and 24-hour panic alarms (Ie. police, fire,
and medical) are always ready 24hrs to report alarms whether
system is armed or not.
17. Trouble Display
When the keypad sends out three short beeps regularly, this
indicates the system has a fault. Once the trouble conditions are
cleared, the system will restore to normal status and stop beeping.
Troubles include Battery Low, AC power, No Clock, No
Communication, No Siren etc. Press [*]+[3] to search on the LCD.
The troubles displayed as follow:
LCD
Trouble
Battery Low
The Backup Battery Power is
low.
AC Power
AC Power is lost.
Trouble Table
No Clock
Clock have not been set
No
The Communication is in
Communication
trouble.
No Siren
The Siren connection is in
trouble.
18. Zone Features
GUARD8 has 8 programmable zones. Each zone can be
programmed for Entry/Exit Delay Zone, Instant (Intrusion) Zone,
Panic Zone, Fire Zone, Tamper Zone, Remote Zone etc .
Entry/Exit Delay Zone: A delay period was setup during your
system’s installation to provide suitable time to allow for your entry
and exit. Exit Delay is the time from pressing the ARM key to
exiting the armed zones; Entry Delay is the time from entering the
armed zones to DISARM. If the time exceeds the selected entry
time, the system will alarm at once.
Instant Intrusion Zone: When it is triggered, the system will alarm
instantly.
Panic Zone: Used for panic button, which is 24-Hours Zone
Fire Zone: Used for smoke detector and gas detector, which is 24Hours Zone
Tamper Zone: Used for connecting with the tamper connector of
detector, which is 24-Hours Zone
Remote Zone: Used for connecting with remote receiver, which is
24-Hours Zone
For user’s convenience, all GUARD8 zones have been defaulted
as following:
Zone 1: Entry/Exit Delay Zone;
Zone 2: Instant (Intrusion) Zone;
Zone 3: Instant (Intrusion) Zone;
Zone 4: Panic Zone;
Zone 5: Fire Zone;
Zone 6: Tamper Zone;
Zone 7: Interior Zone;
Zone 8: Interior Zone;
19. Events History/Memory Logger
You can retrieve events from the events memory logger using the
LCD keypad (up to 50 events) including arm, disarm, alarm etc.
Events are presented from the last entered to the first registered.
The event are listed in chronological order from 1 to 50 using the
following codes for identification.
Press: [*]+[9]+[MASTER CODE]+[EVENT No.]
The keypad display format is as follows:
[MM][DD] [HH][MM] [ID CODE] [Zone No. or User No.]
Identification Code:
11 Zone Alarmed
10 Zone Restore
21 Keypad Panic Alarm
22 Keypad Fire Alarm
23 Keypad Medical Emergency
51 User Arm
50 User Disarm
53 Auto Arm
Zone No. or User No.: When the event shows an activation the last
code number identifies the activated zone. When the event is for
arming or disarming, the last code number identifies the User No.
20. On/Off Door Chime
Assigned to an opening which, when violated during the disarmed
state, will cause the system's keypad(s) to beep once. When alarm
occurs during armed system only the external sounder will be
activated. Enter [*]+[8]+[Master Code]+[2] to turn on/off the door
chime.
21. Remote Control System (optional)
If your system has been installed with the remote control option, the
following buttons may be used and pre-programmed as per the
following table.
When arming or disarming a remote control system, a confirmation
chirp will indicate its status, whether it is armed or disarmed.
Button 1
Button 2
Button 3
Button 4
Arm & Disarm
Panic Button (if programmed by installer)
Garage Door/Gate Control
Garage Door/Gate Control
GUARD8 Warranty
ROISCOK Electronics Ltd., Mr Security Ltd, and Affiliates ("Seller")
warrant its products to be free from defects in materials and
workmanship under normal use for 18 months from the date of
production or 12 months from date of installation whichever is
sooner. Because the Seller does not install or connect the product
and because the product maybe used in conjunction with products
not manufactured by Seller, seller cannot guarantee the
performance of security system which uses this product. Seller's
obligation and liability under this warranty is expressly limited to
repairing or replacing, at Sellers option, within a reasonable time
after the date of delivery, any product not meeting the
specifications.
Seller's obligation under this warranty shall not include any
transportation charges, or costs of installation or any liability for
direct, indirect or consequential or delay. Seller does not represent
that its products may not be compromised or circumvented that the
product will prevent any personal injury or property loss by burglary,
robbery, fire or otherwise; or that the product will in all cases
provide adequate warning or protection. Buyer understands that a
properly installed and maintained alarm may only reduce the risk of
burglary, robbery, fire without warning, but it is not insurance or a
guarantee that such will not occur or that there will be no personal
injury or property loss as a result.
Consequently, Seller shall have no liability for any personal injury,
property damage or loss based on a claim that the product fails to
give warning. However, if seller is held liable, whether directly or
indirectly, for any loss or damage arising under this limited warranty
or otherwise, regardless of cause of origin, sellers maximum liability
shall not exceed the purchase price of the product, which shall be
the complete and exclusive remedy against seller.
No employee or representative of Seller is authorised to change
this warranty in any way or grant any other warranty. All products
should be tested at least once a week.
This page is intentionally blank.
© Copyright 2007 – Mr Secuirty – All rights reserved.
The Manual is not to be reproduced without permission
Phone 0800 022 111