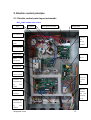
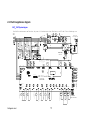
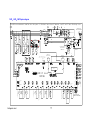
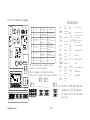
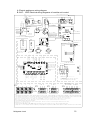
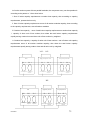
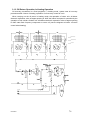
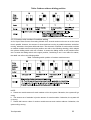
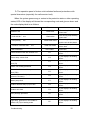
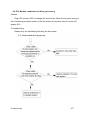
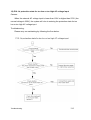
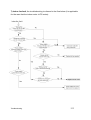
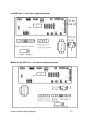
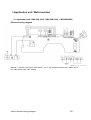
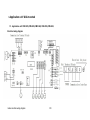
1
Table of Contents
R-410A Heat Pump
1.
Introduction...............................................................III
1.1. Safety Cautions................................................................. III
1.2. Preface...............................................................................VII
Part 1
General Information............................................................................1
1.
2.
3.
Part 2
Model Names of Indoor/Outdoor Units........................2
External Appearance....................................................3
2.1. Indoor Units..................................................................3
2.2. Outdoor Units..............................................................3
Model Selection......... .........................................................5
Specification....................................................................................................9
1. Specifications........................................................................10
1.1. Outdoor Units ............................................................10
1.2. Indoor Unit..................................................................24
Part 3
Refrigerant Circuit.................................................................................40
1. System Principles...............................................................41
1.1. System principle diagram............................................41
1.2. Functional components layout....................................45
1.3. Refrigerant flow chart of operation mode.................48
2. Electric control principle.......................................................53
2.1. Electric control parts layout schematic.....................53
2.2. Electric appliances diagram....................................55
2.3. The control board interface diagram...........................65
Part 4
Function.....................................................................................................67
1. Operation Mode..............................................................68
2. Basic Control......................................................................69
2.1. Normal Operation......................................................69
2.2. Compressor Control..................................................70
2.3. Electronic Expansion Valve Control............................73
2.4. Cooling Operation Fan Control................................74
3. Special Control ..........................................................74
Table of Contents
I
3.1. Oil Return Operation............................................74
3.2. Defrosting Operation...................................................77
4. Protection Control................................................................78
4.1. High Pressure Protection Control................................78
4.2. Low Pressure Protection Control..................................78
4.3. Discharge Pipe Protection Control............................78
4.4. Inverter Protection Control............................................79
5. Other Control.........................................................................79
5.1. Outdoor unit operating time control..............................79
5.2. Demand Operation.....................................................79
Part 5
Test Operation.................................................................................80
1.
Test Operation....................................................................81
1.1. Procedure and Outline.............................................81
2. Outdoor Unit PC Board Layout...........................................82
3. Field Setting.....................................................................84
3.1. Field Setting from Remote Controller...........................84
3.2. Field Setting from Outdoor Unit...................................88
Part 6
Troubleshooting..........................................................................................91
1. Faults display......................................................................92
2. Troubleshooting................................................................99
2.1. Outdoor unit: ........................................................99
2.2. Indoor unit...................................................................118
Part 7
Indoor Electrical Wiring Diagram.................................................125
1. Low ESP, middle ESP, high ESP duct .............................126
2. Wall-mounted...................................................................128
3. Wall-mounted...................................................................130
4.
Table of Contents
II
Floor & Ceiling......................................................................132
1. Introduction
1.1 Safety Cautions
Cautions and Warnings
■
Be sure to read the following safety cautions before conducting
repair work.
■
The caution items are classified into
The
and
items are especially important since they can lead to
death or serious injury if they are not
followed closely. The
items can also lead to serious accidents under some conditions if they
are not followed. Therefore, be sure to observe all the safety caution
items described below.
■
△
About the pictograms
This symbol indicates an item for which caution must be
exercised.
The pictogram shows the item to which attention must be paid.
○
This symbol indicates a prohibited action.
The prohibited item or action is shown inside or near the symbol.
●
This symbol indicates an action that must be taken, or an
instruction.
The instruction is shown inside or near the symbol.
■
After the repair work is complete, be sure to conduct a test
operation to ensure that the equipment operates normally, and explain
the cautions for operating the product to the customer
Table of Contents
III
1.1.1 Caution in Repair
Be sure to disconnect the power cable plug from the plug socket before disassembling the
equipment for a repair. Working on the equipment that is connected to a power supply can cause
an electrical shook. If it is necessary to supply power to the equipment to conduct the repair or
inspecting the circuits, do not touch any electrically charged sections of the equipment.
If the refrigerant gas discharges during the repair work, do not touch the discharging refrigerant
gas. The refrigerant gas can cause frostbite.
When disconnecting the suction or discharge pipe of the compressor at the welded section,
release the refrigerant gas completely at a well-ventilated place first.
If there is a gas remaining inside the compressor, the refrigerant gas or refrigerating machine oil
discharges when the pipe is disconnected, and it can cause injury.
If the refrigerant gas leaks during the repair work, ventilate the area. The
refrigerant gas can generate toxic gases when it contacts flames.
The step-up capacitor supplies high-voltage electricity to the electrical
components of the outdoor unit. Be sure to discharge the capacitor completely before conducting
repair work. A charged capacitor can cause an electrical shock.
Do not start or stop the air conditioner operation by plugging or unplugging the power cable plug.
Plugging or unplugging the power cable plug to operate the equipment can cause an electrical
shock or fire.
Do not repair the electrical components with wet hands.
Working on the equipment with wet hands can cause an electrical shock.
Do not clean the air conditioner by splashing water.
Washing the unit with water can cause an electrical shock.
Be sure to provide the grounding when repairing the equipment in a humid or wet place, to avoid
electrical shocks
Be sure to turn off the power switch and unplug the power cable when cleaning the
equipment.The internal fan rotates at a high speed, and cause injury.
Do not tilt the unit when removing it.
The water inside the unit can spill and wet the furniture and floor.
Be sure to check that the refrigerating cycle section has cooled down sufficiently before
conducting repair work. Working on the unit when the refrigerating cycle section is hot can cause
burns.
Use the welder in a well-ventilated place.
Using the welder in an enclosed room can cause oxygen deficiency.
Table of Contents
IV
1.1.2 Cautions Regarding Products after Repair
Be sure to use parts listed in the service parts list of the applicable model and appropriate tools to
conduct repair work. Never attempt to modify the equipment.
The use of inappropriate parts or tools can cause an electrical shock, excessive heat generation
or fire.
When relocating the equipment, make sure that the new installation site has sufficient strength to
withstand the weight of the equipment. If the installation site does not have sufficient strength and
if the installation work is not conducted securely, the equipment can fall and cause injury.
Be sure to install the product correctly by using the provided standard installation frame.
For
Incorrect use of the installation frame and improper installation can cause the equipment to fall,
units only
integral
resulting in injury.
Be sure to install the product securely in the installation frame mounted on a window frame. If the
For
unit is not securely mounted, it can fall and cause injury.
units only
Be sure to use an exclusive power circuit for the equipment, and follow the technical standards
related to the electrical equipment, the internal wiring regulations and the instruction manual for
installation when conducting electrical work. Insufficient power circuit capacity and improper
electrical work can cause an electrical shock or fire.
Be sure to use the specified cable to connect between the indoor and outdoor units. Make the
connections securely and route the cable properly so that there is no force pulling the cable at the
connection terminals.
Improper connections can cause excessive heat generation or fire.
When connecting the cable between the indoor and outdoor units, make sure that the terminal
cover does not lift off or dismount because of the cable.
If the cover is not mounted properly, the terminal connection section can cause an electrical
shock, excessive heat generation or fire.
Do not damage or modify the power cable. Damaged or modified power cable can cause an
electrical shock or fire. Placing heavy items on the power cable, and heating or pulling the power
cable can damage the cable.
Do not mix air or gas other than the specified refrigerant (R-410A) in the refrigerant system. If air
enters the refrigerating system, an excessively high pressure results, causing equipment damage
and injury.
If the refrigerant gas leaks, be sure to locate the leak and repair it before charging the refrigerant.
After charging refrigerant, make sure that there is no refrigerant leak.
If the leak cannot be located and the repair work must be stopped, be sure to perform pump-down
and close the service valve, to prevent the refrigerant gas from leaking into the room. The
refrigerant gas itself is harmless, but it can generate toxic gases when it contacts flames, such as
fan and other heaters, stoves and ranges.
When replacing the coin battery in the remote controller, be sure to disposed of the old battery to
prevent children from swallowing it.If a child swallows the coin battery, see a doctor immediately.
Table of Contents
V
integral
Installation of a leakage breaker is necessary in some cases depending on the
conditions of the installation site, to prevent electrical shocks.
Do not install the equipment in a place where there is a possibility of combustible
gas leaks.
If a combustible gas leaks and remains around the unit, it can cause a fire.
Be sure to install the packing and seal on the installation frame properly.
If the packing and seal are not installed properly, water can enter the room and wet
the furniture and floor.
1.1.3 Inspection after Repair
Check to make sure that the power cable plug is not dirty or loose, then insert the
plug into a power outlet all the way.
If the plug has dust or loose connection, it can cause an electrical shock or fire.
If the power cable and lead wires have scratches or deteriorated, be sure to replace
them.
Damaged cable and wires can cause an electrical shock, excessive heat
generation or fire.
Do not use a joined power cable or extension cable, or share the same power outlet
with other electrical appliances, since it can cause an electrical shock, excessive
heat generation or fire.
Check to see if the parts and wires are mounted and connected properly, and if the
connections at the soldered or crimped terminals are secure.
Improper installation and connections can cause excessive heat generation, fire or
an electrical shock.
If the installation platform or frame has corroded, replace it.
Corroded installation platform or frame can cause the unit to fall, resulting in injury
Check the grounding, and repair it if the equipment is not properly grounded.
Improper grounding can cause an electrical shock.
Be sure to measure the insulation resistance after the repair, and make sure that
the resistance is 1 Mohm or higher.
Faulty insulation can cause an electrical shock.
Be sure to check the drainage of the indoor unit after the repair.
Faulty drainage can cause the water to enter the room and wet the furniture and
floor.
Table of Contents
VI
For
integral
units only
1.1.4 Using Icons
Icons are used to attract the attention of the reader to specific information. The meaning
of each icon is described in the table below:
1.1.5 Using Icons List
1.2 PREFACE
Thank you for your continued patronage of Chigo products.
We are confident that customers will be able to find the models that best suit their needs.
This service manual contains information regarding the servicing of VRV series Heat Pump S
Table of Contents
VII
Part 1
General Information
1. Model Names of Indoor/Outdoor Units .........................................................2
2. External Appearance....................................................................................3
2.1 Indoor Units...........................................................................................3
2.2 Outdoor Units........................................................................................3
3. Model Selection............................................................................................5
General Information
1
1. Model Names of Indoor/Outdoor Units
Indoor unit
Power supply: 220V/1Ph/50Hz
Model
Struc
Type
Capacity code
ture
code
Ceiling
22
28
22
28
36
45
56
71
80
100
112
125
140
36
45
56
71
80
90
100
112
125
140
70
80
90
100
70
80
90
100
71
80
Q
cassette
Low ESP
32
150
F1
120
150
F2
120
150
F3
duct
Middle
ESP duct
C
M
High ESP
V-
duct
Floor
28
45
56
LD
112
ceiling
Wall22
28
36
45
51
G
70
mounted
Outdoor unit
Power supply: 380V/3Ph/50Hz
system
Model
Model
Module
type
252
Single
unit type
252
Combination model
CMV-V
280
335
400
450
335
400
450
280
532
560
615
680
735
785
850
900
960
1010
1065
1130
1180
1235
1300
WSAM
WSA
WSAM
1350
General Information
2
3. Model Selection
Connectable Indoor Units Number and Capacity
System name
CMV-V252WSA(M)
CMV-V280WSA(M)
CMV-V335WSA(M)
kW
25.2
28
33.5
HP
8
10
12
CMV-V252WM6A(/M)
CMV-V280WM6A(/M)
CMV-V330WN6A(/M)
Outdoor unit 2
——
——
——
Outdoor unit 3
——
——
——
12
14
16
12.6~27.7
14.0~30.8
16.5~36.3
Capacity
Outdoor unit 1 (master modular)
Total number of connectable
indoor units
Total Capacity Index
of Indoor Units to be
kW
Connected
System name
CMV-V400WSA(M)
CMV-V450WSA(M)
CMV-V532WSAM
kW
40
45
53.2
HP
14
16
18
CMV-V400WN6A(/M)
CMV-V450WN6A(/M)
CMV-V280WM6A/M
Outdoor unit 2
——
——
CMV-V252WM6A/M
Outdoor unit 3
——
——
——
20
22
26
20.0~44.0
22.5~49.5
26.6~58.5
CMV-V560WSAM
CMV-V615WSAM
CMV-V680WSAM
kW
56
61.5
68
HP
20
22
24
Outdoor unit 1 (master modular)
CMV-V280WM6A/M
CMV-V330WN6A/M
CMV-V400WN6A/M
Outdoor unit 2
CMV-V280WM6A/M
CMV-V280WM6A/M
CMV-V280WM6A/M
Outdoor unit 3
——
——
——
28
30
34
28.0~61.6
30.5~67.1
34.0~74.8
Capacity
Outdoor unit 1 (master modular)
Total number of connectable
indoor units
Total Capacity Index
of Indoor Units to be
kW
Connected
System name
Capacity
Total number of connectable
indoor units
Total Capacity Index
of Indoor Units to be
kW
Connected
General Information
5
System name
CMV-V735WSAM
CMV-V780WSAM
CMV-V850WSAM
kW
73.5
78
85
HP
26
28
30
Outdoor unit 1 (master modular)
CMV-V450WN6A/M
CMV-V450WN6A/M
CMV-V450WN6A/M
Outdoor unit 2
CMV-V280WM6A/M
CMV-V330WN6A/M
CMV-V400WN6A/M
Outdoor unit 3
——
——
——
36
39
42
36.5~80.3
39.0~85.8
42.5~93.5
CMV-V900WSAM
CMV-V960WSAM
CMV-V1010WSAM
kW
90
96
101
HP
32
34
36
Outdoor unit 1 (master modular)
CMV-V450WN6A/M
CMV-V400WN6A/M
CMV-V450WN6A/M
Outdoor unit 2
CMV-V450WN6A/M
CMV-V280WM6A/M
CMV-V280WM6A/M
Outdoor unit 3
——
CMV-V280WM6A/M
CMV-V280WM6A/M
45
48
50
45.0~99.0
48.0~105.6
50.5~111.1
CMV-V1065WSAM
CMV-V1130WSAM
CMV-V1180WSAM
kW
106.5
113
118
HP
38
40
42
Outdoor unit 1 (master modular)
CMV-V450WN6A/M
CMV-V450WN6A/M
CMV-V450WN6A/M
Outdoor unit 2
CMV-V330WN6A/M
CMV-V400WN6A/M
CMV-V450WN6A/M
Outdoor unit 3
CMV-V280WM6A/M
CMV-V280WM6A/M
CMV-V280WM6A/M
50
50
50
53.0~116.6
56.5~124.3
59.0~129.8
Capacity
Total number of connectable
indoor units
Total Capacity Index
of Indoor Units to be
kW
Connected
System name
Capacity
Total number of connectable
indoor units
Total Capacity Index
of Indoor Units to be
kW
Connected
System name
Capacity
Total number of connectable
indoor units
Total Capacity Index
of Indoor Units to be
kW
Connected
General Information
6
System name
CMV-V1235WSAM
CMV-V1300WSAM
CMV-V1350WSAM
kW
123.5
130
135
HP
44
46
48
Outdoor unit 1 (master modular)
CMV-V450WN6A/M
CMV-V450WN6A/M
CMV-V450WN6A/M
Outdoor unit 2
CMV-V450WN6A/M
CMV-V450WN6A/M
CMV-V450WN6A/M
Outdoor unit 3
CMV-V330WN6A/M
CMV-V400WN6A/M
CMV-V450WN6A/M
50
50
50
61.5~135.3
65.0~143.0
67.5~148.5
Capacity
Total number of connectable
indoor units
Total Capacity Index
of Indoor Units to be
kW
Connected
Connectable Indoor Unit
Model
Struct
Type
Capacity code
ure
code
Ceiling
22
28
22
28
36
45
56
71
80
100
112
125
140
36
45
56
71
80
90
100
112
125
140
70
80
90
100
70
80
90
100
71
80
Q
cassette
Low ESP
32
150
F1
120
150
F2
120
150
F3
duct
Middle
ESP duct
C
M
High ESP
V-
duct
Floor
28
45
56
LD
112
ceiling
Wall22
28
36
45
51
G
70
mounted
General Information
7
Indoor Unit Capacity
Indoor capacity
18/22
25/28
32/36
45/46
51/56
70/71/80
88/90
100
kW
1.8/2.2
2.5/2.8
3.2/3.6
4.5/4.6
5.1/5.6
7.0/7.1/8.0
8.8/9.0
10.0
HP
0.8
1
1.5
1.7
2
3
3.5
4
Indoor capacity
112
120/125
140
150
170
200
224
250
kW
11.2
12.0/12.5
14.0
15.0
17.0
20.0
22.4
25.0
HP
4.5
5
5.5
6
7
8
9
10
Use the above tables to determine the capacities of indoor units to be connected. Make sure the
total capacity of indoor units connected to each outdoor unit is within the specified value (kW).
■ The total capacity of connected indoor units must be within a range of 50 to 120% of the rated
capacity of the outdoor unit.
■ In some models, it is not possible to connect the maximum number of connectable indoor units.
Select models so the total capacity of connected indoor units conforms to the specification.
General Information
8
Part 2
Specification
1. Specifications .......................................................................................10
1.1. Outdoor Units ..............................................................................10
1.2. Indoor Units ..............................................................................24
Specification
9
1. Specifications
1.1 Outdoor Units
Model Name
CMV-V252WSA
CMV-V280WSA
★1 Cooling Capacity
kW
25.2
28.0
★2 Heating Capacity
kW
27.4
31.5
camel gray
camel gray
1665×930×765
1665×930×765
Hydrophilic Aluminum
Hydrophilic Aluminum
Scroll Compressor
Scroll Compressor
cm3/rev
38+49
38+49
rpm
30~62
30~78
kW
(3.88+4.27)×1
(3.88+4.27)×1
soft start
soft start
Casing Color
Dimensions: (H×W×D)
mm
Heat Exchanger
Type
Piston Displacement
Comp.
Number of Revolutions
Motor Input × Number
of Units
Starting Method
Type
Axial
fan
Axial
fan
Motor Output
kW
0.550×1
0.550×1
Air Flow Rate
m3/h
11000
11000
Variable frequency drive
Variable frequency drive
Fan
Drive
Connecting
Liquid Pipe
mm
φ12.7
φ12.7
Pipes
Gas Pipe
mm
φ22
φ22
kg
290
290
dB(A)
58
58
high pressure switch、fan
high pressure switch、fan
Machine Weight (Mass)
★3 Sound Level (Reference Value)
drive overload protector、 drive overload protector、
Safety Devices
Capacity Control
%
Refrigerant Name
Refrigerant
Charge
kg
Control
Refrigerator
Oil
Charge Volume
Standard Accessories
Specification
l
Over-current relay、
Over-current relay、
Inverter overload
Inverter overload
protector
protector
15~110
15~110
R-410A
R-410A
12.5
12.5
Electronic Expansion
Electronic Expansion
Valve
Valve
FVC68D
FVC68D
4
4
Instruction
Instruction
10
Model Name
CMV-V335WSA
CMV-V400WSA
★1 Cooling Capacity
kW
33.5
40
★2 Heating Capacity
kW
37.5
45
camel gray
camel gray
1645×1340×765
1645×1340×765
Hydrophilic Aluminum
Hydrophilic Aluminum
Scroll Compressor
Scroll Compressor
cm3/rev
38+59
38+49+49
rpm
30~78
30~78
kW
(3.88+5.13)×1
(3.88+4.27+4.27)×1
soft start
soft start
Casing Color
Dimensions: (H×W×D)
mm
Heat Exchanger
Type
Piston Displacement
Number of
Comp.
Revolutions
Motor Input ×
Number of Units
Starting Method
Type
Axial
fan
Axial
fan
Motor Output
kW
0.400×2
0.400×2
Air Flow Rate
m3/h
14000
16000
Variable frequency drive
Variable frequency drive
Fan
Drive
Connecting
Liquid Pipe
mm
φ12.7
φ15.88
Pipes
Gas Pipe
mm
φ22
φ28.6
kg
365
420
dB(A)
58
60
high pressure switch、fan
high pressure switch、fan
Machine Weight (Mass)
★3 Sound Level (Reference Value)
drive overload protector、 drive overload protector、
Safety Devices
Capacity Control
%
Refrigerant Name
Refrigerant
Charge
kg
Control
Refrigerator
Oil
Charge Volume
Standard Accessories
Specification
l
Over-current relay、
Over-current relay、
Inverter overload
Inverter overload
protector
protector
15~110
15~110
R-410A
R-410A
14
17
Electronic Expansion
Electronic Expansion
Valve
Valve
FVC68D
FVC68D
4
6
Instruction
Instruction
11
Model Name
CMV-V450WSA
★1 Cooling Capacity
kW
45
★2 Heating Capacity
kW
50
Casing Color
camel gray
Dimensions: (H×W×D)
mm
Heat Exchanger
Hydrophilic Aluminum
Type
Piston Displacement
Number of
Comp.
1645×1340×765
Revolutions
Motor Input ×
Number of Units
Scroll Compressor
cm3/rev
38+59+59
rpm
30~78
kW
(3.88+5.13+5.13)×1
Starting Method
soft start
Type
Axial
fan
Motor Output
kW
0.400×2
Air Flow Rate
m3/h
16000
Fan
Drive
Variable frequency drive
Connecting
Liquid Pipe
mm
φ15.88
Pipes
Gas Pipe
mm
φ28.6
kg
420
dB(A)
60
Machine Weight (Mass)
★3 Sound Level (Reference Value)
high pressure switch、fan drive overload protector、
Safety Devices
Over-current relay、Inverter overload protector
Capacity Control
%
Refrigerant Name
Refrigerant
Charge
15~110
R-410A
kg
Control
18.2
Electronic Expansion Valve
FVC68D
Refrigerator
Oil
Charge Volume
Standard Accessories
l
6
Instruction
Notes: ★ 1 Indoor temp. : 80°FDB or 67°FWB / outdoor temp. : 95°FDB / Equivalent piping length : 25 ft,
level difference: 0.
★ 2 Indoor temp. : 70°FDB / outdoor temp. : 47°FDB or 43°FWB / Equivalent piping length : 25 ft,
level difference: 0.
★
3 Anechoic chamber conversion values, measured under JISB8616 conditions. During actual
operation, these values are normally somewhat higher as a result of ambient conditions.
Specification
12
Model Name (Combination Unit)
CMV-V252WSAM
CMV-V280WSAM
Model Name (Independent Unit)
CMV-V252WSAM
CMV-V280WSAM
★1 Cooling Capacity
25.2
28.0
★2 Heating Capacity
27.4
31.5
camel gray
camel gray
1665×930×765
1665×930×765
Hydrophilic Aluminum
Hydrophilic Aluminum
Scroll Compressor
Scroll Compressor
cm3/rev
38+49
38+49
rpm
30~62
30~78
kW
(3.88+4.27)×1
(3.88+4.27)×1
Starting Method
Soft start-up
Soft start-up
Type
Axial flow fan
Axial flow fan
Casing Color
Dimensions: (H×W×D)
mm
Heat Exchanger
Type
Piston Displacement
Number of
Comp.
Revolution
Motor Input ×
Number of Units
Motor Output
kW
0.550×1
0.550×1
Air Flow Rate
m3/h
11000
11000×1
Variable frequency drive
Variable frequency drive
Fan
Drive
Connecting
Pipes
Liquid Pipe ★3
mm
φ12.7
φ12.7
Gas Pipe ★3
mm
φ22
φ22
Oil Equalizing Pipe
mm
φ6.35
φ6.35
kg
290
290
high pressure switch、fan
high pressure switch、fan
drive overload protector、
drive overload protector、
Over-current relay、
Over-current relay、
Inverter overload protector
Inverter overload protector
Automatic intelligent
Automatic intelligent
defrosting
defrosting
15~110
15~110
R-410A
R-410A
12.5
12.5
Electronic Expansion
Electronic Expansion
Valve
Valve
FVC68D
FVC68D
4
4
manual
manual
Machine Weight (Mass)
Safety Devices
Defrost Method
Capacity Control
%
Refrigerant Name
Refrigerant
Charge
kg
Control
Refrigerator
Oil
Charge Volume
Standard Accessories
Specification
l
13
Model Name (Combination Unit)
CMV-V335WSAM
CMV-V400WSAM
Model Name (Independent Unit)
CMV-V335WSAM
CMV-V400WSAM
★1 Cooling Capacity
33.5
40
★2 Heating Capacity
37.5
45
camel gray
camel gray
1645×1340×765
1645×1340×765
Hydrophilic Aluminum
Hydrophilic Aluminum
Scroll Compressor
Scroll Compressor
cm3/rev
38+59
38+49+49
rpm
30~78
30~78
kW
(3.88+5.13)×1
(3.88+4.27+4.27)×1
Starting Method
Soft start-up
Soft start-up
Type
Axial flow fan
Axial flow fan
Casing Color
Dimensions: (H×W×D)
mm
Heat Exchanger
Type
Piston Displacement
Number of
Comp.
Revolution
Motor Input ×
Number of Units
Motor Output
kW
0.400×2
0.400×2
Air Flow Rate
m3/h
14000×1
16000×1
Variable frequency drive
Variable frequency drive
Fan
Drive
Connecting
Pipes
Liquid Pipe ★3
mm
φ12.7
φ15.88
Gas Pipe ★3
mm
φ22
φ28.6
Oil Equalizing Pipe
mm
φ6.35
φ6.35
kg
365
420
high pressure switch、fan
high pressure switch、fan
Machine Weight (Mass)
drive overload protector、 drive overload protector、
Safety Devices
Defrost Method
Capacity Control
%
Refrigerant Name
Refrigerant
Charge
kg
Control
Refrigerator
Oil
Charge Volume
Standard Accessories
Specification
l
Over-current relay、
Over-current relay、
Inverter overload
Inverter overload
protector
protector
Automatic intelligent
Automatic intelligent
defrosting
defrosting
15~110
15~110
R-410A
R-410A
14
17
Electronic Expansion
Electronic Expansion
Valve
Valve
FVC68D
FVC68D
4
6
manual
manual
14
Model Name (Combination Unit)
CMV-V450WSAM
Model Name (Independent Unit)
CMV-V450WSAM
CMV-V532WSAM
CMV-V252WSAM+CMVV280WSAM
★1 Cooling Capacity
45
53.2
★2 Heating Capacity
50
58.9
camel gray
camel gray
Casing Color
Dimensions: (H×W×D)
mm
Heat Exchanger
Scroll Compressor
Scroll Compressor
cm3/rev
38+59+59
(38+49)×2
rpm
30~78
(30~62)+(30~78)
kW
(3.88+5.13+5.13)×1
(3.88+4.27)×2
Starting Method
Soft start-up
Soft start-up
Type
Axial flow fan
Axial flow fan
Number of
Revolution
Motor Input ×
Number of Units
Motor Output
kW
0.400×2
0.550×2
Air Flow Rate
m3/h
16000×1
11000×2
Variable frequency drive
Variable frequency drive
Drive
φ19.1(Brazing
Liquid Pipe ★3
mm
φ15.88
Gas Pipe ★3
mm
φ28.6
Oil Equalizing Pipe
mm
φ6.35
φ6.35
kg
420
290+290
high pressure switch、fan
high pressure switch、fan
Connecting
Pipes
930×765)
Hydrophilic Aluminum
Piston Displacement
Fan
(1665×930×765)+(1665×
Hydrophilic Aluminum
Type
Comp.
1645×1340×765
Machine Weight (Mass)
Connection)
φ34.9(Brazing
Connection)
drive overload protector、 drive overload protector、
Safety Devices
Defrost Method
Capacity Control
%
Refrigerant Name
Refrigerant
Charge
kg
Control
Refrigerator
Oil
Charge Volume
Standard Accessories
Specification
l
Over-current relay、
Over-current relay、
Inverter overload
Inverter overload
protector
protector
Automatic intelligent
Automatic intelligent
defrosting
defrosting
15~110
15~110
R-410A
R-410A
18.2
12.5+12.5
Electronic Expansion
Electronic Expansion
Valve
Valve
FVC68D
FVC68D
6
4+4
manual
manual
15
Model Name (Combination Unit)
CMV-V560WSAM
CMV-V615WSAM
CMV-V280WSAM+CMV-V2
CMV-V280WSAM+CMV-V33
80WSAM
5WSAM
★1 Cooling Capacity
56
61.5
★2 Heating Capacity
63
69
camel gray
camel gray
(1665×930×765)+(1665×930
(1665×930×765)+(1645×134
×765)
0×765)
Hydrophilic Aluminum
Hydrophilic Aluminum
Scroll Compressor
Scroll Compressor
(38+49)×2
(38+49)+(38+59)
rpm
(30~78)×2
(30~78)×2
kW
(3.88+4.27)×2
Model Name (Independent Unit)
Casing Color
Dimensions: (H×W×D)
mm
Heat Exchanger
Type
Piston Displacement
Number of
Comp.
Revolution
Motor Input ×
Number of Units
cm3/r
ev
(3.88+4.27)×1
+(3.88+5.13)×1
Starting Method
Soft start-up
Soft start-up
Type
Axial flow fan
Axial flow fan
Motor Output
kW
0.550×2
0.550×1+0.400×2
Air Flow Rate
m3/h
11000×2
11000×1+14000×1
Variable frequency drive
Variable frequency drive
Fan
Drive
Connecting
Pipes
Liquid Pipe ★3
mm
φ19.1(Brazing Connection)
φ19.1(Brazing Connection)
Gas Pipe ★3
mm
φ34.9(Brazing Connection)
φ34.9(Brazing Connection)
Oil Equalizing Pipe
mm
φ6.35
φ6.35
kg
290+290
290+365
high pressure switch、fan
high pressure switch、fan
drive overload protector、
drive overload protector、
Over-current relay、Inverter
Over-current relay、Inverter
overload protector
overload protector
Automatic intelligent
Automatic intelligent
defrosting
defrosting
15~110
15~110
R-410A
R-410A
12.5+12.5
12.5+14
Electronic Expansion Valve
Electronic Expansion Valve
FVC68D
FVC68D
4+4
4+4
manual
manual
Machine Weight (Mass)
Safety Devices
Defrost Method
Capacity Control
%
Refrigerant Name
Refrigerant
Charge
kg
Control
Refrigerator
Oil
Charge Volume
Standard Accessories
Specification
l
16
Model Name (Combination Unit)
CMV-V680WSAM
CMV-V730WSAM
CMV-V280WSAM+CMV-V4
CMV-V280WSAM+CMV-V4
00WSAM
50WSAM
★1 Cooling Capacity
68
73
★2 Heating Capacity
76.5
81.5
camel gray
camel gray
(1665×930×765)+(1645×134
(1665×930×765)+(1645×134
0×765)
0×765)
Hydrophilic Aluminum
Hydrophilic Aluminum
Scroll Compressor
Scroll Compressor
(38+49)+(38+49+49)
(38+49)+(38+59+59)
(30~78)×2
(30~78)×2
Model Name (Independent Unit)
Casing Color
Dimensions: (H×W×D)
mm
Heat Exchanger
Type
Piston Displacement
Comp.
Number of
Revolution
Motor Input ×
cm3/r
ev
rpm
(3.88+4.27)×1+
(3.88+4.27)×1+
(3.88+4.27+4.27)×1
(3.88+5.13+5.13)×1
Starting Method
Soft start-up
Soft start-up
Type
Axial flow fan
Axial flow fan
Number of Units
kW
Motor Output
kW
0.550×1+0.400×2
0.550×1+0.400×2
Air Flow Rate
m3/h
11000×1+16000×1
11000×1+16000×1
Variable frequency drive
Variable frequency drive
Fan
Drive
Connecting
Pipes
Liquid Pipe ★3
mm
φ19.1(Brazing Connection)
φ22.2(Brazing Connection)
Gas Pipe ★3
mm
φ34.9(Brazing Connection)
φ38.1(Brazing Connection)
Oil Equalizing Pipe
mm
φ6.35
φ6.35
kg
290+420
290+420
high pressure switch、fan drive
high pressure switch、fan drive
overload protector、Over-current
overload protector、Over-current
relay、Inverter overload protector
relay、Inverter overload protector
Automatic intelligent
Automatic intelligent
defrosting
defrosting
15~110
15~110
R-410A
R-410A
12.5+17
12.5+18.2
Electronic Expansion Valve
Electronic Expansion Valve
FVC68D
FVC68D
4+6
4+6
manual
manual
Machine Weight (Mass)
Safety Devices
Defrost Method
Capacity Control
%
Refrigerant Name
Refrigerant
Charge
kg
Control
Refrigerator
Oil
Charge Volume
Standard Accessories
Specification
l
17
Model Name (Combination Unit)
CMV-V785WSAM
CMV-V850WSAM
CMV-V335WSAM+CMV-V4
CMV-V400WSAM+CMV-V4
50WSAM
50WSAM
★1 Cooling Capacity
78.5
85
★2 Heating Capacity
87.5
95
camel gray
camel gray
(1645×1340×765)+(1645×13
(1645×1340×765)+(1645×13
40×765)
40×765)
Hydrophilic Aluminum
Hydrophilic Aluminum
Scroll Compressor
Scroll Compressor
(38+59)+(38+59+59)
(38+49+49)+(38+59+59)
(30~78)×2
(30~78)×2
Model Name (Independent Unit)
Casing Color
Dimensions: (H×W×D)
mm
Heat Exchanger
Type
Piston Displacement
Comp.
Number of
Revolution
Motor Input ×
cm3/r
ev
rpm
(3.88+5.13)×1+
(3.88+4.27+4.27)×1+
(3.88+5.13+5.13)×1
(3.88+5.13+5.13)×1
Starting Method
Soft start-up
Soft start-up
Type
Axial flow fan
Axial flow fan
Number of Units
kW
Motor Output
kW
0.400×4
0.400×4
Air Flow Rate
m3/h
14000×1+16000×1
16000×2
Variable frequency drive
Variable frequency drive
Fan
Drive
Connecting
Pipes
Liquid Pipe ★3
mm
φ22.2(Brazing Connection)
φ22.2(Brazing Connection)
Gas Pipe ★3
mm
φ38.1(Brazing Connection)
φ38.1(Brazing Connection)
Oil Equalizing Pipe
mm
φ6.35
φ6.35
kg
365+420
420+420
high pressure switch、fan
high pressure switch、fan
drive overload protector、
drive overload protector、
Over-current relay、Inverter
Over-current relay、Inverter
overload protector
overload protector
Automatic intelligent
Automatic intelligent
defrosting
defrosting
15~110
15~110
R-410A
R-410A
14+18.2
17+18.2
Electronic Expansion Valve
Electronic Expansion Valve
FVC68D
FVC68D
4+6
6+6
manual
manual
Machine Weight (Mass)
Safety Devices
Defrost Method
Capacity Control
%
Refrigerant Name
Refrigerant
Charge
kg
Control
Refrigerator
Oil
Charge Volume
Standard Accessories
Specification
l
18
Model Name (Combination Unit)
CMV-V900WSAM
CMV-V960WSAM
CMV-V450WSAM+CMV-V450WS
CMV-V280WSAM+CMV-V280WS
AM
AM+CMV-V400WSAM
★1 Cooling Capacity
90
96
★2 Heating Capacity
100
108
camel gray
camel gray
(1645×1340×765)+(1645×13
(1665×930×765)×2+(1645×
40×765)
1340×765)
Hydrophilic Aluminum
Hydrophilic Aluminum
Scroll Compressor
Scroll Compressor
(38+59+59)+(38+59+59)
(38+49)×2+(38+49+49)
rpm
(30~78)×2
(30~78)×3
kW
(3.88+5.13+5.13)×2
Model Name (Independent Unit)
Casing Color
Dimensions: (H×W×D)
mm
Heat Exchanger
Type
Piston Displacement
Comp.
Number of
Revolution
Motor Input ×
Number of Units
cm3/r
ev
(3.88+4.27)×2+
(3.88+4.27+4.27)×1
Starting Method
Soft start-up
Soft start-up
Type
Axial flow fan
Axial flow fan
Motor Output
kW
0.400×4
0.550×2+0.400×2
Air Flow Rate
m3/h
16000×2
11000×2+16000×1
Variable frequency drive
Variable frequency drive
Fan
Drive
Connecting
Pipes
Liquid Pipe ★3
mm
φ22.2(Brazing Connection)
φ22.2(Brazing Connection)
Gas Pipe ★3
mm
φ38.1(Brazing Connection)
φ41.3(Brazing Connection)
Oil Equalizing Pipe
mm
φ6.35
φ6.35
kg
420+420
290+290+420
high pressure switch、fan drive
high pressure switch、fan drive
overload protector、Over-current
overload protector、Over-current
relay、Inverter overload protector
relay、Inverter overload protector
Automatic intelligent
Automatic intelligent
defrosting
defrosting
15~110
15~110
R-410A
R-410A
18.2+18.2
12.5+12.5+17
Electronic Expansion Valve
Electronic Expansion Valve
FVC68D
FVC68D
6+6
4+4+6
manual
manual
Machine Weight (Mass)
Safety Devices
Defrost Method
Capacity Control
%
Refrigerant Name
Refrigerant
Charge
kg
Control
Refrigerator
Oil
Charge Volume
Standard Accessories
Specification
l
19
CMV-V1010WSAM
CMV-V1065WSAM
CMV-V280WSAM+CMV-V2
CMV-V280WSAM+CMV-V3
80WSAM+CMV-V450WSA
35WSAM+CMV-V450WSA
M
M
★1 Cooling Capacity
101
106.5
★2 Heating Capacity
113
119
camel gray
camel gray
(1665×930×765)×2+(1645×
(1665×930×765)+(1645×134
1340×765)
0×765)×2
Hydrophilic Aluminum
Hydrophilic Aluminum
Scroll Compressor
Scroll Compressor
Model Name (Combination Unit)
Model Name (Independent Unit)
Casing Color
Dimensions: (H×W×D)
mm
Heat Exchanger
Type
Piston Displacement
Comp.
Number of Revolution
Motor Input × Number
of Units
cm3/r
ev
rpm
kW
(38+49)×2+(38+59+59)
(30~78)×3
(3.88+4.27)×2+
(3.88+5.13+5.13)×1
+(3.88+5.13+5.13)×1
Axial flow fan
Axial flow fan
0.550×1+0.400×4
Motor Output
kW
0.550×2+0.400×2
Air Flow Rate
m3/h
11000×2+16000×1
11000×1+14000×1+16000×
1
Variable frequency drive
Variable frequency drive
Liquid Pipe ★3
mm
φ22.2(Brazing Connection)
φ22.2(Brazing Connection)
Gas Pipe ★3
mm
φ41.3(Brazing Connection)
φ41.3(Brazing Connection)
Oil Equalizing Pipe
mm
φ6.35
φ6.35
kg
290+290+420
290+365+420
high pressure switch、fan drive
high pressure switch、fan drive
overload protector、Over-current
overload protector、Over-current
relay、Inverter overload protector
relay、Inverter overload protector
Automatic intelligent
Automatic intelligent
defrosting
defrosting
15~110
15~110
R-410A
R-410A
12.5+12.5+18.2
12.5+14+18.2
Electronic Expansion Valve
Electronic Expansion Valve
FVC68D
FVC68D
4+4+6
4+4+6
manual
manual
Defrost Method
Capacity Control
%
Refrigerant Name
Charge
kg
Control
Refrigerator
Charge Volume
Standard Accessories
Specification
(3.88+5.13)×1
Type
Safety Devices
Oil
(3.88+4.27)×1+
Soft start-up
Machine Weight (Mass)
Refrigerant
(30~78)×3
Soft start-up
Drive
Pipes
9)
Starting Method
Fan
Connecting
(38+49)+(38+59)+(38+59+5
l
20
Model Name (Combination Unit)
CMV-V1130WSAM
CMV-V1180WSAM
CMV-V280WSAM+CMV-V4
CMV-V280WSAM+CMV-V4
00WSAM+CMV-V450WSA
50WSAM+CMV-V450WSA
M
M
★1 Cooling Capacity
113
118
★2 Heating Capacity
126.5
131.5
camel gray
camel gray
(1665×930×765)+(1645×134
(1665×930×765)+(1645×134
0×765)×2
0×765)×2
Hydrophilic Aluminum
Hydrophilic Aluminum
Scroll Compressor
Scroll Compressor
Model Name (Independent Unit)
Casing Color
Dimensions: (H×W×D)
mm
Heat Exchanger
Type
Piston Displacement
Number of
Comp.
Revolution
Motor Input ×
Number of Units
Fan
cm3/r
(38+49)+(38+49+49)+(38+5
ev
9+59)
rpm
(30~78)×3
(3.88+4.27)×1+(3.88+
kW
+(3.88+5.13+5.13)×1
Pipes
Type
Axial flow fan
Axial flow fan
Motor Output
kW
0.550×1+0.400×4
0.550×1+0.400×4
Air Flow Rate
m3/h
11000×1+16000×2
11000×1+16000×2
Variable frequency drive
Variable frequency drive
Liquid Pipe ★3
mm
φ22.2(Brazing Connection)
φ22.2(Brazing Connection)
Gas Pipe ★3
mm
φ41.3(Brazing Connection)
φ41.3(Brazing Connection)
Oil Equalizing Pipe
mm
φ6.35
φ6.35
kg
290+420+420
290+420+420
high pressure switch、fan
high pressure switch、fan
drive overload protector、
drive overload protector、
Over-current relay、Inverter
Over-current relay、Inverter
overload protector
overload protector
Automatic intelligent
Automatic intelligent
defrosting
defrosting
15~110
15~110
R-410A
R-410A
12.5+17+18.2
12.5+18.2+18.2
Electronic Expansion Valve
Electronic Expansion Valve
FVC68D
FVC68D
4+6+6
4+6+6
manual
manual
Defrost Method
Capacity Control
%
Refrigerant Name
Charge
kg
Control
Refrigerator
Charge Volume
Standard Accessories
Specification
(3.88+5.13+5.13)×2
Soft start-up
Safety Devices
Oil
(3.88+4.27)×1+
Soft start-up
Machine Weight (Mass)
Refrigerant
(30~78)×3
Starting Method
Drive
Connecting
4.27+4.27)×1
(38+49)+(38+59+59)×2
l
21
Model Name (Combination Unit)
CMV-V1235WSAM
CMV-V1300WSAM
CMV-V335WSAM+CMV-V4
CMV-V400WSAM+CMV-V4
50WSAM
50WSAM
+CMV-V450WSAM
+CMV-V450WSAM
★1 Cooling Capacity
123.5
130
★2 Heating Capacity
137.5
145
Casing Color
camel gray
camel gray
(1645×1340×765)×3
(1645×1340×765)×3
Hydrophilic Aluminum
Hydrophilic Aluminum
Scroll Compressor
Scroll Compressor
(38+59)+(38+59+59)×2
(38+49+49)+(38+59+59)×2
(30~78)×3
(30~78)×3
(3.88+5.13)×1+
(3.88+4.27+4.27)×1+
(3.88+5.13+5.13)×2
(3.88+5.13+5.13)×2
Starting Method
Soft start-up
Soft start-up
Type
Axial flow fan
Axial flow fan
Model Name (Independent Unit)
Dimensions: (H×W×D)
mm
Heat Exchanger
Type
Piston Displacement
Comp.
Number of Revolution
Motor Input × Number
of Units
cm3/r
ev
rpm
kW
Motor Output
kW
0.400×6
0.400×6
Air Flow Rate
m3/h
14000+16000×2
16000×3
Variable frequency drive
Variable frequency drive
Fan
Drive
Connecting
Pipes
Liquid Pipe ★3
mm
φ22.2(Brazing Connection)
φ22.2(Brazing Connection)
Gas Pipe ★3
mm
φ41.3(Brazing Connection)
φ41.3(Brazing Connection)
Oil Equalizing Pipe
mm
φ6.35
φ6.35
kg
365+420+420
420+420+420
high pressure switch、fan
high pressure switch、fan
Machine Weight (Mass)
Safety Devices
Defrost Method
Capacity Control
%
Refrigerant Name
Refrigerant
Charge
kg
Control
Refrigerator
Oil
Charge Volume
Standard Accessories
Specification
l
drive overload protector、
drive overload protector、
Over-current relay、Inverter
Over-current relay、Inverter
overload protector
overload protector
Automatic intelligent
Automatic intelligent
defrosting
defrosting
15~110
15~110
R-410A
R-410A
14+18.2+18.2
17+18.2+18.2
Electronic Expansion Valve
Electronic Expansion Valve
FVC68D
FVC68D
4+6+6
6+6+6
manual
manual
22
Model Name (Combination Unit)
CMV-V1350WSAM
CMV-V450WSAM+CMV-V450WSAM
Model Name (Independent Unit)
+CMV-V450WSAM
★1 Cooling Capacity
135
★2 Heating Capacity
150
Casing Color
camel gray
Dimensions: (H×W×D)
mm
Heat Exchanger
Hydrophilic Aluminum
Type
Piston Displacement
Number of
Comp.
Revolution
Motor Input ×
Number of Units
(1645×1340×765)×3
Scroll Compressor
cm3/rev
(38+59+59)×3
rpm
(30~78)×3
kW
(3.88+5.13+5.13)×3
Starting Method
Soft start-up
Type
Axial flow fan
Motor Output
kW
0.400×6
Air Flow Rate
m3/h
16000×3
Fan
Drive
Connecting
Pipes
Variable frequency drive
Liquid Pipe ★3
mm
φ22.2(Brazing Connection)
Gas Pipe ★3
mm
φ41.3(Brazing Connection)
Oil Equalizing Pipe
mm
φ6.35
kg
420+420+420
Machine Weight (Mass)
high pressure switch、fan drive overload protector、
Safety Devices
Over-current relay、Inverter overload protector
Defrost Method
Capacity Control
Automatic intelligent defrosting
%
R-410A
Refrigerant Name
Refrigerant
Charge
kg
Control
FVC68D
Charge Volume
Standard Accessories
Specification
18.2+18.2+18.2
Electronic Expansion Valve
Refrigerator
Oil
15~110
l
6+6+6
manual
23
1.2 Indoor Unit
1.2.1. Low ESP duct type
Model
CMV-22F1
CMV-28PF1
CMV-32F1
★1 Cooling Capacity
kW
2.2
2.8
3.2
★2 Heating Capacity
kW
2.5
3.2
3.5
Galvanized steel
Galvanized steel
Galvanized steel
Casing / Color
Dimensions: (W×D×H)
mm
863×485×234
863×485×234
913×485×234
Packing Dimensions: (W×D×H)
mm
910×515×245
910×515×245
950×515×245
2×8×1.5mm
2×8×1.5mm
2×8×1.5mm
0.11867
0.11867
0.139
Model
YSK110-16-4P
YSK110-16-4P
YSK110-20-4P
Type
Centrifugal rotor
Centrifugal rotor
Centrifugal rotor
W
60
60
60
cfm
230
230
312
Pa
20
20
20
3 fan speed
3 fan speed
3 fan speed
16-30
16-30
16-30
/
/
/
Rows × Stages ×
Coil (Cross
Fin Coil)
FPI
Face Area
Motor Output
Fan
Air Flow Rate
(H/L)
External Static
Pressure ★4
m2
Drive
Temperature Control
℃
Air Filter
Piping
Connection
s
Liquid Pipes
mm
φ6.35
φ6.35
φ6.35
Gas Pipes
mm
φ9.52
φ9.52
φ12.7
Drain Pipe
mm
DN20
DN20
DN20
kg
18.5
18.5
23
dB(A)
38
38
39
EXV
EXV
EXV
SP-D029
SP-D029
SP-D029
Wired controller
Wired controller
Wired controller
Machine Weight (Mass)
★5 Sound Level (H/L)
Refrigerant Control
EXV Model
Standard Accessories
Specification
24
Model
CMV-36F1
CMV-45F1
CMV-56F1
★1 Cooling Capacity
kW
3.6
4.5
5.6
★2 Heating Capacity
kW
4
5
6.3
Galvanized steel
Galvanized steel
Galvanized steel
mm
913×485×234
1013×485×234
1133×485×234
mm
950×515×245
1175×515×245
1175×515×245
2×8×1.5mm
2×8×1.5mm
2×8×1.5mm
0.139
0.159
0.18
Model
YSK110-20-4P
YSK110-40-4P
YSK110-50-4P
Type
Centrifugal rotor
Centrifugal rotor
Centrifugal rotor
W
80
100
100
cfm
312
441
465
Pa
20
20
20
3 fan speed
3 fan speed
3 fan speed
16-30
16-30
16-30
/
/
/
Casing / Color
Dimensions: (W×D×H)
Packing Dimensions:
(W×D×H)
Rows ×
Coil (Cross
Fin Coil)
Stages × FPI
Face Area
Motor Output
Fan
Air Flow Rate
(H/L)
External Static
Pressure ★4
m2
Drive
Temperature Control
℃
Air Filter
Piping
Connection
s
Liquid Pipes
mm
φ6.35
φ6.35
φ6.35
Gas Pipes
mm
φ12.7
φ12.7
φ12.7
Drain Pipe
mm
DN20
DN20
DN20
kg
23
25
26
dB(A)
39
40
40
EXV
EXV
EXV
SP-D029
SP-D030
SP-D030
Wired controller
Wired controller
Wired controller
Machine Weight (Mass)
★5 Sound Level (H/L)
Refrigerant Control
EXV Model
Standard Accessories
Specification
25
Model
CMV-71F1
CMV-80F1
CMV-90F1
★1 Cooling Capacity
kW
7.1
8
9
★2 Heating Capacity
kW
7.8
8.8
10
Galvanized steel
Galvanized steel
Galvanized steel
mm
1133×485×234
1133×485×234
1710× 510×245
mm
1175×515×245
1175×515×245
1715×515×255
2×8×1.5mm
2×8×1.5mm
3×8×1.8mm
0.18
0.18
0.2747
Casing / Color
Dimensions: (W×D×H)
Packing Dimensions:
(W×D×H)
Rows ×
Coil (Cross
Stages ×
Fin Coil)
FPI
Face Area
m2
Model
YSK110-85-4P(95) YSK110-85-4P(95) YSK110-85-4P(105)
Type
Motor
Output
Air Flow
Fan
Rate (H/L)
Centrifugal rotor
Centrifugal rotor
Centrifugal rotor
W
140
140
115×2
cfm
530
530
882
Pa
20
20
20
3 fan speed
3 fan speed
3 fan speed
16-30
16-30
16-30
/
/
/
External
Static
Pressure
★4
Drive
Temperature Control
℃
Air Filter
Piping
Connections
Liquid Pipes
mm
φ9.52
φ9.52
φ9.52
Gas Pipes
mm
φ15.88
φ15.88
φ19.05
Drain Pipe
mm
DN20
DN20
DN20
kg
26
26
37
dB(A)
41
41
43
EXV
EXV
EXV
SP-D031
SP-D031
SP-D032
Wired controller
Wired controller
Wired controller
Machine Weight (Mass)
★5 Sound Level (H/L)
Refrigerant Control
EXV Model
Standard Accessories
Specification
26
Model
CMV-100F1
CMV-112F1
CMV-125F1
★1 Cooling Capacity
kW
10
11.2
12.5
★2 Heating Capacity
kW
11.2
12.5
14
Galvanized steel
Galvanized steel
Galvanized steel
mm
1710× 510×245
1710×510×245
1710×510×245
mm
1715×515×255
1715×515×255
1715×515×255
3×8×1.8mm
3×8×1.8mm
3×8×1.8mm
0.2747
0.2747
0.2747
Model
YSK110-85-4P(105)
YSK110-85-4P(105)
YSK110-85-4P(105)
Type
Centrifugal rotor
Centrifugal rotor
Centrifugal rotor
W
115×2
115×2
115×2
cfm
882
1353
1353
Pa
20
20
20
3 fan speed
3 fan speed
3 fan speed
16-30
16-30
16-30
/
/
/
mm
φ9.52
φ9.52
φ9.52
Casing / Color
Dimensions: (W×D×H)
Packing Dimensions:
(W×D×H)
Rows ×
Coil (Cross
Stages ×
Fin Coil)
FPI
Face Area
Motor
Output
Air Flow
Fan
Rate (H/L)
m2
External
Static
Pressure
★4
Drive
Temperature Control
℃
Air Filter
Liquid
Piping
Pipes
Connection
Gas Pipes
mm
φ19.05
φ19.05
φ19.05
Drain Pipe
mm
DN20
DN20
DN20
kg
37
37
37
dB(A)
43
43
43
EXV
EXV
EXV
SP-D032
SP-D032
SP-D032
Wired controller
Wired controller
Wired controller
s
Machine Weight (Mass)
★5 Sound Level (H/L)
Refrigerant Control
EXV Model
Standard Accessories
Specification
27
1.2.2. Ceiling Cassette
Model
CMV-22Q
CMV-28Q
CMV-36Q
★1 Cooling Capacity
kW
2.2
2.8
3.6
★2 Heating Capacity
kW
2.5
3.2
4
Galvanized steel
Galvanized steel
Galvanized steel
Casing / Color
Dimensions: (W×D×H)
mm
580×580×275
580×580×275
580×580×275
Packing Dimensions: (W×D×H)
mm
745×675×375
745×675×375
745×675×375
2×10×1.55mm
2×10×1.55mm
2×10×1.55mm
0.234
0.234
0.234
Model
YDK-18T-6
YDK-18T-6
YDK-35T-4
Type
Centrifugal rotor
Centrifugal rotor
Centrifugal rotor
W
65×1
65×1
70×1
cfm
294
294
353
Pa
0
0
0
3 fan speed
3 fan speed
3 fan speed
℃
16-30
16-30
16-30
Liquid Pipes
mm
φ6.35
φ6.35
φ6.35
Gas Pipes
mm
φ9.52
φ9.52
φ9.52
Drain Pipe
mm
DN25
DN25
DN25
kg
22
22
25
dB(A)
38
38
38
EXV
EXV
EXV
Model
ZSP-S009
ZSP-S009
ZSP-S009
Color
Camel Grey
Camel Grey
Camel Grey
mm
650×650×30
650×650×30
650×650×30
mm
750×750×95
750×750×95
750×750×95
built-in
built-in
built-in
4
4
4
SP-D029
SP-D029
SP-D029
remote controller
remote controller
remote controller
Rows × Stages ×
Coil (Cross
Fin Coil)
FPI
Face Area
Motor Output
Fan
Air Flow Rate (H/L)
External Static
Pressure ★4
m2
Drive
Temperature Control
Piping
Connections
Machine Weight (Mass)
★5 Sound Level (H/L)
Refrigerant Control
Dimensions:
Decoration
Panels
(H×W×D)
Packing
Dimensions:
(H×W×D)
Air Filter
Weight
EXV Model
Standard Accessories
Specification
Kg
28
Model
CMV-45Q
CMV-56Q
CMV-71Q
★1 Cooling Capacity
kW
4.5
5.6
7.1
★2 Heating Capacity
kW
5
6.3
8
Galvanized steel
Galvanized steel
Galvanized steel
Casing / Color
Dimensions: (W×D×H)
mm
580×580×275
580×580×275
840×840×230
Packing Dimensions: (W×D×H)
mm
745×675×375
745×675×375
920×920×310
2×10×1.55mm
2×10×1.55mm
2×8×1.45mm
0.234
0.234
0.302
Model
YDK-35T-4 1
YDK-35T-4 1
YDK-55T-6
Type
Centrifugal rotor
Centrifugal rotor
Centrifugal rotor
W
75×1
75×1
154×1
cfm
441
441
676
Pa
0
0
0
3 fan speed
3 fan speed
3 fan speed
℃
16-30
16-30
16-30
Liquid Pipes
mm
φ6.35
φ6.35
φ9.52
Gas Pipes
mm
φ12.7
φ12.7
φ15.88
Drain Pipe
mm
DN25
DN25
DN25
kg
25
25
28.5
dB(A)
39
39
39
EXV
EXV
EXV
Model
ZSP-S009
ZSP-S009
CSP-S014
Color
Camel Grey
Camel Grey
Camel Grey
mm
650×650×30
650×650×30
950×950×50
mm
750×750×95
750×750×95
1030×1030×105
built-in
built-in
built-in
4
4
5
SP-D030
SP-D030
SP-D031
remote controller
remote controller
remote controller
Rows × Stages ×
Coil (Cross
Fin Coil)
FPI
Face Area
Motor Output
Fan
Air Flow Rate (H/L)
External Static
Pressure ★4
m2
Drive
Temperature Control
Piping
Connections
Machine Weight (Mass)
★5 Sound Level (H/L)
Refrigerant Control
Dimensions:
Decoration
Panels
(H×W×D)
Packing
Dimensions:
(H×W×D)
Air Filter
Weight
EXV Model
Standard Accessories
Specification
Kg
29
Model
CMV-80Q
CMV-90Q
CMV-100Q
★1 Cooling Capacity
kW
8
9
10
★2 Heating Capacity
kW
8.8
10
11
Galvanized steel
Galvanized steel
Galvanized steel
Casing / Color
Dimensions: (W×D×H)
mm
840×840×230
840×840×285
840×840×285
Packing Dimensions: (W×D×H)
mm
920×920×310
920×920×375
920×920×375
2×8×1.45mm
2×12×1.45mm
2×12×1.45mm
0.302
0.467
0.467
Model
YDK-55T-6
YDK-75T-6
YDK-75T-6
Type
Centrifugal rotor
Centrifugal rotor
Centrifugal rotor
W
154×1
170×1
170×1
cfm
676
1000
1000
Pa
0
0
0
3 fan speed
3 fan speed
3 fan speed
℃
16-30
16-30
16-30
Liquid Pipes
mm
φ9.52
φ9.52
φ9.52
Gas Pipes
mm
φ15.88
φ19.05
φ19.05
Drain Pipe
mm
DN25
DN25
DN25
kg
28.5
32
32
dB(A)
39
41
41
EXV
EXV
EXV
Model
CSP-S014
CSP-S014
CSP-S014
Color
Camel Grey
Camel Grey
Camel Grey
mm
950×950×50
950×950×50
950×950×50
mm
1030×1030×105
1030×1030×105
1030×1030×105
built-in
built-in
built-in
5
5
5
SP-D031
SP-D032
SP-D032
remote controller
remote controller
remote controller
Rows × Stages ×
Coil (Cross
Fin Coil)
FPI
Face Area
Motor Output
Fan
Air Flow Rate (H/L)
External Static
Pressure ★4
m2
Drive
Temperature Control
Piping
Connections
Machine Weight (Mass)
★5 Sound Level (H/L)
Refrigerant Control
Dimensions:
Decoration
Panels
(H×W×D)
Packing
Dimensions:
(H×W×D)
Air Filter
Weight
EXV Model
Standard Accessories
Specification
Kg
30
Model
CMV-112Q
CMV-125
CMV-140Q
★1 Cooling Capacity
kW
11.2
12.5
14
★2 Heating Capacity
kW
12.5
14
15
Galvanized steel
Galvanized steel
Galvanized steel
Casing / Color
Dimensions: (W×D×H)
mm
840×840×285
840×840×285
840×840×285
Packing Dimensions: (W×D×H)
mm
920×920×375
920×920×375
920×920×375
2×12×1.45mm
2×12×1.45mm
2×12×1.45mm
0.467
0.467
0.467
Model
YDK-75T-6
YDK-75T-6
YDK-75T-6
Type
Centrifugal rotor
Centrifugal rotor
Centrifugal rotor
W
170×1
170×1
170×1
cfm
1000
1000
1000
Pa
0
0
0
3 fan speed
3 fan speed
3 fan speed
℃
16-30
16-30
16-30
Liquid Pipes
mm
φ9.52
φ9.52
φ9.52
Gas Pipes
mm
φ19.05
φ19.05
φ19.05
Drain Pipe
mm
DN25
DN25
DN25
kg
32
32
32
dB(A)
41
41
41
EXV
EXV
EXV
Model
CSP-S014
CSP-S014
CSP-S014
Color
Camel Grey
Camel Grey
Camel Grey
mm
950×950×50
950×950×50
950×950×50
mm
1030×1030×105
1030×1030×105
1030×1030×105
built-in
built-in
built-in
5
5
5
SP-D032
SP-D032
SP-D032
remote controller
remote controller
remote controller
Rows × Stages ×
Coil (Cross
Fin Coil)
FPI
Face Area
Motor Output
Fan
Air Flow Rate (H/L)
External Static
Pressure ★4
m2
Drive
Temperature Control
Piping
Connections
Machine Weight (Mass)
★5 Sound Level (H/L)
Refrigerant Control
Dimensions:
Decoration
Panels
(H×W×D)
Packing
Dimensions:
(H×W×D)
Air Filter
Weight
EXV Model
Standard Accessories
Specification
Kg
31
1.2.3. Floor Ceiling
Model
CMV-45LD
CMV-56LD
CMV-71LD
★1 Cooling Capacity
kW
4.5
5.6
7.1
★2 Heating Capacity
kW
5
6.3
8
Galvanized steel
Galvanized steel
Galvanized steel
Casing / Color
Dimensions: (W×D×H)
mm
880×208×635
880×208×635
1270×230×635
Packing Dimensions: (W×D×H)
mm
970×301×711
970×301×711
1340×301×721
3×10×1.8mm
3×10×1.8mm
2×10×1.6mm
0.1525
0.1525
0.24875
Rows × Stages ×
Coil (Cross
Fin Coil)
FPI
Face Area
m2
YSK110-45LD-4P
Model
YSK110-65LD-4P
YSK110-65LD-4P
3H90
3H85
3H85
YSK110-22LD-4P
3H90L
Type
Fan
Centrifugal rotor
Centrifugal rotor
Centrifugal rotor
W
65×1
65×1
100×1+60×1
cfm
465
465
647
Pa
0
0
0
3 fan speed
3 fan speed
3 fan speed
℃
16-30
16-30
16-30
Liquid Pipes
mm
φ6.35
φ6.35
φ9.52
Gas Pipes
mm
φ12.7
φ12.7
φ15.88
Drain Pipe
mm
DN20
DN20
DN20
kg
30
30
41
dB(A)
39
40
41
EXV
EXV
EXV
SP-D030
SP-D030
SP-D031
Wired controller
Wired controller
Wired controller
Motor Output
Air Flow Rate (H/L)
External Static
Pressure ★4
Drive
Temperature Control
Piping
Connections
Machine Weight (Mass)
★5 Sound Level (H/L)
Refrigerant Control
EXV Model
Standard Accessories
Specification
32
Model
CMV-80LD
CMV-112LD
★1 Cooling Capacity
kW
8
11.2
★2 Heating Capacity
kW
8.8
12.5
Galvanized steel
Galvanized steel
Casing / Color
Dimensions: (W×D×H)
mm
1270×230×635
1660×230×635
Packing Dimensions: (W×D×H)
mm
1340×301×721
1730×301×721
2×10×1.6mm
2×10×1.6mm
0.24875
0.34625
Rows × Stages ×
Coil (Cross
Fin Coil)
FPI
Face Area
m2
YSK110-45LD-4P3H90
Model
YSK110-22LD-4P3H90L
Type
YSK110-85LD-4P3H90
Centrifugal rotor
Centrifugal rotor
W
100×1+60×1
125×2
cfm
647
1059
Pa
0
0
3 fan speed
3 fan speed
℃
16-30
16-30
Liquid Pipes
mm
φ9.52
φ9.52
Gas Pipes
mm
φ15.88
φ19.05
Drain Pipe
mm
DN20
DN20
kg
41
48
dB(A)
41
43
EXV
EXV
SP-D031
SP-D032
Wired controller
Wired controller
Motor Output
Fan
Air Flow Rate (H/L)
External Static
Pressure ★4
Drive
Temperature Control
Piping
Connections
Machine Weight (Mass)
★5 Sound Level (H/L)
Refrigerant Control
EXV Model
Standard Accessories
Specification
33
1.2.4 Wall-mounted
Model
CMV-22G (M84)
CMV-28G (M84)
CMV-36G (M84)
★1 Cooling Capacity
kW
2.2
2.8
3.6
★2 Heating Capacity
kW
2.5
3.2
4
plastic
plastic
plastic
Casing / Color
Dimensions: (W×D×H)
mm
800×280×185
800×280×185
800×280×185
Packing Dimensions: (W×D×H)
mm
880×360×250
880×360×250
880×360×250
2×14×1.4mm
2×14×1.4mm
2×14×1.4mm
0.18081
0.18081
0.18081
Model
YDK-16-4
YDK-16-4
YDK-16-4
Type
Cross flow fan
Cross flow fan
Cross flow fan
W
40×1
40×1
40×1
cfm
329
329
329
Pa
0
0
0
PJ speed
PJ speed
PJ speed
℃
16-30
16-30
16-30
Liquid Pipes
mm
φ6.35
φ6.35
φ6.35
Gas Pipes
mm
φ9.52
φ9.52
φ12.7
Drain Pipe
mm
DN20
DN20
DN20
kg
10
10
10
dB(A)
33
33
33
EXV
EXV
EXV
SP-D029
SP-D029
SP-D029
remote controller
remote controller
remote controller
Rows × Stages ×
Coil (Cross
Fin Coil)
FPI
Face Area
Motor Output
Fan
Air Flow Rate (H/L)
External Static
Pressure ★4
m2
Drive
Temperature Control
Piping
Connections
Machine Weight (Mass)
★5 Sound Level (H/L)
Refrigerant Control
EXV Model
Standard Accessories
Specification
34
Model
CMV-45G (P84)
CMV-51G (P84)
CMV-70G (W84)
★1 Cooling Capacity
kW
4.5
5.1
7
★2 Heating Capacity
kW
5
5.6
7.7
plastic
plastic
plastic
Casing / Color
Dimensions: (W×D×H)
mm
900×282×205
900×282×205
1080×304×221
Packing Dimensions: (W×D×H)
mm
1085×380×300
1085×380×300
1085×380×300
2×16×1.6mm
2×16×1.6mm
2×16×1.6mm
0.23688
0.23688
0.294
Model
YDK-18-4
YDK-18-4
YDK-26-4
Type
Cross flow fan
Cross flow fan
Cross flow fan
W
60×1
60×1
60×1
cfm
500
500
618
Pa
0
0
0
PJ speed
PJ speed
PJ speed
℃
16-30
16-30
16-30
Liquid Pipes
mm
φ6.35
φ6.35
φ9.52
Gas Pipes
mm
φ12.7
φ12.7
φ15.88
Drain Pipe
mm
DN20
DN20
DN20
kg
14
14
16
dB(A)
40
40
44
EXV
EXV
EXV
SP-D030
SP-D030
SP-D031
remote controller
remote controller
remote controller
Rows × Stages ×
Coil (Cross
Fin Coil)
FPI
Face Area
Motor Output
Fan
Air Flow Rate (H/L)
External Static
Pressure ★4
m2
Drive
Temperature Control
Piping
Connections
Machine Weight (Mass)
★5 Sound Level (H/L)
Refrigerant Control
EXV Model
Standard Accessories
Specification
35
1.2.5 Middle ESP Duct
Model
CMV-71F2
CMV-80F2
CMV-90F2
★1 Cooling Capacity
kW
7.1
8
9
★2 Heating Capacity
kW
7.7
8.8
10
Galvanized steel
Galvanized steel
Galvanized steel
Casing / Color
Dimensions: (W×D×H)
mm
1045×580×385
1045×580×385
1170×600×430
Packing Dimensions: (W×D×H)
mm
1180×610×485
1180×610×485
1315×630×545
2×13×1.5mm
2×13×1.5mm
3×15×2.0mm
0.26
0.26
0.350625
Model
YSK139-150-4P
YSK139-150-4P
YSK139-180-4P
Type
Centrifugal rotor
Centrifugal rotor
Centrifugal rotor
W
300×1
300×1
450×1
cfm
706
706
1330
Pa
70
70
70
3 fan speed
3 fan speed
3 fan speed
℃
16-30
16-30
16-30
Liquid Pipes
mm
φ9.52
φ9.52
φ9.52
Gas Pipes
mm
φ15.88
φ15.88
φ19.05
Drain Pipe
mm
DN20
DN20
DN20
kg
45
45
70
dB(A)
42
42
44
EXV
EXV
EXV
SP-D031
SP-D031
SP-D032
Wired controller
Wired controller
Wired controller
Rows × Stages ×
Coil (Cross
Fin Coil)
FPI
Face Area
Motor Output
Fan
Air Flow Rate (H/L)
External Static
Pressure ★4
m2
Drive
Temperature Control
Piping
Connections
Machine Weight (Mass)
★5 Sound Level (H/L)
Refrigerant Control
EXV Model
Standard Accessories
Specification
36
Model
CMV-100F2
CMV-120F2
CMV-150F2
★1 Cooling Capacity
kW
10
12
15
★2 Heating Capacity
kW
11
13
17
Galvanized steel
Galvanized steel
Galvanized steel
Casing / Color
Dimensions: (W×D×H)
mm
1170×600×430
1170×600×430
1320×600×430
Packing Dimensions: (W×D×H)
mm
1315×630×545
1315×630×545
1465×630×545
3×15×2.0mm
3×15×2.0mm
3×15×2.0mm
0.350625
0.350625
0.406875
Model
YSK139-180-4P
YSK139-180-4P
YSK139-350-4P
Type
Centrifugal rotor
Centrifugal rotor
Centrifugal rotor
W
450×1
450×1
800×1
cfm
1330
1353
1765
Pa
70
70
70
3 fan speed
3 fan speed
3 fan speed
℃
16-30
16-30
16-30
Liquid Pipes
mm
φ9.52
φ9.52
φ9.52
Gas Pipes
mm
φ19.05
φ19.05
φ19.05
Drain Pipe
mm
DN20
DN20
DN20
kg
70
70
75
dB(A)
44
44
44
EXV
EXV
EXV
SP-D032
SP-D032
SP-D040
Wired controller
Wired controller
Wired controller
Rows × Stages ×
Coil (Cross
Fin Coil)
FPI
Face Area
Motor Output
Fan
Air Flow Rate (H/L)
External Static
Pressure ★4
m2
Drive
Temperature Control
Piping
Connections
Machine Weight (Mass)
★5 Sound Level (H/L)
Refrigerant Control
EXV Model
Standard Accessories
Specification
37
1.2.6 High ESP Duct
Model
CMV-71F3
CMV-80F3
CMV-90F3
★1 Cooling Capacity
kW
7.1
8
9
★2 Heating Capacity
kW
7.7
8.8
10
Galvanized steel
Galvanized steel
Galvanized steel
Casing / Color
Dimensions: (W×D×H)
mm
1045×580×385
1045×580×385
1170×600×430
Packing Dimensions: (W×D×H)
mm
1180×610×485
1180×610×485
1315×630×545
2×13×1.5mm
2×13×1.5mm
3×15×2.0mm
0.26
0.26
0.350625
Model
YSK139-150-4P
YSK139-150-4P
YSK139-180-4P
Type
Centrifugal rotor
Centrifugal rotor
Centrifugal rotor
W
300×1
300×1
500×1
cfm
706
706
1330
Pa
120
120
120
3 fan speed
3 fan speed
3 fan speed
℃
16-30
16-30
16-30
Liquid Pipes
mm
φ9.52
φ9.52
φ9.52
Gas Pipes
mm
φ15.88
φ15.88
φ19.05
Drain Pipe
mm
DN20
DN20
DN20
Machine Weight (Mass)
kg
45
45
70
★5 Sound Level (H/L)
dB(A)
42
42
44
EXV
EXV
EXV
SP-D031
SP-D031
SP-D032
Wired controller
Wired controller
Wired controller
Rows × Stages
Coil (Cross
Fin Coil)
× FPI
Face Area
Motor Output
Fan
Air Flow Rate
(H/L)
External Static
Pressure ★4
m2
Drive
Temperature Control
Piping
Connection
s
Refrigerant Control
EXV Model
Standard Accessories
Specification
38
Model
CMV-100F3
CMV-120F3
CMV-150F3
★1 Cooling Capacity
kW
10
12
15
★2 Heating Capacity
kW
11
13
17
Galvanized steel
Galvanized steel
Galvanized steel
Casing / Color
Dimensions: (W×D×H)
mm
1170×600×430
1170×600×430
1320×600×430
Packing Dimensions: (W×D×H)
mm
1315×630×545
1315×630×545
1465×630×545
3×15×2.0mm
3×15×2.0mm
3×15×2.0mm
0.350625
0.350625
0.406875
Model
YSK139-180-4P
YSK139-180-4P
YSK139-350-4P
Type
Centrifugal rotor
Centrifugal rotor
Centrifugal rotor
W
500×1
500×1
900×1
cfm
1341
1353
1765
Pa
120
120
120
3 fan speed
3 fan speed
3 fan speed
℃
16-30
16-30
16-30
Liquid Pipes
mm
φ9.52
φ9.52
φ9.52
Gas Pipes
mm
φ19.05
φ19.05
φ19.05
Drain Pipe
mm
DN20
DN20
DN20
kg
70
70
75
dB(A)
44
44
44
EXV
EXV
EXV
SP-D032
SP-D032
SP-D040
Wired controller
Wired controller
Wired controller
Rows × Stages ×
Coil (Cross
Fin Coil)
FPI
Face Area
Motor Output
Fan
Air Flow Rate (H/L)
External Static
Pressure ★4
m2
Drive
Temperature Control
Piping
Connections
Machine Weight (Mass)
★5 Sound Level (H/L)
Refrigerant Control
EXV Model
Standard Accessories
Specification
39
Part 3
Refrigerant Circuit
1. System Principles....................................................................................41
1.1. System principle diagram...............................................................41
1.2. Functional components layout................................................................45
1. 3. Refrigerant flow chart of operation mode...............................................48
2. Electric control principle..................................................................................53
2.1. Electric control parts layout schematic....................................................53
2.2. Electric appliances diagram...............................................................55
2.3. The control board interface diagram.......................................................65
Refrigerant circuit
40
1. System Principles
1.1. System principle diagram(8HP、10HP、12HP system)
Name
Main functions
Variable-frequency compressor
Variable-frequency compressor runs through a variety of frequency
Fixed-frequency compressor 1
Oil-air separator
High-pressure liquid-tank
Gas-liquid separator
Four-way valve
One-way valve
High-pressure switch
Low-pressure switch
High pressure sensor
Low pressure sensor
Outdoor electronic
expansion valve
Magnetic valve module
converter input speed, a fixed-frequency compressor only work under the
constant rotary-speed.
Oil and gas separation, to ensure compressor oil-return sufficient and
normal.
Store excess refrigerant in the system, adjust the amount of refrigeration
cycle
For gas-liquid separation, to ensure that the compressor normally work, to
prevent the compressor liquid impact
When system is refrigerating and heating, for controlling the refrigerant flow
direction.
To provide one-way refrigerant flow path, while preventing reverse flow of
refrigerant
To prevent the compressor discharge pressure is too high, damage to
compressor, movement pressure 4.2MPa, 3.0MPa pressure recovery
Low pressure protection of the compressor, action pressure is 0.08MPa,
0.15MPa pressure recovery
Used to real-time detect system work pressure, adjust fan speed, control
outdoor unit fluid-side path bypass switch
Used to real-time detect system work pressure, adjust fan speed, control
outdoor unit fluid-side path bypass switch
Outdoor unit has two identical parallel electronic expansion valve, in the
system of cooling and heating, adjust refrigerant cycling quantity
Magnetic valve module is used to stop module refrigerant.
Liquid by-pass
Liquid by-pass magnetic valve is used to prevent compressor exhaust
magnetic valve
temperature is too high.
Variable-frequency
compressor unloading valve
Return-oil magnetic valve
Average-oil magnetic valve
Used to protect variable-frequency compressor
Return-oil magnetic valve is used to control the return-oil path of module.
Average-oil magnetic valve is used to balance compressor lubricants of
every working module in the system.
Variable-frequency compressor
exhaust temperature sensor
Fixed-frequency Compressor 1
Compressor exhaust temperature sensor is used for real-time detection on
the compressor exhaust temperature, to protect the compressor
exhaust temperature sensor
Circumstance
temperature sensor
Condenser temperature
sensor
Refrigerant circuit
For real-time to detect circumstance temperature, provide evidence for
system control.
For real-time to detect system condenser temperature, and provide relative
protection
41
High pressure
ball valve
low pressure
ball valve
Air balance
valve
oil balance
stop valve
Filter
Filter
outdoor temp sensor
outdoor condenser
temp sensor
Filter
Gas-oil
separator
Frequency
compressor
Inverter
compressor
Inverter compressor
temperature sensor
Frequency
compressor 1
temperature
sensor
Frequency compressor
2 temp sensor
inverter
compressor
2
42
Refrigerant circuit
14 HP 、16 Hp system
Name
Function
Inverter compressor
Invariable
frequency
Through inverter, variable frequency compressor input various of frequency to
adjust the speed, fixed frequency compressor only fixed operated under
compressor 1
Invariable
frequency
fixed-power.
compressor 2
Oil-gas separator
For oil and gas separation, ensure the compressor return oil normal.
High pressure tank
For storaging excess of refrigerant, adjust the refrigerant circulation
Gas-liquid separation, guarantee for the normal work, prevent compressor
Gas-liquid separator
liquid hammer
Four way valve
While heating or cooling, for shifting refrigerant flow
Check valve
Providing the single flow path for refrigerant, and stop the reverse flow.
High pressure switch
To prevent the damage caused by compressor exhaust overhigh pressure,
operating pressure is 4.2 Mpa, recovered pressure is 3.0 MPa
Protect the compressor from low pressure, operating pressure is 0.08 MPa,
Low pressure switch
recovered pressure is 0.15 MPa
High-pressure sensor
Low pressure sensor
Used for checking system working pressure, adjust the fan speed,the same
time control the switch for outdoor liquid bypass and
liquid flow switch etc
Used for checking system working pressure, adjust the fan speed,the same
time control the switch for outdoor liquid bypass and
liquid flow switch etc
Outdoor electronic expansion
The two electronic expansion valves for exactly the same in the system, used
valve
for adjusting the system refrigerant circulation while cooling and heating.
Modular magnetic valves
Liquid side magnetic valves
Inverter compressor unloading
magnetic valves
Module used by electromagnetic valve module, make each refrigerant
air-conditioners can operate independently
Liquid side electromagnetic valve is used to prevent compressor exhaust
temperature of overhigh
Used for protecting the inverter compressors,
Oil return magnetic valve
Return oil electromagnetic valve is used to control the modular return oil road.
Oil balance magnetic
Electromagnetic valve is used to balance oil system of compressor lubricants
valve
operation module
Exhaust temperature sensor of
frequency compressor
Exhaust temperature sensor for
fixed-frequency
compressor
Compressor exhaust temperature sensor for the check the exhaust
temperature of compressor, and protect compressors.
1and 2
Amibent temp sensor
Condenser temp sensor
Refrigerant circuit
Real-time detection of environmental temperature, provides the basis for
controlling system.
Real-time detection of system condenser temperature, provide corresponding
protection.
43
High pressure
ball valve
low pressure
ball valve
Air balance
valve
oil balance
stop valve
Filter
Filter
outdoor temp sensor
outdoor condenser
temp sensor
Filter
Gas-oil
separator
Inverter compressor
Frequency
compressor
compressor
Inverter
temperature sensor
Frequency
compressor 1
temperature
sensor
Frequency compressor
2 temp sensor
inverter
compressor
2
44
Refrigerant circuit
1.2 Functional components layout
8HP、10HP system
Front view
High-pressure sensor
outdoor
electronic
expansion
High pressure switch
Return oil capillary
Oil gas separator
Inverter compressor
Oil balancing
valve
stop
Inverter compressor
unloading solenoid
valves
Return oil solenoid
valves
Four way valve
Oil balance solenoid
Invariable frequency
compressor
Modular
valves
solenoid
Liquid side solenoid
valves
High-pressure ball
Low-pressure ball
Air balance valve
Refrigerant circuit
45
Top view
High-pressure
tank
Four
valve
way
Liquid side
solenoid
valves
Modular
solenoid
valves
Low
pressure
sensor
High
pressure
sensor
Low pressure
switch
High pressure
ball valve
Refrigerant circuit
Gas-liquid
separator
Inverter
compressor
High pressure
switch
46
High
pressure
sensor
12HP、14HP、16Hp system (12 HP system with two compressors)
Four way valve
High
sensor
pressure
High
switch
pressure
Return
capillary
Oil balance
solenoid
valve
oil
Inverter
compressor
Filter
Oil gas separator
invariable
compressor F1
High-pressur
e ball valve
Return
oil
solenoid
Refrigerant circuit
invariable
compressor F2
Oil balancing
stop
Air balance
valve
47
Low-pressur
e ball valve
1. 3. Refrigerant flow chart of operation mode
Take 8HP、10HP、12HP for example, refrigerant flow under each working condition as show in diagram. Compare 14HP、16HP system with 14HP、
16HP, more than a compressor, but the refrigerant flow is same with 8HP、10HP、12HP, Therefore no longer detail.
Cooling operation(8HP、10HP、12HP)
Cooling
ON
Cooling
ON
Power off state
High temp&pressure
gas
Filter
Filter
Electronic expansion
valve
480P
Electronic
expansion valve
480P
Electronic
expansion valve
480P
Filter
Filter
Filter
Inner fan
normal operation
Inner fan
Normal operation
Outdoor environment
temperature sensor
High temp&pressure
liquid
Filter
Inner fan
Do not operate
High pressure sensor
High pressure
switch
Inverter
compressor
Filter
High pressure
ball valve
Filter
High
pressure
tank
Outdoor condenser
temperature sensor
Oil gas
separator
Filter
Low pressure
switch
Frequency
compressor 1
Outdoor
condenser
Filter
low pressure
sensor
Four way
valve
low pressure
ball valve
Filter
low pressure
tank
Air balance valve
Oil balance stop
valve
Refrigerant circuit
48
low temp&pressure
Cooling oil return operation
Cooling
ON
Cooling
ON
Power off state
High temp&pressure
gas
Filter
Filter
Electronic expansion
valve
480P
Electronic
expansion valve
480P
Electronic
expansion valve
480P
Filter
Filter
Filter
Inner fan
normal operation
Inner fan
Normal operation
Outdoor environment
temperature sensor
High temp&pressure
liquid
Filter
Inner fan
Do not operate
High pressure sensor
High pressure
switch
Inverter
compressor
Filter
High pressure
ball valve
Filter
High
pressure
tank
Outdoor condenser
temperature sensor
Filter
Oil gas
separator
Low pressure
switch
Frequency
compressor 1
Outdoor
condenser
Filter
low pressure
sensor
Four way
valve
low pressure
ball valve
Filter
low pressure
tank
Air balance valve
Oil balance stop
valve
Refrigerant circuit
49
low temp&pressure
Heating operation
H e a t in g
H e a tin g
ON
ON
Filter
Filter
Electronic
expansion valve
Normal
adjustment
Filter
Filter
Electronic
expansion valve
Often open 40P
E le c tr o n ic
e x p a n s io n v a lv e
N o r m a l a d ju s tm e n t
Filter
F ilte r
Inner fan
do not operate
In n er fan
n o r m a l a d ju s tm e n t
In n e r fa n
N o r m a l o p e r a tio n
O u td o o r e n v ir o n m e n t
te m p e r a tu r e s e n s o r
H ig h p r e s s u r e s e n s o r
H ig h p r e s s u r e
s w itc h
I n v e r te r
c o m p re sso r
F ilte r
H ig h p r e s s u r e
b a ll v a lv e
O F F s ta te
F ilte r
H ig h
p re ssu re
ta n k
O il g a s
s e p a r a to r
O u td o o r c o n d e n s a te
te m p e r a tu r e s e n s o r
F ilte r
O u td o o r
c o n d e n ser
F re q u e n c y
c o m p resso r 1
lo w p r e s s u r e s w itc h
F ilte r
Four
way
L o w p re ssu re se n so r
F ilte r
L o w - p r e s s u r e b a ll v a lv e
lo w
p re ssu re
ta n k
A ir b a la n c e v a lv e
O il b a la n c e s to p v a lv e
Refrigerant circuit
50
Heating oil returned operation
H e a tin g
H e a tin g
ON
ON
Filter
Filter
Electronic
expansion valve
Normal
adjustment
Filter
Filter
Electronic
expansion valve
Often open 40P
E le c tro n ic
e x p a n sio n v a lv e
N o rm a l a d ju stm e n t
Filter
F ilte r
Inner fan
do not operate
In n e r fa n
n o rm a l a d ju stm e n t
In n e r fa n
N o rm a l o p e ra tio n
O u td o o r e n v iro n m e n t
te m p e ra tu re se n so r
H ig h p re s s u re se n so r
H ig h p re ss u re
s w itc h
In v e rte r
c o m p re s so r
F ilte r
H ig h p re ss u re
b a ll v a lv e
O F F s ta te
F ilte r
H ig h
p re ss u re
ta n k
O il g a s
s e p a ra to r
O u td o o r c o n d e n s a te
te m p e ra tu re se n so r
F ilte r
O u td o o r
co n d en ser
F re q u e n c y
c o m p re s so r 1
lo w p re ss u re sw itc h
F ilte r
Four
way
L o w p re ss u re se n so r
F ilte r
L o w -p re ssu re b a ll v a lv e
lo w
p re ss u re
ta n k
A ir b a la n c e v a lv e
O il b a la n c e sto p v a lv e
Refrigerant circuit
51
Defrosting operation while heating
H eating
ON
H eating
OFF
ON
Filter
Filter
F ilter
E lectronic
expansion valve
480P
E lectronic
expansion valve
480P
E lectronic
expansion valve
480P
F ilter
Filter
Filter
Innder fan
O FF ( anti-cold air )
Inner fan
D o not operate
Inner
O FF ( anti-cold air )
H igh pressure sensor
H igh pressure sw itch
Inverter
com pressor
Filter
High pressure
ball valve
F ilter
High
pressure
tank
O il-gas
separator
Filter
O utdoor condenser
tem perature sensor
O utdoor
condenser
F requency
com pressor 1
L ow pressure sensor
Filter
Four w ay
valve
low pressure sensor
Filter
L ow pressure ball valve
H igh
pressure
tank
A ir balance ball valve
O il balance stop valve
Refrigerant circuit
52
2. Electric control principle
2.1. Electric control parts layout schematic
8HP、10HP outdoor unit control
PTC
Capacito
Three-phase converter
Single-phase
Ac contactor
Compres
sor
driven
module
Lightning
plate
AC capacitor
Driven plate
The fan
driver
Filter
(up
and down)
Transformer
Electric
control board
Invariable
compresso
r contac
terminal for
communicati
ng
with
indoor
tor
Reactor,
outdoor
fan and
terminal
s, etc
Power
terminal
terminal for
communicati
ng
with
outdoor
Refrigerant circuit
53
12HP、14HP、16HP outdoor unit electric control
Note:The outdoor electric control system of 12HP、14HP、16HP are same with 8HP、10HP, only
the fan driven system is different, as show below:
Note:12Hp only with one frequency compressor contactor。14HP、16HP with two,From left to
right,the contactor of frequency compressor F1 and F2 is putted in proper order.
Filter (only
one )
Fan driver
Fan
capacitance
invariable
compressor
contactor
Reactor
terminals
Refrigerant circuit
54
2.2. Electric appliances diagram
8HP、10HP System diagram
Note:Before maintenance comfirm that the power is blackouts more than 10 minutes, and C2 and C3 have discharge over.
XT1
BK
I F2B
U
COMM
RD OR BL
RD OR BL
U2 V2 W2
BR BL
CN12
Module-driven board
MODEL
A
2#Electronic
expansion valves
G B
1#Electronic
expansion valves
EXV2
EXV1
High pressure sensor
T
PL.K
PH.K
MODLE RS485
CN30
CN29
Dsp_Comm
T
Outdoor environment temp.
LED3
ON
ON
ON
456
901
78
EXV1
CN35
23
COMP1
CN3
55
KM2
10
Frequency conversion start-up
9
2#Fixed-frequency
KM1
AC RELAY
CN33
COMP2
CN34
8
compressor
HEATER3
CN40
1#Fixed-frequency
KH1
4-WAY
HEATER2
CN37
7
Frequency conversion
compressor heating band
SV5
HEATER1
CN5
compressor
4-WAY
CN25
6
four-way valve
electromagnetic valve
SV4
Frequency conversion unloading
oil balance
electromagnetic valve
Liquid bypass
electromagnetic valve
Module electromagnetic valve
electromagnetic valve
Return oil
SV2
SV5
CN26
5
KM3
FK
RD
Shielding layer
WH
Trans out
CN13
Connect to the
ODU PC board CN8
IDU communication port
SV1
SV4
CN27
4
CN15
Refrigerant circuit
SV6
SV3
CN31
2
Fan overheating
IN-OUT RS485
SV2
CN23
SV1
CN32
1
PL
Low pressure switch
CN14
TRANS_IN
CN8
PH
High pressure switch
FAN PRO
ODU PC board
CONTORL
CN36
L
1 2 1 2 1 2
SW1
SW2 SW3
SW4
A Adderess Type Prower
EXV2
T
SW5
6
H
3PH CHECK CN9
CPU
PT1
6
Pressure.Pro
SW6
CN6
HP_Check
CN7
LP_Check
CN28
Fan_Comm
TRANS1
T6
J5
CN43
T4
T5
T7
T3
Condensate temp.
CN10
F1
I INV
CT3
TRANS_IN
CN41
GREEN
5
Module communication port
Connect to the next module
RD
Frequency compressor
T
RED
CPU
INV
PT3
exhaust temp. sensor
exhaust temp. sensor
T
IC22
CN11
FAN2
Condensing fan Condensing fan
PT4
CN3
WH
transformer
CN4
4
KH3
1#Fixed-frequency compressor
PT5
exhaust temp. sensor
2#Fixed-frequency compressor
OR/GN
transformer
OR
RD
BK
10
RD
Compressor frequency
conversion module
FAN1
F2
BL
9
PT2
I F1B
CT1
transformer
RD
BK
BL
COMP.INV
2#Fixed-frequency
compressor
KH2
I F1A
CT2
V W
W4
COMP2
transformer
BR
Low pressure sensor
V4
Module-driven board
BK
WH
U4
transformer in the
N
Lightning board
FAN INV
COMP1
1#Fixed-frequency
compressor
A
N
PROTEC.
L
Fan variable
frequency board
Shielding
BL
B
layer
RD OR
OR BL RD BK
LINE
W3
I
蓝
RD
BK
EARTH
V3
RD
BR
C
KM2
KM1
U3
RD
RD
HT325
NEUTRAL
I F1A
OR/GN
Connect to the
ODU PC board CN41
RD
OR/GN
RD OR BL
RD OR BL
BR
RD
TRANS2
HT535
BL
RD
I INV
RD
OR
BL
IC22
L1
L2
L3
N
RD
RD
OR
Electrical components arrangement
DZ1
KM3
Unit
Set
DZ2
R1
PTC PTC
Code description
C2
SW1
Lightning
board
C3
SW2
R2
C1
L1 L2 L3 E
Transformer
HT325
P N
CPU
Defrost parameter
selection
SW4
CN3
E
J5
drive
outdoor
remarks
Manufactured outside the
scope of the actual power
setting module reported fault
Factory default 00,11 as invalid,
Module alarm
Setting the scene according
to the actual
Factory default for 00
00:Only host
Discrepancies with the
01:Host and 1 slave actual,host alarm
Setting the scene according
10:Host and 2 slaves to the actual
RED
P' N'
HT535
L1'L2' L3'
Set range
Module quantity
selection
SW3
CN11
GREEN
ON: 1
OFF: 0
0,1,2,3,4
Power choice (disc) were respectively
8,10,12,14,16HP
00:Host
Module address
01:1#Slave
selection
10:2#Slave
Name
00:A=5,B=40
11:A=3,B=30
Others are the
same as 00
T3≤K*T4-A,K as the coefficients,
A for the difference,
B is the defrost cycle,
T3 and B meet to enter defrosting
Short circuit:
Host is set to "short circuit"
Module communication port a terminal resistance
Disconnect: no
Slaves is set to "off"
terminal resistor choice
termination resistor
SW5 for tally key-press, used for various
points of view unit parameters
互感器
CN10
F2 F1 T7
CN7
CN6
CN43
CN30
CN28
CN29
T5 T6 MODLE RS485 Dsp_Comm Fan_Comm LP_Check HP_Check
SW6 for compulsory refrigeration button,
Please do not clicked in the normal operation;
T3 T4
I F1A I F1B
CT2 CT1
互感器
互感器
45 6
LED3
23
3PH CHECK CN9
78
EXV2 CN36
EXV1 CN35
1#Electronic 2#Electronic
expansion valve expansion valve
SV3
CN31
L FAN PRO IN-OUT RS485
CN15
CN14
CPU
ON
1 2 1 2 1 2 SW1
SW2 SW3 Prower
SW4
A Adderess Type
H
ODU PC board
CONTORL
ON ON
901
TRANS_IN
CN8
TRANS_IN SV1 SV2
CN41 CN32 CN23
SW6 SW5
P re ss ure.Pro
I INV
CT3
KM1
XT1
L1
Main power
Refrigerant circuit
IDU communication
Module communication
XT2 XT3
KM2
Trans out
SV4 SV5 4-WAY HEATER1 HEATER2 HEATER3 COMP1 COMP2 AC RELAY
CN37 CN40 CN3 CN34 CN33 CN13
CN27 CN26 CN25 CN5
reactor Condensing fan Condensing fan
overheating
L2
L3
Main power
IDU communication port
Module communication port
N
A B G
A B G
IDU communication
Module communication
XT4
La La FK FK
U2 V2 W2
reactor Condensing fan Condensing fan
overheating
56
INV
COMP1-2
FAN1-2
4-WAY
SV1-5
XT1-4
KH1-3
KM1-3
TRANS1-2
PTC1-2
PH
PL
HT325
Frequency
compressor
Fixed-frequency
compressor
Condensing fan
Four-way valve
Electromagnetic
valve
Terminal
compressor
heating band
AC contactor
Transformer
Thermistor
High pressure
switch
Low pressure
switch
Single-phase
filter
High pressure switch sensor
PH.K
High pressure switch sensor
PL.K
Frequency conversion compressor
current transformer
I INV
frequency compressor
I F1A、IF1B Fixed
current transformer
Three-phase bridge rectifiers
DZ1
Single-phase Bridge Rectifier
DZ2
AC Capacitor
C1
Electrolytic capacitor
C2、C3
reactor
L
Electronic expansion valve
EXV1-2
Temperature sensor
PT1-5
Fan overheating
FK
Three-phase filter
HT535
Note: unit power set to 14HP (including 14HP) above
the dashed part is valid, IDU communication
must connect to the host, cannot be connected
to the slaves;
12HP、14HP、16HP System diagram
Note:Before maintenance comfirm that the power is blackouts more than 10 minutes, and C2 and C3 have discharge over.
XT1
BK
B
KM2
W4
MF2
N
RD OR BL
M
CN12
L
N
OR/GN
Module-driven board
MODEL
EXV2
EXV1
High pressure sensor
G B
WH
RD
A
1#Electronic
expansion valves
Low pressure sensor
Module communication port
Connect to the next module
T
2#Electronic
expansion valves
PL.K
PH.K
CN29
Dsp_Comm
T
Outdoor environment temp.
CPU
6
EXV2
CN36
EXV1
CN35
23
COMP1
CN3
57
KM2
10
Frequency conversion start-up
compressor
9
2#Fixed-frequency
8
KM1
AC RELAY
CN33
COMP2
CN34
compressor
HEATER3
CN40
1#Fixed-frequency
KH1
Frequency conversion
4-WAY
HEATER2
CN37
7
compressor heating band
SV5
6
four-way valve
electromagnetic valve
SV4
5
Frequency conversion unloading
oil balance
electromagnetic valve
electromagnetic valve
Liquid bypass
Module electromagnetic valve
Return oil
electromagnetic valve
SV2
4
HEATER1
CN5
4-WAY
CN25
KM3
FK
RD
Shielding layer
WH
Trans out
CN13
Connect to the
ODU PC board CN8
IDU communication port
2
SV5
CN26
CN15
SV4
CN27
Fan overheating
IN-OUT RS485
1
SV3
CN31
CN14
SV2
CN23
SV1
CN32
PL
Low pressure switch
FAN PRO
ODU PC board
CONTORL
L
1 2 1 2 1 2
SW1
SW2 SW3
SW4
A Adderess Type Prower
PH
High pressure switch
TRANS1
456
901
78
H
ON
T
LED3
ON
PT1
6
SW5
Pressure.Pro
3PH CHECK CN9
CN6
HP_Check
CN7
LP_Check
CN28
Fan_Comm
T3
MODLE RS485
CN30
T6
J5
CN43
T4
T5
T7
TRANS_IN
CN8
Refrigerant circuit
GREEN
5
Shielding
T
ON
SV1
RED
CPU
Condensate temp.
CN10
F1
SW6
SV6
IC22
CN11
C5
I INV
CT3
TRANS_IN
CN41
CN3
CN4
COMP.INV
transformer
OR
RD
BK
10
RD
WH
transformer
N
PT3
Frequency compressor
T
F2
BL
9
Left fan
C4
PT4
exhaust temp. sensor
PT5
KH3
1#Fixed-frequency compressor
2#Fixed-frequency compressor
I F1B
CT1
transformer
MF1
H
BR BL
BK
PT2
I F1A
CT2
transformer
CN4
BL
INV
2#Fixed-frequency
compressor
KH2
H
Right fan
COMP2
1#Fixed-frequency
compressor
M
Module-driven board
Compressor frequency
conversion module
exhaust temp. sensor
COMP1
L
BR
N
PROTEC.
L
layer
BL
Fan board
transformer in the
N
C
L
V4
exhaust temp. sensor
RD OR
CPU
5V
A
Lightning board
communication
12V
U4
I
蓝
I F2B
I F1A
KM1
W3
RD
BR
FAN BOARD
V3
RD
RD
OR BL RD BK
CN1
U3
Connect to the
ODU PC board CN41
RD
OR/GN
RD OR BL
RD OR BL
BR
RD
TRANS2
HT5112
BL
RD
I INV
RD
OR
BL
IC22
L1
L2
L3
N
RD
RD
OR
Electrical components arrangement
DZ1
KM3
Unit
Set
DZ2
R1
PTC PTC
Code description
Name
Set range
C2
0,1,2,3,4
SW1
Lightning
board
R2
CN11
GREEN
CPU
H T 5 1 12
Manufactured outside the
8,10,12,14,16HP
setting module reported fault
FAN1-2
SW2
4-WAY
Module quantity
SV1-5
SW3
selection
XT1-4
00:A=5,B=40
Defrost parameter
A for the difference,
11:A=3,B=30
SW4
selection
B is the defrost cycle,
Others are the
KH1-3
same as 00
Short circuit:
Host is set to "short circuit"
a terminal resistance
J5
KM1-3
Disconnect: no
Slaves is set to "off"
termination resistor
TRANS1-2
SW5 for tally key-press, used for various
PTC1-2
points of view unit parameters
PH
SW6 for compulsory refrigeration button,
Please do not clicked in the normal operation; PL
HT5112
00:Host
01:1#Slave
10:2#Slave
Factory default 00,11 as invalid,
Module alarm
Setting the scene according
to the actual
Factory default for 00
00:Only host
Discrepancies with the
01:Host and 1 slave actual,host alarm
Setting the scene according
10:Host and 2 slaves to the actual
T3≤K*T4-A,K as the coefficients,
RED
L1'L2' L3'
L1 L2 L3
INV
COMP1-2
remarks
Power choice (disc) were respectively scope of the actual power
Module address
selection
C3
C1
ON: 1
OFF: 0
Transformer
T3 and B meet to enter defrosting
CN3
E
Module communication port
Frequency
compressor
Fixed-frequency
compressor
Condensing fan
Four-way valve
Electromagnetic
valve
Terminal
compressor
heating band
AC contactor
terminal resistor choice
drive
outdoor
互感器
CN10
F2 F1 T7
CN7
CN6
CN43
CN30
CN29
CN28
T5 T6 MODLE RS485 Dsp_Comm Fan_Comm LP_Check HP_Check
T3 T4
I F1A I F1B
CT2 CT1
互感器
互感器
CPU
ON
45 6
78
LED3
23
3PH CHECK CN9
ON
EXV2 CN36
EXV1 CN35
1#Electronic 2#Electronic
expansion valve expansion valve
SV3
CN31
L F A N P R O IN- OUT RS4 85
C N 15
CN14
ODU PC board
CONTORL
1 2 1 2 1 2 SW1
SW2
SW3 Prower
SW4
Adderess Type
A
H
ON
90 1
TRANS_IN
CN8
TRANS_IN SV1 SV2
CN41 CN32 CN23
SW6 SW5
P r e s s u re.Pro
I INV
CT3
KM1
KM2
L1
Main power
IDU communication
Refrigerant circuit
Module communication
XT2 XT3
XT1
Trans out
SV4 SV5 4-WAY HEATER1 HEATER2 HEATER3 COMP1 COMP2 AC RELAY
CN13
CN37 CN40 CN3 CN34 CN33
CN27 CN26 CN25 CN5
reactor Condensing fan Condensing fan
overheating
L2
L3
XT4
IDU communication port
Module communication port
N
A B G
A B G
IDU communication
Module communication
La La
reactor
Main power
58
Transformer
Thermistor
High pressure
switch
Low pressure
switch
Single-phase
filter
High pressure switch sensor
PH.K
High pressure switch sensor
PL.K
Frequency conversion compressor
current transformer
I INV
frequency compressor
I F1A、IF1B Fixed
current transformer
Three-phase bridge rectifiers
DZ1
Single-phase Bridge Rectifier
DZ2
AC Capacitor
C1
C2、C3 Electrolytic capacitor
reactor
L
EXV1-2 Electronic expansion valve
Temperature sensor
PT1-5
Fan overheating
FK
Note: unit power set to 14HP (including 14HP) above
the dashed part is valid, IDU communication
must connect to the host, cannot be connected
to the slaves;
A: Electric appliances wiring diagram
B: 8HP、10HP Electrical wiring diagrams of modular unit control
2
3-1.0mm RD
DZ1- 4
Line go through on the right
2
1.0mm RD
L2
A2
43 31
AC
3
COMP.INV
CN5(1.0mm 2 BK)
DZ1
PTC 1.0mm2 RD PTC
44 32
2
2
2.5mm RD
2
2.5mm RD
OR/GN
PROTEC.
MODEL CN12-1(1.0mm BR)
6.0mm RD
2
COMP.INV 2
2
CN4(1.0mm RD)
AC
DZ2
C2
2
1.0mm RD
4
5
2
2.5mm Rd XT4 1#La
2
6.0mm BR
2
2.5mm BR
C1
C3
2.5mm 2 BR
XT4 2#La
MODEL
CN12-2(1.0mm2 WH)
Compressor frequency
conversion module
2
DZ1- 5(2.5mm BL)
2
R2
B
C
1.0mm 2OR DZ1 2
L3
GMC-22
KM3
N
L
A N
1.0mm 2BL DZ1 3
Lightning board
1.0mm 2RD DZ1 1
2
AC
A1 L1
2
1.0mm BK XT1 N
1
R1
KM3
A2
KM3 A1
COMP. INV
MODEL CN12-3(1.0mm BL)
2
CN11
P'
N'
Module-driven board
CN11
MODEL
GREEN
P' N'
L1'L2' L3'
CPU
CN4
RED
3-2.5mm2 BL、OR、RD XT4
HT325
L1 L2 L3
E
P N
CN12
CN3
LINE
CN3
CONTORL CN13
E
W
V
U
High pressure sensor
Low pressure sensor
FAN INV CN1
MODEL CN11
Exhaust temperature
XT3 A RD
XT3 G Shielding layer
XT3 B WH
Frequency conversion compressor
2#Fixed frequency compressor
Exhaust temperature
1#Fixed frequency compressor
Exhaust temperature
CONTORL CN8
CN1
CN7
LP_Check
CN43
CN30
CN29
CN28
T5 T6 MODLE RS485 Dsp_Comm Fan_Comm
CN6
HP_Check
3PH CHECK CN9
ODU PC board
CONTORL
ON
CPU
ON
45 6
901
78
LED3
23
1 2
1 2
1 2 SW1
SW2
SW3 Prower
SW4
Adderess Type
A
EXV2 CN36
1#Electronic
expansion valve
L3
2#Electronic
expansion valve
8
KM1
KM1
2
A1 RD1.0mm 2
A2 BK1.0mm
A B
N
10
L2
L3
N
3-2.5mm 2 RD、OR、BL XT1
2
1.0mm BL
KM1 A1
KM1 A2
A1 L1
XT2 A
XT2 G
XT2 B
L2
L3
A2
43 31
RD
Shielding layer
GMC-22
WH
KM1
44 32
Fixed frequency compressor
2
1.0mm BK XT1 N
G
G
IDU communication terminal
1#Fixed frequency compressor heating
Transfer to contactor contactor and coil of
wire cable walking along on the right
A B
G
1# 2# 1# 2#
La La FK FK
U2 V2 W2
La La FK FK
U2 V2 W2
XT4
XT3
A B
L3
CN13
XT2
L1
White1.0mm2 XT4 1#FK
White1.0mm2 XT4 2#FK
KM3 A1 RD1.0mm 2
KM3 A2BK1.0mm
7
L2
Low pressure switch
2
6
Four-way valve
5
Frequency conversion
compressor heating
4
Oil balance
electromagnetic valve
2
EXV1 CN35
L1
Trans out
SV4 SV5 4-WAY HEATER1 HEATER2 HEATER3 COMP1 COMP2 AC RELAY
CN13
CN37 CN40 CN3 CN34
CN27 CN26 CN25 CN5
CN33
Frequency conversion unloading
electromagnetic valve
SV3
CN31
Liquid bypass
electromagnetic valve
Return oil
electromagnetic valve
Module electromagnetic valve
XT1
1
SV2
CN23
High pressure switch
Condensing temperature
L FAN PRO IN-OUT RS485
CN15
CN14
ON
TRANS_IN
CN8
TRANS_IN SV1
CN41
CN32
L2
Pressure.Pro
SW6 SW5
Outdoor environment temperature
H
CN10
F2 F1 T7
T3 T4
Transformer
Transformer
I INV
CT3
CN1
COMM
I F1A I F1B
CT1
CT2
L1
1.5mm 2 BK HT325 N'
TRANS1
1.5mm2 RD、BK
XT1 L1 N
CONTORL CN41
2
1.0mm BL XT1 L3
1.0mm2 OR XT1 L2
1.0mm2RD XT1 L1
1.0mm2 BK XT1 N
NEUTRAL
FAN INV
MODEL CN3
TRANS2
2
3-2.5mm RD、OR、BL
XT1 L1 L2 L3
Transformer
Cable walking alone
1.5mm 2 RD HT325 P'
Fan variable
frequency board EARTH
CN12-3
CN12-2
CN12-1
HT535
Transformer
2
3-1.5mm RD、OR、BL XT4
3-2.5mm 2 RD、OR、BL DZ1 1、2、3
(6.0mm BL)go through
MODEL Transformer
A B
G
Module communication terminal
Reactor
Note:
condensing fan
overheating
condensing fan
1、the connected line which from L1 of XT1 terminal connected to the L1 of the contactor KM1 must go through current transformer I F1A in the PC board of ODU ;
2、the connected line which from L1' of filter HT535 connected to the three-phase rectifier bridge DZ1 must go through current transformer I INV in the PC board of ODU ;
3、the connected line which from the N side of compressor frequency-converting module to the negative of electrolytic capacitors C3 must go
throngh current transformer IC22 which in the module driven-board(MODEL), current direction must follow the mark, from N to negative of C3,
and the connected line cannot touch the communication terminal, should be kept single, separated far away from the other lines.
4、Filter HT325 should be installed in the HT535;
5、Two holes in the ODU PC board must have plastic pillars support,but does not need to screw fastening;all communication lines cannot
be bound with the strong current lines.
6、Output lines SV1,SV2,SV4,SV5,4-WAY,HEATER1 should be respectively cover on marks 1,2,3,4,5,6, and the N lines doesnot need.
7、Output lines U, V, W of frequency conversion compressor go throngh magnetic ring which away 200mm from the compressor terminal,and reverse loop around and fixed.
Refrigerant circuit
59
C: 12HP Electrical wiring diagram of modular unit control
2
3-1.0mm RD
DZ1- 4
Line go through on the right
2
1.0mm RD
L2
A2
43 31
AC
3
DZ1
PTC 1.0mm2 RD PTC
44 32
2
2
2.5mm RD
OR/GN
N
L
MODEL CN12-1(1.0mm BR)
6.0mm RD
2.5mm RD
PROTEC.
4
2
2
COMP.INV 2
2
CN4(1.0mm RD)
DZ2
AC
C2
2
1.0mm RD
5
2
2.5mm Rd XT4 1#La
2
6.0mm BR
2
2.5mm BR
C1
C3
2.5mm 2 BR
XT4 2#La
MODEL
CN12-2(1.0mm2 WH)
Compressor frequency
conversion module
2
DZ1- 5(2.5mm BL)
2
R2
B
C
1.0mm 2OR DZ1 2
L3
GMC-22
KM3
COMP.INV
CN5(1.0mm 2 BK)
A N
1.0mm 2BL DZ1 3
Lightning board
1.0mm 2RD DZ1 1
2
AC
A1 L1
2
1.0mm BK XT1 N
1
R1
KM3
A2
KM3 A1
COMP. INV
MODEL CN12-3(1.0mm BL)
2
CN11
3-2.5mm 2 RD、OR、BL DZ1 1、2、3
P'
N'
(6.0mm BL)go through
MODEL Transformer
12V 5V
Module-driven board
CN11
MODEL
GREEN
CPU
CN4
RED
L1'L2' L3'
3-2.5mm2 BL、OR、RD XT4
HT5 112
Transformer
2
CN12-3
CN12-2
CN12-1
Connect to XT1 N 1.5mm BK
CN3
CONTORL CN13
Connect to left fan
N L M
MODEL CN3
E
Connect to right fan
H M L
H
MF1
N
MF2
N
L1 L2 L3
Cable walking alone
Connect to XT1 L1 1.5mm 2 RD
CN12
CN3
L
TRANS1
TRANS2
CN4
2
3-2.5mm RD、OR、BL
XT1 L1 L2 L3
CN10
F2 F1 T7
CN7
LP_Check
CN43
CN30
CN29
CN28
T5 T6 MODLE RS485 Dsp_Comm Fan_Comm
3PH CHECK CN9
ODU PC board
CONTORL
ON
CPU
ON
45 6
78
LED3
23
1 2
1 2
1 2 SW1
SW2
SW3 Prower
SW4
Adderess Type
A
EXV2
CN36
expansion valve
XT1
L2
L3
2#Electronic
expansion valve
L2
L3
A B
N
Main Power terminal
N
XT2 A
XT2 G
XT2 B
2
1.0mm BL
KM1 A1
KM1 A2
A1 L1
RD
Shielding layer
WH
12
L2
L3
A2
43 31
GMC-22
KM1
44 32
1#Fixed frequency compressor
CN13
2
1.0mm BK XT1 N
1#Fixed frequency compressor heating
Transfer to contactor contactor and coil of
wire cable walking along on the right
G
A B
G
IDU communication terminal
1# 2#
La La
G
XT4
XT3
A B
L2 L3
2
10
XT2
L1
L1
Low pressure switch
White1.0mm 2 XT4 1#FK
White1.0mm 2 XT4 2#FK
KM3 A1 RD1.0mm 2
KM3 A2 BK1.0mm
7
2
6
KM1 A1 RD1.0mm 2
KM1 A2 BK1.0mm
5
Frequency conversion
compressor heating
4
Oil balance
electromagnetic valve
2
EXV1 CN35
3-2.5mm 2 RD、OR、BL XT1
Trans out
SV4 SV5 4-WAY HEATER1 HEATER2 HEATER3 COMP1 COMP2 AC RELAY
CN13
CN37 CN40 CN3 CN34
CN27 CN26 CN25 CN5
CN33
Four-way valve
SV3
CN31
Frequency conversion unloading
electromagnetic valve
SV2
CN23
Liquid bypass
electromagnetic valve
1
Return oil
electromagnetic valve
Module electromagnetic valve
TRANS_IN
CN8
TRANS_IN
SV1
CN41
CN32
High pressure switch
L FAN PRO IN-OUT RS485
CN15
CN14
ON
1#Electronic
L1
Pressure.Pro
SW6 SW5
901
2
1.0mm BL XT1 L3
1.0mm2 OR XT1 L2
1.0mm2RD XT1 L1
1.0mm2 BK XT1 N
I INV
CT3
Condensing temperature
Outdoor environment temperature
Left fan
capacitance C4
Right fan
capacitance C4
High pressure sensor
CN6
HP_Check
H
Transformer
Transformer
CN1
FAN BOARD
T3 T4
I F1A I F1B
CT1
CT2
5V
12V
communication
CONTORL CN8
Low pressure sensor
FAN INV CN1
MODEL CN11
XT3 A RD
XT3 G Shielding layer
XT3 B WH
Exhaust temperature
1#Fixed frequency compressor
Exhaust temperature
Frequency conversion compressor
CONTORL CN41
Transformer
CPU
Fan PC board
A B
G
Module communication terminal
La La
Reactor
Note:
1、the connected line which from L1 of XT1 terminal connected to the L1 of the contactor KM1 must go through current transformer I F1A in the PC board of ODU ;
2、the connected line which from L1' of filter HT535 connected to the three-phase rectifier bridge DZ1 must go through current transformer I INV in the PC board of ODU ;
3、the connected line which from the N side of compressor frequency-converting module to the negative of electrolytic capacitors C3 must go
throngh current transformer IC22 which in the module driven-board(MODEL), current direction must follow the mark, from N to negative of C3,
and the connected line cannot touch the communication terminal, should be kept single, separated far away from the other lines.
4、Two holes in the ODU PC board must have plastic pillars support,but does not need to screw fastening;all communication lines cannot
be bound with the strong current lines.
5、Output lines SV1,SV2,SV4,SV5,4-WAY,HEATER1 should be respectively cover on marks 1,2,3,4,5,6, and the N lines doesnot need.
6、Output lines U, V, W of frequency conversion compressor go throngh magnetic ring which away 200mm from the compressor terminal,and reverse loop around and fixed.
Refrigerant circuit
60
D: 14HP、16HP Electrical wiring diagram of modular unit control
2
3-1.0mm RD
DZ1- 4
Line go through on the right
2
1.0mm RD
L2
A2
43 31
44 32
2
2
2.5mm RD
OR/GN
N
L
MODEL CN12-1(1.0mm BR)
6.0mm RD
2.5mm RD
PROTEC.
4
2
2
COMP.INV 2
2
CN4(1.0mm RD)
DZ2
AC
C2
2
1.0mm RD
5
2
2.5mm Rd XT4 1#La
2
6.0mm BR
2
2.5mm BR
C1
C3
2.5mm 2 BR
XT4 2#La
MODEL
CN12-2(1.0mm2 WH)
Compressor frequency
conversion module
2
DZ1- 5(2.5mm BL)
2
R2
B
AC
3
DZ1
PTC 1.0mm2 RD PTC
C
1.0mm 2OR DZ1 2
L3
GMC-22
KM3
COMP.INV
CN5(1.0mm 2 BK)
A N
1.0mm 2BL DZ1 3
Lightning board
1.0mm 2RD DZ1 1
2
AC
A1 L1
2
1.0mm BK XT1 N
1
R1
KM3
A2
KM3 A1
COMP. INV
MODEL CN12-3(1.0mm BL)
2
CN11
3-2.5mm 2 RD、OR、BL DZ1 1、2、3
P'
N'
(6.0mm BL)go through
MODEL Transformer
12V 5V
Module-driven board
CN11
MODEL
GREEN
CPU
CN4
RED
L1'L2' L3'
3-2.5mm2 BL、OR、RD XT4
HT5 112
Transformer
CN3
CONTORL CN13
Connect to left fan
MODEL CN3
E
Connect to right fan
H M L N
N L M H
MF1
MF2
N
L1 L2 L3
Connect to XT1 N 1.5mm2 BK
CN12-3
CN12-2
CN12-1
CN3
Cable walking alone
Connect to XT1 L1 1.5mm2 RD
CN12
L
TRANS1
TRANS2
CN4
2
3-2.5mm RD、OR、BL
XT1 L1 L2 L3
12V
CN10
F2 F1 T7
CN6
HP_Check
Outdoor environment temperature
High pressure switch
Condensing temperature
Left fan
capacitance C4
Right fan
capacitance C4
High pressure sensor
Low pressure sensor
CN7
LP_Check
CN43
CN30
CN28
CN29
T5 T6 MODLE RS485 Dsp_Comm Fan_Comm
H
Transformer
FAN BOARD
T3 T4
I F1A I F1B
CT2 CT1
CN1
communication
CONTORL CN41
FAN INV CN1
MODEL CN11
XT3 A RD
XT3 G Shielding layer
XT3 B WH
Exhaust temperature
2# Fixed frequency compressor
Exhaust temperature
1# Fixed frequency compressor
Exhaust temperature
Frequency conversion compressor
CONTORL CN8
Transformer
5V
CPU
Fan PC board
3-2.5mm 2 RD、OR、BL XT1
3-2.5mm 2 RD、OR、BL XT1
Transformer
3PH CHECK CN9
ODU PC board
CONTORL
ON
CPU
ON
45 6
78
LED3
23
1 2
1 2
1 2 SW1
SW4
SW2
SW3 Prower
A
Adderess Type
EXV2 CN36
1#Electronic
expansion valve
L3
CN35
2 #Electronic
expansion valve
L2
L3
10 11 12
Main Power terminal
A1 RD1.0mm 2
A2 BK1.0mm 2
A1 RD1.0mm 2
A2 BK1.0mm 2
A1 RD1.0mm 2
A2 BK1.0mm
L3
2
L2
L3
A2
KM2 A1
KM2 A2
A1 L1
43 31
L2
L3
A2
KM1
44 32
1#Fixed frequency compressor
2
43 31
GMC-22
KM1
1.0mm BK XT1 N
2#Fixed frequency compressor
1#Fixed frequency
compressor heating
2
1.0mm BK XT1 N
2#Fixed frequency
compressor heating
Transfer to contactor contactor and coil of
wire cable walking along on the right
1# 2#
La La
A B G
XT4
XT3
IDU communication terminal
L2
1.0mm BL
KM1 A2
GMC-22
CN13
A B G
L1
44 32
A B G
N
N
KM1 A1
2
7
L3
2
A1 L1
RD
Shielding layer
WH
L2
1.0mm BL
KM1
KM1
KM2
KM2
KM3
KM3
6
Frequency con version
com presso r h eating
5
Four-way valve
4
F requ ency con version unloading
electro magnetic valve
2
XT2
L1
XT2 A
XT2 G
XT2 B
L1
Trans out
SV4 SV5 4-WAY HEATER1 HEATER2 HEATER3 COMP1 COMP2 AC RELAY
CN13
CN37 CN40 CN3 CN34
CN27 CN26 CN25 CN5
CN33
Oil balance
electromagn etic valve
SV3
CN31
Liq uid by pass
electromagn etic valve
Return oil
electro magnetic valve
Module electromagnetic valve
XT1
L2
1
SV2
CN23
EXV1
Low pressure switch
White1.0mm2 XT4 1#FK
White1.0mm2 XT4 2#FK
L FAN PRO IN-OUT RS485
CN15
CN14
ON
TRANS_IN
CN8
TRANS_IN
SV1
CN41
CN32
L1
Pressure.Pro
SW6 SW5
90 1
2
1.0mm BL XT1 L3
1.0mm2 OR XT1 L2
1.0mm 2RD XT1 L1
1.0mm2 BK XT1 N
I INV
CT3
A B
G
Module communication terminal
La La
Reactor
Note:
1、the connected line which from L1 of XT1 terminal connected to the L1 of the contactor KM1 must go through current transformer I F1A in the PC board of ODU ;
2、the connected line which from L1 of XT1 terminal connected to the L1 of the contactor KM2 must go through current transformer I F2A in the PC board of ODU ;
3、the connected line which from L1' of filter HT535 connected to the three-phase rectifier bridge DZ1 must go through current transformer I INV in the PC board of ODU ;
4、the connected line which from the N side of compressor frequency-converting module to the negative of electrolytic capacitors C3 must go
throngh current transformer IC22 which in the module driven-board(MODEL), current direction must follow the mark, from N to negative of C3,
and the connected line cannot touch the communication terminal, should be kept single, separated far away from the other lines.
5、Two holes in the ODU PC board must have plastic pillars support,but does not need to screw fastening;all communication lines cannot
be bound with the strong current lines.
6、Output lines SV1,SV2,SV4,SV5,4-WAY,HEATER1 should be respectively cover on marks 1,2,3,4,5,6, and the N lines doesnot need.
7、Output lines U, V, W of frequency conversion compressor go throngh magnetic ring which away 200mm from the compressor terminal,and reverse loop around and fixed.
Refrigerant circuit
61
E: 8HP、10HP Electric appliances wiring diagram of Single type
2
3-1.0mm RD
DZ1- 4
Line go through on the right
2
1.0mm RD
L2
A2
43 31
AC
3
COMP.INV
CN5(1.0mm 2 BK)
DZ1
PTC 1.0mm2 RD PTC
44 32
2
2
2
2.5mm RD
OR/GN
PROTEC.
MODEL CN12-1(1.0mm BR)
6.0mm RD
2
2.5mm RD
COMP.INV 2
2
CN4(1.0mm RD)
AC
DZ2
C2
2
1.0mm RD
4
5
2
2.5mm Rd XT4 1#La
2
6.0mm BR
2
2.5mm BR
C1
C3
2.5mm 2 BR
XT4 2#La
MODEL
CN12-2(1.0mm2 WH)
Compressor frequency
conversion module
2
DZ1- 5(2.5mm BL)
2
R2
B
C
1.0mm 2OR DZ1 2
L3
GMC-22
KM3
N
L
A N
1.0mm 2BL DZ1 3
Lightning board
1.0mm 2RD DZ1 1
2
AC
A1 L1
2
1.0mm BK XT1 N
1
R1
KM3
A2
KM3 A1
COMP. INV
MODEL CN12-3(1.0mm BL)
2
CN11
P'
N'
Module-driven board
CN11
MODEL
GREEN
CPU
CN4
RED
P' N'
L1'L2' L3'
3-2.5mm2 BL、OR、RD XT4
HT325
L1 L2 L3
E
P N
CN3
CONTORL CN13
Fan variable
frequency board
E
V
U
High pressure sensor
Low pressure sensor
FAN INV CN1
MODEL CN11
Exhaust temperature
Frequency conversion compressor
2#Fixed frequency compressor
Exhaust temperature
1#Fixed frequency compressor
Exhaust temperature
CN1
CN7
LP_Check
CN43
CN30
CN28
CN29
T5 T6 MODLE RS485 Dsp_Comm Fan_Comm
CN6
HP_Check
Pressure.Pro
SW6 SW5
ON
ODU PC board
CONTORL
ON
CPU
ON
4 56
90 1
78
LED3
23
1 2
1 2
1 2 SW1
SW2
SW3 Prower
SW4
Adderess Type
A
EXV2 CN36
Trans out
SV4 SV5 4-WAY HEATER1 HEATER2 HEATER3 COMP1 COMP2 AC RELAY
CN13
CN37 CN40 CN3 CN34
CN27 CN26 CN25 CN5
CN33
8
KM1
KM1
Liquid bypass
electromagnetic valve
7
L3
A B
N
10
L3
N
L3
3-2.5mm 2 RD、OR、BL XT1
2
1.0mm BL
KM1 A1
KM1 A2
A1 L1
XT2 A
XT2 G
XT2 B
L2
L2
L3
A2
43 31
RD
Shielding layer
WH
GMC-22
KM1
44 32
Fixed frequency compressor
2
1.0mm BK XT1 N
1#Fixed frequency compressor heating
Transfer to contactor contactor and coil of
wire cable walking along on the right
G
XT2
L2
Low pressure switch
White1.0mm2 XT4 1#FK
White1.0mm2 XT4 2#FK
L1
CN13
KM3 A1 RD1.0mm 2
KM3 A2BK1.0mm
6
Four-way valve
2
2#Electronic
expansion valve
2
SV3
CN31
EXV1 CN35
2
A1 RD1.0mm 2
A2 BK1.0mm
SV2
CN23
Frequency conversion
compressor heating
TRANS_IN
CN8
TRANS_IN SV1
CN41
CN32
High pressure switch
L FAN PRO IN-OUT RS485
CN15
CN14
3PH CHECK CN9
I INV
CT3
Condensing temperature
Outdoor environment temperature
H
CN10
F2 F1 T7
CN1
COMM
T3 T4
Transformer
1#Electronic
expansion valve
L1
1.5mm 2 BK HT325 N'
CONTORL CN8
I F1A I F1B
CT1
CT2
XT1
NEUTRAL
W
1.5mm RD、BK
XT1 L1 N
Transformer
L2
EARTH
TRANS1
2
CONTORL CN41
L1
1.5mm RD HT325 P'
MODEL CN3
TRANS2
2
1.0mm BL XT1 L3
1.0mm2 OR XT1 L2
1.0mm 2RD XT1 L1
1.0mm2 BK XT1 N
LINE
FAN INV
2
3-2.5mm RD、OR、BL
XT1 L1 L2 L3
Transformer
Cable walking alone
2
CN12
CN3
CN12-3
CN12-2
CN12-1
HT535
Transformer
2
3-1.5mm RD、OR、BL XT4
3-2.5mm 2 RD、OR、BL DZ1 1、2、3
(6.0mm BL)go through
MODEL Transformer
1# 2# 1# 2#
La La FK FK
U2 V2 W2
La La FK FK
U2 V2 W2
XT4
A B
G
IDU communication terminal
Reactor
Note:
condensing fan
overheating
condensing fan
1、the connected line which from L1 of XT1 terminal connected to the L1 of the contactor KM1 must go through current transformer I F1A in the PC board of ODU ;
2、the connected line which from L1' of filter HT535 connected to the three-phase rectifier bridge DZ1 must go through current transformer I INV in the PC board of ODU ;
3、the connected line which from the N side of compressor frequency-converting module to the negative of electrolytic capacitors C3 must go
throngh current transformer IC22 which in the module driven-board(MODEL), current direction must follow the mark, from N to negative of C3,
and the connected line cannot touch the communication terminal, should be kept single, separated far away from the other lines.
4、Filter HT325 should be installed in the HT535;
5、Two holes in the ODU PC board must have plastic pillars support,but does not need to screw fastening;all communication lines cannot
be bound with the strong current lines.
6、Output lines SV1,SV2,SV4,SV5,4-WAY,HEATER1 should be respectively cover on marks 1,2,3,4,5,6, and the N lines doesnot need.
7、Output lines U, V, W of frequency conversion compressor go throngh magnetic ring which away 200mm from the compressor terminal,and reverse loop around and fixed.
Refrigerant circuit
62
F: 12HP Electric appliances wiring diagram of Single type
2
3-1.0mm RD
DZ1- 4
Line go through on the right
2
1.0mm RD
L2
A2
43 31
COMP.INV
CN5(1.0mm 2 BK)
PTC 1.0mm
2
AC
3
44 32
RD
DZ1
PTC
MODEL CN12-1(1.0mm BR)
6.0mm RD
2
2
2.5mm RD
2
2.5mm RD
OR/GN
PROTEC.
4
2
1.0mm RD
COMP.INV 2
2
CN4(1.0mm RD)
DZ2
AC
C2
2
5
2
2.5mm Rd XT4 1#La
2
6.0mm BR
2
2.5mm BR
C1
C3
DZ1- 5(2.5mm BL)
2.5mm 2 BR
XT4 2#La
MODEL
CN12-2(1.0mm2 WH)
Compressor frequency
conversion module
2
2
R2
B
C
1.0mm 2OR DZ1 2
L3
GMC-22
KM3
N
L
A N
1.0mm 2BL DZ1 3
Lightning board
1.0mm 2RD DZ1 1
2
AC
A1 L1
2
1.0mm BK XT1 N
1
R1
KM3
A2
KM3 A1
COMP. INV
MODEL CN12-3(1.0mm BL)
2
CN11
3-2.5mm 2 RD、OR、BL DZ1 1、2、3
P'
N'
(6.0mm BL)go through
MODEL Transformer
12V 5V
Module-driven board
CN11
MODEL
GREEN
CPU
CN4
RED
L1'L2' L3'
3-2.5mm2 BL、OR、RD XT4
HT5 112
Transformer
CN3
CONTORL CN13
Connect to left fan
N L M
MODEL CN3
E
Connect to right fan
H M L
H
MF1
N
MF2
N
L1 L2 L3
Connect to XT1 N 1.5mm2 BK
CN12-3
CN12-2
CN12-1
CN3
Cable walking alone
Connect to XT1 L1 1.5mm 2 RD
CN12
L
TRANS1
TRANS2
CN4
2
3-2.5mm RD、OR、BL
XT1 L1 L2 L3
CN10
F2 F1 T7
CN7
LP_Check
CN43
CN30
CN29
CN28
T5 T6 MODLE RS485 Dsp_Comm Fan_Comm
3PH CHECK CN9
ON
ODU PC board
CONTORL
ON
CPU
ON
45 6
9 01
78
LED3
23
1 2 1 2
1 2 SW1
SW2
SW3 Prower
SW4
Adderess Type
A
EXV2 CN36
L3
10
A B
N
12
CN13
L2
L3
Main Power terminal
N
3-2.5mm 2 RD、OR、BL XT1
L1
Low pressure switch
White1.0mm2 XT4 1#FK
White1.0mm2 XT4 2#FK
XT2 A
XT2 G
XT2 B
RD
Shielding layer
WH
L2
L3
2
1.0mm BL
KM1 A1
KM1 A2
A1 L1
L2
L3
A2
43 31
GMC-22
KM1
44 32
1#Fixed frequency compressor
2
1.0mm BK XT1 N
1#Fixed frequency compressor heating
Transfer to contactor contactor and coil of
wire cable walking along on the right
1# 2#
La La
G
XT2
L1
Condensing temperature
2
7
KM3 A1 RD1.0mm 2
KM3 A2 BK1.0mm
6
Liquid bypass
electromagnetic valve
XT1
L2
Trans out
SV4 SV5 4-WAY HEATER1 HEATER2 HEATER3 COMP1 COMP2 AC RELAY
CN13
CN37 CN40 CN3 CN34
CN27 CN26 CN25 CN5
CN33
Four-way valve
2
2 #Electronic
expansion valve
2
SV3
CN31
EXV1 CN35
KM1 A1 RD1.0mm 2
KM1 A2 BK1.0mm
SV2
CN23
Frequency conversion
compressor heating
TRANS_IN
CN8
TRANS_IN SV1
CN41
CN32
High pressure switch
L FAN PRO IN-OUT RS485
CN15
CN14
SW6 SW5
1#Electronic
expansion valve
L1
Pressure.Pro
I INV
CT3
Outdoor environment temperature
Left fan
capacitance C4
Right fan
capacitance C4
High pressure sensor
CN6
HP_Check
H
Transformer
Transformer
CN1
FAN BOARD
T3 T4
I F1A I F1B
CT1
CT2
2
1.0mm BL XT1 L3
1.0mm2OR XT1 L2
1.0mm 2RD XT1 L1
1.0mm2 BK XT1 N
12V
communication
CONTORL CN8
Low pressure sensor
FAN INV CN1
MODEL CN11
Exhaust temperature
Frequency conversion compressor
1#Fixed frequency compressor
Exhaust temperature
CONTORL CN41
Transformer
5V
CPU
Fan PC board
XT4
A B
G
IDU communication terminal
La La
Reactor
Note:
1、the connected line which from L1 of XT1 terminal connected to the L1 of the contactor KM1 must go through current transformer I F1A in the PC board of ODU ;
2、the connected line which from L1' of filter HT535 connected to the three-phase rectifier bridge DZ1 must go through current transformer I INV in the PC board of ODU ;
3、the connected line which from the N side of compressor frequency-converting module to the negative of electrolytic capacitors C3 must go
throngh current transformer IC22 which in the module driven-board(MODEL), current direction must follow the mark, from N to negative of C3,
and the connected line cannot touch the communication terminal, should be kept single, separated far away from the other lines.
4、Two holes in the ODU PC board must have plastic pillars support,but does not need to screw fastening;all communication lines cannot
be bound with the strong current lines.
5、Output lines SV1,SV2,SV4,SV5,4-WAY,HEATER1 should be respectively cover on marks 1,2,3,4,5,6, and the N lines doesnot need.
6、Output lines U, V, W of frequency conversion compressor go throngh magnetic ring which away 200mm from the compressor terminal,and reverse loop around and fixed.
Refrigerant circuit
63
G: 14HP、16HP Electric appliances wiring diagram of Single type
2
3-1.0mm RD
DZ1- 4
Line go through on the right
2
1.0mm RD
L3
A2
COMP.INV
CN5(1.0mm 2 BK)
43 31
AC
3
DZ1
PTC 1.0mm2 RD PTC
44 32
MODEL CN12-1(1.0mm BR)
6.0mm RD
2
2.5mm RD
2
2.5mm RD
OR/GN
PROTEC.
4
2
2
COMP.INV
2 2
CN4(1.0mm RD)
DZ2
AC
C2
2
1.0mm RD
5
2
2.5mm Rd XT4 1#La
2
6.0mm BR
2
2.5mm BR
C1
C3
2.5mm 2 BR
XT4 2#La
MODEL
CN12-2(1.0mm2 WH)
Compressor frequency
conversion module
2
DZ1- 5(2.5mm BL)
2
R2
B
C
1.0mm2OR DZ1 2
L2
GMC-22
KM3
N
L
A N
1.0mm2 BL DZ1 3
Lightning board
1.0mm2RD DZ1 1
2
AC
A1 L1
2
1.0mm BK XT1 N
1
R1
KM3
A2
KM3 A1
COMP. INV
MODEL CN12-3(1.0mm BL)
2
CN11
3-2.5mm 2 RD、OR、BL DZ1 1、2、3
P'
N'
(6.0mm BL)go through
MODEL Transformer
12V 5V
Module-driven board
CN11
MODEL
GREEN
CPU
CN4
RED
L1'L2' L3'
3-2.5mm 2 BL、OR、RD XT4
HT5 112
Transformer
CN3
CONTORL CN13
Connect to left fan
N L M
MODEL CN3
E
Connect to right fan
H M L
H
MF1
N
MF2
N
L1 L2 L3
Connect to XT1 N 1.5mm 2BK
CN12-3
CN12-2
CN12-1
CN3
Cable walking alone
Connect to XT1 L1 1.5mm 2RD
CN12
L
TRANS1
TRANS2
CN4
2
3-2.5mm RD、OR、BL
XT1 L1 L2 L3
12V
CN10
F2 F1 T7
CN7
LP_Check
CN6
HP_Check
Outdoor environment temperature
High pressure switch
Condensing temperature
Left fan
capacitance C4
Right fan
capacitance C4
High pressure sensor
Low pressure sensor
CN43
CN30
CN29
CN28
T5 T6 MODLE RS485 Dsp_Comm Fan_Comm
H
Transformer
FAN BOARD
T3 T4
I F1A I F1B
CT1
CT2
CN1
communication
CONTORL CN41
FAN INV CN1
MODEL CN11
Exhaust temperature
Frequency conversion compressor
2#Fixed frequency compressor
Exhaust temperature
1#Fixed frequency compressor
Exhaust temperature
CONTORL CN8
Transformer
5V
CPU
Fan PC board
3-2.5mm 2 RD、OR、BL XT1
3-2.5mm 2 RD、OR、BL XT1
Transformer
3PH CHECK CN9
ON
CPU
ON
45 6
78
LED3
23
1 2
1 2
1 2 SW1
SW2
SW3 Prower
SW4
A
Adderess Type
E X V2
C N 36
expansion valve
6
L iquid bypass
electromagnetic valve
XT1
L3
2 #Electronic
expansion valve
Trans out
SV4 SV5 4-WAY HEATER1 HEATER2 HEATER3 COMP1 COMP2 AC RELAY
CN13
CN37 CN40 CN3 CN34
CN27 CN26 CN25 CN5
CN33
Four-way valve
2
C N 35
7
10 11
12
CN13
KM1
KM1
KM2
KM2
KM3
KM3 A2
SV3
CN31
E X V1
2
A1 RD1.0mm 2
A2 BK1.0mm
2
A1 RD1.0mm 2
A2 BK1.0mm 2
A1 RD1.0mm 2
BK1.0mm
SV2
CN23
Frequency conversion
compressor heating
TRANS_IN
CN8
TRANS_IN
SV1
CN41
CN32
L2
L FAN PRO IN-OUT RS485
CN15
CN14
ON
ODU PC board
CONTORL
1 #Electronic
L1
Pressure.Pro
SW6 SW5
90 1
2
1.0mm BL XT1 L3
1.0mm2 OR XT1 L2
1.0mm2RD XT1 L1
1.0mm2 BK XT1 N
I INV
CT3
A B
N
L2
L3
Main Power terminal
N
XT2 A
XT2 G
XT2 B
RD
Shielding layer
WH
L2
L3
L1
L2
L3
2
2
1.0mm BL
KM1 A1
1.0mm BL
KM1 A2
A1 L1
L2
L3
A2
KM2 A1
KM2 A2
A1 L1
43 31
GMC-22
L2
L3
A2
KM1
KM1
44 32
44 32
1#Fixed frequency compressor
2
43 31
GMC-22
1.0mm BK XT1 N
2#Fixed frequency compressor
1#Fixed frequency
compressor heating
2
1.0mm BK XT1 N
2#Fixed frequency
compressor heating
Transfer to contactor contactor and coil of
wire cable walking along on the right
1# 2#
La La
G
XT2
L1
L1
Low pressure switch
White1.0mm 2 XT4 1#FK
White1.0mm 2 XT4 2#FK
XT4
A B
G
IDU communication terminal
La La
Reactor
Note:
1、the connected line which from L1 of XT1 terminal connected to the L1 of the contactor KM1 must go through current transformer I F1A in the PC board of ODU ;
2、the connected line which from L1 of XT1 terminal connected to the L1 of the contactor KM2 must go through current transformer I F2A in the PC board of ODU ;
3、the connected line which from L1' of filter HT535 connected to the three-phase rectifier bridge DZ1 must go through current transformer I INV in the PC board of ODU ;
4、the connected line which from the N side of compressor frequency-converting module to the negative of electrolytic capacitors C3 must go
throngh current transformer IC22 which in the module driven-board(MODEL), current direction must follow the mark, from N to negative of C3,
and the connected line cannot touch the communication terminal, should be kept single, separated far away from the other lines.
5、Two holes in the ODU PC board must have plastic pillars support,but does not need to screw fastening;all communication lines cannot
be bound with the strong current lines.
6、Output lines SV1,SV2,SV4,SV5,4-WAY,HEATER1 should be respectively cover on marks 1,2,3,4,5,6, and the N lines doesnot need.
7、Output lines U, V, W of frequency conversion compressor go throngh magnetic ring which away 200mm from the compressor terminal,and reverse loop around and fixed.
Refrigerant circuit
64
2.3. The control board interface diagram
2.3.1 Real object diagram as shown below:
3
4
5
6
7
8
9
10
2
11
1
12
13
14
26
27
25
16
15
Refrigerant circuit
24
23
22
21
65
20
19
18
17
1: Interface specifications as below:
2: Variable frequency compressor current transformer
3: Fixed frequency compressor 1 current transformer
4: Fixed frequency compressor 2 current transformer
5: Exhaust temperature sensors socket
6: Communication interface of outdoor moduler
7: Socket for communicating with driver board
8: Socket for communicating with external fan driver board
9: Low pressure sensors socket
10: High pressure sensors socket
11: Room tube temperature sensors socket
12: High pressure switch socket
13: low pressure switch socket
14: External fan overload protection switch socket
15: Socket for communicating with indoor unit
16: Transformer secondary input port
17: Ac contactor interface
18: Fixed frequency compressor 2 contactor interface
19: Fixed frequency compressor 1 contactor interface
20: Oil and heat interface of variable frequency compressor
21: Four way valve interface
22: Variable frequency unloading electromagnetic valve interface
23: Oil balance electromagnetic valve interface
24: liquid side electromagnetic valve interface
25: Interface for Modular electromagnetic valve and return oil electromaganetic valve
26: The transformer primary socket
27: Three-phase power inspection hole
28: Outdoor electronic expansion valve socket
Refrigerant circuit
66
Part 4
Function
1. Operation Mode......................................................................................68
2. Basic Control.......................................................................................... 69
2.1 Normal Operation...............................................................................69
2.2 Compressor Control...........................................................................70
2.3. Outdoor electronic expansion valves control ....................................73
2.4 Outdoor condensate fan control.........................................................74
2.5. Electronic Expansion Valve Control..................................................74
2.6. Cooling Operation Fan Control..........................................................74
3. Special Control........................................................................................75
3.1 Oil Return Operation..........................................................................75
3.2 Defrosting Operation..........................................................................77
4. Protection Control....................................................................................78
4.1 High Pressure Protection Control.......................................................78
4.2 Low Pressure Protection Control........................................................78
4.3 Discharge Pipe Protection Control......................................................78
4.4 STD Compressor Overload Protection...............................................79
5. Other Control ..........................................................................................79
5.1 Outdoor unit operating time control....................................................79
5.2. Demand Operation...............................................................................79
Function
67
1. Operation Mode
A. CMV - [V] DC inverter module multi-unit can be supported with multi-indoor unit; the
operation mode in system is confirmed by which indoor unit start at first; if the requirement of
later applying is not conform with current operation mode (Patterns conflict), then indoor unit will
prompt non-prior and stop operation, the system operation mode conflict see the table as
below.
System operating mode conflict
Application
mode
Cooling
Heating
Cooling
NO
YES
Heating
YES
Fan
Fan
Dehumidification
OFF
NO
NO
NO
NO
YES
YES
NO
NO
YES
NO
NO
NO
Dehumidification
NO
YES
NO
NO
NO
OFF
NO
NO
NO
NO
NO
Current mode
B. When receiving heating operation signal in cooling、fan and dehumidification mode, the
indoor controller displaying “non-prior”, after 3 minutes of clearing cooling 、 fan and
dehumidification mode, outdoor unit may carry out the heating mode.
C. When receiving cooling、fan and dehumidification operation signal in heating mode, the
indoor controller displaying “ non-prior”, after 3 minutes of clearing heating mode, outdoor unit
may carry out the cooling、fan and dehumidification mode.
D. The preferred display method: when the conflict in mode, the indoor displaying panel shows
that: running indicator is flashing for 3 times and stop for every five seconds.
Function
68
2. Basic Control
2.1 Normal Operation
Control
Part name
Normal cooling
Normal heating
Compressor
High pressure protection 、 Low
pressure protection 、 exhaust
temperature control 、 over-current
protection, etc.
High
pressure
protection,
low-pressure protection、exhausted
temperature
control
and
over-current protection, etc.
Outdoor fan
According to the pressure to control
According to the pressure to control
Four-way valve
OFF
ON
Outdoor electronic
expansion valves
480P
Regulating
according
to
the
compressor exhaust temperature
Modular
electromagnetic
valve
(ON)
(ON)
Liquid
bypass
electromagnetic
valve
The exhaust temperature control
The exhaust temperature control
Inverter
compressor
of
unloading solenoid
valves
OFF
OFF
oil balance
electromagnetic
valve
Start by
modules
Oil
return
electromagnetic
valve
ON
Operation of indoor unit action
Fan
electronic
expansion
valve
Function
taking
turns
between
Start by
modules
taking
turns
between
(ON)
Normal cooling
Normal heating
Starting indoor unit
Operate according to the
specified wind speed
Operate according
specified wind speed
The indoor unit not
yet been started
to
the
Not start
Not start
Indoor unit been
started
Regulate according to the
evaporator temperatures
Regulate according to
evaporator temperatures
the
The indoor unit not
yet been started
(OFF)
Open the normally open step
69
2.2 Compressor Control
2.2.1 Cooling
In cooling mode, inverter compressor is starting after outdoor unit received boot order, the
frequency is rise to 38Hz and operating for 5 min; after 5 min of operation, according to the
capacity requirements, the compressor is operating with electric control designated frequency.
After inverter compressor starting, the fixed frequency compressor start operating in order by
the size of capacity requirements.
2.2.2 Heating
In heating mode, inverter compressor is starting after outdoor unit received boot order, the
frequency is rise to 38Hz and operating for 5 min, after 5 min of operation, according to the
capacity requirement, the compressor is operating with electric control designated frequency.
After inverter compressor starting, the fixed frequency compressor start operating in order by
the size of capacity requirements.
2.2.3 The priority control of compressor operation
As for single module system, the compressor carry out the operation is according to the
pattern of 1-3 as show below
8HP、10HP、12HP
NO.1
NO.2
inverter compressor Fixed frequency
compressor
14HP、16HP
NO.1
NO.2
NO.3
inverter compressor Fixed frequency Fixed frequency
compressor 2
compressor 1
i. As for the outdoor system of two parallel modules, the compressor carry out the operation is
according to the pattern of 1-5 as show below
ii. Sum of indoor capacity requirements ≤ outdoor unit capacity, then operate host only
according to the capacity requirements
iii. Sum of indoor capacity requirements ≥ outdoor host capacity, then operate the host and
slave units, and share the indoor total capacity requirements equally among outdoor unit and
slave unit by weighted.
Function
70
18HP、 20HP、 22HP、 24HP
NO.1
NO.2
NO.3
in v erter co m p resso r F ix ed fre q u en cy
c o m p resso r
NO.4
in v erte r co m p resso r F ix ed fre q u en cy
c o m p resso r
26HP
NO.1
NO.2
NO.3
NO.4
inverter compressor Fixed frequency Fixed frequency
compressor 1
compressor 2
NO.5
inverter compressor Fixed frequency
compressor 2
28HP、30HP、32HP
NO.1
NO.2
NO.3
inverter compressor Fixed frequency Fixed frequency
compressor 1 compressor 2
Function
NO.4
NO.5
NO.6
inverter compressor Fixed frequency Fixed frequency
compressor 1 compressor 2
71
As for the outdoor system of three parallel modules, the compressor carry out the operation is
according to the pattern of 1-9 as show below.
i. Sum of indoor capacity requirements ≤ outdoor host capacity, then according to capacity
requirements, operate the host only.
ii. Sum of indoor capacity requirements ≥ sum of all outdoor modules capacity, then according
to the capacity requirements, start all outdoor modules
iii. Outdoor host capacity <sum of total indoor capacity requirements ≤ outdoor host capacity
+ capacity of slave unit of less runtime, then share the total indoor capacity requirements
equally among outdoor host and slave unit of less runtime by weighted.
Iv. Outdoor host capacity + capacity of salve unit of less runtime < sum of indoor unit capacity
requirements ≤sum of all outdoor modules capacity, then share the total indoor capacity
requirements equally among outdoor host and all salve unit by weighted.
34HP、36HP
Host
NO.1
High priority slave unit
NO.2
NO.4
NO.3
inverter compressor Fixed frequency
compressor
inverter compressor Fixed frenquency
compressor
Low priority slave unit
NO.5
NO.6
inverter compressor Fixed frenquency
compressor
38HP
Host
NO.1
NO.2
High priority slave unit
NO.3
inverter compressor Fixed frequency Fixed frequency
compressor 1
compressor 2
Function
NO.4
NO.5
inverter compressor Fixed frequency
compressor
Low priority slave unit
NO.6
NO.7
inverter compressor Fixed frequency
compressor
72
40HP、42HP、44HP
High priority slave unit
host
NO.1
NO.2
NO.3
inverter unit Fixed frequency Fixed frequency
compressor 1 compressor 2
NO.4
NO.5
Low priority slave unit
NO.6
NO.7
inverter unit fixed frequency Fixed frequency
compressor 1 compressor 2
NO8
inverter unit fixed frequency
compressor
46HP、48HP
host
NO.1
NO.2
High priority slave unit
NO.3
inverter compressorFixed frequency Fixed frequency
compressor 1 compressor 2
NO.4
NO.5
NO.6
inverter compressorFixed frequency Fixed frequency
compressor 1 compressor 2
Low priority slave unit
NO.7
NO.8
NO.9
inverter compressorFixed frequency Fixed frequency
compressor 1 compressor 2
2.2.4. Inverter compressor control
The operating frequency of inverter compressor is calculated by a certain formula which
according to the number of unit and the HP; then send the capacity to outdoor host and
modules, share it equally by weighted, as for specific data can be checked out in
parameters.( see the appendix two: outdoor unit of spot checking sequence list)
2.3. Outdoor electronic expansion valves control
Two 12VDC and 4-poles of electronic expansion valves are in the control of outdoor controller.
the biggest opening is 480P, the smallest opening is 0P.
A. Cooling mode
Before the system starting, both outdoor electronic expansion valves of opening are 350P,
after the inverter compressor starting, both electronic expansion valve of opening are
480P,After modules shutdown, the module electronic expansion valves of opening is closed to
0P.When the system is shutdown, all outdoor electronic expansion valves of opening are 350P
Function
73
B. Heating
Before the system starting, both outdoor electronic expansion valve of opening are 350P.
After the compressor operating, check each compressor of exhaust temperature, and according
to the compressor exhaust temperature to regulate with a certain calculation method, After
shutdown, the modular electronic expansion valves of opening is closed to zero,When the
system is shutdown, all outdoor electronic expansion valve of opening is 350P
2.4 Outdoor condensate fan control
CMV - [V] DC inverter module multi-unit of outdoor condensate fan using inverter fan, the
highest fan speed control can be achieved to seven- gear, precisely control the system heat
exchange, so that the system can be operated best in any different conditions.
CMV - [V] DC inverter module multi-unit control is operated by pressure. According to system of
suction pressure to regulate outdoor fan’s speed, thus to achieve the purpose of precisely
control system pressure, That make system running in the best working condition
2.5. Electronic Expansion Valve Control
Two 12VDC and 4-poles of electronic expansion valves are in the control of outdoor controller.
the biggest opening is 480P, the smallest opening is 0P.
A. Cooling mode
Before the system starting, both outdoor electronic expansion valves of opening are 350P, after
the inverter compressor starting, both electronic expansion valve of opening are 480P,After
modules shutdown, the module electronic expansion valves of opening is closed to 0P.
When the system is shutdown, all outdoor electronic expansion valves of opening are 350P
B. Heating
Before the system starting, both outdoor electronic expansion valve of opening are 350P.
After the compressor operating, check each compressor of exhaust temperature, and according
to the compressor exhaust temperature to regulate with a certain calculation method, After
shutdown, the modular electronic expansion valves of opening is closed to zero, When the
system is shutdown, all outdoor electronic expansion valve of opening is 350P
2.6. Cooling Operation Fan Control
CMV - [V] DC inverter module multi-unit of outdoor condensate fan using inverter fan, the
highest fan speed control can be achieved to seven- gear, precisely control the system heat
exchange, so that the system can be operated best in any different conditions.
CMV - [V] DC inverter module multi-unit control is operated by pressure. According to system of
suction pressure to regulate outdoor fan’s speed, thus to achieve the purpose of precisely control system
pressure, That make system running in the best working condition
Function
74
3. Special Control
3.1 Oil Return Operation
CMV - [V] DC inverter module multi-unit with it’s feature of long pipe and with multi-indoor unit,
in order to ensure the normal operation, it has been set a oil return program, so that system
could promptly recovery the dispersive oil to outdoor unit, thus to ensure normal operation of
compressor.
When the system executing oil return program, outdoor 3-digital tube displaying “d0” to prompt
user.
3.1.1 Oil Return Operation in Cooling Operation
The oil recovery control is a fixed program in cooling mode, start the oil recovery control after
system operating for 4 hours, the oil recovering time for 3 min.
Oil return in cooling mode, operation of indoor unit: all indoor electronic expansion valve of
largest opening is 480, indoor fan speed keep the original values unchanged. Operation of
outdoor unit: all outdoor module electronic expansion valve of largest opening is 480P, and
stating fixed frequency compressor to return oil. .( see the diagram as below: oil return control
when
cooling)
Heating start up
Heating start up
OFF
High temperature and pressure gas
Filter
Filter
Electronic expansion valve
480P
Filter
low temp and pressure
Electronic expansion valve
480P
Electronic expansion valve
480P
Filter
Filter
inner fan
OFF(anti-cold air)
High-temperature and pressure liquid
Filter
inner fan
do not operate
inner fan
OFF(anti-cold air)
Outdoor
environment
temperature
sensor
inverter
compressor
filter
high pressure ball valve
filter
high
pressure
liquid
storage
tank
gas-oil
seperator
Outdoor
condenser
temperature
sensor
filter
fixed
compressor
Outdoor condenser
filter
low pressure ball valve
filter
Air balance ball valve
Oil balancing stop valve
Function
75
3.1.2 Oil Return Operation in Heating Operation
Oil recovery procedures is a fixed programs i n heating mode, system start oil recovery
procedures after 2 hours of heating, operation of oil recovery control is 3 min.
When carrying out the oil return in heating mode, the operation of indoor unit: all indoor
electronic expansion valve of largest opening is 480P, the indoor fan speed is controlled by the
operation of anti-cold air. Outdoor unit: all outdoor electronic expansion valve of largest opening
is 480P. start fixed frequency compressor to return oil.( see the diagram as below: oil return
control when heating)
Heating start up
Heating start up
OFF
Hightemperatureandpressuregas
Filter
Filter
Electronicexpansionvalve
480P
Filter
Electronicexpansionvalve
480P
Electronicexpansionvalve
480P
Filter
lowtempand pressure
Filter
Filter
inner fan
OFF(anti-cold air)
High-temperatureandpressureliquid
inner fan
do not operate
inner fan
OFF(anti-cold air)
Outdoor
environment
temperature
sensor
inverter
compressor
filter
highpressureball valve
filter
high
pressure
liquid
storage
tank
gas-oil
seperator
Outdoor
condenser
temperature
sensor
filter
fixed
compressor
Outdoorcondenser
filter
lowpressureball valve
filter
Airbalanceballvalve
Oil balancingstopvalve
Function
76
3.2 Defrosting Operation
In order to apply in various of frosting environment, the CMV - [V] DC inverter module
multi-unit has beet set the function of automatic defrosting, system may operating parameters
according to the environment, get into defrosting condition to adjust the operating states to
achieve timely defrosting.
When defrosting, each functional component control of system is as follows:
Compressor: full open,
Outdoor fan: stop running
Outdoor electronic expansion valves, keep the original opening and do not adjust,
Indoor fan: control by the operation of anti-cold air
Indoor electronic expansion valves: the largest opening is 480 step,
When defrosting, each functional component of system and refrigerant flow diagram as show
below
Heating start up
Heating start up
OFF
Hightemperatureandpressuregas
Filter
Filter
Electronicexpansionvalve
480P
Filter
lowtempand pressure
Electronicexpansionvalve
480P
Electronicexpansionvalve
480P
Filter
Filter
inner fan
OFF(anti-cold air)
High-temperatureandpressureliquid
Filter
inner fan
do not operate
inner fan
OFF(anti-cold air)
Outdoor
environment
temperature
sensor
inverter
compressor
filter
highpressureball valve
filter
high
pressure
liquid
storage
tank
gas-oil
seperator
Outdoor
condenser
temperature
sensor
filter
fixed
compressor
Outdoor condenser
filter
lowpressureball valve
filter
Air balanceball valve
Oil balancingstopvalve
Function
77
4. Protection Control
The operation condition of CMV - [V] DC inverter module multi-unit is complex, in actual use,
Not only the piping length is different, also the service environment、capacity、quantity and fall
of indoor unit is different as well. Outdoor system capacity with free match from the 8HP to
48HP. In order to apply to various working and installation environment, the system has been
set many of the protection control to ensure the system always running in safety condition, as
for specific, please refer to the protection control as below.
4.1 High Pressure Protection Control
The function of setting a high pressure protection control is to protect the compressor parts
from damage when system running in high pressure.
CMV - [V] DC inverter module multi-unit of high pressure protection control as follows
A. Check system high pressure with high pressure sensor.
B. When pressure is higher than set value, The system will automatically lower output
capacity until the pressure is lower than set value
C. When high pressure value reaches to a certain value, the compressor will stop operating in
order to protect compressor from damage caused by high pressure.
D. When high pressure switch is tripping off, the compressor will stop operating in order to
protect compressor from damage caused by high pressure.
4.2 Low Pressure Protection Control
CMV - [V] DC inverter module multi-unit has been set a low pressure protection control to
protect system from low pressure when operating which caused by refrigerant leaking etc.
Low-pressure protection control as follows:
A. Checking system low pressure with low pressure sensor.
B. When low pressure is lower than set value, the system will reduce compressor output to
maintain the low pressure
C. When low pressure is lower than a certain value, the compressor will stop operating to
protect the compressor from damaged.
D. When low pressure switch is tripping off, the compressor will stop running to protect the
compressor from damaged
4.3 Discharge Pipe Protection Control
In order to protect compressor from damaged which caused by the system refrigerant leaking,
that may lead to high exhausted temperature, so, the compressor exhaust temperature
protection control has been set to CMV - [V] DC inverter module multi-unit.
The exhaust temperature protection as follows:
A. Check every exhausted temp with exhaust temperature sensor.
Function
78
B. When exhausted temperature reaches to a set value, the system will reduce compressor
output in order to prevent exhaust temperature rising or compressor be damaged, when the
exhaust temperature continues to rise, the system will start liquid bypass to carry out the forced
cooling to compressor to protect it.
C. When the exhaust temperature reaches to a certain value, the compressor will stop to work
in order to protect compressor from damaged which caused by high temperature.
4.4 STD Compressor Overload Protection
Each compressor has been set a over-current protection value, and carry out the detection to each
compressor of running current, once the running current exceeds the protection value, then system will
immediately close compressor to ensure that it is not burned, The current protection values is related to
compressor。
5. Other Control
5.1 Outdoor unit operating time control
For maximum possible of using outdoor unit to extend the system service life, The operating
time control has been set to outdoor unit to ensure that the same operating time among each
outdoor unit.
Indoor unit of operating control as follows:
The system will automatically record the total running time of each module, whenever stating
system, the startup sequence will be put in chronological order: namely preferentially start the
module of less running time.
5.2. Demand Operation
Forced cooling control
For convenience of maintenance, debugging and refilling refrigerant etc operation, the forced
cooling button has been set to system..
Forced cooling function as follows
A. Outdoor unit has been set a forced cooling button, if press the forced cooling button for 5S
under the standby mode(running state is invalid), then the system will send the forced cooling
signal to all indoor unit to force it operating by cooling mode; all indoor units EXV of opening for
300P, indoor fan is operating by high speed.
B. In the forced cooling mode, push the forced cooling button again, the system exit compulsory
cooling operation, and shutdown according to the normal procedure.
C. In the forced cooling conditions, if there is no any operation ; then the system will
automatically exit forced cooling after an hour and shutdown.
Function
79
Part 5
Test Operation
1. Test Operation...............................................................................................81
1.1. Procedure and Outline............................................................................81
2. Outdoor Unit PC Board Layout.........................................................................82
3. Field Setting...............................................................................84
3.1 Field Setting from Remote Controller........................................................84
3.2 Field Setting from Outdoor Unit.................................................................88
Test Operation
80
1. Test Operation
1.1. Procedure and Outline
The system test run CMV-[V] DC inverter module multi-line test run, the basis having two
modes of cooling and heating test run, and must choose a combination of several typical test,
specifically:
a、all terminal equipment must be up and running;
b、the system's most distant end of the device a separate test run;
c、the system minimum operating capacity of the terminal equipment alone;
d、selected 2-3 center combination free commissioning;
Note: The running time for each test less than 2 hours, and fill out the commissioning record
sheets; such as by the combination of tests, the indicators have reached HVAC Specifications
(GB50243-97) in the request, to determine the commissioning qualified to acceptance;
Test Operation
81
2. Outdoor Unit PC Board Layout
8HP、10HP outdoor unit control
PTC
Capacitor
Three-phase
converter
Single-phase
converter
Ac contactor
Compressor
driven
module
Lightning
plate
AC capacitor
Driven plate
The
driver
Filter
(up
and down)
fan
Transformer
Electric
control board
terminal for
communicati
ng
with
indoor
Standard
compressor
contactor
Power
terminal
terminal
for
communicating
with outdoor
Test Operation
Reactor, outdoor fan
and terminals, etc
82
12HP、14HP、16HP outdoor unit electric control
Note:The outdoor electric control system of 12HP、14HP、16HP are same with 8HP、10HP,
only the fan driven system is different, as show below:
Note:12Hp only with one frequency compressor contactor。14HP、16HP with two,From left
to right,the contactor of frequency compressor F1 and F2 is putted in proper order..
PTC
Capacitor
Three-phase
converter
Single-phase
converter
contactor
Capacitor
Compressor
driven
module
Lightning
plate
Fan driver
Driven plate
Filter(only)
Fan
capacitance
Transformer
Electric control
board
Standard
compressor
contactor
Terminal
for
communicating
with indoor
Reactor
terminals
Terminal
for
communicating
with outdoor
Power terminal
Test Operation
83
3. Field Setting
3.1 Field Setting from Remote Controller
Test Operation
84
Test Operation
85
Low ESP duct, middle ESP duct, high ESP duct
Test Operation
86
Test Operation
87
3.2 Field Setting from Outdoor Unit
3.2.1 Outdoor units address setting
As for DC Inverter VRF system, the maximum amount of the outdoor units running in parallel
is three and it needs to set the correct address of outdoor units.
The address dialing switch with two numbers of outdoor units is located on the main electric
control board of outdoor units , the position is referred to Fig
Three-digit
digital display
Forced cooling
button
Check
button
Main chip
Capacity setting
dialing knob of
outdoor unit
Defrosting
parameter
setting dialing switch of
outdoor unit
Address setting dialing
switch of outdoor unit
Amount setting dialing
switch of outdoor unit
Fig: Import parts position sketch map of outdoor units
Outdoor address dialing switch adopts the up/down dialing type dialing switch with two numbers.
0 means the dialing switch at the position below and 1 means the dialing switch at the upper
position; Combining 0 and 1 can make four states, the detail can refer to the following table:
Test Operation
88
Table: Outdoor address dialing position
3.2.2 Outdoor units number of modules setting
As for Super Direct Current Converting Module Unit, several outdoor units can run at the same
time in parallel. However, the amount of those machines running in parallel should be set before
running, otherwise, the system will break down. The electronic controller of each outdoor unit has
an outdoor module amount switch (the position can refer to the following drawing), which adopts
the up/down dialing switch with two numbers. 0 means the dialing switch at the position below
and 1 means the dialing switch at the upper position; Combining 0 and 1 can make four states,
the detail can refer to the following table:
Table: The dialing switch position of outdoor module amount
NOTE:
a. Please set module amount for each outdoor unit in the system. Otherwise, the system will go
wrong.
b. The amount set of modules is just the amount of actual modules. Otherwise, the system will
go wrong.
c. Please dial correct codes of outdoor module amount and outdoor address. Otherwise, the
system will go wrong.
Test Operation
89
3.2.3 The connection of RS 485 Terminal Resistance:
The terminal resistance is used for getting rid of the signal reflection which will happen when
the impedance is not continuous or not matched during communicating.
At the end of the cable. Install a terminal resistance with the same characteristic impedance as
the cable to keep the impedance continuous. Since the signal is intercommunicated, it needs to
install another terminal resistance with the same spec at the other end of the cable, that is, install
one matched resistance at each end of the communication network.
As for Super DC Inverter Module Unit of our company, there are two communication networks:
a. The communication between all indoor units and outdoor main machines;
b. The communication among outdoor units;
During the project installation, it is nard to identify which is the origination or the terminal so
parallel resistance on the outdoor main board with the communication
that we join a 100
interface of the indoor unit and no need to install a matched resistance for the communication
network between indoor units and outdoor main machines.
In the communication network among outdoor units, the communication interface of each
outdoor main board locates a 100
terminal resistance, which is controlled by a short-film J5
located below the interface, refer to Fig. After installing the system, the main machine is
connected with J5(it is set before delivery) and the secondary machines are disconnected
with J5.
T5
CN43
T6
MODLE RS485
CN30
CN29
Dsp_Comm
J5
CPU
LED3
ON
ON
ON
456
901
78
EXV2 CN36
23
1 2 1 2 1 2 SW1
SW4 SW2 SW3
A Adderess Type Prower
SV3
CN31
SV4
CN27
4
EXV1 CN35
CONTORL
SV5
CN26
5
4-WAY
CN25
6
HEATER1
CN5
HEATER2
CN37
7
Fig: J5 jumper position sketch map
NOTE: It is no need to pull out J5 jumper of the main machine. As for J5 jumper of secondary
machines, pull out them and then insert them into one jumper for next using.
Test Operation
90
Part 6
Troubleshooting
1. Faults display.....................................................................................................92
2. Troubleshooting................................................................................................99
2.1. Outdoor unit ....................................................................................99
2.2. Indoor unit.......................................................................................118
Troubleshooting
91
1. Faults display
Number
Codes
Faults
Protection codes and Faults codes of Inverter compressor
1
E01
Inverter module goes wrong (fault).
2
P01
The A.C input of Inverter compressor is so large that the compressor
breaks down.
5
P02
The exhaust temperature of Inverter compressor is too high.
6
P03
The exhaust temperature sensor of Inverter compressor is wrong.
7
E02
The D.C generatrix sampling voltage of outdoor unit is abnormal (fault).
8
E03
Communication between outdoor main CMOS chip and Inverter driven
CMOS chip goes wrong.
System Protection codes an d Faults codes
9
P04
The high pressure (exhaust pressure) switch breaks.
10
P05
The low pressure (suction pressure) switch breaks.
11
P06
Protection for the system exhaust pressure is too high.
12
P07
Protection for the system suction pressure is too low.
13
P08
At capacity reduced protection state for too low suction pressure.
14
P09
At capacity reduced protection state for too high exhaust pressure.
15
P10
At capacity reduced protection state for too high exhaust temperature.
16
P11
The exhaust pressure sensor goes wrong.
17
P12
The suction pressure sensor goes wrong.
18
E04
Lack of Freon or the reversing valve goes wrong.
19
P13
The condensing temperature is too high in cooling mode.
20
P14
The condenser temperature sensor is wrong.
21
P15
The outdoor ambient temperature sensor is wrong.
22
P16
At protection state for too low voltage of A.C.
23
E05
The three-phase A.C power is lack of phase or the phase sequence is
wrong.
24
P17
The communicating circuitry among outdoor units goes wrong.
25
E06
The addresses of outdoor units clash.
26
E07
The addresses of outdoor units are wrong.
27
E08
The communication among the main machine and all indoor units go wrong.
Troubleshooting
92
28
E09
Module capacity dial code goes wrong.
29
E10
Module amount dial code goes wrong.
30
E11
The fault for the module amount is reduced.
31
E12
The fault for the module amount is increased.
32
E13
The driven of module condensing fan goes wrong.
33
E14
The compressor operating is not kept in balance
Protection codes and Faults codes of Fixed-frequency compressor
34
P18
The current input of #1 Fixed-frequency compressor is so large that the
compressor breaks down.
35
P19
The exhaust temperature of #1 Fixed-frequency compressor is too high.
36
P20
The exhaust temperature sensor of #1 Fixed-frequency compressor is
wrong.
37
P21
The current input of #2 Fixed-frequency compressor is so large that the
compressor breaks down.
38
P22
The exhaust temperature of #2 Fixed-frequency compressor is too high.
39
P23
The exhaust temperature sensor of #2 Fixed-frequency compressor is
wrong.
40
P24
Protection for the ambient temperature of the outdoor unit too low.
DC Inverter Module Unit adopts intelligent control, which can detect every
parameter and the working condition of each functional part and once functional parts
go wrong, the system will give the clue to user to deal with the fault in time in several
ways and carry on some protection actions itself.
When the unit goes wrong, there are several ways to warn of user:
a. Three-bit digital display tube on the outdoor main electric control board indicates
faults and protections with special characters;
b. Indicating lamps on the lamp board of indoor units flash in special order;
c. The operation panel of indoor units indicates faults and protections with special
characters;
Troubleshooting
93
Now we will introduce them separately:
A. Three-bit digital display tube on the outdoor main electric control board indicates
faults and protections with special characters:
The drawing of outdoor digital display tube is as follows:
three-bit digital
display tube
Fig 1: The drawing of outdoor digital display tube
When the system goes wrong or enters to the protection state, three-bit digital
display tube on the outdoor main electric control board indicates faults and
protections with special characters and the table below will list all codes and their
meanings:
Table 1: Outdoor protection codes and fault codes table
NOTE: For a normal case, the three-bit digital display tube will indicate the amount of indoor units
connected to the system before operating and the code display begins with “h” letter, for example,
“h05” means that there are 5 sets of indoor units connected to the system. When the compressor
begins to run, however, the three-bit digital display tube will indicate the current operating
frequency of the inverter compressor and the code display begins with “F” letter, for example,
“F62” means that the current operating frequency of the inverter compressor is 62Hz. Once the
system goes wrong, the three-bit digital display tube will indicate the protection code or fault code
and the code display begins with” E” or “P” letter; If there are several protections or faults, it will
indicate those codes circularly and if the system are operating, the current operating frequency
will be indicated.
Troubleshooting
94
B.
Indicating lamps on the lamp board of indoor units flash in special order
(especially for ceiling cassette type indoor unit):
The conventional diagram of the lamp board is as follows:
Fig 2: The conventional diagram of the lamp board
Indicating lamps on the lamp board:
It includes: Power lamp, run lamp, timer lamp, protection lamp, receiving window
and emergency button. The details are as follows:
(1) Power lamp: Red, it will lighten when the air conditioner is supplied with the
power;
(2) Run lamp: Green, it will lighten when the air conditioner runs and be off when
the air conditioner stops;
(3) Timer lamp: Yellow, it will lighten when the air conditioner enters to the timing
state;
(4) Protection lamp: Red, it will lighten when the air conditioner enters to the
protection state;
(5) Emergency button:
It will display the power of indoor unit in horsepower.
As for DC Inverter VRF system, if the system goes wrong or enters to the
protection state during operating, indicating lamps on the lamp board of indoor units
flash in special order and the table below will list flashing ways and their meanings:
Table 2: Indicating codes table of the indoor lamp board
Troubleshooting
95
Remark 1: Flashing ways above are: It keeps flash for one second every other second lashes N
times continually with 5 seconds idle.
Remark 2: “Outdoor units with fault” cue means that outdoor units are operating with the fault, that
is, when the outdoor sensor goes wrong or the module is shielded, outdoor units are kept
operating; However, “ Outdoor unit fault” means that outdoor units go wrong and the system is
shut down. Besides, the indoor unit will not display the corresponding code when outdoor units
enter to the protection state.
Troubleshooting
96
C. The wired controller of door units indicates faults and protections with special
characters (especially for duct type and floor & ceiling type indoor unit):
When the system goes wrong or enters to the protection state or other
operating states, LCD of the wired controller will display the corresponding code and
give an alarm and the code display table is as follows:
Table 3: Code display Table
Troubleshooting
97
D. The operation panel of indoor units indicates faults and protections with
special characters (especially for wall-mounted unit):
When the system goes wrong or enters to the protection state or other operating
states, LED of the display will shows the corresponding code and give an alarm and
the code display table is as follows:
Operation information
LED codes
Instruction
“Defrost” cue
Flash once
The running lamp flashing
when start
“Anti cold air” cue
Flash twice
The running lamp flashing
when start
“Non-priority” cue
Flash three times
The running lamp flashing
and the unit is shut down.
“Outdoor units with fault” cue
Flash four times
The running lamp flashing
all the time
Fault information
LED codes
Instruction
Communication fault with outdoor unit
E0
It just displays at shutting
down.
Room temp. sensor fault
E2
It just displays at shutting
down.
The middle of indoor coil temp. sensor is
fault (T2)
E3
It just displays at shutting
down.
Indoor coil frosting protection
E4
It just displays at shutting
down.
The outlet of indoor coil temp. sensor is
fault (T2B)
E5
It just displays at shutting
down.
Indoor fan motor fault (only when the
motor is PG motor)
E6
It just displays at shutting
down.
Water pump fault
E7
It just displays at shutting
down.
Outdoor ambient temp.(T4) too low
E8
It just displays at shutting
down.
Outdoor unit fault
E9
It just displays at shutting
down.
Zero passage protection
EA
It just displays at shutting
down.
EPROOM fault
EB
Power on 20s and display
High temp. protection of the middle of
indoor coil (T2) in heating mode
EC
It just displays at shutting
down.
Troubleshooting
98
2. Troubleshooting
The followings will give an introduction for protection and faults codes separately
and then explain how to deal with them.
2.1. Outdoor unit:
1) E01: Inverter module fault
Cause: During operating, when Inverter module goes wrong result from the external
electromagnetism interruption or the poor power or the fault itself, E01 will be
indicated on the outdoor electronic control board.
Troubleshooting: Please carry on maintaining following the flow below:
Troubleshooting
99
2) E02: DC generatrix sampling voltage is abnormal
Causes:
When three-phase voltage input of outdoor units is too high or too low or when
the three-phase power is lack of phase, it will cause DC generatrix sampling voltage
abnormal and the system electric control will display E02.
Troubleshooting: please check the power.
3) E03: Communication fault between the outdoor main chip and inverter
drive chip
Causes:
The following factors cause the communication fault and the system electric
control will display E03: such as, the electric control board faults, the driving board
fault, the communication wire open circuit, strong electromagnetism interruption, and
so on.
Troubleshooting:
Please carry on maintaining following the flow below:
Troubleshooting
100
4) E04: Lack of refrigerant
Causes:
When the high-pressure pressure is less than 0.35MPa for the system at off
state or the system trips four times within 45 minutes for low pressure, the system
electric control will display E04:
Troubleshooting:
Please carry on maintaining following the flow below:
E04: Lack of refrigerant
Troubleshooting
101
5) E05: Three-phase AC power is lack of phase or the sequence is wrong
Causes:
When three-phase AC power is lack of phase or the sequence is wrong, the
system electric control will display E05:
Troubleshooting:
Please carry on maintaining following the flow below:
Troubleshooting
102
6) E07: Addresses of outdoor units are wrong
Causes:
When the address of outdoor unit is dialed to the wrong position, the system
electric control will display E07:
Troubleshooting:
Please carry on maintaining following the flow below
NOTE: In System Installation section, it give a detailed instruction for how to dial the address.
Instruction for dialing outdoor address: The dialing address of main machine is 00 and that of #1
Secondary unit and #2 Secondary units are 01 and 10 separately, otherwise it means the dialing
address is wrong and the system will display E07.
Troubleshooting
103
7) E08: Communication fault between outdoor units and indoor units
Causes:
When the communication wires between outdoor units and indoor units are
connected wrong or some wires are not connected well, it will lead the
communication between them go wrong and the system electric control will display
E08:
Troubleshooting:
Please carry on maintaining following the flow below:
Troubleshooting
104
8) E09: Module capacity dialing goes wrong
Causes:
When module capacity dialing goes wrong and the system electric control will
display E09. Besides, the capacity dialing has been set before delivery and it cannot
be modified at will, otherwise it will cause a bad incident.
Troubleshooting:
When E09 is indicated on the outdoor electric control board, please consult with
the salesmen or the technical department of our company and then carry on
maintaining following the flow after affirming the fault:
Troubleshooting
105
9) E10: Module amount dialing goes wrong
E11: Module amount is reduced
E12: Module amount is increased
Causes:
The main machine of DC Inverter Module Unit can automatically inspect the
actual amount of operating outdoor units and the amount set of outdoor units so that
when the former is not in line with the latter, the system electric control will display the
corresponding fault codes:
Troubleshooting:
When E10, E11 or E12 is indicated on the outdoor electric control board, please
carry on maintaining following the flow below:
Troubleshooting
106
10) E13: Module condenser fan drive goes wrong
Causes:
Chigo DC Inverter VRF unit adopts AC inverter fan. When the fan goes wrong or
the overheating protection switch of the fan breaks, the system electric control will
display E13:
Troubleshooting:
Please carry on maintaining following the flow below:
Troubleshooting
107
11) P01: AC current input of Inverter compressor is so large that the
compressor breaks down
Causes: When AC current input of Inverter compressor is more than 16A result
from the large loads or other factors, the system electric control will display P1 and
stop the compressor:
Troubleshooting: Please carry on maintaining following the flow below:
Troubleshooting
108
12) P02: The exhaust temperature of Inverter compressor is too high
P19: The exhaust temperature of #1 Fixed-frequency compressor is too high
P22: The exhaust temperature of #2 Fixed-frequency compressor is too high
Causes: When the exhaust temperature of Inverter compressor gets to 120 during
operating, the system will clue to the compressor entering to the protection from the
exhaust temperature too high and the system electric control will display the
corresponding protection code:
Troubleshooting:
When the compressor enters to the protection from the exhaust temperature too
high, please carry on maintaining following the flow below:
Troubleshooting
109
13) P03: The exhaust temperature sensor of Inverter compressor goes
wrong
P14: The condensing temperature sensor goes wrong
P15: The sensor of outdoor ambient temperature goes wrong
P20: The exhaust temperature of #1 Fixed-frequency compressor goes
wrong
P23: The exhaust temperature of #2 Fixed-frequency compressor goes
wrong
Causes:
When the temperature sensor or the main board goes wrong, the outdoor
system will clue to the corresponding temperature sensor fault.
Troubleshooting:
Please carry on the flow below:
Troubleshooting
110
14) P04: High-pressure switch (exhaust pressure switch) breaks
P05: Low-pressure switch (suction pressure switch) breaks
P06: Protection from the system exhaust pressure too high (pressure sensor)
P07: Protection from the system suction pressure too low (pressure sensor)
Causes: When the system pressure is too high or too low, the pressure components
go wrong or connectors on the electric control board are not contacted well, the
system electric control will display the corresponding fault codes.
Troubleshooting:
When P04, P05, P06 or P07 is indicated on the outdoor electric control board,
please carry on maintaining following the flow below:
Troubleshooting
111
15) P08: At capacity reduced protection state for too low suction pressure
P09: At capacity reduced protection state for too high exhaust pressure
P10: At capacity reduced protection state for too high exhaust
temperature
DC Inverter VRF system can control and adjust the operation by itself to make sure
the system running in the best state and avoid of the danger according to the ambient
condition and use condition for user. When those codes are displayed, that means
that the system is at adjustment state and if those faults cause the system out of work,
please check whether the refrigerant system is normal.
16) P11: The exhaust pressure sensor goes wrong
P12: The suction pressure sensor goes wrong
Causes:
When the pressure sensor is damaged or connectors on the main board are
loose, the system will clue to the corresponding pressure sensor fault.
Troubleshooting:
When the system clues to the corresponding pressure sensor fault, please carry
on maintaining the sensor by following the flow below:
Troubleshooting
112
17) P13: The condensing temperature is too high in cooling mode
Causes:
When the condensing humidity surpasses 62℃, the system will clue to the
condensing temperature too high.
Troubleshooting:
When the system displays P13, please carry on maintaining by following the flow
below:
Troubleshooting
113
18) P16: At protection state for too low or too high AC voltage input
Causes:
When the external AC voltage input is lower than 190V or higher than 270V (the
normal voltage is 220V), the system will clue to entering the protection state for too
low or too high AC voltage input
Troubleshooting:
Please carry on maintaining by following the flow below:
Troubleshooting
114
P17: Communication fault among outdoor units
Causes:
When the communication wires among outdoor units are connected wrong or
some wires are not connected well, it will lead the communication among them go
wrong and the system electric control will display P17 to clue to users.
Troubleshooting:
Please carry on maintaining following the flow below:
Troubleshooting
115
19) P18: The current input of #1 Fixed-frequency compressor is so large that
the compressor breaks down
P21: The current input of #2 Fixed-frequency compressor is so large
that the compressor breaks down
Causes:
As for DC Inverter VRF system, the electric control is kept inspecting the
operating current of the compressor, when the current surpasses the setting value,
the system electronic control will display the corresponding code and stop the
compressor. As for the setting value, it is depended on the type of compressor.
Troubleshooting:
Please carry on maintaining following the flow below:
Troubleshooting
116
20) P24: Protection from outdoor ambient temperature too low
Causes:
As for Super DC Inverter Module Unit, the electric control system is kept
inspecting the outdoor ambient temperature, when the temperature is lower than -14 ,
the electric control system will forbid the unit to run and clue the unit enters to the
protection state.
Troubleshooting:
Please carry on maintaining following the flow below:
Troubleshooting
117
2.2. Indoor unit
1) Communication fault between the unit and outdoor unit, the
troubleshooting is referred to the flow below
Troubleshooting
118
2) Room temperature sensor fault, the troubleshooting is referred to the flow
below
3) Midpoint temperature sensor fault of the pipe, the troubleshooting is referred to
the flow below
Troubleshooting
119
4) Outdoor unit fault
Troubleshooting:
When the indoor unit clue that the outdoor unit goes wrong, it will stop the
outdoor unit running and then inspect and maintain it according to the hint of the
outdoor electric control.
5) Frosting protection of the indoor evaporator
Causes: When the indoor electric control inspects that the temperature in the middle
of the evaporator keeps lower than 2 for 3 minutes, it will clue that the evaporator
begins to frost for protection and stop the indoor unit running to prevent the indoor
unit from frosting.
During frosting protection, when the coil temperature of the evaporator is no lower
than7 , the electric control will unlock the protection and restart up the indoor unit.
The troubleshooting is referred to the flow below:
Troubleshooting
120
6) Outlet temperature sensor fault of the pipe, the troubleshooting is referred to
the flow below
Troubleshooting
121
7) Indoor fan fault, the troubleshooting is referred to the flow below (it is applicable
for the case that the indoor motor is PG motor):
Troubleshooting
122
8) Protection from too high the midpoint temperature of the pipe in heating
mode
Causes:
When the indoor electric control inspects that the temperature in the middle of
the evaporator keeps no lower than 62℃ in heating mode, it will clue to entering
protection from too high the midpoint temperature of the pipe and when the coil
temperature of the evaporator is no higher than 52℃, the electric control will unlock
the protection.
The troubleshooting is referred to the flow below:
Troubleshooting
123
9) Water pump fault
Causes:
In cooling mode, when the indoor electric control inspects that the water level
switch keeps in off-position for 5 minutes, the electric control will display the fault and
shut down the unit. The unit will be restarted up after the fault is eliminated.
The troubleshooting is referred to the flow below:
Troubleshooting
124
Part 7
Indoor Electrical Wiring Diagram
1. Application unit: Low ESP, middle ESP, high ESP duct.................................126
2. Application unit: Wall-mounted......................................................................128
3. Application unit: Wall-mounted......................................................................130
4. Application unit: Floor & Ceiling......................................................................132
Indoor electrical wiring diagram
125
1. Application unit: Low ESP, middle ESP, high ESP duct
Electrical wiring diagram
Indoor electrical wiring diagram
126
Low ESP duct – electrical components layout
Middle & high ESP duct – electrical components layout
Indoor electrical wiring diagram
127
2.Application unit: Wall-mounted
2.1 Application unit: CMV-22G (V84), CMV-28G (V84) , CMV-36G(M84)
Electrical wiring diagram
Remark: 1, About the use of the "SW2” switch. The "1" key stoke must be set "ON" station, the "2"
key stoke must be set "OFF" station
Indoor electrical wiring diagram
128
2.2 Application unit: CMV-45G (P84), CMV-51G(P84), CMV-70G(W84)
Electrical wiring diagram
Remark: About the use of the "SW2” switch
The "1" key stoke must be set "ON" station
The "2" key stoke must be set "OFF" station
Indoor electrical wiring diagram
129
3.Application unit: Wall-mounted
3.1. Application unit: CMV-22Q, CMV-28Q, CMV-36Q, CMV-45Q, CMV-56Q
Electrical wiring diagram
Indoor electrical wiring diagram
130
3.2. Application unit: CMV-71Q, CMV-80Q, CMV-100Q, CMV-112Q, CMV-125Q,
Electrical wiring diagram
Indoor electrical wiring diagram
131
CMV-140Q
4.Application unit: Floor & Ceiling
Electrical wiring diagram
Indoor electrical wiring diagram
132