1
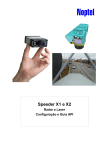
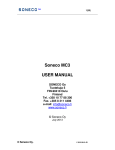
™
Soneco SCS
User Guide
1
™
Published July 2007
Copyright © 2006 Soneco Oy Ltd
Soneco Oy (Ltd.) Teknologiantie 14 A, FI-90570 Oulu, FINLAND.
Soneco SCS is registered trademarks of Soneco Oy Ltd, ®.
This document is intended for devices produced by Soneco Oy Ltd, under production
at the moment of writing this document.
Product support is available straight from the producer by email [email protected] or
by phone +358 10 7788 300, and from authorised retailers in different countries.
It is prohibited to use, copy, modify, reproduce or distribute this document, any part
of it or its accompanying documentation, for any purpose, in any form, by any means
(electronic, photocopy, photography, recording or other) without prior written permission from Soneco Oy Ltd.
Every possible effort has been made to ensure the validity of this document. It represents the current view (as of the publishing date) on the functions and properties of
the products mentioned in the document. Soneco Oy Ltd does not give any warranties
with respect to the accuracy or completeness of this document or its accompanying
documents.
Neither Soneco Oy Ltd nor the authors who have participated in the making of this
document shall be liable for any direct or indirect damages to humans, machinery,
materials, products, production losses, profit losses, business interruptions or any other commercial damages that may result from using the products mentioned according
to this document, including but not limited to special, incidental, consequential, or
other damages.
All rights reserved © Soneco Oy (Ltd.), 2006.
2
™
QUICK GUIDE SCS
Microphone Function button Speaker
A picture of the device, function button, indicator lights, microphone, speaker, charger
connector (on the side of the device)
−
−
−
−
−
Press the function button.
The SMS is sent and Call connected straight to the same pre-programmed number.
The second SMS is sent to the second pre-programmed number.
Press the function button again to end the call.
Press the function button to answer an incoming call.
3
™
Soneco SCS
User guide:
The purpose of this user guide is to familiarise you with the device, its
user interface and the routines you will need in daily use. It is important
to learn to use and understand the user interface and its different
indicators: the indicator lights and sound signals. The device is simple and
logical to use, provided that you have to read and understood this user
guide.
Terminology:
− Standby mode. This is the normal operating mode of the device in
which you can make and receive calls.
− Number setting mode. This is the mode in which you can set the phone
numbers to which you can make a call. Usually it is rarely needed after
the device is taken to use.
− Limited operation mode. This is the mode the device enters in case of
device failure or losing the network connection. In this mode only
emergency calls may be possible.
− Function button. The only user button of the device, which reacts in
different ways depending on how long you press the button.
− Indicator lights. The green, yellow and red indicator lights are near the
function button in a row. The lights function with the same logic as
traffic lights: green is the normal operating mode, yellow means a
function is ongoing and red indicates a possible problem. However, in
the call mode the different colours indicate the phone number to be
chosen and a connected call.
− Long press of the function button: to switch the device on and off (to
call the emergency number, press the button even longer than when
switching the device off).
− Short press of the function button: to select a phone number, to answer
and end a call.
4
™
User interface:
Microphone Function button Speaker
A picture of the device, function button, indicator lights, microphone,
speaker, charger connector (on the side of the device)
Preparation for use:
Before you can begin to use the device, you have to install your personal
SIM card without a PIN code request in the device and charge the battery.
If the normal charging does not start, make sure you follow the steps
given for pre-charging below.
Installing the SIM card:
Press the switch indicated in the picture.
The SIM card holder comes out.
Place the SIM card
on the holder and push
the holder back into the device.
5
™
Charging the battery:
To charge the battery, connect the plug of the charger to the charger
connector. The yellow indicator light burns all the time during the
charging, regardless of whether the device is switched on or not. When
the battery is full, the yellow light goes off if the device is switched on. If
the device is switched off, it does not indicate when the battery is full! The
normal charging time of an empty battery is about two hours. It is
possible to charge the battery in all function modes of the device, but the
indicator light does not show the normal indication of charging if you are
setting phone numbers or the device is starting up.
You can charge the battery every night if you like, because overcharging is
prevented. In view of the user groups, we recommend that a routine is
created for charging the battery to minimise the risk of it emptying
completely.
NOTE! If the battery becomes fully discharged, it has to be pre-charged.
The pre-charging of a fully discharged battery begins automatically when
you connect the charger to the device. The yellow indicator light blinks
about once every four seconds during pre-charging. Pre-charging takes
about one hour, after which normal charging begins. If the normal
charging does not begin after about an hour, disconnect the charger for a
while and reconnect it to the device. If normal charging still does not
begin after an hour of pre-charging, contact the place where you bought
the device or an authorised service point.
NOTE! We recommend you do not leave the device uncharged for an
extended period of time (more than 3 months), because then the charge
may drop too low and the protective mechanisms of the battery may
prevent its normal charging. If this should occur, take the device to the
nearest service point authorised by Soneco Oy Ltd.
Low battery warning:
If the battery charge drops to 20 % of full capacity, the device indicates
this by rapidly blinking the yellow indicator light five times in succession
and by giving a sound signal. This is repeated about every 45 seconds,
until the battery is charged or becomes fully discharged. In addition,
Soneco SCS sends an SMS message (“BATTERY 20 %”) to the first phone
number set in the device half an hour after the low battery warning begins,
if the charging does not begin before that. NOTE! This function may not be
available in all product versions!
6
™
Starting up the device:
Press the function button continuously to switch the device on. The yellow
indicator light turns on. The device gives a sound signal (bip) when you
press the button. Release the button when the yellow light begins to blink.
Soneco SCS then gives a sound signal (bip). If you have not set any
phone numbers in the device, it automatically enters the number setting
mode when it is switched on. The device connects to the telephone
network when you switch it on. When it has done this, the green indicator
light begins to blink about once every two seconds. At this point the sound
assisted model SCS gives a double beep (bip bip). After that the device is
in the standby mode, and you can make and receive calls. If you want to
change the phone numbers set earlier, see chapter Setting phone
numbers.
Switching off the device:
To switch off the device, press the function button continuously until all
indicator lights turn on. The lights turn off, each in turn (green, yellow,
red), and the device switches itself off. Soneco SCS gives a sound signal
(beep) when you can release the function button. The releasing is
confirmed with a series of short beeps (bip bip bip). You cannot make or
receive calls when the device is switched off. To enable calls, switch the
device on.
NOTE! Release the function button immediately after all indicator lights
have turned on when you are switching the device off. Otherwise you may
accidentally make an emergency call, see chapter Emergency calls.
Setting phone numbers:
You have to set one or several phone numbers in the device to be able to
make calls. Numbers are set by sending the desired numbers to the device
by an SMS message. You can set one, two or three phone numbers in the
device, depending on your needs.
The format of the SMS is
<<<number1;number2>>>
•
•
where
number1 is the first phone number to be selected (for sms sending
and call making)
number2 is the second number to be selected (for sms sending)
for example: <<<083114486>>>
or <<<083114486;0107788300>>>
The phone numbers can be either in the international (+358…) or
domestic (0x…) format, but always without hyphen or space, and
divided from each other by a semicolon.
7
™
If contact numbers have not been set in the device previously, it
automatically enters the number setting mode when you switch the device
on. If you want to change previously set numbers, you can enter the
number setting mode when you are switching on the device. When the
device is starting up, the yellow indicator light blinks. When the blinking
ends, the green light turns on for two seconds. When the green light is on,
press the function button once and the device enters the number setting
mode.
The green and yellow indicator light blink in turn when the device is in the
number setting mode. When the device receives an SMS message in the
correct format, the yellow indicator light turns on for a moment and the
device saves the phone numbers to the memory slots that were reserved
for them. When the phone numbers have been saved, the indicator lights
blink in turn again, which indicates that the device is in the number setting
mode. To enter the standby mode, briefly press the function button once.
If the device receives an SMS message that is not in the correct format
described above or some other error occurs, the device indicates an
incorrect message with a sound signal and the red indicator light turns on.
Then the device returns to the number setting mode.
To exit the number setting mode, press the function button once. The
device enters the standby mode. If the phone numbers have not been set
in the device yet, it gives a sound signal and the red indicator light turns
on to indicate an error. The device remains in the number setting mode. If
you do not want to set the numbers in the device, you can switch it off
(see chapter Switching off the device). In case of an emergency you
can make an emergency call (see chapter Emergency calls) or receive
phone calls. After ending the call the device returns to the number setting
mode.
NOTE! The charging indicator lights do not burn when the device is in the
number setting mode, but normal charging proceeds even while the device
is in this mode.
Phone calls:
When Soneco SCS is in the standby mode you can make phone call to
pre-programmed number and receive incoming calls. Except for
emergency call, you can make phone call only when the device is within
the coverage area of your own operator’s GSM network. The green
indicator light blinks every two seconds to indicate standby mode.
Making a call:
Press the function button briefly in the standby mode. The device sends
SMS message and then makes the phone call to the same number. In a
meanwhile it sends the SMS to the second pre-programmed number. If
the device is unable to complete the call, it returns to the standby mode.
8
™
A busy signal, for example, can be heard from the speaker if the number
is busy.
Answering a call:
Soneco SCS indicates an incoming call with a melodic ring tone and by
blinking all the three indicator lights in turn. To answer the call, briefly
press the function button. The green indicator light burns continuously
when the received call is active.
Ending a call:
Press the function button briefly to end the call. The device disconnects
the call and returns to the standby mode. If the calling party ends the call,
the device returns to the standby mode automatically.
Emergency calls:
To make an emergency call, press the function button continuously for
more than ten seconds. After eight seconds all indicator lights blink rapidly
to indicate that an emergency call is being made. At this point you can still
cancel the emergency call by releasing the function button. After you have
pressed the function button continuously for ten seconds the device makes
an emergency call to the emergency number (112). You can end the
emergency call the same way as a normal call.
NOTE! Emergency calls can be made even if you are outside your own
operator's network, as long as you are within the coverage area of some
GSM network.
Emergency calls can be made even if the device does not have SIM
card.
Limited operation mode:
If there is no SIM card installed in the device or if the installed SIM card is
faulty, the device enters so-called limited operation mode. In this mode
only emergency calls can be made if the device is within some GSM
operator’s coverage area.
If the device has entered the limited operation mode, it gives three
consecutive sound signals and the red light blinks rapidly.
The device may also enter the limited operation mode when it is outside
your operator's coverage area, for example in an elevator or in the
basement.
When the connection is restored, the device connects to the telephone
network automatically and the indicator light returns to standby blinking.
9
™
Alarms:
−
−
−
−
The device indicates an incoming call with a melodic ring tone and by
blinking all indicator lights in turn.
The device indicates a low battery by giving a sound signal and
blinking the yellow indicator light rapidly five times in succession. The
low battery alarm is repeated every 45 seconds, until you charge the
battery or it becomes completely discharged. The device blinks the
yellow and red indicator lights at the same time and shuts itself when
the battery is almost completely discharged.
If the device loses its connection to the mobile phone network, the
device gives three sound signals in rapid succession, begins to blink the
red indicator light and enters the limited operation mode. In this mode
emergency calls can still be possible, but other calls are not. When the
connection is restored, the device returns to the standby mode
automatically.
If the device uses an old, slow SIM card, it takes considerably longer
for the device to start up, and it gives three sound signals in rapid
succession and begins to blink the red indicator light. After a while the
device automatically enters the normal standby mode.
Important information:
Use only the 4300P battery charger supplied with the device to charge the
battery.
The device is not waterproof. Do not allow it to get wet. If the device does
get wet, contact the place where you bought it.
If you have a pacemaker, do not carry the device around your neck. The
recommended safety distance from the pacemaker is at least 20 cm.
Warranty:
Soneco Oy Ltd is not responsible for faults in the device caused by
incorrect or careless use or use that is contrary to this user guide, or
connection of the device to another device, or if the device has been
repaired, opened, or otherwise modified or installed incorrectly. Neither
is Soneco Oy Ltd responsible for a fault in the device caused by
inadequate mobile phone network operation or changes made to the
mobile phone network.
Warranty clause:
This warranty is valid in Finland, and it does not limit the application of
currently effective mandatory Finnish legislation, such as Consumer
Protection Act, to the purchase of the device.
10
™
Soneco Oy Ltd grants the device a twelve (12) month warranty and the
devices battery six (6) month warranty. The warranty period begins on the
day when the first user gains possession of the device.
Soneco Oy Ltd or its authorised retailer shall repair or replace a faulty
device at their own discretion.
This warranty does not cover normal wear and tear or the carrying strap
supplied with the device. Soneco Oy Ltd does not grant a warranty if the
device is used contrary to this user guide, improperly or carelessly, or if
the device is connected to another device, or if the device has been
repaired, opened, or otherwise modified or installed incorrectly. Neither is
Soneco Oy Ltd responsible for a fault in the device caused by inadequate
mobile phone network operation or changes made to the mobile phone
network.
If the user wishes to invoke the warranty granted by Soneco Oy Ltd, the
user has to present a legible receipt of purchase to Soneco Oy Ltd or the
retailer of the device. The user has to invoke the warranty regarding a
fault in the device during the warranty period within two months of the
date when the user discovered the fault or when it should have been
discovered.
Soneco Oy Ltd is not responsible for any other demands the user may
have that are not connected to this warranty, unless the mandatory
Finnish legislation dictates otherwise.
Keep the device switched off in hospitals and near health care equipment,
such as pacemakers and hearing aids. The device may interfere with the
operation of such equipment. If you have a pacemaker, do not carry the
device around your neck.
Keep the device switched off when travelling in an airplane. Make sure the
device is not switched on accidentally.
Switch the device off at gas stations, fuel or chemical storages and
blasting areas. The device may interfere with the operation of technical
equipment.
The device may cause interference near TVs, radios and computers.
11
™
Technical specifications:
Phone network: dual band GSM 900/1800 MHz
Antenna: integrated
Weight: 58 g without the carrying strap
Dimensions: 64 x 41 x 23 mm
Battery: Li-Ion 600 mAh
Standby time: > 72 hours
Speaking time: > one hour
Charging time: < 2 hours to 100 %
Operating temperature: -10 ... + 55 C (when charging, 0 ... + 45 C)
SIM card: 3,0 V
SAR: < 0,5 W/Kg
Operating voltage: 3.7 V
Patented
0523
Declaration of conformity:
Soneco Oy Ltd hereby declares that the product Soneco SCS is in compliance
with the requirements of the European Council directive 1999/5/EY.
www.soneco.fi
12