1
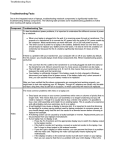
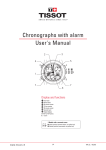
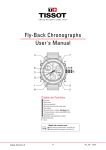
S C UDE R I A FE R R A R I
OROLOGI
OPER A TI NG I NS TR UC TI O NS
Table of Contents
STANDARD 2- AND 3-HAND MODELS
Includes SF 101watch models
STANDARD DATE DISPLAY MODELS
Includes SF 101 and SF 102 watch models
ANALOG CHRONOGRAPHS 1/1 OF A SECOND – TYPE A
with small chronograph minutes/seconds counters and 24-hour hand
Includes SF 103 and SF 107 chronograph models
ANALOG CHRONOGRAPHS 1/1 OF A SECOND – TYPE B
with small chronograph minutes/seconds counters and 24-hour hand
Includes SF 104 chronograph models
ANALOG CHRONOGRAPHS 1/5 OF A SECOND – TYPE A
with center-mounted chronograph fifths-of-a-second hand, chronograph minutes counter and small seconds/24-hour hands
Includes SF 103, SF 105 and SF 107 chronograph models
ANALOG CHRONOGRAPHS 1/5 OF A SECOND – TYPE B
with center-mounted chronograph fifths-of-a-second hand, chronograph hours/minutes counters and small seconds hand
Includes SF 102 analog chronograph models
ANALOG-DIGITAL MODELS
with chronograph and alarm functions
Includes SF 102 Ana-Digi models
STANDARD 2- AND 3-HAND MODELS
Includes SF 101watch models
1 – 2
Figure A
Legend
1, 2 - Crown positions
Crown Positions:
Position 1 - Normal position.
Crown pushed against case.
Position 2 - To set TIME:
Rotate crown in either direction.
STANDARD DATE DISPLAY MODELS
Includes SF 101 and SF 102 watch models
A
1 – 2 – 3
Figure A
Legend
1, 2, 3 - Crown positions
A – Date Display
Crown Positions:
Position 1 - Normal position. Crown pushed against case.
Position 2 - To set DATE*: Rotate crown clockwise.
NOTE: For models with DAY/DATE display(s):
Rotate crown clockwise to set DATE,
and counterclockwise to set DAY.
Position 3 - To set TIME: Rotate crown in either direction.
*CAUTION: Never set the date when the hands are between 9:00 PM
and 3:00 AM. Doing so could damage the calendar mechanism.
NOTE: The functioning of the watch is not affected during date
setting. When the watch is running, the date will change gradually
during the period from 9:00 PM to 3:00 AM.
ANALOG CHRONOGRAPHS 1/1 OF A SECOND – TYPE A
with small chronograph minutes/seconds counters and 24-hour hand
Includes SF 103 and SF 107 chronograph models
M
H
A
C
1 – 2
S
F
B
E
Figure A
Legend
Button A – Start/Stop
Button B – Reset
H – Hour Hand
M – Minute Hand
S – Normal Seconds Hand
C – Chronograph Seconds Counter
E – Chronograph Minutes Counter
F – 24-Hour Hand
These chronograph models feature a minute counter (up to 30),
seconds counter, and small 24-hour hand. They can be used to
time an event up to 29 minutes and 59 seconds in duration to
the nearest second.
To set the TIME:
1. Pull crown out to position 2; watch (normal seconds
hand S) stops.
2. Turn crown in either direction to set hour H and minute
M hands to desired time.
3. Push crown back in to position 1; watch (normal seconds
hand S) restarts.
To operate the CHRONOGRAPH:
This stopwatch is able to measure and display time in 1 second
increments up to a maximum of 29 minutes/59 seconds. It will
stop automatically after running continuously for 30 minutes.
Simple chronograph functions:
1. Press button A to start chronograph.
2. Press button A a second time to stop chronograph.
3. Press button B to reset chronograph to zero.
Accumulated time functions:
To measure the combined time of a series of shorter events:
1. Press button A to start chronograph.
2. Press button A a second time to stop chronograph and
read elapsed time.
3. Press button A again to resume measurement.
4. Press button A a fourth time to stop chronograph again, and
read new elapsed time.
NOTE: Each time you stop chronograph, chronograph hands will
indicate total accumulated time.
5. Repeat steps 1 and 2 to add each additional interval of time.
6. After you have taken your final accumulated time reading,
press button B to reset chronograph hands to zero.
NOTE: Buttons A and B do not function (as start/stop, reset) during
synchronization/resetting of chronograph hands.
To RESET Chronograph Hands:
After changing the battery, or in the event of an error, the
chronograph hands can be re-aligned to zero if necessary:
1. Pull crown out to position 2.
2. Press Button A to set chronograph seconds hand C to zero;
press and hold Button A to advance hand C rapidly.
NOTE: Chronograph minute hand E is synchronized automatically
with chronograph seconds hand C.
3. Once Chronograph hands C and E have been reset to zero
position, reset the time and push crown back into position 1.
ANALOG CHRONOGRAPHS 1/1 OF A SECOND – TYPE B
with small chronograph minutes/seconds counters and 24-hour hand
Includes SF 104 chronograph models
M
H
A
E
F
1–2
B
S
C
Figure A
Legend
Button A – Start/Stop
Button B – Reset
H – Hour Hand
M – Minute Hand
S – Normal Seconds Hand
C – Chronograph Seconds Counter
E – Chronograph Minutes Counter
F – 24-Hour Hand
These chronograph models feature a minute counter (up to 60),
seconds counter, and small 24-hour hand. They can be used to
time an event up to 59 minutes and 59 seconds in duration to the
nearest second.
To set the TIME:
NOTE: Before setting the time, make sure chronograph measurement
is stopped and both chronograph hands have been returned to zero
position at 12 o’clock.
1. The instant Seconds hand S reaches 12 o’clock position,
pull crown out to position 2; watch stops.
NOTE: Do not press button A or B, otherwise chronograph hands
will move.
2. Turn crown in either direction to set Hour H, Minute M and
24-Hour F hands to desired time.
NOTE: 24-hour hand F will move in sync with Hour hand H, so when
setting the hour, make sure 24-hour time is set properly.
3. Take an accurate time signal (from a radio news station, for
example). When the audible tone signals the exact time, push crown
back in to position 1; watch will restart, now set to the exact time.
To RESET Chronograph Hands:
Before setting the time or running the stopwatch, make sure
chronograph counter hands C and E are in the zero position at
12 o’clock. Follow these steps as needed to reset the counter hands
following a battery change or in the event of an error:
1. Pull crown out to position 2.
2. Press Button A to set Chronograph Seconds hand C to zero;
to advance hand C rapidly, press and hold Button A.
NOTE: Chronograph Minute hand E is synchronized automatically
with Chronograph Seconds hand C.
3. Once Chronograph hands C and E have been reset to zero
position, reset the time and push crown back into position 1.
Operating the CHRONOGRAPH
This stopwatch is able to measure and display time in 1 second
increments up to a maximum of 59 minutes/59 seconds. It will
stop automatically after running continuously for 60 minutes.
Measured time is indicated by Chronograph Minute M and
Seconds C hands which move independently of the center-mounted
and 24-hour watch hands.
Simple chronograph functions:
1. Press button A to start chronograph.
2. Press button A a second time to stop chronograph.
3. Press button B to reset chronograph to zero.
Accumulated time functions:
To measure the combined time of a series of shorter events, for
example the actual playing time of a football game, where play is
repeatedly interrupted:
1. Press button A to start chronograph.
2. Press button A a second time to stop chronograph and read
elapsed time.
3. Press button A again to resume measurement.
4. Press button A a fourth time to stop chronograph again, and
read new elapsed time.
NOTE: Each time you stop chronograph, chronograph hands will
indicate total accumulated time.
5. Repeat steps 1 and 2 to add each additional interval of time.
6. After you have taken your final accumulated time reading,
press button B to reset chronograph hands to zero.
Split-time or intermediate-time functions:
To take intermediate time readings as a race progresses:
1. Press button A to start chronograph.
2. Press button B to momentarily stop chronograph and read
the intermediate time.
3. Press button B to resume chronograph function; the
2 chronograph hands will quickly catch up with ongoing event.
Repeat steps 2 and 3 as many times as needed to take additional
split times.
4. Press button A to stop chronograph, and take a reading of
the final time.
5. Press button B to reset chronograph hands to zero.
ANALOG CHRONOGRAPHS 1/5 OF A SECOND – TYPE A
with center-mounted chronograph fifths-of-a-second hand, chronograph minutes counter and small seconds/24-hour hands
Includes SF 103, SF 105 and SF 107 chronograph models
To operate the CHRONOGRAPH:
This chronograph is able to measure and display time in
1/5-of-a-second increments up to a maximum of 60 minutes.
It will stop automatically after reaching 60 minutes.
M
H
A
E
F
1 – 2 – 3
B
C
S
D
Figure A
Legend
Button A – Start/Stop
Button B – Reset
H – Hour Hand
M – Minute Hand
C – Chronograph 1/5 Seconds Hand
S – Small Seconds Hand
E – Chronograph Minutes Counter
F – 24-Hour Hand
D – Date Display
These chronograph models feature a center-mounted fifths-of-asecond chronograph hand, minute counter (up to 60), small seconds
and 24-hour hands, and date. They can be used to time an event up
to 60 minutes in duration to the nearest 1/5 of a second.
To set the TIME:
1. Pull crown out to position 3; watch (small seconds hand S) stops.
NOTE: If crown is pulled to position 3 while chronograph is running,
timing will continue and chronograph hands C and E will continue
to move.
2. Turn crown in either direction to set hour H and minute M hands
to desired time taking AM/PM into account.
3. Push crown back in to position 1; watch restarts.
To set the DATE:
1. Pull crown out to position 2.
2. Turn crown clockwise to set date D.
CAUTION: Do not set date D when hour and minute hands are
between 9:00 PM and 3:00 AM; doing so could damage the calendar
mechanism. If you must reset date during those hours, first move
hour and minute hands to any time outside that period, reset the
date, and then reset hands to correct time.
3. Push crown back in to position 1.
Simple chronograph functions:
1. Press button A to start chronograph; chronograph hands C and
E start moving.
2. Press button A a second time to stop chronograph; read elapsed
time indicated by hands C and E.
3. Press button B to reset chronograph hands to zero.
Accumulated time functions:
To measure the combined time of a series of shorter events, for
example the actual playing time of a football game, where play is
repeatedly interrupted:
1. Press button A to start chronograph.
2. Press button A a second time to stop chronograph and read
elapsed time.
3. Press button A again to resume measurement.
4. Press button A a fourth time to stop chronograph again, and
read new elapsed time.
NOTE: Each time you stop chronograph, chronograph hands will
indicate total accumulated elapsed time.
5. Repeat steps 1 and 2 to add each additional interval of time.
6. After you have taken your final accumulated time reading,
press button B to reset chronograph hands to zero.
To RESET Chronograph Hands:
If the chronograph hand positions are incorrect, the hands can be
realigned to zero by pressing Button A once to start the chronograph,
pressing Button A a second time to stop the chronograph, and then
pressing Button B to return both chronograph hands to zero.
ANALOG CHRONOGRAPHS 1/5 OF A SECOND – TYPE B
with center-mounted chronograph fifths-of-a-second hand, chronograph hours/minutes counters and small seconds hand
Includes SF 102 analog chronograph models
To operate the CHRONOGRAPH:
This chronograph is able to measure and display time in
1/5-of-a-second increments up to a maximum of 12 hours. It will
stop automatically after reaching 12 hours.
E
H
A
M
P
D
1 – 2 – 3
C
B
S
Figure A
Legend
Button A – Start/Stop
Button B – Reset
H – Hour Hand
M – Minute Hand
C – Chronograph 1/5 Seconds hand
P – Chronograph Hours Counter
E – Chronograph Minutes Counter
S – Small Seconds Hand
D – Date Display
These chronograph models feature a center-mounted fifths-of-asecond chronograph hand, hour counter (up to 12), minute counter
(up to 60), small seconds and 24-hour hands, and date. They can be
used to time an event up to 12 hours in duration to the nearest 1/5 of
a second.
To set the TIME:
1. Pull crown out to position 3; watch (small seconds hand S) stops.
NOTE: If crown is pulled to position 3 while chronograph is running,
timing will continue and chronograph hands C, E and P will continue
to move.
2. Turn crown in either direction to set hour H and minute M hands
to desired time taking AM/PM into account.
3. Push crown back in to position 1; watch restarts.
To set the DATE:
1. Pull crown out to position 2.
2. Turn crown clockwise to set date D.
CAUTION: Do not set date D when hour and minute hands are
between 9:00 PM and 3:00 AM; doing so could damage the calendar
mechanism. If you must reset date during those hours, first move
hour and minute hands to any time outside that period, reset the
date, and then reset hands to correct time.
3. Push crown back in to position 1.
Simple chronograph functions:
1. Press button A to start chronograph; chronograph hands C,
E and P start moving.
2. Press button A a second time to stop chronograph; read elapsed
time indicated by hands C, E and P.
3. Press button B to reset chronograph hands to zero.
Accumulated time functions:
To measure the combined time of a series of shorter events, for
example the actual playing time of a football game, where play is
repeatedly interrupted:
1. Press button A to start chronograph.
2. Press button A a second time to stop chronograph and
read elapsed time.
3. Press button A again to resume measurement.
4. Press button A a fourth time to stop chronograph again,
and read new elapsed time.
NOTE: Each time you stop chronograph, chronograph hands will
indicate total accumulated elapsed time.
5. Repeat steps 1 and 2 to add each additional interval of time.
6. After you have taken your final accumulated time reading,
press button B to reset chronograph hands to zero.
To RESET Chronograph Hands:
If the chronograph hand positions are incorrect, the hands can be
realigned to zero by pressing Button A once to start the chronograph,
pressing Button A a second time to stop the chronograph, and then
pressing Button B to return all three chronograph hands to zero.
ANALOG-DIGITAL MODELS
with chronograph and alarm functions
Includes SF 102 Ana-Digi models
E
A
C
M
H
K
G
1– 2
S
B
D
F
Figure A
Legend
Button A – EL Backlight/Reset
Button B – Mode Selection
Button C – Setting Mode
Button D – Start/Stop
To set Analog TIME:
1.Pull crown out to position 2.
2.Rotate crown in either direction until hands indicate desired time.
3.Press crown back in to position 1, flush against case.
H – Analog Hour Hand
M – Analog Minute Hand
S – Analog Seconds Hand
E – Upper Digital display – Mode/Calendar
F – Lower Digital display –Time/Setting
CHRONOGRAPH
In this Mode, watch functions like a stopwatch to measure intervals
of time.
NOTE: You can return to Real Time mode while Chronograph is
running by pressing button B.
G – Chime ON Indicator
K – Alarm ON Indicator
ß
(Button B)
Real Time
TIME SETTING
To set Digital TIME:
1.Press Button B three times to advance to TIME Setting Mode;
Seconds display will blink.
2.Press Button D to reset Seconds to 00.
3.Use Button C to advance through TIME Setting Sequence in
this order: HOUR à MINUTE à MONTH à DATE à DAY OF
WEEK à SECONDS. The active digital field in current Setting
Mode will blink.
4.Press Button D to adjust blinking number.
5.Press Button C to confirm new setting and advance to next field
in setting sequence.
6.Repeat steps 4 and 5 to complete TIME Setting sequence.
NOTES: When setting the Time, “H” is displayed for 24-hour
format, and “A” or “P” for 12-hour format.
To select 12- or 24-hour format, press and hold Button C: The
display will cycle through time formats in this sequence: “A” (AM)
time à “P” (PM) time à “H” (24H) time à “A” (AM) time.
If you press D while Seconds display reads 30 to 59, Seconds are reset
to 00 and Time is set to next Minute; if you press D while Seconds
display reads 00 to 29, Minute does not change.
To operate CHRONOGRAPH:
From Real Time Mode, press Button B once to enter
CHRONOGRAPH Mode; use Buttons C and D to operate
the Chronograph.
ß
ß
(Button B)
(Button B)
Chronograph
Alarm
Time Setting
This analog-digital model features analog Hour, Minute and Seconds
hands, and upper/lower LCD digital display with Calendar/Real Time
in 12-hour or 24-hour format, Alarm and Chronograph functions,
and EL backlight.
To select MODE:
Press Button B to cycle through the Modes in this order: REAL TIME à
CHRONOGRAPH à ALARM à TIME SETTING à REAL TIME.
To use EL Backlight: Press Button A at any time to illuminate the
dial for 3 seconds to make reading digital display possible in low light
conditions.
To measure the duration of a single, non-stop event:
1.Press Button D to start timing.
2.Press Button D a second time to stop timing; read elapsed time
in Lower digital display.
3.Press Button C to reset display to zero.
To measure the combined time of a series of shorter events:
1.Press Button D to start timing.
2.Press Button D a second time to stop timing and read elapsed
time in Lower digital display.
3.Press Button D again to resume measurement.
4.Press Button D a fourth time to stop chronograph again,
and read new elapsed time.
NOTE: Each time you stop timing, digital display will indicate total
accumulated time.
5.Repeat steps 3 and 4 to add additional intervals of time,
as needed.
6.After you have taken your final accumulated time reading,
press Button C to reset display to zero.
To take an intermediate or split-time time readings as an
event progresses:
1.Press Button D to start timing.
2.Press Button C to read intermediate or split time in Lower
digital display; Chronograph continues to keep timing event
in background.
NOTE: When split-time function is activated, the indicator “SP” will
appear in Upper digital display.
3.Press Button D to resume event timing; Lower digital display
advances to show current timing of ongoing event.
4.Repeat steps 2 and 3 to take any additional split times.
5.Press Button D to stop timing at end of event; and read final time
in Lower digital display.
6.Press Button C to reset Chronograph to zero.
DAILY ALARM
Watch may be set to sound a CHIME and/or ALARM.
To activate/deactivate ALARM:
In Real Time Mode, press button D to turn the ALARM [
]
then CHIME [
] ON or OFF. When ALARM and/or CHIME are
activated, their icon(s) will appear in the Upper digital display.
To set the ALARM:
1.Press Button B twice to enter ALARM Mode; Hours will blink.
2.Press button C to adjust the blinking number in HOUR field.
3.When correct number appears in blinking display, press
Button D to confirm HOUR setting.
4.Press button C to adjust the blinking number in MINUTES field.
5.When correct number appears in blinking display, press
Button D to confirm MINUTES setting.
6.Press button C to confirm ALARM setting, then press
button B to return to Real Time mode.
To activate/deactivate Repeater function:
When ALARM CHIME sounds, press button D to stop the chime;
then press button B to start or stop the Repeater function. When
it is activated, the chime will sound again after five minutes, and
will stop automatically after 20 seconds.