1
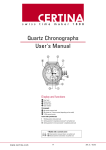
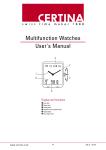
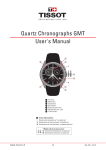
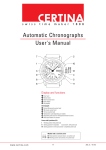
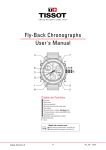
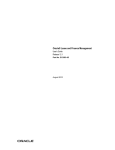
Fly-Back Chronographs User's Manual Display and functions Hour hand Minute hand Alarm hour hand (red) 60 second chrono and alarm minute hand Date indicator 30 minute counter + indicator «Set Alarm» (red) 1/10 second counter + alarm status (ON/OFF) (red) Small second hand A - B - C - D Pushers E Crown * Models with a screwed crown : IA Initial position (screwed down, not pulled out) IB Neutral position (unscrewed, not pulled out) w w w. c e r t i n a.com 1/4 305_E / 02.03 Fly-Back Chronographs Congratulations We would like to congratulate you on having chosen a chronograph from Certina ®, one of the most highly renowned Swiss brands in the world. Meticulously designed, using only the highest quality materials and components, your watch is protected against shock loads, variations in temperature, water and dust. When operating as a chronograph, this model is able to time events lasting up to 30 minutes, displaying the results to the 1/10th of a second, and also provides you with the following functions : – Standard START–STOP function – ADD function (partial times) – SPLIT function (intermediate times) – FLY-BACK function To ensure that your chronograph operates with perfect precision for many years to come, we advise you to pay very careful attention to the advice provided hereafter. This user's manual is applicable to all Certina ® quartz chronographs with FLY-BACK function. Usage / Settings Models with a screwed crown You must first unscrew the crown into position IB before you can pull it out into position II or III. Important : After each operation, you must always screw the crown back down to ensure that your watch remains water-resistant. Pushers Press briefly on the pusher to move the hands in increments. If you press for more than 1 second, the hands will move continuously (rapid setting). Rapid correction of the date Pull the crown out into position II and turn it counterclockwise until the correct date is displayed. Setting the time Crown in position III Pull the crown to position III; the small second hand (8) stops at this point. To set the time, turn the crown clockwise or anti-clockwise. Then, press the crown back into position I (and tighten it down if you have a model with a screwed crown). 8 Important : You will have to synchronize the internal clock time which controls the alarm whenever you set the time (see hereafter). Setting the date and time zone Crown in position II Turn the crown clockwise or anti-clockwise. Only the hour hand moves forwards or backwards in one hour increments. Rapid time setting is particularly useful when changing time zones or when changing from summer to winter time and vice versa. Note : The date changes just after midnight is reached. Important : You will have to synchronize the internal clock time which controls the alarm whenever you set the time (see hereafter). 4 7 D A 6 2 3 C B 1 w w w. c e r t i n a.com 8 Synchronizing Crown in position III Activate the appropriate pusher in sequence: A B C D To synchronize the minutes To synchronize the hours To adjust – 1 hour with each press To adjust + 1 hour with each press Important : You will have to synchronize the internal clock time which controls the alarm with the analogue time displayed by the hands whenever you set the time or change time zones. 2/4 305_E / 02.03 Fly-Back Chronographs Synchronizing 4 Synchronizing of the internal clock is carried out as follows : – When the small second hand (8) is at 60 seconds, pull the crown to position III (the hand stops). – Using pusher A, set the 60 second hand (4) over the minute hand (2). – Using pusher B, set the alarm hour hand (3) (red hand) over the analogue hour hand (1). – Then, press the crown back into position I (and tighten it down if you have a model with a screwed crown). 7 D A 2 6 The internal clock is now synchronized. Note : Rapid synchronization (particularly useful when changing time zones) by + or - 1 hour can be carried out using both pushers D and C. 3 C B 1 8 Important : Before synchronizing the watch, check that hands (3) and (4) and counter hands (6) and (7) are at position 0 (at 12 o'clock) with the crown pulled to position II (see Setting the counters to zero). Alarm Crown in position I Select the « Set Alarm » mode. Set the alarm minute using pusher A. Set the alarm hour using pusher B. Exit the « Set Alarm » mode. 7 1 D A 2 B 3 4 3 Notes : The 30 minute counter hand is set at the « Set Alarm » position. When the alarm time is set, the alarm is activated (ON). Your watch will exit the « Set Alarm » mode if no settings are made within 15 seconds. The red hand (3) always shows the alarm time and the 1/10 second counter hand (7) indicates whether the alarm is switched on. Crown in position I B Ringing test C ON/OFF (activated/deactivated) C Notes : An audible signal indicates that the alarm is switched on (ON). The ringing can be stopped by pressing any pusher. These functions are not available if the chronograph is running or on hold. B Chronograph (simple function) 1 A The simple « chronograph function » enables you to measure isolated events. 2 Crown in position I START/STOP STOP Reading the time Reset counters to zero Notes : The 60 second, chrono and 30 minute hands return to 0 for all chronograph functions, while the 1/10 second counter hand shows the alarm status (ON/OFF). 3 B 4 3 A B 2 1 5 w w w. c e r t i n a.com Chronograph (ADD function) The ADD function enables you to measure consecutive events without having to reset to zero between each event. Each time recorded is simply added to the previous total. Crown in position I START STOP Reading the time RESTART STOP Reading the time Reset counters to zero 3/4 305_E / 02.03 Fly-Back Chronographs Chronograph (SPLIT function) A B 4 1 2 5 3 3 1 A Crown in position I START SPLIT Reading the time X RESTART (catchup) STOP Reading the last time Reset counters to zero Chronograph (double chrono) This function allows you to time two events simultaneously. 2 B The SPLIT-TIME function enables you to stop the hands to read an intermediate time, without interrupting the timing operation. When you restart, the hands « catch up » the lost time. 5 4 Crown in position I START (T1, T2) SPLIT Reading the time T1 STOP T2 (memorizes T2) Reading the time T2 Reset counters to zero Chronograph (FLY-BACK function) A 2 C 1 B 3 4 The FLY-BACK function can be activated while timing. The 30 minute, 60 second, chrono and 1/10 second counter hands are reset and a new timing function starts automatically. Crown in position I START FLY-BACK STOP Reset counters to zero Advantage : Pressing once on pusher C replaces successive pressing on pushers A to stop, B to reset and A to restart. Setting the counters to zero D C A B Crown in position II In exceptional circumstances, the counter hands may not be set at or return to the 0 position (12 o'clock). In this case, press each pusher to reset the hands concerned to zero: A B C D 60 second chrono counter hand Alarm hour hand (red) 30 minute counter hand 1/10 second counter hand Care and maintenance We would advise you to clean your chronograph regularly (except for the leather strap) using a soft cloth and warm soapy water. After immersion in salty water, rinse it in fresh water and leave it to dry completely. Do not leave it anywhere where it might be subjected to major variations in temperature or humidity, in direct sunlight or near strong magnetic fields. To benefit from the highest standards of service and to ensure your guarantee remains in force, please always contact an approved Certina® representative or retailer. Certina ® Quartz chronographs benefit from the incomparable precision of quartz. Their power reserve usually enables them to operate for more than 2 years in continuous use. If you envisage not wearing your chronograph for several weeks or months, we would advise you to put it to one side with the crown pulled out into position II. This cuts the electrical power supply to the motor, thereby extending battery life considerably. Replacing the battery Once the battery has run flat, it must be replaced without delay by an approved Certina ® representative or retailer. Type : High impedance / SR 936 PW / Renata 380. w w w. c e r t i n a.com 4/4 305_E / 02.03