1
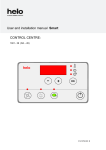
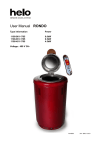
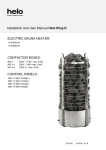
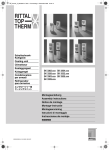
OH
Installation and User's Manual Helo T2
CONTROL CENTRE
RA – 28 (T2)
OK
314 SYRA 67-3 C
2
Installation and User’s Manual Helo T2
Contents
1.
1.1
1.2
2.
3.
4.
4.1
4.2
5.
6.
General
Check the following before taking a sauna bath
General information on the control panel
Circuit diagram
Basic schematic of the terminal connections and the installation
Installation and use of control panel T2
Control panel T2
Control panel functions
External switch function
RoHS
2
2
2
3
4
5
6
7
10
11
1.
General
1.1
Check the following before taking a sauna bath
1. The sauna room is in an appropriate condition for taking a sauna bath.
2. The sauna room door and the window are closed.
3. The sauna heater is topped with stones that comply with the manufacturer's recommendations; the stones
cover the heating elements; the stones are piled in the sauna heater leaving copious amounts of space in
between.
4. Temperatures approaching 70°C assure a pleasant, smooth sauna bath experience.
1.2
General information on the control panel
Control centre 1601 – 28 (T2) and contactor case 2005 – 14 (WE – 14) can be used with the following sauna
heaters:
- SKLE - .…
- SKLA - ….
1105 - ….
1112 - ….
The Contactor case should be installed outside the sauna room. The cables should be installed using the
protocols for permanent installation. A split box with a semi-permanent installation into the sauna heater should
be attached inside the sauna room. Caution: not adhering to the minimum distances indicated in the Installation
manual may cause a fire hazard.
To ensure that that it is in an appropriate condition for bathing, always check the sauna room before switching
on the sauna heater.
3
Installation and User’s Manual Helo T2
2. Connection diagram
R6
R3
A B 11 12 51 52
R8
R9
R7
A B 11 12
OLEA 97
R5
SR1
SR2
17
18
R1
Lamp
Mu
Ru
5.
Ru
Va
Vi
Ke
Si
Va
Pu
Ke
R2
F2
10 A
SR3
Securityrelay
SR4
N
3.
L
F1
1 AT
N L1 L2 L3
N L1 L2 L3
1a.
1b.
N U1 V1 W1
2a.
N U2 V2 W 2
4.
N 55 N
2b.
400V - 415V 3N~
N L1 L2 L3
1a.
N L1 L2 L3
230V 3~
1b.
Max 21 kW
1. Syöttö / Nätet / Stromnetz / Power input. / Puissance absorbée / Vermogensingang /
Entrada de alimentación / Входное напряжение / Wejście zasilania.
2. Kiuas / Bastuugn / Sauna heater / Saunaofen / Calentador de sauna / Chauffe-sauna /
Elektryczny piec / ЭЛЕКТРОКАМЕНКА
3. Ohjauskeskus / Styrpanel / Steuergerät / Control panel. / Panneau de commande /
Bedieningspaneel / Panel de control / Пульт управления / Panel sterujący / min.LiYY 4x0.25mm2
4. Termostaatti / Sensor / Fühler / Sensor / Capteur / Sensor / Czujnik / Датчик
5. Ovikytkin / Dörrströmbrytare / Door switch / Türschalter / Interrupteur de porte /
Interruptor de puerta / Дверной выключатель / Rozłącznik na drzwiach
354 SYWE 19 D
2.1 Connecting the control cables and the circuit board
NOTE: The cable connecting the Contactor case WE-14 to the Control centre must be screened, e.g. LiYY 4 x
0.25mm². Maximum length of the cable is 50m.
Connecting terminal markers A, B, 11
and 12 of the Control panel T2
Sensor markers SR1 and SR2 as well as
17 and 18 of the circuit board
4
Installation and User’s Manual Helo T2
3.
Basic schematic of the terminal connections and the installation
Connector strip
Limiter
Contactor box
1
2
3
4
Sensor cable
SR 1
SR 2
17
18
SR 1. Blue
SR 2. White
17. Red
18. Yellow
1.
2.
3.
4.
Blue
White
Red
Yellow
Control panel
1601-28 (T2)
Contactor box
A
B
11
12
A
B
11
12
A. Ruskea
B. Valk
11. Vihreä
12. Kelt
Sensor
OLET 28
Brun
Vit
Grön
Gul
Brown
White
Green
Yellow
Braun
Weiss
Grün
Gelb
Control panel
1601-28 (T2)
Silicone 4 x 0.25
LiYY 4 x 0.25
Sauna heater
Contactor box
WE 14
Door switch
Power supply
400V – 415 V 3N~
230 V 3~
5
Installation and User’s Manual Helo T2
4.
Installation and use of Control panel T2
Control panel RA28 (T2)
Open the screw at the head of the control panel.
Install the bottom piece for the
control panel.
NOTE! If the control panel is
installed in a humid place, use
the provided seal.
Control panel dimensions:
-
Height 140 mm
Width 80 mm
Depth 22 mm
Remove the control panel frame and lid.
Install and connect the cable.
For connecting instructions, see page 10.
6
Installation and User’s Manual Helo T2
4.1
Control panel T2
Display
Activated functions
Touch display keys
Motion sensor
OK
Screen symbols explained:
Start and stop.
Sauna room temperature setting. Value 60–110°C.
24h timer and calendar timer. The 24h timer can be pre-set 0–24 hours
in advance to turn on the sauna heater.
Settings. For setting the language, time display, maintenance, etc. information.
Activated symbols explained:
Sauna heater ON / Sauna-is-ready indicator ON
Sauna room lighting control ON. Can be turned on temporarily or for the period of the sauna use.
Sauna heater 24h timer ON.
Calendar timer ON.
Key lock ON. The locking is released by pressing the "HOME" and "RETURN" keys simultaneously for about 2
seconds.
Key functions:
Choose a function / Accept the function.
Activate sauna lighting.
Move up the menu / Increase the setting value
Move down the menu / Decrease the setting value
"HOME" key. Brings you back to the front page.
"BACK" key Brings you one step back in a sub-menu.
When pressed on the front page, shows the temperature, the time and the date.
7
Installation and User’s Manual Helo T2
4.2
Control panel functions:
General
‐
‐
‐
‐
‐
‐
‐
‐
The control panel is intended for installation outside the sauna room.
Maximum bathing time in monitored facility use is 18 hours. With timer control the maximum time is 12 hours,
after which there is a compulsory 6 hour break. The control panel gives an error message if 12 hours is
exceeded. The pause period can be reset from the control panel separately, for instructions see Settings –
Service – Settings – Reset pause timer. In private use the maximum on time for the sauna heater is 6 hours.
The available pre-set period for the 24h timer is 24 hours.
The control panel includes also a calendar function that can be used to turn the sauna heater ON on certain days
and at certain times. However, this function should not be utilized in monitored institutional use conditions.
There is a motion sensor in the front of the control panel. If the control panel senses no movement, it switches
to the screen saver mode to save energy. The activated functions will stay on.
The control panel is equipped with a key lock to prevent the misuse of the panel.
In accordance with the applicable regulations on electrical devices, only a qualified professional is allowed to
connect the sauna heater and the control panel to the power mains.
In accordance with the regulations concerning the sauna heaters, a door switch must be installed for use in
unsupervised conditions to prevent the remote switching on of the sauna heater (the calendar timer or the 24h
timer) while the sauna room door is open.
First time starting up / Restoring the factory settings:
Select Region
Europe
USA
Other Regions
Select the geographic region where the sauna heater is used. After this,
select the appropriate language from the menu using the arrow keys and press OK.
OK
Next, set the time and the date. After each number selection, press OK.
00:00
OK
Next, select the intended use of the sauna heater. Your choices are:
‐
Supervised facility. Supervised conditions in a facility, such as an indoor
swimming pool,spa or health resort. The maximum
ON-time for the sauna heater is 18 hours.
The timers (calendar, 24h) are not available for turning on the sauna heater
‐
Time controlled. Pre-set time to turn on the sauna heater. The maximum
ON-time for the sauna heater is 12 hours. The timers (calendar, 24h) are
available for turning on the sauna heater.
‐
Private sauna use. Maximum on time for the sauna heater is 6 hours.
Facility type
Supervised facility
Time controlled
Private factility
Using pre-set timer is possible. Using calendar timer is not possible.
OK
Next, choose the length of the sauna bathing time. The selected ON-period for the sauna heater may be maximum
allowed or less, in other words, 0–18 hours, 0–12 hours or 0–6 hours, depending on the type of use
Next, choose the use of the door switch. According to the electric device regulations, a Door switch must be
installed and switched ON in circumstances where the sauna heater can be turned on remotely and/or on a
timer, and where no pre-checking of the sauna is performed. Before the remote use, as indicated above, is
possible, the door of the sauna room must be closed and the appropriate option checked in the control panel
as needed. This will make it possible to turn on the sauna heater.
8
Installation and User’s Manual Helo T2
The door switch can be utilized also in supervised institutional and in private use.
22°c
19:34
Basic mode:
2012-03-10
In its basic mode, the control panel's screen is off. As the control panel senses an
object e.g. a hand) less than 50mm from its front surface, the screen activates
automatically. Removal of the object causes the screen to revert to its energy
saving mode, after a designated period. The period to the screen turn-off can be
adjusted to a value between 10 seconds and 5 minutes (see selection: Settings –
General – Period to turn-off).
OK
Turning on the sauna heater:
The sauna heater can be turned on by choosing the START/STOP icon on the front
page (default) and pressing OK. This will cause the sauna heater to raise the
temperature to the one indicated in the control panel memory. Also, the heating will
last the period indicated in the control panel memory. Changing the target
temperature – see below. The sauna heater stays on for the period indicated in
Settings – Maintenance – Settings – Bathing time limit. The sauna heater can be
turned off any time by pressing OK while on the front page.
OK
Pressing "RETURN" while on the front page will bring up the date and time as well
as the sauna room temperature.
Setting the sauna room temperature:
To set the desired sauna room temperature, choose the front page icon that is the
second from the top and press OK. The temperature on the screen is changed by
pressing the up or down arrows. Accept the temperature chosen by pressing OK.
You can set a limit to the allowed temperatures of the sauna room by going to
Settings – Maintenance (code 124) – Settings – Temperature limit
Available values: 60°C–110°C.
OK
Timers:
The sauna heater can be pre-programmed in two different ways: Using the calendar
timer (calendar) or the 24h timer (timer). They are chosen from the menu: Timer –
Calendar or timer. In the calender timer, you can program sauna bathing schedules
for different days of the week.
Calendar timer:
1/6 setting the starting up time
2/6 setting the switching off time
3/6 setting the temperature
4/6 setting the type of function, On = Sauna heater starts with a set target
temperature.
Standby = The sauna heater raises the temperature to a setting that is lower than the
target temperature. The lower standby temperature is set using the menu:
Settings – Sauna – Standby; value 0 – 20°C.. The screen shows an S (for standby).
next to the R (Run). As long as the Standby is active, the standby symbol is shown at
the bottom of the screen.
5/6 setting the desired days of the week
6/6 setting up a repeat, either by week or by month
Finally, the Calendar shows "Function 1", the chosen times and days as well as the
set temperature; also, the calendar icon appears at the bottom of the screen.
OK
Calendar
Function 1
09:00 - 21:00
45 OC
MTKTP
R
OK
The 24h timer:
Setting the time for the sauna heater to turn on. The sauna heater will stay on until
the maximum time set by the control panel is reached. For this period, it will maintain
the temperature set by the control panel.
The sauna heater can be switched off earlier using the OK-key or by pressing the
ON/OFF button if one has been installed.
Timers
08:00
Start time
OK
9
Installation and User’s Manual Helo T2
Settings
The control panel has the following sub-menus:
Sauna
¤ Standby. The standby temperature can be set 0–20°C below the target temperature.
The standby temperature can be used also if a sauna user prefers a lower
sauna room temperature; after this user, the temperature can be raised back up
to the target temperature. This property can be applied only through the
calendar function.
Settings
Sauna
General
Service
General
¤ Set time. The time of day is set by pressing either of the arrow keys until the
correct number appears. Confirming the choice by pressing OK allows the
next number to be chosen.
¤ Set Date. When the correct year is chosen press OK. Now the month can
be set; press OK to confirm. Finally choose the day of the month and press
General
OK.
Set time
Set date
¤ Region. Choose the language using this menu. 10 different language
Region
Switch off time
choices can be found in this menu. Press OK after finding the language of
Key lock
your choice.
Vibration
Further information
You can choose either the Celsius (°C) or Fahrenheit (°F) temperature scale.
Also, you can choose either a 24 hour or a 12 hour clock.
¤ Switch off Time. Set the control panel screen switch off time, time can be set
between 10 sec and 5 min. After making your choice, press OK.
¤ Key Lock. Slow down. Can be set between 10 sec and 5 min after the last
touch of the control panel. Activate by pressing OK.
Unauthorized use of the control panel can be prevented by setting a coded key lock.
The factory code is 0000. The code can be changed by choosing first the current
code and then feeding the new code, each number followed by the OK key.
The coded key lock can be activated from Coded key lock, No or Yes, followed by OK..
¤ Vibration. The purpose of this function is to make using the menus easier: the
vibration emphasizes the settings choices and confirms that an appropriate key has
been pressed. Select Yes or No and confirm with OK..
¤ Further Information. The control panel serial number and the version number of the equipment software are
shown.
OK
OK
Service
Service
Settings
¤ Service. You can enter the service menu with the code 124.
Diagnostics
Restore factory settings
¤ Under the Settings menu there are the following submenus.
Bathing time limit. Set the maximum time for the sauna heater on time, monitored
facility 1 min – 18 hours, Timer controlled facility, setting 1 min – 12 hours.
Note! In private use 1 min – 6 hours. After every number selection press OK.
Switch for extending the bathing time. On / Off remote start push button must be
connected. You can set the maximum on time for using the On / Off push button.
External control. Remote start On / Off push button use selection. On /
Off use. Sauna heater use can be controlled with the On / Off push button.
OK
Extend the bathing time. You can extend the time selected with the On / Off push button,
at most up to the maximum time set with the controller.
Please refer to section Switch for extending the bathing time.
Temperature limit. Set the maximum temperature for the sauna, setting 60 – 110 °C.
Overheating limit. Temperature limit setting for the circuit board controlling the sauna
Settings
heater.
Bathtime
Setting 50 – 85 °C. Activate / Deactivate. When overheating limit is set on or off.
External Switch Bathtime
Extended Switch Function
Corrected temperature. Select No, if you want to see the real time temperature or
Temperature Limit
Overheating Limit
select Yes to see the average temperature.
Corrected Temperature
Reset pause timer. The 6 hour pause period can be reset and start a new
12 hour on and 6 hour pause cycle for the sauna heater.
¤ Diagnostics. Relay control. Relay outputs can be controlled separately for troubleshooting
purposes.
PIN code 666.
OK
System status. Shows information on control panel status, room temperature, use time,
software versions.
Heaternet – node list. Shows bus communication information between the control panel and circuit board.
Error log. Shows the last 8 error codes with their date and time. See page 10.
¤ Reset. Resets all settings to default values. Code 421.
For instructions see page 7, Reset.
10
Installation and User’s Manual Helo T2
5.
External switch function
ON/OFF Push Button (Optional)
The sauna heater can be turned on remotely using the ON/OFF push button, for instance from the hotel reception in
case of requests for non-scheduled sauna use periods. The LED indicator light on the push button will light up to
indicate that the sauna heater has been turned on. As long as the maximum time and temperature have been pre-set
on the T2 Control panel, the sauna heater will stay on. If the calendar timer or the 24h timer has been programmed,
the LED indicator light on the push button will blink slowly. A fast blinking indicator light signifies that the sauna heater
is on Standby (lowered sauna room temperature). If an irregular (non-scheduled) sauna use period is required, the
change in the regular program can be effected from the Calendar, the 24 hour timer or the Standby modes.
Led indicator light
ON – OFF button
40 mm
Retaining nut
46 mm
32 mm
24 mm
11
11
12
12
13
13
14
14
15
15
T2 Control panel
T2 Control panel
16
16
17
17
18
18
21
21
Push button circuit schematic
ON/OFF
Push Button
20
20
Brown
White
Yellow
Green
19
19
Brown and yellow (+)
White
Green (-)
Remote start
Connecting the remote start
Remote start can be implemented with an output make connector information.. The contact signal can be a pulse
where the first pulse connects the sauna heater on and the second pulse interrupts the sauna heater control.
Alternately, the contact may be closed for the duration of the remote control so that the sauna heater will turn off as
the contact opens up.
11
Installation and User’s Manual Helo T2
6.
RoHS
Ympäristönsuojeluun liittyviä ohjeita
Anvisningar för miljöskydd
Tämän tuotteen käyttöiän päätyttyä sitä ei
saa hävittää normaalin talousjätteen
mukana, vaan se on toimitettava
sähkö- ja elektroniikkalaitteiden kierrätykseen
tarkoitettuun keräyspisteeseen.
Denna produkt får inte kastas med
vanliga hushållssopor när den
inte längre används. Istället ska den
levereras till en återvinningsplats
för elektriska och elektroniska apparater.
Symboli tuotteessa,
käyttöohjeessa tai
pakkauksessa tarkoittaa sitä.
Symbolen på produkten,
handboken eller
förpackningen refererar till detta.
Valmistusaineet ovat kierrätettävissä merkintänsä
mukaan. Käytettyjen laitteiden
uudelleenkäytöllä, materiaalien hydöyntämisellä
tai muulla uudelleenkäytöllä teet arvokkaan teon
ympäristömme hyväksi.
Tuote palautetaan ilman kiuaskiviä ja verhouskiviä
kierrätyskeskukseen.
De olika materialen kan återvinnas enligt
märkningen på dem. Genom att återanvända,
nyttja materialen eller på annat sätt återanvända
utsliten utrustning, bidrar du till att skydda vår
miljö.
Produkten returneras till återvinningscentralen
utan bastusten och eventuell täljstensmantel.
Tietoa kierrätyspaikoista saat
kuntasi palvelupisteestä.
Vänligen kontakta de kommunala myndigheterna
för att ta reda på var du hittar närmaste
återvinningsplats.
Instructions for environmental protection
Hinweise zum Umweltschutz
This product must not be disposed with
normal household waste at the end of
its life cycle. Instead, it should be
delivered to a collecting place for the recycling
of electrical and electronic devices.
Dieses Produkt darf am Ende seiner LebensDauer nicht über den normalen Haushaltsabfall
Entsorgt werden, sondern muss an einem
Sammelpunkt für das Recycling von elektrischen
und elektronischen Geräten abgegeben werden.
The symbol on the product, the
instruction manual or the
package refers to this.
Das Symbol auf dem produkt, der
Gebrauchsanleitung oder der
Verpackung weist darauf hin.
The materials can be recycled according to the
markings on them. By reusing, utilising the
materials or by otherwise reusing
old equipment, you make an important
contribution for the protection of our environment.
Please note that the product is returned to the
recycling centre without any sauna rocks and
soapstone cover.
Please contact the municipal administration
with enquiries concerning the recycling place.
Die Werkstoffe sind gemäß ihrer Kennzeichnung
wiederverwertbar, Mit der Wiederverwendung,
der stofflichen Verwertung oder anderen Formen
der Verwertung von Altgeräten leisten Sie einen
wichtigen Beitrag zum Schutze unserer Umwelt.
Dieses Produkt soll ohne Steine und
Specksteinmantel an dem Sammelpunkt für
Recycling zurückgebracht werden.
Bitte erfragen Sie bei der Gemeindeverwaltung
die zuständige Entsorgungsstelle.