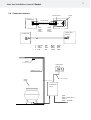
1
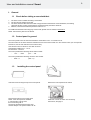
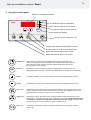
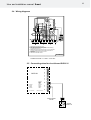
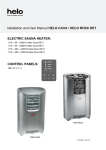
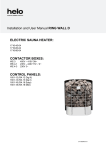
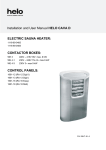
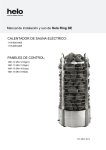
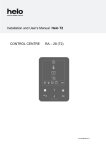
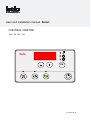
User and installation manual Smart
CONTROL CENTRE:
1601 - 26 (RA – 26)
helo
OK
314 SYRA 60 B
2
User and installation manual Smart
Contents
1.
2.
3.
General
1.1 Check before taking a sauna bath
1.2 Overview of the control panel
1.3 Installing the control panel
3
3
3
Using the control panel
4
2.1
2.2
2.3
2.4
2.5
2.6
2.7
2.8
2.9
5
5
5
6
6
7
8
8
8
Choosing the measurement unit
Eco function
Alerts
Switch diagrams
Connecting wires for circuit board OLEA 91
Connection principle
Electric heating toggle
If the sauna heater will not heat up
Mains connection
ROHS
9
3
User and installation manual Smart
1.
General
1.1
1.
2.
3.
4.
Check before taking a sauna bath that:
The sauna room is suitable for taking a sauna bath.
The door and the window are closed.
The sauna heater is filled with stones that comply with the manufacturer's recommendations, the heating
elements are fully covered, and the stones are placed loosely around the elements.
Pleasant, smooth sauna bath temperature is about 70 °C.
For additional information about enjoying a sauna bath, please visit our website at www.helo.fi
NOTE: Structural clay tiles are not allowed.
1.2
Control panel in general
The control panel is must be mounted outside the actual sauna room – it is rated to IP X4.
The main switch for the sauna heater is located at the foot of the sauna heater or in the contactor case. (For more specific
instructions, see the user manual for the contactor box).
One should not sit in a sauna for more than six hours.
Temperature adjustment 5 – 110 °C.
Pre-set time 0 – 23 hours.
The control panel fits the following sauna heater models.
-
1112 - … - 0405
(LM - … - DE
The control panel fits the following contactor case models.
-
2005 – 11
1.3
(WE – 11)
Installing the control panel
Undo the screw securing the top of the control panel.
Fit the bottom piece for the control panel
NOTE: If the control panel is installed
in a humid place, use the seal
that comes along with it.
The seal is placed between the base part
and the wall part. The panel is rated to IP X4.
Remove the control panel frame and lid.
Install and connect the cable. For connecting
instructions, see page 8.
4
User and installation manual Smart
2 Using the control panel
Display for temperature and time.
helo
Indicator light for temperature.
Indicator light for the On period.
OK
Indicator light for the pre-set time.
Saving the settings.
Turning the control panel On / Off.
Changing the settings for temperature and time.
Activating the Eco function with indicator light.
Button with indicator light for light control.
Button with indicator light for fan control.
OK
On/Off button
When the unit is in standby mode (displays are off) pressing the button will
activate the programme. Quick starting the sauna heater is done with this button.
When the unit is active, pressing the button will end all functions and turn off
the control panel / sauna heater
OK button
This button is used for confirming changes in settings and / or moving to the next
setting depending on the control centre mode (temperature, the On period or pre-set time)
button
Increases the setting. You can select values more quickly by holding the button down.
button
Decreases the setting. You can select values more quickly by holding the button down.
Fan button
Activates the relay on the circuit board. The sauna heater has fan connections N and a Fan
symbol, voltage of 230 VAC and a maximum power of 100W. The LED light on the control
panel above the Fan button is on when the fan control is active.
Light button
Activates the relay on the circuit board. The sauna heater has light connections N and a
Lamp symbol, a voltage of 230 VAC and a maximum power of 100W. NOTE: Resistive load,
not suited for an electronic transformer (switched-mode power supply). LED light above
the Light button on the control panel is on when the light(s) are on.
Eco button
Activates the selected Eco function. Activation and selection is done while the control
panel is Off.
User and installation manual Smart
Indicator lights
5
When the indicator light is flashing, the temperature and time can be changed by pressing
the + and – buttons.
The indicator light for temperature begins to flash when the On/Off button is pressed. The tempera
ture can be changed with the + and – buttons, and set by pushing the OK button or waiting five
seconds to move automatically to the time setting for the sauna heater. The indicator light for the
On period for the sauna heater flashes, which means the time can be changed with the + and –
buttons. The maximum time for taking a sauna bath is six hours.. Press the OK button or wait for
five seconds. The next light to flash is the indicator light for the pre-set time. The pre-set time for
the sauna heater can be changed with the + and – buttons, 0–23 hours. The selection can be con
firmed by pressing OK button or by waiting for five seconds. If the pre-set time is 0, the sauna hea
ter activates instantly according to the set On period.
2.1 Choosing the measurement unit
When in Off mode, press the OK button and the display will show the software version; press it
again, and it will show the current measurement unit for temperature. You can toggle between Cel
sius and Fahrenheit by pressing the + button.
helo
Eco 0
OK
2.2
Eco function
The Eco mode means functions that can help save energy by reducing unnecessary heating time.
Using the Eco function
The Eco function is selected when the control panel is in Off mode. Pressing the Eco button displays the setting from the
control panel memory (Eco 0...2). You can toggle between settings by pressing the Eco button and confirm it by pressing the
OK button or waiting for five seconds, which will exit Eco mode automatically.
After the sauna is heated to the set temperature a signal will sound (buzzer) and an Eco sign is shown on the control panel.
You can exit Eco mode by pressing the Eco button in order to change to a normal bathing programme.
Eco modes
-
Eco 0 Eco function is not active.
Eco 1 The heating will stop after five minutes. Before the sauna heater stops, the temperature setting is decreased
by 2 degrees Celsius.
Eco 2 The heating will stop after 20 minutes. Before the sauna heater stops, the temperature setting is decreased
by 10 degrees Celsius.
2.3
Alerts
helo
Err 1
OK
-
Err1
Err2
Err3
Err4
serial communication is not functioning.
temperature limiter is broken.
thermostat sensor 1 is faulty.
if installed, thermostat sensor 2 is faulty.
You can acknowledge the alert by pressing the On – Off button.
6
User and installation manual Smart
2.4 Wiring diagrams
V
W
OL EA 91
J7
U
L2 L3
J6
L1
J4
J5
MCNTRL
J2
J3
N
J1
L
J12
J11
Light
Fan
1 2 3 4
1
F1
T1AH
N L1 L2 L3
N
U
V W N
2 3 4
F2
N
T1AH
8 11
5.
2.
1.
3.
6.
4.
1. Syöttö/ Nätet/ Stromnetz/ Power input.
2. Kiuas/ Bastuugn/ Saunaofen/ Sauna heater.
3. Saunavalo-Puhallin/ Bastu belysning - Fläkt/ Saunabeleuchtung Ventilator/ Sauna light - Fan.
4. Sähkölämmityksen vuorottelu/ El.förregling av annan el. förbrukare/
Control of el heating/ Steuerkontact für Verrieglund anderer el.
Verbraucher
5. Ohjauskeskus/ Styrning/ Steuerung/ Control.
6. Tuntoelin/ Sensor/ Fühler/ Sensor.
354 SYWE 16C
Contactor box WE 11 400V – 415V 3N~
J7
J6
J5
2
Yellow
Red
White
Blue
Silicon 4x0,25mm
J3
J4
LiYY 4x0,25mm
4.
3.
2.
1.
J2
Yellow
Green
White
Brown
Yellow
Red
White
Blue
2
J1
4.
3.
2.
1.
4.
3.
2.
1.
1 2 3 1 23 4 12 34
OLEA 91
12 34 1 2 1 23 4 1 234
2.5 Connecting wires for circuit board OLEA 91
Control panel
RA 26
1 2 3 4
1
2 3 4
Sensor
OLET 19
7
User and installation manual Smart
2.6 Connection method
Connector strip
Limiter
Contactor box
Sensor cable
4
3
2
1
1 Blue
2 White
3 Red
4 Yellow
4
3
2
1
OLET 19
1 Blue
2 White
3 Red
4 Yellow
Control panel
1601-26
1234
1234
Contactor box
1.
2.
3.
4.
Ruskea
Valk
Vihreä
Kelt
Brun
Vit
Grön
Gul
Brown
White
Green
Yellow
Braun
Weiß
Grün
Gelb
Sensor
Control panel
1601-26
Silicone 4 x 0,25
LiYY 4 x 0,25
Sauna
heater
Contactor box
WE 11
Input
230V – 240V 1N~/2~
230V 3~
400V – 415V 3N~
User and installation manual Smart
8
2.7 Electric heating toggle
Electric heating toggle applies to homes with an electric heating system.
The contactor case and the sauna heater have connections (marked N - 55) for controlling the electric heating toggle. Connectors N – 55 and the heating elements are simultaneously live (230V).
2.8 If the sauna heater will not heat up
If the sauna heater will not heat up, please check that:
- the electricity isolator is turned on.
- the front fuses of the sauna heater are intact.
- there are no error messages on the control panel. If the display has an error message, see the control panel manual chapter 2.3 on page 5.
2.9 Main connection
The sauna heater must be connected to the mains by a qualified electrician and in compliance with current regulations. Sauna heater is connected with a semi-permanent connection. Use H07RN-F (60245 IEC 66) cables or a corresponding type.
Other output cables (signal lamp, electric heating toggle) must also adhere to these recommendations. Do not use PVC
insulated cable as a connection cable for the sauna heater.
A multipolar (e.g. 7-pole) cable is allowed, if the voltage is the same. In the absence of a separate control current fuse, the
diameter of all cables must be the same, i.e. in accordance with the front fuse.
The connecting box on the sauna wall should be located within the minimum safety clearance specified for the sauna heater.
The maximum height for the connection box is 500mm from the floor.
If the connection box is located at 500 mm distance from the heater, the maximum height is 1000 mm from the floor.
Sauna heater insulation resistance: The sauna heater's heating elements may absorb moisture from the air during storage etc. This may cause low resistance. The moisture will be gone after a few heating sessions. Do not connect the heater
power supply through an earth leakage trip.
However, adhere to the effective electrical safety regulation when installing the sauna heater.
9
User and installation manual Smart
3. ROHS
Ympäristönsuojeluun liittyviä ohjeita
Anvisningar för miljöskydd
Tämän tuotteen käyttöiän päätyttyä sitä ei
saa hävittää normaalin talousjätteen
mukana, vaan se on toimitettava
sähkö- ja elektroniikkalaitteiden kierrätykseen
tarkoitettuun keräyspisteeseen.
Denna produkt får inte kastas med
vanliga hushållssopor när den
inte längre används. Istället ska den
levereras till en återvinningsplats
för elektriska och elektroniska apparater.
Symboli tuotteessa,
käyttöohjeessa tai
pakkauksessa tarkoittaa sitä.
Symbolen på produkten,
handboken eller
förpackningen refererar till detta.
Valmistusaineet ovat kierrätettävissä merkintänsä
mukaan. Käytettyjen laitteiden
uudelleenkäytöllä, materiaalien hydöyntämisellä
tai muulla uudelleenkäytöllä teet arvokkaan teon
ympäristömme hyväksi.
Tuote palautetaan ilman kiuaskiviä ja verhouskiviä
kierrätyskeskukseen.
De olika materialen kan återvinnas enligt
märkningen på dem. Genom att återanvända,
nyttja materialen eller på annat sätt återanvända
utsliten utrustning, bidrar du till att skydda vår
miljö.
Produkten returneras till återvinningscentralen
utan bastusten och eventuell täljstensmantel.
Tietoa kierrätyspaikoista saat
kuntasi palvelupisteestä.
Vänligen kontakta de kommunala myndigheterna
för att ta reda på var du hittar närmaste
återvinningsplats.
Instructions for environmental protection
Hinweise zum Umweltschutz
This product must not be disposed with
normal household waste at the end of
its life cycle. Instead, it should be
delivered to a collecting place for the recycling
of electrical and electronic devices.
Dieses Produkt darf am Ende seiner LebensDauer nicht über den normalen Haushaltsabfall
Entsorgt werden, sondern muss an einem
Sammelpunkt für das Recycling von elektrischen
und elektronischen Geräten abgegeben werden.
The symbol on the product, the
instruction manual or the
package refers to this.
Das Symbol auf dem produkt, der
Gebrauchsanleitung oder der
Verpackung weist darauf hin.
The materials can be recycled according to the
markings on them. By reusing, utilising the
materials or by otherwise reusing
old equipment, you make an important
contribution for the protection of our environment.
Please note that the product is returned to the
recycling centre without any sauna rocks and
soapstone cover.
Please contact the municipal administration
with enquiries concerning the recycling place.
Die Werkstoffe sind gemäß ihrer Kennzeichnung
wiederverwertbar, Mit der Wiederverwendung,
der stofflichen Verwertung oder anderen Formen
der Verwertung von Altgeräten leisten Sie einen
wichtigen Beitrag zum Schutze unserer Umwelt.
Dieses Produkt soll ohne Steine und
Specksteinmantel an dem Sammelpunkt für
Recycling zurückgebracht werden.
Bitte erfragen Sie bei der Gemeindeverwaltung
die zuständige Entsorgungsstelle.