1
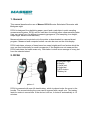
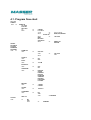
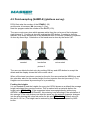
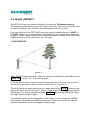
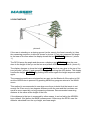
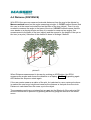
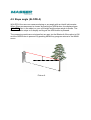
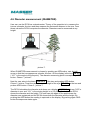
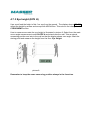
Masser RC3H
User manual for form factor
calculation
V.1.5.X
Masser Oy
Jämytie 1
FI-96910 Rovaniemi, Finland
Tel. +358 40 904 500
Fax. +358 16 282 554
BID No 0665142-9
VAT No. FI06651429
Domicile Rovaniemi
Ver. 1.5.0/ 24112009 / K-PU/AU
Table of contents
1. General ........................................................................................................................ 3
2. RC3H ........................................................................................................................... 3
3. External connections ................................................................................................... 4
4. User menu ................................................................................................................... 4
4.1. Program flow chart ................................................................................................... 5
4.2 Point-sampling (SAMPLE) (plotless survey) .............................................................. 6
4.3 Height (HEIGHT) ....................................................................................................... 8
4.4 Distance (DISTANCE) ............................................................................................. 10
4.5 Slope angle (SLOPE A) ........................................................................................... 11
4.6 Diameter measurement (DIAMETER) ..................................................................... 12
4.7 Settings (SETTINGS) .............................................................................................. 13
4.7.1 Form Factor (FORM FAC) .................................................................................... 13
4.7.2 Slope correction (SLOPE C) ................................................................................. 13
4.7.3 Eye height (EYE H) .............................................................................................. 14
4.7.4 Bluetooth (BLUETOOTH) ..................................................................................... 15
4.7.5 Language selection (LANGUAGE) ....................................................................... 15
4.7.6 Clearing the memory (CLEARMEM) ..................................................................... 15
4.7.7 Height measuring principle (METHOD) ................................................................ 15
4.7.8 Software version ................................................................................................... 15
4.8 Output ...................................................................................................................... 16
5. Loading a new program version ................................................................................ 17
6. Calibration of the hologram sight ............................................................................... 18
7. Warranty .................................................................................................................... 19
8. Contacts .................................................................................................................... 20
1. General
This manual describes the use of Masser RC3H Counter Calculator Clinometer with
Hologram sight
RC3H is designed for substituting paper, pencil and a calculator in point-sampling
measurement system. RC3H can be used also for multiple other measurements tasks.
User can select from five different measuring programs. (Plot sampling, tree height,
slope angle, distance and diameter)
Measured data can be printed out to the printer or downloaded to a spread sheet
program. Measured and computed values can also be seen on the units display.
RC3H calculates volumes of trees based on mean heights and form factors which the
user can feed individually for each tree species. If the heights are not measured the
RC3H calculates the basal areas only. Calculation is done as an average of every plot
from the selected stand.
2. RC3H
A Hologram sight
B Display
C Serial port
D Keyboard
E ADD- button
F Battery lid
picture 1.
RC3H is powered with one AA-sized battery, which is placed under the cover in the
handle. The screws holding the cover can be opened with a small coin. The battery
lasts for weeks in normal use. If the device is left on, it shuts off automatically in 15
minutes.
RC3H is switched ON by pushing ON – key from the keyboard. The device is switched
OFF by pushing ON – key or ADD-button when the text ON / OFF is visible on the
display.
RC3H is waterproof and does not need any special servicing.
3. External connections
Connecting the RC3H to a PC or a serial printer is made via the RS-232 serial port
(situated on the back of the device) by the serial cable supplied with the calculator.
Settings for the connection are: 9600 baud, 8 bit, 1 stop, no parity.
RC3H can be optionally equipped with an internal Bluetooth connection.
If the option Bluetooth is set on from settings menu, then it is used as a primary channel
for connection. Bluetooth must be switched off if the serial port is used. Bluetooth has a
factory setting for a passive receiver / transmitter.
4. User menu
The device is switched on by pushing ON-key and the display shows ON/OFF.
ARROW UP and ARROW DOWN keys are used for scrolling up and down the menus.
Selection is made by ADD-button. MENU-key is used for branching out from a program.
Number entry is done via the ARROW- keys and entering is done with the ADD-button.
Counting the trees is done by clicking the ADD-button and the selection of species with
the arrow keys.
4.1. Program flow chart
ON / OFF
SAMPLE
ADD
=>
HEIGHT
DISTANCE
SLOPE A
DIAMETER
SETTINGS
ADD
=>
STAND XX
HA XX.X
PLOT XX
SP01 XXX
On
Menu
FORM FAC
ADD
=>
=>
=>
CANCEL
H 01 XX.X
Arrow
=>
Menu
=>
SLOPE XX
Menu
=>
WAIT
M3 XXX.X
SP01XXX.X
Menu
=>
SP01 500
ADD
=>
feed the height
BASE, EYE,HEIGHT
XX.X DEC
NEW PLOT
RETURN
FAC XXX
ADD
Menu
SLOPE C
ADD
=>
ON
OFF
EYE H
ADD
=>
170 CM
BLUETOOT
ADD
=>
OFF
ON
LANGUAGE
ADD
=>
ENGLISH
SUOMI
ESPANOL
DEUTSH
FRANCAIS
SVENSKA
RUSSIAN
PORTUGUE
LATVIAN
METHOD
ADD
=>
1-POINT
2-POINT
OFFSET
ADD
=>
XX.X X.X
CLEARMEM
ADD
=>
NO
YES
ADD
=> ERASING
VER 1.50
OUTPUT
ADD
=>
NO
YES
ADD
=>
SENDING
4.2 Point-sampling (SAMPLE) (plotless survey)
RC3H first asks the number of the STAND(1-30)
and the size in hectares HA (accuracy 0.1 ha).
Next the program asks the number of the PLOT(1-30).
The user counts every tree which appears wider than the red cross of the hologram
sight (picture 2). Counting is done by pushing the ADD-button. Counting is done by
species. Only every second one of the borderline trees is counted. Selection of species
is done by arrow keys. Calculation of the basal area is done by the factor 0,87.
counted
borderline
not counted
picture 2.
The user can delete the last entry by pushing ON-key and ADD-button to accept the
delete and the display shows the new counter value.
When all the trees have been counted on the plot, the user pushes the MENU-key and
the calculator asks for the median height for every species counted (accuracy 0.1 m).
Heights can be entered by arrow keys or by measuring.
Feeding the heights
It is not needed to feed the heights for every plot. RC3H shows as a default the average
height calculated from previous entries. This is marked with an asterisk before the
height value HT01* 15.8 . If the suggested value is accepted directly (without any
ARROW- key pushes) by ADD-button, this entering is not affecting in the calculation of
the average. If the user pushes one time the arrow key the asterisk character changes
into the pile showing the value fed earlier for this plot HT01>14.6 . (Default value for
the plot is 15.0 m.) The height can be entered by arrow keys and accepted by ADDbutton.
Measuring the heights
If the user wants to measure the heights immediately, then by pushing MENU-key the
display shows BASE 10.7. The instructions for height measurement are described in
chapter 4.3.
The height input will be repeated for every species which were counted.
Slope correction
If the slope correction function is selected on from the SETTINGS / SLOPE C-menu,
RC3H shows after the height input a text SLOPE 2.2 . By pushing arrow keys the user
can feed the slope angle.
By pushing MENU-key the user can measure the slope angle (picture 5.). The display
shows the horizontal angle. User should aim on a tree on a point which is on his eye
height and push ADD-button. The slope angle is stored and used to correct the basal
area measurements by multiplying the measured area by the secant of the angle of the
slope.
Results on a display
When the heights and the optional slope angle are fed, the device stores the measured
data automatically to non-volatile flash-memory. WAIT is displayed (it takes some
seconds). Whenever starting the SAMPLE program, the calculator reloads the earlier
measured data for the plot if it exists. This makes it possible to measure heights as a
separate operation or correct the earlier measured data.
First the calculator shows the total volume m3 (accuracy 0.1 m3) for the stand.
Volumes for all the species can be viewed by scrolling the display by the arrow keys. By
pushing ADD-button consecutively user can select either the volume M3 or the basal
area M2 on the display. Results on the display are average values calculated of
measured data for the stand.
Users can see, during the sampling work in the forest, when the average of the volume
stabilizes and figure out the required accuracy from the deviation.
When the MENU-key is pushed the program asks: NEW PLOT . By arrow keys the
user can select either RETURN to main menu or to the new plot to the same stand.
Acceptance of the selection is done by ADD-button.
4.3 Height (HEIGHT)
With RC3H the user can measure heights of the trees by The Masser-method.
The method is based on the known eye height of the user. The user’s eye height must
be fed first (Settings / Eye H) before the measurement can be accurate.
User can select from the SETTINGS-menu two ways to measure height: 1-POINT or
2- POINT method. It is recommended to use always 2-point method when measuring
heights in forest. 1-point method can be used accurately for example when measuring
heights of a pile on a flat road side or on a mill yard.
1-POINT METHOD
picture 3.
When HEIGHT-measurement is chosen by pushing an ADD-button, the display shows
BASE 10.7 , where “10.7” is the aiming angle.
If the user stands on the same horizontal level as the base of the tree, then the user
should aim to the base of the tree and push ADD (picture 3 / phase 1.).
The RC3H saves the angle and shows on a display the height 2.00 M . Now the user
aims to the top of the tree (picture 3 / phase 2.) and accepts the angle by pushing the
ADD-button. The display freezes the height 15.52 M . By pushing ADD-button again
the height sequence starts again.
If the distance to the tree is measured by other means, it can be fed by the ARROWkeys (default 15m) before the BASE-measurement. Other ways the RC3H uses the
distance calculated from the eye height and base angle.
2-POINT METHOD
picture 4
If the user is standing on a sloping ground (as the case in the forest normally is), then
the measuring sequence is done as shown in picture 4. First user measures the angle
to the base of the tree when the display shows the text BASE 10.7 (picture 4 / phase
1.).
The RC3H saves the angle and shows on a display a text EYE 06.2. Now the user
aims to the height of the eye on the tree and pushes ADD-button. (picture 4 / phase 2.).
The display changes to show the height 12.00 M . Now the user aims to the top of the
tree (picture4 / phase 3.) and accepts the angle by pushing the ADD-button. The display
freezes the height 15.52 M . By pushing ADD-button again the height sequence starts
again.
The measuring results are not stored but are sent via the Bluetooth if the option is ON
and the ADD-button is pressed. By pushing MENU-key program returns to the MAINmenu.
This method is recommended to use when ever there is doubt that the terrain is not
exactly flat. Even one to two degrees difference with the user and the tree base can
result an error especially on long measuring distances. Recommended measuring
distance is the same as the height of the tree.
If the distance to the tree is measured by other means, it can be fed by the ARROWkeys (default 15m) before the BASE-measurement. Other ways the RC3H uses the
distance calculated from the eye height, and base angle.
4.4 Distance (DISTANCE)
With RC3H the user can measure horizontal distances from the eye to the objects by
Masser-method based on the angle measuring principle. 1- POINT-method means that
the user is at the same horizontal level as the base of the tree (object). Then it is only
needed to measure the angle to the base of the tree. 2-POINT-method means that the
user stands on a sloping terrain and then it is needed to measure two angles; first
measurement to the base of the tree (object) and the second to the height of the eye on
the tree (or a pole). Selection of the method is done in Settings / Method.
picture 5.
When Distance-measurement is chosen by pushing an ADD-button, the RC3H
measures the angles and shows the distance on a display 20.00 m By pushing again
ADD-button the sequence starts again.
If the user wants measure a radius of the plot, its is advised to use a center pole where
is marked the user’s eye height and measure the distance to that pole from the circle.
Distance is calculated from the users eye to the object.
The measuring results are not stored but are sent via the Bluetooth if the option is ON
and the ADD-button is pressed. By pushing MENU-key program returns to the MAINmenu.
4.5 Slope angle (SLOPE A)
With RC3H the user can measure sloping or any angle with an inbuilt inclinometer.
When Slope-measurement is chosen by pushing an ADD-button, the display shows
00.0 DEG . Aim to the object on your eye height and the slope angle is shown. The
measured value stays on a display so long as the ADD-button is pressed.
The measuring results are not stored but are sent via the Bluetooth if the option is ON
and the ADD-button is pressed. By pushing MENU-key program returns to the MAINmenu.
Picture 6.
4.6 Diameter measurement (DIAMETER)
User can use the RC3H as a dendrometer. Theory of the operation is to measure the
tree as a boarder line tree and then measure the horizontal distance to the tree. From
these values the RC3H computes the diameter. Diameters can be measured at any
height.
picture 7.
When DIAMETER-measurement is chosen by pushing an ADD-button, user should
move so that the tree appears as a border line tree. On the display is the text DIA 10.7 .
(“10.7” is the angle to the dia point). The diameter measuring point is accepted by ADDbutton. Phase 1 / picture7.
Next the user aims to the base BASE 02.4 of the tree and pushes ADD-button.
Phase 2 / picture 7.Last the user aims to the height of the eye EYE 06.2 on the tree and
pushes ADD-button. Phase 3 / picture 7.
The RC3H calculates the diameter and shows on a display 203MM12.1 (where “203” is
diameter in mm and “12.1” is the aiming height in m). By lifting the device the RC3H
shows the diameter and the height. The user can aim again to the point where the
diameter was registered and the RC3H shows both the diameter and the height. By
pushing the ADD-button the reading is captured on the display. By pushing again ADDbutton the sequence starts again.
The measuring results are not stored but are sent via the Bluetooth if the Bluetooth
option is ON. By pushing MENU-key program returns to the MAIN- menu.
4.7 Settings (SETTINGS)
4.7.1 Form Factor (FORM FAC)
Users can specify individual form factors for 30 species. Default form factor is 0.500.
Form factor is used for calculation of the volume (V) of the trees.
V= FAC * BA * H (BA = Basal Area, H= average height of the species)
First the program shows the pre-set form factor for species number 01: SP01 500 .
By pushing the ADD-button the program gives an entry display: FAC XXX
Selection is made by arrow keys and accepted with ADD-button and the display returns
to show species and selected form factor. These values are not changed with CLEAR
MEM-function. By pushing MENU-key the program returns to SETTINGS menu.
4.7.2 Slope correction (SLOPE C)
User can select by arrow keys if the option for slope correction is ON or OFF.
Acceptance is done by ADD-button and the program returns back to SETTINGS- menu.
Default for this parameter is OFF. MEM CLEAR- function does not change the status.
4.7.3 Eye height (EYE H)
User must feed the height of his / her eye from the ground. The display shows 170 CM,
adjust the height by arrows and accept with ADD-button. This value is not changed with
CLEAR MEM-function.
How to measure accurate the eye height is illustrated in picture 8. Select from the main
menu angle measurement mode SLOPE A and stand near the wall. Take a natural
measuring position and aim to the wall so that the display shows zero angle. Mark the
aiming point and measure the height from the floor: Eye Height.
picture 8.
Remember to keep the same measuring position always in the forest too.
4.7.4 Bluetooth (BLUETOOTH)
User can select by arrow keys if the option for Bluetooth is ON or OFF. Acceptance is
done by ADD-button and the program returns back to SETTINGS- menu.
Default for this parameter is OFF. MEM CLEAR- function does not change the status.
4.7.5 Language selection (LANGUAGE)
In the language menu users can change the display and output texts to another
language. Selection is made by arrow keys and accepted with ADD-button.
4.7.6 Clearing the memory (CLEARMEM)
When entering the memory clear-function the display shows: CLEARMEM
By pushing the ADD-button the display shows : NO
If ADD-button is pushed the program returns to SETTINGS menu without erasing the
memory. User can select an option YES with arrow keys and accept it with ADD-button
and then the display shows ERASING
4.7.7 Height measuring principle (METHOD)
User can select by arrow keys if the option for height measurement is 1-POINT or 2POINT. Acceptance is done by ADD-button and the program returns back to
SETTINGS- menu. Default for this parameter is 2-POINT. MEM CLEAR- function does
not change the status.
It is strongly recommended to use 2-POINT method in all measurements in the forest
because the surface is very seldom so flat that 1-POINT method gives reliable results.
1-POINT method works fine on the road, mill yard and in-house.
4.7.8 Software version
On a display is shown the loaded software version number. This manual is valid for SWversions 1.5.x. VER 1.5.0
4.8 Output
A PC-program for downloading the measured data to the PC (LOADER) can be
installed from the CD.
Connect the cables or check that the Bluetooth option is in ON-state.
The receiving device (PC, printer) must be set in a waiting state. LOADER is set to
receive the data by selecting RECEIVE / START from the PC menu window. (Select the
serial port and set baud rate to 9600 baud)
Select from RC3H OUTPUT and push the ADD-button, the display shows :NO
(If ADD-button is now pushed the program returns to main menu.)
Select an option YES with arrow keys and accept it with ADD-button and the display
shows SENDING. When the download is ready the display shows a text READY.
Wait until the PC has got the report ready and push ADD-button to shut off the RC3.
Example of the output file:
STAND AREA
1
2.0
1
2.0
1
2.0
1
1
1
2.0
2.0
2.0
PLOT
1
1
1
2
2
2
RF
0.87
0.87
0.87
0.87
0.87
0.87
SPECIES PCS
1
5
2
4
3
3
1
2
3
3
3
0
SLOPE_DEG HEIGHT BA
15.0
20.0
9.0
15.0
21.0
7.2
15.0
22.0
5.4
TOTAL BA
21.6
0.0
25.0
5.2
0.0
0.0
5.2
0.0
0.0
0.0
TOTAL BA
10.4
STAND AREA SPECIES FF MHEIGHT BAm2/ha m3/ha
1
2.0
1 0.490
22.5
3.56
39.2
1
2.0
2 0.500
21.0
3.11
32.6
1
2.0
3 0.500
22.0
1.35
14.9
TOTAL BAm2/ha m3/ha
m3
BA
*
8.01
86.7 173.4 16.0
*** RC3H Int. V1.5.0 ***
m3
78.4
65.2
29.8
BA
7.1
6.2
2.7
5. Loading a new program version
1. Connect the PC-cable to RC3H and PC.
2. Start the Loader from the PC and OPEN the new program.
3. Push the MENU-key down while starting the RC3H from ON-key.
4. Release both buttons and a load-menu appears:
RUN (starts the previous loaded program)
INSTALL (starts the loading of a new program)
SHUTDOWN (shuts the device off)
1 .Select first INSTALL from the RC3H menu and press ADD-button.
2. Select START Y with ARROW UP/DOWN keys and press ADD-button.
3. Then select LOAD from the PC program.
4. Program loading starts and wait until RC3 shuts off.
5. Loading is complete.
6. Calibration of the hologram sight
picture 9.
The elevation angle can be checked as shown in picture 9. Mark your eye height on the
wall. Select SETTINGS-MENU, OFFSET and walk to the distance about 10 m. Aim to
the measured eye height and push ENTER. If the reading differs from the zero, adjust
the offset value with ARROW UP and ARROW DOWN keys. Push ENTER and repeat
the procedure to verify the calibration.
Note that you must keep your natural measuring position same in both places.
7. Warranty
•
Hardware Limited Warranty
MASSER products and accessories are warranted for a period of (1) one year starting
from the date of delivery. Masser Oy warrants that this hardware product will perform
substantially in accordance with published specifications and be substantially free of
defects in material and workmanship.
•
Software License, Limited warranty
This Masser software is licensed and not sold. Masser Oy warrants that this Masser
product will substantially conform to Masser’s applicable published specifications for the
software for a period for ninety (90) days, starting from the date of delivery.
•
Limitation of Liability
Warranty applies to manufacture defects and general malfunction. Masser Oy is not
liable for the misuse of this product or for the damages caused due to misuse or
unauthorized service.
Masser is not liable, in any case, for the lost of data collected.
Warranty does not cover transportation costs.
8. Contacts
Service and sales:
MASSER OY
Jämytie 1
FIN-96910 ROVANIEMI
FINLAND
Tel + 358 400 904 500
Fax + 358 16 282 554
e-mail: [email protected]
www.masser.fi