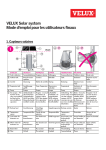
1
Report no: 03.4 PILOT A USER’S MANUAL Testing personnel’s activities and instructions Elias Hakalehto, Anneli Heitto, Anssi Suhonen, Petteri Rautvuori, Emmy Hämäläinen, Sanna Juopperi, Saana Nevalainen, Risto Rissanen, Ari Jääskeläinen February 2015 Disclaimer This publication has been produced with the assistance of the European Union (http://europa.eu). The content of this publication is the sole responsibility of authors and can in no way be taken to reflect the views of the European Union. Index 1. INTRODUCTION .......................................................................................................... 4 2. PILOT A TECHNICAL OPERATION .............................................................................. 5 2.1 AUTOMATIC MEASUREMENTS AND SAMPLING POINTS IN PILOT A PROCESS .............................................. 5 2.2 TECHNICAL OPERATION DESCRIPTION .................................................................................................... 6 2.2.1 Crushing machine and homogenizer .......................................................................................... 6 2.2.2 Water heater ................................................................................................................................ 9 2.2.3 Hydrolyzer ................................................................................................................................. 10 2.2.4 Bioreactor ................................................................................................................................... 10 2.2.5 Stabilizer ..................................................................................................................................... 14 2.2.6 Filtration..................................................................................................................................... 14 2.2.7 Calibration of pH sensors and diluted oxygen sensor ............................................................ 14 3. MICROBIOLOGICAL OPERATION IN PILOT A ........................................................... 15 3.1 INTRODUCTION ..................................................................................................................................... 15 3.2 CONSUMABLES FOR MICROBIOLOGICAL PROCESS .................................................................................. 15 3.3 CULTIVATIONS IN PMEU5 ................................................................................................................... 16 3.3.1 Starting microbiological growth in PMEU5 ............................................................................ 16 3.3.2 Adjustments of the PMEU5 ....................................................................................................... 18 3.4 CULTIVATION IN INOCULUM FERMENTERS ............................................................................................ 18 3.5 CHECKING THE PURITY OF MICROBE INOCULUMS .................................................................................. 19 3.6 INOCULATION TO BIOREACTOR ............................................................................................................. 19 3.7 MAINTAINING THE BACTERIAL STRAINS ................................................................................................20 4. MEASUREMENTS PERFORMED BY TESTING PERSONNEL ..................................... 21 4.1 DRY MATTER MEASUREMENT ................................................................................................................ 21 4.2 GLUCOSE MEASUREMENT ..................................................................................................................... 21 4.3 GAS CHROMATOGRAPHY ....................................................................................................................... 21 4.4 ADDING AND STORING MANUAL MEASUREMENT RESULTS TO THE CONTROL SYSTEM ............................. 21 5. SAMPLING ................................................................................................................. 22 5.1 INTRODUCTION ..................................................................................................................................... 22 5.2 SAMPLING POINTS ................................................................................................................................ 22 5.3 TAKING THE SAMPLES ........................................................................................................................... 24 5.4 MARKING THE SAMPLES ....................................................................................................................... 24 5.5 HANDLING OF LEFTOVER SAMPLES ....................................................................................................... 24 2 5.6 STORING OF SAMPLES ........................................................................................................................... 24 5.7 SENDING OF SAMPLES ........................................................................................................................... 25 6. WASHING OF PILOT A .............................................................................................. 26 6.1 HOMOGENIZER ..................................................................................................................................... 26 6.2 HYDROLYZER ....................................................................................................................................... 26 6.3 BIOREACTOR ........................................................................................................................................ 26 7. WORKING SAFETY .....................................................................................................27 7.1 PERSONAL SAFETY................................................................................................................................. 27 7.2 PILOT A SAFETY SYSTEMS...................................................................................................................... 27 7.2.1 General ........................................................................................................................................ 27 7.2.2 Gases ........................................................................................................................................... 29 7.2.3 Microbiology .............................................................................................................................. 29 8. TROUBLESHOOTING ................................................................................................. 31 9. LIST OF APPENDICES OF PILOT A USER’S MANUAL ............................................... 32 APPENDIX 1. INSTALLATIONS, CLEANING AND PACKING APPENDIX 2. PROCESS USER INTERFACE APPENDIX 3. GAS SYSTEM APPENDIX 4. PH AND DILUTED OXYGEN SENSORS’ CALIBRATION APPENDIX 5. DRY MATTER MEASUREMENT APPENDIX 6. GLUCOSE MEASUREMENT APPENDIX 7. GAS CHROMATOGRAPHY 3 1. Introduction The goals of the ABOWE project and the Pilot A designed and manufactured in Finland by Savonia University of Applied Sciences is to provide "proof of concept" on the ways, how biomass based waste materials could be used for producing, with the help of microorganisms, biofuels, organic chemicals, fertilizers and nutrients in an economically feasible way. A coherent objective is to achieve industrial action which is implementing same principles that are maintaining the ecosystems. In the Nature there are not e.g. landfills anywhere, but all organic material is recycled. Future biorefineries are industrial fields, where side streams from industries and municipalities are treated and refined into useful products in successive process solutions. All waste is then integrated as a raw material into them. The novel biorefinery pilot plant in its first testing site at Savon Sellu Oy’s waste water treatment plant in Kuopio in January 2014. This manual and its appendices have been compiled for testing personnel’s use in various testing locations of Pilot A. Theoretical and practical training session shall precede testing periods. 4 2. Pilot A technical operation 2.1 Automatic measurements and sampling points in Pilot A process Results manually to Exel-file Results manually to Labview Samples to Ostfalia With moisture meter Dry mass For lab analysis Dry mass Total solids Volatile solids Total nitrogen TOC (BOD) With handheld meter pH Glucose pH With handheld meter Glucose pH Incoming substrate Pretreatment Hydrolyzer Reactor Amount of water TOC Weight Temperature Level For lab analyzis Phosphorus Total nitrogen Total solids Volatile solids TOC BOC For Gas chromatograph 2,3 Butanediole Ethanol Butanol Acetone Propanol Simple org. Acids Other fatty acids Filtered substrate (Solid fraction) Filtered substrate (Liquid fraction) For Gas chromatograph 2,3 Butanediole Ethanol Butanol Acetone Propanol Simple org. Acids Other fatty acids With sensor Diluted oxygen pH Automatically to Labview With wall analyzer Methane Hydrogen sulphide Hydrogen Oxygen Carbon dioxide TOC NMR Figure 1. Automatic measurements and sampling points in Pilot A. Pilot A process starts with the incoming substrate. Weight of the substrate fed to the homogenizer is measured with a scale, or with the weighing mechanism in the homogenizer. Small sample is taken from all different substrates, solid and liquid, for possible later laboratory analysis. When the substrates are in the homogenizer they are mixed together. From this mixture a sample is taken, and from that the dry matter content is measured. If dry matter is around 10%, the mixture can be transferred to the hydrolyzer. 5 In the hydrolyzer pH of the feed mixture is measured, either with a sensor in the hydrolyzer or with a separate hand held meter. Temperature is measured automatically with a sensor, and can be followed from the LabView. Samples are taken troughout the heating process for glucose measurements. After being hydrolyzed, the feed mixture is transferred to the bioreactor. Diluted oxygen and pH are measured automatically with a sensor. Gases, such as methane and hydrogen, are measured automatically with a gas analyser set in the wall of Pilot A. Samples are taken throughout the bioreactor phase. From the samples taken, the gas chromatograph tests are run, and glucose measured. Samples are stored to fridge or freezer for possible later analysis. After the bioreactor phase is completed a sample from the final product is taken for laboratory analysis. The process control system has been built with Labview. Pilot A Process User Interface has been instructed in a separate manual. 2.2 Technical operation description 2.2.1 Crushing machine and homogenizer The feed going to the process is fed through the crushing machine or the hatch on top of the homogenizer tank. Crushing machine is used to make sure that no particles large enought to block the operating pumps are getting into the process. The feed mixture is adjusted to suitable form so it can be pumped without any problems by controlling its moisture content. This is done by mixing in water till the mixture is runny enough. Before starting to add the feed, make sure that the mechanism locking the weight measurement on the homogenizer is unlocked. This is done by pulling the lever attached to the leg of the homogenizer, which releases the weight measurement pad (Picture 1). Also make sure that safety switch (04Q1) is switched on. 6 Picture 1 Weighing mechanism Then switch on the crushing machine (100M1) from the control room. When the crushing machine is running, the magnetic valve controlling the water flow opens automatically. You can adjust the amount of water flow by turning the on/off switch in the tab (Picture 2). The amount of water is measured automatically, and can be seen in the LabView window (100FIQ). You can find more information about operating LabView in the User Interface manual. Picture 2 Water adjustment Then star pouring in the feed into the funnel attached to the crushing machine. You can solve the amount of the feed by calculating; weight of the homogenizer (101WIQ) – weight of water (100FIQ) = amount of feed (kg). With this knowledge the mixtures moisture concentration can be solved. If the feed is fine enough to not need crushing it can be poured straight into the homogenizer. In this case, use a separate scale to weight the feed before adding it to the homogenizer. To 7 add the feed, simply open the hatch on top of the tank and pour in the feed material with a bucket. Make sure to avoid looking too closely to avoid any unnecessary splashing to reach your face. When using waste water, it can be pumped straight to the pretreatment tank by using a separate pump. Homogenizers mixer is operated through LabView in the control room. It can be adjusted to desired speed, which depends on the quality of the feed. Mixing direction can also be changed to improve the mixing process. This is done through the LabView program as well, and can be set to automatically change the direction at certain times. More information regarding this can be found from the User Interface manual. The pH for rough adjustment can be measured by scooping out a sample from the hatch at the top of the tank and using a handheld pH-meter. Before doing this, make sure to turn off the mixer. If pH is completely out of desired range pour small amount of HCl mixture or lime/baking soda, depending if the pH level is too high or low, though the hatch. Wait for the pH to stabilize before repeating the measurement. Note that the pH of the feed is adjusted to its final form in the hydrolyzer. When the material is ready to be transferred to hydrolysis stage, make sure that the valve 101V2 is OPEN (picture 3) and valve 102V1 CLOSED. Also check the valves on the pipe between pretreatment and the hydrolyzer to make sure they are open. Only after that the pump 101P1 can be used. Pump 101P1 is operated with the LabView. Picture 3 Valve 101V2 open If for some reason there is a blockage and no feed goes to the pump, open valve 101V3 to allow water to flow into the joint between pump and pretreatment tank. This should help opening the blockage. Similar valves can be found in every joint between tanks and pumps. 8 2.2.2 Water heater Water used to heat the hydrolyzer for disinfection process is heated in the water heater (Picture 4). Heating process is operated with LabView. It is important to start the water heater early to make sure there is heated water by the time of hydrolysis stage. To adjust the temperature, turn the button on the thermostats (Picture 4, orange circles) to maximum setting. When the heating begins the three thermostats should have red light on, which means that they are heating the water. When the red light is turned off water is at adjusted temperature. Before starting to heat the hydrolyzer, make sure to open all the valves on the water heater (Picture 4, red circles), as well as all the valves on the copper pipes carrying the heated water to the hydrolyzer. Picture 4 Water heater When all the needed valves are open, turn on the heating process with LabView. Water flow to the hydrolyzer is adjusted with valves 102TV1 and 102TV2 (Picture 5), which are both used automatically through LabView. 9 Picture 5 Valve 102TV2. 2.2.3 Hydrolyzer The hydrolyzer’s objective is to disinfect the substrate mixture. This is done by heating the mass to a temperature high enough to kill the microbes living in it. To allow the mass to heat evenly there is a mixer mixing it while the heating takes place. Mixer should always be running to prevent the solid matter from sinking to the bottom of the tank. In the hydrolyzer the pH level of the substrate is also adjusted to desired level by adding HCl or lime (or other suitable substrates), depending if the pH level is too low or high, through the top of the tank. Some anti-foaming chemical can be added if needed. When the substrate is ready to be hydrolyzed, switch on the hydrolysis stage in the LabView window. Temperatures upper limit and hydrolysis stage time, as well as the cooling temperatures lower limit is set from the control room with LabView. The temperature is adjusted to set point by opening and closing valves 102TV1 and 102TV2. They are operated automatically when the LabView’s heating program is in place. 2.2.4 Bioreactor Bioreactor is the most important part of this process. The microbiological feed is fed to the reactor, which commences the growth of the organisms that create the substrates we are aiming to obtain. Lots of sampling and measuring takes place during the reactor phase, meaning that this is the most hectic point of the process. Before pumping the feed from the hydrolyzer to the bioreactor, make sure to open valve 102V1 (picture 6). This valve allows the feed mixture to flow in to pump 102P1. Also make 10 sure to open other valves on the pipeline between the hydrolyzer and reactor. From the bioreactor, close valves 103V4 and 103V3 to avoid the feed mixture from entering the circulation pipe. Picture 6 Valve 102V1. Pump 102P1 (picture 6) is operated with LabView. Turn on the pump with LabView and start pumping the feed to the bioreactor at about 70% pump speed. At the same time keep notice on the surface level in the bioreactor through the window on its side. Keep pumping the feed until the surface level reaches the lower end of the upper window. Then turn off the pump. As stated earlier, there are many different processes happening at the same time during the reactor phase. These processes are explained briefly below. Aeration process There is also an aeration process taking place in the bioreactor. This is done to help microbiological growth. Aeration is achieved by adding gas-mixture in to the bioreactor through two aeration rings which are placed inside the reactor. The gases used are carbon dioxide (CO2), nitrogen (N), oxygen (O2) and compressed air. These gases are mixed in a gas mixer. Aeration process is operated with LabView. The gas mixer system is described in a separate manual in more detail. Circulation process Circulation is done with a circulation pump, pump 103P1, that is attached to the reactor. Before starting the circulation, open valves 103V3 and 103V4 and make sure valves 103V7V13 are closed. Sample is taken from valve 103V9 (Picture 7) during circulation. Circulation pump should always be used at minimum 30% speed or higher. When taking sample from valve 103V9, the circulation speed can be dropped to 10% to avoid splashing. After the sample is taken, lift the speed back up. 11 Picture 7 Circulation valves Adding microbiological mass The microbiological mass grown in the fermenters is added to the bioreactor via hose pump (Picture 8). It can be added when temperatures in the fermenters and the bioreactor are in suitable range. To start pumping the mass, attach a tube coming from the pump into the fermenters and another tube from pump to the bioreactor’s valve, located in the circulation process. Make sure that the joints are thoroughly attached before starting the pump. Then slowly start to pump the mass by operating the pump with the controls in it. The microbiological process is described in a separate manual in more detail. Picture 8 Hose pump and fermenters used to add microbiological mass to the bioreactor. 12 Adjusting pH If needed, the pH can be adjusted in the reactor. There are two pumps, one for base (Picture 9), one for acid, located close to the bioreactor. A tube is attached between the pump and a valve on the circulation process and the pH adjuster is fed through it into the circulation (Picture 10). This allows is to mix in evenly, so that no sudden pH spikes would occur. To operate the pump, simply press the button that says 100%. Picture 9 pH adjustment pump. Picture 10 pH adjustment. 13 2.2.5 Stabilizer The stabilizer stabilizes the substrate after it comes from the reactor. There is a cooling circle inside the stabilizer which cools down the substrate and ends all microbiological growth that might occur otherwise. The cooling process is operated with LabView. The feed comes to the stabilizer through valve 103V5 (Picture 11), which works with pneumatic air. The valve is opened and closed with LabView. Operation of this valve is based on the overflow of the reactor tank, so there needs to be enough material in the bioreactor for it to be able to flow into the stabilizer. Picture 11 Valve 103V5. 2.2.6 Filtration The filtration takes place in the filter. Its purpose is to separate the liquid fraction from the solid fraction of the final product received from the stabilizer. Filter uses air pressure to filter the product. 2.2.7 Calibration of pH sensors and diluted oxygen sensor There is a pH sensor in the hydrolyzer and the bioreactor and a diluted oxygen sensor in the bioreactor. The calibration of these sensors is instructed in a separate manual. 14 3. Microbiological operation in Pilot A 3.1 Introduction The microbiological inocula are produced first in the PMEU equipment (Portable Microbe Enrichment Unit) (Samplion Oy, Siilinjärvi, Finland), and then in the seed fermenters connected to the bioreactor. The entire microbiological and biotechnical process control is designed by Finnoflag Oy, Siilinjärvi, Finland. PMEU 5 is a unit for creating optimal conditions for bacterial growth. Picture 12 PMEU 5 (Portable Microbe Enrichment Unit). 3.2 Consumables for microbiological process PMEU 5 Terumon 60 ml –syringes Dialators in packs Nutrient mediums for growing the inoculum (for example THG) in PMEU5 and concentrated (5x) mediums for seed fermenters Colilert IDEXX nutrient mediums for monitoring reactor samples 15 Bacterial strains on plates CHROMagar Orientation etc. plates Loops 500 ml bottles for medias silicon tubes for bacterial transfers hotplate and pot 3.3 Cultivations in PMEU5 3.3.1 Starting microbiological growth in PMEU5 1. Take 5-10 bacterial colonies from the plate with loop to bottle with 300 ml of sterile medium, let stay 30-60 min with shaking every now and then 2. Take one Terumon syringe from sterile pack. Do not touch the head of the syringe! 3. Take 40-50 ml of the medium inoculated with bacteria from bottle to syringe using sterile silicon tube, fill 6 syringes 4. Take the dialator from sterile pack. Do not touch the needle! You can touch only to the red handle. Picture 13 Dialator. 16 5. Put the dialator inside the syringe and make sure that they are properly in place. Picture 14 Syringe. 6. Put the syringe in the PMEU5. 7. Connect gas hose to the dialator’s red valve. Picture 15 Connection of gas hose to dialator. 17 3.3.2 Adjustments of the PMEU5 In pilot A processes gas composition is a result of mixing up air from compressor, and N2 and CO2 from the pressurized bottles. (See the separate manual for the gas system.) 1. Turn the PMEU5 on (See technical instructions of PMEU5.) 2. Open the valves to syringes. Picture 16 A valve to a syringe. 3. 4. 5. 6. Select the temperature (usually 37 oC). Select the gas composition and flow rate. Start the enrichment process Follow growth curves 3.4 Cultivation in inoculum fermenters 1. Boil 14 l of distilled water and pour 7l to each two fermenters 2. Close the fermenters and let cool to 38oC 3. Pour the concentrated nutrient mediums (1000 ml of 5x concentrated media to each inoculum fermenter) to fermenters 4. When microbe inoculum is ready to use, transfer the microbes from PMEU5 to inoculum fermenters, 3 syringes/fermenter. 5. Adjust the temperature and gas flow to same level as they was in PMEU5 6. Take a sample from one inoculum fermenter to a new syringe using the sterile silicone tube 7. Put the syringe back to PMEU5 to follow the bacterial growth 18 3.5 Checking the purity of microbe inoculums This instruction is only for enterobacteria. For anaerobes please follow the separate instructions. 1. Take syringe from PMEU5 and remove carefully the dialator from the syringe. Be careful not to spill the inoculum from the dialator! 2. Put one drop from the syringe to ChromAgar plate and spread with a loop. 3. Put the dialator back to the syringe. 4. Put the inoculated plates to the cultivation chamber in a laboratory (37 oC) or into the PMEU. 3.6 Inoculation to bioreactor 1. When the inoculums are ready, check the conditions in the process (pH, temperature, gas). If the conditions are suitable for bacteria, go to next step. 2. Take new clean hose and connect it to the pump. Picture 17 Hose pump. 3. Pump bacteria from inoculum fermenters to reactor. Use the valve in the reactor’s circulation tube. 19 Picture 18 Reactor’s circulation tube. 4. Clean up the inoculum fermenters. 3.7 Maintaining the bacterial strains This instruction is only for enterobacteria. For anaerobes please follow the separate instructions. To maintain the bacterial strains it is necessary to rejuvenate them in every one week. 1. Take a fresh ChromAgar plate 2. Take one colon from the initial plate and spread it with a sterile loop to a fresh plate. 3. Keep the plate in room temperature or warmer. 4. Ensure the purity of the strain visually after 2 days incubation. 20 4. Measurements performed by testing personnel 4.1 Dry matter measurement Dry matter content is measured with a moisture meter that is on the Laboratory table. There is a separate manual for measuring dry matter contents in Pilot A. 4.2 Glucose measurement Glucose is measured with conventional stripe tests of which there is a separate manual for measuring glucose in Pilot A. 4.3 Gas chromatography In the Laboratory room there is a gas chromatography for measuring liquid product concentrations from samples taken from the reactor process broth. There is a separate manual for gas chromatography measurements in Pilot A. 4.4 Adding and storing manual measurement results to the control system Please write down results of all measurements performed by the testing personnel and type them to the specific Excel workbook of each run and/or LabView according to what is agreed among the testing group. It is naturally of ultimate importance to carefully maintain records of test runs. 21 5. Sampling 5.1 Introduction In a biological process it is important to take samples regularly, so that the process can be monitored. Sampling plan needs to be done, where sampling points, sampling times and amounts of samples are determined for each run. In Pilot A the following measurements can be done from the liquid samples: temperature, pH, dry matter content, glucose, gas chromatography. 5.2 Sampling points There are 3 sampling points in the process. The first sampling point is at Homogenizer (H). There is a hatch on top of the tank, where the sample can be taken with a scoop. Picture 19 Sampling point in the Homogenizer. 22 The second sampling point is at the hydrolyzer (HY). Also there is a hatch on top of the tank, where the sample can be taken with a scoop. Picture 20 Sampling point in the hydrolyzer. The third sampling point is a valve in the bioreactor’s circulating tube (R). It can also be necessary to take samples from reactor’s bottom valve. Picture 21 Sampling point in the bioreactor’s circulating tube. Attention! When taking sample from the valve, the circulation should be reduced about 50 %. Otherwise the flow of matter is too intense, and it can splatter from the valve when the sample is taken. Splattering can not be avoided by opening valve partially. Valve will clog, if it is opened partially. 23 The circulation can be controlled by the computer of the control room. 5.3 Taking the samples Take always two samples, one for measuring and one for the storage. Use clean instruments and work hygienically. Wear single-use gloves and breathing mask if needed. There are detailed instructions for taking the sample for dry mass and glucose in the separate instructions for the moisture analyzer and the glucose meter. 5.4 Marking the samples Each stored sample must be marked in following way: Sampling point (H, HY or R) Date and time Number of sample Name of the sample’s collector 5.5 Handling of leftover samples Treatment of leftover samples need to be agreed and organized locally between the testing site and the testing partner. 5.6 Storing of samples For short-term storage for further analysis, please keep samples in refrigerator before analyzing them. For long-term storage for documentation, please keep samples for longer term storage also in refrigerator. Additionally, put some samples from reactor to freeze as well. Samples to freezer are the first and the last sample and between for example in every four to six hours. 24 5.7 Sending of samples Concerning the Finnish tests, all samples are sent after each run to the water laboratory of Savonia UAS in Kuopio. Some samples are sent for NMR (Nuclear Magnetic Resonance) analyzer of University of Eastern Finland, Kuopio. These samples are prepared in the same way as GC samples. The amount of these samples is decided after each run based on GC results. Based on the results some final samples are sent to Ostfalia University of Applied Sciences, Wolfenbüttel, Germany for Downstream operations. The amount of process fluid to these samples is 10l. Samples are stored in refrigerator. Microbiological samples such as samples for cultivation and further identification of bacteria are sent to Finnoflag Oy’s laboratory in Siilinjärvi, Finland., if needed. The volume of these samples is 2-10 ml. Samples are stored in refrigerator. 25 6. Washing of Pilot A The washing is performed during and after each run. Each part of the process needs to be thoroughly cleaned to prevent any misconducts in the runs to come. In the end of testing period in one testing site the whole process shall be washed with disinfectant. Disposal of process fluid waste, process washing waste water and floor washing and sink waste water need to be agreed and organized locally between the testing site and the testing partner. 6.1 Homogenizer The homogenizer can be cleaned as soon as the feed mixture has been pumped out of it in to the hydrolyzer. When the tank is empty close valve 101V1. Then start pouring in water using a water hose. While the tank is filling, start the mixer with LabView. Let the mixer run for a period of time, while changing direction every now and again so that as much dirt as possible is removed. When the homogenizer looks clean turn off the mixer, open valve 101V1 and another valve, and close valve 102V1. This way the contents of the homogenizer will be led outside. Then turn on pump 101P1 and empty all the contents of the homonizer. Then start hosing the insides of the tank to wash out the dirt still stuck in there. When the homogenizer looks clean keep spraying water for a while to make sure pump 101P1 has no contents left inside. 6.2 Hydrolyzer The hydrolyzer can be cleaned using a method similar to that used in the homogenizer. 6.3 Bioreactor There are separate instructions in the attachment. 26 7. Working safety 7.1 Personal safety Testing personnel shall wear appropriate safety equipment, depending on testing site and the feed in substance in question. For example, in the Finnish testing site Savon Sellu there was obligation to use principally the same equipment as the factory is demanding from its own personnel: safety shoes, safety vest, protection eyewear. Also working safety licence was demanded from the testing personnel. Laboratory coat is one option in working Pilot A laboratory, but safety trousers and safety jacket is more practical as testing activities take place in the Process room as well. Basic respiratory filter is recommended to be used in certain points of testing, these are mentioned in the respective parts of the manual. Overall when some aerosols or dusts are in the air, respiratory protection is recommended in the pilot. It is also possible to use motorized active carbon breathing mask (not included in Pilot A equipment). Ear plugs are also possible to be used, although there is not such noise levels in Pilot A that is worth mentioning. In washing Pilot A process and floor it is recommended to use a long rain coat. Vaccination needs to be taken care. For instance at Savon Sellu testing period the personnel had hepatitis vaccination in force. When taking samples from the homogenizer or the hydrolyzer the mixers shall always be turned off, and suitable protective equipment weared. Running inside Pilot A is strictly prohibited. Smoking and open flame are strictly prohibited. 7.2 Pilot A safety systems 7.2.1 General There are two emergency exits in Pilot A, one on the each end of the container with the proper signs. To the equipment belong fire extinguisher and fire extinguisher blanket. 27 First aid kit and eye wash bottle are located next to the door in the control room. Emergency shower is in the process side of the facility, located next to the filter. Picture 22 First aid kit and emergency shower. The electrical system and all liquids shall be kept away from each other. The same applies for acid and base chemicals, although they are used in low-concentrations. 28 7.2.2 Gases Gases coming out from the bioreactor form the biggest risk in Pilot A. Explosion or fire are the utmost risks. The gases in question are hydrogen, methane and hydrogen sulphur. Whatever gases come out, they are measured, and go out from the pilot. Behind Pilot A, in quite middle on the wall there is the exhaust gas outlet from the reactor and this outlet needs to have an open space as big as a ball with the radius of 50 cm. The gases dilute quickly in the outside air. In the bioreactor there is pressure measurement and in case that set values are exceeded, gas outflow via water lock outside is increased. Pressure can be forming in each part of the process. Pumps need to be rinsed carefully. The early phases of the process is possible to be washed while the process is still going on in the final steps. Disinfectant may be used, if needed. Key issue is to make sure that pressure shall not rise in a closed section but the pressure can be released in a controlled way. No vessels, bins or connections may be left closed but all parts have to be in the atmospheric pressure. Hand and automatic valves are normally closed. Although no gas is expected to diffuse into the pilot air, the ventilation is still seven times efficient in comparison to a usual detached house which dilutes possible gas concentrations in the air inside Pilot A. There are gas alarms for methane and hydrogen in the roof of Pilot A and they are connected to the extra emergency airing inside Pilot A. The motor is blowing air in from the central part of Pilot A and there is outlet in the beginning of the process. According to the experience in Finland and in Poland there is a H2S formation easily rising up when running the pilot anaerobically as is the case in Sweden. For this situation there is a three staged security "guarantee": 1. H2S goes out from the reactor, not inside 2. In the pilot there is an alarm for elevated concentration 3. On the wall there is a gas measurement sensor display which shows the situation a. inside the tank and b. in the Pilot, with intervals of some minutes. 7.2.3 Microbiology All microbial strains that are used in Pilot A are non-pathogenic. In case aerosol is forming or there is a natural microbial risk respiratory filter is recommended. A hazard of miscellaneous microbes in the raw materials is negligible and manageable with safety procedures/precautions currently in place and in use. Decisions about the sensible 29 handling of the raw material have to be made. Any waste material has to be hygienized according to the common industrial principles, although raw material should get hygienized in the pH adjustment and heating for the hydrolysis step in the hydrolyzer. To be always on safe side, testing in Pilot A is done as if there was a hazardous microbe in question. In the table below is presented general microbial risks and their mitigation. Table 1 General microbial risks and their mitigation. 30 8. Troubleshooting Here are presented experiences from the Finnish tests at Savon Sellu. The weighing mechanism in the homogenizer has needed more calibration and the result should be verified with other method, too. It was also noticed that the feed mixture used was highly foamy. The foam, combined with below-zero temperature outside, clogged the pipe that was supposed to let the gases out of the reactor as well as the tube going to the gas analyzer. After that it was decided that the run would be canceled. The pipe got re-modified, pH-adjustment solution changed and antifoaming chemical got added to the next run. Sample taking and pH adjusting in the bioreactor turned out to be slightly difficult at first. During the whole testing period several modifications were made to make it more userfriendly and to avoid any unnecessary splashing. Picture 23 Upgraded pH adjusting system. 31 9. List of Appendices of Pilot A User’s Manual Appendix 1. Installations, Cleaning and Packing Appendix 2. Process User Interface Appendix 3. Gas System Appendix 4. pH and Diluted Oxygen Sensors’ Calibration Appendix 5. Dry Matter Measurement Appendix 6. Glucose Measurement Appendix 7. Gas Chromatography 32 Appendix 1. INSTRUCTIONS FOR INSTALLATIONS, CLEANING AND PACKING OF PILOT A Tero Kuhmonen Tero Reijonen Savonia University of Applied Sciences Installations of Pilot A To make sure that water flows to the drain the container must be aligned so that the tilt will be about 1 cm/m. The container end with pair doors should be 10-15 cm lower than the Laboratory room end. Please use wooden, metal or concrete blocks to adjust the tilt. The blocks must be placed to the corners of the container, see Pictures 1 to 4. Picture 1 Picture 2 Picture 3 Picture 4 Checklist for cleaning and packing Main principles of cleaning Pilot A is to make plant microbiologically safe to avoid contaminations for the next testing site. Lifting the reactor lid Lock frame to container with 6 mm bolts (Picture 5, arrow 1) Picture 5 Slide horisontal bar to center chain block (Picture 6, arrow 1 and 2) Picture 6 - Remove gas lines from top of the reactor (Picture 7, arrow 1) Unscrew reactor lid bolts (Picture 7, arrow 2) Unscrew gas flow meter Picture 7 - Picture 8 Lift the reactor lid with chain block (Picture 6, arrow 3) Flush tanks with fresh water as many times as possible. Use a brush to clean tanks walls. Flush pipes with fresh water by using process pumps and valves Use reactor circulation pump with fresh water and use that different ways (up to bottom, up to up, bottom to up) (Picture 10, arrow 2). You flushing circulation pipes and the same time open every sampling valve and flush it with fresh water (Picture 8 and 9, arrows 1,2,3 and 4). Remember flush also valves which located bottom of reactor (Picture 10, arrow 1). Picture 9 Picture 10 - If tanks are still dirty (fat on the wall) you can wash all tanks with mild base solution (Example 5% sodium hydroxide solution) and pump it through the process Use pressure washer if you can You can also open reactor window and wash the reactor (Picture 11, arrow 2). Picture 11 - Clean carefully pH and oxygen sensors with water and brush. Also wash sensors holding pipes (Picture 11, arrow 1). You can also use mild soap solution. Put to pH sensor the storage cap. If water is still dirty, repeat flushing procedure Use pressure washer to clean floor, start washing from the laboratory room side. When lifting reactor lid, change all aeration disks at the same time (Picture 12, arrow 1). Picture 12 Install also new sealing to reactor lid, use butyl sealant. (http://www.wurth.co.uk/technicalchemicals/sticky-tapes/sealing-tapes/car-body-sealing-tape-rd-black-10m ) or similar Pump fresh water through the dosing pumps because pumps may getting stuck if chemicals dry inside the pumps Desinfection Fill homogenizer tank with fresh water as full as possible pour 50 ml sodium hypochlorite to homogenizer tank, turn on mixer at 10% of full speed. pump solution thru the pipes Finally spray all tanks, walls and floor with sodium hypochlorite solution. Packing Place smaller things on the floor Lift chiller inside and tie it up to floor. Secure inoculum fermenters to their frame. Tie monitor of controller PC to table, also use padding. Lift gas chromatography on the floor and tie it to table feet. Appendix 2. INSTRUCTIONS FOR PILOT A PROCESS USER INTERFACE Asmo Jakorinne April 2014 Disclaimer This publication has been produced with the assistance of the European Union (http://europa.eu). The content of this publication is the sole responsibility of authors and can in no way be taken to reflect the views of the European Union. Savonia University of Applied Sciences Index 1. STARTING THE PROGRAM.......................................................................................... 3 2. PROGRAM OPERATION .............................................................................................. 6 2.1 USER IDENTIFICATION AND PROGRAM CONTROL ..................................................................................... 6 2.2 PROCESS CONTROL TABS ........................................................................................................................ 7 2.2.1 SETTINGS ..................................................................................................................................... 8 2.2.2 CRUSHER/PRETREATMENT .................................................................................................... 8 2.2.3 MIXER AND PUMP CONTROL .................................................................................................. 9 2.2.4 HYDROLYZER ........................................................................................................................... 10 2.2.5 REACTOR ................................................................................................................................... 12 2.2.6 GAS MIXER CONTROL ............................................................................................................. 14 2.2.7 STABILIZER/FILTER/DOWNSTREAM CONTAINER ........................................................... 15 2.3 PROCESS DATA INDICATORS ................................................................................................................. 16 2 1. Starting the program Program for User Interface is located C:\ABOWE-Process Control\ ABOWE-Process Control_v3 - Double click to start the program Picture 1. Location of the user interface program Measurement data is saved automatically in a C:\ABOWE-Process Control\ Measurement Data folder File is created automatically based on process starting date and time. Example data file name: 20140206_13_56_58ABOWE_data 3 After LabVIEW have started the following Project view will come available Picture 2. Project view. - (1) Right click NI-cRIO9074 and select ”connect”. Green led lights after connection is established - (2 )Open and run CS_cRIO-PB_DP-MasterAbowe(host).vi. This background subprogram controls PROFIBUS communication and needs to be started first. - (3) Open and run ABOWE RT Process.vi. This background subprogram controls and adjusts temperature in the process. - (4) Open and run ABOWE-Process Control_main.vi. This is the main program for controlling the process. To run a program press “run” arrow (see Picture 3) 4 Picture 3. CS_cRIO-PB_DP-MasterAbowe(host).vi. Run program by clicking “RUN”- Arrow in left hand top corner. All programs are started similarly by clicking “RUN”- Arrow User Interface main program is divided in to active areas. User identification and program control (top), Process Specific Controls (middle) and Process Data Indicators (bottom) Picture 4. User interface overview 5 2. Program operation 2.1 User identification and program control - (A) Write your name in the User field. - (B) Write description of the waste material in the Waste material field Picture 5. User identification and program control - (C) Press START button to start process control and confirm by pressing OK from pop up window - (D) Press STOP button to stop the process control and confirm by pressing OK from pop up window - (E) You can turn on the gas outlet fan manually by pressing 100M GAS OUTLET button - (F) If sensors recognize methane CH4 or hydrogen H2 in the container air GAS alarm led will turn red and fan will start automatically. Green leds will indicate which gas gives the alarm. - (H) Water heater temperature and heater resistors activity - (G) To exit program press EXIT PROGRAM button. Exit program button is disabled and grayed out if process is started and active. 6 Gas Chromatograph results and glucose measurement results are typed manually by a user. Results are updated in graph indicator and in the data file. The same values are being written until Confirm button is pressed and new values activated. Picture 6. Gas Chromatograph input values - (A) Last update time is presented in field. When Confirm button is pressed values are updated and Last update time indicator change. - (B) Confirm button updates values in graph and data file. - (C) Values are typed manually to these input fields. In addition to static fields there are two free label fields available. (NOTE: Values are not updated until CONFIRM button is pressed) 2.2 Process Control Tabs Process specific controls are separated in to five (5) tabs. SETTINGS, CRUSHER/PRETREATMENT, HYDROLYZER, REACTOR and STABILIZER/FILTER/DOWNSTREAM CONTAINER 7 2.2.1 SETTINGS Picture 7. Settings Tab - (A) User can set the file write interval in seconds. Initial value is 30 seconds. File name is created automatically based on date, time and user identification data. - (B) When the Pretreatment tank is empty it is possible to tare weight sensor. (NOTE: tare pretreatment weight sensor only when the tank is empty.) 2.2.2 CRUSHER/PRETREATMENT When material is too solid it is possible to run through a crusher in to the Pretreatment tank. Also water can be added to make the material more liquid. For safety reason crusher is operated in two phases. First Crusher needs to be activated from the user interface program (pic. 8 A) and second the activation button needs to be pressed by the user. Picture 8. Crusher/Pretreatment Tab Crusher will operate by pressing button in the wall next to crusher in the beginning of the process line. When Crusher is running CRUSHER ACTIVE led (B) will turn green. - (A) Activate Crusher. After crusher is activated and user press button next to crusher CRUSHER ACTIVE led will turn green. When crusher is active, magnetic valve that controls water flow to crusher opens. Also, Remember to open the manual water valve from the crusher. - (B) Water flow is calculated in litres. When starting a new batch, water flow calculation can be set to 0 by pressing RESET FLOW CALCULATION button. 8 In the pretreatment phase material is mixed with liquid (e.g. water) and suitable composition of solid and liquid is generated. After pretreatment is finished material is transferred to the Hydrolyzer tank. - (C) TURN ON PRETREATMENT MIXER Button activates the mixer. MIXER ACTIVE led will turn green when mixer is ready. MIXER DIRECTION CHANGE INTERVAL Set time in seconds when mixer changes its rotation direction. SET PRETREATMENT MIXER SPEED Slider control for Speed of the MIXER in percentage. 0 – 30 %. (NOTE: Run mixer as high speed as possible without material splashing) ACKNOWLEDGE PRETREATMENT MIXER ALARM, if mixer stops and red ALARM led turn on it is possible to reset the alarm and set mixer in ready state by pressing Acknowledge alarm button. - (D) Mixer power consumption is displayed on the graph - (E) TURN ON PRETREATMENT PUMP. Activates pump which is used to transfer material to the Hydrolyzer tank. ACKNOWLEDGE PRETREATMENT PUMP ALARM, if pump stops and red ALARM led turn on it is possible to reset the alarm and set pump in ready state by pressing Acknowledge alarm button. SET PRETREATMENT PUMP SPEED Slider control for Speed of the PUMP in percentage. 0 – 100 %. Maximum speed correspond to 40 l/min. 2.2.3 MIXER AND PUMP CONTROL All process pumps and the pretreatment mixer are controlled in a similar manner. By pressing TURN ON button pump become active (Active led will light). For safety reason and for a reminder a pop up window will open if a pump is activated. Pop up window remind user to check that valve are set correct and pipe line is open. Press OK to continue Speed is controlled from slide control. Inside slider control speed and outside slider indicate current speed. Speed can also be set by typing value to white field shown in Picture 9. Current speed is shown in grey field. (NOTE: Pump can be stopped by turning off pump from button. Speed value remains in memory. After stopping the pump it is possible to decrease the speed value) 9 Picture 9. Mixer and pump Control When PUMP ALARM light red, pump will automatically stop. Alarm needs to be acknowledged by pressing OK button before pump can be restarted again. Before staring the pump again solve the cause of alarm. One possible reason for what causes alarm: - Higher speed is needed to run the pump/mixer because of the material thickness. 2.2.4 HYDROLYZER In hydrolysis material is mixed and heated up to a high temperature. High temperature is necessary to eliminate unwanted bacteria from the material. The pH value of the material is monitored and if necessary suitable acid or base is inserted to the Hydrolyzer tank. After hydrolysis the material is transferred to the Reactor tank. Picture 10. Hydrolyzer Tab 10 - (A) Hydrolyzer mixer is turned on by pressing the HYDROLYZER MIXER button. When mixer is on it will rotate in constant speed and green led is on. If red ALARM led turn on, stop the mixer by pressing the Hydrolyzer mixer button. Red Alarm led will turn on when user has pressed mixer button but the mixer is not rotating. Check if something is preventing mixer to rotate and start again. - (B) Setting of the Hydrolysis sequence. TURN ON HYDROLYSIS button will be available after material level in the Hydrolyzer tank is above 50%. HYDROLYSIS TEMPERATURE UPPER LIMIT sets the temperature that material will reach at highest. HYDROLYSIS STEADY-STATE TIME (in seconds) sets the time how long the high temperature is maintained. HYDROLYSIS LOWER TEMPERATURE LIMIT sets the temperature that material will be cooled down after reaching the high temperature. HYDROLYSIS COOLING TIME (in seconds) sets the time how fast or slow the cooling from high temperature to low temperature is accomplished. Green leds indicated in which phase of hydrolysis the sequence currently is. After hydrolysis sequence is finished only HYDROLYSIS DONE led is lit. NOTE: Hydrolysis sequence can be stopped in any time by pressing HYDROLYSIS STOP button. Time and temperature settings cannot be changed when the hydrolysis is active. If you notice that settings are wrong, stop the sequence, set new parameters and start sequence again. - (B) HYDROLYZER TEMPERATURE CONTROL button is activated by pressing the corresponding button. Target temperature is taken from Hydrolysis lower set temperature value. When hydrolysis is active temperature control is automatically ignored. Temperature is measured from the bottom of the tank and with pH sensor. User can select which temperature is used to compared target and measured temperature values. See Pictures 11. and 12. Picture 11. Hydrolyzer temperature control 11 Picture 12. Hydrolyzer temperature control options - (C) TURN ON HYDROLYZER PUMP. Activates pump which is used to transfer material to the Reactor tank. ACKNOWLEDGE HYDROLYZER PUMP ALARM, if pump stops and red ALARM led turn on it is possible to reset the alarm and set pump in ready state by pressing Acknowledge alarm button. SET HYDROLYZER PUMP SPEED Slider control for Speed of the PUMP in percentage. 0 – 100 %. Maximum speed corresponds to 40 l/min 2.2.5 REACTOR In the Reactor it is possible to control temperature, gas feeding, pH and circulation pump for mixing. In principle Temperature is set to 37 °C and circulation pump is set to 50 % and they are kept in this setting indefinitely. Gas valves are set based on suitable composition and flowrate indefinitely. Acid, Base and fermentor is pumped if necessary. Samples are gathered from the circulation line through sampling valves. Picture 13. Reactor Tab - (A) TANK OVERFILL stops the hydrolyzer pump, that feed material in to the Reactor tank, when over fill is reached. (NOTE: This parameter is not currently in use. Set to 100 % and stop the hydrolyzer pump manually based on visual observation). - (A) SET REACTOR TEMPERATURE set the preferred value for the automated temperature control to maintain. Temperature is measured from the bottom of the tank, heating water exit line, LDO sensor and pH sensor. User can select which 12 temperature is used to compare target and measured temperature values. See Pictures 14. and 15. Picture 14. Reactor temperature control and Reactor exhaust gas flow indicator Picture 15. Reactor temperature control options is selected by user - (B) Gas valves control. Upper and lower gas feed is set with slider controls or manually typing the flow value in the control field. Actual measured gas flow is presented and if there is a difference between set and measured values ALARM led will turn red. (NOTE: Minimum flow rate varies for each gas. If actual measured value does not correspond to low setpoint value gas flow is too small) - (C) ACID, BASE and FERMENTOR pump settings. Flowrate can be set independently for each pump. PUMP ACID button starts pump which feed acid to the Reactor. Pump can be stopped in any time by pressing the button again. Pump will stop automatically after time in PUMPING TIME is reached. PUMP BASE button starts pump which feed base to the Reactor. Pump can be stopped in any time by 13 pressing the button again. Pump will stop automatically after time in PUMPING TIME is reached. PUMP INNOCULUM button starts pump which feed fermentor to the Reactor. Pump can be stopped in any time by pressing the button again. Pump will stop automatically after time in PUMPING TIME is reached. When pump is active corresponding green led will lit. If pump is turned on but it is not pumping corresponding red ALARM led will light. - (D) REACTOR CIRCULATION PUMP. Activate pump which is circulates material in the Reactor tank. ACKNOWLEDGE REACTOR CIRCULATION PUMP ALARM, if pump stops and red ALARM led turn on it is possible to reset the alarm and set pump in ready state by pressing Acknowledge alarm button. SET REACTOR CIRCULATION PUMP SPEED Slider control for Speed of the PUMP in percentage. 0 – 100 %. Maximum speed corresponds to 40 l/min - (E) REACTOR OUTPUT VALVE button opens and closes the pneumatic valve to the Stabilizer tank, when valve is fully open green led will light. Principle of the use: 1. Stop reactor circulation pump. 2. Over fill material in the Reactor tank above output valve. 3. Let material to settle preferred time period. 4. Open output valve and let material to flow to the Stabilizer tank. Flow will eventually stop after material level is below output valve. AUTOMATIC REACTOR EVACUATION button activates described sequence. Sequence is accomplished with REACTOR SETTLING TIME and REACTOR EVACUATION TIME. When AUTOMATIC EVACUATION is activated it is possible to cancel by pressing CANCEL EVACUATION. (NOTE: Automatic evacuation is currently not in use. Commit reactor evacuation manually based on visual observation.) - (F) REACTOR REJECT PUMP Activate pump which is used to pump material back to the Pretreatment (Homogenizer) tank or to the waste drain. ACKNOWLEDGE REACTOR REJECT PUMP ALARM, if pump stops and red ALARM led turn on it is possible to reset the alarm and set pump in ready state by pressing Acknowledge alarm button. SET REACTOR REJECT PUMP SPEED Slider control for Speed of the PUMP in percentage. 0 – 100 %. Maximum speed corresponds to 40 l/min. 2.2.6 GAS MIXER CONTROL Gas mixer is used for deliver suitable gas composition to the top part and bottom part of the Reactor tank and to a sideline which lead small amount of gas to fermentor tanks. Gas flow is set with a slide control or typing set value to corresponding field (see Picture 13.). Measured 14 gas flow is indicated as a slide indicator next to slide control and as a numeric value in a corresponding indicator field Picture 16. Gas mixer control 2.2.7 STABILIZER/FILTER/DOWNSTREAM CONTAINER When material processing is finished is the Reactor tank. Material is cooled down and stabilized in the Stabilizer tank. Picture 17. Stabilizer Tab - (A) Stabilizer temperature is possible to cool down. No heating is available. SET STABILIZER TEMPERATURE set target temperature to cool down the Stabilizer to. After temperature is reached cooling stops and material is left unassisted. - (B) STABILIZER PUMP Activate pump which is used to pump material to filtration or to the waste drain. ACKNOWLEDGE STABLIZER PUMP ALARM, if pump stops and red ALARM led turn on it is possible to reset the alarm and set pump in ready state by pressing Acknowledge alarm button. SET STABILIZER PUMP SPEED Slider 15 control for speed of the PUMP in percentage. 0 – 100 %. Maximum speed corresponds to 40 l/min. Processed material is filtered in last phase. Filtered sample is packed and stored to be analyzed. - (C) Filter pressure in indicated in the FILTER PRESSURE field. (NOTE: pressure sensor is currently not connected, use visual observation) - (D) When downstream container is full and need to replaced DOWNSTREAM CONTAINER FULL led will light. If container is full the stabilizer pump shuts down and it is not possible to start before downstream container is replaced or emptied. 2.3 Process Data Indicators All measured data is presented in graphs or in numeric indicators Picture 18. Process data indicators - (A) PRETREATMENT TANK weight, WATER FLOW, SOLID MATERIAL WEIGHT and TOTAL MATERIAL WEIGHT are presented here. - (B) HYDROLYZER TANK LEVEL is presented in tank indicator. Hydrolyzer chart indicates Temperature and pH values. - (C) REACTOR TANK LEVEL is presented in the tank indicator. Reactor Broth Sample chart presents glucose and gas chromatograph values which user types in the Gas chromatograph input values field. Reactor Chart presents Temperature, pH and Diluted Oxygen values measured automatically from the Reactor. Reactor Gas Chart presents automatically measured gases from the Reactor. - (D) STABILIZER TANK LEVEL is presented in tank indicator. Stabilizer temperature chart presents automatically measured Stabilizer temperature. 16 Appendix 3. PILOT A – GAS SYSTEM Tero Kuhmonen February 2014 Disclaimer This publication has been produced with the assistance of the European Union (http://europa.eu). The content of this publication is the sole responsibility of authors and can in no way be taken to reflect the views of the European Union. Savonia University of Applied Sciences Fig. 1. Process gas lines. 2 Fig 2. Gas flow settings on control software, volume flow of each gas for both layers of reactor. Fig. 3 Adjusting air pressure for gas mixer. 3 Measuring ranges: CO2 0…5 l/min N2 0…10 l/min Air 0…100 l/min Controlling ratio 1:50 (2 %), minimum flow: 0.1 l/min 0.2 l/min 2 l/min Accuracy ± 0.8 % o. R. ± 0.3 % of F. S. ± 0.8 % o. R. ± 0.3 % of F. S. ± 1.5 % o. R. ± 0.3 % of F. S. Fig 4. Flow adjustment for fermenters and for PMEU. Fig. 5 Gas mixer outlets: pressure meters of each line (Reactor top and Reactor bottom). 4 Fig. 6. Finnish process gas bottles of CO2 and N2. 5 1 2 3 Fig. 7. Carbon dioxide regulator and line pressure meter: 1. bottle pressure, 2. adjusting screw, 3. outlet pressure. 6 Appendix 4. CALIBRATION AND MAINTENANCE LD™ Dissolved Oxygen sensor pHD sc Digital Differential pH sensor Sc1000 Controller Extracted from manufacturers’ manuals Disclaimer This publication has been produced with the assistance of the European Union (http://europa.eu). The content of this publication is the sole responsibility of authors and can in no way be taken to reflect the views of the European Union. Contents 1 LD™ Dissolved Oxygen sensor 1.1 Maintenance 1.1.1 Maintenance schedule 3 3 3 1.2 Cleaning the Sensor 3 1.3 Calibration 3 1.3.1 Calibration in air 4 1.3.2 Concurrent Calibration of Two Sensors 5 2 pHD sc Digital Differential pH sensor 2.1 Maintenance 2.1.1 Maintenance schedule 2.2 Cleaning the Sensor 2.2.1 Replacing the Standard Cell Solution and Salt Bridge 2.3 Calibration 2.3.1 Two Point Automatic Calibration 6 6 6 6 7 8 9 2.3.2 One Point Manual Calibration 10 2.3.3 Two Point Manual Calibration 10 2.3.4 Adjusting the Temperature 11 3. Sc1000 Controller 12 3.1 Maintenance 12 3.1.1 General maintenance 12 3.1.2 Fuse replacement 12 3.2 Calibration of the touch screen 14 2 1 LD™ Dissolved Oxygen sensor 1.1 Maintenance DANGER! Only qualified personnel should conduct the tasks described in this section of the manual. Explosion hazard. Do not connect or disconnect equipment unless power has been switched off or the area is known to be non-hazardous. Explosion hazard. Substitution of components may impair suitability for Class 1, Division 2. 1.1.1 Maintenance schedule Table 1. 1.2 Cleaning the Sensor Clean the exterior of the sensor with a soft, wet cloth. If the sensor cap is removed from the sensor body, do not leave the interior of the cap exposed to sunlight. Sun exposure to the interior of the cap can adversely affect the performance of the sensor. Degradation from sunlight is only an issue if the sensor cap is off the sensor body and the interior of the sensor cap is exposed to sunlight. 1.3 Calibration The air calibration is the most accurate method. Due to the inherent accuracy and stability of the luminescent dissolved oxygen technology, sensor calibration is seldom or never necessary. The calibration procedures will result in an instrument offset or gain correction and may be performed if required by regulatory agencies. 3 1.3.1 Calibration in air 1. Remove the sensor from the process stream and wipe with a wet cloth to remove debris and biological growth. 2. Place the sensor in the supplied Calibration Bag, add a small amount of water (25–50 mL) and secure the bag to the sensor body. 3. Lay the bagged probe on a flat surface where it will not be exposed to a heat source. 4. From the Main Menu, select SENSOR SETUP and confirm. 5. Select the appropriate sensor if more than one is attached and confirm. 6. Select CALIBRATE and confirm. 7. Select AIR CAL. Select the available Output Mode (Active, Hold, or Transfer) from the list box and confirm. 8. “Move the sensor to air” will be displayed if the sensor is moved to air (in the calibration bag). 9. The Air Calibration procedure will begin and “Wait to Stabilize” will be displayed. The current DO and temperature readings will be displayed. Confirm. 10. The calibration will automatically occur when the reading stabilizes or when the reading is confirmed to base the calibration on the currently displayed value. Two to three minutes for the reading to stabilize is typical, however, if it has not stabilized after 45 minutes, the display will ready “Unable to Calibrate”. After calibration, one of the responses in Table 2 will be displayed. Table 2. 11. Follow the prompts to return the sensor to the process. 4 1.3.2 Concurrent Calibration of Two Sensors 1. Begin a calibration on the first sensor and proceed when “Wait to Stabilize” is displayed. 2. Select the BACK arrow, then LEAVE. The display will return to the Main Measurement screen. 3. Begin the calibration for the second sensor and continue until “Wait to Stabilize” is displayed. 4. Select the BACK arrow, then LEAVE. The display will return to the Main Measurement screen and the reading for both sensors will be flashing. 5. To return to the calibration of either sensor, select the Main Menu button. Select SENSOR SETUP and confirm. Select the appropriate sensor and confirm. 6. The calibration in progress will be displayed. Continue with the calibration 5 2 pHD sc Digital Differential pH sensor 2.1 Maintenance DANGER! Only qualified personnel should conduct the tasks described in this section of the manual. Explosion hazard. Do not connect or disconnect equipment unless power has been switched off or the area is known to be non-hazardous. Explosion hazard. Substitution of components may impair suitability for Class 1, Division 2. 2.1.1 Maintenance schedule Table 3. 2.2 Cleaning the Sensor CAUTION! Before cleaning with acid, determine if the chemical reaction between the acid and the sample will create a hazardous chemical reaction. (For example, do not put a sensor that is used in a cyanide bath directly into a strong acid for cleaning because this chemical combination may produce poisonous cyanide gas.) 1. Clean the exterior of the sensor with a stream of water. If debris remains remove loose contaminate buildup by carefully wiping the entire measuring end of the sensor (process electrode, concentric metal ground electrode, and salt bridge) with a soft clean cloth. Rinse the sensor with clean, warm water. 2. Prepare a mild soap solution of warm water and dish detergent or other non-abrasive soap that does not contain lanolin such as laboratory glass cleaner. Note: Lanolin will coat the glass process electrode and can adversely affect sensor performance 6 3. Soak the sensor for 2 to 3 minutes in the soap solution. 4. Use a small soft bristle brush (such as a toothbrush) and scrub the entire measuring end of the sensor, thoroughly cleaning the electrode and salt bridge surfaces. If surface deposits cannot be removed by detergent solution cleaning, use muriatic acid (or other dilute acid) to dissolve them. The acid should be as dilute as possible. Experience will determine which acid to use and the appropriate dilution ratio. Some stubborn coatings may require a different cleaning agent. For assistance, contact Technical and Customer Service (U.S.A. only). DANGER! Acids are hazardous. Always wear appropriate eye protection and clothing in accordance with material safety data sheet recommendations. 5. Soak the entire measuring end of the sensor in dilute acid for no more than 5 minutes. Rinse the sensor with clean, warm water then place the sensor back into the mild soap solution for 2 to 3 minutes to neutralize any remaining acid. 6. Remove the sensor from the soap solution, and rinse the sensor again in clean, warm water. 7. After cleaning, always calibrate the measurement system. 2.2.1 Replacing the Standard Cell Solution and Salt Bridge If calibration cannot be attained, rejuvenate the sensor by replacing its standard cell solution and salt bridge as shown in Figure 1. 7 Figure 1. 1. To remove the salt bridge, hold the sensor upright (electrode at top), and use pliers or a similar tool to turn it counterclockwise. Take care not to damage the protruding process electrode. Properly discard the old salt bridge. 2. Replace the standard cell solution in the sensor reservoir. a. Pour out the aged solution, and thoroughly flush the reservoir with standard cell solution. b. Fill the reservoir to the bottom of the salt bridge mating threads with fresh standard cell solution (Cat. No. 25M1A1025-115). 3. Carefully thread the new salt bridge clockwise until it is finger-tight and the bottom surface of the salt bridge is in full contact with the top surface of the sensor body. Tighten the salt bridge another ½ turn with the wrench or tool. 2.3 Calibration The manufacturer offers one and two point automatic and manual calibrations for pH. An automatic calibration identifies the buffer table corresponding to the chosen buffer and 8 automatically calibrates the probe after it stabilizes. A manual calibration is performed by placing the pH sensor in any buffer or sample with a known value and then entering that known value into the controller. The value of the sample used in the manual calibration may be determined by laboratory analysis or comparison reading. 1. From the Main Menu, select SENSOR SETUP and confirm. 2. Select the appropriate sensor if more than one is attached and confirm. 3. Select CALIBRATE and confirm. 4. Select 1 POINT AUTO. Select the available Output Mode (Active, Hold, or Transfer) and confirm. 5. Move the clean probe to buffer and confirm to continue. 6. Confirm when stable. A screen will display 1 Point Auto Complete and the slope (XX.X mV/pH). 7. Return the probe to process 2.3.1 Two Point Automatic Calibration 1. From the Main Menu, select SENSOR SETUP and confirm. 2. Select the appropriate sensor if more than one is attached and confirm. 3. Select CALIBRATE and confirm. 4. Select 2 POINT AUTO. Select the available Output Mode (Active, Hold, or Transfer) and confirm. 5. Move the clean probe to Buffer 1 and confirm. 6. Confirm when stable. 7. Move the clean probe to Buffer 2 and confirm. 8. Confirm when stable. A screen will display 2 Point Calibration Complete and the slope (XX.X mV/pH). 9. Return the probe to process. 9 2.3.2 One Point Manual Calibration 1. From the Main Menu, select SENSOR SETUP and confirm. 2. Select the appropriate sensor if more than one is attached and confirm. 3. Select CALIBRATE and confirm. 4. Select 1 POINT MANUAL. Select the available Output Mode (Active, Hold, or Transfer) and confirm. 5. Move the clean probe to solution and confirm to continue. 6. Confirm when stable. Edit the solution value and confirm. 7. Confirm when stable. A screen will display 1 Point Manual Complete and the slope (XX.X mV/pH). 8. Return the probe to process 2.3.3 Two Point Manual Calibration 1. From the Main Menu, select SENSOR SETUP and confirm. 2. Select the appropriate sensor if more than one is attached and confirm. 3. Select CALIBRATE and confirm. 4. Select 2 POINT MANUAL CAL. Select the available Output Mode (Active, Hold, or Transfer) and confirm. 5. Move the clean probe to Solution 1 and confirm. 6. Confirm when stable. Edit the solution value and confirm. 7. Move probe to solution 1 and confirm. 8. Confirm when stable. Edit the solution value and confirm. 9. A screen will display 2 Point Manual Cal Complete and the slope (XX.X mV/pH). 10. Return the probe to process 10 2.3.4 Adjusting the Temperature View or change the temperature using the steps below. 1. From the Main Menu, select SENSOR SETUP and confirm. 2. Select the appropriate sensor if more than one is attached and confirm. 3. Select CALIBRATE and confirm. 4. Select TEMP ADJUST and confirm. 5. Select MEASURED TEMP and confirm. 6. The temperature will be displayed. Edit the temperature and confirm. 11 3. Sc1000 Controller 3.1 Maintenance DANGER! Electrocution and fire hazard. Only qualified personnel should conduct the installation tasks described in this section of the manual. 3.1.1 General maintenance • Regularly check the probe module and the display module for mechanical damage. • Regularly check all connections for leaks and corrosion. • Regularly check all cables for mechanical damage. • Clean the probe module and the display module with a soft, damp cloth. Use mild detergent, if necessary. 3.1.2 Fuse replacement DANGER! Fire hazard. An incorrect fuse can cause injury and damage or pollution. Only replace the fuse with a fuse of the same type and same specification. Information can be found on the internal fuses on the inside of the housing. Refer to the labeled fuse specification and the following instructions for proper fuse replacement. 1. Disconnect all power to the equipment before removing any covers and attempting to check fuses. 2. Remove the display module from the probe module. 3. Remove the four screws securing the probe module front cover. Open the probe module and disconnect the chassis ground connection from the ground stud to the cover. 4. Remove the six screws from the high voltage barrier and remove the barrier. 5. Press a screwdriver into the slot. 12 6. Turn the screwdriver 45° to the left. 7. The top is spring-loaded and now opens. 8. Remove the top with the fuse and change the fuse. 9. Insert the new fuse with the top in the fuse holder. 10. Press a screwdriver into the slot on the top and carefully press down the top. 11. Turn the top to the right with the screwdriver until the cover is securely fastened. Figure 2. Fuse replacement (AC version) 13 Figure 3. Fuse replacement (24 VDC version) 3.2 Calibration of the touch screen During initial commissioning of the sc1000 controller, the touch screen calibration will be automatically displayed. To configure the touch screen, follow the calibration points on the screen. Make sure that the touch screen is calibrated to the appropriate device (finger, stylus, etc.) that will be used by all operators. If the device is changed, it will be necessary to recalibrate the screen. To calibrate the touch screen after initial commissioning: 1. Select sc1000 SETUP, DISPLAY SETTINGS, TOUCH SCREEN CALIBRATION. 2. Follow the calibration points. When calibration is complete the Display Settings menu is displayed. 14 Appendix 5. DRY MATTER MEASUREMENT IN PILOT A - MOISTURE ANALYZER MB 160 Operation and sample treatment Emmy Hämäläinen Saana Nevalainen Sanna Tuhkanen February 2014 Disclaimer This publication has been produced with the assistance of the European Union (http://europa.eu). The content of this publication is the sole responsibility of authors and can in no way be taken to reflect the views of the European Union. Savonia University of Applied Sciences Contents 1 Introduction 3 2 Starting up the moisture analyzer 3 2.1 Symbols 4 2.2 Set Balance functions in new conditions 5 2.3 Create program for measuring 5 3 Taking the sample 6 4 Measuring 7 5 Results 8 6 Calibration 9 7 Shutting down the moisture analyzer 9 8 Sources of error 9 9 Warnings 10 2 1 Introduction The moisture analyzer from VWR is designed for the industrial and professional sectors. The moisture analyzer can determine the remaining dry matter after a drying process with infrared energy of the original matter which weighted beforehand. So humidity is calculated in relation to the weight of the wet matter. During the drying process the decreasing of moisture in the material is shown on the display. The moisture analyzer is an ideal device to determine humidity and the amount of dry matter. The moisture analyzer is mainly used in the industrial sector to analyze pastes, mass, moods, adhesive materials and dust for the production and quality control of materials. 2 Starting up the moisture analyzer If the moisture analyzer is in use at first time, connect Balance to Heater by using 9 poles M/F cable. Plug Balance’s power supply and Heater’s power supply. Press I/0 to switch on the heater. Level the Balance using the level bubble and leveling feet located underneath the case. Press the ON/OFF button to bring Balance to work conditions. Now device is ready to use. 3 Note: If you have problems check the user manual VWR bil serie iThermo from the CD. If the moisture analyzer is used before and all the connects are done, press ON/OFF button to bring Balance to work conditions. Now device is ready to use. 2.1 Symbols 4 2.2 Set Balance functions in new conditions When the device takes in new conditions should these settings be checked. From zero condition on display, press and keep pressed the MENU button until to buzzer sound off, then release the button. The message “unitS” is displayed, then press MENU button until the message “BAUD RT” is displayed and confirm by pressing the PRINT button. The select serial data transmission speed. Pressing MENU or CAL buttons it will be possible to scroll forward or backward trough the different transmission speeds, then confirm 9600 baud by pressing PRINT button. After having selected the transmission speed, press the MENU button to go to next parameter. The message “AUTO 0” is displayed, then press PRINT to confirm. Autozero is an automatic correction of a possible zero drift. Pressing MENU or CAL button it will be possible to scroll forward or backward through the different autozero levels, select the “Au0 off” and confirm it by pressing the PRINT button. Press the MENU button to go to next parameter. The message “FILTER” is displayed then confirm it by pressing the PRINT button. It is possible to adapt the balance to the different environment conditions thanks to the selection of three filters. Pressing MENU or CAL button it will be possible to scroll forward or backward the different filtering levels, select the “FILTER 3” and then confirm it by pressing the PRINT button. Press the MENU button to go to next parameter. The message “StAbiL ” is displayed, then confirm this by pressing the PRINT button. Pressing MENU or CAL button it will be possible to scroll forward or backward the different stability levels, select the “STAB 2” and then confirm it by pressing the PRINT button. Press the MENU button to go to next parameter. The message “bLt ” is displayed, then press the PRINT button to confirm this. Pressing MENU or CAL button it will be possible to scroll forward or backward the different working modes, select the “AUTO” and then confirm it by pressing the PRINT button. Then to escape from parameters setup menu, press the MENU button until to buzzer sound off, then release the button. Now settings are done and they are recorded to the device. The device will remember settings when you take it in use again. 2.3 Create program for measuring 1. 2. 3. 4. 5. Press MENU quickly. Select “therm” by pressing PRINT. Select “PrG set” by pressing MENU and then PRINT. Choose PrG 1, 2, 3, 4 or 5 and press PRINT. Set “PrG time” by pressing PRINT and choosing right time with MENU or CAL buttons. Confirm setting by pressing PRINT. (In Finland selected time was 10-15 minutes.) 6. Set temperature with MENU or CAL buttons. Confirm setting by pressing PRINT. 5 (In Finland selected temperature was 150-160 degrees of Celsius.) 7. Select “SAVE YES” by pressing MENU. Press PRINT. 8. Then press ESC. 9. Now the device is ready to measure. 3 Taking the sample 1. Wear protection gloves. 2. Take scoopful of sample from the hatch of Homogenizer. 6 3. Pour the sample to the plastic box. 4. Mix the sample with spoon. 5. Continue by reading the next paragraph ”Measuring”. 4 Measuring Attention! Put protection gloves before you handle pans. 1. 2. 3. 4. Press MENU quickly. Select ”therm” by pressing PRINT. Select ”measure” by pressing PRINT. Select program which you have created earlier by pressing PRINT. 7 5. Select ”PrH no” by pressing PRINT. 6. Press PRINT again. 7. Put empty pant to the Heater and press 0/T to tare the Balance. 8. 9. 10. 11. 12. Add about 2 grams of mixed sample to the pan. Write down the initial weight. Press PRINT and close the cover of the Heater. A small ”H” appears to the display when heating starts. Measuring is ready when the Heater give out an acoustic signal for about 15 secods. On the display will appear ”OK” symbol. It is possible to stop the cycle at any moment pressing the ON/OFF button. It is also possible to see the drying parameters pressing sequentially the MENU button. There is the order of parameters on display in the paragraph ”Results”. 5 Results After signal sound measuring is ready and results appear to the display. By pressing MENU or CAL-button the results can be browsed. 8 The results appear in the next order when browsing downwards: 1. Percentual loss of moisture (M) 2. Percentual dry residual (r) 3. Ratio of initial weight/dry residual weight in percentual (A) 4. Actual temperature (C) 5. If measuring is going on, Time remaining (Min). If measuring is ready, empty screen. Write results down to the LabView. 6 Calibration Calibration is accomplished by pressing CAL button when pan is empty. “0-t” are displayed on the display. When calibration weight value (100 g) starts to flash, load the weight on the pan. The display will stop flashing, indicating calibration weight value. Once the calibration is effected will be shown the value of the calibrated weight and the current unit of measure. Unload calibration weight from the pan. The balance is ready for weighting operations. 7 Shutting down the moisture analyzer If the moisture analyzer is going to be used in the next few days, press the ON/OFF button. In the display will appear a small dot. Then device is in stand-by mode. If the moisture analyzer remains unused more than a week, press first the ON/OFF button to get the device to stand-by mode. Then press I/0 to switch off the heater. 8 Sources of error Error codes ERR01: the weight does not reach stability after a tare operation -> Protect the balance from air flows or from vibrations of the working table. ERR02: impossible to start the calibration operation due to balance instability -> Protect the balance from air flows or from vibrations of the working table. ERR03: calibration weight not correct or balance unstable -> Calibrate with correct weight or protect the balance from environment disturbs. ERR05: print not allowed due to balance unstability -> Protect the balance from environment disturbs. 9 ERR07: error in insertion data. ERR10: the weight does not reach stability before start of dry -> Protect the balance from environment disturbs. ERR11: weight of substance not enough -> Increase quantity of substance . “UNLOAD”: weight loaded on the pan or pan not positioned properly -> Remove the weight from the pan or position properly the pan and underpan. “Err thb”: the heater doesn’t work check if in the rear of instrument there is the cable allowed balance heater. Overrange condition -> Unload the weights loaded on the pan. Underrange condition -> Place properly pan and underpan. 9 Warnings Please follow carefully these steps for installing and use the new balance before starting your work routine. A way of use of the instrument different from this user manual will not guarantee the instrument’s safety anymore. Keep this manual in a safe place. Please follow these indications to avoid problems and to grant a safe use of moisture analyzer: Use the moisture analyzer exclusively for the moisture determination of samples. Every incorrect use of this instrument may create danger for safety of persons and may cause damages at the instrument or at other objects. Do not use the instrument in areas where there is danger of explosions; also make the instrument work only respecting the environment conditions as reported in this manual. If this material is used in plants or in environment conditions that require strict safety conditions, please respect the instructions of the directives regarding the installation of this material currently existing in your country. This instrument must be used only by qualified personnel, who knows the features and characteristics of the sample under test. Before starting to work with the instrument for the first time, please check that voltage is the same of your electric mains. To get the instrument free from tension, remove the power supply cable. Place straight the power supply cable so that to avoid contact with the very hot surfaces of the instrument. Use only extension cables that are conform to normatives and that are equipped of a protection conductor. 10 Attention, protection against heat Respect the distance and the free space around the instrument to avoid an accumulation of heat in the instrument and the overheating of the instrument ifself: - 20 cm around the instrument - 1 m upon the instrument Do not place flammable materials upon, below or near the instrument since the heater warms the surrounding area. Remove the samples carefully, the heater and the dishes for samples may be still very hot. Danger for persons or objects when working with particular samples: Fire Explosion Flammable or explosive substances Substances that contain solvents Substances that during drying emit gas or flammable explosive vapors 11 Appendix 6. GLUCOSE MEASUREMENT IN PILOT A - On Call Vivid Glucose Meter Operation and sample treatment Created based on the manufacturer’s manual by: Emmy Hämäläinen Sanna Tuhkanen Saana Nevalainen February 2014 Disclaimer This publication has been produced with the assistance of the European Union (http://europa.eu). The content of this publication is the sole responsibility of authors and can in no way be taken to reflect the views of the European Union. Savonia University of Applied Sciences Contents 1 Introduction 3 2 Meter setup before testing 3 3 Taking the sample 4 4 Measurement instructions 7 4.1 Measuring 7 4.2 “HI” and “LO” Messages 8 5 Results 9 5.1 Transmitting results to the data base 9 5.2 Using the meter memory 9 6 Calibration 10 7 Sources of error 11 8 Warnings 13 2 1 Introduction Glucose meter On Call Vivid is for measuring glucose values from liquids. It is intended to measure glucose from blood, but possible to use also with other liquids. In ABOWE project the meter is used for measuring glucose values from the process. The optimal glucose is important parameter for the successful and optimal growth of the bacteria. In the process the glucose is measured primarily from the hydrolyzer tank. 2 Meter setup before testing Before using your meter for the first time, you will need to adjust the settings that are listed in detail below. 1. Meter Setup Mode: Press the S button for 2 seconds to enter the meter setup mode. The meter will automatically enter the setup mode when turned on for the first time by any method. 2. Clock: Set the clock for either 12 or 24 hour mode. Press the M or S button to switch between the two settings, then press the Power button to save your choice and then start setting the year, month and date. Note: The clock needs to be reset after replacing the battery. To the display of the meter appears first setting: time. The adjustable value is blinking on display. 3. Date: The year will appear at the top of the display. Press the M or S button to increase or decrease the year. Once you have selected the correct year, press the Power button to save your choice and start setting the month. Press the M or S button to increase or decrease the month. Then press the Power button to save your choice and start setting the date. Press the M or S button to increase or decrease the date. Then press the Power button to save your choice and start setting the time. 4. Time: The hour will appear at the top of the display. Adjust the hour with the M or S button until the correct hour is displayed. Press the Power button to save 3 your choice and set the minutes. Press the M or S button to change to the correct minute. Press the Power button to save your choice and move to set the meal marker feature. 5. Meal Marker: The meter comes with the meal marker feature disabled. Meal Marker is automatically on “OFF”- mode. Do not change this setup. 6. Audio Feature: The meter comes with the meter audio feature enabled. The meter will give one short beep when it is turned on, after sample detection and when the result is ready. The meter will sound three short beeps to sound a warning when an error has occurred. Please check the error number on the display to confirm what kind of error has occurred. Press the M or S button to switch between turning the meter beep “On” and “Off”. Press the Power button to confirm your selection. 7. Ketone Indicator: The meter comes with the Ketone indicator feature disabled. Press the M or S button to switch the Ketone indicator “Off”. 8. Hyper Indicator: The meter comes with the Hyper indicator feature disabled. Press the M or S button to switch the Hyper indicator “Off”. 9. Hypo Indicator: The meter comes with the Hypo indicator feature disabled. Press the M or S button to switch the Hypo indicator “Off”. 10. Test Reminder: The meter comes with the Test Reminder feature disabled. Press the M or S button to switch the Test Reminder “Off”. 3 Taking the sample 1. Wear protection gloves. 2. Take the sample from hydrolyzer with sampling scoop and from a valve in the circulating pipe at Bioreactor. 4 3. Put the sample to the plastic box. 5 4. Measure 5 ml of sample from plastic box to the plastic tube. 5. Add 5 ml distilled water to the plastic tube and mix carefully. 6. Pour the mixed sample to some low and small bowl for measuring. 7. Continue by reading the next paragraph “Measuring”. 6 4 Measurement instructions 4.1 Measuring Sample tip Check window Contact bars 1. Insert a test strip into the strip port, contact bars end first and facing up, to turn on the meter and display all the display segments. If the audio option is on, the meter will beep, signaling the meter is turned on. The display will turn on briefly with all the icons and segments turned on. Check the display to confirm that all the display segments turn on with no missing components. The display will then show only the date and time, with a dash moving across the display. Check the display to ensure no inappropriate segments or icons are permanently turned on. 2. If the test strip has been inserted incorrectly, the meter will not turn on. The meter is ready for testing when the blinking blood drop and strip symbol appears. At this time a sample drop can be added. 7 3. Touch the sample at the end of the test strip until the countdown starts. If the audio option is turned on, the meter will also beep to indicate the sample is sufficient and the measurement has started. 4. The meter will count down from 5 to 1 and then display the measurement results. The meter will also beep to indicate that measurement is complete. Then your sample glucose level will display on the screen, along with the unit measurement, date, and time of the test. 5. After measurement, record valid results in your logbook with the date and time. 6. Slide forward the strip ejector to discard the used test strip. 4.2 “HI” and “LO” Messages The meter can accurately measure blood glucose concentrations between 0.6 to 33.3 mmol/L (10 to 600 mg/dL). “HI” and “LO” messages indicate results outside of this range. 8 If “HI” appears on the display, the measured concentration value is above 33.3 mmol/L (600 mg/dL). If “LO” appears on the display, the measured concentration value is below 0.6 mmol/L (10 mg/dL). 5 Results 5.1 Transmitting results to the data base After the glucose meter has given a result, write it down to the LabView. 5.2 Using the meter memory The meter automatically stores up to 500 test records. Each record includes the test result, time and date. If there are already 500 records in memory, the oldest record will be erased to make room for a new one. To view stored records: 1. Press the M button to turn the meter on and enter memory mode. The most recent value and the word “MEM” will appear on the display. 2. If you are using the meter for the very first time, the meter display will show three dashed lines (- - -), the word “MEM” and the unit of measure. This shows that no data have been stored in memory. 9 3. Press the M or S button to view the previous or next stored records. 4. Press the M button to view the stored results. 5. Press the Power button twice to turn off the display. 6 Calibration It is possible to calibrate the glucose meter by the control solution. It is recommend by the manufacturer to do before you first use your meter, before using a new box of test strips, when you suspect that the meter or test strips are not working properly, when you suspect that your test results are inaccurate, when you suspect your meter is damaged or at least once a week. 1. Insert a test strip into the strip port. 2. The meter is ready for testing when the blinking blood drop and strip symbol appear. 3. Shake the control solution bottle well, then squeeze it gently and discard the first drop. 4. Squeeze out a second small drop on a clean nonabsorbent surface. 5. Touch the control solution drop at the end of the test strip until the countdown starts. 6. Once a sufficient sample has been applied, the meter display will count down from 5 to 1 and then the result and a control solution symbol will be displayed on the screen. 7. The control solution test results should be within the control range (CTRL 1) printed on the test strip vial. This means that the glucose monitoring system is working properly and performing the procedure correctly. 8. Slide forward the strip ejector to discard the used test strip. If the result falls outside the indicated control range: - Confirm you are matching the correct range. Control Solution 1 results should be matched to the CTRL 1 range printed on the test strip vial (or on the foil pouch). Check the expiration date of the test strip and control solution. Make sure that the test strip vial and control solution bottle have not been opened for more than 6 months. Confirm the temperature in which you are testing is between 10 to 40 °C. Make sure that the test strip vial and control solution bottle have been tightly capped. Confirm that you are using the same brand of control solution that was provided with you kit. Make sure that you followed the test procedure correctly. After checking all of the conditions listed above, repeat the quality control test with a new test strip. If results still fall outside of the control range shown on the test strip vial, the meter may be defective. Contact the project leaders for help. When using the meter memory, a pound sign (#) is indicating that the test is a control solution test. 10 7 Sources of error 11 12 8 Warnings Precautions: Do not get water or other liquids inside the meter. Keep the strip port area clean. Keep your meter dry and avoid exposing it to extreme in temperature or humidity. Do not drop the meter or get it wet. If you do drop the meter or get it wet, check the meter by running a quality control test. Do not take the meter apart. Taking the meter apart will void the warranty. Keep the meter and all associated parts out of reach of children. All Glucose Systems Preventive Warnings with Regard to EMC: This instrument is tested for immunity to electrostatic discharge as specified in IEC 61000-4-2. However, use of this instrument in a dry environment, especially if synthetic materials are present (synthetic clothing, carpets, etc.) may cause damaging static discharges that may cause erroneous results. This instrument complies with the emission and immunity requirements described in EN61326-1 and EN61326-2-6. Do not use this instrument in close proximity to sources of strong electromagnetic radiation, as these may interfere with proper operation of the meter. For professional use, the electromagnetic environment should be evaluated prior to operation of this device. 13 Appendix 7. GAS CHROMATOGRAPHY IN PILOT A Operation and sample treatment Henna Huopainen January 2014 Disclaimer This publication has been produced with the assistance of the European Union (http://europa.eu). The content of this publication is the sole responsibility of authors and can in no way be taken to reflect the views of the European Union. Savonia University of Applied Sciences Contents 1 Introduction 3 2 Starting up the GC 4 2.1 Opening the GC1 Online program 4 Sample treatment 5 7 4.1 Preparation of 2 % phosphoric acid 8 4.2 A single run and creating a sequence 8 4.3 Handling waste 10 5 Results 11 6 Calibration 12 7 Shutting down the GC 14 8 Sources of error 15 8.1 Replacing a septum, liner and o-ring 9 Agilent Leak Detector 16 19 9.1 Operation 19 9.2 Detecting leaks 19 9.3 Charging the battery 20 2 1 Introduction Gas Chromatography (GC, Picture 1) is a chemical analysis for separating and identifying chemicals from volatile samples. A small amount of sample is injected with a syringe to a hot injector port of the gas chromatograph. The temperature of the injector is higher than the components’ boiling point, because it evaporates the sample for carrier gas to push the components into a GC column. Separation is based on gaseous compounds being analyzed between a carrier gas (mobile phase) and a stationary phase that is inside a column. The carrier gas in this case is helium. The separation occurs in the column, the thin tubing that is in an oven. There are different types of stationary phases and each one affect to retention times differently. It is the time that each compound needs to exit the column. In the end of the column the chemicals are identified electronically by a detector. The used detector is flame ionization detector (FID) which is sensitive to hydrocarbons. An important way to affect to the rate which a sample passes through the column is to program the oven temperature. The higher the temperature, the faster the sample moves through the column. The temperature has to be set according to the sample’s boiling point. Too fast rate weakens the resolution, but on the other hand minimal temperatures increase retention times. Picture 1. Gas chromatograph with its computer. The red circled part is the electricity button. 3 2 Starting up the GC The settings are different depending on if the GC has been shut down or left on. If the GC has been shut down, 1. First switch on the electricity to the GC (Picture 1). The electricity button is under the oven door. 2. Turn on the computer. 3. Open the virtual GC remote controller from a white icon on desktop (Picture 2) and connect it to the GC by clicking “Connection” and “Connect” as in the Picture 2. 4. Let the inlet and detector temperatures stabilize before continuing. 5. Turn the gases on (helium, hydrogen and air) from their sources. 6. From the GC remote controller, click “Back Inlet” and turn the pressure on. Scroll down with an arrow button and turn total flow on if it didn’t do it itself. 7. Go to “Back Det”. Scroll down with arrow buttons and turn all the gas flows on. 8. Keep scrolling down with arrow buttons and ignite the flame. 9. Let the GC stabilize a couple of hours because the detector and inlet have been in room temperature and helium flow purifies the column. 10. The GC is ready to use. For everyday start up, where the GC has been left on, 1. First turn on the computer. 2. Open the GC remote controller and connect it to the GC. 3. There are buttons for “Oven”, “Back inlet” and “Back Det”. From these put the back inlet temperature to 300 °C, oven temperature to 70 °C and back detector temperature to 300 °C. 4. Turn the gases on from their sources. 5. When the detector temperature reaches its highest point, click “Back Det”, scroll down and ignite the flame. When igniting the flame, the gas flows turn automatically on. Hydrogen flow should be 35 ml/min; air flow should be 400 ml/min and helium flow 25ml/min. Do not change the gas flows! 6. The GC is ready to use. 4 Picture 2. The remote controller and how it connects to the GC. Down in the left side corner there are GC1 Online and GC1 Offline icons. There are also icons for more precise GC manuals if problems occur. 2.1 Opening the GC1 Online program There is an online and an offline program for the GC (see the icons in the Picture 2). In offline program you can do settings without a connection and therefore not affecting to GC. Open the online program. First appears a window which asks to choose a type of method to load (Picture 3). Choose “Download to instrument” so it loads the latest method and those settings will also be the same in the GC directly. Never “upload from instrument” or it will modify the method “Alcohols”! That method is created for calibration and for the samples. Never change any values from method “Alcohols”! Every little detail can change the conditions of a run. After loading method appears a screen looking like the Picture 4. A window called an “Online Plot” which covers one-third of the screen, displays the signal from detector. The signal has to be straight as in Picture 4 before running any samples. Peaks and other shapes are, without runs going on, signs of impurities in the column. In other words, the GC is not stable. If just a helium flow won’t seem to purify the column, read about sources of error page 16. 5 Picture 3. Load the last selected method and the needed settings are automatically ready. Picture 4. GC1 Online program. 6 4 Sample treatment Samples should never be injected into the GC in their original form. Solid particles have to be removed and impurities should be minimal when injecting. A strong color indicates the presence of impurities. At first filter the sample. The easiest way to do it is with a funnel and some cotton wool. If the sludge is too thick and filtering doesn’t work, centrifuge the sample in four eppendorf tubes (Picture 11) for 10 minutes in 10000 rpm with the centrifuge as in the Picture 5. Both values have already been set, so do not change anything. Set the tubes exactly opposite sides of the rotor and the sample amount has to be the same in each tube. This way the centrifuging stays stable. Always remember to put the lid on the rotor. Remove the supernatant with a pasteurpipette (Picture 9) in two new eppendorf tubes. Centrifuge the tubes again for 10 minutes in 10000 rpm. Picture 5. The sentrifuge, the rotor with its tube places and the lid. Use the supernatant from lastly centrifuged tubes for dilution. Usually a proper dilution factor has been 10 or 15 but it depends on the phase of the process. If the dilution factor is too high, the peaks are too small or there is nothing to detect and if the dilution factor is too low, the impurities cause too much noise in the baseline (and contamination). In the beginning of the process there isn’t much to detect, so the dilution factor might be only 5. In further phases the dilution factor rises up to 15 and it shouldn’t be more. The dilutions are easy to prepare directly in to the vials. The used solvent is deionized water. Volatile fatty acids (VFA) cause trouble to the column and also to the baseline giving incorrect values if they are analyzed without pre-treatment. 2 % phosphoric acid is needed for sample treatment to make them behave better. About 100 µl of 2 % phosphoric acid to each vial is enough to lower the pH to 2-3 and affect to VFA behavior. Other acids won’t help and 7 some inorganic acids are even destructive for stationary phase. Phosphoric acid won’t make a peak. For example, the sample preparation for dilution factors 5-30 is described in table 1. Table 1. Sample preparation in vials. Dilution Sample factor 5 300 µl 10 150 µl 15 100 µl 20 75 µl 30 50 µl Water 2 % H₃PO₄ Total 1100 µl 1250 µl 1300 µl 1325 µl 1350 µl 100 µl 100 µl 100 µl 100 µl 100 µl 1500 µl 1500 µl 1500 µl 1500 µl 1500 µl Add the amounts with automatic pipettes (Picture 8) to vials (Picture 10). Always take a new tip for each component. In other words, you must not use the same tips for sample, water and phosphoric acid. Shake the vials well by hands. Put the vials to the sample tray. Analyze each sample twice with the GC to compare the results. Also remember to put solvent vials (filled with water) and waste vials to bigger holes of the tray so the syringe can wash itself before injecting a sample. The letter “W” means waste and “A” and “B” mean solvent places. In this case solvent “A” place is used. Insert a waste vial in every waste place even though it uses only two. 4.1 Preparation of 2 % phosphoric acid Take a 100 ml volumetric flask and add some water to the flask. Add 2,35 ml 85 % phosphoric acid with automatic pipettes. Reaction between water and acid causes heating to the solution. Let it cool to the room temperature before filling the volumetric flask to its mark. Put a cap and shake the solution well by turning the flask upside down several times. 4.2 A single run and creating a sequence To do a single run, click “Run Control” from upper left of the screen. Choose “Sample Info”. There should appear a window looking like the one in the Picture 6. There you can define a vial place, a sample name, dilution factor and other comments. The file name will automatically be the sample name including date. Also pay attention to the way the vial numbers are written. If the vial place in the sample tray is 1, write it 201. If the vial place in the sample tray is 2, write it 202 and so on. Start running a sample by clicking “Run Method”. In the upper left there is a green part saying “Ready” if the GC is ready to run. 8 Picture 6. Sample info for a single run. If you want to run automatically several samples in specific order, then create a sequence. To create a sequence, click “Sequence” from upper left of the screen. Choose “New Sequence” and then “Sequence Table”. There appears a window looking like the one in the Picture 7 except the table is empty. Start always from empty table if you don’t wan’t to erase the previous one. Picture 7. A queue of samples that is about to be analyzed can be created. As an example in the picture the created sequence is for standard line. 9 To a sequence table you may define vial places, sample names, a method name (which is Alcohols), the number of injections (runs) the GC does for each sample, sample type and dilution factor. The injection volume has already been defined in the method. As in single run, write the vial numbers the same way. If the vial place in the sample tray is 1, write it 201. Click “Insert” to add a new sample to the line. Click “Cut” to delete a sample from the line if needed. Samples will be analyzed in written order. Notice that above the table, injector can be “Front” or “Back”. Front injector doesn’t exist. Let the injector always be chosen as “Back”, otherwise the program stops working. Click “Run Sequence” to start running. If you want to save the sequence, choose from “Sequence” section “Save Sequence As…” and write a name. When you want to load a saved sequence, choose “Load Sequence”. If for some reason something goes wrong, you can abort the run or sequence by pressing “Abort” from upper section of the screen. 4.3 Handling waste Lastly, something has to be done with the waste. The reagents aren’t harmful or toxic so they can be poured to the sewer. According to the safety data sheets, acids must be neutralized to pH 6-10 before pouring to the sewer. Neutralizing can be done for example with sodium hydroxide (NaOH). Pour a lot of tap water with the neutralized solution when pouring everything to the sewer. Small acid amounts (such as the volumes in vials) may be poured to the sewer along with tap water without neutralizing. In Pilot A, if neutralizing isn’t possible the wisest option is to collect all waste in to a waste bottle and neutralize it somewhere else. 10 5 Results After running, the peaks must be identified. That is called integration. The identification is based on comparison of each peak in the signal with the peaks stored in the calibration table. For most of the time the program will integrate the peaks automatically. All the basic settings for automatic integration have already been done. The way of integration affects to results so it is preferable to always let the computer do the integration if possible (an example in the Picture 8). Check the integration from “Data Analysis”. Choose a sequence or a single run signals from left side menu. A signal has to be chosen to be able to integrate. Above the peaks there are icons in the left side for computer calibration and in the right side are icons for manual calibration. Especially 2,3-butanediol appears to be more like a hill than a peak, so it remains unrecognized. Therefore the integration has to be done manually. The baseline of the peaks has to be straight. If there are peaks too close to each other, integrate them both as one, choose an icon “split peak” and click the spot where they are wanted to be split. If integration fails for some reason, choose an icon “delete peak” and click the peak that has an integration to be deleted. If it is difficult to distinguish the right peaks to integrate, see the calibration table, click the compounds one by one and you can see shaded places for their retention times. Seeing the retention times you can pick the correct peaks. Among the icons there is a picture of a magnifier. Click it to view the results. There the peaks and amounts are visible. Save this short report after integration is done. The path to all the methods and sequences and where the results should also be saved, is: C/Chem32/1/DATA Picture 8. Peaks of a control solution and their integration. Above the peaks are the retention times. 11 6 Calibration Prepare a control solution and run it weekly to update correct retention times. Control solution must be treated the same way as samples. The method the values with their retention times are calibrated for is “Alcohols”. Within time the retention times drift so control solutions are used to correct it. Picture 9. The uppermost is an automatic pipette and a tip for it. In the middle is a glass pasteur pipette and the last one is a plastic pasteur pipette. All the calibration curves have already been made for every compound that has to be analyzed. A control solution is prepared from pure reagents of acetone, ethanol, propanol, butanol, acetic acid, propionic acid, butyric acid and 2,3-butanediol. Take a 100 ml volumetric flask and add some deionized water there. Weigh each compound for example 500 mg/l (50 mg to 100 ml volumetric flask, Picture 10, add the drops with a pasteur pipette as in the Picture 9). The calibration curve is made for 20 – 1000 mg/l so the control solution is preferred to be inside that range. Also add 5 ml of 2 % phosphoric acid. Fill the volumetric flask with deionized water to its mark. Shake the flask well by turning it upside down several times. Put it to a vial (Picture 11) with a pasteur pipette. When creating a sequence add a control solution to the line. Mark sample type as “Calibration”. Put “Update RF” and Update RT” as “Replace”. Logic is the same as putting samples to the line except only one injection at a time is enough and no dilution factor is needed. The retention times are updated automatically to the calibration table. Picture 10. A volumetric flask. 12 Picture 11. The first from the left is an eppendorf tube. Two others are vials; smaller one is for samples and bigger is for solvent and waste. The small thing in the right is a diffusion cap for a solvent vial. 6.1 Calibration table Calibration table contains a list of retention times from a calibration run. These retention times are compared with retention times of peaks from sample run. Where a match occurs, the peak in the sample is assumed to represent the same component as that in the calibration table. Also defining amounts is important. Never change any values related to calibration table! When integrating sample peaks manually, you can check the retention times by clicking the compounds in the calibration table. That way you can identify the right peaks. 13 7 Shutting down the GC If the GC is going to be used in the next few days, 1. First close the GC1 Online program. 2. Use the GC remote controller to turn the flame off from “Back Det” button (Picture 2). 3. Shut the air and hydrogen flow from their sources. Helium (the carrier gas) flow must always be on, because it cleans the column and therefore avoids contamination. Gas saver turns on automatically after 2 minutes which is 20 ml/min. 4. Decrease the detector temperature to 150-200 °C and the oven temperature to 30-50 °C. 5. Disconnect the GC remote controller and close it. 6. Shut down the computer. The GC may be left on, even through weekends. If the GC remains unused more than a week or it is about to be transported somewhere, 1. First close the GC1 Online program. 2. Use the GC remote controller to turn the flame off from “Back Det” button (Picture 2). 3. Also from “Back Det” you can see all the gas flows, turn all of them off. 4. Turn all the gases off from their sources. 5. Click “Back Inlet” from the GC remote controller. Turn the pressure off, scroll down using the arrow buttons and be sure that total flow is also off. Let the inlet and back detector temperatures stay 300 °C so the next time the GC is put on, it automatically starts to increase the temperature. 6. Disconnect the GC remote controller and close it. 7. Shut down the computer. 8. Switch off the electricity from the GC by pushing the button under the oven door. In case of transportation, when the GC is in room temperature, remove the column by screwing it off and put it in its package. 14 8 Sources of error It is unnecessary to go through all the troubleshooting, but it is important to distinguish some of the most common sources of error. Most of the trouble is caused by contamination. Impurities in the column or in the liner are visible in noise and/or drifting baseline. Even ghost peaks may appear when running a sample or a standard. Ghost peaks mean peaks appearing at positions where peaks are not expected. Briefly, be aware of avoiding contamination. When running samples or standards, every other run should be plain water, because it avoids samples to contaminate each other. To maintain Picture 12. In the back, there is a liner, septums and o-rings from the column clean, the helium flow must left to right. In front of them are tools for replacing them in the inlet and for maintaining the column. to be on all the time. It also helps to “bake out” the impurities from the column increasing the oven temperature to 200-230 °C for ten minutes every day. The column won’t last very long if it’s baked continuously in its maximum temperature, but short baking at times purifies it. Every time when there are no samples to run, the time can be spent to purify the column by baking the oven and/or running water. Organic acids consume the stationary phase so the retention times change slightly within time, but that can be corrected with calibration. If the ghost peaks keep continuously appearing, it may be necessary to cut a little piece from the beginning of the column (a cutter and explanation in the Picture 13), because most of the contamination piles up there. Regular maintenance will help avoiding chromatographic issues. Other supplies that have to be replaced from time to time are the liner, septum and oring (Picture 12) especially if problems occur. It is Picture 13. Used for cutting a piece from the column tubing. Use the side with black stripes to scratch it a couple of times and bend the column tubing off. recommended to replace the o-ring and septum after a hundred injections. A new liner is needed when the old one is dirty (glass wool turns black) and it depends on how much impurities there are in samples. Remember 15 that the inlet is 300 °C so at first the temperature must be reduced and the pressure switched off. Put “Maintenance” method on from the GC program so the required settings are automatically put on. The flame must be ignited to be able to run any methods. If it doesn’t ignite or it burns out suddenly, usually the hydrogen flow is too low. The recent flow has worked well so to avoid problems; do not change any gas flow values! If the flame still won’t ignite, surprisingly shutting down the electricity from the GC for a few seconds has helped every time. 8.1 Replacing a septum, liner and o-ring General maintenance instructions are found from the computer, but knowing how to replace certain supplies to inlet is very important. At least to maintain successful analyzes. The inlet is under the sample tray, which can be lifted off. After lifting off the sample tray, the view is as in the Picture 14. Screw the green piece off with a tool that is showed in the Picture 11. Remember to put the “Maintenance” method on and wait for the inlet to cool down before touching it, otherwise its 300 °C hot and you don’t want to get your fingers burned! Be sure all the flows are off. If the GC complains with constant beeping, the reason most likely is that there is still a flow on. Usually it’s the “total flow”. It can be found from “Back Inlet” using the GC remote controller. Switch it off. Picture 14. The inlet under the sample tray. 16 Picture 15. The soft and red part is a septum. If the side with a little hole in the middle of a septum is upwards, it has been set correctly. Remove the septum (Picture 15) with tweezers and screw the next metallic part (Picture 16). Picture 16. The septum has been removed and the last part has to be opened to see the liner under it. 17 Picture 17. The brown component around the liner is an o-ring. O-ring is round the liner keeping it tight in its position. The liner can also be removed with tweezers as in the Picture 17. Check the purity of the liner. If glass wool is still pure white, put the liner back. When the needed parts are replaced then put the screws back in the opposite order. Do not screw them too tight, just as much as they can be turned around, but not tightened. After screwing every part in their place, put the sample tray back to its position. Use the GC remote controller to set the inlet temperature to 300 °C and the detector temperature to 300 °C. All flows and the pressure must be off. The temperatures have to be increased first before setting the pressure or the GC will be unstable. This sort of instability causes a safety shut down. Change the method from “Maintenance” back to “Alcohols” when the temperatures are ready. All the required settings will be automatically on. If the flame won’t ignite automatically, ignite it with the remote controller. Let the GC stabilize. Check the inlet with a leak detector to be sure you didn’t leave a leak. Read about Leak Detector from the next chapter. If a leak is detected, check if everything is screwed properly in the inlet. 18 9 Agilent Leak Detector Agilent leak detector is a portable, highly sensitive instrument designed to detect helium and hydrogen gas leaks in gas chromatographs and their accessories. The detector finds leaks by comparing thermal conductivity between the ambient atmosphere and a target gas. The leak detector is not a quantitative device. It is designed to detect leaks in gas line connections commonly associated with laboratory equipment. 9.1 Operation At startup, the detector warms up for 25 s to 90 s depending on the sensitivity range. After warm up, the detector is ready to use. There are two sensitivity ranges. R_Std means standard sensitivity range, for example helium 0,005 ml/min. R_Hi means high sensitivity range, which is ten times more sensitive than standard range, for example helium 0,0005 ml/min. When a leak gas is detected, displays a bar graph. The number of bars indicates the relative size of the gas leaks. Maximum is 8 bars. When measuring clean ambient air, the first bar alternates between black and white, when the detector becomes stable. The same principle goes also with the LEDs light from the bottom left to the top, then from bottom right to the top. Maximum is 8 bars. In LED display, the colors are red and green, where red bars indicate a gas leak. The LED indicators can also be turned off to save the battery. Press [FUNK/POWER] to cycle through the setting options or to change a selected function on or off. Press [ZERO/ENTER] to select a function for editing. Remember also not to block the reference port (fresh air inlet) at the top of the detector. 9.2 Detecting leaks Press and hold [FUNK/POWER] to turn on the detector. You will hear the detector begin to sample air. Wait until the warm up completes. Check the stability at the zero point (while sampling clean air). When it is stable, the leak indicator will alternate between black and white. If the detector indicates a leak (more than one bar), because temperature or moisture fluctuations can impact the zero point, press [ZERO/ENTER] to reset the zero balance. 19 Place the sample probe near the gas connection to check for a leak. Do not press the probe tip against the fittings, tubing and etc. Also do not use the detector in environments that may be potentially contaminated with dust or combustible fumes. However, one bar may not indicate a leak, but two or more bars indicate a leak. Be aware that the detector will give a positive response to water vapor. Turn off the detector when not in use. Press [FUNK/POWER] and hold for 3 seconds. The detector is set to turn off automatically after 10 minutes. 9.3 Charging the battery After long period of disuse, fully charge the battery by connecting it to a PC with USB cable. Allow to charge approximately 2, 5 hours. Do not use the detector while the cable is attached. Because the battery gets warm while charging, allow the detector to stabilize (cool) for 30 minutes before use. You should not replace the battery yourself. Then the detector must be returned to an authorized Agilent Repair Center for repair. 20