1
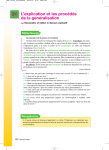
www.nicholl.co.uk
DiVA Series 2 HWL Digital Spectrometer User Guide
DiVA 32 Version 2.0 Sep 2003
DiVA Serial No. 2/1121
Updates will be posted with new versions of the DiVA 32 software. Please
check that you are running the latest version. Next upgrade expected Nov
2003
DiVA ( Digital Visible light Analyser)is a simple to use fibre optic entry
spectrometer sensitive to the full visible spectrum. It is based on the
Microparts VIS spectrometer, which is a monolithic device, bonded to a
Hamamatsu linear photodiode array of 256 elements. For details of the device
please visit www.microparts.de. The illustrations in the pdf file on that site
make a very useful teaching aid for students using DiVA.
DiVA is designed for educational use. The Microparts device is not affected by
humidity or temperature and DiVA requires only the care normally required by
an electronic bench top instrument.
DiVA provides new teaching opportunities for colour filtering, emission,
absorption, reflection, near infrared and long UV detection. For students it is
an inspirational taster of modern instrumentation technology and helps them
to consolidate their understanding of spectra and appreciate the vital role it
plays in modern science and instrumentation.
Applications
DiVA produces spectral graphs for:
Emission from discharge lamps, lasers and LED’s
Transmission/Absorbance through colour filters and solutions
Transmission/Absorbance through translucent materials including
polymers, leaves, inks, dyes etc.
Reflection from coloured surfaces, fabrics, paints, metals etc.
Luminescence and Fluorescence
Mains Power Supplies
DiVA Series 2 requires a 12V 500mA DC power supply with 2.1x 5mm
centre positive connector.
1
Optical Range
The Microparts device has a quoted range of 380 to 780 nm. However it is
sensitive beyond that range and the current version of DiVA 32 has a
displayed wavelength range of 300 to 900nm. Sampling an infrared LED
(typically peaking at 850nm) shows DiVAs sensitivity up to 900nm. The sharp
drop-off as the trace approaches 900nm is apparent. Care is required with
interpreting data at the extremes of the range.
Fig.1 Infrared led. Peak wavelength 860nm
Fibre Optic probe
The steel reinforced silica glass fibre optic probe has a minimum bend radius
of 2 cm It must be handled with care. The reinforcement makes it look tough,
but it is possible to break the fibre. The reinforcement is designed to protect it
from accidental damage as far as possible but students should be warned to
handle it with care. Replacements are available at approx. £60.00 each direct
from Nicholl or via your distributor.
Connection to DiVA is via the SMA threaded connector. This is a standard
telecommunications fibre optic connector. Always replace the dust caps
immediately and keep them in the sealable bag provided.
To clean the fibre ends, use lens tissue and alcohol. Dust can be blown away
with a cleaning air jet canister. The fibre faces are brought into physical
contact by the spring-loaded connector. Any grit or dust can damage the fibre
faces.
In practice the fibre optic connector and adapter will not require cleaning if the
dust caps are replaced immediately in a clean environment.
The end of the probe is housed in a machined alloy holder designed for
holding in a laboratory clamp. The fibre optic end face is recessed 1mm from
the metal face to avoid damage if the probe comes into contact with a surface
such as the glass of a spectrum lamp or an LED. Reasonable care must be
taken to avoid damage to the fibre end.
The fibre optic entry allows lasers and UV sources to be used safely since the
light can be directed away from the user’s field of view. Normal precautions
2
must be taken. If in doubt consult the appropriate adviser/inspector/safety
officer responsible
Operation
Connect the serial connector to a PC running Windows 95 or higher.
Connect the power supply and check that the power LED is on.
Run DiVA 32.exe
Note that the File New icon is greyed out.
Go to the Options Menu and click on Connect to DiVA.
After a few seconds DiVA will connect and the File New icon will go yellow.
The green Sampling LED will flash. DiVA is continuously sampling the
photodiode array. The rate of flashing depends on the integration time set in
Settings. Integration time is the “exposure time” for the photodiode array. If
the integration time is too long, the spectrum trace will go off scale or
“saturate”. If this happens, either reduce the integration time or move the light
source away from the probe.
Go to the Settings menu and set the integration time to 5. The units are
centiseconds. The default setting on start up is 10.
Also in Settings, set the number of readings to 1. (See signal averaging
below)
Point the probe at a light source such as a bulb or daylight.
Click on the File New icon.
Wait while DiVA runs the sampling process. A progress bar will appear.
Certain menu items will be greyed out during this period. After a few seconds
a trace will appear. This is a sample reading.
The y axis is displayed in % saturation. At 100% saturation the photodiode
array is at maximum output.
DiVA has to check data before displaying a trace. The delay is proportional to
the integration time and the number of averaging readings being taken.
To run a second sample in a new Window, click File New again. To overwrite
in the same window (the previous data will be lost, but DiVA asks first) go to
the Options menu and select Add Sample Reading (pressing F2, Enter is
the keyboard equivalent)
Use the cursor to obtain precise wavelength readings in the status bar window
Working off line option: Allows DiVA32 to run without DiVA connected. This
is useful when studying saved data because the software runs faster. Use the
commands in the Options menu. When Disconnect DiVA is selected, menu
items, which require DiVA, are greyed out.
Note that Read Continuous Data is permanently greyed out. This feature is
not yet available.
3
Display Options
• Spectral display: the graph line displays the spectrum colour in the visible
range.
• Graph fill: the area under the graph is filled with the visible spectrum
• Spectrum intensity: the colour display intensity is proportional to the trace
height. This gives an approximation to the view through a conventional
spectroscope.
• Auto scale: This forces the highest point to the full graph height. The Y
axis re-scales to maintain the same % saturation readings. This feature is
very useful for revealing low strength emission peaks.
All three of the spectral display options above can be selected simultaneously
from the tool bar icon. Alternatively use the View drop down menu. Auto scale
can also be selected from the tool bar icon
File Export: DiVA files can be exported to spreadsheets as .csv files.
Spreadsheet packages such as Excel have a range of display and
mathematical options which can be applied to DiVA traces. Go to the File
menu.
Signal Averaging: Significant noise reduction can be obtained by taking
multiple samples and averaging them. The number of readings is set in the
Settings menu.
Five readings is usually optimum. However, there is a time penalty to pay,
especially at longer integration times. If you are taking reference and dark
readings DiVA will force the same number of averaging readings on
reference, sample and dark readings.
Unless the signal/noise ratio is poor, the number of readings should be set at
1.
The number of averaging readings is displayed at the top of the graph.
Averaging over three readings is optimum.
Taking a dark reading IMPORTANT
DiVA will give an output even with no light entering the probe. This is a result
of the way the instrument amplification is set up. This is why the trace is not
zero even with no light and a ripple effect can sometimes be seen.
The dark reading allows the base level of the trace to be lowered. The dark
reading can be subtracted from the sample and reference readings.
Significant noise reduction can be achieved by subtracting the dark reading.
To take a dark reading, cover the probe so that no light is let in, go to the
Options menu. To subtract the dark reading, go to the View menu
Transmission %: For taking readings through filters or solutions. A reference
reading can be taken from a bright white light source. (a 12 volt halogen lamp
is ideal)
4
A sample reading is then taken into the same window. Follow the Options
menu.
Once one reference reading is taken, any number of samples can be taken
and saved against it. To view Transmission % DiVA demands that a Dark
reading is taken.
Absorbance
An alternative to Transmission % is Absorbance. Having taken a Reference
Reading and Dark Reading go to the View menu and select Absorbance.
Absorbance is the inverse of Transmission, but on a Log10 scale.
Absorbance = Log10 (100 / % transmission)
The Absorbance scale is from 0 to 2 absorbance units and values would
normally lie between 0.5 and 1.5. Note that the log scale accentuates low
transmission values as peaks between 1 and 2 on the Y-axis.
Physicists tend to use Transmission (how much gets through) whereas
chemists tend to use Absorbance (which wavelengths are absorbed most,
indicating the presence of particular substances)
However, BE WARNED that the physical position of the reference light source
and the DiVA probe MUST NOT CHANGE between reference and sample
readings. If the experimental set up is changed the readings obtained may be
meaningless.
For very dark filters or solutions the sample reading may be low and relatively
noisy.
Note that the transmission % and Absorbance views have a wavelength axis
restricted to the 400-700nm band. Outside this band the low signal/noise
ratios make transmission and Absorbance data unreliable.
The 400 to 700 waveband for Transmission % is the industry standard for
colour filters.
Comparing two sources without viewing transmission %:
To compare different sources without viewing transmission % you can take a
reference reading and then change the experimental set up to take a sample
reading for comparison. Note DiVA32 will not allow any change to the
integration time when working in the same window. If the integration time is
reset, DiVA will ignore the change until a new window is opened. Also note
that transmission % data will not be reliable because the set up has been
changed.
NOTE: In October 2003 an upgrade will allow multiple readings to be
displayed.
Download from www.nicholl.co.uk
To compare different sources using different integration times, export the files
to a spreadsheet and create a multi-line chart. Alternatively use Tile in the
Windows menu.
5
Smooth data: The very low parts of a DiVA trace have a low signal/noise
ratio. The smooth data option in VIEW applies a rolling average to the trace
for values below 30%. This is a purely cosmetic operation designed to mask
the effects of low signal/noise ratios. The Smooth data command is in the
View menu
Integration time: for the sampling process is set from the Settings menu.
This is the “exposure” time for the photodiode array measured in 1/100ths of a
second.
For bright sources close to the probe, select a short integration time. The
lowest integration time is 1 which needs to be used for Class2 Lasers (see
Hints) and quartz halogen lamps at close range.
The maximum integration time is 500 (5 seconds), which is required for low
intensity sources.
Note DiVA32 will not allow any change to the integration time when working in
the same window. If the integration time is reset, DiVA will ignore the change
until a new window is opened.
The Sampling LED flashes when each sample is taken. At an integration time
of 100, the LED will flash once per second. The integration time is displayed
at the top of the graph.
DiVA responds to a wide range if light intensity from low intensity spectrum
lamps to LEDs , lasers and daylight,
DiVA is not designed to detect very low light levels. For low light levels the
signal/noise ratio becomes too low for reliable readings.
At high intensity the photodiode array will “saturate” giving a line, which is cut
off at 100. DiVA is not damaged by saturation, but the data is meaningless.
To take a sample click on File New or the File New icon. The Comms LED
will light momentarily.
Reference readings (see Transmission)
A reference source (usually a bright white light source such as a halogen
bulb) can be saved. Any number of sample readings can be taken against it
and saved.
Once a window is open and a sample has been recorded, go to the Options
menu and select Add Reference Reading. Note the keyboard short cut F3
Calibration: DiVA 32 needs to be set up with the following calibration
constants before being used for accurate measurement.
DiVA Serial No. 2/1121
Calibration: wavelength = array x3.54 +291.5
NOTE: NEW SOFTWARE VERSION WILL ALLOW NEW DEFAULT
FIGURES TO BE SET. AVAILABLE OCT 2003 FROM www.nicholl.co.uk
The calibration tool bar in the View menu allows the X-axis to be adjusted by
adjusting the scaling (x) and offset (+). In View check Spectrum Lines. This
will show emission lines for some common elements. You can use fluorescent
ceiling strip lights for calibration since these emit clear mercury peaks.
Increasing the scale factor (x) stretches the sample spectrum. Increasing the
offset (+) shifts the sample spectrum to the right on the display.
6
Interpreting Data
For most monochromatic or near monochromatic sources, the data displayed
by DiVA is unambiguous. For white sources or transmission through broad
band pass filters, the data must be interpreted with care.
Typically a white source will give a broad bell shaped graph, which tails off at
the UV and IR ends. THIS IS NOT A “WHITE” LIGHT SPECTRUM. What you
are seeing is partly the efficiency curve of the grating and array system. A true
white light spectrum will rise from left to right with less drop off as wavelength
increases because it is the left hand side of a black body curve which will
extend into the infrared, beyond the range of DiVA.
To correct for this effect a near white light reference can be taken and stored.
Transmission through a filter can then be viewed as a percentage of the
reference signal. This effectively normalises the sample trace.
Some objects and filters give unexpected results. Blue fabrics and filters
reflect and transmit large amounts of red light.
Many filters also transmit a lot of infrared. You can reduce this with an infrared
filter, but it is probably best to discuss this point and live with it. This is one
reason why 700nm is the limit for transmission % graphs.
Colour perception
The spectral colour display is created from an RGB combination. It is not
possible to recreate pure spectral colours from RGB. The DiVA spectral
display is a close approximation.
HINTS FOR SUCCESS
Where possible set the probe in a clamp and provide holders for filters and
light sources. The end results will be far more consistent.
Take reference readings with over 80% saturation on the y axis. More light
means proportionally less noise.
Avoid very dense filters or solutions. The sample reading will be relatively
weak.
If you need to increase the integration time you will need to open a new
window. Tile the windows to compare spectra, or export to Excel and plot a
chart. Use a scaling factor in Excel to compensate for differences in intensity.
Using lasers
A class 2 laser will saturate the array even at an integration time of 1.
The easiest way to reduce the intensity is to move the beam off centre so that
is just grazing the fibre optic probe end.
7
Using reflected light
Illuminate the surface at 90° and set the probe at 45° or vice versa.
What to do with interesting spectra or projects?
Send them to us! If they are genuinely interesting, we will post them on our
web site for the world to see.
Mail to [email protected] with explanatory text. We will acknowledge the
source.
Troubleshooting
Software running slowly off line
Auto connect is on. Switch it off in Options
DiVA not responding
Go to Options and Connect DiVA. If DiVA will not connect, shut the software
down and remove power from DiVA. Then start again. DiVA will then re-set to
an integration time of 30.
No Trace
Reason: Not enough light.
Solution: move the probe closer to the light source, increase the integration
time
Saturated trace
Reason: Too much light
Solution: Move the probe away from the light source, reduce the integration
time..
Still saturated at integration time = 1
Reason: DiVA cannot accept this much light.
Solution: Reduce the intensity by moving the probe away from the light source
or use a neutral density filter.
Data varies from one reading to the next
Reason: The probe is moving.
Solution: Use a clamp to keep the probe position relative to the source
constant. Small differences in angle and distance can change the amount of
light entering the probe dramatically.
Trace is always full scale
Reason: Auto Scale is on.
Solution: Toggle it off from the toolbar icon or uncheck in the View menu
when a graph is displayed.
8
Integration time refuses to change
You must open a new window. DiVA will not allow a change of integration time
in the same window. This ensures that reference and sample readings are
compared under the same conditions.
Readings are very slow
Check that the number of readings is set to 1
Software refuses to start or crashes with error messages
Check the web site to ensure that you are running the latest version of DiVA
32.
Delete the software registry entry for DiVA and restart the software.
www.nicholl.co.uk
9