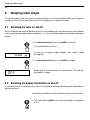
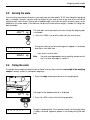
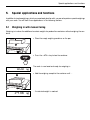
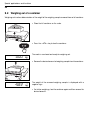
1
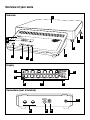
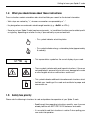
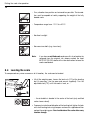
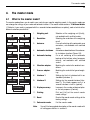
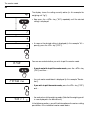
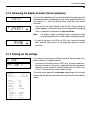
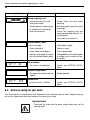
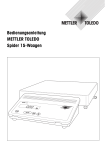
Operating instructions
METTLER TOLEDO
Spider 1S Scales
In FreeHand auf 70% skaliert ohne Linien
Overview of your scale
Overview
1
In FreeHand auf 70% skaliert ohne Linien
2
11
10
3
4
5
9
8
7
6
Display
12
17
16
tPCSNetBG
PT
%
12
kglb
+ -
14
15
13
Connections (rear of terminal)
RS232C
In FreeHand auf 30% skaliert ohne Linien
21
20
19
18
Display, controls and connections of your scale
Overview
No. Designation
Connections (rear of terminal)
No. Designation
1
Weighing pan
18
Connection cable terminal-platform
2
Level (with certified scales only)
19
Power cable
3
Weighing platform
20
Serial interface RS232C
4
Leveling foot
21
Free outputs for options
5
Terminal
6
On/off key
7
Transfer key
8
Tare key
9
Zeroing key
10
Display (see also expanded view)
11
Model designation
Display
No. Designation
12
Display for special functions
13
Weighing units (kg, g, lb, t)
14
Alphanumeric display
15
Symbol for discharged battery (option)
16
Stability detector
17
Special symbol
Please see section 7.1 for specifications of the
power supply, the platform supply and the RS232C
interface.
Contents
4
Contents
1.
Getting to know your Spider S scale .................................................................. 6
1.1
Introduction ................................................................................................................... 6
1.2
Overview of the Spider 1S scales ...................................................................................... 6
1.3
A wide range of optional equipment .................................................................................. 6
1.4
What you should know about these instructions ................................................................ 7
1.5
Safety has priority ........................................................................................................... 7
1.6
Declaration of conformity and safety tests ......................................................................... 8
2.
Putting the scale into operation ....................................................................... 10
2.1
For those in a great hurry .............................................................................................. 10
2.2
Unpacking and checking the standard equipment ............................................................ 11
2.3
Selecting or changing the location .................................................................................. 11
2.4
Leveling the scale ......................................................................................................... 12
2.5
Power supply ............................................................................................................... 13
3.
Weighing made simple ................................................................................... 14
3.1
Switching the scale on and off ....................................................................................... 14
3.2
Switching the display illumination on and off ................................................................... 14
3.3
Zeroing the scale .......................................................................................................... 15
3.4
Taring the scale ........................................................................................................... 15
3.5
Performing a simple weighing ....................................................................................... 16
3.6
Printing out the weighing result and transferring data ........................................................ 16
4.
The master mode ........................................................................................... 17
4.1
What is the master mode? ............................................................................................. 17
4.2
Operation in the master mode ........................................................................................ 18
4.3
Selecting the weighing unit ............................................................................................ 21
4.4
Selecting the resolution of the weighing result .................................................................. 21
4.5
Switching the automatic zero correction on or off ............................................................. 21
4.6
Activating or deactivating the automatic shutdown ........................................................... 22
4.7
Switching the automatic backup on or off ........................................................................ 22
4.8
Setting the vibration adapter .......................................................................................... 22
Contents
5
4.9
Setting the process adapter ............................................................................................ 23
4.10
Configuring interface 1 .................................................................................................. 23
4.11
Configuring interface 2 (optional equipment) ................................................................... 24
4.12
Increasing the display accuracy (for test purposes) .......................................................... 25
4.13
Printing out the settings ................................................................................................. 25
4.14
Resetting the settings to the factory settings ..................................................................... 26
5.
Special applications and functions .................................................................. 27
5.1
Weighing in with manual taring ..................................................................................... 27
5.2
Weighing out of a container ........................................................................................... 28
6.
Further important information regarding your scale .......................................... 29
6.1
When faults appear ...................................................................................................... 29
6.2
Notes on caring for your scale ....................................................................................... 30
6.3
Notes on the interface ................................................................................................... 31
6.4
Overview of the master mode ......................................................................................... 32
7.
Technical data ................................................................................................ 33
7.1
General data and standard equipment of the Spider 1S scales ........................................... 33
7.2
Data for individual models ............................................................................................ 34
Getting to know your Spider S scale
6
1.
Getting to know your Spider S scale
This section provides you with detailed information on your Spider S scale. Please read this section through
carefully even if you already have experience with METTLER TOLL6O balances and scales and be sure to
familiarize yourself with the safety instructions!
1.1 Introduction
Thank you for deciding to purchase a scale from METTLER TOLEDO.
The industrial scales of the Spider S line combine a wide range of weighing functions and setting possibilities
with exceptional ease of operation and ruggedness. The weighing platform and the terminal have IP67
degree of protection. The Spider S scales are thus eminently suitable for use in production environments
which necessitate frequent cleaning using a water jet (e.g. in the chemical industry and in food production).
Further, the comprehensive sealing of the entire scale ensures hygienically perfect conditions as the ingress
of foreign substances is virtually completely impossible. The integral interface ensures problem-free data
interchange with numerous peripherals and thanks to the easily surveyed and attractively styled terminal
your Spider S scale looks well in any environment. Please read through these operating instructions very
carefully so that you can exploit all the possibilities offered by your scale to the full.
1.2 Overview of the Spider 1S scales
Different models of the Spider 1S scale are available. All scales have the same terminal, but differ in their
weighing range and the size of the weighing platform. All Spider 1S scales have the following equipment
features in common:
– Compact and rugged, industrial construction with a housing made of stainless steel. All materials used
are resistant to moisture, resistant to most chemicals and suitable for use in the food industry. The
weighing platform and the terminal meet the requirements of IP67 degree of protection.
– Built-in RS232C serial interface.
– Convenient keypad and large size, illuminated display.
– Universal expandability through an extensive range of optional equipment.
Your Spider scale has a CE declaration of conformity (see section 1.6) and METTLER TOLEDO as the
manufacturer has been awarded ISO 9001/EN␣ 29001 certification. Certified versions of Spider scales are
also available, please ask your METTLER TOLEDO dealer.
1.3 A wide range of optional equipment
The wide range of optional equipment expands the application possibilities of your Spider S scale. For
inquiries or orders, your local METTLER TOLEDO dealer will be pleased to help you.
Getting to know your Spider S scale
7
1.4 What you should know about these instructions
These instructions contain orientation aids which facilitate your search for the desired information:
– Work steps are marked by “•”, whereas enumerations are preceded by a “–”.
– Key designations are enclosed in double angle brackets (e.g. «On/Off» or «±»).
– Some keys of your Spider S scale have two assignments, i.e. two different functions can be called up with
a single key, depending on whether the key is pressed briefly or pressed and held:
– This symbol indicates a brief keystroke.
– This symbol indicates a long, sustained keystroke (approximately
5 seconds).
1"46 ∆
– This representation symbolizes the current display of your scale.
– These symbols indicate safety and hazard instructions. If these are
not complied with, personal injuries to the user, damage to the scale
or other tangible assets or malfunctions could result.
– This symbol indicates additional information and instructions which
facilitate your handling of the scale and contribute to proper and
economical use.
1.5 Safety has priority
Please note the following instructions for safe and problem-free operation of your Spider S scale.
– Read through these operating instructions carefully, even if you are
already familiar with METTLER TOLEDO balances and scales.
– It is essential to note the instructions in section 2 when putting your
new scale into operation.
Getting to know your Spider S scale
8
– The Spider S scales must not be operated in a hazardous environment.
– It is essential you note and comply with the cleaning instructions
for your scale (section 6). The water tightness of your␣ scale is
assured only if the correct cleaning procedure is followed. This
is a prerequisite for protection of the terminal and weighing
platform to IP76 requirements!
– Ensure that the voltage value printed on the model plate of your
Spider S scale matches the local line voltage.
– Use only optional equipment and peripherals supplied by METTLER
TOLEDO with your Spider S scale, these have been optimally
matched to your scale.
– Your Spider S scale has a rugged construction, but it is still a
precision instrument – treat it with the appropriate care and it will
thank you with years of trouble-free operation.
– Open neither the terminal nor the weighing cell, they contain no
parts which can be maintained, repaired or replaced by the user.
Should the terminal or the weighing cell be opened, the warranty
becomes null and void. Do not attempt to clean the interior of the
weighing platform with solid objects. In the unlikely event you should
experience problems with your scale, please contact your responsible METTLER TOLEDO dealer.
1.6 Declaration of conformity and safety tests
We, as manufacturer with sole responsibility, attest that the product to which this declaration relates is in
conformity with the EC Directives stated below.
Notes: An EC type examination certificate has been obtained for certified scales and those subject␣ to␣ compulsory verification. The year of the first calibration is given next to the CE mark. Scales of this type are factorycertified and bear the designation «M» on the instrument itself and on its packaging. If the M is on a plain
background, the scale may be put into service␣ immediately. If the background is divided and hatched, the
scale must be calibrated locally at its place of use by a certified METTLER TOLEDO Service facility. If the
validity of the calibration is for a period limited by the country’s national regulations, the operator of a scale
of this type has sole responsibility for ensuring repeat certification in good time.
Getting to know your Spider S scale
9
Scales and Terminals Spider 1S
Mark
[year]
[code]
1)
1)
M
EC Directive
Compliant with standard
73/23EEC Low Voltage
EN61010-1:1993
EN61010-1/A2:1995 (Safety requirements)
89/336EEC EMC
EN55011:1991 Radio interferences
EN50082-1:1992 Immunity
90/384EEC 1)
Not
automatic
scales
EN45501:1992 1) Not automatic
scales
Applies only to certified scales (approval/test certificate no. T2867/TC2518)
Mettler-Toledo GmbH
Industrial BA IND-N
Nänikon, September 1996
Johannes Schmid
Manager
Business Area Industrial
Stephan Hermanns
Manager
Product Area Precision Scales
The scales and terminals of the Spider 1S range have been examined by accredited testing agencies. They
have passed the safety tests listed below and carry the corresponding marks of conformity. The production
is subject to process inspection by the testing authorities.
Country
Germany
Mark of conformity
Standard
EN61010-1:1993
EN61010-1/A2:1995
EN50082-1:1992
EN55011:1991
USA/Canada
This equipment has been tested and found to comply with the limits for a Class A digital device, pursuant to both Part 15 of the FCC Rules
and the radio interference regulations of the Canadian Department of Communications. These limits are designed to provide reasonable
protection against harmful␣ interference when the equipment is operated in a commercial environment. This equipment generates, uses and
can radiate radio frequency energy and, if not installed and used in accordance with the instruction manual, may cause harmful interference
to radio communications. Operation of this equipment in a residential area is likely to cause harmful interference, in which case the user
will be required to correct␣ the interference at his own expense.
Cet appareil a été testé et s’est avéré conforme aux limites prévues pour les appareils numériques de classe A et à la partie 15 des règlements
FCC et à la réglementation des radio-Interférences du Canadian Department of communications. Ces limites sont destinées à fournir une
protection adéquate contre␣ les interférences néfastes lorsque l’appareil est utilisé dans un environnement commercial. Cet appareil génère,
utilise et peut radier une énergie à fréquence radioélectrique; il est en outre susceptible␣ d’engendrer des interférences avec les
communications radio, s’il n’est pas installé et utilisé␣ conformément aux instructions du mode d’emploi. L’utilisation de cet appareil dans
les zones résidentielles␣ peut␣ causer des interférences néfastes, auquel cas l’exploitant sera amené à prendre les dispositions utiles pour
palier aux interférences à ses propres frais.
Putting the scale into operation
10
2.
Putting the scale into operation
In this section you will learn how you unpack and set up your new scale and prepare it for operation. On
completion of the steps described in this section, your scale is ready for operation.
2.1 For those in a great hurry
If you are already familiar with the Spider S scales, the following short-form instructions comprising 5 steps
will suffice for putting your new scale into operation. All other users are advised to study the following
sections, which describe the individual steps in detail.
Nothing could be simpler!
1
• Unpack
2
• Set up
3
• Level
4
• Connect to power supply:
First check whether the voltage printed on the
model plate of the scale matches your local line
voltage. If this is not the case, on no account
connect the scale to the power supply, but
contact your METTLER TOLEDO dealer!
Putting the scale into operation
11
5
• Weigh!
2.2 Unpacking and checking the standard equipment
Before you set up your new scale and put it into operation, you should check whether you have received all
accessories that are part of the standard equipment of your scale.
• Open the packaging carton and pull the scale together with the␣ protective cushioning out of the carton. Remove the protective cushioning.
• Check the delivery for completeness. The following parts are included in the standard equipment:
– Terminal and weighing platform with mounted weighing pan and
level (with certified scales only)
– Operating instructions
– Open-end wrench to level the scale
• Store all parts of the packaging. This packaging guarantees the best
possible protection for the transport of your scale.
• Check the scale for any damage. Notify your METTLER TOLEDO
dealer immediately if you have any complaints. On no account put
the scale into operation if you discover any external damage!
2.3 Selecting or changing the location
For your own safety, heed the following instructions regarding selection of the location. Also bear in mind
that your scale is a precision instrument and will thank you for an optimum location with high accuracy and
dependability.
– Never operate scale in a hazardous environment.
Putting the scale into operation
12
– Firm, vibration-free position as horizontal as possible. The foundation must be capable of safely supporting the weight of the fully
loaded scale.
– Temperature range from -10 °C to +40 °C
– No direct sunlight
– No excessive drafts (e.g. from fans)
Note:
If you have a certified scale and move this to a location far
removed from the original site, please contact the local
METTLER TOLEDO dealer at the new destination to have the
scale recalibrated.
2.4 Leveling the scale
To compensate any minor uneveness at its location, the scale can be leveled:
• Lift off the weighing pan. Loosen the lock nuts (“A”) of the leveling
feet (if necessary, use the open-end wrench supplied). Turn the
adjustable feet (“B”) until the scale is level, or ...
A
In FreeHand skaliert auf 70%
inkl. Linien
B
... the air bubble is located in the center of the level (only certified
scales have a level).
• To prevent unintentional alteration of the leveling feet, tighten the lock
nuts of all leveling feet using the open-end wrench supplied and then
replace the weighing pan. You should relevel the scale after every
location change.
Putting the scale into operation
13
2.5 Power supply
On delivery, the scale is set to the line voltage of the country of destination.
• First check whether the voltage printed on the model plate of the scale
matches the local line voltage. If this is not the case, on no account
connect the scale to the power supply, but contact your METTLER
TOLEDO dealer.
• Connect the scale terminal to the power supply.
100% Grösse aus FreeHand
Route the power cable so that it does not touch the weighing pan and
such that it can never hinder your daily operations nor be damaged!
After connection to the power supply, the scale performs a self-test in
which all display segments light up briefly. In addition, information
specific to the scale is displayed briefly (software version etc.). This
information is displayed each time the scale has been disconnected
from the power supply and then reconnected. We advise you to␣ disconnect the scale from the power supply if it will not be used for a
lengthy period.
=00 ∆
On completion of the self-test, your scale is ready for operation.
Weighing made simple
14
3.
Weighing made simple
This section explains how you switch the scale on and off, set it to zero and tare it and how you perform
a weighing. You will also learn how to print out the weighing result and transfer data.
3.1 Switching the scale on and off
After the scale has been put into operation for the first time we advise you not to disconnect it from the power
supply (except during lengthy breaks in operation) – it is then in thermal equilibrium and ready for operation
quicker.
• To switch the scale on, press the «On/Off» key briefly.
The scale performs a self-test.
=00 ∆
As soon as the weight display appears, your scale is ready
for␣ weighing.
• To switch the scale off, press the «On/Off» key again.
OFF
Switching off is confirmed briefly in the display with “OFF” and then
the display is cleared.
3.2 Switching the display illumination on and off
For convenient work, the display of your scale is illuminated to allow perfect reading even under adverse
lighting conditions.
The display illumination can be switched on and off at a keystroke:
• Press and hold the «On/Off» key until the illumination is switched on
or off.
Weighing made simple
15
3.3 Zeroing the scale
As a result of environmental influences, your scale may not show exactly “0.00” even though the weighing
pan is unloaded. However, you can reset the display of your scale to zero at any time to ensure that the
weighing really starts at zero. Zeroing with a loaded weight is possible only within a certain range, which
depends on the scale model. If the scale can not be reset to zero when a weight is loaded, this range has
been exceeded.
=04 ∆
The scale does not show exactly zero even though the weighing pan
is unloaded.
• Press the «Ç» key and the scale starts the reset to zero.
- - - - - =00 ∆
During the resetting, the horizontal segments appear in the display
and after a short wait time ...
... your scale is reset to zero.
Note:
If an error message appears during resetting, please consult
the list of error messages in section 7.
3.4 Taring the scale
The weight of any weighing container can be “tared” at a keystroke so that the net weight of the weighing
sample is always shown in subsequent weighings.
• Place the empty weighing container on the weighing pan.
In FreeHand auf 30% skaliert ohne Linien
+24 ∆
The weight of the loaded container is displayed.
• Press the «#» key to start the taring operation.
- - - - - -
Taring runs automatically. If the scale has to wait until the weight value
is stable, horizontal segments appear in the display during the wait
time.
Weighing made simple
16
=00 ∆~
On completion of taring, the zero display and the symbol “Net” (for net
weight) appears. Your scale is again ready for weighing.
Notes
– The scale can store only one tare value at a time.
– When the scale is unloaded, the stored tare value is displayed with
a negative sign.
– To clear the stored tare value, unload the weighing pan and then
press the «#» key.
3.5 Performing a simple weighing
Performing a simple weighing is described only for the sake of completeness as this operation comprises
only two work steps.
• Place the weighing sample on the pan (if you are working with a
weighing container, tare this as described in the previous section).
In FreeHand auf 30%
skaliert ohne Linien
•
2ç36 ∆
• Wait until the circular symbol of the stability detector in the bottom
left corner of the display fades. Fading of the symbol indicates that
the weighing result is stable.
2ç36 ∆
• Now read off the weight in the display.
You will find information regarding special weighing types (weighing
into a container with manual or automatic taring, weighing out of a
container) in section 5 of these instructions.
3.6 Printing out the weighing result and transferring data
If your scale is connected to a printer via the RS232C interface, you can print out the current weighing result
with a single keystroke. If your scale is connected to a computer, you can transfer data to and from the
computer. You will find additional information on the attachment of a printer in the documentation␣ accompanying
your printer. Further details on the serial interface and regarding attachment of a computer can be found in
the interface description available from your METTLER TOLEDO dealer.
• Press the «±» key. As soon as the weighing result is stable, it will
be transferred to the attached device.
The master mode
17
4.
The master mode
4.1 What is the master mode?
The master mode allows you to match your scale to your specific weighing needs. In the master mode you
can change the settings of your scale and activate functions. The master mode contains 12 different blocks
(13 blocks if your scale is equipped with the second interface available as an option), each of which offers
different selection possibilities.
1.Weighing unit
13. End Mastermode
UnitS
End
2. Resolution
1.
Weighing unit:
Selection of the weighing unit (Units),
not available with certified scales.
2.
Resolution:
Selecting the resolution of the weighing
result.
3.
Autozero:
On or off switching of the automatic zero
correction, not available with certified
scales.
4.
Automatic shutdown:
Activation or deactivation of the automatic shutdown function (Power Off).
5.
Automatic backup:
On or off switching of the automatic
backup of the last tare value (on power
failure), not available with certified
scales.
6.
Vibration adapter:
Matching the scale to the ambient conditions.
7.
Process adapter:
Matching the scale to the type of weighing.
8.
Interface 1:
Settings for the first interface built in as
standard (Interface 1).
9.
Interface 2:
Settings for the second interface (Interface 2). This block appears only if a
second interface is built in (option).
10. Display accuracy:
Increase in the number of decimal places for test purposes (Control).
11. Printing:
Print out (List) of the current master
mode settings.
12. Reset:
Reset of the master mode settings to the
factory settings.
13. End master mode:
Exit the master mode.
12. Reset
rESolu
rESEt
11. Printing
3. Autozero
LiSt
Aã2ErO
4. Autom. shutdown
10. Display accuracy
CtrL
PWrOFF
5. Automatic backup
9. Interface 2
1FACE2
SAVE
6. Vibration adapter
8. Interface 1
VibrAt
1FACE1
7. Process adapter
ProcES
Note:
You will find a complete description of the master mode with
all setting possibilities in section 6.
The master mode
18
4.2 Operation in the master mode
In this section you will learn how to work with the master mode. Information regarding the individual master
mode blocks and available settings can be found in the following sections.
These are the keys you need in the master mode
For operation in the master mode, you need only two keys:
– The «±» key is used for the acceptance of a proffered option and
has the same meaning as “YES”.
YES:
Whenever you wish to accept a proffered option,␣ press the «±»
key briefly.
– The «#» key is used for the rejection of a proffered option and
has the same meaning as “NO”.
NO:
Whenever you wish to reject a proffered option,␣ press the «#»
key briefly.
Switching from the weighing mode to the master mode
2ç36 ∆
The scale operates in the normal weighing mode.
• Press the «±» key and keep it pressed for approx. 5 seconds.
MAStEr
The scale now asks whether you really wish to switch to the master
mode:
• If you do not wish to switch to the master mode, press the «#»
key (“NO”) and ...
2ç36 ∆
... the scale then returns to the weighing mode.
• If you wish to switch to the master mode, press the «±» key
(“YES”) and...
UnitS
... the scale then shows the first block of the master mode (“Units” =
weighing unit) directly.
The master mode
19
Selecting the master mode blocks
UnitS
Following entry into the master mode, the first master mode block
(“Units”, not available with certified scales) is displayed.
• Press the «#» key (“NO”) and ...
... the display shows the next master mode block (“Resolution”). Each
time the «#» key (“NO”) is pressed, the scale switches to the next
master mode block.
End
In the last master mode block you (“End”) you are asked if you wish
to quit the master mode.
○ ○ ○ ○ ○ ○
rESolu
- If you do not wish to quit the master mode, press the «#» key
(“NO”) again and then ...
UnitS
... the first master mode block (“Units”, not available with certified
scales) is again displayed.
- If you wish to quit the master mode, press the «±» key (“YES”)
and ...
2ç36 ∆
... the scale returns to the weighing mode.
Changing the setting in a master mode block:
UnitS
• Select the master mode block as described above in which you wish
to change a setting (in this example the block “Units” =␣ weighing
units, not available with certified scales).
• Press the «±» key (“YES”). This tells the scale that you wish to
make changes in the selected block.
The master mode
○ ○ ○ ○ ○ ○ ○ ○ ○ ○ ○ ○ ○ ○ ○ ○ ○ ○
20
∆
The display shows the setting currently active (in this example the
weighing unit “kg”).
• Now press the «#» key (“NO”) repeatedly until the desired
setting is displayed.
t
¡
¬
End
• As soon as the desired setting is displayed (in this example “lb” =
pound), press the «±» key (“YES”).
You are now asked whether you wish to quit the master mode.
- If you do not wish to quit the master mode, press the «#» key
(“NO”) and then ...
rESolu
... the next master mode block is displayed (in this example “Resolution”).
- If you wish to quit the master mode, press the «±» key (“YES”)
and ...
5*71 ¬
... the scale returns to the weighing mode. (Note that the weighing result
is now displayed in the desired unit.)
In the following sections, you will find information on the various setting
possibilities in the individual master mode blocks.
The master mode
21
4.3 Selecting the weighing unit
In the first master mode block you specify the unit in which the weighing
result should be displayed. This block is not available with certified
scales. The following units are available:
UnitS
∆
t
¡
¬
– The weighing result is displayed in kilograms (kg). This is the
factory setting.
– The weighing result is displayed in metric tons (t).
– The weighing result is displayed in grams (g).
– The weighing result is displayed in pounds (lb).
4.4 Selecting the resolution of the weighing result
rESolu
=001∆
In this master mode block you can select the resolution in which the
weighing result is displayed. The settings available and the factory
setting depend on the scale’s nominal load and whether it is a certified
model or not.
The example shown here illustrates the maximum and minimum
resolution of a 35 kg scale which is not certified. Other settings are
available between these two extreme values.
=200∆
4.5 Switching the automatic zero correction on or off
Aã2ErO
On
OFF
In this master mode block you can switch the automatic zero correction
on or off. When switched on (factory setting), the zero point is␣ automatically corrected for temperature fluctuations or contamination of the
weighing pan. This block is not available for certified scales.
– Automatic zero correction switched on. This is the factory setting.
– Automatic zero correction switched off.
The master mode
22
4.6 Activating or deactivating the automatic shutdown
PWrOFF
When the automatic shutdown function is activated, the scale switches
itself off automatically 3 minutes after the last operation presupposing
that no weight is loaded. This is particularly useful if you operate your
scale with the optional battery since you can then appreciably prolong
the line-independent operating time of the scale. To switch the scale on
again, press the «On» key.
OFF
– Automatic shutdown deactivated. This is the factory setting.
On
– Automatic shutdown activated.
4.7 Switching the automatic backup on or off
SAVE
OFF
On
When the automatic backup is activated, the current net weight and the
current tare weight are automatically written to a nonvolatile memory.
As soon as the scale is ready for operation again after disconnection
from the power supply or after a power failure, the stored value is
available. This block is not available with certified scales.
– Automatic backup switched off. This is the factory setting.
– Automatic backup switched on.
4.8 Setting the vibration adapter
VibrAt
MEd
LOW
HIGH
The vibration adapter is used to match the scale to the ambient␣ conditions (vibrations, drafts at scale location).
– Setting for normal ambient conditions. This is the factory setting.
The scale operates at moderate speed.
– Setting for virtually disturbance-free, stable surroundings. The
scale operates very quickly, but is more sensitive to external␣ influences.
– Setting for unstable surroundings. The scale operates more slowly
than in the factory setting, but is less sensitive to external influences.
The master mode
23
4.9 Setting the process adapter
The process adapter can be used to match your scale to the different
types of weighing.
ProcES
– Universal setting, suitable for all types of weighings and normal
weighing samples. This is the factory setting.
UNIVEr
– Absolute weighing. This setting is suitable for checkweighings and
for the weight determination of weighing samples.
AbS
– Dosing of liquid or powdery weighing samples.
dOSING
4.10 Configuring interface 1
In this master mode block you can configure all parameters of the
RS232C serial interface built in as standard. You need configure the
interface only if you do not obtain the desired result with the factory
settings. This master mode block is very extensive.
1FACE1
You will find a complete description of this master mode block and
other useful information regarding the interface in the interface
description of the Spider S scales which you can obtain from your
METTLER TOLEDO dealer.
If you have made unintentional changes in this master mode block, you
can reset all settings of the interface to the factory settings:
• Select the master mode block “I-FACE 1” and then press the «±»
key (“YES”) to confirm that you wish to make changes in this block.
1FACE1
rESEt
1
• You are now asked whether you wish to reset the interface settings
to the factory settings. Press the «±» key (“YES”) to confirm that
you wish to reset the settings.
The master mode
24
Std ON
1
End
2ç36 ∆
• To be on the safe side, you are again asked whether you wish to
restore the factory settings. Press the «±» key (“YES”) again to
confirm.
• The scale asks you whether you now wish to exit the master mode.
Press the «±» key (“YES”) and ...
... the scale returns to the weighing mode. The first serial interface
now operates with the following factory settings:
Parameter
Factory setting
Data transmission protocol
XON/XOFF
Parity
Even
Data transmission rate
2400 baud (2400)
Operating mode
Printer (Print)
Data for transmission
Gross weight (Gross), tare weight
(Tare), net weight (Net)
Print format
Multi (new line for every value)
4.11 Configuring interface 2 (optional equipment)
1FACE2
This master mode block is displayed only if the second interface
available as an option is installed!
In this master mode block you can configure all parameters of the
optional second RS232C interface. You need configure the interface
only if you do not obtain the desired result with the factory settings.
You will find a complete description of this master mode block and
other useful information regarding the interface in the interface
description of the Spider S scales which you received with the
optional second interface.
To reset all parameters of the optional interface to the factory settings,
proceed as described in the previous section.
The master mode
25
4.12 Increasing the display accuracy (for test purposes)
CtrL
‹ 2ç357 ∆
In this master mode block you can choose whether the weighing result
should be temporarily displayed with a ten times greater resolution for
test purposes, i.e. with one decimal place more than with normal
resolution.
– If you confirm the high resolution (with the «±» key), the asterisk
symbol appears in the top left corner of the display and the weighing
result is temporarily displayed with high resolution.
Note:
2ç36 ∆
The actual number of decimal places displayed at high
resolution depends on the scale model and weighing range.
– As soon as you press the «#» or «±» key, the asterisk symbol
fades and the scale returns to the weighing mode and normal
resolution.
4.13 Printing out the settings
In this block you have the possibility to record all settings made in the
master mode on the attached printer.
LiSt
Print1
RANGE
RESOL
OS 1.29
:
:
UNIT
A-ZERO
PWROFF
SAVE
VIBRAT
PROCES
RS232
PROTOC
PARITY
BAUD
MODE
:kg
:ON
:OFF
:OFF
:MED
:UNIVER
1
1
1
1
6.018 kg
0.002 kg
AP 4.68
:XONOFF
:EVEN
:2400
:PRINT
– If you confirm this block (with the «±» key), all master mode␣ settings are printed out. If the printer is attached to the optional second
interface, you can select the second interface with the «#» key
(“Print 2”) to print out the master mode settings.
The record shown opposite is a specimen, depending on the␣ selected
settings and the type of printer the printout may differ from the example
shown.
The master mode
26
4.14 Resetting the settings to the factory settings
rESEt
Std On
In this master mode block you have the possibility to reset the entire
master mode to the factory settings.
– The master mode is reset to the factory settings if you confirm this
option (with the «±»key).
Notes:
– Resetting to the factory settings affects all master mode blocks with
the exception of the two blocks for configuring the interfaces (“IFACE 1” and “I-FACE 2”), which can be reset in the respective block
(see sections 4.10 and 4.11).
– Proceed with caution with this option as you lose all individual
settings (with the exception of the interface parameters)!
The factory settings in the master mode blocks affected by the resetting
are as follows:
Master mode block
Factory setting
Weighing units (UNITS)
Kilogram (kg)
Resolution (RESOLU)
Depends on model
Autozero (A-ZERO)
Switched on (On)
Autom. shutdown (PWR OFF)
Switched off (Off)
Autom. backup (SAVE)
Switched off (Off)
Vibration adapter (VIBRAT)
Setting for normal ambient conditions (Med)
Process adapter (PROCES)
Universal setting (Univer)
Special applications and functions
27
5.
Special applications and functions
In addition to simple weighings, which you are already familiar with, you can also perform special weighings
with your scale. You will learn these applications in the following sections.
5.1 Weighing in with manual taring
Weighing in involves the addition of a certain weight of a product to a container without weighing␣ the␣ container.
• Place the empty weighing container on the pan.
In FreeHand auf 30% skaliert ohne Linien
• Press the «#» key to tare the container.
=00 ∆~
The scale is now tared and ready for weighing in.
• Add the weighing sample to the container until ...
In FreeHand auf 30% skaliert ohne Linien
2ç36 ∆~
... the desired weight is reached.
Special applications and functions
28
5.2 Weighing out of a container
Weighing out involves determination of the weight of the weighing sample removed from a full container.
• Place the full container on the scale.
In FreeHand auf 30% skaliert ohne Linien
• Press the «#» key to tare the container.
=00 ∆~
The scale is now tared and ready for weighing out.
• Remove the desired amount of weighing sample from the container.
In FreeHand auf 30% skaliert ohne Linien
-%82 ∆~
The weight of the removed weighing sample is displayed with a
negative sign.
• For further weighings, tare the container again and then remove the
desired amount.
Further important information regarding your scale
29
6.
Further important information regarding your scale
6.1 When faults appear
Error messages in the display draw your attention to the existence of an incorrect operation, the failure of
the scale to execute a procedure properly or the appearance of a fault in the hardware or software of the scale.
The following table provides you with information for interpretation of the error messages and symptoms,
as well as details regarding the cause and rectification.
Error message/Symptom
íååååì
î____ï
Cause
Rectification
Overload:
– Weighing range exceeded
• Unload scale or reduce preload
Underload:
– Weighing pan not in place
– Weighing range gone below
• Ensure the weighing pan is correctly installed and surrounding parts
are not touched
– Contact between weighing pan
• Set scale to zero
and surroundings
• Apply preload
òãnoãô
î_no_ï
ãããããã
Zeroing not possible:
– Zeroing outside the zero setting • Ensure that zeroing is performed
range (overload)
only in the admissible range (on
switching on: -2% to +18% of
– Zeroing outside the zero setting
factory zero setting, on zeroing in
range (underload)
operation: ±2% of the full load)
and not on underload or overload
No stability of the display:
– Unstable location
– Unstable weighing sample
• Ensure more stable ambient conditions/weighing sample
– Contact between weighing pan or • Change setting of the vibration
adapter in the master mode
sample and surroundings
• Ensure that weighing pan and
weighing sample do not touch surrounding parts
Further important information regarding your scale
30
Error message/Symptom
2%34 ∆
Cause
Rectification
Wrong weighing result:
– Wrong zeroing of the scale
– Wrong tare weight
• Unload scale, zero and repeat
weighing
– Contact between weighing pan • Clear tare weight or tare with correct
tare weight
or sample and surroundings
• Ensure that weighing pan and
– Scale not horizontal
weighing sample do not touch surrounding parts
• Level scale (see section 2)
Display remains “dark”:
– No line voltage
• Check power supply
– Scale switched off
• Switch on scale
– Power cable not plugged in
• Plug in power cable
– Batteries discharged (in opera- • Change batteries of the battery pack
tion with optional battery pack)
or charge (see instructions for battery pack)
Err 6
No calibration:
– The scale is not calibrated
• Contact your METTLER TOLEDO
dealer
Unstable weight value:
– The weight value did not achieve • Repeat operation
stability
Err 53
EAROM error:
– Checksum error in EAROM
• Contact your METTLER TOLEDO
dealer
6.2 Notes on caring for your scale
Your scale requires no maintenance work whatsoever and is extremely easy to clean. Regular cleaning
assures the hygiene and also helps preserve the value of your scale.
Important notes
– Disconnect the scale from the power supply before you start the
cleaning work!
Further important information regarding your scale
31
– Please consult the in-plant and branch-specific regulations governing cleaning intervals and admissible cleaning agents. Never use
acids, bases or powerful solvents for cleaning.
Terminal
• Clean the terminal with a suitable agent approved for your branch
and with water at a temperature of maximum 60 °C. Never use
high-pressure cleaning equipment!
• Dry the terminal immediately following cleaning with a soft, lint-free
cloth.
Weighing platform
• Remove the weighing pan.
• Clean the weighing pan and the understructure of the weighing␣ platform with a suitable agent approved for your branch and with water
at a temperature of maximum 60 °C. Never use high-pressure
cleaning equipment!
The rubber cover of the weighing cell must on no account be
cleaned with sharp objects! This can cause leaks and lead to a
situation where the IP protection is no longer assured!
• Dry the weighing platform immediately following cleaning with a
soft, lint-free cloth.
6.3 Notes on the interface
Your scale is fitted with an RS232C serial interface and can also accommodate a second interface of the
same type (as well with hardware handshake) or a RS422/485 interface available as an option. You will
find information regarding the pin assignment, the commands, the configuration, attachment of peripherals
(printer, computer) and on working with the interface in the separate interface description of the Spider S
scales available from your METTLER TOLEDO dealer. If you purchase the second interface, the interface
description is supplied.
Further important information regarding your scale
32
6.4 Overview of the master mode
WEIGHING MODE
2ç36 ∆
MASTER MODE
MAStEr
1. Weighing unit
1)
2. Resolution
¬
End
End
1)
Aã2ErO
4. Automatic shutdown
PWrOFF
5. Automatic backup
¡
t
depends on model
rESolu
3. Autozero
2)
∆
UnitS
On
2)
OFF
End
OFF
2)
On
End
Operation in the master mode
press and hold (approx.5 sec)
1)
OFF
SAVE
2)
On
End
2)
LOW
HIGH
press briefly (“YES”)
press briefly (“NO”)
6. Vibration adapter
MEd
VibrAt
End
Important information
7. Process adapter
2)
UNIVEr
ProcES
AbS
dOSING
End
Description of the master mode block for
interface 1, see “Interface description”.
End
1) With certified scales, this master mode block
is not available.
2) Factory setting
8. Interface 1
1FACE1
9. Interface 2
3)
1FACE2
Description of the master mode block for
interface 2, see “Interface description”.
End
4)
Print1
6) Settings are reset to the factory setting.
Caution: Resetting leads to loss of all
individual master mode settings (with the
exception of those in the interface blocks)!
CtrL
LiSt
12. Reset
rESEt
13. End master mode
End
4) After confirmation of this option, the result
is displayed in 10x higher resolution. After
the key «T» or «±» has been pressed, the
scale returns to the weighing mode.
5) Settings are printed out if a printer is␣ attached
and the interface has been␣ correctly configured.
10. Display accuracy
11. Printing
3) This block is displayed only if the optional
interface is installed.
3)
Print2
End
5)
Std On
End
6)
6)
5)
Technical data
33
7.
Technical data
7.1 General data and standard equipment of the Spider 1S scales
The following data apply to all Spider 1S models.
Vibration adapter
3 settings
Weighing process adapter
3 settings
Weighing units
kg, t, g, lb (kilogram, metric ton, gram, pound), switchable in
weighing operation
Resolution
Selectable (settings depend on model)
Functions
Automatic zeroing, shutdown function, automatic backup, temporary
change of display accuracy (control mode)
Display
LCD (liquid crystal display), height 20 mm, backlit
Platform supply
5 V= (admissible platform impedance: 80 ohm ... 1000 ohm)
Interface
RS232C, serial, bidirectional (optional 2nd interface)
_ 3 kohm)
Signal level: -25 V= ... +25 V= (at RL >
IP degrees of protection
Terminal to IP65, weighing platform to IP67
Ambient conditions
Admissible temperature range: -10 ... +40 °C
Admissible relative atmospheric humidity: 90% rh
Overvoltage category: II
Pollution degree: 2
Application height: up to 4000 m above sea level
Power supply
Direct connection to power supply via national cable/connector
230 ..240 V (-15% / +10%), 50/60 Hz, power consumption: 80 mA
120 V (-15% / +10%), 50/60 Hz, power consumption: 160 mA
Standard equipment
Scale complete, operating instructions, open-end wrench
Technical data
34
7.2 Data for individual models
Specifications
Model
Max. capacity
Readability
Net weight
Spider 1S-3S
3 kg
1g
7.0 kg
Spider 1S-6S
6 kg
2g
7.0 kg
Spider 1S-15S
15 kg
5g
7.0 kg
Spider 1S-35S
35 kg
10 g
9.6 kg
Spider 1S-60S
60 kg
20 g
9.6 kg
Spider 1S-60LS
60 kg
20 g
14.8 kg
Spider 1S-60XLS
60 kg
20 g
24.7 kg
Spider 1S-60XXLS
60 kg
20 g
34.2 kg
Spider 1S-150S
150 kg
50 g
14.8 kg
Spider 1S-150LS
150 kg
50 g
24.7 kg
Spider 1S-150XLS
150 kg
50 g
34.2 kg
Spider 1S-300S
300 kg
100 g
24.7 kg
Spider 1S-300LS
300 kg
100 g
34.2 kg
Spider 1S-600S
600 kg
200 g
34.2 kg
Dimension drawings
Terminal
a
b
c
Technical data
35
Weighing platform
d
e
f
g
h
i
Dimensions (in millimeters)
a
b
c
d 1)
e
f
g
h
i
Spider 1S-3S
84
199
307
91
235
300
15
175
240
Spider 1S-6S
84
199
307
91
235
300
15
175
240
Spider 1S-15S
84
199
307
91
235
300
15
175
240
Spider 1S-35S
84
199
307
96
335
400
15
235
300
Spider 1S-60S
84
199
307
96
335
400
15
235
300
Spider 1S-60LS
84
199
307
99
435
500
15
335
400
Spider 1S-60XLS
84
199
307
104
585
650
20
435
500
Spider 1S-60XXLS
84
199
307
125
724
800
21
503
600
Spider 1S-150S
84
199
307
99
435
500
15
335
400
Spider 1S-150LS
84
199
307
104
585
650
20
435
500
Spider 1S-150XLS
84
199
307
125
724
800
21
503
600
Spider 1S-300S
84
199
307
104
585
650
20
435
500
Spider 1S-300LS
84
199
307
125
724
800
21
503
600
Spider 1S-600S
84
199
307
125
724
800
21
503
600
Model
1)
when leveling feet fully screwed in
To protect your METTLER TOLEDO product’s future:
METTLER TOLEDO service assures you of quality, measuring
accuracy and preservation of value of the METTLER TOLEDO
products for years to come.
Please send for full details of our attractive terms of service.
Many thanks.
Subject to technical changes and to the availability
of the accessories supplied with the instrument.
Printed on recycled paper.
Because we care.
*P21253241*
© Mettler-Toledo GmbH 1999
21253241A Printed in Switzerland 9907/2.12
Mettler-Toledo GmbH, CH-8606 Greifensee, Switzerland, Tel. (01) 944 22 11, Fax (01) 944 30 60, Internet: http://www.mt.com
AT
AU
BE
BR
CA
CH
CN
CZ
DE
DK
ES
FR
HK
HR
HU
IT
JP
KR
MY
MX
NL
NO
PL
RU
SE
SG
SK
SL
TH
TW
UK
US
US
Mettler-Toledo Ges.m.b.H., A-1100 Wien, Tel. (01) 604 19 80, Fax (01) 604 28 80
Mettler-Toledo Ltd., Port Melbourne, Victoria 3207, Tel. (03) 9646 4551, Fax (03) 9645 3935
n.v. Mettler-Toledo s.a., B-1651 Lot, Tél. (02) 334 02 11, Fax (02) 378 16 65
Mettler-Toledo Indústria e Comércio Ltda., São Paulo, CEP 06465-130, Tel. (11) 421 5737, Fax (11) 725 1962
Mettler-Toledo Inc., Ontario L7R3Y8, Tel. (905) 681 7011, Fax (905) 681 1481
Mettler-Toledo (Schweiz) AG, CH-8606 Greifensee, Tel. (01) 944 45 45, Fax (01) 944 45 10
Mettler-Toledo Instr. (Shanghai) Ltd., Shanghai 200233, Tel. (21) 6485 0435, Fax (21) 6485 3351
Mettler-Toledo, spol, s.r.o., CZ-12000 Praha 2, Tel. (2) 251 555, Fax (2) 242 47 583
Mettler-Toledo GmbH, D-35353 Giessen, Tel. (0641) 50 70, Fax (0641) 52 951
Mettler-Toledo A/S, DK-2600 Glostrup, Tel. (43) 27 08 00, Fax (43) 27 08 28
Mettler-Toledo S.A.E., E-08038 Barcelona, Tel. (03) 223 22 22, Fax (03) 223 02 71
Mettler-Toledo s.a., F-78222 Viroflay, Tél. (01) 309 717 17, Fax (01) 309 716 16
Mettler-Toledo (HK) Ltd., Kowloon HK, Tel. (852) 2744 1221, Fax (852) 2744 6878
Mettler-Toledo, d.o.o., CR-10010 Zagreb, Tel. (1) 660 2189, Fax (1) 660 3009
Mettler-Toledo Kft, H-1173 Budapest, Tel. (1) 257 9889, Fax (1) 257 7030
Mettler-Toledo S.p.A., I-20026 Novate Milanese, Tel. (02) 333 321, Fax (02) 356 29 73
Mettler-Toledo K.K., Shiromi, J-Osaka 540, Tel. (6) 949 5901, Fax (6) 949 5945
Mettler-Toledo (Korea) Ltd., Seoul (135-090), Tel. (02) 518 20 04, Fax (02) 518 08 13
Mettler-Toledo (M) Sdn.Bhd., 47301 Petaling Jaya, Tel. (03) 703 2773, Fax (03) 703 8773
Mettler-Toledo S.A. de C.V., Mexico CP 06430, Tel. (5) 547 5700, Fax (5) 541 2228
Mettler-Toledo B.V., NL-4000 HA Tiel, Tel. (0344) 638 363, Fax (0344) 638 390
Mettler-Toledo A/S, N-1008 Oslo, Tel. (22) 30 44 90, Fax (22) 32 70 02
Mettler-Toledo, Sp. z o.o., PL-02-929 Warszawa, Tel. (22) 651 92 32, Fax (22) 42 20 01
Mettler-Toledo AG, 10 1000 Moskau, Tel. (095) 921 68 12, Fax (095) 921 63 53
Mettler-Toledo AB, S-12008 Stockholm, Tel. (08) 702 50 00, Fax (08) 642 45 62
Mettler-Toledo (S) Pte. Ltd., Singapore 139944, Tel. (65) 778 6779, Fax (65) 778 6639
Mettler-Toledo service, s.r.o., SK-83103 Bratislava, Tel. (7) 525 2170, Fax (7) 525 2173
Mettler-Toledo, d.o.o., SL-61111 Ljubljana, Tel. (6) 112 35 764, Fax (6) 127 4575
Mettler-Toledo (Thailand), Bangkok 10310, Tel. (02) 719 64 80, Fax (02) 719 64 79
Mettler-Toledo Pac Rim AG, Taipei, Tel. (62) 579 59 55, Fax (62) 579 59 77
Mettler-Toledo Ltd., Leicester, LE4 1AW, Tel. (0116) 235 0888, Fax (0116) 236 5500
Mettler-Toledo, Inc., Worthington, Ohio 43085, Tel. (614) 438 4511, Fax (614) 438 4755
Mettler-Toledo, Inc., Hightstown, NJ 08520-0071, Tel. (609) 448 3000, Fax (609) 586 5451
For all other countries: Mettler-Toledo GmbH, PO Box VI-400, CH-8606 Greifensee, Tel. (01) 944 22 11, Fax (01) 944 31 70