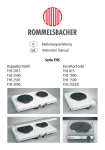
1
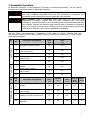
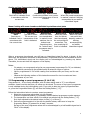
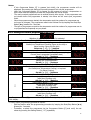
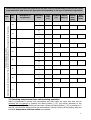
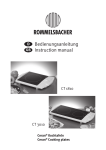
INSTRUCTION MANUAL Biological Oven BGO 1600/E R O M M E L S B A C H E R ElektroHausgeräte GmbH Telefon+(0)9851/57 58-0 Fax +(0)9851/57 58 59 Rudolf-Schmidt-Str. 18 D-91550 Dinkelsbühl e-mail: [email protected] Internet: www.rommelsbacher.de The Biological Oven is a product innovation aimed at making your life easier by helping you nourish yourself perfectly on healthy food. While the traditional attitude towards the wholesome cuisine is that it is time-consuming, the new Biological Oven will manage it that simply. Prepare your dishes to the minute at low temperatures, at the same time preserving all essential vitamins and nutrients while economising on time and energy. Of course you may also utilise the Biological Oven as a conventional oven, availing yourself of all functions that go with it, such as combined top/bottom heat, only top heat, only bottom heat plus grill setting. We are pleased you decided in favour of this multi-purpose and state-of-the-art appliance and thank you for your confidence. Its easy operation and wide range of application are bound to captivate you, too. To make sure you can enjoy using this appliance for a long time, please read the following notes carefully and observe them. 1. For your safety Prior to first use please read through these instructions carefully and keep them for your future reference. Use the appliance exclusively for the purpose specified in this manual. Improper use will void all warranty claims. Make sure the mains voltage is identical with the details on the rating label. Only connect to an AC outlet. Place the appliance on a heat-proof, solid and even worktop. Do not operate unit in the proximity of other heat sources (stove, open gas flame etc.). For the protection against fire hazard, keep the space above the appliance (category B) free. Check that the appliance is positioned at least 10 cm away from all walls. Ensure free air circulation. Operate the appliance under supervision only. Caution: Glass door and casing become hot in use. Mind the danger of burns! Do not splash cold water onto the hot oven door! Children are not aware of the dangers which may occur in using electrical appliances. Therefore, never allow children to operate electrical appliances unattended. The cable of the meat probe must not touch the heating elements. When opting for the grill setting, the meat probe must be removed from the oven chamber. The appliance’s power cord and those of any adjacent electrical appliances must not touch any hot parts of the appliance in use. The spacers located on the rear side of the appliance must not be used to wind up the power cord. Do not use the appliance as a space heater. Ensure switch-off by pulling the mains plug. The appliance complies with the relevant safety regulations. Should the appliance or the power cord be damaged, pull the mains plug immediately. Proceed likewise before having the oven’s interior illumination replaced. Repairs may be performed by authorised specialist shops only. Improper repairs may constitute a considerable danger to the user! 2. Biological Oven – Available settings Features of your new biological oven: Gentle Cooking Low Temperature Cooking Menu Cooking with subdivided oven chamber Baking with combined top/bottom heat Baking with bottom heat only Gratinating with top heat only Core Temperature Measurement Grilling → For further information on cooking methods and functions, please refer to section 12 – “Tips on Biological Cooking”. 1 What Low Temperature Cooking and Gentle Cooking involves Professional chefs swear by the ‘Gentle Cooking’ method involving low temperatures. Meat turns out extraordinarily juicy, whereas cooking losses are reduced by up to 60%. While Low Temperature Cooking is being performed at cooking temperatures from 60°C – 100°C, the Gentle Cooking method presupposes cooking temperatures from 100°C - 150°C. The cooking time is longer than that required for conventional cooking. However, as preparations in the new Biological Oven are fully automated, you will economise on time, indeed. And: The cooking time may be extended after your fancy, for meat will stay tender and juicy even if kept in the oven for a longer amount of time. In the Low Temperature Cooking mode you may prepare any kind of quality meat and fish fillets. It can be particularly recommended to cook pieces of sirloin of pork, beef, venison and lamb, while you will also achieve excellent results for meat loafs, stuffed pepper bell peppers and stuffed cabbage. What greatly matters is that you choose well-hung meat of young animals. 3. Initial use For a start, remove all transport wrappings and packaging materials as well as the protective film on the partition plate. Then clean all accessory parts in warm water, mixed with a little dishwashing detergent. Doing so, make sure not to immerse the meat probe in the water, but just wipe with a damp cloth. Prior to first usage, the protective coating of the heating elements has to be burnt in. To this end, please heat the appliance, without the meat probe, for approx. 20 minutes on maximum heat setting by choosing "top/bottom heat" first and then the “grill” setting (refer to sections 5 - “Setting the Time and the audible signal’s sound level” and 6 - “Manual Operation”). Please do not be bothered by the faint temporary formation of smoke, which is absolutely harmless. After the appliance has cooled, please clean the oven chamber with a damp cloth. Prior to each usage, check that the oven is dry. 4. How to use the appliance All functions of the BGO 1600/E are controlled via a digital clock timer and via the connected meat probe respectively. Reading from the left to the right, the timer buttons are designated as follows: P ► ■ °C - + a) [P] - Programme Selecting a programme b) [►■] - Start / Stop Starting or stopping (interrupting) a programme or a manual function. Keeping this button pressed for 2 seconds will quit any function. Thereafter, the current time will be indicated. c) [°C] – Setting Press this button if you wish to vary either cooking times or temperatures. Thereafter, you may adjust either time or temperature by pressing the Plus or Minus Button. d) [ - ] - Minus To reduce a value. The value has to be selected first. e) [ + ] – Plus To raise a value. The value has to be selected first. 2 5. Setting the time and the audible signal’s sound level When the Biological Oven is connected to the mains supply, the time will automatically adapt to 0:00 h. Symbol “A” is blinking. To put the appliance into operation, you will have to set the time first. Having set the time you can furthermore select the audible signal’s sound level. Attention: The setting menus will be quit automatically after 5 seconds if no button was pressed. The set value will be adopted automatically in the process. Table 1: Setting the time and the audible signal’s sound level Function Readout Description Readout after Display of the time adjusted to 0:00h upon connecting the mains switch-on. Digits and symbol “A” are blinking. plug Press the Setting Button [°C] for setting the time Setting the time For the period the time can be set, the dot in the centre of the readout keeps blinking. Press [ + ] / [ - ] buttons to adjust Press the Setting Button [°C] for setting the audible signal’s sound level Audible signal can be adjusted via the Minus Setting the audible Button [-]: sound level 1 – low signal sound level 2 - medium sound level 3 – loud The current audible signal keeps activated as long as the Minus Button [-] is pressed. Press [ - ] button to adjust Press the Setting Button [°C] to change to the standard readout (time) (END) Display of time (standard readout) When the time is displayed, all heating functions are off. The appliance is now ready for use and in basic position. If you wish to set the time or buzzer frequency later on, keep the Setting Button [°C] pressed for 2 seconds while the time is displayed. Thereafter, the setting menu for the time becomes activated while the dot in the middle of the display is blinking (step 2 in the above table). 6. Manual Operation Attention: If no button is pressed for 12 seconds within the selection and setting menus before a function is started, those menus will be quit automatically, with the time appearing on the display. Any values set until that time will be cancelled. 6.1 Selecting the function By pressing the Plus [+] or Minus button [-], you may select one of the available manual functions, which will appear on the display as follows: Top heat Bottom heat Combined top/bottom heat Combined top/ bottom heat with meat probe Grilling Having selected the function, acknowledge by pressing the Setting Button [°C]. Now you can set the temperature and time values for the function selected. 3 6.2 Setting the temperature and time values Setting the function will make the first fixed value appear. It can be adjusted via Plus [+] or Minus [-]. Further values can be activated via the Setting Button [°C] and then set. The selected function is displayed by the symbols shown at the fourth position of the digital display (after the temperature value, and after the time value respectively). When all parameters have been set, start the function by pressing Start/Stop [►■]. During active operation the “oven” symbol is being shown on the display. Having started a function, the oven symbol will be blinking until the preset temperature is reached. 6.2.1 Setting procedure for Manual Operation with top heat Setting the Now you can set the requested temperature within a range requested from 50 to 300°C. The standard setting is 180°C. The temperature symbolised function at the 4th digit is blinking. Set the temperature via [ + ] / [ - ] buttons Press Setting Button [°C] for changing to set the operating time (Timer) Setting the operating time (Timer) Now you can set the operating time ranging from 1 to 99 min. The standard setting prompts operation with no operating time limitation involved (see example in fig. on the left). The symbolised function at the 4th digit is blinking. Set the operating time via [ + ] / [ - ] buttons Press Start/Stop Button [►■] to start the function subject to the set values Activated function The current operating time and the symbolised function are indicated. Operation is indicated by the top right-hand oven symbol (fig. on the left shows operation without operating time limitation). Function is finished/interrupted when operating time has elapsed or by keeping the Start/Stop Button [►■] pressed for 2 seconds. Interruption will prompt display of current time. The functions of bottom heat, combined top/bottom and grill (however presupposing a suggested temperature of 280°C) are identical with the above described top heat function. By contrast, the combined top/bottom heat function with meat probe differs from the other set of functions in so far as this function does not allow for any operating time to be set. This function is only limited by the switch-off temperature around the meat probe being reached. The point in time when the preset value is reached is above all dependent on the type, size and quality of the food to be roasted or baked. 4 6.2.2 Manual Operation with combined top/bottom heat with meat probe Selecting The function of “combined top/bottom heat with meat „combined probe” is indicated through a line symbol in both top and top/bottom heat bottom left-hand corner next to the “H” and the meat probe with meat probe” in the bottom right-hand corner. The meat probe must be connected for this function! Press Setting Button [°C] for changing to set the switch-off temperature Setting the switchoff temperature Now you can set the switch-off temperature (core temperature) within a range fro 10 to 99°C. The standard setting is 80°C. The “C” symbol at the 4th digit is blinking. Set the temperature via [ + ] / [ - ] buttons Press Setting Button [°C] for changing to set the requested temperature Selecting The function of “combined top/bottom heat with meat „combined probe” is indicated through a line symbol in both top and top/bottom heat bottom left-hand corner next to the “H” and the meat probe with meat probe” in the bottom right-hand corner. The meat probe must be connected for this function! Setting the Now you can set the requested temperature within a range requested from 50 to 300°C. The standard value is 180°C. The temperature symbolised function at the 4th digit is blinking. Set the temperature via [ + ] / [ - ] buttons Press Start/Stop Button [►■] to start the function subject to the set values Activated function The temperature around the meat probe is indicated. Operation is indicated by the top right-hand oven symbol (fig. on the left shows an effective temperature of 32°C) Function is finished/interrupted when operating time has elapsed or by keeping the Start/Stop Button [►■] pressed for 2 seconds. Interruption will prompt display of current time. 6.3 Quick start with manual functions If the Start/Stop Button [►■] is pressed right after setting the requested temperature, the operating time setting will be skipped. The selected function will start immediately without time limitation. If you wish to quit a manual function without time limitation, keep the Start/Stop Button [►■] pressed for 2 seconds. Cancelling the function will prompt indication of the current time. 6.4 How to check and alter temperature/time values during operation By pressing the Setting Button [°C], the temperature and time values set in manual function can be checked and altered as required, even while the function is active. To this end, select the temperature or time value to be altered via the Setting Button [°C]. While the symbolised function or the °C symbol is blinking at the 4th digit, you may vary the relevant value via Plus [+] or Minus [-]. Altered values are immediately (i.e. during the setting process) adopted. Unless a button is pressed for a period of 12 seconds, this setting mode will be quit automatically and the function will resume subject to the settings as altered. The Start/Stop Button [►■] need not be activated. 5 6.4.2 Example of how to change operating time from 3 to 10 minutes during operation The function of combined top/bottom heat is active Activated function (symbolised function at the 4th digit and top right-hand oven symbol are static). With regard to the example, the operating time effectively remaining is 3 minutes. Press Setting Button [°C] for changing to set the requested temperature Changing the requested temperature The effective requested temperature (example: 200°C) is indicated. The symbolised function at the 4th digit is blinking. Now you may alter the requested temperature within a range from 50 to 300°C. Adjust value via [ + ] / [ - ] buttons as required Press Setting Button [°C] for changing to set the operating time (Timer) Changing the operating time (Timer) The operating time effectively remaining is 3 minutes. The symbolised function at the 4th digit is blinking and the operating time can be set within a range from 1 to 99 min. Adjust value via [ + ] / [ - ] buttons as required Press Plus Button [+] 7 times to increase the remaining operating time to 10 min. Altered operating time The operating time effectively remaining was changed to 10 min. The symbolised function at the 4th digit keeps blinking (further changes would be possible). The altered value affecting the operating time has already been adopted nonetheless. Wait 12 seconds for the symbolised function at the 4th digit to stop blinking Activated function The function of combined top/bottom heat is active (symbolised function at the 4th digit and top right-hand oven symbol are static). The operating time effectively remaining is 10 minutes. Cf. Table 6.2.1: Setting of parameters for manual functions 6.5 Pause function during manual operation Manual functions can be interrupted (paused) by briefly pressing the Start/Stop Button [►■]. This will prompt deactivation of any heating functions and interruption of any operating times probably effective. Interruption is signalled by the oven symbol in the upper right-hand corner of the display extinguishing. Depending on the respective programme step, the temperature currently prevailing around the meat probe and the operating time effectively remaining will be indicated. Briefly re-pressing the Start/Stop Button [►■] will make the function resume. Any manual function that is stopped will be automatically quit after 12 seconds unless a button is pressed. Thereafter, the current time will be indicated again. 6.6 Finish of operating time / Core temperature reached in Manual Operation If a time was preset for a manual function, you will hear an intermittent signal for approx. 1 minute once the pre-programmed time has elapsed. At the same time, the appliance will power down automatically. The oven symbol in the upper right-hand corner of the display will extinguish and the remaining operating time will be indicated as “0” min. Likewise, you will hear an intermittent signal when the preset core temperature was reached in the “combined top/bottom heat with meat probe” function. In that case, too, the oven symbol in the upper right-hand corner of the display will extinguish, whereas the current core temperature will continue being activated on the display. The audible signal may be acknowledged by pressing any button. Thereafter, the current time will be indicated again. 6 7. Automatic Operation In Automatic Operation, a fixed sequence of functions is executed successively. You can choose between two programme modes in Automatic Operation: Gentle Cooking/Low Temperature Cooking (involving 2 programme steps: start time; combined top/bottom heat until core temperature is reached). This programme mode presupposes the non-subdivided oven chamber. Menu Cooking (with 4 programme steps: start time; top heat until core temperature is reached; bottom heat for preset operating time, rest period (pausing) for preset rest period). This programme mode presupposes the subdivided oven chamber requiring the stainless steel partition plate as included in the delivery scope. In the lower part of the oven chamber you may simultaneously cook the side dishes that go with the menu, such as vegetables and potatoes. Programmes P1-P12, as described in the table below, have been tested in the settings mentioned and are firmly pre-programmed. Programmes P1-P8 relate to Gentle Cooking and Low Temperature Cooking; P9-P12 relate to Menu Cooking. Furthermore, there are 8 (P 13-20) vacant programmes available. Info Core Temp. [°C] Combined Top/Bottom Heat [°C] 84 150 78 145 77 140 80 145 85 140 58 100 55 90 8 60 90 Prog.No. Core Temp. [°C] Top Heat [°C] Bottom Heat [°C] Time Bottom Heat [min.] Pause [min.] 58 120 200 25 10 55 100 200 25 10 72 120 200 25 10 72 120 200 25 10 Prog.No. Gentle Cooking 100°C to 150°C 1 2 Description of Programme Roast beef, boiled (fillet of) beef, beef olives, leg joints in gravy Shoulder/leg of pork, pork olives in gravy Roast veal in gravy 3 4 Venison (roast venison) Lamb in gravy Poultry Low Temp. Cooking below 100°C 5 Menu-based Gentle Cooking involving sub-divided oven chamber Info 6 7 9 Roast beef and tenderloin of beef, medium; Breast of duck, medium Tenderloin of pork and veal, medium Menu Cooking Steaks, almost done Description of Programme Roast beef and tenderloin of beef, medium; Tenderloin of pork and veal; medium 10 11 Menu Cooking Stuffed bell peppers; stuffed cabbage; any type of minced meat Neck of pork, chops; 12 Roast fillet 7 Notes: - If you prefer your poultry or meat to turn out crispy brown, remove the meat probe after the cooking process and allow the meat to grill for about 5-10 minutes in the same oven (opting for the “Gr” function) - Older meat lacking an adequate degree of maturation (concerns beef, especially) may prevent the meat from becoming sufficiently tender by the approximate times indicated. Therefore, it is recommended to keep such meat simmering in the gravy for an extended amount of time. - During menu-based gentle cooking of vegetables, fill the steamer insert with 1/4 l of cold water and place on the right side of the lower half of the oven chamber. In order to accomplish simultaneous cooking with the vegetables, quarter large potatoes and submerge by 2/3 in salted water. Thereafter, place the container on the left side of the lower half of the oven chamber. - Dealing with the subject of Low Temperature Cooking there is available comprehensive literature as well as special cookbooks, providing lots of further information and ideas. 7.1 Starting time All programmes allow for programming the start for later. The start time refers to the time at which the programme starts. The start time setting is indicated by the “bell” symbol. The start time allows you to place all food in the oven beforehand, while postponing the programme start to a later time. The start time can be set within a range from “current time” to “current time +23:59h”. With a Menu Cooking programme it is thus possible for a complete menu to be prepared even while you are away. Example of how to avail yourself of the start time facility: Cooking 400g of tenderloin of pork (opting for programme P 10) will require you, depending on the quality of the meat, to let it roast for about 2 hours until the core temperature of 55°C is reached. An additional 25 minutes will be needed to cook the side dishes (such as vegetables and potatoes) as well as 10 minutes of rest period, resulting in an overall time of about 2 hours and 35 minutes for Menu Cooking. All prepared ingredients are placed in the oven at 8:30 h already. By pre-programming the start time, the programme start subject to P10 is set to 9:55 h. The programme will only start to run at the pre-programmed time. Therefore, the complete menu will be ready at about 12:30. Within the period of 9:55 h to 12:30 h, the entire cooking process is proceeding automatically. For recommended cooking times relating to the varying quantities of meat and temperature settings, please consult the tables in the appendix. 7.2 Selecting and starting a programme When the current time is indicated, you can change to the programme menu by pressing the Programme Button [P]. The programme menu can be prompted by pressing the Programme Button [P] repeatedly or by pressing the Plus [+] and Minus [-] buttons. The menu always starts with the programme last used. Fig.: Selected programme P5 Thereafter, the selected programme can be started directly, subject to the stored temperature and time values, by pressing the Start/Stop Button [►■]. The meat probe must be connected in all Automatic Operation programmes. However, when required, you may also choose to set the temperature and time values ahead of programme start. After the start the programme will proceed subject to the altered values only once, while they cannot be stored permanently. When the programme is activated for the next time, all the pre-programmed standard values will be active again. By contrast, programmes P14P20 are freely adjustable and storable. 8 7.3 Setting temperature/time values with programmes P1 – P12 After selecting a programme, you may set the belonging temperature and time values by pressing the Setting Button [°C]. The values on the display may be varied via Plus [+] or Minus [-]. Depending on the type of menu (type of programme), you may choose between different temperature and time values. During the setting procedure the automatic symbol “A” in the upper left-hand corner will not glow. The symbol on the 4th digit is a static one (difference to Manual Operation: 4th digit is blinking during the setting process). General notes - Temperatures can basically be set within a range from 50-300°C. Setting the temperature to 0°C will skip the relevant programme step. - The switch-off temperature for the meat probe can be adjusted within a range from 10°C 99°C. If the switch-off temperature is set to 0°C, this programme section will be skipped. - The duration of a programme step can be defined within a range from 1-99 min. If the duration is fixed as 0 min., the relevant programme section will be skipped. - The start time can be set within the range from “current time” to “current time + 23:59h” - If no button is pressed for more than 12 seconds, the menu will be quit automatically. Thereafter, the current time will be indicated again. The values set until then will be quit. - You may start the programmes during any setting step, subject to the parameters currently set, by pressing the Start/Stop Button [►■]. 7.3.1 Settings for programmes P1-P8 (Gentle Cooking/Low Temperature Cooking) Function Readout Description Selected Selected programme P4 appears on the display programme: P4 Press Setting Button [°C] for changing to the options for altering the parameters Display of type Programme type information: Gentle/Low Temperature of programme Cooking. This cannot be changed with programmes P1-P12 Press Setting Button [°C] for changing to set the start time Setting the Now you can set the start time (time at which programme start time starts running). Current time is suggested (immediate start) Adjust via [ + ] / [ - ] buttons Press Setting Button [°C] for changing to set the core temperature Setting the core Now you can set the core temperature. temperature The value stored in the respective programme is suggested (example: value for P4 = 80°C) Adjust via [ + ] / [ - ] buttons Press Setting Button [°C] for changing to set the requested temperature Setting the Now you can set the requested temperature for top and requested bottom heat. The value stored in the respective temperature programme is suggested (example: value for P4 = 145°C) Adjust via [ + ] / [ - ] buttons Press Start/Stop Button [►■] to start a programme, or press Setting Button [°C] to reset or recheck the parameters (start time menu will appear) 9 7.3.2 Settings for programmes P9-P12 (Menu Cooking) Function Readout Description Selected Selected programme P10 appears on the display programme: P10 Press Setting Button [°C] for changing to the options for altering the parameters Display of type Programme type information: Menu Cooking. This cannot of programme be changed with programmes P1-P12. Press Setting Button [°C] for changing to set the start time Setting the start Now you can set the start time (time at which the time programme starts running). Current time is suggested (immediate start). Adjust via [ + ] / [ - ] buttons Press Setting Button [°C] for changing to set the core temperature Setting the core Now you can set the core temperature. temperature The value stored in the respective programme is suggested (here: value for P10 = 55°C) Adjust via [ + ] / [ - ] buttons Press Setting Button [°C] for changing to set the requested top heat temperature Setting the Now you can set the requested top heat temperature. requested top The value stored in the respective programme is suggested heat (here: value for P10 = 100°C) temperature Adjust via [ + ] / [ - ] buttons Press Setting Button [°C] for changing to set the requested bottom heat temperature Setting the Now you can set the requested top heat temperature. requested The value stored in the respective programme is suggested bottom heat (here: value for P10 = 200°C) temperature Adjust via [ + ] / [ - ] buttons Press Setting Button [°C] for changing to set the bottom heat operating time Setting the Now you can set the lower heat operating time. bottom heat The value stored in the respective programme is suggested operating time (here: value for P10 = 25 min.). (cooking time) Adjust via [ + ] / [ - ] buttons Press Setting Button [°C] for changing to set the rest period Setting the rest Now you can set the rest period. The value stored in the period respective programme is suggested (here: value for P10 = 10 min.). Adjust via [ + ] / [ - ] buttons Press Start/Stop Button [►■] to start a programme, or press Setting Button [°C] to reset or recheck the parameters (start time menu appears) 7.4 Digital readout of ongoing procedure The sequence of digital readouts appearing on the display while an automatic programme is running varies depending on the respective type of programme. Automatic Operation is indicated in all readouts by an “A” appearing in the upper left-hand corner of the display. The following readouts appear during the programme steps: 10 Gentle and Low Temperature Cooking (non-subdivided oven chamber) Programme start Start time is indicated if not in accordance with the current time Combined top/ bottom heat Combined top/bottom heat is active. Current core temperature of food is indicated. Signal and finish When the preset temperature is reached, readout is blinking accompanied by an audible intermittent signal. Menu Cooking with oven chamber subdivided by stainless steel plate Programme start Start time is indicated if not in accordance with the current time Top heat Top heat is active. The current core temperature of the food is indicated. Bottom heat Rest period Signal and finish When the preset When the preset When the preset core temperature time for bottom rest period has is reached, oven heat has elapsed, elapsed, readout is switches over to the rest period will blinking bottom heat. commence. The accompanied by Remaining time time remaining till an audible for “bottom heat” finish is indicated. intermittent signal. programme step is indicated. When a programme has elapsed, you will hear an intermittent signal for about 1 minute. At the same time, the appliance will switch off automatically. Programme finish will be indicated as shown above. The intermittent signal and the display can be acknowledged by pressing any button. Thereafter, the current time will reappear on the display. Notes: - For starters, we recommend using the pre-programmed programmes P1-P12, as indicated, to familiarise yourself with the appliance and its extensive range of options. Opt for programmes P1-P12 when creating food variations after your fancy and for new ideas. Observe the following sections of this instruction manual for how to create and store programmes of your own. 7.5 Programming a vacant programme (P 14-P 20) Programmes 14 – 20 are freely selectable, with all values being reset to “0” in as-delivered condition. Apart from the start time, all values can be stored. The menu of the type of programme is only indicated during the initial setting cycle. If you wish to alter the type of programme later on, press the Programme Button [P] and then the Setting Button [°C]. Follow the instructions below to create a vacant programme: 1. Select the programme whose data is to be changed. Press the Programme Button [P] repeatedly until the desired programme number appears. 2. The temperature and time values to be altered are selected via the Setting Button [°C] first, then adjusted to the desired value via Plus [+] or Minus [-]. 3. Once all programme data is in line with the desired values, make sure to keep the Programme Button [P] pressed for at least 2 seconds. Storage of the new programme values will be acknowledged by a brief audible signal and a “blink” of the display. 11 Notes: - If the Programme Button [P] is pressed just briefly, the programme number will be displayed. Re-pressing the button will prevent storage of the current programme. - When the Programme Button [P] is pressed for the purpose of storing, a temperature or time values must be displayed, or else the programme will not be stored! - The newly created programme can be started directly after storing. If the programme was not stored before the programme is started, the values will be reset upon programme finish. - Once the programme was started, the temperature and time values of a programme can no longer be changed. The programme needs to be finished first by keeping the Start/Stop Button [►■] pressed for 2 seconds. - The type of programme as well as the temperature and time values of a programme can be re-programmed as frequently as you please. 7.5.1 Settings for vacant programmes P 14 – P 20 Selection of vacant programme P15 is indicated Press Setting Button [°C] for changing to set the type of programme Setting the type of programme Gentle/Low Temperature Cooking (figure on the left) or Menu cooking (figure on the right) Select via [ + ] / [ - ] buttons Press Setting Button [°C] Set the start time (time at which to set the programme going) Current time is suggested (immediate start) Set via [ + ] / [ - ] buttons Press Setting Button [°C] Setting the core temperature Set via [ + ] / [ - ] buttons Press Setting Button [°C] Set the requested temperature for top and bottom heat (for Gentle/Low Temperature Cooking) or top heat (for Menu Cooking) Set via [ + ] / [ - ] buttons Press Setting Button [°C] Set the requested temperature for bottom heat (with Menu Cooking only) Set via [ + ] / [ - ] buttons Press Setting Button [°C] Set the time for bottom heat (with Menu Cooking only) Set via [ + ] / [ - ] buttons Press Setting Button [°C] Set the time for the rest period (pausing) (with Menu Cooking only) Set via [ + ] / [ - ] buttons Keep Programme Button [P] pressed until storage is acknowledged by a brief audible signal and a „blink“ of the display. ↓ To verify proper programming proceed as follows: - Quit the function after the programming procedure by keeping the Start/Stop Button [►■] pressed for 2 seconds. - Thereafter, re-select the programme via the Programme Button [P] and verify the set values by pressing the Setting Button [°C] repeatedly. 12 In this table you may enter the temperature and time values programmed by yourself for the vacant programmes P14-P20. Choose the appropriate line depending on the type of operation programmed. Info Prog.No. Description of Programmes Operating Mode Core Temp. [°C] Top Heat Bottom [°C] Heat [°C] Time Bottom Heat [min.] Rest period [min.] „S“ → 13 Freely-assignable programmes Optionally as Gentle Cooking and Low Temperature Cooking Programmes or Menu-based Cooking Programmes „M“ → „S“ → 14 „M“ → „S“ → 15 „M“ → „S“ → 16 „M“ → „S“ → 17 „M“ → „S“ → 18 „M“ → „S“ → 19 „M“ → „S“ → „M“ 20 → 7.6 Checking temperature/time values during operation While a programme is running, the temperature and time values set upon start time can be activated but not altered by pressing the Setting Button [°C]. Any further activation of the Setting Button [°C] will prompt the next value. Unless the Setting Button [°C] is pressed for 5 seconds, the particular display will be quit automatically. Symbol A (Auto) will be glowing while the individual temperature and time values are indicated. 13 While the individual temperature and time values are indicated, symbol A (Auto) is glowing. Apart from that, the readout of the display will be in line with that shown during the setting procedure. 7.7 Pause function in Automatic Operation Any activated function can be interrupted by briefly pressing the Start/Stop Button [►■]. This will prompt deactivation of any heating functions and interruption of any operating times probably effective. The interruption is signalled by the symbol “A” in the upper left-hand corner of the display blinking. Depending on the respective programme step, the current temperature around the meat probe and the operating time effectively remaining for the respective programme step are indicated. The programme will keep interrupted until the Start/Stop Button [►■] is briefly re-pressed to resume the function, or the programme function is quit by keeping the Start/Stop Button [►■] pressed for 2 seconds. 8. Troubleshooting and error display 8.1 Meat probe is missing If the meat probe is neither required for a function nor connected, the function will be started nonetheless. The starting process will be accompanied by an audible signal with the “meat probe” symbol blinking. The meat probe is required for the following functions: - Manual function: “combined top/bottom heat with meat probe” - All automatic programmes Choosing those functions, the oven will not power up until meat probe is recognised. Fig.: Readouts indicating missing meat probe in both Manual and Automatic Operation (“meat probe” symbol is blinking) Connecting the meat probe will reset the alarm and set the function going. The audible signal can be reset for 2 minutes by pressing any button once. 8.2 Excessive temperature around meat probe When the upper sensor detects too excessive a temperature (T>230°) around the meat probe, you will notice both an audible and a visual signal. In such a case, remove the meat probe. Caution! Mind the danger of burns upon removal of the meat probe! As the temperature drops, the audible signal will be reset automatically. The audible signal can be reset for 2 minutes by pressing any button once. 8.3 Defective sensors to determine the oven temperature When an improper value is detected by a temperature sensor (T<= 0°C or T>350°C), the appropriate error code appears on the display (e.g. „Er01“). In such a case, please approach our customer service by dialling (+49) 9851 / 57 58-32 and give a description of the fault. 8.4 Overheating protection The BGO 1600/E additionally features a thermal overheating protection facility, interrupting the voltage supply inside the appliance when the tolerable temperature limit is exceeded. After the appliance has cooled down, the voltage supply will be restored automatically. At this stage, the timer will be in the switch-on mode. 14 9. “Quick heat” special function The two manual functions „combined top/bottom heat“ and „combined top/bottom heat until core temperature is reached“ as well as the Gentle and Low Temperature Cooking programmes P1-P8 feature the “quick heat” function. This function reduces the heating-up time by almost half the time actually required. During the first heating cycle, bottom heat 1 and bottom heat 2 are active until approx. 75% of the requested temperature are reached. Thereafter, bottom heat 2 becomes deactivated. 10. Accessories The Biological Oven comes delivered with the following standard accessories: chromium-plated grill grid enamelled roasting/baking tray stainless steel partition plate removable meat probe 2 x stainless steel 1/3-65 standard size food container 1 x stainless steel 1/3-65 standard size food container, perforated 2 x lid for 1/3 standard size food container As special accessories, we suggest besides: - Our Pizza Stone Set PS 16, consisting of a high-quality fireclay stone plus a wooden pizza tray shovel, allowing you to prepare perfect stone-baked pizza and bread at home as well. The Pizza Stone can be purchased from your local dealer or by approaching our service department at our Dinkelsbuehl premises. 11. Cleaning and maintenance Prior to each cleaning procedure, always disconnect the mains plug and allow appliance to cool down! Clean the accessory parts in warm water mixed with a little dishwashing detergent. Wipe casing, oven chamber and oven door with a damp cloth and dry. Never immerse the appliance in water. Do not allow steam or water to infiltrate the appliance from below! Never use abrasives, solvents or oven sprays!! We wish you lots of fun with your Biological Oven! 15 12. Tips on Biological Cooking With the following hints we would like to furnish you with some ideas and suggestions. 12.1 What to observe during Low Temperature Cooking 1. Choose meat of young animals which is well-hung. 2. Prior to Low Temperature Cooking, season lavishly and sauté on all sides in hot fat for pores to seal and to prevent loss of meat juice. 3. After browning, place meat – goes particularly for tender meat and minced meat – in a water bowl for cooking. 4. Always employ the meat probe during Low Temperature Cooking! Stick meat probe in the centre of the meat and opt for the programme belonging to the type of meat. 5. After cooking, i.e. shortly before serving, re-place poultry in the oven exposing to the grill setting for 4-8 for your poultry to turn out especially crispy brown. To roast geese and ducks in wholes, remove the partition plate from the oven and select combined top/bottom heat right from the beginning. Geese and ducks should be preroasted for approx. 30 minutes at 170°C to 180°C. Then complete the cooking process at 100°C using the meat probe. 12.2 Hints on the Low Temperature Cooking process As the term already suggests, Low Temperature Cooking is generally performed at temperatures lower than 100°C. Filet of pork, beef, venison and lamb, as well as poultry and fish, are above all recommended for Low Temperature Cooking. Essential is that you choose meat of young animals. Likewise, we can suggest meat loafs, stuffed bell peppers and stuffed cabbage and similar. 12.3 Which meat to choose for Low Temperature Cooking Preferred sorts of meat are tenderloin and sirloin of beef, veal, pork, lamb as well as venison. You may also opt for fillets of all sorts of animals, but also for poultry, leg and saddle of rabbit and all variations on meat loafs, stuffed bell peppers, stuffed cabbage and other stuffings based on vegetables/minced meat. When using joints of beef, pork, venison or mutton for Low Temperature Cooking, you have to pay special attention to choosing well-hung meat of young animals. For poultry, you should also make sure to opt for young poultry. In this regard, it is recommended to cook parts of poultry, like legs and breasts. All kinds of steaks of an appropriate thickness will turn out particularly good in quality and become juicy and tender above all. For lager pieces of roast meat or beef olives, we suggest longer browning times ranging from 4 to 8 minutes. During the preparation using combined top/bottom heat, it is advisable to add gravy or stock to the roast meat to let it develop its full flavour at temperatures of less than 100°C. The result is tender and juicy roast or beef olives, ready to serve for your lunch. We recommend using the meat probe for this preparation. 12.4 Roasts requiring extended cooking times Rules of thumb for roasts requiring extended cooking times (such as roast beef, roast pork, beef olives etc.): No Menu Cooking, i.e. remove oven partition plate. 16 Always use well-hung meat of young animals. Using meat of older animals might entail an extension of the cooking procedure by keeping the meat simmering in the gravy for another 40 minutes. Roast meat for extended cooking should also be seasoned beforehand and then browned on all sides in hot fat. Then add stock or broth. For larger pieces of meat and meat from older animals, it is recommended to cook the meat by choosing combined top/bottom heat and the meat probe. Brown the meat on all sides by mixing in vegetables and onions and add stock or broth. Then place in the oven and cook at 90°C to 100°C. You may raise the temperature at any time. 12.5 Fish, steaks, médaillons, pieces of tenderloin Cook fish in the fish stock using the meat probe. To roast in the oven, use thicker pieces of fish fillet and sauté on both sides prior to exposing to Low Temperature Cooking. For this application, too, always choose tender, young and well-hung meat without tendons! Season lavishly on all sides prior to the roasting procedure. Sear on all sides for 2-3 minutes opting for a high heat setting to make the pores seal. Place on the tray, insert in the upper end of the oven and allow to cook for approx. 8-12 minutes at 85°C – 90°C until ready, or use the meat probe. This will make the meat turn out most juicy and tender. When gratinating steaks or fish, finish the cooking process using the integrated grill feature. Always use the partition plate. 12.6 Minced meat, beef steak, stuffed bell peppers, stuffed cabbage and similar For stuffed bell peppers, stuffed cabbage and other vegetables stuffed with minced meat, also brown all sides. Thereafter, place pot/pan in a larger container filled with cold water and put in the oven. Stick meat probe in the centre of the lower third of the food and cook at a temperature from 99°C to 125°C. In the event of time constraints, you may speed up the cooking process at any time by choosing temperatures exceeding 125°C, whereas such will have a slightly adverse effect on the cooking result. ATTENTION: For minced meat, always select a core temperature of 68°C-72°C. By cooking in the water bath, vegetables and minced meat become especially juicy, while vegetables and meat develop their natural flavours to their best. 12.7 Cooking in the water bath Season the meat and allow to sauté on all sides for pores to seal. Thereafter, place the heat-resistant container with the meat in a (stainless steel) water bowl (not included in the delivery scope), filled with 0.7l of cold water. During Menu Cooking, the water bowl is to be placed in the upper half of the oven. Always refill the water bowl with cold water, for due to the pan being used for the searing process it will become very hot and the heat would reach the preset core temperature too quickly for very tender and small pieces of meat, preventing the meat from becoming tender. Therefore, we always use cold water for filling the water bowl, because this will immediately cut down on temperature prior to the main cooking process. When the respective cooking process is started by selecting the appropriate programme, the water inside the water bowl will be heated as well. The steam produced in the process will surround the meat during cooking. This will prevent the meat from becoming dry in cooking. The meat cooked by this method will turn out most juicy and tender. 17 Cooking in the water bath is effected at about 85°C, which constitutes a true Low Temperature Cooking procedure. The oven temperature involved ranges from 125°C to 130°C. ATTENTION: Stick meat probe in the centre of the lower third for cooking in the water bath. 12.8 Measuring the core temperature What is implied by Core Temperature Measurement? Meat is cooked between 65°C and 80°C depending on the respective kind of meat, whereas steaks may be eaten at 55°C. Poultry, however, should be exposed to higher core temperatures for hygienic reasons. In order to defy the traditional methods by which you had to stick around the kitchen stove checking the meat’s level of doneness continually, you may now avail yourself of the Biological Oven with its integrated meat probe and electronics, allowing you to read the temperature to the exact centigrade from the display. That is, when the preset core temperature is reached, you will hear an audible signal. ATTENTION: Always stick meat probe in the thickest piece of meat by paying attention to stick its pointed end exactly in the centre. During cooking in the water bath, stick meat probe in the centre of the lower third of the meat. 12.9 Low Temperature Cooking involving electronic control The control of the core temperature, the activation and deactivation of the required heat supply and the operational sequence of the pre-programmed residual heat utilisation feature, not to forget the audible signal, indicating the finish of the cooking process, are effected in line with the selected programme by means of the integrated meat probe and the built-in sensors, the timer and the other technical features. During Menu Cooking, the top heat turns off and the bottom heat turns on simultaneously once the core temperature of the meat is reached. The electronic control of the Core Temperature Measurement can also be applied during conventional cooking, but likewise during cooking processes based upon bottom heat only and other controls. For further control options, please consult instruction manual. 12.10 Menu Cooking by separating the oven chamber in two halves For Menu Cooking you should only choose well-hung (mature) and tender meat of young animals, so as not to be required to allow the meat to cook in the gravy until tender. The ingredients to form a menu for lunch had so far called for being separately cooked in the oven and on the relevant stoves, which has been quite troublesome. The NEW aspect about Menu Cooking is that all components of the menu, such as carrots, vegetables and meat, are placed in the oven chamber at the same time and are cooked analogous to the integrated electronic control in line with the respective programme selected. Pursuant to the programme flow, the browned meat is cooked to the minute (thanks to meat probe) first, turning out perfectly. When the meat has reached its preset core temperature and thus its ideal level of doneness, the top heat will turn off, whereas the bottom heat gets activated in return to cook, for instance, the vegetables and potatoes located in the lower part of the oven. The cooking time required to steam the vegetables and to cook the potatoes is already preassigned in the respective programmes (vegetables are to be steamed in the steamer insert). On 18 the whole, the cooking time required for vegetables and potatoes ranges between 22 and 25 minutes and allows a residual heat utilisation of 10 minutes. Making use of the residual heat is another chance to economise on energy. As the potatoes and the vegetables are cooking, the meat will be treated to a rest period to allow meat juices to spread inside the meat to make sure they do not drain off the meat the minute it is cut in pieces. Simultaneously, the meat is being subject to the mellowing process. Vegetables are to be steamed in the steamer inserts. The Menu Cooking function can be used for all kinds of meat, for the available programmes always allow flexible setting and can thus be adjusted to a single cooking process. 12.11 Advantages of Menu Cooking Menu Cooking, i.e. cooking all ingredients in one oven while availing yourself of the residual heat at the same time, is amazingly energy-saving. Now, the new Biological Oven caters to all essential factors contributing to a high-quality and wholesome diet, at the same time involving cost-cutting factors as well as savings on energy and preparation time, not to forget the reduced cooking loss. ATTENTION: Always place potatoes on the left side, vegetables on the right side of the oven! Fill up at least ¼ of the container for the steamer insert. Cut potatoes into halves or into quarters (large potatoes) and place in water to cook as usual. This helps housewives to save not only much time but also energy whilst guaranteeing high-quality cooking results and a cooking process to the minute. 12.12 Hints on grilling To grill, fill about half of the enamelled roasting tray with water and insert in the lower tray rack to function as a drip tray. This will help to collect any fat residues dripping down, to keep your appliance clean and to make your food turn out particularly tender. During the grilling process, make sure to close the oven door as far as the position lock or leave completely open. Do not allow food to come in contact with the heating elements, as this may pose the danger of fire! R O M M E L S B A C H E R ElektroHausgeräte GmbH Telefon+(0)9851/57 58-0 Fax +(0)9851/57 58 59 Rudolf-Schmidt-Str. 18 D-91550 Dinkelsbühl e-mail: [email protected] Internet: www.rommelsbacher.de 19