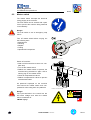
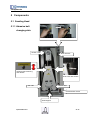
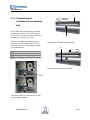
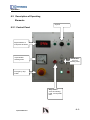
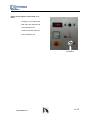
1
Operating Instructions Optimat SBE 109 K Created: Schreiber Date: 02/04/25 Version 1 Clause of Copyright Translation, passing on to third party as well as each duplication and distribution are forbidden without our approval Copyright by .Bütfering Schleiftechnik GmbH Operation of this customer documentation The operating instructions should always be kept near. The machine operator should know the contents of the operating instructions and how they have to operate the machine The operating instructions contain 10 sections: 1: Product description 7: Adjustments Information on installation and function of the machine. Technical data Declaration of Conformity Abrasive belt oscillation Tensioning and setting of conveyorbelt Tensioning / changing of V-belt Setting up of thickness adjustment Dressing of sanding insert 2: Safety regulations 8: Care and maintenance General Safety Advice, Safety Recommendations. Lubrication instructions. Cleaning and Maintenance. 3: Transport / Installation 9: Faults Information on transport, installation and location of machine. Problem solving. Description of faults. 10: Appendix 4:Commissioning Information on connection of machine, power, compressed air and dust extraction. Floorplan, Electrical and Pneumatic Drawings Spare parts lists and drawings. 5:Components Symbol for General Information Description of sanding head. Description of feed device. 6: Operation Description of operating elements Start and Stop Changing the abrasive belt Changing the sanding Insert Optimat SBE 109 K 1 Operation of this customer documentation Contacts Bütfering Schleiftechnik GmbH Stromberger Straße 170 Postfach 1245 59269 Beckum Address Telephone 02521 / 842-0 Sales / Export 842-111 Sales 842-130 / National Service 842-400 Spare Parts 842-410 Fax Fax Fax (Sales) (Service) Internet Internet E-Mail Switchboard @ 02521 / 842-67 842-83 www.buetfering.de E-Mail Service [email protected] ( Service Manager ) [email protected] ( Technical Questions ) [email protected] ( Spare Parts ) Optimat SBE 109 K 2 Description of Product 1.Basic Machine....................................2 1.1 Construction ................................2 1.2 Operating Side............................2 1.3 Back Side ....................................3 1.4 Belt Changing Side ....................3 1.5 Drive Side ....................................4 1.6 Description of Function..............4 1.7 Electrical Cabinet........................5 1.8 Technical Data – Wide Belt Sander Optimat SBE 109 K ......6 1.9 EC – Declaration of Conformity8 Optimat SBE 109 K 1-1 Description of Product 1.Basic Machine 1.1 Construction The Basic Machine, type SBE 109 consits of machine frame, feed table, pressure elements and head. 1.2 Operating Side 1 2 3 4 1 Operating table 2 3 Emergency switch Electrical cabinet 4 Main switch 5 5 6 Safety switch rail Feed table 6 7 Compressed air connection 7 Optimat SBE 109 K 1-2 Description of Product 1.3 Back Side 1 2 Emergency switch off Feed table 3 Drive, height adjustment 1 2 3 1.4 Belt Changing Side 1 2 Tensioning drum Sanding head 1 3 4 Pressure rollers Height adjustment 2 4 Drive, height adjustment 3 A B Height adjustment, feed table • • A min. 3 mm / 0,118 inch B max. 150 mm / 5,905 inch Optimat SBE 109 K 4 5 1-3 Description of Product 1.5 Drive Side 1 1 Tensioning drum 2 2 Oscillation cylinder 3 3 4 Pressure regulator, belt tension V-belt pulley, contact roller 4 5 V-belt pulley, idle roller 6 7 Height adjustment Drive, sanding head 5 6 7 1.6 Description of Function The sanding is driven by an electro-motor via V-belt drive. The workpiece thickness to be achieved, is adjusted by the height adjustment. Ø Feed table is moving. The feed table transports the workpiece through the machine. The pressure rollers are pressing the workpiece onto the conveyorbelt during processing. The workpiece is sanded to the adjusted workpiece thickness by the sanding head. Optimat SBE 109 K 1-4 Description of Product 1.7 Electrical Cabinet The electrical cabinet can be opened by lifting the electrical cabinet door. A max 8mm The safety switch rail switches off the feed upon risk of squashing. A min. 3 mm – max. 8 mm 0,118 inch – max. 0,315 inch Optimat SBE 109 K 1-5 Description of Product 1.8 Technical Data – Wide Belt Sander Optimat SBE 109 K • • Only the executions of the corresponding Order Acknowledgements or Special Data Sheets apply for machines, which are deviating from this data sheet The positions marked with (Sond) are deviating from the standard execution and correspond to the special executions of the pricelist. Workpiece dimenions max. sanding width 950 mm / 37.4 inch max. workpiece thickness 150 mm / 5,905 inch Working height min. working height 750 mm / 29,528 inch max. working height 900 mm / 35,433 inch Abrasive belt dimensions Abrasive belt width 970 mm / 38,189 inch 1900 mm / 74,803 inch Abrasive belt length Sanding head Drive capacity at 1 r.p.m. 11 KW Drive capacity at 1 r.p.m. 12,7 KW or drive capacity at 1 r.p.m. (Sond) 15 KW or drive capacity at 1 r.p.m. (Sond) 17,5 KW Abrasive belt speed Contact roller diameter 50Hz/400V 230V+460V/ 60Hz 50Hz/400V 230V+460V/ 60Hz 18 m/s 116 mm / 6,338 inch Conveyorbelt feed devic Length of conveyorbelt 2045 mm / 80,512 inch Width of conveyorbelt 950 mm / 34,4 inch Drive capacity at 2 r.p.m. Feed speed 0,6 / 0,4 KW 4 / 8 m/min Height adjustment Drive capacity 0,1 KW Dust extraction Air speed on outlet Machine resistance Minimum extraction quantity – abrasive belt Outlet diameter Optimat SBE 109 K mind. 20 m/s 800 Pa 1100 m3/h 140 mm / 5,512 inch 1-6 Description of Product Recommended extraction quantity at an air speed of 20-25 m/s. Compressed Air 1100 -1400 m3/h Inner feeding diameter 8 mm / 0,315 inch min. air pressure 6 bar max. air pressure 8 bar Air consumption (referring to normal atmosphere.) Machine control Machine dimensions / Data Total weight (Variations in weight are possible due to execution) Dimensions Electrical Connection Values Total connected load: Voltage Frequence Noise emission (nach DIN 45636, Teil 1663) In front of the machine 10 L/min (See floorplan) approx.950 kg see floorplan see wiring diagram see wiring diagram see wiring diagram non-run 78,0 db(A) Operation 82,0 db(A) Behind the machine non-run 79,5 db(A) Operation 83,0 db(A) Deviations up to 4 db(A) are possible by measuring and production tolerances. Optimat SBE 109 K 1-7 Description of Product 1.9 EC – Declaration of Conformity as defined by the EC Machinery Directive 98/37/EC, Appendix IIA We hereby declare, that the production equipment Type: SBE 109 K #Type# Year of construction: 2002 #AJ# Machine No.: #MaschineNr# intended for the machining of wood and similar materials and designed for EC-countries corresponds, in the supplied version, to the following directives and standards: Directives • EC Machinery Directive 98/37/EC, Appendix I • EC Low Voltage Directive 73/23/EEC (in the Version 93/68/EEC) • EEC Directive 89/336/ECC (in the Version 93/68/ECC) Standards • EMC Standard: EN 50081/82, Part 2 of each Bütfering Schleiftechnik GmbH Stromberger Strasse 170 D-59262 Beckum Phone : +49 (025 21) 842-0 Fax : +49 (025 21) 842-67 E-Mail : [email protected] Antonius Bütfering Joint Managing Director eProduktbeschreibung.usa.test3.doc Description of Product Appendix to EC – Declaration of Conformity as defined by the EC Machinery Directive 98/37/EC, Appendix IIA Type: SBE 109 K #Type# Year of construction: 2002 #AJ# Machine No.: #MaschineNr# If alternations or conversions are made to production installation (e.g. changes/updates of aggregates or controls) that are not performed by the manufacturer or by a company authorised in writing, the EC-conformity expires. Bütfering Schleiftechnik GmbH Stromberger Strasse 170 D-59262 Beckum Phone : +49 (025 21) 842-0 Fax : +49 (025 21) 842-67 E-Mail : [email protected] Antonius Bütfering Joint Managing Director eProduktbeschreibung.usa.test3.doc Safety Regulations 2 Safety Regulations.......................2 2.1 Safety Recommendations .........2 2.1.1 Non-operation, longer standstill times and working breakes ................................2 2.2 Safety – Switch Devices............3 2.3 Safety Recommendations of Abrasive belts..............................6 Optimat SBE 109 K 2-1 Safety Regulations for HOMAG Group Machines 0.0.0 Safety Regulations for the designated use of HOMAG Group Machines T:\\9021\\000230\\X00105td.wmf These safety regulations • contain important information for the safe operation of HOMAG Group Machines • apply to all components of the machines • describe the sometimes apparent, sometimes hidden risks associated with the machines 8.2 9-021-00-0230 e0012.DOC 1 / 62 Safety Regulations for HOMAG Group Machines 0.0.0 Read and apply these safety regulations before carrying out the following work: • Transportation • Installation • Starting • Operation, including - Programming - Tooling - Trouble-shooting - Clearing away production waste - Disposal of operating and auxiliary materials - Cleaning - Inspection • Maintenance Any person who experiences difficulties with reading or understanding must receive special training from the operating body of the production equipment. 8.2 9-021-00-0230 e0012.DOC 2 / 62 Safety Regulations for HOMAG Group Machines 0.0.0 All persons entrusted with work on the production equipment must confirm the following by signing: Read and understood Name Date I have read and understood all parts of the Operating Manual, particularly the Safety Regulations. 8.2 9-021-00-0230 e0012.DOC 3 / 62 Safety Regulations for HOMAG Group Machines 0.0.0 Contents: 1 Basics 1.1 1.2 Symbols used ....................................................................................................... 6 Definitions ............................................................................................................ 7 2 Designated use 11 3 Notes for the operating body 14 4 Notes for the operator 18 4.1 4.2 4.3 4.4 4.5 4.6 4.7 4.8 Dangers.............................................................................................................. 18 Personal protection gear..................................................................................... 24 Behaviour ........................................................................................................... 25 Danger of fire! .................................................................................................... 26 Auxiliary and operating materials........................................................................ 27 Cleaning the machine ......................................................................................... 27 Working area...................................................................................................... 28 Raw material ...................................................................................................... 28 5 Emission values 29 6 Safety devices 32 6.1 6.2 6.3 6.4 Emergency stop.................................................................................................. 32 Master switch...................................................................................................... 33 Residual risks when master switch is off ............................................................. 34 Machine covers .................................................................................................. 37 7 Emergencies 38 8 Operating the machine 40 8.1 8.2 8.3 8.4 8.5 9 10 Starting............................................................................................................... 40 Maintenance....................................................................................................... 46 Conversion / changes ......................................................................................... 52 Disposal / environmental protection .................................................................... 52 Machining tools................................................................................................... 53 Accessories 9.1 57 Laser .................................................................................................................. 57 Production lines 10.1 10.2 10.3 10.4 8.2 6 58 Designated use................................................................................................... 58 Security .............................................................................................................. 59 Operation ........................................................................................................... 59 Maintenance....................................................................................................... 61 9-021-00-0230 e0012.DOC 5 / 62 Safety Regulations for HOMAG Group Machines 1 Basics 1.1 Symbols used 0.0.0 Note: Notes on application or use Caution: Precautions for preventing material damage. Danger: Hazard warning to prevent personal injury and/or extensive material damage. Optional: Devices available depending on the particular version of the machine. Subject to change Hazard warning signs: to U.S. ANSI Z535 Standard 8.2 9-021-00-0230 e0012.DOC 6 / 62 Safety Regulations for HOMAG Group Machines 1.2 0.0.0 Definitions The following conditions apply within the context of these Safety Regulations and the Operating Manual: Auxiliary and operating materials Cleaning Conversion Emergency stop External components Fault Feed - stop Inspection Installation 8.2 • Oils • Lubricants • Separating agent • Adhesive • Glues • Solvents • Cleaning agents • Paints • Anti-freeze Cleaning and/or removal of the following materials: • Production residues • Workpiece remnants • Impurities generated by auxiliary and operating materials • Dust deposits These activities are amongst the regular tasks, which the operator has to carry out. This cleaning work is always described in Section 3 of User Manual. All changes to the machine, which are not described in the Operating Manual Fastest possible shut-down of all potentially hazardous movements • Components that are not supplied by the manufacturer • Components that have functions similar to original components Production sequence interrupted through the following events: • Lack of power • Lack of material • Lack of auxiliary and operating materials • Workpieces or workpiece remnants jammed or wedged • Malfunctions of machine • Incorrect operation Stop workpiece transport or feeding of processing spindle • Checking the reference condition of the machine • recurrent, general inspection • Examination as part of the maintenance schedule or on the basis of official regulations Assembling the machine at the site of installation 9-021-00-0230 e0012.DOC 7 / 62 Safety Regulations for HOMAG Group Machines 0.0.0 Isolating safety devices Examples: • Machine covers • Protective hoods • Protective doors • Protective enclosures Examples: Maintenance • Cleaning • Maintenance Maintenance manual Describes all tasks, which the operating body must carry out regularly in order to maintain the reference condition of the machine. Manufacturer • Designer and constructors of the machine • Designer and manufacturer of processing tools • Developer and manufacturer of auxiliary or operating materials and materials Non-isolating Examples: safety devices • Emergency stop switch • Rip cords • Access-protected mats • Light barriers Operating behaviour Characteristic parameters: • Noise generation • Vibration • Temperature • Dust generation in the machine Operating body Company/organization which owns and operates the machine. Operating instructions Instructions for the operating company on organizing the process within its plant Operating Manual • General information • Start-up instructions • User Manual • Maintenance instructions • Spare parts lists • Electrical circuit diagrams Operational interruption • All periods during which the machine is not in production and is not supervised Operator Operator • Person familiar enough with the machine to be capable of working with it independently. Original components Spare or wearing parts supplied by the manufacturer Production area Closed area in which machine is set-up and operated 8.2 9-021-00-0230 e0012.DOC 8 / 62 Safety Regulations for HOMAG Group Machines Production equipment Production mode Qualified electricians Qualified personnel Repair Repair work Retooling Routine maintenance Service team 8.2 0.0.0 Equipment: • Unit which has or which can execute individual or several functions or which are execution on the functions Unit: • Unit, which executes individual processing steps or functions • Unit, which cannot be used independently Machine: • Unit, which executes several processing steps or functions • Unit, which can be used independently Unit: • Combination of several machines which may be from various manufacturers, which jointly machine workpieces or execute functions • Designated use of the machine • Reference condition of machine Person who is able to assess the assigned jobs and potential hazards based on • his professional training, knowledge in the relevant areas and experience • his familiarity with the relevant standards Person able to assess the safe condition of the machine for operation based on: • his professional training, knowledge in the relevant areas and experience • his knowledge of the relevant national working protection regulations, accident protection regulations, directives and generally recognized rules of technology (example: Standards) Examples: • Cleaning • Maintenance • Repair and/or sharpen Work that is necessary to restore the machine to the reference condition. • Automatic conversion to other settings • Manual conversion to other settings • Program change • Production adjustments • Work during the production operation, so that other workpieces can be processed as part of the designated use All tasks, which are described in the Maintenance Instructions. Work requiring special training or special tools may only be carried out by trained and qualified personnel or by a service team. Works customer service, distribution partner customer service or authorized service agent 9-021-00-0230 e0012.DOC 9 / 62 Safety Regulations for HOMAG Group Machines Start of production Starting Starting instructions Switch off from the power supply Switching off Tooling Turn on User Manual 8.2 0.0.0 Start of designated use Start of processing Initial operation of a production facility after setting-up, repair, conversion or maintenance This also includes: • Check programming • Perform basic settings • Refill operating materials • Fit tools • Instruction for initial start or re-start of the machine • Instruction for transporting and setting up the machine • For qualified personnel • Physically isolate production equipment from power supply • Disconnect supply cables • Control voltage off • Control off • Compressed air off and lines depressurized • Master switch is off. • Fitting or changing tools • Performing manual adjustments • Setting up the clamping devices • Adapting the machine to the workpiece dimensions • Master switch on • Start up main computer • Control voltage on • Compressed air on • Work to prepare for the start of production Instructions for tasks, which the operator must carry out. 9-021-00-0230 e0012.DOC 10 / 62 Safety Regulations for HOMAG Group Machines 2 0.0.0 Designated use The machine has been constructed according to the latest state of the art and the recognized safety rules. However, danger may still occur during use: • Danger to the life and limb of the user or third persons • Danger to the machine and other physical objects This applies predominantly if the machine is not used for its intended purpose The machine is intended exclusively for the machining and transportation of the following materials: • Wood • Wood-like materials The following must also be observed when using the machine for its intended purpose: • All specifications and regulations in the Operating Manual and on the machine • All generally applicable requirements and other binding safety regulations and accident prevention rules • All regulations on environmental protection The machine may only be operated with a functioning extraction device 8.2 9-021-00-0230 e0012.DOC 11 / 62 Safety Regulations for HOMAG Group Machines 0.0.0 Improper use Any use other than that designated will be construed as improper use. Examples: • Processing of materials containing metals similar to metal or metallic materials • Use in potentially explosive areas • Machining of materials which create sparks, since sparks can penetrate the suction channels and cause fires. The following are not permitted: • Unauthorized changes to the machine or to auxiliary equipment, which are part of the specification • Particularly changing, bridging or decommissioning equipment, which serve active and passive security • Installation of parts from other manufacturers Note: In the event of changes made on the basis of official regulations: • Consult a Service Team • Obtain official approval from the manufacturer 8.2 9-021-00-0230 e0012.DOC 12 / 62 Safety Regulations for HOMAG Group Machines 0.0.0 Liability The machine may only be used if the following are guaranteed: • Technically perfect condition • Desginated use • Safety awareness during use • Risk awareness during work • With fitted safety devices • Under observation of the Operating Manual Faults which may affect safety must be rectified immediately. If necessary or in case of doubt, commission a Service Team to rectify the fault. Danger: The manufacturer will not accept any liability for personal injury or material damage, arising on account of the following actions: • Non-observance of operating instructions • Non-observance of the details on the order confirmation • Non-observance of general and countryspecific valid conditions and regulations In the event of such improper use of the machine, the sole risk lies with the operating body. 8.2 9-021-00-0230 e0012.DOC 13 / 62 Safety Regulations for HOMAG Group Machines 3 0.0.0 Notes for the operating body Always keep the Operating Manual available and accessible at the place of machine operation Supplement the Operating Manual with: • Accident prevention instructions for woodworking machines • Accident prevention regulations for the country of the operating body • Generally applicable regarding environmental protection • Regulations on wearing personal protection gear • Regulations on handling dangerous substances • Operating instructions on special operating conditions - Work cycle - Work organisation - Personnel - Area of responsibility for personnel T:\\9021\\000013\\X000014MT.wmf Check On an irregular basis, but at least every six months, check safety devices without notice and confirm that personnel are working with safety awareness. Observe the Operating Manual and all supplementary documents. 8.2 9-021-00-0230 e0012.DOC 14 / 62 Safety Regulations for HOMAG Group Machines 0.0.0 Choice of personnel / skills Ensure that work on and with the machine is only carried out by reliable personnel who have the relevant training, are authorized, have been commissioned for this type of work and are familiar with the local conditions or by instructed persons under the direction and supervision of a manager. This applies not only to operation of the machine, but also to special work within the scope of its use (commissioning, maintenance) and particularly for work on hydraulics, pneumatic, electrics and software. 8.2 9-021-00-0230 e0012.DOC 15 / 62 Safety Regulations for HOMAG Group Machines 0.0.0 Training Personnel who work on the machine must be: • Trained • Suitable • Instructed • Commissioned Personnel must be given information on: • Proper use of the Safety devices • Any potential dangers • Precautionary measures to be taken Personnel must be trained in the function of the isolating and non-isolating safety devices. Personnel must regularly check the isolating and non-isolating safety devices. The manufacturer offers the following comprehensive training in this regard. Danger: Personnel who are being trained on the machine may only work on this machine under the constant supervision of experienced qualified personnel. Observe the legal minimum age for machine operation. 8.2 9-021-00-0230 e0012.DOC 16 / 62 Safety Regulations for HOMAG Group Machines 0.0.0 Responsibilities Clearly allocate responsibilities for the following activities: • Operation • Tooling • Maintenance Do not give any ambiguous safety regulations. Personnel must be authorized to decline any ambiguous instructions. Technical safety tests Technical safety tests may only be carried out by qualified personnel. This concerns: • Routine examinations • Examinations after interruptions 8.2 9-021-00-0230 e0012.DOC 17 / 62 Safety Regulations for HOMAG Group Machines 4 Notes for the operator 4.1 Dangers 0.0.0 The machine has been constructed according to the latest state of the art and the recognized safety rules. However, risks may still arise during use: The unavoidable dangers associated with the machine are: Danger: The rotating components of the feed or rotating tools may result in a Danger of becoming trapped! Í Danger: The moving components on the machine may result in Danger of becoming trapped! Í Danger: Sharp tools may result in a Danger of being cut! Í 8.2 9-021-00-0230 e0012.DOC 18 / 62 Safety Regulations for HOMAG Group Machines 0.0.0 Danger: Hot components, units, tools or hot melt glue may result in a Risk of burns! Í Danger: Dangerous auxiliary and operating materials may result in a Risk to health! Í 8.2 9-021-00-0230 e0012.DOC 19 / 62 Safety Regulations for HOMAG Group Machines 0.0.0 Safety devices Only operate the machine when all the safety and extraction devices are working properly. Danger: Safety devices may not be removed or deactivated! If safety devices are removed, refit and carry out a functional test immediately after completion of the work. This concerns: • Tooling work • Routine maintenance • Repair work T:\\9082\\411070\\x00106td.wmf If the machine is idle or switched off for a long time, all safety devices must be remain fitted and in proper working order. Caution: • Check the machine at least once per shift for externally visible damage and faults • Report any changes, including those in operating behaviour, immediately to the department or person responsible • Shut down and secure damaged machines immediately T:\\9082\\411070\\X00108td.WMF 8.2 9-021-00-0230 e0012.DOC 20 / 62 Safety Regulations for HOMAG Group Machines 0.0.0 Safe machine operation Danger: Make sure that no-one is in danger before switching on the machine and starting operation. This applies for • Production operation • Retooling • Adjusting safety devices • Maintenance For all work: • Observe starting and User Manual For maintenance work: • Observe maintenance instructions For production operation: • Do not place objects on the machine • Observe workpiece dimensions See order confirmation / specification Danger: The following work must not be carried out during production operation of the machine: • Cleaning • Maintenance • Repair work 8.2 9-021-00-0230 e0012.DOC 21 / 62 Safety Regulations for HOMAG Group Machines 0.0.0 Danger: • Do not reach into the feed area • Do not look into the feed area • Do not reach into the area near the rollers • Do not stand near flying chips • Do not open unsecured machine covers • Keep well away from moving workpieces • Keep well away from moving machine components Danger: Use suitable measures to prevent faults resulting from loose workpiece parts or remnants • Completely remove parts • Programmed stop, in order to remove parts • Position workpiece clamping device correctly Only release clamping devices when the feed is in a vertical position and the tool is idle. Ensure that the outfeed area is adequate for long components. Before leaving the machine: • Turn off control voltage • Turn off the master switch • Secure master switch • Remove key from key-operated switch • Switch off pneumatics 8.2 9-021-00-0230 e0012.DOC 22 / 62 Safety Regulations for HOMAG Group Machines 0.0.0 Caution: In the event of a functioning fault: • Emergency stop • Wait until all moving parts have come to a stop • Ensure that the machine cannot be switched on again: - electrics - pneumatics • Rectify fault • Examine machine for damage Notes on the machine Observe all safety and danger signs on the machine and keep them in a legible condition. Clothing Danger: Risk of injury by becoming caught or being pulled in if wearing: • Loose clothing • Jewelry • Watches • Rings • Loose, long hair All the above are therefore banned when working on the machine. 8.2 9-021-00-0230 e0012.DOC 23 / 62 Safety Regulations for HOMAG Group Machines 4.2 0.0.0 Personal protection gear Use suitable officially tested protection gear. Ear protection Always wear ear protection when carrying out clamping work on machines. Eye protection Wear safety glasses: • For tooling work • During the setting-up operation • When cutting tools Safety shoes Only wear safety shoes at the work site, never casual shoes or sandals. Dust protection mask Wear a dust protection mask if the set-up work requires material to be processed without extraction device. 8.2 9-021-00-0230 e0012.DOC 24 / 62 Safety Regulations for HOMAG Group Machines 0.0.0 Protective gloves Wear protective gloves • When handling chemicals, tools and sharp-edged workpieces • When cleaning and handling hot components on the machine 4.3 Behaviour • Never operate machines whilst under the influence of alcohol or drugs • The safety of other persons may depend on your awareness and ability to react. • Medication may delay your reactions 8.2 9-021-00-0230 e0012.DOC 25 / 62 Safety Regulations for HOMAG Group Machines 4.4 0.0.0 Danger of fire! Due to the risk of fire and explosion caused by dust, the following are strictly forbidden throughout the entire production area: • Naked flames • Smoking • Welding work • Burning work • Grinding work • Isolating work If such work has to be carried out for operational reasons: • Cordon off the area • Switch off the machine completely • Clean the machine and surrounding area of dust and flammable substances • Ensure the area is adequately ventilated • Prepare solvent • Organize supervisory staff On completion of the work, organize the fire service and monitor the working area for an adequate period of time Danger: Risk of explosion! Í 8.2 9-021-00-0230 e0012.DOC 26 / 62 Safety Regulations for HOMAG Group Machines 4.5 0.0.0 Auxiliary and operating materials Always observe the manufacturer’s safety regulations and data sheets relevant to these products when handling chemical substances. Wear safety equipment! Danger: Exercise caution when handling hot-melt glue Risk of burns! Í 4.6 Cleaning the machine • Switch off the machine before cleaning • Only clean the machine with a vacuum cleaner or dry cloth • Vacuum all machines thoroughly, especially those units that get hot, every day and after every shift • The control cabinet should be cleaned regularly by a qualified electrician 8.2 9-021-00-0230 e0012.DOC 27 / 62 Safety Regulations for HOMAG Group Machines 4.7 0.0.0 Working area The working area must be kept clear. Keep the following areas clean: • Production equipment • Safety area • Handles • Steps • Pedestals • Platforms • Ladders • Floors must be even and free from: - Waste - Chips - Workpiece remnants - Oil - Sawdust Do not place objects on the machine. The working area must be adequately lit. Keep raw materials near to the workplace. Stack machined workpieces safely. 4.8 Raw material Only use raw materials that contain no nails, stones or similar inclusions. Danger: Wood is not homogenous. Work with care: Risk of splitting, breaking and flying splinters! Í 8.2 9-021-00-0230 e0012.DOC 28 / 62 Safety Regulations for HOMAG Group Machines 5 0.0.0 Emission values Dust emission Dust emission values for machines on which clamping work is carried out: The values are less than 2mg/m (see order confirmation) 3 Do not operate machine unless the extraction device is working properly. If it is not possible to fully encapsulate the machine assemblies, e.g. in setup mode: • Wear dust protection mask Í Danger: Sawdust is damaging to health! 8.2 9-021-00-0230 e0012.DOC 29 / 62 Safety Regulations for HOMAG Group Machines 0.0.0 Noise emissions Values for machines with clamping operations: Noise level Stationary machining Continuous machining Panel saw No-load 75... 85 dB(A) 80... 90 dB(A) 100 dB(A) Machining 80... 100 dB(A) 80... 105 dB(A) 100 dB(A) Workplace 1 No-load 70... 80 dB(A) 70... 80 dB(A) 80 dB(A) Workplace 1 Machining 70... 90 dB(A) 80... 87 dB(A) 80 dB(A) 4 dB 4 dB Work place-related emission values Measuring uncertainty 4 dB allowance K Values for machines without clamping operations: These values are subject to final measurement. Note: This information should enable the operating body to better estimate the danger and risk. 8.2 9-021-00-0230 e0012.DOC 30 / 62 Safety Regulations for HOMAG Group Machines 0.0.0 Safe work place values The specified values are emission values and need not therefore represent safe work place values. Although there is a connection between emission and emission levels, it still cannot be reliably derived whether or not additional precautions are necessary. Factors which may influence the presently existing emission levels in the work place are: • Tool model • Machined material • Duration of exposure • Type of work room • Other sources of noise • Number of machines • Other adjacent processes Permissible noise emissions are based on the country-specific regulations in the country of the operating body. If under certain circumstances, the noise emission level exceeds the country-specific limit values, the operating company must provide additional noise protection. Note: Changes in the level of noise emissions may indicate a fault. Operators must familiarize themselves with the standard noise levels and react to any changes. Danger: Wear ear protection: Continuous noise is damaging to the ears: Í 8.2 9-021-00-0230 e0012.DOC 31 / 62 Safety Regulations for HOMAG Group Machines 6 Safety devices 6.1 Emergency stop 0.0.0 Emergency stop switches can be: • Pressure switch • Rip cord Only actuate Emergency Stop switch if personnel or machine is at risk. Do not actuate the emergency off switch for general shut-down. The Emergency Stop switch brings all potentially dangerous movements to a controlled stop as quickly as possible. Danger: Emergency Stop does not completely switch off the power to the machine. T:\\9082\\411070\\x00106td.wmf Electrical energy is required for the following functions: • Motor brakes • Moving machine components to release injured persons • Driving the glue roller in order to prevent hot-melt glue from escaping • Maintaining the machine control function Pneumatic energy is required for the following functions: • To hold machine components in a defined position Restarting after Emergency Stop • Eliminate cause of Emergency Stop situation! • Remove all workpieces from machine • Unlock the Emergency Stop switch • Switch on machine according to User Manual 8.2 9-021-00-0230 e0012.DOC 32 / 62 Safety Regulations for HOMAG Group Machines 6.2 0.0.0 Master switch The master switch interrupts the electrical energy supply to the machine. The main switch can be secured with a padlock to prevent the machine being switched on accidentally. Danger: The main switch is not an emergency stop switch Turn off master switch before carrying out the following work: • Maintenance • Cleaning • Repairs • Tooling • Operational interruptions T:\\9082\\411070\\x00105td.wmf Switch off machine: • Wait until all motors have come to a complete stop • Turn off the master switch • Padlock the master switch to prevent the machine being switched on again. Affix a warning sign on the master switch • Close all compressed air valves • Padlock compressed air valves to prevent unauthorized restart All personnel employed on the machine must secure the master switch and compressed air valve using their own padlocks. T:\\9082\\411070\\X00021td.WMF Danger: The input terminals in the control box are still under voltage even when the master switch is switched off fatal injury! Í 8.2 9-021-00-0230 e0012.DOC 33 / 62 Safety Regulations for HOMAG Group Machines 6.3 0.0.0 Residual risks when master switch is off Electrical power Connection terminals in the control box remain under voltage even when the master switch is off. Supply to machine lighting remains under voltage. Supply to control cabinet heater and electronic data memory remain under voltage. Capacitors remain under voltage even when the master switch is off. Therefore, wait for 5 minutes after turning off the master switch before starting work in the control cabinet. Pneumatic power De-pressurize compressed air systems to prevent uncontrolled movements from occurring. Hydraulic power De-pressurize hydraulic systems to prevent uncontrolled movements from occurring. Transmission energy Rotating or moving components and tools may run-on. 8.2 9-021-00-0230 e0012.DOC 34 / 62 Safety Regulations for HOMAG Group Machines 0.0.0 Positioning power Machine components may fall from their position. If the gas pressure damper is faulty, machine covers may fall. If the pressure in the hydraulic system falls, pressing plates may fall. Workpieces may drop during loss of vacuum. If necessary, secure components with suitable lifting gear. Spring assemblies may become loose. Tensioned chains may rip. Thermal energy Machine components may remain hot hours after the machine is switched off. Examples: • Glue tank • Glue applicator • Hot plates • Processing units • Tools 8.2 9-021-00-0230 e0012.DOC 35 / 62 Safety Regulations for HOMAG Group Machines 0.0.0 Magnetic fields In certain areas, machines with linear magnetic drives have static magnetic fields of up to 1.2 Tesla. These magnetic components may only be installed and removed in accordance with the component manufacturer’s instructions and by qualified engineers. Danger: Do not place metallic objects near to these components. Risk of injury! Í Persons with pace-makers, metallic implants and hearing aids must not enter this area. 8.2 9-021-00-0230 e0012.DOC 36 / 62 Safety Regulations for HOMAG Group Machines 0.0.0 Machine covers protect against: • Noise • Dust • Chips • Flying workpiece parts • Areas likely to pinch • Hot surfaces • Rotating tools T:\\9021\\000230\\x00102td.wmf Always keep machine covers closed. Switch off motors before opening the machine covers. Wait until the motors have come to a complete stop Protective hoods on machining tools serve as: • Anti-contact devices • Chip collecting device Do not remove or affect the function of the machine covers or protective hoods whilst the machine is running Danger: Do not touch tools that have not come to a complete standstill: Risk of injury! Í Do not turn the motor on unless the extraction hood is in place. T:\\9082\\635250\\X00003td.WMF Before commissioning: • Fit the machine covers and protective hoods properly. Note: Inspection window in the machine cover serves to aid production checks: • Have damage repaired immediately • Clean regularly 8.2 9-021-00-0230 e0012.DOC 37 / 62 Safety Regulations for HOMAG Group Machines 7 0.0.0 Emergencies Damage to persons • Keep calm • Activate emergency stop • Remove injured persons from dangerous situations • Proceed carefully if a person becomes trapped • Enlist help • Perform first aid • Call emergency services • Emergency numbers are located at the nearest telephone The emergency services offer first-aid courses 8.2 9-021-00-0230 e0012.DOC 38 / 62 Safety Regulations for HOMAG Group Machines 0.0.0 In case of fire • Keep calm • Report fire • Isolate machine from main power supply • Attempt to put out the fire Precautions • Mark the location of the fire alarm • Instruct personnel on how to operate the fire alarm • Provide operating instructions on the fire alarm • Provide information on escape routes • Set-up muster stations • Provide information on where to find and how to operate fire extinguishers • Suitable fire extinguishers - Dry-powder - carbon dioxide extinguishers for - electrical components Danger: When using carbon-dioxide extinguishers in small, badly ventilated areas, there exists: Danger of suffocation! Í Reconstruction In the event of fire harmful gases and vapors are generated from oils, lubricants, plastics and paint on the machine. After a fire, consult with repairs company and service team: • Corrosive vapors cause rust to form on the machine. 8.2 9-021-00-0230 e0012.DOC 39 / 62 Safety Regulations for HOMAG Group Machines 8 Operating the machine 8.1 Starting 0.0.0 Unloading instructions Observe unloading transport packaging. instructions on the Transport damage • Examine packaging and machine for damage immediately upon delivery • Notify transport company of any damage within the stipulated period • Notify the manufacturer and the transport insurers of any damage immediately • Never operate a damaged machine Storage • Only store machines in a dry, oiled and lubricated condition • Store machines to protect against adverse weather conditions • Use additional corrosion protection if storing machines over a long period Transport preparation • Move machine into transport position (see Operating Manual) • Isolate machine from external connections • Remove tools • Tighten clamps • Fit transport fasteners • Prepare stopper points (see Operating Manual) • Observe weight of machine (see shipping documents) 8.2 9-021-00-0230 e0012.DOC 40 / 62 Safety Regulations for HOMAG Group Machines 0.0.0 Transport • The machine may only be transported by qualified personnel with experience of transporting heavy loads • The director must be in view of or in verbal contact with the driver • Only transport the machine with suitable lifting gear • Only transport the machine with lifting gear in a technically perfect condition • Only transport the machine using loading equipment with adequate load bearing capacity • Ropes, stacker arms must only reach to the released stopper points • Do not allow transport belts to come into contact with clothing • Do not use sensitive parts of the machine for pushing, pressing or pulling Danger: • The center of gravity is not necessarily in the middle • Always protect load from inadvertent position changes • No person may stand beneath suspended loads Transport fasteners • Always remove transport fasteners properly before re-starting • Always remove transport devices properly before re-starting • Refit components removed for transport • Check all fasteners 8.2 9-021-00-0230 e0012.DOC 41 / 62 Safety Regulations for HOMAG Group Machines 0.0.0 Ambient conditions The machine is designed primarily for use in closed rooms. Ambient conditions for operation: • Max. 80% relative air humidity (not condensing) o • Ambient temperature approx. 5 C... 40 °C Danger: If the above values are not observed, any malfunctions in the control system may trigger machine movements Risk of injury! Í Machines must be protected against: • Climatic influences • Flashes of lightning • Hail stones • Electro-static charge • High humidity • Rain • Salty air near to the sea • Severe temperature fluctuations • Ground vibrations • Grinding dust • Chemical vapors • Unauthorized access • Rodents • Insects 8.2 9-021-00-0230 e0012.DOC 42 / 62 Safety Regulations for HOMAG Group Machines 0.0.0 Floor load bearing capacity The load bearing capacity of the floor must correspond to the details in the Operating Manual (see general and suction plan) If the load bearing capacity is inadequate • Lay a foundation • Observe the requirements Working area • The working area must offer access for control and maintenance • Note and observe the safety areas of adjacent machines • Make any required interconnections safe • Provide bridges as safe connecting routes Country-specific regulations Machines must be set up with the countryspecific regulations as a priority: • Observe laws • Observe regulations, for example: - Escape routes - Protective enclosures 8.2 9-021-00-0230 e0012.DOC 43 / 62 Safety Regulations for HOMAG Group Machines 0.0.0 Connect machine • Do not lay cables across the working area of the operator • Do not pinch or bend cables • Cables must not be under strain • Cables must at no point be subject to abrasion • Observe movements and travel paths of the machine This applies for • Power cables • Pneumatic cables • Hydraulic cables • Coolant cables • Suction cables Electrical connection • Observe the details in the Operation Manual • The machine may only be connected to the mains power supply by qualified electricians who are familiar with the local conditions • Ensure contact screws are tight • Check rotational direction of all motors • Check motional direction of linear magnetic motors Pneumatic connection Observe the details in the Operating Manual: • Layout and suction diagram Caution: • Compressed air must be dry and filtered • Observe compressed air quality • Connect compressed air cables by means of electrically insulated adapters 8.2 9-021-00-0230 e0012.DOC 44 / 62 Safety Regulations for HOMAG Group Machines 0.0.0 Connection to suction device • Never operate machine unless the suction device is working properly • Observe the details in the Operating Manual: (see layout and suction diagram) • Observe connection cross-section • Observe air speeds • Observe air volumes • Flexible suction hoses must be made of nonflammable material • Connect suction device cables by means of electrically insulated adapters Welding work Danger: Welding work must never be carried out on the machine! Incorrect flows or delayed heat may cause: Severe machine damage! 8.2 9-021-00-0230 e0012.DOC 45 / 62 Safety Regulations for HOMAG Group Machines 8.2 0.0.0 Maintenance Note: Maintenance work on machines may only be carried out by qualified personnel. • Observe maintenance instructions Observe specified periods for following work: • Recurrent, general inspections • Checking the safety equipment • Settings work • Routine maintenance • Exchanging components • Exchanging parts of equipment Before maintenance, repair work and cleaning work: • Nominate qualified supervisory personnel • Switch off machine • Ensure that the machine cannot inadvertently be switched on again: - Secure master switch with a padlock - Secure compressed air shut-off valve with padlock - Affix warning plate to master switch and compressed air valve • Do not open machine covers until the machine has come to a complete standstill For maintenance work, carry out a visual check on the following components • Pneumatic cables • Hydraulic cables • Electrical cables • Coolant cables • Suction cables Possible damage includes: • Areas subject to abrasion • Loose connections • Damaged insulation • Leaky areas Report all faults and ensure that they are rectified by qualified personnel or electricians. 8.2 9-021-00-0230 e0012.DOC 46 / 62 Safety Regulations for HOMAG Group Machines 0.0.0 Assembly tools Suitable workshop equipment is absolutely essential. Only approach the machine when the tool has been numbered. Count the tools before re-starting, to ensure that none remain in the machine. Do not allow any tool to be inserted into the machine. Do not place any tool on the machine. Assembly work For assembly work above body height: • Do not climb on parts of the machine • Use the appropriate steps and work platforms • Keep steps clean • Wear fall protection Repairs • Use only original parts When using parts from other manufacturers, the manufacturer shall be liable for neither damage to persons or property, nor for the proper functioning of the machine. 8.2 9-021-00-0230 e0012.DOC 47 / 62 Safety Regulations for HOMAG Group Machines 0.0.0 Cleaning • Use lint-free cloths for cleaning • Do not use aggressive cleaning agents • Do not use high-pressure cleaners • Do not use water • Do not use flammable solvents • Do not use compressed air • Fit safety equipment immediately on completion of the work and check that it functions properly • Re-tighten loose bolt connections • Check all bolt connections Work on electrics Turn off master switch before any work is carried out on live components The master switch can be padlocked to prevent the machine being switched on again. Work on electrical equipment may only be performed by a qualified electrician under observation of the electrical regulations. • Only use insulated tools • Check electrical equipment for visible defects at least quarterly • Rectify faults such as loose connections immediately • Only use safety devices (fuses, motor circuit breakers, automatic fuses etc.) with the prescribed technical data • Turn off machine immediately in the event of faults in the electrical power supply • Only open and close the control cabinet when the machine is switched off (master switch off, i.e. in the OFF position) 8.2 9-021-00-0230 T:\\9082\\411070\\X00105td.wmf e0012.DOC 48 / 62 Safety Regulations for HOMAG Group Machines 0.0.0 Machine parts on which maintenance or repair work needs to be conducted: • Switch off from the power supply • Check disconnected parts first for novoltage, then earth and short-circuit • Insulate live, adjacent components Danger: Live parts can cause fatal injury! Í If it is necessary to work on live components: • Ensure a second person is present, who can switch off the machine using the master switch in an emergency • Cordon off the work area with a red-andwhite safety chain and a warning sign When working on high voltage modules: • Connect the power cable to earth and short-circuit the components, e.g. capacitors, with an earthing rod • After installing or repairing electrical components, test the safety measures used (e.g. earthing resistance) 8.2 9-021-00-0230 e0012.DOC 49 / 62 Safety Regulations for HOMAG Group Machines 0.0.0 Work on pneumatics Work on the pneumatic equipment may only be performed by qualified personnel with special knowledge and experience of pneumatics • De-pressurize pressurized lines to be opened before carrying out maintenance work on pneumatic components • Lay and assemble compressed air lines properly • Do not confuse connections • Check cables, hoses and bolts for leaks and externally visible damage at least quarterly, rectify any faults immediately Work on hydraulics Work on the hydraulic equipment may only be performed by qualified personnel with special knowledge and experience of hydraulics: • De-pressurize pressurized lines to be opened before carrying out maintenance work on hydraulic components • Lay and assemble hydraulic lines properly • Do not confuse connections • Check cables, hoses and bolts for leaks and externally visible damage at least quarterly • Rectify any faults immediately 8.2 9-021-00-0230 e0012.DOC 50 / 62 Safety Regulations for HOMAG Group Machines 0.0.0 Controls Machine movements can be triggered by the following equipment: • Buttons on the control panels • Control functions • Remote control buttons • Foot switch • Toggle switch • Key-operated switch Observe the Operating Manual Machine programs Machine programs are password-protected. Danger: Do not make changes to the machine programs (software). Repair of controls Plug-in control cards must be exchanged for repair. Never activate the master switch unless a plug-in card is inserted into the control, otherwise uncontrolled machine movements may be triggered. 8.2 9-021-00-0230 e0012.DOC 51 / 62 Safety Regulations for HOMAG Group Machines 8.3 0.0.0 Conversion / changes If conversion or changes are made independently, the manufacturer shall be liable for neither damage to persons or property, nor for the proper functioning of the machine. Conversions and changes may only be carried out with the written approval of the manufacturer. 8.4 Disposal / environmental protection Always observe country-specific regulations for disposing of the machine or machine components. Ensure that the method of disposal is compatible with the environment. Where possible, use officially approved disposal companies. Separate material groups • Electrical and electronic scrap • Steel scrap • Plastics • Wood materials For storing waste, separate • Wood • Plastics • Metals • Oils / greases Danger: Hot metal chips can ignite other materials. Examples: • Wood chips • Oil-drenched cloths Danger of fire! Í 8.2 9-021-00-0230 e0012.DOC 52 / 62 Safety Regulations for HOMAG Group Machines 8.5 0.0.0 Machining tools Handling • Only handle tools when wearing suitable protective gloves • Store tools so as to protect from damage • Only transport tools when packed or in a suitable container • Only fit tools when they are in a clean condition • Do not reach into the area near rotating tools • Cover tools when carrying out repair work on the machine • Observe the rated speeds of the tools • Check direction of rotation • Observe the details of the tool manufacturer • Check the tool is secure after fitting • Observe protection and safety regulations for handling wood machining tools • Do not use HSS saw blades Danger: • Machining tools have sharp blades • Rotating tools are not always visible Risk of injury! Í Isolate master switch and ensure the machine cannot inadvertently be restarted when working on tools fitted into the machine. 8.2 9-021-00-0230 e0012.DOC 53 / 62 Safety Regulations for HOMAG Group Machines 0.0.0 Service tools within the specified periods Service tools in the following cases: • When the blades are visibly torn • The machine noticeably consumes more power • The workpiece surfaces no longer meet the specified requirements Reversing plate tools • Observe the tool manufacturer’s Operating Manual • Fit the reversing plate tools carefully • Keep the reversing plate clean • Clean the tool body before fitting the reversing plates • Load tool complete • Tighten bolts as described in the Operating Manual • Only use original reversing plates and spare parts 8.2 9-021-00-0230 e0012.DOC 54 / 62 Safety Regulations for HOMAG Group Machines 0.0.0 Insert tools • Use original spindle rings • Check direction of rotation • Observe the Operating Manual - Many units have changeable rotational directions • Check direction of threads for tool fixing • Only fit spindles with permissible tool dimensions (See tool layout plan) • Check tools for: - Fractures - Changes in shape - Discoloration - Unbalanced condition - Sharpness - Permissible tool speeds - Permissible feed methods - Bolts on the tool must be tight • Tools must be the same temperature as the machine, otherwise the tool fastener may become loose as a result of shrinkage • Thoroughly clean: - Spindles - Support surfaces - Spacer rings - Securing rings - Spindle nuts • Tighten spindle nuts (Observe the Operating Manual) 8.2 9-021-00-0230 e0012.DOC 55 / 62 Safety Regulations for HOMAG Group Machines 0.0.0 After fitting the tool: • Check idle run before starting by manually rotating the tool • Fit protective hoods • Check smooth running during switch-on and test run • Check entries in the tool database: - Magazine slot - Tool type - Tool data After removing the tool: • Check tool immediately • Mark damaged tools and ensure they cannot be refitted • Have damaged tools repaired • Clean spindles and protect against corrosion 8.2 9-021-00-0230 e0012.DOC 56 / 62 Safety Regulations for HOMAG Group Machines 9 Accessories 9.1 Laser 0.0.0 • Do not look into the light source of the laser • Do not make changes to the machine • Do not allow reflective surfaces in the area of the laser light • Only operate the equipment in an undamaged condition Danger: Do not look into the light source: Laser light can damage the eyes! Í 8.2 9-021-00-0230 e0012.DOC 57 / 62 Safety Regulations for HOMAG Group Machines 10 Production lines 10.1 Designated use 0.0.0 Production lines serve to machine wood and wood materials in accordance with the technical data. The following operations are carried out for this purpose: • Feeding • Transporting • Positioning • Processing • Stacking T:\\9021\\000230\\x00002td.wmf Other materials may only be processed with the written permission of the manufacturer. The production lines are not suitable for processing metals. All parts of a production line are adapted to suit the designated use. This concerns: • Feeding units • Roller tracks • Processing machines • Rotary transfer stations • Stacking units Details in the assembly plan and on the order confirmation must be observed. 8.2 9-021-00-0230 e0012.DOC 58 / 62 Safety Regulations for HOMAG Group Machines 10.2 0.0.0 Security If as contractually agreed, the operating body undertakes to provide security for the transport equipment by means of barriers, fences, secured doors, these must be equipped in accordance with the manufacturer’s specifications and the countryspecific regulations. • Areas for the following activities must be kept clear: - Loading with raw material - Unloading finished products - Removing waste or rejects • Mark safety areas • Keep passageways free 10.3 Operation Overviews of production lines can be difficult Therefore check: • The operation and function of the individual machines • Safety areas • Workpiece movements • Stop feed and Emergency stop functions • Learn and test the position and function of the emergency stop equipment T:\\9082\\411070\\x00106td.wmf Switch-on production line • Observe the Operating Manual Danger: Ensure that no-one is at risk from the operating production line! 8.2 9-021-00-0230 e0012.DOC 59 / 62 Safety Regulations for HOMAG Group Machines 0.0.0 Feed speed Synchronize the feed speeds and cycle times for all individual components. Faults In the event of a fault, take the appropriate action: • Feed stop • Emergency stop • Stop supply of materials to faulty area • Notify the operator Danger: from moving machine parts and workpieces Never reach into the following areas: • Conveyor belts • Roller tracks • Stacking devices • Rotary transfer stations Danger of getting caught! Í 8.2 9-021-00-0230 e0012.DOC 60 / 62 Safety Regulations for HOMAG Group Machines 10.4 0.0.0 Maintenance • Keep transport units clean • Remove material residues • Keep all steps, platforms and ladders clean Caution: Never climb on parts of the machine If certain areas have to be switched off for set-up and maintenance work, ensure that no materials are fed to the production line. Danger: Only seal off enclosed hazardous areas, when you are sure that the area is clear of personnel. Ensure that unauthorized persons cannot access hazardous areas. 8.2 9-021-00-0230 e0012.DOC 61 / 62 Safety Regulations for HOMAG Group Machines 0.0.0 Note: We would point out that the content of the Operating Manuals and the product documentation does not form or change any part of previous or existing agreements, assurances or legal relationships. All obligations of the manufacturer are derived from the particular purchase contract, which also contains the complete and only valid warranty regulation. These contractual conditions are neither expanded nor limited through the context of these regulations, instructions or documentation. 8.2 9-021-00-0230 e0012.DOC 62 / 62 Safety Regulations 2 Safety Regulations 2.1 Safety Recommendations 2.1.1 Non-operation, longer standstill times and working breakes 1. Main switch in „0ff-Position“ (Observe indication advice) 2. Close – compressed air supply off off Optimat SBE 109 K 2-2 Safety Regulations 2.2 Safety – Switch Devices. The following safety switch devices are installed for the protection of the operating personnel and the machine. Lockable Main Switch: In order to prevent unintentional switching-on. Emergency switch off: switches off all the drives. Switches on the brake for the abrasive belt. the abrasive belt oscillation Back side Front side remains in function. Pressure regulator: If the necessary air pressure for operation is falling short, the pessure regulator switches off the drive motors and the feed. Optimat SBE 109 K 2-3 Safety Regulations Door locking: The drive an only switched on when the doors are locked. Belt running off switch:: The abrasive belt drive is switched off when the abrasive belt is running off. Belt tear – belt tensioning switch: switches off the abrasive belt drive in case of belt tearing and prevents the switching on, if the abrasive belt is not tensioned. Optimat SBE 109 K 2-4 Safety Regulations Safety switch rail: „click“ switches off the feed drive Limit switch: for thickness adjustment. Limits the workpiece passage to min 3 mm and max 150 mm / 0,118 inch and 5,905 inch workpiece thickness. Overthickness protection (switch roller) Switches off the feed drive during excessive thickness deviation (max. 2,5 mm/ 0,098 inch)) of the workpiece. The height adjustment remains in function. Optimat SBE 109 K 2-5 Safety Regulations 2.3 Safety Recommendations of Abrasive belts Transport and Storage min 50 mm min 1,968 inch Place the abrasive belts on bar of min. 50 mm / 1,968 inch dia., after taking out of the original packing. Careful treatment. No throwing, pushing or bending 40°C • Storage temperatures between 5° C and 40° C • Air humidity between 45 % and 65 %. • protect against direct sun influence • Please keep sanding tools in their original packing until use. Optimat SBE 109 K 5°C 2-6 Safety Regulations Other Safety Recommendations • Observe limitations of use and special indications of use of the abrasive belt supplier. • Only switch off the sanding machine, when there are no more workpieces inside the machine. • Slacken abrasive belt during loger standstill times!! If an abrasive belt remains tensioned, it can become wavy. . Preparing for sanding • Check if abrasive belts are ok. • Observe running direction (arrows) of the abrasive belts. • Sanding machine must achieve maximum idle running speed • Then the sanding process can start. • Abrasive belt should preferably charged in the centre. Sanding Optimat SBE 109 K 2-7 Safety Regulations Abrasive Belts in Use • Belt joints can leave marks on the workpiece. Belt joint may not be thicker than max. 0,02 mm as the abrasive belt. • Abrasive belt is creasing diagonally and tears Reason: Abrasive belt too damp. Ø Change abrasive belt. • The dry abrasive belt is creasing diagonally and tears. Reason: Tension pressure too high. Ø Reduce tension pressure. • A wavy belt causes marks on the workpiece. • A wavy belt can damage the conveyorbelt upon minor workpiece thickness. Ø Change abrasive belt. Optimat SBE 109 K 2-8 Transport / Installation 3 Transport / Installation................2 3.1 Dimensions and Weight.............3 3.2 Reliable Devices and Means for Transport......................................3 3.3 Installation and Connection.......4 3.3.1 Levelling of Machine ..........6 Optimat SBE 109 K 3-1 Transport / Installation 3 Transport / Installation The following safety regulations have to be observed for the transport of the machine – highly dangerous personal injuries, damage of machine and other damages are thereby prevented. • The transport works may only be carried out by qualified personnel under the observation of the safety regulations. • The machine may only be lifted on the holding points provided. • Only load suspension devices may used for the transport of the machine. • Observe total weight of machine. • The transport ways are to be shut off and secured, so that no unauthorised persons may enter the danger zone. • Industrial floor with sufficient loadbearing capacity. Optimat SBE 109 K Danger No persons may be underneath suspending load! 3-2 Transport / Installation 3.1 Dimensions and Weight • • • Length: 1010 mm / 40” Width: 1450 mm / 55 “ • Height: 1800 mm / 71” • Gewicht: ca.950 kg / 2090 lbs 3.2 Reliable Devices and Means for Transport The machine is delivered on a pallet of skids. Lifting of machine by: • Forklift • low lift platform truck Attention! Dumping danger • Crane Attention! Observe load bearing Suitable means of transport • Chains • Ropes Attention! Observe minimum charge 2 openings are situated on the upper side of the machine. Pull-off covering caps and pull through rope or chain. Optimat SBE 109 K 3-3 Transport / Installation 3.3 Installation and Connection Room features: • Closed, heatable • Temperature 5°C to 40°C (41°F – 104 °F) • 40°C 5°C Relative air humidity max – 80 % Extraction Necessary Connections Electric • Electric • Compressed Air • Dust collector Compressed Air Optimat SBE 109 K 3-4 Transport / Installation Attention Use suitable lifting means. Angle between 45° and 60°! 45° Attention! Machine may only be placed on solid ground. A foundation must be built, if the necessary load-bearing capacity is not guaranteed. An uneven surface of the floor can lead to deformation of the machine frame and can have influence on the parallelism between feed table, pressure rollers and contact roller. Please observe the following in order to prevent costly adjustment works: ca.950 kg • All feet must be standing firmly on the floor. • Level unevennesses ! ca. 2090 lbs Observe minimum floor charge !! After the machine is installed • Put in cover caps. Optimat SBE 109 K 3-5 Transport / Installation 3.3.1 Levelling of Machine All machine elements are levelled to the table area. These adjustments should be checked upon installation, but not be changed without necessary reason. • Level machine in cross and longitudinal direction. Levelling in cross direction • The machine is levelled correctly, when the head support can be slightly moved after releasing the tension lever Levelling in longitudinal dir Head support Optimat SBE 109 K 3-6 Commissioning 4 Commissioning.............................2 4.1 Electrical connection..................2 4.1.1 Electrical Connection- Dust Extraction.........................................3 4.2 Connection to the Compressed Air Supply.....................................4 4.3 Connection to Dust Extraction ...5 Optimat SBE109 K 4-1 Commissioning 4 Commissioning In order to prevent machine damage or personal injury upon machine commissioning, the following instructions are to be observed: Connections to electrical power supply, compressed air, and dust extraction may only be carried out by qualified personnel according to the applicable safety regulations. The position of the feed table to the upper pressure rollers and the contact roller are to be checked before commissioning of the machine. 4.1 Electrical connection Power supply from above • Observe regulations of local power supply companies. • Connection values are taken from the wiring diagram. Warning! Electrical Danger! Optimat SBE109 K 4-2 Commissioning Attention! Observe the correct phase connection (clockwise rotation) The power supply is to be connected to the terminals L1,L2, L3 of the main power switch. Connect the earth strip to clamp PE. 4.1.1 Electrical ConnectionDust Extraction • A 'normally open' contact is available for switching on the dust extraction. This is located inside the electrical cabinet (see wiring diagram). When using this, the dust extraction can be started by switching on the conveyorbelt feed motor. Optimat SBE109 K 4-3 Commissioning 4.2 Connection to the Compressed Air Supply Attention! Only dry, filtered and oil-free compressed air should be used. Compressed air feeding = min 8mm = min 3,15” Compressed Air min. 6 bar / 82 psi max. 8 bar/ 100 psi If the compressed air exceeds 8 bar 100 psi), an additional pressure regulator must be fitted. The compressed air requirement (air consumption) is 10 l/min / 1 cfm. Pressure regulating valve for air supply, abrasive belt tension and conveyorbelt tracking Regulator Air gauge The shut-off valve is to be closed when the machine is not in use. Shut-off valve off on Optimat SBE109 K Compressed air inlet 4-4 Commissioning 4.3 Connection to Dust Extraction Please observe the latest edition of the "Safety Regulations for hazardous materials" TRGS 553 (Wood dust) and the code of pratice "Wood Dust" ZH 1/739. Other local codes may also apply. For electrical control of dust extraction: see 'connection to power supply.' For the position and dimensions of the dust outlet: see the 'machine floorplan' The minimum air speed on the dust outlet is 20 m/sec./65 ft/sec Dust extraction influences the sanding quality and abrasive belt lifetime. Please take the recommended minimum extraction volume from the technical data. The ductwork should be fitted with a blast gate or damper. Blast gate Optimat SBE109 K The extraction strength should be reduced by using a blast gate (not supplied) when thin workpieces are to be processed. This is to prevent the conveyorbelt from being sanded. 4-5 Components 5 Components..................................2 Sanding Head .....................................2 5.1.1 Abrasive belt changing side ......................2 5.1.2 Drive side.............................3 5.1.3 Tensioning and oscillation of the abrasive belt .............4 5.2 Feed table ....................................5 5.2.1 Machine Layout...................5 5.2.2 Conveyorbelt tracking ........7 Optimat SBC 109 K 5-1 Components 5 Components 5.1 Sanding Head 5.1.1 Abrasive belt changing side Motor Brake 'ON' Motor Brake 'OFF' Tension roller Door interlock Abrasive belt tensioning and release Over travel limit switch Idle roller Contact roller Overthickness switch Head support Optimat SBC 109 K 5-2 Components 5.1.2 Drive side Pressure regulator for belt tension Tension roller Oscillation cylinder - + Door interloock Normal tension pressure 4 - 6 bar. V-belt drive Table Spindle Drive motor Optimat SBC 109 K 5-3 Components 1 5.1.3 Tensioning and oscillation of the abrasive belt The abrasive belt is tensioned by a centrally positioned air cylinder. The tension roller is able to pivot on top of this cylinder to steer the abrasive belt, and keep it on 'track'. The right hand edge of the abrasive belt is sensed by an infra-red light scanner, which controls the air flow to an 'oscillation cylinder' via a solenoid valve. 1 Tension drum 2 3 Tension cylinder Main support 4 Oscillation cylinder 2 Movement of the abrasive belt to the left 3 Movement of abrasive belt to the right 4 The tension roller is moved to the left or right, by the oscillation cylinder. Optimat SBC 109 K 5-4 Components 5.2 Feed table 5.2.1 Machine Layout 1. Conveyor Drive motor 2. Drive drum 5 3. Conveyor tension roller 4. Conveyor belt 5. Control panel Control Feeding direction 2 3 – 150 mm 3 1 2 1 4 3 Optimat SBC 109 K 5-5 Components Attention! The feed table moves by 150 mm. Don't place any objects underneath it. Feeding direction 3 – 150 mm Optimat SBC 109 K 5-6 Components 5.2.2 Conveyorbelt tracking The conveyorbelt is kept on track by a steering system acting on the conveyorbelt tension roller. This is situated at the infeed side of the machine at the right hand side. When the conveyorbelt moves too far to the right hand side, it pushes on a sensing roller, which activates an air cylinder to apply more tension to the conveyor. This has the effect of keeping the conveyorbelt on track. 1 Conveyorbelt 2 Sensing Roller 3 4 Tension roller shaft Tracking cylinder 1 3 Optimat SBC 109 K 2 3 4 4 5-7 Operation 6 Operation........................................2 6.1 The Workplace around the machine ........................................2 6.2. Description of Operating Elements ......................................3 6.2.1 Control Panel.......................3 6.2.2Joystick....................................5 6.3 Contact roller adjustment ..........7 6.3.1 Retracting the contact roller:.....................................7 6.3.2 Changing of Sanding Insert .....................9 6.3.3 Contact roller for leveling towards sanding pad........12 6.4 Starting the machine ................16 6.4.1 Sanding with Sanding pad only......................................16 6.4.2 Sanding with Contact roller .....................19 6.4.3 Combi-Sanding .................22 6.5 Stopping of Machine ................25 6.6 Changing of Abrasive belt.......26 Optimat SBE 109 K 6-1 Operation 6 Operation 6.1 The Workplace around the machine Machine Infeed area 1 • • Machine operating side Workpiece feeding Optimat SBE 109 K Machine Outfeed Area 2 • • Backside of machine Machine outfeed 6-2 Operation 6.2 Description of Operating Elements Joystick 6.2.1 Control Panel Digital readout of workpiece thickness Amperemeter Sanding head Start-Button Turns on Sanding head Emergency stop button Stop-button Turns off sanding head, conveyorbelt feed Optimat SBE 109 K 6-3 Operation Control Panel Green control light Feed speed 1 - on Green control light Feed speed 2 - on Green light for: Limit switches from - Doors - 2 Emergency stops - belt tracking - Compressed air - Belt rupture Fault Red light for Motor protection switch Feed Drive Height adjustment Optimat SBE 109 K 6-4 Operation 6.2.2 Joystick Moving lever 'UP' raises the table to Reduce machine opening Lever to the left Feed speed 1 on Lever to the right Feed speed 2 on Moving lever 'DOWN' lowers the table to Increase machine opening Lever 'UP' - Feed table is raised to reduce machine opening Optimat SBE 109 K 6-5 Operation Lever 'DOWN' + Feed table is lowered to increase machine opening Lever to the left Speed 1 Conveyorbelt speed 4 m/min / 13 ft/min. Lever to the right Speed 2 Conveyorbelt speed 8 m/min / 26 ft/min. Optimat SBE 109 K 6-6 Operation 6.3 Contact roller adjustment 6.3.1 Retracting the contact roller: 1. Undo the outboard clamping lever by rotating anti-clockwise 2. Rotate the inboard adjustment lever anti-clockwise to raise the contact roller 3. Re-tighten the outboard locking handle to lock the contact roller in the retracted position. Optimat SBE 109 K 6-7 Operation Lowering the contact roller – grit size compensation 4. Undo the outboard clamping lever by rotating anti-clockwise 5. Adjust the abrasive belt grit size. Turn the ‘dice’ so that the chosen grit number will contact the adjustment shaft. 6. Press the Adjusting shaft against the ‘dice’. 7. Lock the height adjustment lever in place using the outboard clamping lever. Optimat SBE 109 K Grit size adjusted 80 6-8 Operation 6.3.2 Changing of Sanding Insert Safety Warning. No fire, open light or smoking in case of risk of fire and explosion due to dust. 1. Ensure there are no workpieces in the machine 2. Stop drive motor (Operate stop button) 3. Switch off dust extraction Stop Safety Warning Please note that parts remaining in the machine can be a risk even after switching off the drive motor. • Danger from the sanding head • Danger of ‘pinching’ in conveyorbelt feed area Danger “Stored Energy! Wait until the machine has come to a complete stop and there are no workpieces in the machine. Risk of pinch points! • Only then open door on belt changing side. Optimat SBE 109 K 6-9 Operation Belt tension 4. Release abrasive belt 5. Release head support. ‘Fill Block’ 6. Pull out head support. 7. Take out sanding insert. Optimat SBE 109 K 6 - 10 Operation 8. Then slide in new sanding insert carefully. (Please observe abrasive belt when replacing sanding insert) 9. Slide in sanding insert until limit stop. Belt tension 10. Tension abrasive belt Attention! Surface on ‘Fill Block’ and support surface on frame. • Needs to be cleaned. Clean surface on frame Clean surface on ‘Fill Block’ 11. Push in ‘Fill Block, align and fasten. Optimat SBE 109 K 6 - 11 Operation 6.3.3 Contact roller for leveling towards sanding pad 1. Stop feed. Stop abrasive belt drive. Operate stop button. Stop 2. Select a flat workpieces of 20 mm / 0,787 inch thickness, approx. 500 mm/ 20 inch long and 300 mm / 12 inch wide. 500mm 2X 20mm 300mm Optimat SBE 109 K 6 - 12 Operation 3. The sanding insert must be inserted and the contact roller must be retracted. 4. Joystick down. The feed table moves down. Lower the table so far so that the distance between the abrasive belt and conveyorbelt is larger than 20 mm/ 0,787 inch. 5. Push the workpiece on the left hand side of the feed table underneath the sanding head and pressure rollers. 6. Lift joystick carefully, until the work piece just touches the abrasive belt. Optimat SBE 109 K larger 20mm 6 - 13 Operation 7. Release tension lever 8. Turn adjustment lever clockwise and lower contact roller onto the workpiece. 9. Fasten adjustment lever Optimat SBE 109 K 6 - 14 Operation 10. Joystick down. Feed table lowers. Remove workpiece. Optimat SBE 109 K 6 - 15 Operation 6.4 Starting the machine Attention! The contact roller needs to be upper position when sanding with the sanding pad only Attention! 6.4.1 Sanding with Sanding pad only Check: 1. Main switch on (wait until digital readout lights up) 2. Compressed air on. Is sanding insert pushed in? Has abrasive belt been fitted correctly ? (Observe running direction) 1 2 Contact roller in upper position? Fill Block fastened? Abrasive belt tensioned? Optimat SBE 109 K 6 - 16 Operation Green control light for limit switch is on, when: Emergency stop buttons OK Belt over-travel switches OK Compressed air OK Abrasive belt tensioned OK Doors Interlocks OK Limit switch Optimat SBE 109 K 6 - 17 Operation 3. Adjust for workpiece thickness (i.e. 20 mm / 0,787 inch) 4. Operate joystick until digital readout indicates 20 mm (0,787 inch) 5. Operate joystick. Select feed speed 1. Green control light lights up. 6. Start sanding head. Operate start button. 7. Switch on dust extraction. 8. Place workpiece on conveyorbelt and feed through machine 9. Machine outfeed area 2 Remove workpiece Start 10. Check the workpiece. 11. If the workpiece is ok, then select 2nd feed speed Optimat SBE 109 K 6 - 18 Operation 6.4.2 Sanding with Contact roller Attention! Sanding with contact roller only without sanding insert! 1. Main switch on (wait until digital readout lights up) 2. Compressed air on. Attention! 1 Check: 2 Sanding insert removed? Abrasive belt fitted correctly? (Observe running direction) Contact roller adjusted? Fill Block fastened? Abrasive belt tensioned? Green control light for limit switch is on when: Emergency stop buttons OK Belt over-travel switches OK Compressed air OK Abrasive belt tensioned OK Limit switch Doors Interlocks OK Optimat SBE 109 K 6 - 19 Operation 3. Adjust for workpiece thickness (i.e. 20 mm / 0,787 inch) 4. Operate joystick until digital readout shows 20 mm.(0,787 inch) 5. Operate joystick. Select feed speed 1. Green control light lights up. 5. Start sanding head. Operate start button. 7. Switch on dust extraction. Start Optimat SBE 109 K 6 - 20 Operation 8. 9. Place workpiece on conveyorbelt and feed through machine. Speed 2 Machine outfeed area 2 Remove workpiece 10. Check the workpiece. 11. If workpiece is ok, 2nd speed can be selected. Optimat SBE 109 K 6 - 21 Operation 6.4.3 Combi-Sanding Sanding with contact roller and sanding pad. 1. Main switch on (wait until digital readout lights up) 2. Compressed air on Check: Is sanding insert pushed in? Abrasive belt fitted correctly? (Observe running direction) 1 2 Contact roller levelled to sanding pad? Abrasive belt tensioned OK Doors Interlocks OK Optimat SBE 109 K 6 - 22 Operation Green control light for limit switch is on when: Emergency stop buttons OK Belt over-travel switches OK Compressed air OK Abrasive belt tensioned OK Doors Interlocks OK Endschalter Optimat SBE 109 K 6 - 23 Operation 3. Adjust for workpiece thickness (i.e. 20 mm / 0,787 inch) 4. Operate joystick until digital readout indicates 20 mm (0,787 inch) 5. Operate joystick. Select feed speed 1. Green control light lights up. 6. Start sanding head. Operate start button. 7. Switch on dust extraction. 8. Place workpiece on conveyorbelt and feed through machine 9. Machine outfeed area 2 Remove workpiece Start 10. Check the workpiece. 11. If the workpiece is ok, then select 2nd feed speed Optimat SBE 109 K 6 - 24 Operation 6.5 Stopping of Machine 1. Remove workpieces from the machine. 2. Operate stop button. Stop abrasive belt drive and conveyorbelt drive. 3. Main switch and compressed air supply valve may only be operated, if the abrasive belt has come to a standstill, as otherwise the abrasive belt is no longer controlled. Optimat SBE 109 K Stop 6 - 25 Operation 6.6 Changing of Abrasive belt. Safety Warning. No fire, open light or smoking in case of risk of fire and explosion due to dust. 1. Remove workpieces from the machine 2. Stop drive motor (operate stop button) 3. Switch off dust extraction Stop Safety Warning Please note that parts remaining in the machine can be a risk even after switching off the drive motor. • Danger from the sanding head • Danger of ‘pinching’ in conveyorbelt feed area Risk of stored Energy Wait until the machine has come to a complete stop and there are no workpieces in the machine. • Only then open the door on the belt changing side Risk of pinch points 4. Lower feed table. A value of at least 20 mm will make belt changing easier. Optimat SBE 109 K 6 - 26 Operation 5. Release abrasive belt 6. Release Fill Block Clamping lever. 7. Pull out Fill Block. 8. Remove abrasive belt Optimat SBE 109 K Belt tension 6 - 27 Operation Place new abrasive belt carefully around the contact roller, idle roller and tension roller. (Be careful of the sanding insert 1 and belt running switch 2) running direct. 9. 2 1 Attention! Observe running direction of abrasive belt (see direction of arrow). Sanding direction is ‘Against the feed’. Attention! Keep distance to belt running switch. appr.10mm 0,394 inch Optimat SBE 109 K 6 - 28 Operation Belt Tension 10. Tension abrasive belt Attention! Surface on Fill Block and support surface on frame: • Always to be cleaned Fill Block Clean surface on frame 11. Push in Fill Block, align and tighten clamping lever. Optimat SBE 109 K 6 - 29 Adjustments 7 Adjustments...................................2 7.1 Abrasive belt oscillation.............2 7.1.1 Sanding head – abrasive belt changing side ..............2 7.1.2 Abrasive belt – drive side ..3 7.2 Conveyorbelt tensioning ............5 7.3 V-belt tensioning .........................8 7.4 Setting up Thickness adjustment .................................11 7.5 Sanding inserts of different hardnesses ................................16 7.6 Sanding insert in use ...............16 Optimat SBE 109 K 7-1 Adjustments 7 Adjustments 7.1 Abrasive belt oscillation 7.1.1 Sanding head – abrasive belt changing side The abrasive belt oscillation system (tracking system) keeps the abrasive belt running centrally on the machine. The oscillation movement is brought about by a Photo Eye Light Scanner, solenoid operated air valve and an air cylinder. The Photo Eye has an integral time delay, to ensure that the system can cope with abrasive belts that have slightly damaged edges. Photo Eye Light scanner in main frame Optimat SBE 109 K If the abrasive belt moves too far, the over-travel limit switch switches off the motor. Abrasive belt oscillation and over-travel limit switch 7-2 Adjustments 7.1.2 Abrasive belt – drive side The abrasive belts can have running differences depending on the supplier. 3 The abrasive belt oscillation can be adjusted, so that each abrasive belt will get a stable running movement. 2 • • 2. 3. Cylinder Tension roller Centre position Tension drum The centre position of the tension drum is adjusted with the mounting block (1) of the cylinder (2). 2 The mounting block can be moved to the left or right by releasing the bolt (3). This will modify the centre point, about which the tension roller will oscillate. 1 3 Optimat SBE 109 K Simultaneous moving towards both sides 7-3 Adjustments The cylinder (2) moves the tension roller (4) either to the left or right hand side. Restrictors (5) control the speed of the piston, by regulating the airflow. Restrictors (5) Restictor (5) 4 Oscillation Valve Adjustment of the restrictors should be made so that the piston is moving smoothly both ways, without slamming to the end of its stoke. Optimat SBE 109 K 2 7-4 Adjustments 7.2 Conveyorbelt tensioning The conveyorbelt tensioning is to be checked at regular intervals and re-tensioned if necessary to prevent the conveyorbelt slipping on the drive drum. Attention! The main switch has to be switched off and locked when adjusting the conveyorbelt. Risk of pinch points 1. Remove workieces from the machine. 2. Stop conveyorbelt. Stop abrasive belt drive. Operate stop-button. 3. Stop Remove cover. Cover Optimat SBE 109 K 7-5 Adjustments 4. Loosen lock nut and tighten conveyorbelt with tensioning nut. Release lock nut looser tighter 5. Select feed speed 1 for checking of tracking. 6. Observe conveyorbelt tracking. 7. Undo locknut and re-tension conveyorbelt with tension screw. Undo locknut loosen Optimat SBE 109 K tighten 7-6 Adjustments 8. Stop feed. Stop 9. If the conveyorbelt is mistracking, correct by adjusting the tension at the left or right. 10. Repeat points 4 to 8 until the conveyorbelt tracking is correct again. 11. Replace the cover. Cover Optimat SBE 109 K 7-7 Adjustments 7.3 V-belt tensioning The V belt tension is to be checked at regular intervals (50 operating hours) and re-tensioned if necessary in order to avoid slipping of the Vbelt on the V-belt pulley. Replace worn V-belts. 1. Remove workpieces from the machine. 2. Stop feed. Stop abrasive belt drive. Operate stop button. Stop 3. Main switch in Off- position, and lock in the off position. Optimat SBE 109 K 7-8 Adjustments 4. Open the door on the drive side. 5. Release four counter nuts on bottom of motor. 6. Move the motor down with the 4 tension nuts to tension the V-belts. Optimat SBE 109 K 7-9 Adjustments appr.12mm 7. The correct V-belt tension is when the belts can be deflected by approximately 12 mm /0,5 inch between the V-belt pulleys. 8. Tighten the locking nuts securing the motor. Optimat SBE 109 K 7 - 10 Adjustments 7.4 Setting up Thickness adjustment This adjustment should only be carried out by an electrician. Electrical Hazard If the sanded dimension does not agree with the value of the digital readout, the thickness adjustment and digital readout need to be set up. 1. Stop feed. Stop abrasive belt drive. Operate stop button. 2. Open the door on the abrasive belt changing side and put on a grit size 150. (see chapter abrasive belt change) 3. Select a flat workpieces of 20 mm / 0,787 inch thickness, approx. 500 mm/ 20 inch long and 300 mm / 12 inch wide. Stop 500mm 2X 20mm 300mm Optimat SBE 109 K 7 - 11 Adjustments 4. The sanding insert must be inserted and the contact roller must be retracted. 5. Joystick down. The feed table moves down. Lower the table so far so that the distance between the abrasive belt and conveyorbelt is larger than 20 mm /0.787inch. 6. Push the workpiece on the left hand side of the feed table underneath the sanding head and pressure rollers. 7. Lift joystick carefully, until the workpiece just touches the abrasive belt. 8. In order to move the abrasive belt. Release motor brake. Optimat SBE 109 K larger 20mm 7 - 12 Adjustments 9. The abrasive belt must be drawn over the workpiece by turning the tension roller by hand. Only moderate force is needed. 10. Open the door on the drive side. 11. Unlock the set screw locking the axel of the encoder to the table spindle. Lower the encoder. Optimat SBE 109 K 7 - 13 Adjustments 12. Adjust the digital LED to the required value by turning the encoder shaft. 13. Re-install the encoder, and tighten the set screw. 14. Joystick down. Feed table lowers. Remove workpiece. Optimat SBE 109 K 7 - 14 Adjustments Attention! The motor brake is to be activated after this procedure. If it is not the abrasive belt mainmotor cannot be started. A new adjustment may become necessary, if an abrasive belt of a different make is fitted, as different makes can have thickness variations. Optimat SBE 109 K 7 - 15 Adjustments 7.5 Sanding inserts of felt different hardnesses The sanding insert is available with felts of a different hardness. • Medium hard felt (0,5) • Hard felt (0,68) graphite 7.6 Sanding insert in use If narrow rails and large surface workpieces are sanded frequently, the use of separate sanding inserts is recommended. P100 or P120 Narrow rails will eventually damage the graphite surface, and this may otherwise cause lines when sanding wider parts. Graphite surface shows ‘tracking lines’. Optimat SBE 109 K 7 - 16 Care and Maintenance 8 Care and Maintenance ................2 8.1 Lubrication ...................................2 8.1.1 Drive motor..........................2 8.1.2 Motorised gearboxes .........3 8.1.3 Table Spindles ....................3 8.1.4 Roller chain..........................4 8.2 Cleaning .......................................5 8.2.1 Dust on Rollers....................5 8.2.2 Dust on conveyorbelt .........6 8.2.3 Dust on sanding pad ..........6 8.2.4 Photo Eye – Light Scanner..................7 8.2.5 Pressure regulator..............7 8.3 Care..............................................8 8.3.1 Conveyorbelt .......................8 Optimat SBE 109 K 8-1 Care and Maintenance 8 Care and Maintenance 8.1 Lubrication Only proper maintenance ensures the correct performance of the Wide Belt Sander Danger! The main switch is to locked in the Offposition when carrying out maintenance work. 8.1.1 Drive motor The roller bearings of the drive motor for the sanding head are to re-filled with new lithium based grease, Type K3N according to DIN 51825 with consistence 3 after 10.000 operating hours. Maintenance of brakes A disc brake is installed in the drive motor. The brake linings are to be replaced if they cease to function correctly. This maintenance should only be carried out by an electrician. Optimat SBE 109 K 8-2 Care and Maintenance 8.1.2 Motorised gearboxes The motorised gearboxes for the conveyor drive and for the table height adjustment are factory filled with long life oil for maintenance-free operation. Geared motor for thickness adjustment Feed geared motor 8.1.3 Table Spindles The threaded spindles can be clean and greased if necessary. All hose clamps / jubiliee clips are to be released for this. Lubrication interval is once per year with • • • • • Aral grease HL 2 BP Energrease LS 2 Esso Beacon 2 Mobil Mobilux grease No.2 Shell Alvania grease 2 Optimat SBE 109 K 8-3 Care and Maintenance 8.1.4 Roller chain The height adjustment chain is to cleaned monthly and inspected. All other bearings points are equipped with a long life lubrication Optimat SBE 109 K 8-4 Care and Maintenance 8.2 Cleaning Only proper maintenance ensures the correct performance of the Wide Belt Sander No smoking Danger! The main switch is to locked in the Offposition when carrying out maintenance work. The machine has to be cleaned of dust every day. Danger The cleaning of the machine may not be done with compressed air. Risk of injury by parts being blown around 8.2.1 Dust on Rollers A build up of dust will cause an imbalance on the rollers. Consequence: • Vibration in the machine • ‘Thumping’ of abrasive belts • Marks on the workpieces Remove dust on the front sides of the drums and pressure rollers The front sides of the contact roller, tension drum, idle roller and pressure rollers have to be cleaned carefully. Optimat SBE 109 K 8-5 Care and Maintenance 8.2.2 Dust on conveyorbelt If the conveyorbelt is dusty parts may slip and not be transported through the machine correctly. Dirty pressure rollers can cause scratches and drag marks. Clean the conveyorbelt and pressure rollers daily. Conveyorbelt Pressure rollers 8.2.3 Dust on sanding pad Check the sanding pad at least once a day. Check the graphite for damage. Clean sanding insert from dust. Check sanding insert Clean sanding insert Check for damages. Optimat SBE 109 K 8-6 Care and Maintenance 8.2.4 Photo Eye – Light Scanner The Photo Eye is used to sense the position of the abrasive belt, and control its oscillation. • Clean daily. • clean when changing the abrasive belt Photo Eye Clean Photo Eye from this side Checking the Photo Eye • Cover the lens with thick paper Effect: The cylinder moves the tension roller. 8.2.5 Pressure regulator Check the container of the compressed air filter daily for water. Drain when necessary. An additional water separator has to fitted if there is excessive water in the compressed air system. Drain valve Optimat SBE 109 K 8-7 Care and Maintenance 8.3 Care Only proper maintenance ensures the correct performance of the Wide Belt Sander Danger! The main switch is to locked in the Offposition when carrying out maintenance work. 8.3.1 Conveyorbelt In order to prevent hardening of the conveyorbelt, it has to be protected against direct exposure to UV-radiation, artificial light, and influence of oils, grease, chemicals (lacquer mist) and ozone. If the belt is not used, it should be covered with plates impervious to light at the infeed and outfeed area of the machine. The surface of the belt is cleaned with a clean cloth, moistened with washing-up liquid or spirit. No fire, open light and smoking due to fire and explosion risk when using combustible cleaning material. Optimat SBE 109 K 8-8 Faults 9 Faults ................................................................................................................................2 9.1 Troubleshooting ...........................................................................................................2 Optimat SBE 109 K 9-1 Faults 9 Faults 9.1 Troubleshooting Even when following the operating instructions, a fault can still occur, affecting the machine performance or function. The following table should help to troubleshoot more quickly. Faults Possible Cause Action Drive motors do not start Emergency stop button pushed in. Pull out Emergency Stop button. Compressed air supply missing or shut-off valve not opened Switch on compressed air Main switch in off-position Turn Main switch to On-position Motor protection thermal Re-set motor protection thermal overload triggered after overload overload manually. Machine switches off during sanding Abrasive belt drive motor does not start or switches off again immediately Optimat SBE 109 K Abrasive belts not tensioned Tension abrasive belt Doors open Close doors Air pressure or volume too low, pipe cross-section too small Check air supply or use larger cross section Cartridge in air inlet filter is dirty Clean cartridge or exchange Belt over-travel limit switch is operated, belt was not placed properly De-tension belt and place it in the correct position Abrasive belt is too wide and constantly activates the overtravel limit switch Use the right size abrasive belts Abrasive belt is too long, belt rupture limit switch is operated Use the right size abrasive belts 9-2 Faults Fault Abrasive belt drive motor or abrasive belt stop during sanding Possible cause Action Belt rupture limit switch has not been adjusted correctly and is therefore operated Adjust switch Belt rupture limit switch is operated, as belt is not fitted or not tensioned Place abrasive belt and tension Drive motor is overloaded, as stock removal is excessive Reduce stock removal Feed speed is adjusted too high Reduce feed speed in relation to the workpiece width Abrasive belt tears during operation Optimat SBE 109 K Abrasive belt worn or abrasive belt with a too fine grit is being used Use new belt or coarser belt V-belts do not transmit drive correctly, as they are loose or worn V-belts to be tensioned or renewed Main switch was brought into off- Wait for the machine to come to position before machine came to a complete stop before switching complete stop Main switch off. Belt was damaged during loading, edge was ripped before Damaged belts should not be used Pneumatic belt tension too high Reduce tension pressure Belt joint was badly glued Replace the abrasive belt Inconsistent air pressure supply The machine needs a constant air pressure supply Abrasive belt oscillation system has failed Check the oscillation system 9-3 Faults Fault Possible cause Action Abrasive belt oscillation system fails Air pressure or air volume is too low for control Check, ensure consistent 6 bar is fed to the machine. Pressure regulator is defective Check regulator, and replace if necessary Photo eye Light sensor defective Check and clean light sensor, or dirty replace if necessary Feed drive switches off Workpiece surface has been sanded too much Workpiece surface has been sanded too little Optimat SBE 109 K Solenoid valve is defective, Replace solenoid valve Air cylinder is leaking air Replace cylinder or seals Safety switch bar has been operated by workpiece or by hand Check function Drive motor was overloaded by excessive stock removal Reduce feed speed or stock removal Feed speed too slow Increase feed speed Abrasive belt grit size too rough Use a finer abrasive belt Sanding pressure too high Reduce sanding pressure Feed speed too fast Reduce feed speed Abrasive belt grit size too fine Use a coarser abrasive belt 9-4 Faults Fault Possible Cause Action Sanded surface shows marks in line with the feed direction Abrasive belt is partly worn or clogged with sanding dust Replace abrasive belt Felt or graphite of sanding pad is Replace or dress felt and damaged in places graphite Abrasive belt is wavy, was not de-tensioned after use Replace abrasive belt, and detension when not in use Abrasive belt tension too high, creases occur under high humidity conditions Reduce pressure Belt joint is too thick or free of grit Use different abrasive belt Abrasive belt is ‘thumping’ possibly due to an imbalance in the contact roller or idle roller Check contact roller, clean idle roller and check for possible bearing problems Sanded surface shows transverse marks at irregular intervals Workpieces are slipping on the conveyorbelt Clean conveyorbelt. Check machine adjustment. Re-tension belt Workpieces stop in the machine Workpieces are too short. ‘Butt’ feed pieces end to end Machine adjustment incorrect Check and correct Workpiece thickness does not correspond to machine LED setting Adjust feed table by operating the height adjustment Sanded surface shows marks across the direction of the feed Optimat SBE 109 K 9-5 Faults Fault Possible cause Action Workpieces stop in the machine Pressure of contact roller or sanding pad too excessive Increase height of contact roller or sanding pad Conveyorbelt is dusty and therefore smooth Clean conveyorbelt The infeed and outfeed ends of the workpieces have been sanded excessively Contact roller or sanding pad is et too low Raise contact roller or sanding pad The infeed and outfeed ends of the workpieces have been sanded insufficiently Contact roller or sanding pad is set too high Lower contact roller or sanding pad Right or left hand edge of workpiece has been sanded too much Contact roller or sanding pad is not parallel to the upper pressure rollers Adjust contact roller or sanding pad on one side Felt and graphite of sanding pad are worn in the Replace and dress felt and graphite Contact roller or sanding pad is not parallel to the upper pressure rollers Adjust contact roller or sanding pad on one side Workpiece is thinner on longitudinal edges Replace and dress felt and graphite Right and left hand edge of workpiece has been sanded too little If you cannot solve problems locally, please contact our Service Department. Optimat SBE 109 K 9-6 Appendix 10. Appendix • Installation drawing • Pneumatic dokumentation • Spare parts lists • Electrical documentation Optimat SBE 109 K 10 - 1 Ersatzteilliste / Spare part list ┌──────────────────────┬───────────────────────────────────────────────────────────────────────────┬───────────────┐ │ Gebr. Bütfering GmbH │ ─ Ersatzteilliste / spare part list │ │ │ Maschinenfabrik │ Zu Ersatzteilplan : 123158 │ Blatt 1 │ │ │ in addition to spare part plan : 123158 │ page 1 │ ├──────────────────────┴───────────────────────────────────────────────────────────────────────────┴───────────────┤ │ Für Artikel : Schleifmaschine, Optimat SBE 109 K │ │ for part : Sanding machine, Optimat SBE 109 K │ │ │ │ Baugruppe : Maschinenunterteil, Optimat SBE 109 K │ │ subpart : Machine sub assembly, Optimat SBE 109 K │ ├────┬───────┬─────────────────────────────────────────────────────────────────────────────────────────┬───────────┤ │Pos.│Art.Nr.│ Bezeichnung │ Anzahl │ │pos.│part No│ description │ quantity │ ├────┼───────┼─────────────────────────────────────────────────────────────────────────────────────────┼───────────┤ │ 1 │ 10057 │ Kugelhahn, QH 1/4", zur Druckluft Absperrung am Maschineneingang. │ 1 │ ├────┼───────┼─────────────────────────────────────────────────────────────────────────────────────────┼───────────┤ │ │ 10057 │ Pneumatic-stoppage, type: QH 1/4. │ 1 │ ├────┼───────┼─────────────────────────────────────────────────────────────────────────────────────────┼───────────┤ │ 2 │ 10234 │ Manometer, 0 - 10 bar, G 1/8", Dm 40 mm, │ 1 │ ├────┼───────┼─────────────────────────────────────────────────────────────────────────────────────────┼───────────┤ │ │ 10234 │ Pressure gauge, 0 - 10 bar, G 1/8", diam. 40 mm, │ 1 │ ├────┼───────┼─────────────────────────────────────────────────────────────────────────────────────────┼───────────┤ │ 3 │ 62537 │ Filterregler 40, 0.3 - 7.0 bar, G 1/4" B07-201-M3KG, Norgren: 958101 │ 1 │ ├────┼───────┼─────────────────────────────────────────────────────────────────────────────────────────┼───────────┤ │ │ 62537 │ Filter regulator 40, 0.3 - 7.0 bar, G 1/4", B07-201-M3KG, Norgren 958101 │ 1 │ ├────┼───────┼─────────────────────────────────────────────────────────────────────────────────────────┼───────────┤ │ 4 │ 62540 │ Befestigung mit Mutter 18-999-444, Norgren │ 1 │ ├────┼───────┼─────────────────────────────────────────────────────────────────────────────────────────┼───────────┤ │ │ 62540 │ Mounting nut, 18-999-444, Norgren │ 1 │ ├────┼───────┼─────────────────────────────────────────────────────────────────────────────────────────┼───────────┤ │ │ │ │ │ │ │ │ │ │ │ │ │ │ │ │ │ │ │ │ │ │ │ │ │ │ │ │ │ │ │ │ │ │ │ │ │ │ │ │ │ │ │ │ │ │ │ │ │ │ │ │ │ │ │ │ │ │ │ │ │ │ │ │ │ │ │ │ │ │ │ │ │ │ │ │ │ │ │ │ │ │ │ │ │ │ │ │ │ │ │ │ │ │ │ │ │ │ │ │ │ │ │ │ │ │ │ │ │ │ │ │ │ │ │ │ │ │ │ │ │ │ │ │ │ │ │ │ │ │ │ │ │ │ │ │ │ │ │ │ ├────┴───────┴─────────────────────────────────────────────────────────────────────────────────────────┴───────────┤ │ Verschleißteile sind mit einem * vor der Artikelnummer gekennzeichnet, Ausgedruckt von : Dreier V-1.9 │ │ wearing parts are signed with a * in front of the part no. printed by : Dreier V-1.9 │ └──────────────────────────────────────────────────────────────────────────────────────────────────────────────────┘ Ersatzteilliste / Spare part list ┌──────────────────────┬───────────────────────────────────────────────────────────────────────────┬───────────────┐ │ Gebr. Bütfering GmbH │ ─ Ersatzteilliste / spare part list │ │ │ Maschinenfabrik │ Zu Ersatzteilplan : 123148 │ Blatt 2 │ │ │ in addition to spare part plan : 123148 │ page 2 │ ├──────────────────────┴───────────────────────────────────────────────────────────────────────────┴───────────────┤ │ Für Artikel : Schleifmaschine, Optimat SBE 109 K │ │ for part : Sanding machine, Optimat SBE 109 K │ │ │ │ Baugruppe : Maschinenoberteil,, Optimat SBE 109 K │ │ subpart : Machine upper frame, Optimat SBE 109 K │ ├────┬───────┬─────────────────────────────────────────────────────────────────────────────────────────┬───────────┤ │Pos.│Art.Nr.│ Bezeichnung │ Anzahl │ │pos.│part No│ description │ quantity │ ├────┼───────┼─────────────────────────────────────────────────────────────────────────────────────────┼───────────┤ │ 1 │ 11928 │ Deckelstütze, Typ: 1097-U1 │ 2 │ ├────┼───────┼─────────────────────────────────────────────────────────────────────────────────────────┼───────────┤ │ │ 11928 │ Door stabilizer, 1097-U1, 215 mm │ 2 │ ├────┼───────┼─────────────────────────────────────────────────────────────────────────────────────────┼───────────┤ │ 2 │ 11966 │ Knebelgriff mit Gehäuse, 1000-U9, einschraubbar, │ 1 │ ├────┼───────┼─────────────────────────────────────────────────────────────────────────────────────────┼───────────┤ │ │ 11966 │ T-handle with housing, 1000-U9, │ 1 │ ├────┼───────┼─────────────────────────────────────────────────────────────────────────────────────────┼───────────┤ │ 3 │ 11973 │ Zunge, 1000-13, │ 2 │ ├────┼───────┼─────────────────────────────────────────────────────────────────────────────────────────┼───────────┤ │ │ 11973 │ Door latch, 1000-13, │ 2 │ ├────┼───────┼─────────────────────────────────────────────────────────────────────────────────────────┼───────────┤ │ 4 │ 11981 │ Zunge 1000- 53 │ 2 │ ├────┼───────┼─────────────────────────────────────────────────────────────────────────────────────────┼───────────┤ │ │ 11981 │ Door latch 1000-53 │ 2 │ ├────┼───────┼─────────────────────────────────────────────────────────────────────────────────────────┼───────────┤ │ 5 │ 11988 │ Gehäuse mit Mutter, 1000-U 51 │ 3 │ ├────┼───────┼─────────────────────────────────────────────────────────────────────────────────────────┼───────────┤ │ │ 11988 │ Door lock housing with lock nut, 1000-U51 │ 3 │ ├────┼───────┼─────────────────────────────────────────────────────────────────────────────────────────┼───────────┤ │ 6 │ 11990 │ Betätigungsdorn, 1000 - U 5 │ 3 │ ├────┼───────┼─────────────────────────────────────────────────────────────────────────────────────────┼───────────┤ │ │ 11990 │ Operating thorn, 1000 - U 5. │ 3 │ ├────┼───────┼─────────────────────────────────────────────────────────────────────────────────────────┼───────────┤ │ 7 │ 53107 │ Scharnier-Anschraub, Stift mit Nut Best.Nr: 243-9104, Öffnungswinkel 120° │ 6 │ ├────┼───────┼─────────────────────────────────────────────────────────────────────────────────────────┼───────────┤ │ │ 53107 │ Hinge │ 6 │ ├────┼───────┼─────────────────────────────────────────────────────────────────────────────────────────┼───────────┤ │ │ │ │ │ │ │ │ │ │ │ │ │ │ │ │ │ │ │ │ │ │ │ │ │ │ │ │ │ │ │ │ │ │ │ │ │ │ │ │ │ │ │ │ │ │ │ │ │ │ │ │ │ │ │ │ │ │ │ │ │ │ │ │ │ │ │ │ │ │ │ │ │ │ │ │ │ │ │ │ ├────┴───────┴─────────────────────────────────────────────────────────────────────────────────────────┴───────────┤ │ Verschleißteile sind mit einem * vor der Artikelnummer gekennzeichnet, Ausgedruckt von : Dreier V-1.9 │ │ wearing parts are signed with a * in front of the part no. printed by : Dreier V-1.9 │ └──────────────────────────────────────────────────────────────────────────────────────────────────────────────────┘ Ersatzteilliste / Spare part list ┌──────────────────────┬───────────────────────────────────────────────────────────────────────────┬───────────────┐ │ Gebr. Bütfering GmbH │ ─ Ersatzteilliste / spare part list │ │ │ Maschinenfabrik │ Zu Ersatzteilplan : 123167 │ Blatt 3 │ │ │ in addition to spare part plan : 123167 │ page 3 │ ├──────────────────────┴───────────────────────────────────────────────────────────────────────────┴───────────────┤ │ Für Artikel : Schleifmaschine, Optimat SBE 109 K │ │ for part : Sanding machine, Optimat SBE 109 K │ │ │ │ Baugruppe : Vorschubeinheit kompl., K11, 950mm .,400V, 50Hz,+460V, 60Hz, │ │ subpart : Conveyor table assembly, K11, 950mm, 400V, 50Hz, +460V, 60Hz │ ├────┬───────┬─────────────────────────────────────────────────────────────────────────────────────────┬───────────┤ │Pos.│Art.Nr.│ Bezeichnung │ Anzahl │ │pos.│part No│ description │ quantity │ ├────┼───────┼─────────────────────────────────────────────────────────────────────────────────────────┼───────────┤ │ 1 │ 11914 │ Kegelpfanne 19 - DIN 6319, Form D, für Schraube M 16 │ 1 │ ├────┼───────┼─────────────────────────────────────────────────────────────────────────────────────────┼───────────┤ │ │ 11914 │ Self aligning washer, DIN 6319-19-D │ 1 │ ├────┼───────┼─────────────────────────────────────────────────────────────────────────────────────────┼───────────┤ │ 2 │ 11916 │ Kugelscheibe 17 - DIN 6319, Form C, für Schraube M 16 │ 1 │ ├────┼───────┼─────────────────────────────────────────────────────────────────────────────────────────┼───────────┤ │ │ 11916 │ Self aligning washer, DIN 6319-17-C │ 1 │ ├────┼───────┼─────────────────────────────────────────────────────────────────────────────────────────┼───────────┤ │ 3 │ 11944 │ Druckstück DIN 6311- 32-S Dm12.1 │ 1 │ ├────┼───────┼─────────────────────────────────────────────────────────────────────────────────────────┼───────────┤ │ │ 11944 │ Push rod DIN 6311 - 32 - S │ 1 │ ├────┼───────┼─────────────────────────────────────────────────────────────────────────────────────────┼───────────┤ │ 4 │ 27106 │ Rillenkugellager, 6309-2RS1 LgDm 45, beidseitige Dichtscheibe │ 2 │ ├────┼───────┼─────────────────────────────────────────────────────────────────────────────────────────┼───────────┤ │ │ 27106 │ Bearing, 6309, sealed on both sides. grooved ball bearing, │ 2 │ ├────┼───────┼─────────────────────────────────────────────────────────────────────────────────────────┼───────────┤ │ 5 │ 52183 │ Schalldämpfer J-SD5-1/8-SB, Kurz mit Sechskant │ 1 │ ├────┼───────┼─────────────────────────────────────────────────────────────────────────────────────────┼───────────┤ │ │ 52183 │ Silencer J-SD5-1/8-SB │ 1 │ ├────┼───────┼─────────────────────────────────────────────────────────────────────────────────────────┼───────────┤ │ 6 │ │ Bitte bei Ersatzteilbestellung die auf dem Typenschild genannten Daten angeben !! │ 1 │ ├────┼───────┼─────────────────────────────────────────────────────────────────────────────────────────┼───────────┤ │ │ │ By spare part orders please state the data mentioned on the data plate !! │ 1 │ ├────┼───────┼─────────────────────────────────────────────────────────────────────────────────────────┼───────────┤ │ 7 │ 62273 │ Paßfeder A 8 x 7 - 100 DIN 6885/1 │ 1 │ ├────┼───────┼─────────────────────────────────────────────────────────────────────────────────────────┼───────────┤ │ │ 62273 │ Feather key A 8 x 7 - 100 │ 1 │ ├────┼───────┼─────────────────────────────────────────────────────────────────────────────────────────┼───────────┤ │ 8 │ 70978 │ Hülsenlager, Kugellager YAT 206 dm 30 │ 2 │ ├────┼───────┼─────────────────────────────────────────────────────────────────────────────────────────┼───────────┤ │ │ 70978 │ Ball bearing YAT 206, Ø 30, │ 2 │ ├────┼───────┼─────────────────────────────────────────────────────────────────────────────────────────┼───────────┤ │ 9 │ 70979 │ Gehäuse für Lager YAT 206 dm 30 │ 2 │ ├────┼───────┼─────────────────────────────────────────────────────────────────────────────────────────┼───────────┤ │ │ 70979 │ Housing for ball bearing YAT 206, PFD 62 │ 2 │ ├────┼───────┼─────────────────────────────────────────────────────────────────────────────────────────┼───────────┤ │ 10 │ 74864 │ Trommel mtlg. Dm 115 - 982 EASY 950, Vorschubantrieb │ 1 │ ├────┼───────┼─────────────────────────────────────────────────────────────────────────────────────────┼───────────┤ │ │ 74864 │ Drum, Ø 115 - 982, Drive drum for conveyor belt │ 1 │ ├────┼───────┼─────────────────────────────────────────────────────────────────────────────────────────┼───────────┤ │ 11 │ 74871 │ Rolle Dm 110 - 1008 EASY 950, Gurtspanntrommel │ 1 │ ├────┼───────┼─────────────────────────────────────────────────────────────────────────────────────────┼───────────┤ │ │ 74871 │ Roller Ø 110 - 1008, take-up pulley │ 1 │ ├────┼───────┼─────────────────────────────────────────────────────────────────────────────────────────┼───────────┤ ├────┴───────┴─────────────────────────────────────────────────────────────────────────────────────────┴───────────┤ │ Verschleißteile sind mit einem * vor der Artikelnummer gekennzeichnet, Ausgedruckt von : Dreier V-1.9 │ │ wearing parts are signed with a * in front of the part no. printed by : Dreier V-1.9 │ └──────────────────────────────────────────────────────────────────────────────────────────────────────────────────┘ Ersatzteilliste / Spare part list ┌──────────────────────┬───────────────────────────────────────────────────────────────────────────┬───────────────┐ │ Gebr. Bütfering GmbH │ ─ Ersatzteilliste / spare part list │ │ │ Maschinenfabrik │ Zu Ersatzteilplan : 123167 │ Blatt 4 │ │ │ in addition to spare part plan : 123167 │ page 4 │ ├──────────────────────┴───────────────────────────────────────────────────────────────────────────┴───────────────┤ │ Für Artikel : Schleifmaschine, Optimat SBE 109 K │ │ for part : Sanding machine, Optimat SBE 109 K │ │ │ │ Baugruppe : Vorschubeinheit kompl., K11, 950mm .,400V, 50Hz,+460V, 60Hz, │ │ subpart : Conveyor table assembly, K11, 950mm, 400V, 50Hz, +460V, 60Hz │ ├────┬───────┬─────────────────────────────────────────────────────────────────────────────────────────┬───────────┤ │Pos.│Art.Nr.│ Bezeichnung │ Anzahl │ │pos.│part No│ description │ quantity │ ├────┼───────┼─────────────────────────────────────────────────────────────────────────────────────────┼───────────┤ │ 12 │ 74929 │ Wegeventil, RW/O-3-1/8 . Stoesselventil, │ 1 │ ├────┼───────┼─────────────────────────────────────────────────────────────────────────────────────────┼───────────┤ │ │ 74929 │ Valve RW/0-3-1/8 │ 1 │ ├────┼───────┼─────────────────────────────────────────────────────────────────────────────────────────┼───────────┤ │ 13 │*74956 │ Transportgurt, 950 x 2045 mm, endlos, Karo Klein, 14 B, EPQ 3, Haerte: 40 │ 1 │ ├────┼───────┼─────────────────────────────────────────────────────────────────────────────────────────┼───────────┤ │ │*74956 │ Conveyor belt, 950 x 2045 mm, endless 14 B, EPQ 3, │ 1 │ ├────┼───────┼─────────────────────────────────────────────────────────────────────────────────────────┼───────────┤ │ 14 │ 75144 │ Zylinder, Pneumatik, Dm:100mm, Hub:10mm. einfachwirkend, │ 1 │ ├────┼───────┼─────────────────────────────────────────────────────────────────────────────────────────┼───────────┤ │ │ 75144 │ Cylinder Ø 100 mm, stroke 10 mm, │ 1 │ ├────┼───────┼─────────────────────────────────────────────────────────────────────────────────────────┼───────────┤ │ │ │ │ │ │ │ │ │ │ │ │ │ │ │ │ │ │ │ │ │ │ │ │ │ │ │ │ │ │ │ │ │ │ │ │ │ │ │ │ │ │ │ │ │ │ │ │ │ │ │ │ │ │ │ │ │ │ │ │ │ │ │ │ │ │ │ │ │ │ │ │ │ │ │ │ │ │ │ │ │ │ │ │ │ │ │ │ │ │ │ │ │ │ │ │ │ │ │ │ │ │ │ │ │ │ │ │ │ │ │ │ │ │ │ │ │ │ │ │ │ │ │ │ │ │ │ │ │ │ │ │ │ │ │ │ │ │ │ │ │ │ │ │ │ │ │ │ │ │ │ │ │ │ │ │ │ │ │ │ ├────┴───────┴─────────────────────────────────────────────────────────────────────────────────────────┴───────────┤ │ Verschleißteile sind mit einem * vor der Artikelnummer gekennzeichnet, Ausgedruckt von : Dreier V-1.9 │ │ wearing parts are signed with a * in front of the part no. printed by : Dreier V-1.9 │ └──────────────────────────────────────────────────────────────────────────────────────────────────────────────────┘ Ersatzteilliste / Spare part list ┌──────────────────────┬───────────────────────────────────────────────────────────────────────────┬───────────────┐ │ Gebr. Bütfering GmbH │ ─ Ersatzteilliste / spare part list │ │ │ Maschinenfabrik │ Zu Ersatzteilplan : 123160 │ Blatt 5 │ │ │ in addition to spare part plan : 123160 │ page 5 │ ├──────────────────────┴───────────────────────────────────────────────────────────────────────────┴───────────────┤ │ Für Artikel : Schleifmaschine, Optimat SBE 109 K │ │ for part : Sanding machine, Optimat SBE 109 K │ │ │ │ Baugruppe : Breitbandaggregat, K11, 109, Combi,SW..,..N-11.0,.., │ │ subpart : Abrasive belt assembly, K11, 109, Combi, SW..,..N-10.0,.., │ ├────┬───────┬─────────────────────────────────────────────────────────────────────────────────────────┬───────────┤ │Pos.│Art.Nr.│ Bezeichnung │ Anzahl │ │pos.│part No│ description │ quantity │ ├────┼───────┼─────────────────────────────────────────────────────────────────────────────────────────┼───────────┤ │ 1 │ 10027 │ Rückschlagventil, H-QS-6 │ 1 │ ├────┼───────┼─────────────────────────────────────────────────────────────────────────────────────────┼───────────┤ │ │ 10027 │ Check valve, H-QS-6 │ 1 │ ├────┼───────┼─────────────────────────────────────────────────────────────────────────────────────────┼───────────┤ │ 2 │ 10234 │ Manometer, 0 - 10 bar, G 1/8", Dm 40 mm, │ 1 │ ├────┼───────┼─────────────────────────────────────────────────────────────────────────────────────────┼───────────┤ │ │ 10234 │ Pressure gauge, 0 - 10 bar, G 1/8", diam. 40 mm, │ 1 │ ├────┼───────┼─────────────────────────────────────────────────────────────────────────────────────────┼───────────┤ │ 3 │ 11441 │ Druckfeder, in der Aggregatabstützung, Durchmesser 14 mm, Länge 20 mm. │ 1 │ ├────┼───────┼─────────────────────────────────────────────────────────────────────────────────────────┼───────────┤ │ │ 11441 │ Pressure spring in the head support, 14 mm dia., length 20 mm │ 1 │ ├────┼───────┼─────────────────────────────────────────────────────────────────────────────────────────┼───────────┤ │ 4 │ 11868 │ Keilriemenscheibe SPZ 4 x 90, f. Taper-Spannbuchse │ 1 │ ├────┼───────┼─────────────────────────────────────────────────────────────────────────────────────────┼───────────┤ │ │ 11868 │ V-belt pulley │ 1 │ ├────┼───────┼─────────────────────────────────────────────────────────────────────────────────────────┼───────────┤ │ 5 │ 11870 │ Keilriemenscheibe SPZ 4 x 112, f. Taper-Spannbuchse │ 1 │ ├────┼───────┼─────────────────────────────────────────────────────────────────────────────────────────┼───────────┤ │ │ 11870 │ V-belt pulley, SPZ 4 x 112, │ 1 │ ├────┼───────┼─────────────────────────────────────────────────────────────────────────────────────────┼───────────┤ │ 6 │ 12049 │ Doppelseitiges-Klebeband, 55 mm breit, für Schleifschuh-Bestückung. │ 3,108 │ ├────┼───────┼─────────────────────────────────────────────────────────────────────────────────────────┼───────────┤ │ │ 12049 │ adhesive tape 55 mm width │ 3,108 │ ├────┼───────┼─────────────────────────────────────────────────────────────────────────────────────────┼───────────┤ │ 7 │ 12109 │ Kugelgriff, GN 6337.3- 28-M12-N, verstellbar, │ 1 │ ├────┼───────┼─────────────────────────────────────────────────────────────────────────────────────────┼───────────┤ │ │ 12109 │ Kip handle, GN 6337.3-28-M12-N, adjustable │ 1 │ ├────┼───────┼─────────────────────────────────────────────────────────────────────────────────────────┼───────────┤ │ 8 │*12149 │ Filz 0.50 g/cm3 8 x 55 x 1030, einseitig klebend │ 1 │ ├────┼───────┼─────────────────────────────────────────────────────────────────────────────────────────┼───────────┤ │ │*12149 │ Felt 0.50, 8 x 55 x 1030 mm, │ 1 │ ├────┼───────┼─────────────────────────────────────────────────────────────────────────────────────────┼───────────┤ │ 9 │ 12207 │ Spannbuchse, Typ:1610, mit Nut, für Bohrung Dm 38 mm. │ 1 │ ├────┼───────┼─────────────────────────────────────────────────────────────────────────────────────────┼───────────┤ │ │ 12207 │ Taperlock for v-belt pulley │ 1 │ ├────┼───────┼─────────────────────────────────────────────────────────────────────────────────────────┼───────────┤ │ 10 │ 12210 │ Spannbuchse, Typ:2012, mit Nut, für Bohrung Dm 28 mm. │ 1 │ ├────┼───────┼─────────────────────────────────────────────────────────────────────────────────────────┼───────────┤ │ │ 12210 │ Taperlock for v-belt pulley │ 1 │ ├────┼───────┼─────────────────────────────────────────────────────────────────────────────────────────┼───────────┤ │ 11 │*12448 │ Keilriemen, LW 1800, SPZ, DIN 7753, │ 4 │ ├────┼───────┼─────────────────────────────────────────────────────────────────────────────────────────┼───────────┤ │ │*12448 │ V-belt, SPA 1800, profile: SPA, DIN 7753, │ 4 │ ├────┼───────┼─────────────────────────────────────────────────────────────────────────────────────────┼───────────┤ ├────┴───────┴─────────────────────────────────────────────────────────────────────────────────────────┴───────────┤ │ Verschleißteile sind mit einem * vor der Artikelnummer gekennzeichnet, Ausgedruckt von : Dreier V-1.9 │ │ wearing parts are signed with a * in front of the part no. printed by : Dreier V-1.9 │ └──────────────────────────────────────────────────────────────────────────────────────────────────────────────────┘ Ersatzteilliste / Spare part list ┌──────────────────────┬───────────────────────────────────────────────────────────────────────────┬───────────────┐ │ Gebr. Bütfering GmbH │ ─ Ersatzteilliste / spare part list │ │ │ Maschinenfabrik │ Zu Ersatzteilplan : 123160 │ Blatt 6 │ │ │ in addition to spare part plan : 123160 │ page 6 │ ├──────────────────────┴───────────────────────────────────────────────────────────────────────────┴───────────────┤ │ Für Artikel : Schleifmaschine, Optimat SBE 109 K │ │ for part : Sanding machine, Optimat SBE 109 K │ │ │ │ Baugruppe : Breitbandaggregat, K11, 109, Combi,SW..,..N-11.0,.., │ │ subpart : Abrasive belt assembly, K11, 109, Combi, SW..,..N-10.0,.., │ ├────┬───────┬─────────────────────────────────────────────────────────────────────────────────────────┬───────────┤ │Pos.│Art.Nr.│ Bezeichnung │ Anzahl │ │pos.│part No│ description │ quantity │ ├────┼───────┼─────────────────────────────────────────────────────────────────────────────────────────┼───────────┤ │ 12 │ 14478 │ Drossel-Rückschlagventil, GRLA-1/8-QS-6 │ 2 │ ├────┼───────┼─────────────────────────────────────────────────────────────────────────────────────────┼───────────┤ │ │ 14478 │ Throttle valve, GRLA-1/8-QS-6 │ 2 │ ├────┼───────┼─────────────────────────────────────────────────────────────────────────────────────────┼───────────┤ │ 13 │*21830 │ Gleitbelag, UK 20, 55 mm breit. Für Classic und ECO Maschinen. │ 2,06 │ ├────┼───────┼─────────────────────────────────────────────────────────────────────────────────────────┼───────────┤ │ │*21830 │ Graphite strip, 55 mm width, grade UK 20. │ 2,06 │ ├────┼───────┼─────────────────────────────────────────────────────────────────────────────────────────┼───────────┤ │ 14 │*22740 │ Schleifband Ho, 970x1900,K- 150,Papier endlos, Trockenschliff, Edelkorund, │ 1 │ ├────┼───────┼─────────────────────────────────────────────────────────────────────────────────────────┼───────────┤ │ │*22740 │ Abrasive belt, 970 x 1900 mm, grit size 150, │ 1 │ ├────┼───────┼─────────────────────────────────────────────────────────────────────────────────────────┼───────────┤ │ 15 │ 34219 │ Druckregler, 0.3 - 7.0 bar, │ 1 │ ├────┼───────┼─────────────────────────────────────────────────────────────────────────────────────────┼───────────┤ │ │ 34219 │ Pressure regulator, 0.3 - 7.0 bar, │ 1 │ ├────┼───────┼─────────────────────────────────────────────────────────────────────────────────────────┼───────────┤ │ 16 │ 34221 │ Rändelmutter für Druckregler aus Kunststoff │ 1 │ ├────┼───────┼─────────────────────────────────────────────────────────────────────────────────────────┼───────────┤ │ │ 34221 │ Locking ring for pressure regulator │ 1 │ ├────┼───────┼─────────────────────────────────────────────────────────────────────────────────────────┼───────────┤ │ 17 │ 52183 │ Schalldämpfer J-SD5-1/8-SB, Kurz mit Sechskant │ 2 │ ├────┼───────┼─────────────────────────────────────────────────────────────────────────────────────────┼───────────┤ │ │ 52183 │ Silencer J-SD5-1/8-SB │ 2 │ ├────┼───────┼─────────────────────────────────────────────────────────────────────────────────────────┼───────────┤ │ 18 │ 62346a│ Halter für Oszillationszylinder │ 1 │ ├────┼───────┼─────────────────────────────────────────────────────────────────────────────────────────┼───────────┤ │ │ 62346a│ Support for oszillation cylinder │ 1 │ ├────┼───────┼─────────────────────────────────────────────────────────────────────────────────────────┼───────────┤ │ 19 │ 63041 │ Wegeventil, Kipphebelventil (3/2) 2xM5 2x M 5, Ms vernickelt, Best.Nr: 61.005 │ 1 │ ├────┼───────┼─────────────────────────────────────────────────────────────────────────────────────────┼───────────┤ │ │ 63041 │ Rocking valve, (3/2) 2xM5, No.: 61.005 │ 1 │ ├────┼───────┼─────────────────────────────────────────────────────────────────────────────────────────┼───────────┤ │ 20 │ 67515 │ Drosselrückschlagventil, für Dm 6 mm, max 10 bar, │ 1 │ ├────┼───────┼─────────────────────────────────────────────────────────────────────────────────────────┼───────────┤ │ │ 67515 │ Throttle valve, for diam. 6 mm, max. pressure 10 bar, │ 1 │ ├────┼───────┼─────────────────────────────────────────────────────────────────────────────────────────┼───────────┤ │ 21 │ 68003 │ Nutmutter M 30 x 1.5 DIN 1804 St, (nicht selbstsichernd) │ 4 │ ├────┼───────┼─────────────────────────────────────────────────────────────────────────────────────────┼───────────┤ │ │ 68003 │ Groove nut, M30 x 1.5 DIN 1804 St │ 4 │ ├────┼───────┼─────────────────────────────────────────────────────────────────────────────────────────┼───────────┤ │ 22 │ 70978 │ Hülsenlager, Kugellager YAT 206 dm 30 │ 6 │ ├────┼───────┼─────────────────────────────────────────────────────────────────────────────────────────┼───────────┤ │ │ 70978 │ Ball bearing YAT 206, Ø 30, │ 6 │ ├────┼───────┼─────────────────────────────────────────────────────────────────────────────────────────┼───────────┤ ├────┴───────┴─────────────────────────────────────────────────────────────────────────────────────────┴───────────┤ │ Verschleißteile sind mit einem * vor der Artikelnummer gekennzeichnet, Ausgedruckt von : Dreier V-1.9 │ │ wearing parts are signed with a * in front of the part no. printed by : Dreier V-1.9 │ └──────────────────────────────────────────────────────────────────────────────────────────────────────────────────┘ Ersatzteilliste / Spare part list ┌──────────────────────┬───────────────────────────────────────────────────────────────────────────┬───────────────┐ │ Gebr. Bütfering GmbH │ ─ Ersatzteilliste / spare part list │ │ │ Maschinenfabrik │ Zu Ersatzteilplan : 123160 │ Blatt 7 │ │ │ in addition to spare part plan : 123160 │ page 7 │ ├──────────────────────┴───────────────────────────────────────────────────────────────────────────┴───────────────┤ │ Für Artikel : Schleifmaschine, Optimat SBE 109 K │ │ for part : Sanding machine, Optimat SBE 109 K │ │ │ │ Baugruppe : Breitbandaggregat, K11, 109, Combi,SW..,..N-11.0,.., │ │ subpart : Abrasive belt assembly, K11, 109, Combi, SW..,..N-10.0,.., │ ├────┬───────┬─────────────────────────────────────────────────────────────────────────────────────────┬───────────┤ │Pos.│Art.Nr.│ Bezeichnung │ Anzahl │ │pos.│part No│ description │ quantity │ ├────┼───────┼─────────────────────────────────────────────────────────────────────────────────────────┼───────────┤ │ 23 │ 70979 │ Gehäuse für Lager YAT 206 dm 30 │ 12 │ ├────┼───────┼─────────────────────────────────────────────────────────────────────────────────────────┼───────────┤ │ │ 70979 │ Housing for ball bearing YAT 206, PFD 62 │ 12 │ ├────┼───────┼─────────────────────────────────────────────────────────────────────────────────────────┼───────────┤ │ 24 │*74333 │ Schleifzunge, Filz 0.50, 950 Arb.Br. Ecomat SBE │ 1 │ ├────┼───────┼─────────────────────────────────────────────────────────────────────────────────────────┼───────────┤ │ │*74333 │ Sanding insert, felt 0.50 working 950 mm │ 1 │ ├────┼───────┼─────────────────────────────────────────────────────────────────────────────────────────┼───────────┤ │ 25 │*74334 │ Schleifzunge, Filz 0.68, 950 Arb.Br. Ecomat SBE │ 1 │ ├────┼───────┼─────────────────────────────────────────────────────────────────────────────────────────┼───────────┤ │ │*74334 │ Sanding insert, felt 0.68, working width 950 mm │ 1 │ ├────┼───────┼─────────────────────────────────────────────────────────────────────────────────────────┼───────────┤ │ 26 │ 74446 │ Dichtring, O-Ring dm 70 - 3 72 NBR 872 │ 1 │ ├────┼───────┼─────────────────────────────────────────────────────────────────────────────────────────┼───────────┤ │ │ 74446 │ Conical nipple Ø 70 - 3 │ 1 │ ├────┼───────┼─────────────────────────────────────────────────────────────────────────────────────────┼───────────┤ │ 27 │ 74852 │ E-Motor 11kW, 3510UpM, B3, KKO, 134M, WF 190-830V/50-60Hz,IP54, von Fa.Watt-Drive │ 1 │ ├────┼───────┼─────────────────────────────────────────────────────────────────────────────────────────┼───────────┤ │ │ 74852 │ Drive motor, 11kW, 3510 RPM, B3, KKO, 134M, 190-830V, 50-60Hz, IP54, │ 1 │ ├────┼───────┼─────────────────────────────────────────────────────────────────────────────────────────┼───────────┤ │ 28 │ 74901 │ Wegeventil Best-Bez:9982 MFH-5-1/8 24 V AC - OD m. Spule MSVW-24 AC 50/60 │ 1 │ ├────┼───────┼─────────────────────────────────────────────────────────────────────────────────────────┼───────────┤ │ │ 74901 │ Directional control valve MFH-5-1/8 │ 1 │ ├────┼───────┼─────────────────────────────────────────────────────────────────────────────────────────┼───────────┤ │ 29 │ 75177 │ Federbandstahl 65 x 1.0 - 1115 │ 2 │ ├────┼───────┼─────────────────────────────────────────────────────────────────────────────────────────┼───────────┤ │ │ 75177 │ Spring steel 65 x 1.0 - 1115 │ 2 │ ├────┼───────┼─────────────────────────────────────────────────────────────────────────────────────────┼───────────┤ │ 30 │*75182 │ Filz 0.68 g/cm3 8 x 55 x 1030, einseitig klebend │ 1 │ ├────┼───────┼─────────────────────────────────────────────────────────────────────────────────────────┼───────────┤ │ │*75182 │ Felt 0.68 g/cm3 8 x 55 - 1030 │ 1 │ ├────┼───────┼─────────────────────────────────────────────────────────────────────────────────────────┼───────────┤ │ │ │ │ │ │ │ │ │ │ │ │ │ │ │ │ │ │ │ │ │ │ │ │ │ │ │ │ │ │ │ │ │ │ │ │ │ │ │ │ │ │ │ │ │ │ │ │ │ │ │ │ │ │ │ │ │ │ │ │ ├────┴───────┴─────────────────────────────────────────────────────────────────────────────────────────┴───────────┤ │ Verschleißteile sind mit einem * vor der Artikelnummer gekennzeichnet, Ausgedruckt von : Dreier V-1.9 │ │ wearing parts are signed with a * in front of the part no. printed by : Dreier V-1.9 │ └──────────────────────────────────────────────────────────────────────────────────────────────────────────────────┘ Ersatzteilliste / Spare part list ┌──────────────────────┬───────────────────────────────────────────────────────────────────────────┬───────────────┐ │ Gebr. Bütfering GmbH │ ─ Ersatzteilliste / spare part list │ │ │ Maschinenfabrik │ Zu Ersatzteilplan : 123144 │ Blatt 8 │ │ │ in addition to spare part plan : 123144 │ page 8 │ ├──────────────────────┴───────────────────────────────────────────────────────────────────────────┴───────────────┤ │ Für Artikel : Schleifmaschine, Optimat SBE 109 K │ │ for part : Sanding machine, Optimat SBE 109 K │ │ │ │ Baugruppe : Dickenverstellung, K11, Optimat 109 K,400V,50Hz,230V,60Hz, Standard, │ │ subpart : Height adjustment assembly, K11, Optimat SBE 109 K │ ├────┬───────┬─────────────────────────────────────────────────────────────────────────────────────────┬───────────┤ │Pos.│Art.Nr.│ Bezeichnung │ Anzahl │ │pos.│part No│ description │ quantity │ ├────┼───────┼─────────────────────────────────────────────────────────────────────────────────────────┼───────────┤ │ 1 │ 11727 │ Kettenrad 1/2 Zoll, Z=19, Bo=20, NL=22, Dm=60, │ 4 │ ├────┼───────┼─────────────────────────────────────────────────────────────────────────────────────────┼───────────┤ │ │ 11727 │ Sprocket, 1/2 inch, Z=19, Bo=20, NL=22 , Dm=60, │ 4 │ ├────┼───────┼─────────────────────────────────────────────────────────────────────────────────────────┼───────────┤ │ 2 │ 16217a│ Spindelmutter, Tr 30 x 4 │ 4 │ ├────┼───────┼─────────────────────────────────────────────────────────────────────────────────────────┼───────────┤ │ │ 16217a│ spindle nut Tr 30 x 4, │ 4 │ ├────┼───────┼─────────────────────────────────────────────────────────────────────────────────────────┼───────────┤ │ 3 │ 17876 │ Faltenbalg, TH 59, schwarz, mit glatter Stulpe, │ 8 │ ├────┼───────┼─────────────────────────────────────────────────────────────────────────────────────────┼───────────┤ │ │ 17876 │ Rubber boot, TH 59, black, with smooth sleeve, │ 8 │ ├────┼───────┼─────────────────────────────────────────────────────────────────────────────────────────┼───────────┤ │ 4 │ 25122 │ Sechskantmutter M 20 x 1.5 DIN 439-B-04 verz., niedrige Form │ 8 │ ├────┼───────┼─────────────────────────────────────────────────────────────────────────────────────────┼───────────┤ │ │ 25122 │ hexagonal nut M 20 x 1.5 │ 8 │ ├────┼───────┼─────────────────────────────────────────────────────────────────────────────────────────┼───────────┤ │ 5 │ 25126a│ Spindel, Tr 30 x 4, │ 4 │ ├────┼───────┼─────────────────────────────────────────────────────────────────────────────────────────┼───────────┤ │ │ 25126a│ spindle, Tr 30 x 4, │ 4 │ ├────┼───────┼─────────────────────────────────────────────────────────────────────────────────────────┼───────────┤ │ 6 │ 62322a│ Halterung Ø50mm │ 8 │ ├────┼───────┼─────────────────────────────────────────────────────────────────────────────────────────┼───────────┤ │ │ 62322a│ Support Ø50mm │ 8 │ ├────┼───────┼─────────────────────────────────────────────────────────────────────────────────────────┼───────────┤ │ 7 │ 62436 │ Gleitlager 202425 BP25 Innen 20mm, Außen 24mm, Höhe 25mm, │ 16 │ ├────┼───────┼─────────────────────────────────────────────────────────────────────────────────────────┼───────────┤ │ │ 62436 │ plain bearing 202425 BP25 inside Ø 20mm, outside Ø24mm, │ 16 │ ├────┼───────┼─────────────────────────────────────────────────────────────────────────────────────────┼───────────┤ │ 8 │ 74999 │ Getriebemotor, MU.40 100/1 56 b/4 0.09kW, 14U/min, 230/400 V,50/60 Hz │ 1 │ ├────┼───────┼─────────────────────────────────────────────────────────────────────────────────────────┼───────────┤ │ │ 74999 │ Gearbox with motor MU.40 100/1 56 b/4 │ 1 │ ├────┼───────┼─────────────────────────────────────────────────────────────────────────────────────────┼───────────┤ │ 9 │ 75193 │ Einfach-Rollenkette 0.5 Z, 12.7 mm 7.75 l.W.,312 Gl.,DIN 8187,inkl.V-Gli │ 1 │ ├────┼───────┼─────────────────────────────────────────────────────────────────────────────────────────┼───────────┤ │ │ 75193 │ Chain 0.5 Z, 12.7 mm, 7.75 l.W., 312 Gl, │ 1 │ ├────┼───────┼─────────────────────────────────────────────────────────────────────────────────────────┼───────────┤ │ │ │ │ │ │ │ │ │ │ │ │ │ │ │ │ │ │ │ │ │ │ │ │ │ │ │ │ │ │ │ │ │ │ │ │ │ │ │ │ ├────┴───────┴─────────────────────────────────────────────────────────────────────────────────────────┴───────────┤ │ Verschleißteile sind mit einem * vor der Artikelnummer gekennzeichnet, Ausgedruckt von : Dreier V-1.9 │ │ wearing parts are signed with a * in front of the part no. printed by : Dreier V-1.9 │ └──────────────────────────────────────────────────────────────────────────────────────────────────────────────────┘ Ersatzteilliste / Spare part list ┌──────────────────────┬───────────────────────────────────────────────────────────────────────────┬───────────────┐ │ Gebr. Bütfering GmbH │ ─ Ersatzteilliste / spare part list │ │ │ Maschinenfabrik │ Zu Ersatzteilplan : 123145 │ Blatt 9 │ │ │ in addition to spare part plan : 123145 │ page 9 │ ├──────────────────────┴───────────────────────────────────────────────────────────────────────────┴───────────────┤ │ Für Artikel : Schleifmaschine, Optimat SBE 109 K │ │ for part : Sanding machine, Optimat SBE 109 K │ │ │ │ Baugruppe : Andruckelemente, K11, 109, Standard,, Optimat 109 K │ │ subpart : Pressure elements, K11, 109, Standard,, Optimat 109 K │ ├────┬───────┬─────────────────────────────────────────────────────────────────────────────────────────┬───────────┤ │Pos.│Art.Nr.│ Bezeichnung │ Anzahl │ │pos.│part No│ description │ quantity │ ├────┼───────┼─────────────────────────────────────────────────────────────────────────────────────────┼───────────┤ │ 1 │ 74384a│ Druckrolle Dm 50 x 3.0 x 1090 mm Einbaulaenge 1100 mm, │ 2 │ ├────┼───────┼─────────────────────────────────────────────────────────────────────────────────────────┼───────────┤ │ │ 74384a│ Roller Ø50 x 3.0 x 1090 │ 2 │ ├────┼───────┼─────────────────────────────────────────────────────────────────────────────────────────┼───────────┤ │ 2 │ 74652 │ Druckfeder FR= 4,682N/mm lo: 68.00 Dm 16 if 8.5 d 2.0 │ 4 │ ├────┼───────┼─────────────────────────────────────────────────────────────────────────────────────────┼───────────┤ │ │ 74652 │ Spring FR= 4,682N/mm lo: 68.00, Dm: 16, if: 8.5, d: 2.0 │ 4 │ ├────┼───────┼─────────────────────────────────────────────────────────────────────────────────────────┼───────────┤ │ 3 │ 74654 │ Halter fuer Rolle Ecomat 950 Schaltrolle fuer Ueberdickenschutz, │ 2 │ ├────┼───────┼─────────────────────────────────────────────────────────────────────────────────────────┼───────────┤ │ │ 74654 │ Support for roller │ 2 │ ├────┼───────┼─────────────────────────────────────────────────────────────────────────────────────────┼───────────┤ │ 4 │ 74655 │ Halter fuer Rolle Ecomat 950, Andruckrollen │ 2 │ ├────┼───────┼─────────────────────────────────────────────────────────────────────────────────────────┼───────────┤ │ │ 74655 │ Support for roller │ 2 │ ├────┼───────┼─────────────────────────────────────────────────────────────────────────────────────────┼───────────┤ ├────┴───────┴─────────────────────────────────────────────────────────────────────────────────────────┴───────────┤ │ Verschleißteile sind mit einem * vor der Artikelnummer gekennzeichnet, Ausgedruckt von : Dreier V-1.9 │ │ wearing parts are signed with a * in front of the part no. printed by : Dreier V-1.9 │ └─────────────────────────────────────────────────────────────────────────────────────────-─────────────────────────┘ Betriebs- und Wartungsanleitung Operating and maintenance manual EUSAS-Motor EUSAS-motor WATT EUSAS Motore WATT EUSAS motors BA Motore Betriebsanleitung für WATT EUSAS Motore Operating instructions for WATT EUSAS motors 1. Sicherheitshinweise 1. Safety Instructions Der Kunde ist verantwortlich für die fachgerechte Aufstellung des Antriebes. Bestätigte Eigenschaften der Antriebe sowie die Erfüllung eventueller Garantieansprüche bedingen die Einhaltung der Hinweise in dieser Betriebsanleitung. The user is responsible for correct installation of the drive unit. Drive unit properties can only be guaranteed and warranty claims considered if the instructions in this manual have been observed. Achten Sie darauf, niemals beschädigte Produkte in Betrieb zu nehmen! Never use damaged products. Lesen Sie die Betriebsanleitung sorgfältig, bevor Sie mit Aufstell-, Montage- oder Wartungsarbeiten beginnen. Please read the operating instructions carefully before starting any installation, assembly or maintenance work. Beachten Sie unbedingt die in der Betriebsanleitung enthaltenen Sicherheitshinweise, die wie folgt gekennzeichnet sind: Follow the safety instructions in the manual at all times. For easy identification they are marked as follows: Warnung vor elektrischer Gefahr, z.B. Bei Arbeiten unter Spannung. Warning of electrical danger, e.g. working with live machines. Warnung vor mechanischer Gefahr, z.B. Arbeiten an Hubwerken. Warning of mechanical danger, e.g. working with hoisting equipment. Wichtige Anweisung für sicheren und störungsfreien Betrieb. Important instructions for safe, trouble-free operation. Warnung: Spannungsführende und bewegte Teile in elektrischen Maschinen können schwere oder tödliche Verletzungen verursachen. Montage, Anschluß, Inbetriebnahme, sowie Wartungs- und Reparaturarbeiten dürfen nur durch qualifiziertes Fachpersonal erfolgen unter Berücksichtigung: Warning Live or moving parts in electrically driven machines can cause serious or fatal accidents. Only qualified personnel may carry out assembly, connection, commissioning, maintenance and repair work and must observe the following: 1. dieser Anleitung, 1. these instructions, anderen zum Antrieb gehörenden 2. aller Projektierungsunterlagen, Inbetriebnahmeanleitungen und Schaltbilder, 2. all other planning documentation, commissioning instructions and circuit diagrams for the drive unit 3. der aktuell gültigen nationalen und regionalen Vorschriften über Sicherheit und Unfallverhütung. 3. the applicable regional and national regulations on safety and accident prevention. WATT DRIVE GMBH A-2753 Markt Piesting AUSTRIA Wöllersdorferstr. 68 Tel.:+43/2633/404-0 Fax: +43/2633/404-220 www.wattdrive.com [email protected] 1 Betriebsanleitung für WATT EUSAS Motore Operating instructions for WATT EUSAS motors 4. Elektrischer Anschluß (bei Getriebemotoren) 4. Electrical connection (at geared motors) Der Elektroanschluß darf nur durch einen befugten Elektrofachmann durchgeführt werden! Die in der Elektrotechnik gültigen Regeln und Vorschriften, insbesondere hinsichtlich Schutzmaßnahmen sind zu beachten. Die Vorschriften der örtlichen nationalen Energieversorgungsunternehmehmen sind ebenso einzuhalten. Only authorized electricians are permitted to connect electrical systems. Observe all rules and regulations governing electrical installations, especially safety precautions. The national utility regulations for the country concerned also have to be complied with. Vor Inbetriebnahme ist zu prüfen, ob die Netzspannung und Frequenz mit den angeführten Daten am Motorleistungsschild übereinstimmen. Before starting the motor, please check that the mains voltage and frequency correspond to the data on the motor rating plate. - Motoranschluß nach Schaltbild vornehmen (siehe Seite 12 und 13; - sichere Schutzleiterverbindung herstellen; - eventuell falsche Drehrichtung korrigieren durch Vertauschen von 2 Phasen; - nicht benötigte Kabeleinführungsöffnungen und den Kasten selbst staub- und wasserdicht ver schließen; - Überbelastung und Phasenausfall durch Schutzschalter vorbeugen; - vor Inbetriebnahme ist der Isolierwiderstand der Wicklung zu kontrollieren; - Connect the motor as in the circuit diagram (see pages 12 and 13) - Connect the equipment grounding conductor - Check the motor rotation and correct if necessary by revers ing the phases - Seal any unused cable entries and the terminal box ensuring that it is dust and watertight - Install a circuit breaker to prevent overloading and phase failure - Before starting the motor, check the insulation resistance of the winding. Achtung! Ein Motorschutzschalter bzw. ein Schutz mit Überstromrelais zum Schutz der Motorwicklungen ist unbedingt zu installieren. Schmelzsicherungen schützen den Motor nicht vor Überlastungen sondern lediglich die Netzzuleitungen oder Schaltanlagen gegen Schäden bei Kurzschluß. Warning! A motor circuit breaker or contactor with an overcurrent relay must be installed to prevent the motor winding from burning out. Fuses do not stop the motor overloading, but merely protect the power cables or switchgear from damage in the event of a short circuit. 4.1. Aufstellung und Anschluß des Motors 4.1. Motor installation and connection Die Motoren in Standardausführung sind für den Betrieb bei einer maximalen Umgebungstemperatur von +40°C (104°F) sowie einer Aufstellungshöhe bis 1000m über dem Meeresspiegel geeignet. Die Aufstellung hat so zu erfolgen, daß der Zutritt von Frischluft und das Abströmen der Warmluft ungehindert erfolgen kann. Es ist verboten den Lüfterflügel und die Lüfterhaube zu entfernen bzw. den Motor in ein Gehäuse einzuschließen, da in beiden Fällen die Kühlluftzufuhr verringert wird. Dadurch würde der Motor überhitzt werden. Standard motors are suitable for use at a max. ambient temperature of +40°C (104°F) and an altitude of up to 1000m above sea level. When installing the motor, ensure that the intake is not obstructed and air can circulate freely. Do not remove the fan blade or cowl, or enclose the motor with a casing because in both cases there would not be enough air for cooling and the motor could overheat. Kondenswasserbohrung Condensate drain hole Bei Motoren, die starken Temperaturschwankungen oder extremen klimatischen Verhältnissen ausgesetzt sind, empfehlen wir eine Kondenswasserbohrung. If motors are subject to great fluctuations in temperature or extreme climatic conditions, we recommend using a condensate drain hole. Achtung! Bei Motoren mit Kondenswasserbohrungen ist auf die richtige Einbaulage zu achten! Warning! Before installing motors with condensate drain holes, check that the mounting position is correct. Temperaturwächter TH Temperature controller TH Temperaturwächter sind kleine Bimetallschalter, die beim Überschreiten der Ansprechtemperatur einen Kontakt öffnen oder schließen. Der Öffnungskontakt trennt den Erregerkreis des Motorschützes und die Spannungsversorgung des Motors wird damit getrennt. Thermostats have small bimetallic strips that make or break a contact when the critical temperature is reached. The break contact opens the field circuit and disconnects the power supply to the motor. Farbe: rot Colour: red WATT DRIVE GMBH A-2753 Markt Piesting AUSTRIA Wöllersdorferstr. 68 Tel.:+43/2633/404-0 Fax: +43/2633/404-220 www.wattdrive.com [email protected] 2 Betriebsanleitung für WATT EUSAS Motore Operating instructions for WATT EUSAS motors Kaltleitertemperaturfühler TF Thermistor protection TF Kaltleitertemperaturfühler sind Halbleiter, bei denen der ohmsche Widerstand bei Erreichen der Bemessungs-ansprechtemperatur extrem ansteigt. Zusätzlich zu den Kaltleiterfühlern ist ein Auslösgerät notwendig. Das im Auslösegerät befindliche Relais mit einem Wechselkontakt kann nach Bedarf zum Unterbrechen des Erregerkreises des Motorschützers oder zum Auslösen eines Warnsignals verwendet werden. PTC thermistors are semi-conductors whose electrical resistance increases dramatically when the critical temperature is reached. In addition to the PTC thermistor, a control unit is also required. The relay in the tripping unit has a changeover contact, which can either be used to open the excitation circuit in the motor contactor or trigger a warning signal. Farbe: gelb Colour: yellow Stillstandsheizung Anti-condensation heater Bei besonderen Klimaverhältnissen z.B. bei starken Temperaturschwankungen oder bei stillstehenden Motoren in feuchter Atmosphäre kann eine Stillstandsheizung vorgesehen werden. Die Beschaltung des Heizelementes ist im Klemmkasten des Motors ersichtlich. Under certain climatic conditions an anti- condensation heater may be required e.g. when there are great fluctuations in temperature or the motor is at rest in a humid atmosphere. For heater connection, see the motor terminal box. Achtung! Während des Betriebes muß die Stillstandsheizung ausgeschaltet sein. Warning! The anti-condensation heater must be switched off during normal operation. Klemmenbezeichnung und Drehsinn Terminal markings and direction of rotation Ständerklemmen siehe Schaltbilder auf den Seite 12 und 13 L1, L2, L3 ... Phasenfolge des Netzes For stator terminals, see circuit diagrams on pages 12 and 13 L1, L2, L3 .. Phase sequence in power supply When connected as illustrated in the following diagrams (pages 12 and 13), the rotor will rotate clockwise. If this is not the case, please change two of the three leads to the starter or motor. Bei Anschluß entsprechend den nachstehenden Anschlußdiagrammen (Seite 12 und 13) ergibt sich Rechtslauf des Rotors. Ist dies nicht der Fall, dann sind zwei von den drei Zuleitungen des Anlaßgerätes oder Motors untereinander auszutauschen. Anschluß Connection Für den Anschluß der Netzleitungen ist das Schaltbild im Klemmkasten und die Daten auf dem Motorleistungsschild zu beachten. Bei Motoren mit Y/D Start sind alle Klemmbrettbrücken (Verbindungsbleche) am Klemmbrett zu entfernen und die sechs Klemmen am Anlaßgerät nach Schaltplan anzuschließen. Bei Motoren mit Direktstart (Y od. D) sind die Klemmbrettbrücken am Klemmbrett entsprechend den nachfolgenden Anschlußdiagrammen auf den Seiten 12 und 13 am Motorklemmbrett zu legen. When connecting to the power supply, observe the diagram inside the terminal box and the data on the motor rating plate. In the case of motors with Y/D start, remove all terminal links on the board and connect the six terminals to the starter as indicated in the circuit diagram. For direct start (Y or D) motors, connect the terminal links on the board as shown in the diagrams on pages 12 and 13 below. WATT DRIVE GMBH A-2753 Markt Piesting AUSTRIA Wöllersdorferstr. 68 Tel.:+43/2633/404-0 Fax: +43/2633/404-220 www.wattdrive.com [email protected] 3 Betriebsanleitung für WATT EUSAS Motore Operating instructions for WATT EUSAS motors DICHTUNGSRING Baugröße Type IEC WATT size type 63 71 80 90 100 112 132 160 180 200 225 250 280 64 72 81 91 101 114 134 161 180 200 226 251 281-2 pol. 281-4,6,8 pol. 316-2 pol. 316-4,6,8 pol. 315 BEARING SEAL Antriebsseite WAR (B5-spezial) Getriebeanbaumotor driving ends WAR (B5-special) gear motor Antriebsseite WAG, WAF B3/B5 driving end WAG, WAF B3/B5 Antriebsseite WAC B14 driving end WAC B14 Gegenantriebsseite WDR 12x22x7 WDR 15x26x7 WDR 20x32x7 WDR 25x40x7 WDR 30x52x8 WDR 30x52x8 WDR 40x62x7 WDR 45x65x8 WDR 55x80x13 WDR 60x90x8 WDR 65x90x12 ----------- CD 12x17x4 CD 15x23x4 CD 20x30x4 CD 25x32x4 CD 30x36x5 CD 30x36x5 CD 40x47x5 CD 45x52x5 WDR 55x80x13 WDR 60x90x8 V-65S V-75S V-80S V-85S V-80S V-95S WDR 12x22x7 WDR 15x26x7 WDR 20x32x7 WDR 25x40x7 WDR 30x47x7 WDR 30x47x7 WDR 40x62x7 ------------------- CD 12x17x4 CD 15x23x4 CD 20x30x4 CD 25x32x4 CD 30x36x5 CD 30x36x5 CD 40x47x5 CD 45x52x5 WDR 50x72x8 WDR 60x90x8 V-65S V-75S V-80S V-85S V-80S V-95S WDR = Wellendichtung / sealing CD = CD-Ring / CD-ring LAGER CD 12x17x4 CD 15x23x4 CD 20x30x4 CD 25x32x4 WDR 30x52x8 WDR 30x52x8 WDR 40x62x8 WDR 45x65x8 WDR 50x72x8 WDR 60x90x10 V-65S ----------- V = V-Ring / V-ring BEARINGS Baugröße Type IEC WATT size type 63 71 80 90 100 112 132 160 180 200 225 250 280 64 72 81 91 101 114 134 161 180 200 226 251 281-2 pol. 281-4,6,8 pol. 316-2 pol. 316-4,6,8 pol. 315 non driving end Gegenantriebsseite mit Bremse non driving end with brake WATT DRIVE GMBH Antriebsseite WAR (B5-spezial) Getriebeanbaumotor driving ends WAR (B5-special) gear motor Antriebsseite WAG, WAF, WAC B3/B5/B14 driving end WAG, WAF, WAC B3/B5/B14 Gegenantriebsseite non driving end Gegenantriebsseite mit Bremse non driving end with brake 6201 6203 6304 6305 6306 6306 6308 6309 6311 6312 6313 ----------- 6201 6202 6204 6205 6206 6306 6308 6309 6311 6312 6313 6315 6316 6317 6316 6319 6201 6202 6204 6205 6206 6306 6308 6209 6310 6312 6313 6315 6316 6317 6316 6319 6201 6202 6204 6205 6206 6306 6308 6209 6310 6312 6313 ----------- A-2753 Markt Piesting AUSTRIA Wöllersdorferstr. 68 Tel.:+43/2633/404-0 Fax: +43/2633/404-220 www.wattdrive.com [email protected] 4 Betriebsanleitung für WATT EUSAS Motore Operating instructions for WATT EUSAS motors Teile Nr. part No. Bezeichnung designation Baugröße IEC / size Type WATT / type Stator B3 Stator B3 Stator B5, B14 1.2 Stator B5, B14 Rotor + Welle 2 Rotor + shaft Klemmkasten komplett 3 Terminal box complete Klemmkastendeckel 3a Terminal box cover Dichtung Klemmkastendeckel 3b Seal terminal box cover PG-Verschraubung 3c PG-screwing Klemmkastenrahmen 3d Terminal box frame Dichtung Klemmkastenrahmen 3e Seal terminal box frame Klemmbrett komplett 3f Terminal board complete Klemmbrettbrücke 3g Terminal board bridge Klemmbrett lose 3h Terminal board Flanschlagerschild B5, B14 4a*) Flange end schild B5, B14 Lagerschild A-Seite B3 4b End shield A-side B3 Lagerschild B-Seite 5 End shield B-side Kugellagerausgleichsscheibe 6 Ball bearing shim Lager Antriebsseite 7 Bearing input side Sicherungsring,Lagerschild Lüfters. 8***) Circlip, end shield fan side Lager Lüfterseite 9 Bearing fan side Distanzring 10**) Threaded distance ring Sicherungsring, Welle Lüfterseite 11 Circlip, shaft fan side Wellendichtungen 12 Shaft seals Paßfeder - Antriebsstummel 15 Key - output Lüfter 16 Fan Lüfterhaube 20 Fan cover Paßfeder - Lüfterflügel 21 Key - fan blade Schraube B-Seite 23 Screw B-side Motorfüsse 24 motor feet Schrauben für Motorfüsse 24a Screw for motor feet Schraube A-Seite 25 Screw A-side WAF / WAR 63 64 71 72 80 81 WAG B5 / V1 / V3 90 91 100 101 112 114 132 134 160 161 1.1 B3 / B6 / B7 / V5 / V6 63 64 71 72 80 81 90 91 100 101 • • • • • • • • • 112 114 132 134 160 161 • • • • • • • • • • • • • • • • • • • • • • • • • • • • • • • • • • • • • • • • • • • • • • • • • • • • • • • • • • • • • • • • • • • • • • • • • • • • • • • • • • • • • • • • • • • • • • • • • • • • • • • • • • • • • • • • • • • • • • • • • • • • • • • • • • • • • • • • • • • • • • • • • • • • • • • • • • • • • • • • • • • • • • • • • • • • • • • • • • • • • • • • • • • • • • • • • • • • • • • • • • • • • • • • • • • • • • • • • • • • • siehe Tabelle auf der Seite 4 / see at table on page 4 • • • • • • • • • • siehe Tabelle auf der Seite 4 / see at table on page 4 • • • • • • • • • • • • • • • • • siehe Tabelle auf der Seite 4 / see at table on page 4 • • • • • • • • • • • • • • • • • • • • • • • • • • • • • • • • • • • • • • • • • • • • • • • • • • • • • • • • • • • • • • • • • • • • • • • • • • • • • • • • • • • • • • • • • • *) B14 nur bis Baugröße 132 / B14 only up to size 132 **) nur bei Baureihe WAR / Only at serie WAR ***) nur bei der Baureihe WAR für die Typen 64, 71, 81, 91 / Only at WAR for the types 64, 71, 81, 91 WATT DRIVE GMBH A-2753 Markt Piesting AUSTRIA Wöllersdorferstr. 68 Tel.:+43/2633/404-0 Fax: +43/2633/404-220 www.wattdrive.com [email protected] 5 Betriebsanleitung für WATT EUSAS Motore Operating instructions for WATT EUSAS motors Type 64 - 91 Type 101-161 WATT DRIVE GMBH A-2753 Markt Piesting AUSTRIA Wöllersdorferstr. 68 Tel.:+43/2633/404-0 Fax: +43/2633/404-220 www.wattdrive.com [email protected] 6 Betriebsanleitung für WATT EUSAS Motore Operating instructions for WATT EUSAS motors Teile Nr. part No. Bezeichnung designation Baugröße IEC / size Type WATT / type WAF / WAR***) B5 / V1 / V3 180 180 250 251 Stator B3, B5 Stator B3, B5 Rotor + Welle 2 Rotor + shaft Klemmkastendeckel 3a Terminal box cover Dichtung Klemmkastendeckel 3b Seal terminal box cover PG-Verschraubung 3c PG-screwing Klemmkastenrahmen 3d Terminal box frame Dichtung Klemmkastenrahmen 3e Seal terminal box frame Klemmbrett komplett 3f Terminal board complete Klemmbrettbrücke 3g Terminal board bridge Klemmbrett lose 3h Terminal board Flanschlagerschild B5, B14 4a*) Flange end shield B5, B14 Lagerschild A-Seite B3 4b End shield A-side B3 Außenlagerdeckel Antriebsseite 4d Outer bearing cover inp. side Lagerschild B-Seite 5 End shield B-side Kugellagerausgleichsscheibe 6 Ball bearing shim Lager Antriebsseite 7 Bearing input side Lager Lüfterseite 9 Bearing fan side Sicherungsring, Welle Lüfterseite 11 Circlip, shaft fan side Sicherungsring, Welle A-Seite 11a Circlip, shaft A-side Wellendichtungen 12 Shaft seals Paßfeder - Antriebsstummel 15 Key - output Lüfter 16 Fan Innenlagerdeckel Antriebsseite 17**) Inside bearing cover inp. side Lüfterhaube 20 Fan cover Paßfeder - Lüfterflügel 21 Key - fan blade Schraube B-Seite 23 Screw B-side Schraube Lagerdeckel B-Seite 23a Screw bearing cover B-side Schraube A-Seite 25 Screw A-side Schraube Lagerdeckel A-Seite 25a Screw bearing cover A-side Tragöse 26 Carrying ring Außenlagerdeckel Lüfterseite 27 Outer bearing cover fan side Außenring Lüfterseite 27a Outer ring fan cover Außenring A-Seite 27b Outer ring A-side Innenlagerdeckel Lüfterseite 28 Inside bearing cover fan cover Außenlagerdeckel A-Seite 29**) Outer bearing cover A-side 200 200 225 226 280 281 WAG 315 316 180 180 200 200 B3 / B6 / B7 / V5 / V6 225 226 250 251 280 281 315 316 Reparatur auf Anfrage / repair on inquiry 1.1 • • • • • • • • • • • • • • • • • • • • • • • • • • • • • • • • • • • • • • • • • • • • • • • • • • • • • • • • • • • • • • • • • • • • • • • • • • • • • • • • • • • • • • • • • • • • • • • • • • • • • • • • • • • • • • • • • • • • • • • • • • • • • • • • • • • • • • • • • • • • siehe Tabelle auf der Seite 4 / see at table on page 4 siehe Tabelle auf der Seite 4 / see at table on page 4 • • • • • • • • • • • • siehe Tabelle auf der Seite 4 / see at table on page 4 • • • • • • • • • • • • • • • • • • • • • • • • • • • • • • • • • • • • • • • • • • • • • • • • • • • • • • • • • • • • • • • • • • • • • • • • • • • • • • • • • • • • • • • • • • • • • • • • • • • • • • • • • • • • • • • • • • • • • • • • • • • • • • • • • • *) nur bei der Baureihe WAR für die Typen 180, 200, 226 / Only at serie WAR for the types 180, 200, 226 **) nur bei der Baureihe WAF / Only at serie WAF ***) Baureihe WAR derzeit nur bei den Typen 180, 200, 226 / Serie WAR only for the types 180, 200, 226 at the moment WATT DRIVE GMBH A-2753 Markt Piesting AUSTRIA Wöllersdorferstr. 68 Tel.:+43/2633/404-0 Fax: +43/2633/404-220 www.wattdrive.com [email protected] 7 Betriebsanleitung für WATT EUSAS Motore Operating instructions for WATT EUSAS motors Type 180-316 ACHTUNG: ATTENTION: WATT DRIVE GMBH Bei Ersatzteilbestellung unbedingt Motornummer, Motortype und Getriebenummer angeben ! With spare part orders always quote motor number, motor size and number of the gear unit ! A-2753 Markt Piesting AUSTRIA Wöllersdorferstr. 68 Tel.:+43/2633/404-0 Fax: +43/2633/404-220 www.wattdrive.com [email protected] 8 Betriebsanleitung für WATT EUSAS Motore Operating instructions for WATT EUSAS motors SCHUTZARTEN DEGREES OF PROTECTION Schutzart nach IEC Pub. 34 - 5, IEC 529 und DIN 40050 Die Schutzarten werden durch die Kennbuchstaben IP und zwei Kennziffern für den Schutzgrad angegeben. Die erste Kennziffer gibt den Schutzgrad für Berührungs- und Fremdkörperschutz, die zweite Kennziffer den Schutzgrad für Wasserschutz an. Degree of protection according to IEC Publ. 34 - 5, IEC Publ. 529 and DIN 40050 The designation to indicate the degrees of protection consists of the characteristic letters IP followed by two numerals. The first numeral indicates the degree of protection against contact with live or moving parts and against ingress of solid foreign bodies. The second numeral indicates the degree of protection against harm for ingress of water. Vorzugsweise ausgeführte Schutzarten Preferred degrees of protection Berührungs- und Fremdkörperschutz Wasserschutz 1. Kennziffer 2. Kennziffer Schutz gegen schädliche Staubablagerung Schutz gegen Spritzwasser aus allen Richtungen IP 54 Protected against harmful dust Protected against splashing deposits water from all directions Schutz gegen schädliche Staubablagerung Schutz gegen Strahlwasser aus allen Richtungen IP 55 Protected against harmful dust deposits Protected against water jets from all directions Schutz gegen Staubablagerungen im Inneren Schutz gegen Berührung mit Werkzeugen Ø > 1 mm Schutz gegen starkes Strahlwasser aus allen Richtungen IP 56 Protected against dust deposits in the interior Protected against contact with tools above 1 mm dia. Protected against strong spray water from all directions IP 65 Protected against entering of dust Protected against contact with tools above 1 mm dia. Protected against spray water from all directions Schutzart / Degree of pro-tection Schutz gegen Eindringen von Schutz gegen Strahlwasser Staub aus allen Richtungen Schutz gegen Berührung mit Werkzeugen Ø > 1 mm Die Standardmotoren sind in Schutzart IP 55 ausgeführt. Die Motoren sind für max. 95% Luftfeuchtigkeit bei 25°C ausgelegt. ZWEITES WELLENENDE NORMALAUSFÜHRUNG -ZW BREMSAUSFÜHRUNG -ZB SECOND SHAFTEND STANDARD -ZW BRAKE EXECUTION -ZB k0 ,k0BR siehe Maßblätter Seite 54 - 59. k0 ,k0BR see dimension sheets page 54 - 59. SCHUTZDACH FÜR MOTOR VERTIKAL NACH OBEN -SD WATT DRIVE GMBH PROTECTIVE CAP FOR MOTOR VERTICAL AT THE TOP -SD A-2753 Markt Piesting AUSTRIA BAUGR. IEC size Protection against contact and Protection against ingress against ingress of solid foreign of water bodies First numeral Second numeral The standard motors are protected in IP 55. The motors are resistant against max. 95% air humidity at 25°C. TYPE WATT type - ZW l3 63 64 29,5 71 72 38 80 81 51,5 90 91 58 100 101 65,5 112 114 68 132 134 98 160 161 133 180 180 124,5 200 200 126 225 226 119 225M2 226M2 119 d2 11 14 19 19 24 24 38 42 48 55 55 48 l2 23 30 40 40 50 50 80 110 110 110 110 110 - ZB t2 12,5 16 21,5 21,5 27 27 41 45 51,5 59 59 51,5 u2 4 5 6 6 8 8 10 12 14 16 16 14 BAUGR. IEC size TYPE WATT type kS j 63 71 80 90 100 112 132 160 180 200 225 64 72 81 91 101 114 134 161 180 200 226 27 27 27 48 48 48 50 50 65 70 100 125 125 125 170 170 170 250 250 300 340 425 Wöllersdorferstr. 68 Tel.:+43/2633/404-0 z2 M4 M5 M6 M6 M8 M8 M12 M16 M16 M20 M20 M16 l3 27 35 35 45 55 56 66 87 d2 11 14 14 19 24 24 28 38 l2 23 30 30 40 50 50 60 80 Fax: +43/2633/404-220 www.wattdrive.com t2 u2 12,5 4 16 5 15 5 21,5 6 27 8 27 8 31 8 41 10 z2 M4 M5 M5 M6 M8 M8 M10 M12 [email protected] 9 Betriebsanleitung für WATT EUSAS Motore Operating instructions for WATT EUSAS motors B3 (IEC-STANDARD 72-1 DIN 42673) TYPE WAG 101 - 200 5) B5 (IEC-STANDARD 72-2 DIN 42677) TYPE WAF 101 - 200 B14 (IEC-STANDARD 72-2 DIN 42677) TYPE WAC 101 - 134 WATT DRIVE GMBH A-2753 Markt Piesting AUSTRIA Wöllersdorferstr. 68 Tel.:+43/2633/404-0 Fax: +43/2633/404-220 www.wattdrive.com [email protected] 10 Betriebsanleitung für WATT EUSAS Motore Operating instructions for WATT EUSAS motors B3 Type a a´ b c e f g2 h h1 h3 n p p´ sa sb s3 w1 101L, LA 140 - 160 12 176 196 160 100 229 125 42 18 - 12 16 2xPG21 63 114M, M. 140 - 190 12 176 226 173 112 254 140 46 18 - 12 16 2xPG21 70 134S, SA 140 - 216 15 180 256 190 132 307 156 53 20 - 12 16 2xPG21 89 134M, M. 178 - 216 15 218 256 190 132 307 156 53 20 - 12 16 2xPG21 89 161M 210 - 254 18 256 300 223 160 357 184 60 23 - 15 19 2xPG21 108 161L 254 - 254 18 300 300 223 160 357 184 60 23 - 15 19 2xPG21 108 180M 241 - 279 22 285 342 269 180 449 218 66 22 - 15 15 2XPG29 121 180L 279 241 279 22 325 342 269 180 449 218 66 22 60 15 15 2XPG29 121 200L 305 - 318 28 385 392 306 200 506 248 80 40 - 19 19 2XPG36 133 200LA 305 - 318 28 385 392 306 200 506 248 80 40 - 19 19 2XPG36 133 Type a1 b12) 101L, LA 250 114M, M. 250 134S, SA 300 134M, M. 300 230 12 265 4 14,5 200 130 165 3,5 175 M10 - - - - - - 161M 350 250 13 300 5 18,5 - - - - - - - - - - - - 161L 350 250 13 300 5 18,5 - - - - - - - - - - - - 180M 350 250 13 300 5 19 - - - - - - - - - - - - 180L 350 250 13 300 5 19 - - - - - - - - - - - - 200L 400 300 15 350 5 19 - - - - - - - - - - - - 200LA 400 300 15 350 5 19 - - - - - - - - - - - - B5 B3, B5 Type 1) 3) 4) B14A B14 c1 e1 f1 s1 a1 b12) 180 11 215 4 14,5 160 110 130 3,5 129 M8 200 130 165 3,5 129 M10 180 11 215 4 14,5 160 110 130 3,5 142 M8 200 130 165 3,5 142 M10 230 12 265 4 14,5 200 130 165 3,5 175 M10 - - - - - und / and g g1 e1 f1 g1 s1 a1 b12) e1 f1 B14 h2 g1 s1 - Wellenende / shaft end k k0 k0BR3) k0FL3) k0MO3) 390 431 486 m o 120 210 q s24) y1 y2 d1) l t u z 102 2xPG21 60 60 28 60 31 8 M10 101L, LA 196 129 78 39 312 114M, M. 220 142 91 44 371 458 504 569 120 269 102 2xPG21 60 60 28 60 31 8 M10 134S,SA 259 164 107 50 416 522 557 627 140 287 129 2xPG21 70 70 38 80 41 10 M12 134M, M. 259 164 107 50 416 522 557 627 140 287 129 2xPG21 70 70 38 80 41 10 M12 161M 313 197 127 60 478 597 650 715 165 318 160 2xPG21 82,5 82,5 42 110 45 12 M16 161L 313 197 127 60 478 597 650 715 165 318 160 2xPG21 82,5 82,5 42 110 45 12 M16 180M 353 269 218 70 562 667 717 775 179 387 175 2xPG29 98,5 103,5 48 110 51,5 14 M16 180L 353 269 218 70 600 705 755 813 179 425 175 2xPG29 98,5 103,5 48 110 51,5 14 M16 200L 393 306 248 80 667 819 824 918 198 484 183 2xPG36 109 129 55 110 58,8 16 M20 200LA 393 306 248 80 667 819 824 918 198 484 183 2xPG36 112 158 55 110 58,8 16 M20 bis ∅ 48mm "k6" . . . über ∅ 50mm "m6" 2) bis ∅ 230mm "j6" . . . ab ∅ 250mm "h6" k0BR . . . für Bremsmotoren up to ∅ 48mm "k6". . . over ∅ 50mm "m6" up to ∅ 230mm "j6" . . . from ∅ 250mm "h6" k0BR . . . for brakemotors k0BR ... für Bremsmotoren bzw. Motormodule / for brake motors resp. motormodules Bei den Typen 101 - 161 vorbereitet für PG mit Gegenmutter oder für metrische Anbauverschraubungen mit Gegenmutter siehe Tabelle Seite 55/ At types 101 - 161 prepared for PG with contra nut or for metrical connection screwing with contra nut see at table on page 55 Bei den Motortypen 101, 114, 134 und 161 ist der Klemmkasten bei der Bauform B3 (WAG) in Standardausführung oben, die Klemmkastenlage " rechts" bei diesen Motortypen auf Anfrage. Bei den Motortypen 180 und 200 ist der Klemmkasten bei der Bauform B3 (WAG) in Standardausführung rechts, Klemmkastenlage "oben" auf Anfrage. At motortypes 101, 114, 134 and 161 the terminal box at the mounting position B3 (WAG) in standard execution is on top, the mounting position of the terminal box "right" at these motortypes on inquiry. At motortypes 180 and 200 the terminal box at the mounting position B3 (WAG) in standard execution is right, mounting position of the terminal box "on top" on inquiry. 5) WATT DRIVE GMBH A-2753 Markt Piesting AUSTRIA Wöllersdorferstr. 68 Tel.:+43/2633/404-0 Fax: +43/2633/404-220 www.wattdrive.com [email protected] 11 Betriebsanleitung für WATT EUSAS Motore Operating instructions for WATT EUSAS motors 9. Schaltungsschema für Drehstrommotoren 9. Three phase motors connecting diagrams 9.1. 9.1. Stern- und Dreieckschaltung für Motoren mit einer Drehzahl: Star and delta connection for single speed motors: -Schaltung / connection 9.1.1. Klemmen - Anschluß für EUSAS Motoren bis inkl. 2,2kW : 220-240V, 50Hz 220-280V, 60Hz Dreieck Schaltung Delta connection -Schaltung / connection 9.1.1. Terminal connections for EUSAS motors up to 2.2kW 380-420V, 50Hz Standard Schaltung, standard connection 380-480V, 60Hz Stern Schaltung Star connection 9.1.2. Klemmen - Anschluß für EUSAS Motoren über 3kW : (bis Baugröße 160) 9.1.2. Terminal connections for EUSAS motors over 3.0kW: (up to size 160) 380-420V, 50Hz 380-480V, 60Hz 660 (-730V), 50Hz 660 (-830V), 60Hz 190-210V, 50Hz 190-240V, 60Hz 330-365V, 50Hz 330-415V, 60Hz Dreieck Schaltung Standard-Lieferung Delta connection Standard supply Stern Schaltung Star connection Dreieck/Dreieck Schaltung Delta/delta connection Stern/Stern Schaltung Star/star connection WATT DRIVE GMBH A-2753 Markt Piesting AUSTRIA Wöllersdorferstr. 68 Tel.:+43/2633/404-0 Fax: +43/2633/404-220 www.wattdrive.com [email protected] 12 Betriebsanleitung für WATT EUSAS Motore Operating instructions for WATT EUSAS motors 9.1.3. Klemmen - Anschluß für EUSAS Motoren Baugröße 180 -225 : 9.1.3. Terminal connections for EUSAS motor sizes 180 - 225: 380-420V, 50Hz 380-480V, 60Hz 660 (-730V), 50Hz 660 (-830V), 60Hz 190-210V, 50Hz 190-240V, 60Hz Dreieck Schaltung Standard-Lieferung Delta connection Standard supply Stern Schaltung Star connection Dreieck/Dreieck Schaltung Delta/delta connection 9.2. Schaltung für Motoren mit zwei Drehzahlen und zwei getrennten Wicklungen: 9.2. Dahlanderschaltung für Motoren mit zwei Drehzahlen und konstantem Drehmoment: 9.3. niedrige Drehzahl, -Schaltung low speed, -connection 9.4. Dahlanderschaltung für Motoren mit zwei Drehzahlen und quadratischem Drehmoment: 9.4. niedrige Drehzahl, -Schaltung low speed, -connection WATT DRIVE GMBH A-2753 Markt Piesting AUSTRIA Wöllersdorferstr. 68 Stern/Stern Schaltung Star/star connection Circuit for two speed motors with two separate windings: hohe Drehzahl, -Schaltung high speed, -connection niedrige Drehzahl, -Schaltung -Schaltung low speed, 9.3. 330-365V, 50Hz 330-415V, 60Hz Tel.:+43/2633/404-0 Dahlander circuit for two speed motors with constant torque: hohe Drehzahl, -Schaltung high speed, -connection Dahlander circuit for two speed motors with square torque: hohe Drehzahl, -Schaltung high speed, -connection Fax: +43/2633/404-220 www.wattdrive.com [email protected] 13 Betriebsanleitung für WATT EUSAS Motore Operating instructions for WATT EUSAS motors 10. Technische Beschreibung - Bremsen 10. Technical specifications - brake 10.1. Wartung 10.1. Maintenance Die WATT-Federdruckbremsen sind nahezu wartungsfrei. Es ist zu empfehlen, den Luftspalt “a” in bestimmten Zeitabständen zu überprüfen, um ein sicheres Lüften der Bremse zu gewährleisten. Ein erforderliches Einstellen des Luftspaltes “a” kann nach Tabelle 1 erfolgen. The WATT spring-loaded brakes hardly need any maintenance. However we recommend checking air gap "a" periodically to ensure safe brake release. Adjust air gap "a" to the figures given in table 1 below if necessary. 10.2. Einstellung 10.2. Adjustment Die Bremsen sind bei der Lieferung auf das Nennmoment MB eingestellt. The brakes are set to torque MB on delivery MB. Tabelle 1 Table 1 MB P20 JB PR WRmax WRN anormal amax. bmin Gewicht / weight t1 t2 ≈ t2 = MB P20 JB PR WRmax WRN anormal amax. bmin t1 t2 ≈ t2 = [Nm] [W] [kgm2] x 10-3 [J/s] [J] x 103 [J] x 107 [mm] [mm] [mm] [kg] [ms] [ms] [ms] 2 22 0,015 80 3 5 0,2 0,7 4,5 1,0 35 70 30 5 22 0,015 80 3 5 0,2 0,7 4,5 1,0 35 70 30 10 20 28 34 0,045 0,172 100 130 6 12 12 20 0,2 0,3 0,8 0,8 5,5 7,5 1,9 3,1 45 60 95 140 45 60 40 42 0,45 160 25 35 0,3 0,9 9,5 4,6 80 175 75 60 50 0,86 200 35 60 0,3 1,0 11,5 6,3 120 210 90 100 64 1,22 250 50 125 0,4 1,1 12,5 10 160 280 120 150 76 2,85 300 75 200 0,4 1,1 14,5 14,7 200 350 150 250 100 6,65 350 105 340 0,5 1,2 16,5 21,5 220 500 180 500 125 13,3 700 210 680 0,6 1,1 16,5 28 220 500 180 Braking torque Power Brake mass moment of inertia Thermal load Friction per operating cycle Friction until readjustment Air gap Max. readjustment Min. lining thickness Make time Break time A.C. Break time D.C. Bremsmoment Leistung Massenträgheitsmoment Bremse Wärmebelastung Reibarbeit je Schaltspiel Reibarbeit bis zum Nachstellen Luftspalt max. Nachstellung Belagstärke min. Einschaltzeit Ausschaltzeit Ausschaltzeit 10.3. Nachstellung des Bremsluftspaltes 10.3. Readjusting the air gap Zuerst werden die drei Befestigungsschrauben (13) eine halbe Umdrehung gelöst. Nun lassen sich die Hülsenschrauben (26) durch Drehen gegen den Uhrzeigersinn in den Magnetkörper (12) hineindrehen. Durch Drehen der drei Befestigungsschrauben (13) im Uhrzeigersinn läßt sich der Magnetkörper (12) in Richtung Ankerscheibe (25) so weit bewegen, bis der Nennluftspalt (Tabelle 1) errreicht ist. Jetzt werden die drei Hülsenschrauben wieder im Uhrzeigersinn bis zur festen Anlage aus dem Magnetkörper (12) herausgeschraubt und die Befestigungsschrauben (13) nachgezogen. Der Luftspalt muß jetzt noch auf Gleichmäßigkeit mit einer Fühlerlehre kontrolliert und gegebenenfalls korrigiert werden. First undo the three fixing screws (13) a half turn. The sleeve screws (26) can then be inserted into the magnet body (12) by turning them anti-clockwise. By turning the three fixing screws (13) clockwise, the magnet body (12) can be moved towards the armature (25) until the nominal air gap (Table 1) is reached. Now undo the three sleeve screws again by turning them clokkwise out of the magnet body (12) and retighten the fixing screws (13). Check that the air gap is symmetrical with a feeler gauge and adjust if necessary. WATT DRIVE GMBH A-2753 Markt Piesting AUSTRIA Wöllersdorferstr. 68 Tel.:+43/2633/404-0 Fax: +43/2633/404-220 www.wattdrive.com [email protected] 14 Betriebsanleitung für WATT EUSAS Motore Operating instructions for WATT EUSAS motors 11. Gleichrichter 11. Rectifier 11.1. Einweggleichrichter 11.1. Half-wave rectifier Anschlüsse: Connections: 1,2: 3,4: 5,6: 1,2: 3,4: 5,6: Anschlußspannung (V~) Ausgangsgleichspannung (V=) Kontakt für gleichstromseitiges Schalten Connection voltage (A.C. V~) Output voltage (D.C. V=) Connection for D.C.-side switching Schaltbeispiel 1) für Motoren in Dreieckschaltung “gleichstromseitiges Schalten” Connection example 1) for motors in delta-connection “switching in DC circuit” Schaltbeispiel 1) für Motoren in Dreieckschaltung “wechselstromseitiges Schalten” Example 1) for delta connection motors "switching in AC circuit" Schaltbeispiel 2) für Motoren in Sternschaltung “gleichstromseitiges Schalten” Connection example 2) for motors in star-connection “switching in DC circuit” Schaltbeispiel 2) für Motoren in Sternschaltung “wechselstromseitiges Schalten” Example 2) for star connection motors "switching in AC circuit" STROMVERSORGUNG POWER SUPPLY Die Gleichstrom-Bremsspule wird normalerweise über einen im Motor-Klemmkasten eingebauten Einweggleichrichter gespeist und ist für Spulenspannung 162-236 VDC, 85-133 VDC oder 24 VDC ohne Mehrpreis lieferbar (24V mit Blockklemme für externe Stromversorgung!). Entsprechende Gleichrichter- und Spulenspannungen sind gegen Mehrpreis für alle Sonderspannungen lieferbar. Zum Schutz gegen Überspannungen sind die Gleichrichter mit Varistoren beschaltet. Maximale Umgebungstemperatur +80°C. Bei Schalthäufigkeit über 1/s wegen Gleichrichter-Belastung rückfragen! Einweggleichrichter (Normalausführung): Der Anschluß des Bremssystems erfolgt über einen im Klemmenkasten eingebauten Gleichrichter entsprechend dem jeweils beigefügten Schaltbild. Anschluß: Wechselspannung 100% z.B. 400 V~ Gleichspannung 45% z.B. 180 V= The DC brake coil is normally supplied with power from a half wave rectifier installed in the motor terminal box which is available for 162-236 VDC, 85-133 VDC or 24 VDC coil voltage at no extra charge (24V with block terminal for external power supply). Rectifiers and coils are available for all special voltages at extra cost. The rectifiers are equipped with varistors to protect them against overvoltage. Max. ambient temperature for rectifiers is +80°C. For starting frequency above 1/s, contact us for rectifier loading capacity! Achtung! Bei Betrieb eines Bremsmotors mit Frequenzumrichter ist die Bremsspule an eine externe Spannungsversorgung anzuschließen. Warning! If a brake motor is operated with a frequency converter, connect the brake coil to an external power supply. WATT DRIVE GMBH A-2753 Markt Piesting AUSTRIA Wöllersdorferstr. 68 Half-wave rectifier (standard version): The braking system is connected with a rectifier installed in the terminal box in accordance with the enclosed circuit diagram. Connection: Tel.:+43/2633/404-0 a. c. voltage d. c. voltage 100% e.g. 400 V a.c 45% z.B. 180 V d.c. Fax: +43/2633/404-220 www.wattdrive.com [email protected] 15 Watt Drive Antriebstechnik GmbH Partner The WATT partners all over the world Stammhaus Headquarter EUROPE AUSTRIA WATT DRIVE ANTRIEBSTECHNIK GMBH Wöllersdorferstraße 68 A-2753 Markt Piesting Tel.: +43 / 2633 / 404-0 Fax: +43 / 2633 / 404-220 e-mail: [email protected] Web: www.wattdrive.com Belgium S.A. Vermeire-Belting N.V. Rue de la Filature 41 B-4800 Ensival-Verviers Tel.: +32 / 87 / 32 23 60 Fax: +32 / 87 / 31 50 71 e-mail: [email protected] Web: www.vermeire.com Denmark Regal A/S lndustrivej 4 DK- 4000 Roskilde Tel.: +45 / 46 77 70 00 Fax: +45 / 46 75 76 20 e-mail: [email protected] Web: www.regal.dk Finland LÖNNE SCANDINAVIA OY Sirrikuja 3 FIN-00940 Helsinki Tel.: +358 / 9 / 3424 300 Fax: +358 / 9 / 34243099 e-mail: [email protected] Web: www.lonne.com Germany WATT Drive Nord GmbH Eickelstraße 4 D-59759 Arnsberg Tel.: +49 / 2932 / 96 81 -0 Fax: +49 / 2932 / 96 81-81 e-mail: [email protected] Germany WATT Drive Nord GmbH Vertriebs- und Servicecenter Köln Friedrich Ebert Straße D-51429 Bergisch Gladbach Tel.: +49 / 2204 / 84 -2800 Fax: +49 / 2204 / 84 -2819 e-mail: [email protected] Germany WATT Drive Süd GmbH Walkenmühleweg 49 D-72379 Hechingen Tel.: +49 / 7471 / 9865-0 Fax: +49 / 7471 / 9865-29 e-mail: [email protected] Germany WATT DRIVE Vertriebs- und Servicecenter Würzburg Max Lamb GmbH & Co KG, Am Bauhof D-97076 Würzburg Tel.: +49 / 931 / 27 94-0 Fax: +49 / 931 / 27 45 57 e-mail: [email protected] Greece Control Technik S.A. 22 Vas. Georgiou B' Str. Athens 116 35 Tel.: +30 / 1 / 7232 655 Fax: +30 / 1 / 7214 683 e-mail: [email protected] Web: www.controltechnik.gr Netherlands Euronorm Aandrijftechniek Zweedsestraat 1 NL - 7202 CK Zutphen Tel.: +31 / 575 599 700 Fax: +31 / 575 599 701 e-mail: [email protected] Web: www.euronorm.nl Norway LONNE SCANDINAVIA AS Postb. 160 Nyborg N-5871 Bergen Tel.: +47 / 55 39 10 00 Fax: +47 / 55 39 11 00 e-mail: [email protected] Web: www.lonne.com Slovakia Watt Drive Slovensko D.I. Daniel Svolik P.V.Rovnianka 8/87 SK-03601 Martin Tel.: +421 / 842 / 4276 668 Mobil: +421 / 905 / 438 499 Fax: +421 / 842 / 4276 668 Slovenia SB-Elektronika Branko Skribe s.p. Ljubljanska 100 SLO-2000 Maribor Tel.: +386 / 2 / 42 96 370 Mobil: +386 / 41 / 674 828 Fax: +386 / 2 / 42 96 371 e-mail: [email protected] Spain Atcor / Geryma S.A. Carretera del Medio 141 E-08907 L´Hospitalet de Llobregat Tel.: +34 / 93 335 91 53 Fax: +34 / 93 335 20 89 e-mail: [email protected] Sweden Bevi EL AB Box 41 SE - 38421 Blomstermala Tel.: +46 / 499 / 27100 Fax: +46 / 499 / 20008 e-mail: [email protected] Web: www.bevi.com Switzerland Elektromotorenwerk Brienz AG Mattenweg 1 CH - 3855 Brienz Tel.: +41 / 33 / 951 31 31 Fax: +41 / 33 / 951 34 55 e-mail: [email protected] Web: www.emwb.ch WATT DRIVE GMBH A-2753 Markt Piesting AUSTRIA Wöllersdorferstr. 68 Tel.:+43/2633/404-0 Fax: +43/2633/404-220 www.wattdrive.com [email protected] 16 Watt Drive Antriebstechnik GmbH Partner The WATT partners all over the world AMERICA U.S.A.Midwest RUSSIA DieQua Corporation 180 Covington Drive Bloomingdale / Chicago Illinois USA 60108-3105 Tel.: +1 / 630 / 980 1133 Fax: +1 / 630 / 980 1232 e-mail: [email protected] Web: www.diequa.com Russia IBC Industrial Business Consulting 13, Groholsky per., building 2 RU 129090 Moscow Tel.: +7 / 095 / 974 1223 Fax: +7 / 095 / 974 1224 e-mail: [email protected] AFRICA AND ASIA Egypt Original Group for Trading & Marketing Commercial Agents - Imp. & Exp. 2 Rood 79, P.O.Box 783 11728 Maadi Tel.: +202 / 75 09 031/2 Fax: +202 / 75 09 034 e-mail: [email protected] China Hong Kong RITECH AUTOMATION & EQUIPMENT LIMITED Flat 7, 11/F, South China Industrial Building No. 1 Chun Pin Street, Kwai Chung New Territories, Hong Kong Tel.: +852 / 2410 1819 Fax: +852 / 2410 1735 e-mail: [email protected] Indonesia PT. LEMBAYUNG Gedung Graha Eka Citta Jalan Budi Raya No. 9, Kemanggisan Jakarta 11530 Tel.: +62 / 21 / 54 90 641, 53 28 140, 53 28 141, 53 67 02 48 Fax: +62 / 21 / 53 05 593, 83 08 550 e-mail: [email protected] Korea WATT DRIVE CO., Ltd / Korea Ji-won B/D # B-306, Shiheung Yoo Tong Center, # 984, Shiheung 3-dong, Keum-Chon Gu, Seoul, 153-755 Tel.: +82 / 2 / 894 1230 Fax +82 / 2 / 894 1243 e-mail: [email protected] Web: www.wattdrive.co.kr Malaysia WATT DRIVE TECHNIC SDN. BHD. No. 20, Jalan PJU 3/41 Sunway Damansara 47810 Petaling Jaya Selangor D.E. Tel.: +603 / 788 08773 Fax: +603 / 788 08776 email: [email protected] Web: www.wattdrive.com.my Malaysia WEM DRIVE SYSTEMS SDN BHD No. 23, Jalan Nilam 1/9 Taman Perindustrian Teknologi Tinggi Subang, Batu Tiga 40400 Shah Alam, Selangor Darul Ehsan Tel.: +603 / 737 7300 Fax: +603 / 738 1245 e-mail: [email protected] Web: www.wemdrive.com.my Philippines AVESCO Marketing Corporation Aurora Blvd., cor. Yale Street Cubao, Quezon City Tel.: +63 / 2 / 912 8881 Fax: +63 / 2 / 912 2999, 912 2911, 912 2352 e-mail: [email protected] Singapore WATT Euro-Drive (Far East) Pte Ltd 67B, Joo Koon Circle Singapore 629082 Tel.: +65 / 86 22 220 Fax: +65 / 86 23 330 e-mail: [email protected] Taiwan WOWTECH International Co.,Ltd. 10F, No. 18, Chinshan South Road, Sec.2 Taipei Tel.: +886 / 2 / 2 393 16 94 Fax: +886 / 2 / 2 393 16 72 e-mail: [email protected] Thailand Far East lnternational Co., Ltd. 4/9 Moo 16 Theaparak road, Bangsaothong Bangsaothong Samutprakarn 10540 Tel.: +662 / 705 0623/7 Tel.: +662 / 315 1331 Fax: +662 / 315 1673 e-mail: [email protected] Thailand AMCO Advanced Mechanics Co., Ltd. 27/1 Soi Areesumphun 5 Phayathai Bangkok 10400 Tel.: +66/ 2 / 617 10 26-30 Fax: +66 / 2 / 271 28 71 e-mail: [email protected] Web: www.advancedmech.com Vietnam Hoang Quoc Co., Ltd. 509 Kim Ma Street Hanoi Tel.: +84 / 4 / 831 7421 Fax: +84 / 4 / 831 7433 e-mail: [email protected] WATT DRIVE GMBH A-2753 Markt Piesting AUSTRIA Wöllersdorferstr. 68 Tel.:+43/2633/404-0 Fax: +43/2633/404-220 www.wattdrive.com [email protected] 17 WATT Drives the World WATT DRIVE ANTRIEBSTECHNIK GMBH A-2753 Markt Piesting Wöllersdorferstraße 68 Austria, EUROPE Tel.: +43 / 2633 / 404-0 Fax: +43 / 2633 / 404-220 e-mail: [email protected] Web: www.wattdrive.com BA.MA.MT.001.000.0401