1
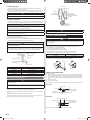
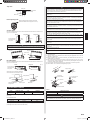
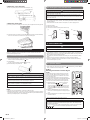
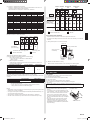
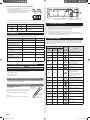
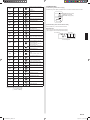
(2) Set the R.C. address (DIP switch setting)
Set the R.C. address of each indoor unit using the DIP switches on the indoor unit
circuit board. (See the following table and figure.)
The DIP switches are normally set to make the R.C. address 00.
Indoor unit
R.C. address
Outdoor
unit 1
Outdoor
unit 2
Indoor
unit 1
Indoor
unit 2
Simultaneous
twin
Simultaneous
triple
Outdoor
unit 4
Outdoor
unit 3
DIP SWITCH No.
1
OFF
ON
OFF
ON
OFF
ON
OFF
ON
OFF
ON
OFF
ON
OFF
ON
OFF
ON
00
01
02
03
04
05
06
07
08
09
10
11
12
13
14
15
①
②
③
④
⑤
⑥
⑦
⑧
⑨
⑩
⑪
⑫
⑬
⑭
⑮
⑯
Standard Standard
pair
pair
2
OFF
OFF
ON
ON
OFF
OFF
ON
ON
OFF
OFF
ON
ON
OFF
OFF
ON
ON
3
OFF
OFF
OFF
OFF
ON
ON
ON
ON
OFF
OFF
OFF
OFF
ON
ON
ON
ON
4
OFF
OFF
OFF
OFF
OFF
OFF
OFF
OFF
ON
ON
ON
ON
ON
ON
ON
ON
Remote
controller
Indoor Indoor
unit 3 unit 4
Indoor
unit 5
Indoor Indoor
unit 6 unit 7
R.C. address
(DIP switch setting)
Refrigerant circuit
address setting
(Function number 02)
Primary/Secondary setting
(Function number 51)
: Transmission cable, Power supply cable
: Power supply cable
: Remote controller cable
: Bus wire
NOTE
Be sure to set the R.C. address sequentially.
Remote
controller
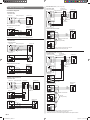
9.4.3. Dual remote controllers
Outdoor
unit 1
Outdoor
unit 2
Outdoor
unit 3
Outdoor
unit 4
Indoor
unit 1
Indoor
unit 2
Indoor
unit 3
Indoor
unit 4
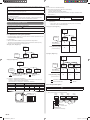
• 2 separate remote controllers can be used to operate the indoor units.
• The timer and self-diagnosis functions cannot be used on the secondary unit of remote
controller.
(1) Wiring method (indoor unit to remote controller)
Indoor unit
R.C. address
(DIP switch setting)
00
01
02
03
1 2 3
: Transmission cable, Power supply cable
: Power supply cable
: Remote controller cable
: Bus wire
When ground wire
is necessary
¡Settings when simultaneous Multi is included
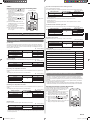
(3) Set the refrigerant circuit address (Remote controller setting)
1. Turn on all of the indoor units.
* Turn on the indoor unit with the R.C. address 00 last.
(Within 1 minute)
2. Set the refrigerant circuit address.
Assign the same number to all of the indoor units connected to an outdoor unit.
(The unit is factory-set to “00”)
Refrigerant circuit address
Function Number
1 2 3
1 2 3
Primary unit
Secondary
unit
Remote
controller
Remote
controller
(2) Remote controller DIP switch 1 setting
Set the remote controller DIP switch 1-No. 2 according to the following table.
Setting Value
00
∼
∼
00
DIP SW 1-No. 2
Primary unit
Secondary unit
01
02
Remote controller cable
OFF
ON
15
14
10. TEST RUN
15
(4) Set the “primary” and “secondary” settings. (Remote controller setting)
(Set the indoor unit that is connected to the outdoor unit using a transmission cable as the
“primary”.)
Primary
Secondary
Function Number
Setting Value
51
00
01
After completing the function settings, turn off all of the indoor units,
and then turn them back on.
* If error code 21, 22, 24, or 27 is displayed, there may be an incorrect
setting. Perform the remote controller setting again.
NOTE
• When different indoor unit models are connected using the group control system, some
functions may no longer be available.
• If the group control system contains multiple units that are operated simultaneously, connect and set the units as shown below.
• Auto-changeover operates under the same mode with model R.C. address 00.
• It should not be connected to any other Gr that is not of the same series (A**G only).
CHECK ITEMS
(1) Is operation of each button on the remote controller normal?
(2) Does each lamp light normally?
(3) Do not air flow direction louvers operate normally?
(4) Is the drain normal?
(5) Is there any error noise and vibration during operation?
• Do not operate the air conditioner in the running state for a long time.
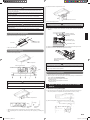
• Test running
When the air conditioner is run by pressing the remote controller test run button, the
OPERATION and TIMER Lamps flash slowly at the same time.
[Operation method]
• For the operation method, refer to the operating
manual.
• The outdoor unit may not operate depending on the
room temperature. In this case, press the TEST RUN
button on the remote controller while the air conditioner is running. (Point the transmitter section of
the remote controller toward the air conditioner and
press the TEST RUN button with the tip of a ballpoint
pen, etc.)
• To end test operation, press the remote controller
START/STOP button. (When the air conditioner
is running by pressing the TEST RUN button, the
OPERATION Lamp and TIMER Lamp will simultaneously flash slowly.)
Transmitter section
TEST RUN button
En-12
9374318445-05_IM.indb 12
4/6/2012 10:08:20 AM