1
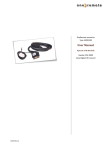
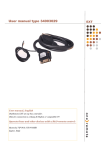
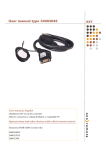
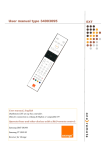
OneRemote converter
Type 34002965
User Manual
Operate with Beolink
Technisat Digicorder S1
Technisat Digicorder S1
Technisat HD S2
Technisat Plus
34002965u7uk
Everyday use
Recording and playback.
o*3
oW
Play/ pause press 1 sec
Play/ pause optional
Stop
Record
Record optional
OO
OK
Q*2
E*2
W*1,*2
R *1,*2
SFI/ EPG
Exit
P+
P-
rr
o1
TV/ Radio
Special operations
q
o8
*1 The yellow and blue buttons are being used as programme
zapping buttons. In this way the up, down, left and right buttons are
directly available in all menus as well as the programme zapping
buttons.
This is the OneRemote layout and compatible with other OneRemote
controllers.
Some people might prefer to have the programme zapping buttons
on the up and down buttons. To exchange the functions of the blue/
yellow and the up/ down buttons, see option programming on page
3.
o0
o9
Text
Genre
info
OPT
Menu
PIP
Sound
Power
*2 As the coloured buttons has been assigned other direct functions,
a O has to be pressed first, to get the coloured operation.
oe
HDMI
OQ
OE
OW
OR
Green function
Red function
Yellow function
Blue function
o2
o3
o4
o5
o6
o7
*3
A 1 second long press on the O button of a Beo4 or Beo5, will send a
play command to the receiver.
First generation Beo4 remote controls do not have this command
implemented. Your B&O dealer can help you with a software update of your
Beo4 or you can use the optional commandoW.
Operating using a Beolink 1000 or other old remote controllers.
Older remote controls do not have coloured buttons, and use is
not logical.
As Beolink 1000 has no coloured buttons the
Zapmode option needs to be set, to make the
the up/ down arrows serve as P+ and P-.
See page 6 about option programming.
g
x
SFI/ EPG
Exit
hZ
hX
hC
hV
Green function
Yellow function
Blue function
Red function
The P button on older Bang & Olufsen remote controls
does the exact same operation as theObutton on never
remote controls.
www.oneremote.dk
Page 1
Congratulations.
The EXT controller from www.oneremote.dk can fully operate your device using your Bang &
Olufsen remote control terminal, via a Bang & Olufsen TV.
Beo4 Beo5 or Beo6 remote controls can be used. Beolink 1000 can be used with reduced
functionality. This guide explains how.
This EXT controller is ready for use, plug & play. See the opposite page regarding daily
operation.
Some operations can be altered, to improve interaction with other controllers or to your
convenience. Refer to the installation section further on, if changes are needed.
www.oneremote.dk
Page 2
EXT controller.
When a scart type connected source is selected with a Bang & Olufsen remote control, the B&O TV starts to
parse control data from the remote control to the attached device, via the scart cable.
The OneRemote EXT controller captures these data and converts these into IR data, that can operate the
specific device.
The converted IR data is being
transmitted via a small IR-emitter
that has to placed in front of the
device to be controlled. Here it
emits the same IR data into the
front of the device, that it was
made to receive from its own
remote control.
As an EXT controller operates on data received via the scart cable, it will function only when attached to a
B&O TV.
If both the B&O TV and the device are equipped with DVI and/ or HDMI sockets, a suitable cable can be
added to improve the picture quality. The EXT cable will still be needed for control data and maybe also the
sound.
Refer to the user manuals for both the TV and the device, about correct installation of HDMI/ DVI cables. In
a setup with link rooms, all rooms will be able to operate the device, via the link system.
With a OneRemote OneWay or TwoWay cable, the device can be placed up to 25 metres away from the
TV. It could be placed in another room, under a sofa or where ever it suits, as operation is handled via the
Scartcable.
If both the TV and the device are equipped with a HDMI connection, a HDMI cable can be added to improve
picture and sound quality.
www.oneremote.dk
Page 3
OneRemote operation in a B&O system
To be able to operate the device correctly with a B&O remote control the user has to be familiar with
operations with the original remote control as described in the device’s user manual.
B&O remote controls are not equipped with many keys, so we have designed a ‘layout’ that works logically,
even when shifting between different devices. To get a common layout for many devices, we therefore
needed to redefine a few of the beo4 buttons to other functions:
Coloured buttons.
To make room for direct access to important functions, we have moved the coloured buttons, to a lower
layer. To send a ‘red’ button command O must be pressed before the red button. OEwill send
the actual red command. The same goes with the other 3 coloured buttons. This way we are able to assign
other functions to the coloured buttons, when they are pressed directly. In a OneRemote environment the
coloured buttons is mostly assigned to these operations:
Q
Guide, EPG or similar.
E
Back, Backup, Return or similar.
WR
Programme zapping. P+/ P- ,
Channel up/ down or CH+/ CH-.
Programme stepping, up/ down manoeuvring in menus.
Most set top boxes or TV’s has 4 arrow buttons for moving up, down, left and right in on screen menus. In
addition they have separate programme stepping buttons for zapping through programmes. B&O remote
control does not have separate buttons for programme zapping. We therefore have chosen the blue and
the yellow buttons to function as programme stepping buttons. The four up, down, left and right buttons
have been assigned for manoeuvring in on screen menus, in our basic setup. It is possible to use the up and
down arrow for programme stepping, refer to the installation section.
Go and Stop shifted operation.
Some of the buttons has two or three functions. To get to these they have to be preceded with Oor
q. The buttons that has been assigned secondary functions on this controller can be seen in the
operating table on page 2.
www.oneremote.dk
Page 4
Option programming
The OneRemote EXT controller can be programmed with different options, to fit different set ups.
An option programming is done by pressing a series of buttons in a special scheme that does not occur
during daily use. A programming must be ended within 10 seconds.
To abort an ongoing programming sequence, press any other button than q or the numeric buttons
0 to 9.
Power off option.
In some cases it is not wanted that the device automatically powers off, when the TV is powered off. Use
this option to enable or disable this.
qqqqqq70 Device never powers off.
qqqqqq71 Device powers off with TV.
Menu option.
Some B&O TVs not only echoes the MENU button from the remote control to the device attached to the
Scart socket. It also opens the TV’s own ON-screen menu. Use this option to avoid that the device acts on
this command, if your setup has this conflict.
qqqqqq81 Use the MENU button.
qqqqqq80 Ignore the Menu button..
Zap mode option.
The zapmode option makes it possible to exchange the functions of the up & down buttons with the blue &
yellow buttons. The factory setting of programme zapping and up/ down arrows:
W andR
D andF
Programme zapping.
Moving up/ down in on-screen menus.
While using a Beolink 1000 or other older remote control without coloured buttons, it is a little awkward to
make a programme zap when option 91 is set. This option reverses the use of the sets of arrows.
www.oneremote.dk
Page 5
Some people find it more comfortable to use the up/ down arrows for programme zapping, and therefore
also benefits from this option, using a Beo4 or Beo5.
qqqqqq91 Yellow/ Blue is programme Zap.
qqqqqq90 Up/ Down is Programme Zap.
Installation - troubleshooting
The OneRemote EXT cable must be connected to the devices ’TV’ scart output socket and a scart input
socket on the TV. Then the IR-emitter must be stuck in a way that it can emit IR-light in to the devices IRreceiver, that normally receives the IR-light emitted from the devices own remote control.
Only scart input sockets can be used, that are able to send out linkdata to the EXT controller. Also the TV
must be programmed to send out data to the scart socket, which is done in the TV’s ’Sources’ menu. Refer
to the TV’s user manual.
The EXT controller emulates DVD, VMEM, VTAPE, SAT, DTV, VAUX and other sources.
There is no programming needed on the EXT controller.
The scartplug in that end of the EXT cable where the power supply and
the IR-emitter cable is attached, MUST be inserted in to the devices
’TV’ output. If not, the EXT controller might not be able to power on
and off the device correctly.
The EXT cable is equipped with a control LED build in to the scartplug, that is inserted in to the device. This
LED assists in faultfinding if something is not operating correctly.
www.oneremote.dk
Page 6
Control LED indications
Continous red or green flashing.
When power is applied to the EXT controller, the LED will start flashing. The flash
indicates that the EXT controller has not received a command data from the TV, since
power on.
As soon as a command is received from the TV, the LED will stop flashing and light solid
red or green.
If the control LED continues flashing after you have selected the source on the TV where the
cable is attached, the socket does not include control data or the TV has not been set up
correctly. Refer to the TV’s user manual.
LED - colour.
The EXT controller will light red when it has detected a device that is powered on. It
will either flash or light solid red.
The EXT controller will light green when it is not connected to a device or if it is
connected to a device that is powered off.
If not connected to the TV output socket of a device, the EXT controller will not be able
to measure if the device is powered on and therefore always light green.
LED - short flash off.
During use the LED will light red or green, depending on the powerstatus of the device.
When receiving a controldata from the TV, the control LED will shortly go out to
indicate this. If a button is pressed on the TV’s remotecontrol supposed to operate the
device and teh LED does not indicate this, the TV has not been correctly set up.
www.oneremote.dk
Page 7