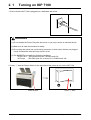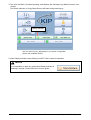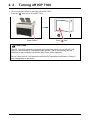
1
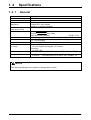
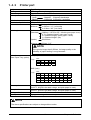
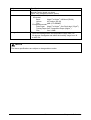
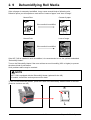
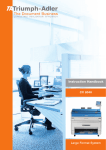
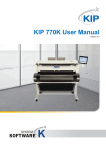
KIP 7100 ‐ User Manual Version A1
Thank you for purchasing the Multi-Function Printer KIP 7100.
This Hardware Operation Guide contains functional and operational explanations for the KIP 7100.
Please read this Hardware Operation Guide carefully before using the printer.
Please keep this Hardware Operation Guide for future reference.
1. When this product is installed in North America.
This device complies with part 15 of the FCC Rules. Operation is subject to the following two
conditions: (1) This device may not cause harmful interference, and (2) this device must
accept any interference received, including interference that may cause undesired operation.
2. When this product is installed in Europe
This equipment complies with the requirements in Pub.22 of CISPR Rules for a Class B
computing device.
Operation of this equipment in a residential area may cause unacceptable interference to radio
and TV reception requiring the operator to take whatever steps are necessary to correct the
interference.
Do not install Machine around other electronic equipment or other precision instruments.
Other devices may be effected by electrical noise during operation.
If the Machine is installed near other electronic equipment, such as a TV or a radio,
interference to said equipment, such as noise or flickering, may occur.
Use a separate power line and install the PRINTER as far as possible from said equipment.
As an ENERGY STAR ® Partner, Katsuragawa Electric Co., Ltd. has determined
that this product meets the ENERGY STAR ® guidelines for energy efficiency.
The International ENERGY STAR ® Office Equipment Program is an international program that
promotes energy saving through the penetration of energy efficient computers and other office
equipment. The program backs the development and dissemination of products with functions that
effectively reduce energy consumption. It is an open system in which business proprietors can
participate voluntarily. The targeted products are office equipment such as computers, monitors,
printers, facsimiles, copiers, scanners, and multifunction devices. Their standards and logos are
uniform among participating nations.
The symbol shown indicates that this product conforms to Directive
2002/96/EC of the European Parliament and the council of 27 January
2003 on waste electrical and electronic equipment (WEEE) and does not
apply to countries outside of EU.
The symbol shown indicates that this product conforms to
SJ/T11364-2006 of People’s Republic of China Electronic
Industry Standard and does not apply to countries outside of
People’s Republic of China.
The symbol shown indicates that this product conforms to GB
18455-2001 11364-2006 of National Standard of the People’s
Republic of China and does not apply to countries outside of
People’s Republic of China.
(1)
1. 1
Installation Requirements
The following conditions are required for installation of the equipment.
1. POWER SOURCE should be rated as follows.
In U.S.A. : 120V plus/minus 10%, 50/60Hz, 15A or higher
In Europe : 220-240V plus 6% or minus10%, 50/60Hz, 10A or higher
2. The equipment must be on an exclusive circuit.
3. The outlet must be near the equipment and easily accessible.
1. Make sure to connect this equipment to a grounded outlet.
2. For PLUGGABLE EQUIPMENT, the socket-outlet shall be installed near
the equipment and shall be easily accessible.
The site temperature range = 10 to 32 degrees Centigrade, with the humidity between
15% to 85% RH. (NON CONDENSING)
Keep the printer away from water sources, boilers, humidifiers or refrigerators.
1. The installation site must not have open flames, dust or ammonia gases.
2. The equipment must not be exposed to the air vents from air conditioners.
It may affect the image quality.
3. The equipment should not be exposed to the direct sunlight.
Please draw curtains to block any sunlight.
When you open the Movable Unit, do not expose the Photoconductive Drum
to strong (intense) light as this will damage the Drum.
Ozone will be generated while this equipment is use, although the quantity generated
is within safe levels. (see certifications)
Ventilate the room, if required.
Keep ample room around the equipment to ensure comfortable operation.
(Refer to the following figure.)
The equipment must be leveled and the floor strength must be ample to sustain the
weight of the equipment.
30cm/12” or larger
(Rear)
KIP 7100
L*
R*
(Front)
* L + R = 35cm/14” or larger
(R must be larger than L)
(L = 5cm/2” or larger
recommended)
80cm/32” or larger
90cm/35.4” or larger
for Paper Tray (option)
1-2
Chapter 1 Before Use
1. 4
Specifications
1. 4. 1
General
Subject
Model
Configuration
Power consumption
(Maximum)
Power consumption
(Low power mode)
Acoustic noise
Ozone
Dimensions
Weight
Environmental condition
for usage
Interface
Rating Input Power
Specification
KIP 7100
Console
1,440W (US model)
1,680W (EU / Asia model)
(scanner / controller included)
30W or less
Idling
Max. 60db
Printing
Max. 65db
(impulse sound excluded)
EN ISO 7779
Max. 0.05ppm (Measurement method under UL Standard)
1346mm (Width) x 704mm (Depth) x 1105mm (Height)
(UI, Tray excluded)
About 244kg (538lb)
(Temperature)
10 to 32 degrees Centigrade / 50 to 89.6 F
(Humidity)
15 to 85% RH
Network Interface (10 BASE-T / 100 BASE-TX / 1000 BASE-T)
In the US
: 120V plus/minus 10%, 50/60Hz, 12A
In Europe : 220-240V plus 6% or minus 10%, 50/60Hz, 7A
NOTE
The above specifications are subject to change without notice.
1-5
Chapter 1 Before Use
1. 4. 2
Printer part
Subject
Printing method
Photoreceptor
Print speed
Print head
Resolution of print head
Print width
Print length
Specification
LED Array Electro photography
Organic Photoconductive Drum
80mm per second
(Inch)
3.4ppm/E 5.8ppm/D Landscape
(Metric)
3.3ppm/A0 5.6ppm/A1 Landscape
LED Array
600dpi x 600dpi
Maximum
914mm / 36”
Minimum
or 297mm / 11” (roll media)
or 210mm / 8.5” (cut sheet)
Maximum
(Standard)
6,000mm / 19.7ft for 36” / A0 wide (plain paper / bond)
or “5 x Standard length” (plain paper / bond)
“2 x Standard length” (tracing paper / vellum)
“1 x Standard length” (film)
(Option)
200,000mm
Minimum
210mm / 8.5”
NOTE
If the print is longer than 6,000mm, its image quality or the
reliability of paper feeding is not guaranteed.
Print size
(from Paper Tray, option)
ISO (mm)
Width
Length
420
297
594
X
420
297
X
X
210
X
ANSI (inch)
Width
Length
18
17
12
11
Warm up time
First print time
Fusing method
Development method
24
X
22
18
17
12
X
X
11
9
8.5
X
X
X
X
X
Shorter than 4 minutes 30 seconds
(At 23oC, 60%RH, the rated voltage, and plain paper is used)
18 seconds (D Landscape)
(At 23oC, 60%RH, the rated voltage, and plain paper is used)
Heat and Pressure Rollers
Dry type non-magnetic mono-component toner
NOTE
The above specifications are subject to change without notice.
1-6
Chapter 1 Before Use
Subject
Media source
Media
Storage of consumables
Specification
2 Roll Decks
Manual Feeder (single cut sheet)
Paper Tray (multiple cut sheet, option)
(Recommended Media)
US model:
Bond
64g/m2 to 80g/m2, US Bond (PB-20)
Vellum
US Vellum (XV-20)
Film
4MIL (PF-4DDME)
Europe/Asia model:
Plain Paper 64g/m2 to 80g/m2, Oce Red Label (75g/m2)
Tracing Paper Oce Transparent Paper (80g/m2)
Film
Oce 3.5MIL
(Toner cartridge)
Store the cartridge within the temperature range from 0 to
35 degrees Centigrade and within the humidity range from 35
to 85% RH.
NOTE
The above specifications are subject to change without notice.
1-7
Chapter 1 Before Use
1. 4. 3
Scanner part
Subject
Scanning method
Light source
Setting of original
Starting point of scan
Scan width
Scan length
Margin area
Optical resolution
Digital resolution
Original transportation
Transportable original
thickness
Specification
Contact Image Sensor (CIS)
(5 pieces of A4 sized CIS)
LED (R/G/B)
Face up
Center
Max: 914.4mm / 36”
Min : 279.4mm
Max: 6,000mm / 19.7ft (Including the margin area)
Min : 210mm / 8.5” (Including the margin area)
3mm from leading, trailing and both side edges
600dpi
200 / 300 / 400 / 600 dpi
Sheet through type
Max: 1.60mm
Min : 0.05mm
NOTE
If the original is thicker than 0.6mm, its image quality is not
guaranteed.
Scanning speed
60 mm per second (max)
NOTE
The above specifications are subject to change without notice.
1-8
Chapter 1 Before Use
2. 1
Turning on KIP 7100
1. Ensure that the KIP 7100 is plugged into a dedicated wall outlet.
WARNING
(1) Do not handle the Power Plug with wet hands, or you may receive an electrical shock.
(2) Make sure to earth the machine for safety.
(3) Do not plug the printer into a multi-wiring connector in which other devices are plugged.
It may overheat the outlet and may result in a fire.
(4) The OUTLET must satisfy the following conditions.
In the U.S.A. : 120V plus/minus 10%, 50/60Hz and 15A
In Europe
: 220-240V plus 6% or minus 10%, 50/60Hz and 10A
2. Press “ | ” side the Power Switch on the right side of the printer to turn on the KIP 7100.
Power Switch
Press “ | “ side.
2-2
Chapter 2 Basic Operation
3. The User Interface (UI) starts operating, and displays the following Copy Mode Screen in one
minute.
The Ready Indicator on Copy Mode Screen will flash during warming up.
Ready Indicator
The UI screen may vary depending on your system configuration.
(Shown with available options)
4. When Ready Indicator stops flashing, the KIP 7100 is ready for operation.
NOTE
It is impossible to make any prints while Ready Indicator is
flashing in orange. Please wait until it turns in green.
2-3
Chapter 2 Basic Operation
2. 2
Turning off KIP 7100
1. There is a Power Switch on the right side of KIP 7100.
Press its “ ” side to turn off the KIP 7100.
Power Switch
Press “
” side.
CAUTION
The KIP 7100 print engine and UI appear to be shut down when you turn off KIP 7100.
However, the controller PC embedded inside the KIP 7100 is still operating and will
shutdown in approximately two minutes after Power Switch operation.
Do not unplug the KIP 7100 before the controller PC completes its shutdown. Doing so
may damage data or the device.
2-4
Chapter 2 Basic Operation
2. 8
Canceling Sleep Mode
The KIP 7100 has two Sleep Modes to reduce the power consumption.
The KIP 7100 will enter Sleep Mode after a certain period of inactivity.
In the default setting;
• Warm Sleep Mode will start after a 15 minute of inactivity in order to reduce the power supply
for Fuser Unit.
• Cold Sleep Mode will start after a 60 minute of inactivity to stop the power supply for Fuser
Unit and some other components.
Sleep Mode is canceled and the machine gets ready when;
• the machine receives a print job through the network.
• you tap on the UI screen then an original is inserted the scanner unit.
NOTE
(1) It may take time for the machine to get ready.
(2) Tapping on the UI screen can cancel the screensaver but the KIP 7100 needs to recover
temperature on Fuser Unit.
It may need another waiting time to start warming up for printing.
2-19
Chapter 2 Basic Operation
2. 9
Dehumidifying Roll Media
If the roll paper is extremely humidified, it may cause several kinds of defective print.
Defective prints you will experience most will be “crease of paper” and “loss of image”.
Normal Print
Crease of paper
If the media is humidified;
Normal Print
Loss of image
If the media is humidified;
If the KIP 7100 is installed in such a condition, it is recommended to use the optional embedded
“Dehumidify Heater”.
Turn on the Dehumidify Heater if the room air has too much humidity (65% or higher) to prevent
the above kinds of print defect.
Such problems above may be resolved.
NOTE
KIP 7100 is equipped with the Dehumidify Heater (optional for the US)
If needed, contact the service personnel for detail.
To turn on the Dehumidify Heater, press the H side of the Dehumidify Heater Switch on the rear.
(Press its L side to turn off.)
H
L
2-20
Chapter 2 Basic Operation