1
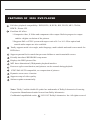
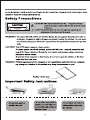
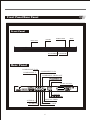
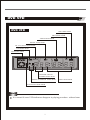
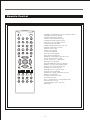
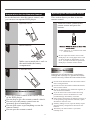
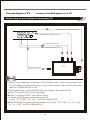
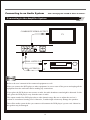
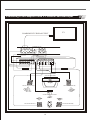
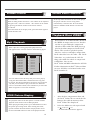
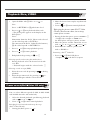
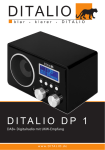
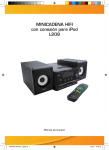
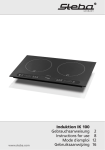
FEATURES OF 2008 DVD PLAYER
Full discs playback compatibility: DVD,DVD±R,DVD±RW, DVCD, MP3, CD-DA,
HDCD , Picture CD.
Excellent AV effect:
1.Composite video, S-Video and component video output. Built-in progressive output
enables a higher resolution of the pictures.
2.Supports PAL or NTSC system with aspect ratio of 4:3 or 16:9. Fiber optical and
coaxial audio outputs are also available.
Totally supports multi view-angle, multi-language, multi-subtitle and multi screen mode for
DVD discs.
Supports parental lock control that prevents children to watch unsuitable scenes.
Friendly-interfaced WINDOWS setup menu.
Displays the JPEG picture files.
MP3 three-dimensional (3D)dynamic playback interface.
Possesses agile zoom function, and pictures can be zoomed during playback.
NTSC/PAL/AUTO compatible, no compression of pictures.
Dynamic screen saver function.
Supports setup of video quality.
Software update automatically.
Notes: "Dolby" and the double-D symbol are trademarks of Dolby Laboratories Licensing
Corporation. Manufactured under license from Dolby laboratories.
Confidential unpublished works. C 1992-1997 Dolby Laboratories. Inc. All rights reserved.
1
OPEN/CLOSE
POWER
MUTE
1
2
3
4
5
6
AUDIO
SUBTITLE
7
8
0
+10
9
RETURN
SEARCH
CLEAR
ANGLE
TITLE
DISPLAY
MENU
PBC
ENTER
SETUP
VIDEO
PLAY
STOP
FB
FF
A-B
REPEAT
SLOW
ZOOM
PAUSE/STEP
PREV
- VOL
PROGRAM
NEXT
+
N/P
SCART Cord
2008
Playback
Playback DIVX VIDEO
20-22
23
24
25
Front Panel/Rear Panel
Front Panel
STOP
OPEN/CLOSE
POWER
DISC TRAY
VFD SCREEN
PLAY/PAUSE
Rear Panel
COMPONENT Cb/Pb
COMPONENT Y
COMPONENT Cr/Pr
COMPOSITE VIDEO OUT
SUBWOOFER
SCART OUTPUT
2008
SBN
CENTER
AUDIO (L)
AUDIO (R)
OPTICAL FIBER
S-VIDEO
COAXIAL OUTPUT
6
DVD VFD
DVD VFD
MP3 INDICATOR
PBC INDICATOR
ANGLE INDICATOR
DOLBY INDICATOR
CD, VCD, SVCD INDICATOR
DTS INDICATOR
DVD INDICATOR
SVCD
PBC
ALL
CHAPTER / TRACK
NUMBER INDICATOR
REPEAT PLAYBACK INDICATOR
TIME INDICATOR
PLAY/PAUSE INDICATOR
Notes:
It is normal if some VFD indicators disappear in playing procedure without harm.
7
Remote Control
OPEN/CLOSE
POWER
MUTE
1
2
3
4
5
6
7
8
9
0
+10
RETURN
SEARCH
AUDIO
SUBTITLE
CLEAR
ANGLE
TITLE
DISPLAY
MENU
PBC
ENTER
SETUP
VIDEO
PLAY
STOP
FB
FF
A-B
REPEAT
SLOW
ZOOM
PAUSE/STEP
PREV
- VOL
PROGRAM
NEXT
+
N/P
1.POWER: switch DVD player on or go to standby mode
2.PROGRAM: program playback
3.AUDIO:audio language selector
4.ANGLE: select DVD camera angle
5.SUBTITLE:subtitle language selector
6.PBC:open or close the PBC(VCD2.0)
7.ZOOM: enlarge video image
8.DIRECTION BUTTONS: select an item
9.ENTER: acknowledge selection
10.MUTE: mute sound
11.STOP: stop playback
12.PLAY: start playback
13.FB: fast reverse playback
14.FF: fast forward playback
15.REPEAT: repeat chapter, track, title or disc
16.A-B: repeat a specific segment
17.VOL: volume up +; volume down 18.SLOW: slowly playback
19.PAUSE/STEP:pause and step playback
20.PREV: go to a previous chapter or track
21.NEXT: go to a next chapter or track
22.MENU: access menu of a disc
23.SEARCH: go to a specific scene
24.TITLE: title of a DVD disc
25.DISPLAY: to display information of a disc
26.SETUP: setup function
27.VIDEO: switch video output
28.CLEAR: clear input
29.0-9,+10,numerical key: select numbered items
30.N/P:switch the TV type
31.OPEN/CLOSE: open or close tray
32.RETURN
8
Operating with the Remote Control
Preparations for the Remote Control
Insert the batteries into the remote control, and
you can use it to operate DVD player.
1
This section shows you how to use the
remote control.
Point the remote control at the
remote sensor and press the
buttons.
Open the cover
OPEN/CLOSE
POWER
MUTE
1
3
2
AUDIO
5
4
6
SUBTITLE
8
7
9
0
+10
RETURN
SEARCH
CLEAR
ANGLE
TITLE
DISPLAY
MENU
PBC
ENTER
SETUP
VIDEO
PLAY
2
STOP
FB
FF
A-B
REPEAT
SLOW
ZOOM
PAUSE/STEP
PREV
- VOL
PROGRAM
NEXT
+
N/P
Insert batteries
Angle: About 30°in each direction of the
remote sensor.
+
+
-
Make sure to match the + and - to
the mark inside the battery
compartment.
3
Close the cover.
Do not expose the remote sensor of the
DVD player to a strong light source such
as direct sunlight or illumination. If you
do so, you may not be able to operate the
DVD player with the remote control.
Notes on Batteries
Improper use of batteries may cause battery
leakage and corrosion. To operate the remote
control correctly, follow the instructions below.
Do not insert the batteries into the remote control
in the wrong direction.
Do not leave the discarded or exhausted batteries
in the remote control.
Do not use different types of batteries together, or
mix old and new batteries.
Notes on the Remote Control
Direct the remote control at the remote sensor
of the DVD player.
Do not drop or give the remote control a shock.
Do not leave the remote control near an
extremely hot or humid place.
Do not spill water or put anything wet on the
remote control.
Do not open the remote control.
9
If you do not use the remote control for a long
period of time, remove the batteries to avoid
possible damage from battery corrosion.
If the remote control does not function correctly or
if the operating range becomes reduced, replace
all batteries with new ones.
If battery leakage occurs, wipe the battery liquid
from the battery compartment, then insert new
batteries.
The battery can last for about 1 year when
normally used.
Connecting to a TV
Connect the DVD player to a TV.
Connecting to an Interlaced Scanning TV
COMPONENT VIDEO OUTPUT
MODEL:SH318H
COMPOSITE VIDEO OUTPUT
AUDIO OUTPUT (R)
AUDIO OUTPUT (L)
TV
S-VIDEO OUTPUT
Notes:
(1)If the TV has component video input (YcbCr/YPbPr) jacks, you can connect them to the
YcbCr/YPbPr jacks of the DVD player to get a clearer picture, and use these jacks rather
than the S-VIDEO OUTPUT jack.
(2)DVD player setup: (Setup the DVD player according to the connected TV.)
If the TV system is PAL, select PAL output.
If the TV system is NTSC, select NTSC output.
Connect the DVD player to the wide screen TV,
set the “TV TYPE” as“16:9 ” in FUNCTION SETUP.
If the DVD player is connected to an ordinary TV, set the “TV TYPE” to “4:3 PS”
or “4:3 LB” in FUNCTION SETUP.
10
Connecting to a TV
Connect the DVD player to a TV.
Connecting to a Progressive Scanning TV
COMPONENT VIDEO OUTPUT
SCART OUTPUT
AUDIO OUTPUT (R)
AUDIO OUTPUT (L)
Notes:
1.Select progressive when you have a TV
that can accept progressive signals to
enjoy accurate color reproduction and
high quality images.
2.If your TV has a component video (YPbPr)
input connector , connect the YPbPr video
out jacks on the DVD player to corresponding
input on the TV.
3.If your TV has a SCART input connector ,
connect the SCART out jacks on the DVD
player to the corresponding input on the TV.
11
TV
Connecting to an Audio System
You can enjoy the sound of discs in stereo.
Connecting to the Amplifier System
COMPOSITE VIDEO OUTPUT
TV
MODEL:SH318H
AUDIO OUTPUT(R)
AUDIO OUTPUT(L)
Notes:
Refer to the user’s manual of the connected equipment as well.
When you connect the DVD player to other equipment, be sure to turn off the power and unplug all the
equipment from the wall outlet before making any connections.
If you place the DVD player near a tuner or radio, the radio broadcast sound might be distorted. In this
case, place the DVD player away from the tuner or radio.
The output sound of the DVD player has a wide dynamic range. Be sure to adjust the receiver’s
volume to a moderate listening level. Otherwise, a sudden high volume may damage the speakers.
Turn off the audio system before you connect or disconnect the DVD player’s power cord. Otherwise,
the speaker may be damaged.
12
Connecting to an Audio System
Connecting to the Amplifier with Digital Input Port
Dolby Digital
Dolby Digital is the surround sound technology used in theatres showing the latest movies,
and is now available to reproduce this realistic effect at home. You can enjoy motion
picture and live concert DVD video discs with this dynamic realistic sound by connecting
the DVD player to a 5.1-channel amplifier with a Dolby Digital decoder or Dolby Surround
decoder, you will obtain the full benefit from the DVD movies that provide full 5.1-channel
Dolby Digital sound tracks, as well as from those with the Dolby Surround mark.
COMPOSITE VIDEO OUTPUT
TV
OPTICAL FIBER OUTPUT
COAXIAL OUTPUT
13
Connecting to the Amplifier with 5.1-channel Surround Input
TV
COMPONENT VIDEO OUTPUT
SURROUND (L)
SURROUND (R) CENTER
SUBWOOFER
AUDIO IN
FRONT (R )
V C D L D D V D V C R TUNER
AC-3/5 1/2CH IN
R
SR
C
L
SL
SW
SPEAKERS IMPEDANCE 8Ω
S-WOOFER
OUT
FRONT (L)
CEN
SR
SL
R
L
+
+
-
CENTER
SURROUND
FRONT
CENTER SPEAKER
FRONT SPEAKER (L)
FRONT SPEAKER (R)
SUBWOOFER SPEAKER
REAR SPEAKER(R)
REAR SPEAKER (L)
14
Basic Playback
Preparations
If you want to play a DVD, VCD or CD-DA disc, turn on the TV and select the video input source which is
connected to the DVD player.
If you want to enjoy the sound of disc from the audio system, turn on the audio system and select the input
source which is connected to the DVD player.
For connection details, see ‘Connections’.
1.Turn on the DVD player
Press the POWER button on the front panel,
And then press the PLAY button to wakeup
the DVD.
When the Player is not used for a long
period,please pull off the power plug.
2.Open the tray
Press the OPEN/CLOSE button to open the
disc tray.
3.Place the disc
When the disc tray is open, place the disc on
the disc tray, with the playback side down..
Notes:
There are two different disc sizes.Place the disc in
the correct guide on the disc tray.If the disc is out of
the guide,It may damage the disc and cause the DVD
player to malfunction.
Do not place anything except the DVD,VCD,CD and
MP3 discs on the disc tray.
4.Play
Notes:
Press the PLAY button, the disc tray closes
For the playback control(PBC)of the VCD2.0 and
SVCD, please refer to PBC Playback.
and playback starts.
When playing a DVD disc with the title menu When not using the menu screen(with PBC) of the
recorded or VIDEO CD with the playback
VCD2.0 or SVCD, you can press the PBC button to
turn off the “PBC”.
control (PBC),a menu screen will appear.
Notes
Do not move the DVD player during playback.Doing so may damage the disc.
Use the OPEN/CLOSE button on the remote control or DVD player to open or close the disc
tray. Do not push or touch the disc tray while moving. Doing so may cause the DVD player
to malfunction.
Do not push up on the disc tray or put any objects other than discs on the disc tray.Doing so may
cause the DVD player to malfunction.
15
Enjoy pictures of higher quality
Sometimes when playing DVD discs, on the TV screen there is unusual interference that are not common in
ordinary television broadcast. This is because the high-resolution pictures of DVD discs contain a wide
range of information. The extent of the interference depends on the TV set connected with the DVD player,
and it is recommended that you set the TV set to a low contrast ratio when watch a DVD disc.
Playback Control
1.Direction Buttons
Press the direction buttons to move the cursor to the selected
item, then press the ENTER button to confirm it.
2.Play
Press this button to play the disc.
3. Pause/Step
Press this button once to pause the playback. and press this
button twice to step the playback
4.Clear
Press this button to clear the input digits (displays on the screen)
when programming tracks or in searching operation.
5.Number Buttons
When playing a VCD disc, press the number buttons directly to
play your favorite track in PBC off status. If the track number is
from 1 to 9, you can directly press the number. If the track
number is more than 9, you should use button 10+ and the other
number buttons together to select the track, eg.: for track 25,
first, press the +10 button twice, then press button 5.
6.STOP
When playing a DVD disc, press this button the first time during
playback, the DVD player memorizes the location where you
stopped (press PLAY to resume playback from the memorized
point). Press this button again to stop the disc (then press PLAY
to start playing from the beginning of the disc).
7.FF / FB
You may speed up a DVD , CD, VCDor Mp3 disc by pressing
the FF / FB buttons on the Remote control . You can fast
reverse at 2X,4X,8X and 20X.
8.SLOW
The DVD player allows for Slow Motion playback . Press this
button to select :1/2-1/3-1/4-1/5-1/6-1/7
Press PLAY button to resume normal playback.
9.NEXT /P REV
Press skip to select the next (previous) chapter (for DVD) or
track (for VCD/CD/MP3).
10.ZOOM
This feature allows you to enlarge the picture on
screen 2X , 3X, 4X,1/2X,1/3X, and 1/4X the
original size . Press the ZOOM button to
cyclically scroll through the available strengths
16
11.A-B
You can replay a specific portion of a disc
repeatedly using this function
Press the A-B button on the Remote control
to select the starting point for the section to be
repeated.
Press the A-B button on the Remote control
again to select the ending point This section will
now continue to repeat until; A-B is pressed for
a third time to resume normal playback
12. REPEAT
This function can be used to repeatedly play a
Title Chapter , Track or other part of a disc.
DVD-Press REPEAT on the Remote Control to
cyclically select CHAPTER REPEAT-TITLE
REPEAT -REPEAT ALL-REPEAT OFF .
CD/VCD - When PBC is off , Press REPEAT on
the Remote Control to cyclically select REPEAT
ONE-REPEAT ALL-REPEAT OFF.
13. PROGRAM
You can program the player to play a customised
order of specific tracks , title or chapters . To program
a DVD follow the instructions below.
1)Press the PROGRAM button to initiate the program
function
2)Press LEFT or RIGHT to highlight either T for title
or C for CHAPTER
3)Press the Numeric button of the desired title and
chapter
4)Highlight PLAY on the screen using the direction
button and press ENTER. Your programmed list w
will now be set
5)Press the PLAY button after programming to begin
playback of the memorised play-list . The memory
is erased if the disc tray is opened . The unit is
powered OFF or the STOP button is pressed twice.
For CD programming follow the above steps 1-5.For
steps 2-3, enter the track number instead of the title
and chapter numbers
Playback Control
14.SEARCH
Press this button to search the playback point by chapter number
or title time (for DVD discs), disc time or track time or track
number (for SVCD/VCD/CD discs)
15.N/P
Press this button to swith the TV type ,NTSC-PAL-AUTO
Set Hot Button
16. DISPLAY
Press this key to display on TV the time information of current
playback. For different discs, different choices are available.
17. MENU
For DVD discs, press this button to enter DVD menu (if
supported by the discs).
19. OPEN/CLOSE
Press this button to open or close the disc tray.
20. POWER
When this button is pressed, the DVD player will
enter standby status. Press this button again to
resume the player.
Note: When the Player is not used for a long
period,please pull off the power plug.
21. VIDEO
The user can adjust the output mode of the
pictures among INTERLACE-YUV , TV-RGB
P-SCAN YPBPR or S-Video output.
This button is a hot button, it has the same
function as the VIDEO SETUP item in the
SETUP menu. As for details of connection with
the TV set, please refer to the CONNECTIONS
chapter.
22. AUDIO
This button allows the user to select a preferred
audio language from those included on the disc.
DVD Function
18. PBC
For SVCD or VCD2.0 discs, press this button to open/close the
PBC functions.
a.In the PBC display of the SVCD or VCD2.0, if the PLAY
button is pressed, the player will enter PBC playback status.
If the PBC is turned off, the disc will be played as VCD1.0/1.1.
b.When PBC is set to ON, menu of the disc appears on the
screen, press the number buttons to select and play the track
you want.
c.Press this button to return to the interface of selecting
tracks.
17
23. TITLE
For DVD discs,press this button to enter the title
menu, then press the direction buttons and PLAY
button to select and play.(If it is supported by
the discs.)
24. ANGLE
Press this button to change the camera angle of
the scene you are watching if the scene was
recorded from multiple angles. (It needs support
of the discs.)
25. SUBTITLE
For those DVD discs that have multiple languages
of caption recorded, press this button to change
the caption to different languages.
Screen Saver Function
Volume Control
26. VOLUME
With an analog Audio connection . The volume can be adjusted
using the VOL+ and VOL- buttons . The volume can be muted
by pressing the MUTE button on the remote control.
27. MUTE
Press this button to set the play mute, press this button again to
cancel the mute state.
In the stop status and when no discs in the player,
the player will enter screen saving status
automatically 3 minutes later. Press the PLAY
button or OPEN/CLOSE button to resume the
player.
Playback Divx© VIDEO
Mp3 Playback
When Mp3 disc is being played,the playback menu
will appear on the screen,as shown in the following figure.
[1MMEGFMF]TRACK1.MP3
01:1MMEGFMF
01:TRACK1
02:1OMMEGFM
02:TRACK2
03:2MMFGFMF
03:TRACK3
04:3MMEGFMG
04:TRACK4
05:4MMEGFMG
05:TRACK5
06:5MMEGFMJ
06:TRACK6
07:6MMEGFMN
07:TRACK7
08:7MMEGFMC
08:TRACK8
09:8MMEGFMC
09:TRACK9
DivX Video is an encoder/decoder, based on
the MPEG-4 compression sys tem, which is
used to encrypt and display compressed
video data.This enables the DVD player to
play back videos compressed in the DivX©
format. This results in playback quality
with less artefacts and higher compression.
DivX© video files have the suffix .AVI. DivX©
Video data are packed into the AVI file
along with audio data which is compressed
as MP3 data, this means:
DivX© Video and MP3 audio form the AVI file.
Further information on DivX© Video and how
to create AVI files can be found under www.
DivX Networks.de.
10:9MMEGFMC
[-] D01_DIVX1_.AVI
01.—
01.D01_DIVX1_
02.E01_PRELOA
You can either into the directory that you want to play by
using the directional button, and then the first song will
be played. The directional button can also be used to choose
any file you would like to play in the file area.When the
cursor is in left film column, Press number key to select file.
When in right one it can select document.
03.E02_PRELOA
04.E03_INTER4
05.E04_AES_EN
06.E05_8AUDIO
07.E06_LONGER
08.E07_LONGER
09.E08_8SUBTI
10.F01_44KHZ_I
JPEG Picture Display
The playback menu of the JPG picture is similar to MP3
playback menu. Please refer to MP3 playback.
When playing the JPG pictures, press STOP button to enter
the picture previewing mode. After entering this mode,
operate with the direction buttons and play button. Press
PLAY or ENTER button to return to the playback mode.
18
1
After the disc compartment shuts and
the DivX© Video CD is scanned, the file
browser (the table of contents) of the
DivX© Video CD is displayed.
2
Select the folder or track required with
>> << or >> <<.
- A list of sub-directories appears.
Playback Divx© VIDEO
3
Open the folder with È
>>OK<< or >>
<<.
2 Move the freeze frame step by step forwards
with >> << .
to resume normal playback.
3 Press >> << È
Note:
Press >> RETURN << È
to go back one level.
4
to start playback of the track.
Press >> << È
- The playing time appears in the display on the
DVD player.
Notes:
Information about the DivX Video track selected
can be called up with >>ENTER<<.
The contents of the DivX© Video CD (file browser)
È be called up with >> RETURN <<.
can
©
5
Press >> << È
to interrupt playback (pause).
6
Press >>
7
End playback by pressing >> ■ << .È
to resume playback.
<<È
2
During playback select the desired track with
>>1...0<<
- Playback begins with the selected track. È
Select the next track by pressing >>
<< during
playback.
Select the previous track by pressing >> << .
- Playback begins with the selected track.
Frame search(DivX © Video CD only)
You can select different speeds (2-fold, 4-fold, 8-fold
and 20-fold forwards and backwards).
1
2
Select the desired playback speed during playback
with >>
<< or >>
<< .
to resume normal playback.
Press >> << È
Switching freeze frames forwards step-by-step
(DivX© Video CD only)
1
1 During playback or pause, press >>ZOOM<< È
- Display: for example >> ZOOM 2 << ,
the DVD player enlarges a picture section.
2 Move the picture section around the screen
with >> << or >> <<, >> <<or>> <<.
3 Switch back to " normal " picture size
with >> ZOOM << .
1 Press >> << È
on the DVD player
- Display: >> << the disc tray opens.
Selecting a track in steps (SKIP)
1
various picture sections.
Removing a DivX© Video CD
Selecting specific tracks using the number keys
1
Enlarging the picture-zoom (DivX© Video
CD only) This function allows you to enlarge
During playback, press >> << .
19
Function Setup
Press the SETUP button, the following graphic will display on
the screen.
SYSTEM SETUP
TV SYSTEM
SCREEN SAVER
VIDEO
TV TYPE
PASSWORD
RATING
DEFAULT
EXIT SETUP
SYSTEM SETUP
SYSTEM SETUP
NTSC
PAL
SCREEN SAVER >>
VIDEO >>
TV TYPE >>
PASSWORD >>
RATING >>
DEFAULT >>
EXIT SETUP
Video setup has four options . If using INTERLACEYUV output to TV , choose INTERLACE-YUV
mode. If using P-SCAN YPBPR output to TV ,
choose P-SCANYPBPR mode
TV TYPE
1.Press the SETUP menu to enter the setup menu.
2.Use the / button to choose the menu item you want to
change, then press ENTER to confirm it.
3.Use the button to move the high light icon to the right side
item.
4.Use the up/down button to change the current setup, then press
the ENTER button to confirm it.
5.Use the button to move the high light icon to the left side item.
6.Select the EXIT SETUP item or press the SETUP button to quit
the setup menu.
TV SYSTEM >>
VIDEO
AUTO
ON
OFF
INTERLACE - YUV
P-SCAN YPBPR
TV-RGB
S-VIDEO
4:3 PS
4:3 LB
16:9
-----
NO ADULT
KID SAFE
VIEW ALL
RESTORE
TV SYSTEM
the TV output mode can be : NTSC , PAL or AUTO . Set
up the system of your DVD player to match the system of your
TV .
16:9-To view broad mode picture with the broad
screen TV set
4:3(LB)-To view the standard 4:3 picture or the cut
standard 4:3 picture.
4:3(PS)- 4:3 subtitle block to view the full width of
the broad mode
PASSWORD
The default mode is set at LOCK , you cannot change
the RATING , and cannot change the password in this
state. Factory setup(password 0000)
If you want to change the RATING grade or the
password, please input the initial password 0000 to
unlock , and press the ENTER button first . Thereafter
input your new password and enter the ENTER button.
If later on you want to make a new setting for the
RATING. And you want to change the password ,
please input the new password as set above . If you
input 0000,it will also work.
Important:
Please remember to write down the new password and
keep it in a safe place(Ex.behind the remote control
battery cover).
The parent lock function will only work on DVD
discs with parental control marks
RATING
There are three grade ratings . The performance of this
function will depend on the discs
DEFAULT
SCREEN SAVER
When in ON mode , if you do not make any operation or are in
stop mode for 3 minutes , the screen saver picture will appear.
20
The default is to change your setup state to the
factory default setup
Function Setup
LANGUAGE SETUP
OSD LANGUAGE >>
AUDIO LANG >>
SUBTITLE LANG >>
MENU LANG >>
AUDIO SETUP
LANGUAGE SETUP
ENGLISH
GERMAN
SPANISH
FRENCH
TURKISH
CHINESE
ENGLISH
TURKISH
FRENCH
SPANISH
PORTUGUESE
LATIN
GERMAN
CHINESE
ENGLISH
TURKISH
FRENCH
SPANISH
PORTUGUESE
GERMAN
OFF
CHINESE
ENGLISH
TURKISH
FRENCH
SPANISH
PORTUGUESE
GERMAN
LATIN
AUDIO OUT >>
AUDIO SETUP
SPDIF/OFF
SPDIF/RAW
SPDIF/PCM
EXIT SETUP
AUDIO OUT
Audio output includes three different types : for
common AV output , pleased choose SPDIF/OFF ,
for coaxial or optical please choose SPDIF/RAW
or SPDIF/PCM.
EXIT SETUP
OSD LANGUAGE
OSD has five languages :English, German,Spanish,French,
Turkish.
AUDIO LANG
To choose the audio language , the disc must be equipped
with different languages . It is possible that the disc may have
more audio languages than shown above . Use the AUDIO
button on the remote control to change to the desired
languager
SUBTITLE LANG
To choose a subtitle language , the disc must be
equipped with different subtitle languages . It is
possible that the disc may have more subtitle
languages than shown above . Use the SUBTITLE
button on the remote control to change to the desired
subtitle language
MENU LANG
The Menu can be in different languages :Chinese ,
English , Turkish ,French , Spanish , Portuguese , German
Latin etc. To choose a menu language , the disc
must be equipped with multi-language menus .
21
Function Setup
VIDEO SETUP
DOWNMIX
VIDEO SETUP
- - - - - - - - - - - - - - -
BRIGHTNESS>>
CONTRAST>>
HUE>>
-
SATURATION>>
-
LT/RT is recommended if the discs support
PROLOGIC DOLBY STEREO , you can enjoy
clear and superior sound effect as in the cinema.
If the discs support 5.1 channal output , STEREO
is recommended . If you choose VSS mode , you
will enjoy virtual surround effect
12
10
8
6
4
2
0
12
10
8
6
4
2
0
SUBWOOFER
The subwoofer could open or close ,choose this
option to open or close
+6
+4
+2
0
-2
-4
-6
12
10
8
6
4
2
0
BASS MODE
There are three BASS mode you could choose
ALL LG SPK , ALL SM SPK, MIXED SPK
CENTER DELAY
Use Up/Down directional buttons to adjust
the center delay
EXIT SETUP
REAR DELAY
BRIGHTNESS
Use Up/Down directional buttons to adjust the brightness
CONTRAST
Use Up/Down directional buttons to adjust the colour contrast
Use Up/Down directional buttons to adjust the
rear delay
DIGITAL SETUP
DIGITAL SETUP
HUE
DYNAMIC RANGE>>
-
Use Up/Down directional buttons to adjust the hue setup
SATURATION
Use Up/Down directional buttons to adjust the colour saturation
EXIT SETUP
SPEAKER SETUP
DOWNMIX>>
SUBWOOFER>>
BASS MODE>>
CENTER DELAY>>
REAR DELAY>>
SPEAKER SETUP
LT/RT
STEREO
VSS
OFF
OFF
ON
ALL LG SPK
ALL SM SPK
MIXED SPK
- +
- - 4MS
- - 2MS
- - 0MS
- +
- - 12MS
- - 6MS
- - 0MS
EXIT SETUP
22
-FULL
-6/8
-4/8
-2/8
-OFF
On Handing Discs
On Discs
Do not touch the playback side of the disc.
Disc mark
Contents
Maximum
playback time
Disc size
Approx.2 hours(single
sided single layer disc)
Playback side
DVD
video
discs
Audio+video
(motion
picture)
12cm
Approx.4 hours(single
sided double layer disc)
Approx .4 hours(double
sided single layer disc)
Do not attach paper or tape to discs.
Approx.8 hours(double
sided double layer disc)
VCD
On Cleaning discs
Fingerprints and dust on the disc may cause picture and
sound deterioration.Wipe the disc from the center outwards
with a soft cloth.Always keep the disc clean.
If you cannot wipe off the dust with a soft cloth, wipe the
disc lightly with a slightly moistened soft cloth and finish
with a dry cloth. Do not use any type of solvent such as
thinner, benzine, commercially available cleaners or
antistatic spray for viny1 LPs. They may damage the disc.
Audio+video
(motion
picture)
12cm
Approx .74 minutes
Approx .74 minutes
Audio
CD-DA
Audio
12cm
MP 3
Audio
12cm
This DVD player adopts NTSC/PAL color system, so it
can not respond to discs that are produced in other color
systems (such as SECAM).
Notes on Copyright
It is forbidden by law to copy, broadcast, show on cable,
play in public, and rent copyrighted material without
permission. DVD video discs are copy protected, and
any recordings made from these discs will be distorted.
On Storing Discs
Do not store discs in a place subject to direct sunlight or near
heat sources.
Do not store discs in places subject to moisture and dust such
as a bathroom or near a humidifier.
Store discs vertically in a case. Stacking discs or placing
objects on the case may warp the discs.
About this User’s Manual
This user’s manual explains the basic instruction of this DVD
player. Some DVD video discs are produced in a manner that
allows specific or limited operation during playback. As such,
the DVD player may not respond to all operating commands.
Refer to instruction notes of discs.
23
Type of TV System
Please connect this DVD player to a TV compatible with
PAL/NTSC system .
Notes on Service
Check the following guide for the possible cause of a problem before contacting service.
Symptom
Cause
No power
The power plug is disconnected
Measure
Connect the power plug into the wall outlet securely
The TV is not set to receive DVD signal output
No picture
No sound
The video cable is not connected securely
Connect the audio cable into the jacks securely.
The audio cable is not connected securely
Connect the audio cable into the jacks securely
The power of the equipment connected with
the audio cable is turned off.
Turn on the equipment connected with the audio
The setting of output sound type is not correct.
The playback
picture has
occasional
distortion
Brightness is
unstable or noises
are produced on
playback pictures
Set the audio setting correctly
Eject the discs and clean it
The disc is dirty
It is in fast forward or fast reverse playback
The copy protection effect.
Sometimes a small amount of picture distortion may
appear. This is not malfunction.
Connect the DVD player to the TV directly
Insert a disc
No disc is inserted
The DVD player
does not start
playback
Select the appropriate video input mode on the TV so the
picture from the DVD player appears on the TV screen.
An unplayback disc is inserted
Insert a disc(Check the disc type and color system.)
The disc is placed upside down.
Place the disc on the disc tray correctly inside the guide
The disc is not placed within the guide.
Place the disc on the disc tray correctly inside the guide.
The disc is dirty
Clean the disc
A menu is on the TV screen.
Press the SETUP button to turn off the menu screen
Cancel the parental lock function or change the parental
The parental lock function is set.
lock level.
Buttons do not Power supply fluctuations or other abnormalities Turn the power on or off with the POWER button. Or
such as static electricity may interrupt correct
disconnect the power plug and insert it into the wall
work.
operations.
outlet again.
The remote control is not pointed at the remote Point the remote control at the remote sensor of the DVD
player.
The remote
sensor of the DVD player.
control does not The remote control is too far from the DVD
Operate the remote control within about 7m
work properly.
player.
The batteries in the remote control are
exhausted.
Replace the batteries with new ones.
24
Specifications
DVD Player/Outputs/Supplied Accessories
DVD Player
Power Supply
~110V-~240V AC,50/60HZ
Power Consumption
≤15W (Normal Playback State)
Mass
Size
Signal system
Laser
2.5Kg+0.25
430x255x38mm(W/H/D)
PAL/NTSC
Semiconductor Laser ( wavelength 650nm,780nm)
Frequency Response
土3db(20HZ-20KHZ)
Signal-to-noise ratio
≥90db
Audio dynamic range
≥80db
Temperature:-5.C ~40.C, Operation status: Horizontal
Operating conditions
Outputs
Composite Video Output
1.0±0.2 Vp-p,75Ω
Audio Output (analog audio)
2.0
+0.2
-1.0
Supplied Accessories
Scart Cord
-------------------------------------------1
Remote Control
-------------------------------------------1
Batteries
-------------------------------------------2
User’s Manual/Maintenance Card
-------------------------------------------1
25