1
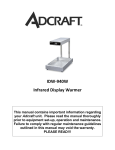
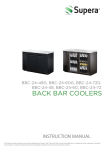
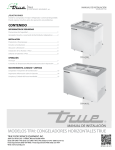
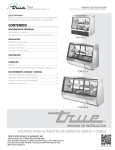
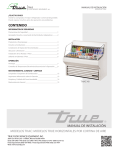
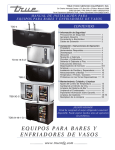
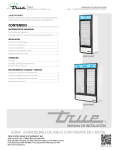
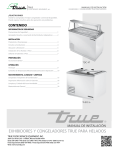
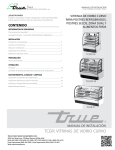
BB-48G, BB-60G, BB-72G
Back Bar Coolers – Glass Swing Door
This manual contains important information regarding your
Admiral Craft unit. Please read this manual thoroughly prior to
equipment set-up, operation and maintenance. Failure to comply
with regular maintenance guidelines outlined in this manual may
void the warranty. MUST READ!!!
WARNINGS
• Do not immerse unit, cord or plug in liquid at any time
• Plug only into a 3-hole grounded electrical outlet
• Do not use this unit for anything other than intended use
• Do not use outdoors
• Do not use if unit has a damaged cord or plug, in the event the appliance malfunctions, or has been damaged in any
manner
• Keep children and animals away from unit
• Any incorrect installation, alterations, adjustments and/or improper maintenance can lead to property loss and injury
All repairs should be done by authorized professionals only
• Ensure that the designated power supply is adequate for continual usage and the voltage is correct
• If power shuts off, wait 5 minutes before turning the unit back on to avoid damage to the compressor
INSTALLATION
1. To remove the unit from the wood skid, using a Phillips head screwdriver, un-screw the 4 screws from the L-bracket
2. Remove skid by unscrewing all base rail anchor brackets.
3. Lift unit off skid. Please remember not to use the countertop as a lifting point. Also remember to leave the cabinet
upright for 24 hours before plugging into power source.
4. Place unit in desired location. Make sure there is adequate ventilation. If necessary use an exhaust fan to keep cool.
Improper installation will void the manufacturer’s warranty.
5. Make sure unit is in a level area.
6. When setting unit in desired location make sure it is near a 3-prong grounded wall outlet that is set for the proper
voltage requirements. Compressor warranties are voided if compressor burns out due to inadequate power
supply.
7. Do not use an extension cord.
8. Unit should always be plugged into its own dedicated circuit.
It is strongly recommended that any servicing be performed by a manufacture’s authorized service technician.
For proper installation, cabinet must be fastened to the floor with one of the following approved NSF sealants:
Minnesota Mining #ECU800 Caulk
Minnesota Mining #ECU2185 Caulk
Minnesota Mining #ECU1055 Bead
Minnesota Mining #ECU1202 Bead
Armstrong Cork – Rubber Caulk
Products Research Co #5000 Rubber Caulk
GE Silicone Sealer
Dow Corning Silicone Sealer
1.
Position cabinet on level surface and allow at least 1 inch between the wall and rear of the unit for proper
ventilation.
2. Using a carpenter’s level, make sure the unit is level side to side and front to back and cabinet interior floor.
3. To apply the sealant:
a. Draw an outline on the base of the floor
b. Raise and place blocks under the front side of the cabinet
c. Apply the NSF approved bead sealant (see list above) to the floor half an inch inside the outline drawn
d. Raise and place blocks under the rear of the cabinet and repeat steps a-c
e. Once cabinet is on floor in place, check to make sure the seal is around the entire unit and is tight
Note: When sealing unit on asphalt floor, place a layer of tape on the floor prior to applying the sealant to protect the floor.
TO USE
1.
2.
Plug the power cord into proper outlet and the compressor will turn on.
Set the unit to temperature control setting #4 to give the approximate temperature of 35°F. Allow unit to cool
down for a couple of hours before re-adjusting the control setting.
Excessive adjusting of the temperature control switch is not advised.
To ensure proper air flow inside the cooler, load products so that they don’t press against the back wall or comes within 4 inches of the evaporator housing. Cold air off the coils must circulate down the back wall.
3. To turn on interior lights, open the front door and the switch is located towards the right of the unit.
Note: If the unit is disconnected or shut off, wait 5 minutes before re-starting unit.
CLEANING
Condenser
• Condensers naturally accumulate dust and require cleaning every 30 days. Dirty condensers result in compressor
failure and product loss. Please note product loss is not covered by warranty.
• To clean condenser, use a soft brush or vacuum with a shop vac or pressurized air
• If you can’t remove the debris adequately, please call an authorized refrigeration service company
Condenser Coil – tools required are; Phillips head screwdriver, stiff bristle brush and adjustable wrench
•
•
•
•
•
•
•
•
Disconnect power to the unit
Remove lower grill assembly by removing all the screws
Remove bolts anchoring compressor assembly to frame rails and carefully slide out
Clean off accumulated dirt from condensing coil with stiff bristle brush
Lift cardboard cover above fan at plastic plugs and carefully clean condenser coil and fan blades
After brushing condenser coil, vacuum dirt from coil and interior floor
Replace cardboard cover, carefully slide compressor assembly back into position and replace bolts
Re-install louver assembly onto unit with appropriate fasteners and clips and tighten screws
•
Plug unit back in and check to see if condenser is running
BB48G
BB60G
BB72G
VER0413
Back Bar Coolers - Swing Glass Door - BB-48G, BB-60G, BB-72G
Reference
Number
1
2
3
4
5
6
7
8
9
10
11
12
13
14
15
16
17
18
19
20
21
22
23
24
25
26
27
28
29
30
31
32
33
34
35
36
37
38
39
40
41
42
43
44
45
VER0413
Quantity
1
1
1
1
1
1
1
1
1
1
1
1
1
1
1
1
1
1
1
1
1
2
1
1
1
1
1
1
1
1
1
1
1
1
1
1
1
8
9
18
4
1
1
1
6
Description
CABINET
TOP BOARD
INNER DRAIN PAN
EVAPORATOR
FAN MOTOR INSTALLATION PANEL
EVAPORATOR FAN MOTOR
EVAPORATOR FAN MOTOR HOLDER
BLADE OF CONDENSER FAN MOTOR
EVAPORATOR COVER
TEMPERATURE CONTROL PANEL
MECHANICAL THERMOSTAT
TEMPERATURE CONTROL KNOB
LIGHT SWITCH
FRAME FOR MACHINE ROOM
COMPRESSOR UNIT INSTALLATION BOARD
CONDENSER
COMPRESSOR
SPLICE BOX
START CAPACITOR
OVERLOAD PROTECTOR
STARTER
CONDENSER FAN MOTOR
OUTER DRAIN PAN
FILTER FIXER
FILTER
INNER SHEET FOR MACHINE ROOM
SHEET FOR MACHINE ROOM
LEFT GLASS DOOR
GASKET
RIGHT GLASS DOOR
GASKET
BOTTOM RIGHT HINGE
LEFT BOTTOM HINGE
UPPER RIGHT HINGE
UPPER LEFT HINGE
PLATE OF LOCK FOR LEFT DOOR
PLATE OF LOCK FOR RIGHT DOOR
FIXED BLOCK FOR WORKTOP
K STRIP-4 HOLES
K CLIP
SHELF
LED LIGHT
DRAIN HOSE
POWER CORD
ADJUSTED FEET
(Page left blank on purpose)
WHAT IS NOT COVERED BY THIS WARRANTY
Admiral Crafts obligation under warranty is limited to either repair or replacement of parts, subject to the additional limitations
below. This warranty neither assumes nor authorizes any person to assume obligations other than expressly covered by
this warranty.
1. WARRANTY IS NOT TRANSFERABLE. This warranty is not assignable and applies in favor of the original
purchaser/user to whom delivered. Any such assignment or transfer shall void the warranties herein made and shall void
all warranties, express or implied, including any warranty of merchantability or fitness for a particular purpose.
2. NO CONSEQUENTIAL DAMAGES. Admiral Craft is not responsible for economic loss: profit loss or special, indirect, or
consequential damages, including without limitation, losses or damages arising from food or product spoilage claims
whether or not on account of refrigeration failure.
3. ALTERATION, NEGLECT, ABUSE, MISUSE, ACCIDENT, DAMAGE DURING TRANSIT OR INSTALLATION, FIRE,
FLOOD, ACTS OF GOD. Admiral Craft is not responsible for the repair or replacement of any parts that Admiral Craft determines
have been subjected after the date of manufacture to alteration, neglect, abuse, misuse, accident, damage during transit
or installation, fire, flood, or an Act of God.
4. NO IMPLIED WARRANTY OF MERCHANTABILITY OR FITNESS FOR A PARTICULAR PURPOSE. There are no
other warranties, express, implied or statutory, except the one(1) year warranty and the additional four(4) year
compressor warranty as described above. These warranties are exclusive and in lieu of all other warranties, including
implied warranty and merchantability or fitness for a particular purpose. There are no warranties which extend beyond the
description on the face hereof.
5. TRANSPORTATION COSTS. Admiral Craft will accept parts covered under this warranty freight collect, provided that
shipment has received prior approval. Admiral Craft is not responsible for any other transporation costs, but will ship freight
collect parts either repaired or replaced under these warranties.
6. WARRANTY CLAIMS. All claims should include: model number of the cooler, the serial number of the cabinet, proof of
purchase, date of installation, and all pertinent information supporting the existence of the alleged defect. Any action or
breach of these warranty provisions must be commenced within one (1) year after that cause of action has accused.
940 South Oyster Bay Rd
Hicksville, NY 11801